Avionic Pics From "Kofana"...
"Specific Energy" or PS...
There is one other maneuvering concept that I will address before we blast off. This concept is called
"Specific Energy" or PS. PS is a concept that describes the energy or potential
maneuverability of a fighter. Falcon 4.0 was developed using the PS curves of the F-16. These
curves describe how well the F-16 will maneuver in terms of turn rate, turn radius and G.
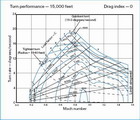
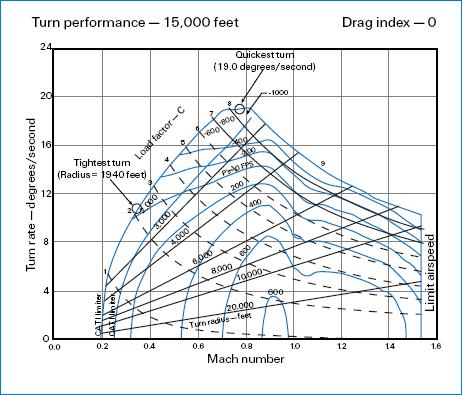
The PS chart shows a series of fluid lines that represent specific energy states of the F-16 at an
altitude of 15,000 feet and a drag index of zero. The drag index is determined by what is loaded externally on
the jet. The zero PS line is the area of the chart where the jet can maintain airspeed and altitude
for a specific G load. The PS lines that have negative values represent a flight regime in which the
jet will lose either airspeed or altitude. The PS lines with positive numbers represent where the
aircraft has the potential to gain altitude or airspeed.
Joystick Controls...
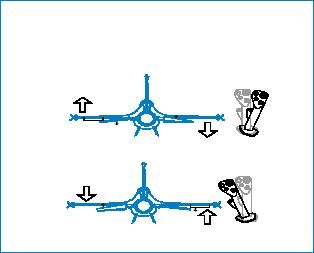
Roll the jet either right or left and set the wings between 75o - 85o of bank. Figure given
below shows the proper movement of the joystick and the corresponding response of the aircraft wings. The side-toside
movement of the joystick controls aircraft roll.
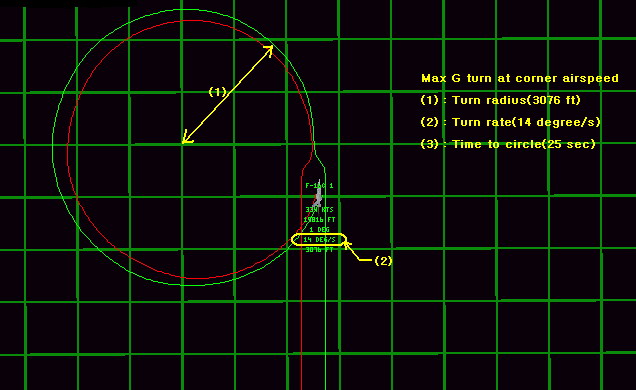
Pull all the way back on the stick to command the maximum G possible. Forward and backward movement of the joystick
controls aircraft pitch as shown in figure given below. Pitch essentially equates to aircraft Gs. Notice that you
cannot pull max Gs at 20,000 feet and maintain corner velocity. If you pull more than 7 Gs in this turn, you will
lose airspeed.
Keep pulling around the turn, trying to maintain 330 - 440 knots, until you are back to your original heading
(thereby making a full 360o turn). Since this is a canned maneuver, you have the luxury of using the
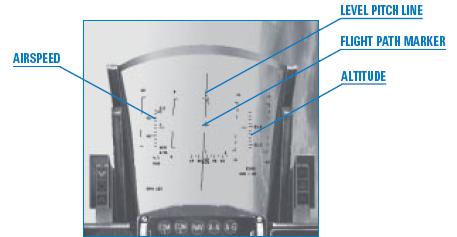
HUD to help you make this level turn. Figure given below shows the HUD flight path marker, the HUD level line and
your airspeed and altitude scales.
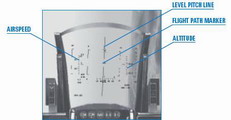
During this turn, drag the flight path marker across the level pitch line in the HUD. The flight path marker is
presented in the HUD to show the pilot where the aircraft is going. At speeds above 300 knots, it is very close
to the nose of the aircraft. You control the HUD flight path marker with the joystick.
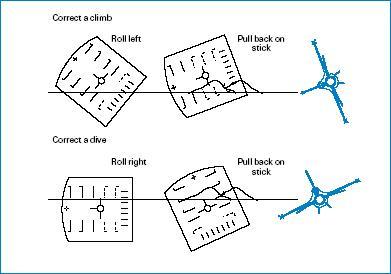
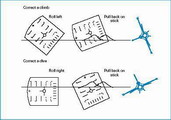
Once you roll the jet 75o - 85o, you can move the flight path marker by pulling back on the
joystick. If the flight path marker is on the level pitch line in the HUD, the aircraft will stay level. If it gets
above or below this line, then the aircraft will climb or dive respectively. Figure given below shows what do with
the joystick in order to correct a climb or dive during this turn.
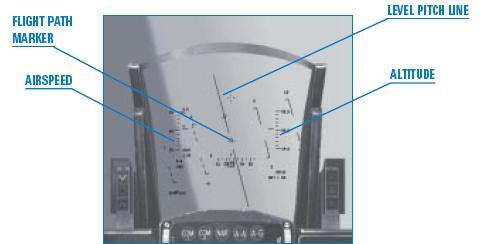
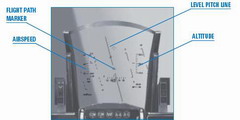
Pull all the way back on the stick to command maximum G possible. Front and back movement of the joystick controls
aircraft pitch as shown in figure given above. Pitch essentially equates to aircraft Gs. Figure given below shows
the HUD flight path marker, the HUD level line, and your airspeed and altitude scales. During this turn, drag the
flight path marker across the level pitch line in the HUD. Remember from the last training mission that the flight
path marker shows the pilot where the aircraft is going. You control the HUD flight path marker with the joystick.
Maneuverability...
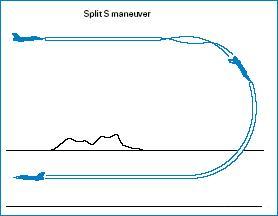
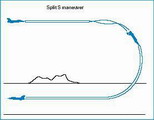
Use the Split S maneuver to simultaneously change your heading by 180o and descend to a lower altitude. In
the three preceding training missions, we turned the jet in a horizontal plane; in other words, we stayed level with
the horizon while turning. The Split S maneuver is the first of a series of three training missions in which you will
practice maneuvering the jet in the vertical plane. The vertical plane extends above and below the aircraft's current
altitude.
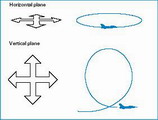
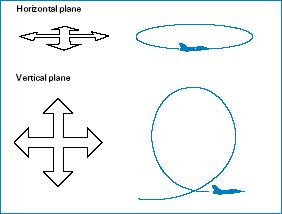
Since air combat is a three-dimensional affair, it is important to master turning the jet in both the horizontal and
vertical planes. A big difference between the two different maneuvering planes is the effect of gravity on the jet. If
you are turning the jet straight across the horizon in the horizontal plane, then gravity has relatively little affect
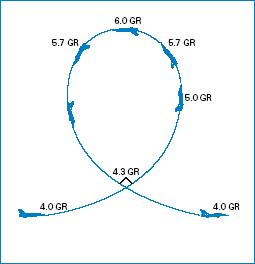
on your turn performance. When you pull the nose up or down in the vertical, however, gravity becomes a player. Figure
given below illustrates "GR", which stands for radial G (the G that the aircraft is actually adding to the turn rate
and radius equation). In figure given below, the cockpit G at the start of the pull is 5 Gs. Cockpit G is the G being
felt and read out on the G meter in the cockpit. At the point the jet is pulling straight up, however, so the effective
G or radial G is only 4 Gs. As the jet gets to 90o straight up or down, the radial Gs go to 5 Gs to match
cockpit G.
Figure given below shows that cockpit G is not equal to radial or turning G when maneuvering in the vertical. Remember
that 2o per second is a significant turning advantage. The extra G you can get by placing your nose below
the horizon when you turn can give you at least 2o per second turn advantage. Most of the time 1 GR equates
to 3o - 4o per second.

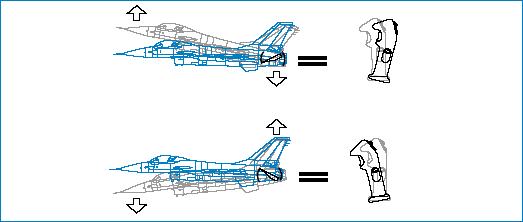
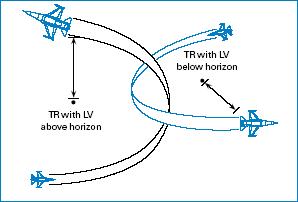
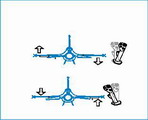
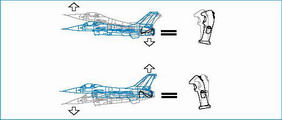
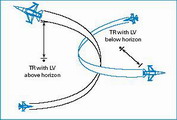
You can see the concept of radial G even more clearly in figure given below, in which both fighters are pulling the
same cockpit G. Notice that the fighter with his lift vector below the horizon is turning more tightly. (Lift vector
is an imaginary arrow that is projected from the top of the jet perpendicular to the aircraft's wings.) What is not
so obvious is that the fighter turning toward the ground is also moving, or rating, the nose faster.
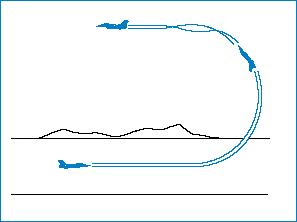
In this mission, you will practice maneuvering over the top or up in the vertical. This training mission and the one
that follows will help you gain more confidence and control when climbing in the jet. Variations of this maneuver are
used often in air combat, and it is important to note your entry and exit airspeed and the altitude that you gain during
the maneuver.
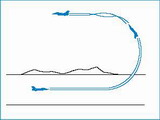
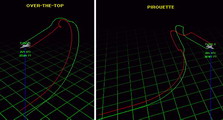
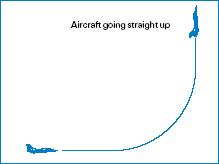
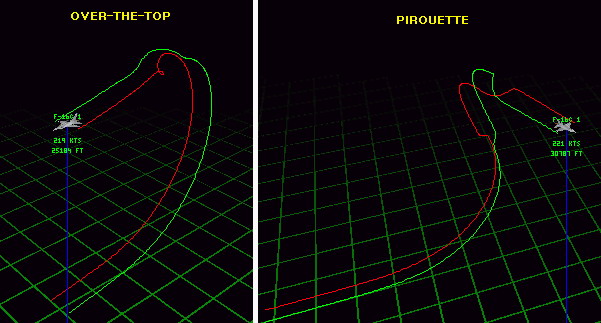
In this mission, you will fly the jet over the top and end up at a higher altitude heading the opposite direction. A
key to this maneuver is to get the jet pointed up away from the earth and to note your airspeed and the altitude you've
gained. Once the jet is going straight up, the pilot has several options if the maneuver was started at high speed. When
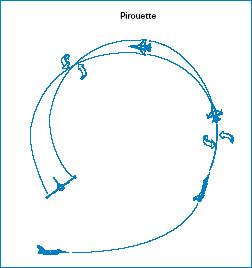
you get going straight up, you can pirouette the jet. The pirouette is used to maneuver the jet in relation to an
adversary. After practicing a straight pull up and over, try doing the mission again and pirouetting the jet and
rolling off in another direction.
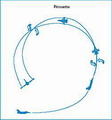
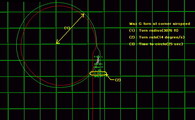
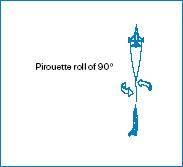
Once the aircraft is established at 90o nose high, relax back stick pressure and then roll the jet
90o. Be sure not to roll and pull at the same time. Use the heading tape to determine your orientation.
Your heading should change by 90o. Figure given below shows this pirouette. The maneuver should end with
the jet heading 90o from the original heading at this new higher altitude.

Low-Speed Over-the-Top Maneuver and Departures...
In this mission, you will practice maneuvering the jet in the vertical at low airspeed. To maneuver a jet, you need
airspeed. Low speed maneuvering against an enemy aircraft in the vertical is a critical combat skill that is difficult
to master. Maneuvering in the vertical at low speed is very different than at high speed, because your F-16 might deep
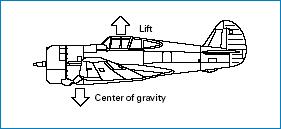
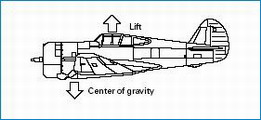
stall. A deep stall is a condition in which the F-16's nose gets hung up and you're essentially out of control. Figure
given below displays a conventional aircraft with its center of gravity and the center of lift. Without getting into
the math on this stuff, this aircraft is stable because the center of lift is aft of the center of gravity.
Such a design is stable because if the aircraft is maneuvered or encounters a condition that takes it out of a steady
state flight condition, the aircraft has a tendency to recover back to that steady state condition. The F-16 has what
is called "relaxed static stability". In other words, it is designed to be very close to being unstable. Instability
is desirable in fighters because the less stable an aircraft is, the more maneuverable it is. Relaxed static stability
means simply that if the jet is maneuvered or encounters conditions that take it out of steady state flight, then it may
not recover back to the steady state condition very easily. The F-16's FLCS (Flight Control System, pronounced "flickus")
keeps the jet from going out of control by placing "limits" on what the flight controls will let the pilot do. Sometimes
(especially at slow speeds), the FLCS will not allow certain control inputs that are commanded by the pilot. The FLCS
works well as long as the pilot only "assaults" one limiter at a time, that is commands a control input that requires
the limiter in a given axis to do its job and prevent further movement of a specific flight control.
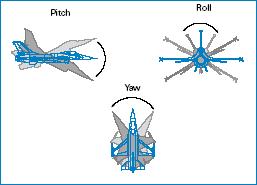
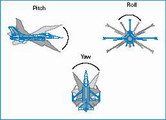
The F-16 moves through the air along three axes of movement: pitch, roll and yaw. Pitch is movement around the horizontal
axis of the aircraft. You experience it as the nose moving up and down. Roll is movement along the long axis of the
aircraft. You experience a roll by seeing the horizon in front of you. Yaw is movement around the vertical axis of the
aircraft. You experience it as the nose moving left and right from your point of reference as the pilot.
The bottom line on the F-16 is that the FLCS only works well in limiting the flight controls and preventing trouble one
axis at a time. If two limiters are assaulted at the same time, the result can be like a carnival ride. When you put a
fighter out of control, it is called a departure. To keep from departing the aircraft, you must be smooth at slow speed
and watch what you do with the stick. Recall that in the very first training mission, we flew a HART maneuver and that
the F-16's low speed warning horn comes on as a function of pitch and airspeed (nose high pitch and slow airspeed). Once
you hear the horn, you are in danger of departing the F-16 if you are not careful with the controls. If you do jerk the
jet around, you may depart. Once the aircraft is departed, one of three things will happen: the jet will self-recover,
it will end up in an upright deep stall or it will end up in an inverted deep stall. In the F-16, you will find yourself
in a deep stall most of the time.
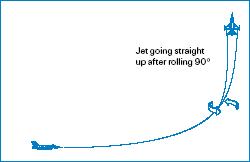
Next you will practice doing a pirouette. This maneuver is difficult to perform at slow speed but can be accomplished
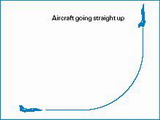
with some practice. To perform a pirouette during this over-the-top maneuver, follow these steps : ( 1 ) From the starting
entry conditions, start a wingslevel 4 G pull. ( 2 ) Place the throttle in full AB. ( 3 ) Continue the pull all the way
over the top, but stop when you are going straight up. Figure given below shows this position with the jet going straight
up, 90o from the horizon.
( 4 ) Once the aircraft is established at 90o, relax back stick pressure and then roll the jet 90o.
Be sure not to roll and pull at the same time. ( 5 ) When you have established your wings in the desired plane, start a
pull toward the horizon. Figure given below shows this pirouette.