Stabilization Ponds - 6...
Operating and Maintaining Stabilization Ponds...
A stabilization pond is a large shallow excavation that receives sewage from a sewer system, detains the sewage jso that biological process can destroy most of the disease-causing organisms, and discharges the effluent as treated sewage. Operating a stabilization pond requires the services of a trained person. Operation and maintenance involves starting up
the pond, managing pond surface conditions, maintaining the embankment and the pond site, and possibly, after 10-20 years, draining the pond and removing sludge. Correct operation and maintenance is important because a neglected stabilization
pond will produce foul odors, become a breeding place for flies and mosquitoes, and require costly repairs. This technical note describes how to operate and maintain a stabilization pond.
Materials Needed...
To manage pond surface: small boat and long-handled rakes and, if available, standpipe and water hose or portable pump and water source. To maintain embankment and pond site: shovels, axes, machetes, grass and weed cutting tools, cart, supply of rocks, wood posts, wire screen, hammer, nails, screen cutter, sections of sewer pipe, mortar. Other: tool shed, warning signs, fencing material, gloves and rubber boots.
Caution !...
Always wear boots and gloves when working around a stabilization pond.
A well-operated and properly maintained stabilization pond usually will not have an odor. It may appear to children and adults as a place to swim or wade. This must be prohibited. Precautions must be taken to keep away unauthorized persons.
Post warning signs, or erect fences or barricades.
Useful Definitions...
ALGAE : Tiny, green plants usually found floating in surface water; they act on sewage in a stabilization pond and produce oxygen.
ANAEROBIC POND : Stabilization pond that receives sewage from a sewer system and discharges sewage effluent to a facultative pond.
EFFLUENT : Settled sewage.
FACULTATIVE POND : Stabilization pond that receives sewage effluent from an anaerobic pond or sewer system and discharges treated sewage to a dry ditch or maturation pond.
MATURATION POND : Stabilization pond that receives treated sewage from a facultative pond, further treats the sewage, and discharges it to a dry ditch or waterway; maturation ponds are sometimes stocked with fish.
SCUM : Floating impurities found on top of liquid or bodies of water; especially common in anaerobic ponds.
SEWAGE : All washwater, excreta, and water used to flush excreta that flows from a building or buildings through a sewer
pipe and into a septic tank, cesspool, or stabilization pond.
SLUDGE : Settled solids.
TREATED SEWAGE : The liquid that flows out of a stabilization pond or series of ponds. Treated sewage is safer than settled sewage and may be used to irrigate crops not intended for human consumption.
Starting Up a Pond...
If the designed detention time of the pond is more than 10 days, or if only a portion of the total number of dwellings is connected to the sewer system, it may be desirable to temporarily divide the pond in parts. This will allow the bottom of
the pond to seal more rapidly and help prevent the growth of weeds. Build one or two temporary dikes across the width of
the pond, dividing it in half or into thirds. Dikes are made from soil and are no higher than about 0.5 m. See Figure 1.
Allow sewage to enter the pond. Settled solids will soak into and grandually seal the bottom of the first section. The
first section will be filled in a few days and the sewage will spill over the temporary dike and begin sealing the bottom
of the second section. After one or more weeks, depending on the size of the pond and the volume of daily flow, the pond
will fill with effluent to its design depth. If more than one pond has been constructed :
1. Close the inlet of the first pond and divert sewage to the second pond, filling it by sections. See Figure 1.
2. Allow the effluent in the pond being filled to "mature" for 10-20 days. It will gradually turn a greenish color.

3. Divert the flow of effluent back to the first pond allowing the now treated sewage to be discharged al the outlet. If
the ponds are connected in series, the treated sewage will pass from the first pond to the second, and be discharged from
the outlet of the second pond. If the ponds are connected in parallel :
4. Allow the content of the pond being filled to mature for 10-20 days, until it turns a greenish color.
5. Allow sewage to enter both parallel ponds and be discharged by both as treated sewage.
Managing Pond Surface Conditions...
Changes in weather, volume of daily flow, water temperature, and winds can cause undesirable conditions on the pond
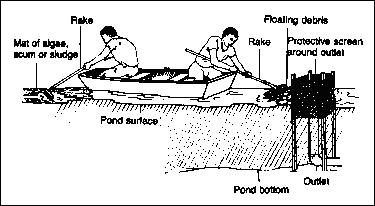
surface, especially algae growth, scum layers, and sludge mats. Algae may grow and form floating mats that will block out sunlight and interfere with the efficency of the pond. Dead algae mats can decay and produce foul odors. Mats should be broken up and dispersed with a jet of water from a water hose or with rakes. If necessary, take a boat onto the surface of the pond to reach the mats. See Figure 2.
Scum layers frequently form on the surface of anaerobic ponds. These will cause foul odors and will encourage insect breedubg. Break up scum layers with a water hose or long-handled rakes. Another surface problem is windblown debris, such
as leaves. This material can interfere with the pond outlet, and it should be removed from the surface and disposed of outside of the pond.
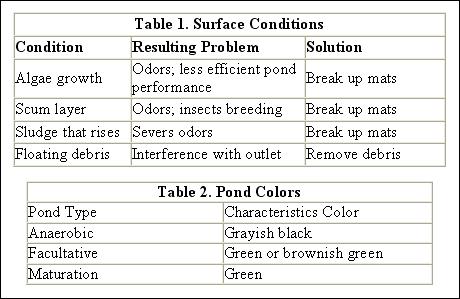
One other surface condition that should be regularly checked is pond color. Each type of pond has a characterisitic color, and changes in the color generally signal a problem that should be checked immediately. Table 2 lists the colors of ponds operating in a balanced conditions.
Changes in color usually mean a change in the sewage entering the pond. This can be caused by a increased concentration of excreta, rainwater or subsurface water entering the sewer system, or by materials such as oil, chemicals, and animal blood coming in with the sewage. Whatever the cause, it must be found and stopped at once. This may mean making inquiries in the village and inspectin the sewer system as described in "Operating and Maintaining Sewer Systems," SAN. 2.0.4. If a
government laboratory is available, samples of pond water taken at and below the surface may be examined to find the
cause of the pond changes.
Maintainging Embankment and Pond Site...
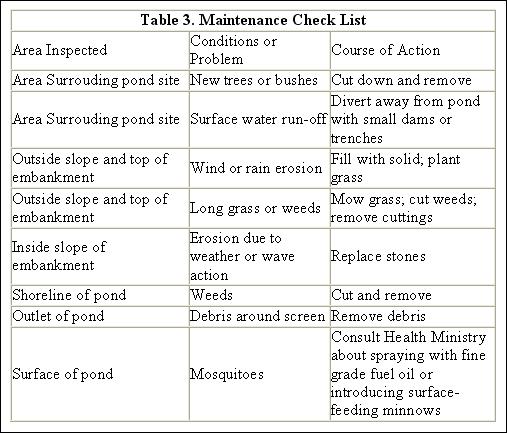
Make an inspection tour of the embankment and pond site every week or two. Besides surface conditions of the pond already discussed, there are a number of other items that must be checked. See Figure 3. If a problem is found, correct it at once. Table 3 can be used as an aid for regular pond maintenance.

Removing Sludge...
During the first years of pond operation, sludge will accumulate on the bottom of the pond. Biological processes will
then begin to digest the sludge at about the same rate that it is deposited, generally making further sludge accumulations negligible. However, the sludge depth should be checked once each year. If it is greater than one-third the design ponde depth, it will interfere with the natural operation of the pond and may block the inlet pipe. In either case, the pond
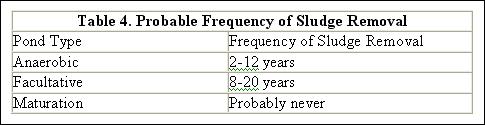
must be drained and the sludge removed. How often this occurs depends on local conditions and the type of pond, and is summarized in Table 4.
If the community sewer system is connected to only one pond, either another pond, even if temporary, must be built or a temporary alternative means of community sanitation must be used. Effluent from a sewer suytem must not be allowed to flow into a stream, lake, or dry ditch. Checking Sludge Depth : Once each year, measure the sludge depth near the inlet
of the pond. Use a boat and a long wooden pole with about 1m of light-colored cloth wrapped aroun and tie to the lower
end. See Figure 4.
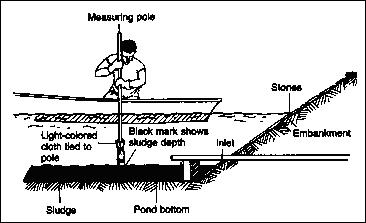
Lower the pole to the bottom of the pond and after a minute slowly raise it. Sludge particicles will cling to the cloth,
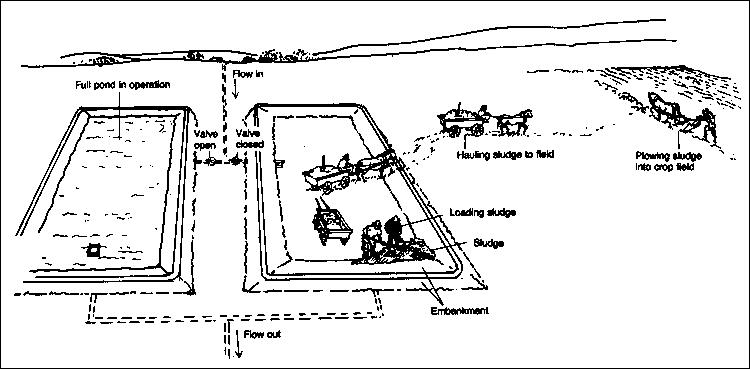
and the sludge depth can be measured. If the depth is less than one-third the design depth of the pond, no action need be taken. If the sludge depth is equal to or greater than one-third the design depth, the pond must be drained and the sludge removed. Do this during the dry season. Draining the Pond : If the ponds are connected in series, divert the flow of the next lower pond in the series. If the ponds are connected in parallel, divert all sewage from the pond to be drained to the other pond. To drain the pond, remove the sleeved pipe sections of the vertical outlet one section at a time. This will allow you to lower the surface of the pond in stages until the sludge level is reached. Removing Sludge : Allow the sludge to dry in the sun. This may take several weeks depending on local conditions. When the sludge is fairly dry, it can
be handled with a front-end loader, animal-drawn scoops, or shovels. Load the sludge on trucks or carts an haul it away.
See Figure 5. A thin layer of sludge ca be left on the bottom of the pond to help begin the biological processes when the pond is put back into operation. Disposing of Sludge : Dispose of dry sludge in a landfill or other burial site, or use it to fertilize crops, preferably crops not intended for human consumption. If used for fertilizer, it should be plowed into the ground. Never use sludge to fertilize vegetables which are to be eaten raw, such as lettuce, tomatoes or celery.
Refilling the Pond : While the pond is empty, check the inlet and outlet pipes and protective screen for any damage. Repair at once. Replace the sleeved pipe sections of the vertical outlet. If the ponds are connected in series, divert the flow of effluent back to the inlet of the empty pond and away from the lower pond in the series. If the ponds are connected in parallel, the second pond probably needs to be emptied and cleaned. Divert the flow of effluent to the empty pond, and
the second pond has been drained and the sludge removed, divert the effluent so that it flows equally into both ponds.
Other Considerations...
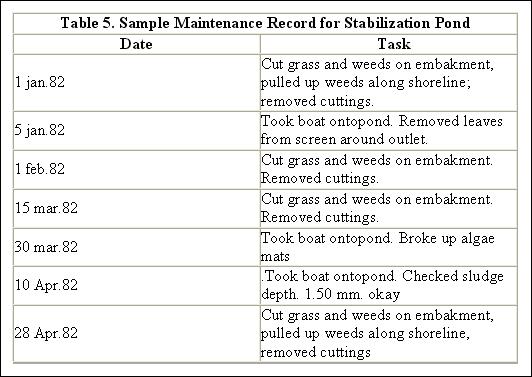
Tools for operating and maintaining a stabilization pond should be kept in a locked shed near the pond site. Clean all
tools and keep them in good repair. Maintain a record similar to Table 5 showing all maintenance activities.