|
Oracle® Reports Building Reports
10g Release 2 (10.1.2) B13895-01 |
|
 Previous |
 Next |
|
Oracle® Reports Building Reports
10g Release 2 (10.1.2) B13895-01 |
|
 Previous |
 Next |
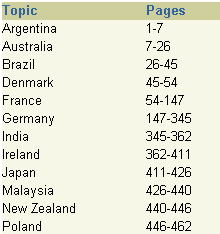
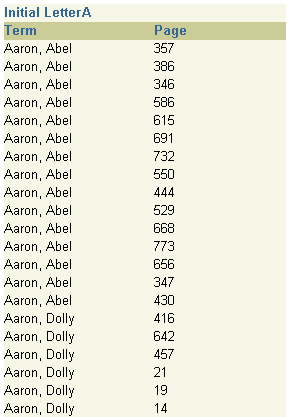
In this chapter, you will learn about reports that include a simple table of contents and index. By following the steps in this chapter, you can generate the report output shown in the figure below.
Figure 35-1 Simple table of contents for a large report

Figure 35-2 Simple index for a large report

Concepts
When you have large paper report, it is sometimes easier for your users to navigate through the report if you include a table of contents. Using Reports Builder, you can generate a table of contents that displays at the beginning of your paper report.
Normally, Reports Builder formats the report starting with the Header section, then the Main section, followed by the Trailer section. With the functionality demonstrated in this example report, Reports Builder can format any section first to create information that is only known at the time of formatting, such as page numbers, then use that information in the formatting of a previous section.
In this example, you will use the built-in procedure called SRW.SET_FORMAT_ORDER to generate the Main section of the report first, then the Header and Trailer sections. Doing so enables you to generate the page numbers for the report in the Main section, then display the page numbers in the table of contents in the Header section.
|
Note: Although you can use SRW.SET_FORMAT_ORDER to change the order in which the report is formatted, the report will still display the Header section first, then the Main section, and finally the Trailer section. You can use SRW.SET_FORMAT_ORDER to simply change the formatting order, but not the display order of the report sections. |
You will use the After Parameter Form trigger and a format trigger to place the page numbers temporarily in a table you create in the database. You will then create a simple tabular report that displays at the beginning of your report, that lists the category and its page number. Finally, you will create an index that simply lists the record and the page number in the Trailer section of the report.
For information on creating a multilevel table of contents, refer to Chapter 36, "Building a Paper Report with a Multilevel Table of Contents".
Example Scenario
In this example, you will generate a list of all the e-mail addresses for your customer database, which contains thousands of records. First, you want to categorize the customers (in this case, by country), then generate a table of contents so you can easily find the e-mail address for the desired customer. Then, you will learn how to create an index for your report.
As you build this example report, you will:
Create a simple table of contents:
Create a table in the database to hold the TOC data using SQL*Plus.
Create a group above report using the Report Wizard.
Create an After Parameter Form trigger and a format trigger using the PL/SQL Editor to change the order in which the report sections are executed and fetch the page number for each record.
Create a second query in the data model with a formula column that calculates the page range for the data under each country name.
Create a report block to display the table of contents using the Report Block Wizard to create a tabular report block in the Header section to display the country name and page number.
Create a table in the database to hold the information for the index.
Create a format trigger to generate a page number for every customer record.
Add a query to the data model using the Data Model view to create another query that retrieves the necessary information for the index.
Create a report block to display the index in the Trailer section.
To see a sample table of contents and index report, open the examples folder named tocindex, then open the Oracle Reports example named formatorder_index.rdf. For details on how to open it, see "Accessing the Example Reports" in the Preface.
To build the example in this chapter, you must have the example files we have provided (see "Example Scenario", above), as well as access to the Sales History sample schema provided with the Oracle Database. If you do not know if you have access to this sample schema, contact your database administrator.
The steps in this section will show you how to create a basic table of contents for a large, multipage report. The table of contents will look like the following:
The steps in this section will show you how to create a table in the database that will hold the page numbers for the records you want to list in the table of contents. If you are not sure whether you have the privileges to create a table in the database, contact the database administrator.
To create a table in the database:
Start SQL*Plus.
On Windows, from the Start menu, choose Programs > Oracle Application Server - oracle_home_name> Application Development > SQL Plus.
On UNIX, type sqlplus.
Connect to the Sales History schema of the database (for example, use the sh/sh@database_name connect string).
At the SQL prompt, type the following line:
create table toc_example (topic varchar2(100), page number);
Press Enter.
You should see a notification that the table has been created.
Exit SQL*Plus.
The steps in this section will show you how to build a simple group above report in Reports Builder. This group above report will display the country name, then the customers and customer e-mail addresses under each country name. The table of contents you create will then be based on the country name in this report.
To create a simple group above report:
In Reports Builder, choose File > New > Report, then choose to create the report manually.
In the Data Model view that displays, right-click on the canvas, then choose Report Wizard from the pop-up menu.
On the Report Type page, select Create Paper Layout only, then click Next.
On the Style page, select Group Above, then click Next.
On the Data Source page, click SQL Query, then click Next.
On the Data page, enter the following SELECT statement in the Data Source definition field:
SELECT ALL COUNTRIES.COUNTRY_NAME,
           CUSTOMERS.CUST_LAST_NAME,
           CUSTOMERS.CUST_FIRST_NAME,
           CUSTOMERS.CUST_email
FROM CUSTOMERS, COUNTRIES
WHERE (CUSTOMERS.COUNTRY_ID = COUNTRIES.COUNTRY_ID)
|
Note: You can enter this query in any of the following ways:
|
Click Next.
|
Note: If you are not already connected to a database, you will be prompted to connect to the database when you click Query Builder or Next. Ensure that you connect to a database that has the appropriate schema for this example. Section 35.1, "Prerequisites for this example" describes the sample schema requirements for this example. |
On the Groups page, click COUNTRY_NAME, then click > to move the field to the Group Fields list.
Click Next.
On the Fields page, click >> to move all fields to the Displayed Fields list, then click Next.
On the Totals page, click Next.
On the Labels page, click Next.
On the Template page, click Finish.
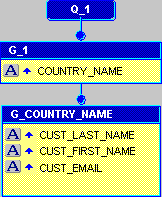
In the toolbar, click the Data Model view button. The data model should look like this:
Figure 35-4 Data model for the group above report

In the toolbar, click the Paper Layout view button. The Paper Layout view should look like this:
Figure 35-5 Paper Layout view of the group above report

Save your report as formatorder_your_initials.rdf. You have now created the data model and the basic layout for your report.
The steps in this section will show you how to create two triggers. The first trigger will use the SRW.SET_FORMAT_ORDER built-in procedure to format the Main section of the report first, then the Header and Trailer sections. The second trigger will fetch the number of the page on which each country name displays, and place that information into the table you created in Section 35.2.1, "Create a table in the database to hold the TOC data".
An After Parameter Form trigger is a function that executes after the parameter form is executed. In this section, you will set the trigger to change the order of the report execution, so that the Main section runs first.
To create an After Parameter Form trigger:
In the Object Navigator, under your report name (FORMATORDER_your_initials), expand the Report Triggers node.
Right-click AFTER PARAMETER FORM, then choose PL/SQL Editor from the pop-up menu.
In the PL/SQL Editor, use the template to enter the following PL/SQL code:
function AfterPForm return boolean is
begin
  srw.set_format_order(srw.main_section, srw.header_section, srw.trailer_     section);
  return (TRUE);
end;
|
Note: You can also copy and paste the code from the provided file,formatorder_code.txt.
|
Click Compile.
Once the code has compiled, click Close.
In this section, you will create a format trigger based on the field F_COUNTRY_NAME. This field displays the country name. This format trigger will fetch the page number for each country name, so that the table of contents will enable the user to navigate to various parts of the report based on the name of the country.
To create a format trigger:
In the Object Navigator, under the Paper Layout node for your report, navigate to Main Section > Body > M_G_1_GRPFR > R_G_1, then click F_COUNTRY_NAME.
|
Tip: If you cannot find this field, use the Find field at the top of the Object Navigator. |
Choose Tools > Property Inspector to display the Property Inspector for this field.
Under Advanced Layout, double-click the Format Trigger property field to display the PL/SQL Editor.
In the PL/SQL Editor, type the following code:
function F_COUNTRY_NAMEFormatTrigger return boolean is
pageNum number;
begin
  -- get current page number
  srw.get_page_num(pageNum);
  -- insert row into table
  insert into toc_example
  values (:country_name, pageNum);
  return (TRUE);
end;
|
Note: You can also copy and paste this code from the provided file,formatorder_code.txt.
|
Click Compile.
Once the code is compiled, click Close, then close the Property Inspector.
Save your report.
The steps in this section will show you how to create a second query in the data model with a formula column that calculates the page range for the data under each country name. This query will fetch the information from the database table you created in Section 35.2.1, "Create a table in the database to hold the TOC data". You will later create a tabular layout to display this information in your table of contents.
To create a second query with a formula column:
In the Data Model view, click the SQL Query tool in the tool palette then click in an open area of the Data Model view, somewhere to the right of query Q_1, to display the SQL Query Statement dialog box.
In the SQL Query Statement field, enter the following SELECT statement:
SELECT
    TOPIC,
    MIN(PAGE) FROMPAGE,
    MAX(PAGE) TOPAGE
FROM TOC_EXAMPLE
GROUP BY TOPIC
|
Note: You can also copy and paste this code from the provided file, calledformatorder_code.txt.
|
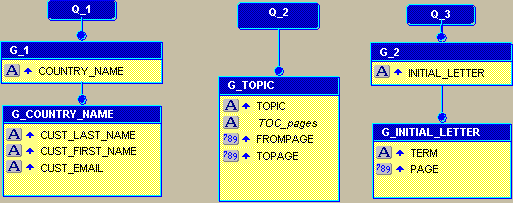
Click OK. Your data model should now look like this:
In the Data Model view, click the Formula Column tool in the tool palette, then click in the group (G_TOPIC) for the second query.
While the formula column is selected, choose Tools > Property Inspector to display its Property Inspector.
Under General Information, set the Name property to TOC_pages, and the Datatype property to Character.
Under Placeholder/Formula, click the PL/SQL Formula property field to display the PL/SQL Editor.
In the PL/SQL Editor, use the template to enter the following code:
function TOC_pagesFormula return Char is
begin
  if :fromPage = :toPage then
  return (:fromPage);
  else
  return (:fromPage ||'-'|| :toPage);
  end if;
end;
|
Note: You can also copy and paste this code from the provided file, calledformatorder_code.txt.
|
Click Compile.
Once the code is compiled, click Close.
Save the report.
The steps in this section will show you how to create a tabular report block in the Header section of your report. This report block will display the headings in the table of contents (in this example, the country name), and the page range where the information can be found in the report.
To create a tabular report block in the Header section:
In the Paper Layout view, click the Header Section button in the toolbar.
Click the Report Block tool in the tool palette, then draw an area about about 5 inches (12.5 centimeters) wide and 1.5 inches (4 centimeters) high in the Paper Layout view. When you release the mouse button, the Report Block Wizard displays.
On the Style page, select Tabular, then click Next.
On the Groups page, click G_TOPIC and click Down to move it to the Displayed Groups list, then click Next.
On the Fields page, click each of the following fields in the Available Fields list, then click the right arrow (>) to move them to the Displayed Fields list, then click Next:
TOPIC
TOC_pages
On the Labels page, click Next.
On the Template page, click Finish.
Your report block displays in the Paper Layout view:
Figure 35-7 Paper Layout view of the Header Section

Save your report.
To run your report to paper:
Click the Run Paper Layout button in the toolbar.
|
Note: To generate the table of contents (TOC), you must click the Run Paper Layout button. If you click the Paper Design view button, the change of format order will not take effect, thus the TOC will not be generated. |
The table of contents displays on the first page of the report, and looks something like the following:
Figure 35-8 Table of contents page of the report

You can navigate to various pages in your report to view the data for each country. For example, when you navigate to page 1, you will see the e-mail addresses for the customers in Argentina:
Figure 35-9 Results for customers in Argentina

|
Note: At this point, you can compare your report against the example file we have provided,formatorder.rdf. First, compile the PL/SQL by choosing Program > Compile > All, then run the report to paper.
|
For information on creating a multilevel table of contents, see Chapter 36, "Building a Paper Report with a Multilevel Table of Contents".
In this section, you will create an index that displays at the end of your report. This index will simply display the customer's name and the page number on which the name appears. This indexing technique is useful when users want to find a specific customer's name, but are not sure what category (for example, country) to reference.
Figure 35-10 Sample index for the paper report

The steps in this section will show you how to create a table in the database that will hold the page numbers for the items you want to list in the index. If you are not sure if you can create a table in the database, contact the database administrator.
To create a table in the database:
Follow the steps in Section 35.2.1, "Create a table in the database to hold the TOC data" to create a new table in the database, using the following code:
create table index_example (term varchar2(100), page number);
Press Enter.
You should see a notification that the table has been created.
Exit SQL*Plus.
The steps in this section will show you how to create a format trigger based on the customer's last name. You will use the SRW.GET_PAGE_NUM built-in function to find the page number for the current customer, and insert that page number into the table you created in the previous section.
To create a format trigger:
In Reports Builder, open the report, formatorder_your_initials.rdf.
Click the Paper Layout button in the toolbar to display the Paper Layout view.
In the Paper Layout view, right-click the field F_CUST_LAST_NAME, then choose Property Inspector from the pop-up menu.
Under Advanced Layout, double-click the Format Trigger property field to display the PL/SQL Editor.
In the PL/SQL Editor, use the template to enter the following code:
function F_CUST_LAST_NAMEFormatTrigger return boolean is
  PageNum number;
begin
  -- get pagenumber
  srw.get_page_num(pageNum);
  -- insert into table
  insert into index_example
  values (:Cust_last_name||', '||:Cust_first_name, PageNum);
  return (TRUE);
end;
|
Note: You can enter this code by copying and pasting it from the provided text file calledformatorder_code.txt.
|
Click Compile.
If there are compilation errors, match your code to the code we have provided (either in the example RDF file or in this chapter), then compile it again.
Once there are no compilation errors, click Close.
Save your report as formatorder_index_your_initials.rdf.
The steps in this section will show you how to add a query to your data model that will retrieve the individual customer names and the page numbers for your index.
To add the query:
In the Data Model view, click the SQL Query tool in the tool palette then click in an open area of the Data Model view, somewhere to the right of query Q_1, to display the SQL Query Statement dialog box.
In the SQL Query Statement field, enter the following SELECT statement:
SELECT SUBSTR(TERM,1,1) INITIAL_LETTER, TERM, PAGE FROM INDEX_EXAMPLE ORDER BY TERM
|
Note: You can enter this query in any of the following ways:
|
Click OK.
In the new query that displays in the Data Model view, click and drag the INITIAL_LETTER column above the rest of the query, so that the data model now looks like this:
Figure 35-11 Data model view of the index

Save your report.
The steps in this section will show you how to display the index information in the Trailer section of your report.
To create a report block in the Trailer section:
In the Paper Layout view, click the Trailer Section button in the toolbar.
Choose Insert > Report Block.
On the Style page, select the Group Above radio button, then click Next.
On the Groups page, click G_2 (the name of the new group that contains the INITIAL_LETTER column), then click Down to specify the print direction.
In the Available Groups list, click G_INITIAL_LETTER, then click Down.
Click Next.
On the Fields page, click INITIAL_LETTER, then click > to move it to the Displayed Fields list.
Move TERM and PAGE to the Displayed Fields list.
Click Next, then Next again, then click Finish.
Save your report.
Click the Run Paper Layout button in the toolbar. The index displays on the last pages of the report. We chose page 2402, which (in our example) looks like the following:
|
Note: To generate the table of contents (TOC), you must click the Run Paper Layout button. If you click the Paper Design view button, the change of format order will not take effect, thus the TOC will not be generated. |
|
Note: The data on page2402 in your report may not appear the same as ours, depending on the amount and type of data you have in the schema.
|
Congratulations! You have successfully created a report with a table of contents and an index. You now know how to:
create a table of contents (TOC) and index for a large paper report.
use the SRW.SET_FORMAT_ORDER built-in procedure to change the order in which the sections of a report are executed.
use the SRW.GET_PAGE_NUM built-in procedure to retrieve the page number for a specific record.
create a new table in your database to hold the necessary page numbers.
create a simple group above report using the Report Wizard.
manually create a simple data model to retrieve the information for your report.
create a format trigger to generate the necessary page numbers for an index.
use the Report Block Wizard to create a group report that displays the index in the trailer of a report.
For more information on any of the wizards, views, or properties used in this example, refer to the Oracle Reports online Help, which is available in Reports Builder or hosted on the Oracle Technology Network (OTN), as described in Section 3.1.1, "Using the Oracle Reports online Help".