|
Oracle® Application Server Single Sign-On Administrator's Guide
10g Release 2 (10.1.2) B14078-02 |
|
 Previous |
 Next |
|
Oracle® Application Server Single Sign-On Administrator's Guide
10g Release 2 (10.1.2) B14078-02 |
|
 Previous |
 Next |
This chapter explains how to enable the single sign-on server to support multiple realms within one instance of the Oracle Identity Management infrastructure.
The chapter contains the following topics:
Application Service Providers: Deciding to Deploy Multiple Realms
How the Single Sign-On Server Enables Authentication to Multiple Realms
Application service providers are companies that install and maintain Oracle and non-Oracle applications and make them available to their customers, typically for a fee. These companies achieve economies of scale by serving multiple sets of users within the same application instance. The application service provider may, for example, use different realms, or namespaces, within one instance of the Oracle Identity Management infrastructure to set and store Oracle configuration information unique to different customers.
If user IDs are the only criterion for deciding whether to deploy multiple realms, and there are no ID conflicts, Oracle recommends maintaining users in a single, default realm. The application service provider may, for example, be one who has users log in with an email ID, which is unique. In situations where user IDs conflict, separate realms may be unavoidable. Note, too, that the decision to deploy multiple realms affects how Oracle 10g middle-tier components and customer applications are deployed.
|
Note: To gain a thorough understanding of Oracle Identity Management, see Oracle Identity Management Concepts and Deployment Planning Guide. |
The work involved in setting up multiple realms may require resources and administrative overhead that exceed those of OracleAS Single Sign-On. Other components are involved in the process. In fact, realm configuration is a three-part process that consists of the following:
Creating realms in Oracle Internet Directory
"Turning on" multiple realms in OracleAS Single Sign-On
Making partner applications aware of identity management realms
The first process is discussed in Oracle Internet Directory Administrator's Guide. The second is the subject of this chapter. The third is discussed in product-relevant documentation.
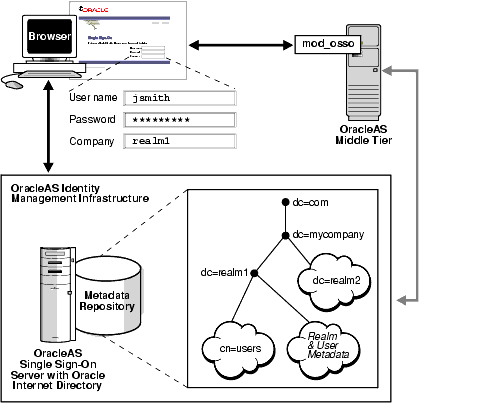
The authentication sequence for single sign-on to multiple realms is much the same as it is for single sign-on in a single, default realm. The only difference from the user's perspective is that, when the user affiliated with the first type of realm is presented with the login screen (see Figure 10-1), he or she must enter not only a user name and password but also a new credential: the realm nickname. The value entered can be case insensitive.
This section covers the following topics:
Once a user has entered his credentials, both his realm nickname and user name are mapped to entries in Oracle Internet Directory. More specifically, the single sign-on server uses directory metadata to find the realm entry in the directory. Once it finds this entry, the single sign-on server uses realm metadata to locate the user. Once the user's entry is found, his password, an attribute of his entry, is validated. And once his password is validated, he is authenticated.
Figure 10-1 The Big Picture: Single Sign-On in Multiple Realms

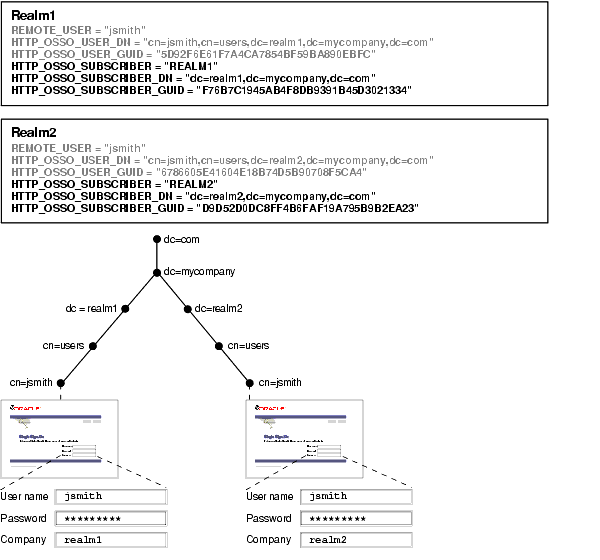
Presented with two users, both with the same nickname but affiliated with different realms, a partner application requires some mechanism for distinguishing between these users. The application requires such a mechanism because it must be able to adapt content—an OracleAS Portal page with stock news and stock listings, for instance—to match the needs of the realm requesting it. Accordingly, OracleAS release 9.0.4 adds the realm nickname, realm DN, and realm GUID as attributes passed to mod_osso. Recall that mod_osso sets a cookie, storing the retrieved attributes as HTTP headers. When deciding what content to offer up, the application may use function calls to retrieve any one of these attributes from mod_osso headers.
For detailed information about mod_osso headers and the methods used to access them, see the chapter about mod_osso in Oracle Identity Management Application Developer's Guide.
Figure 10-2 shows how applications running in mod_osso see HTTP headers for two users with the same nickname who are affiliated with two different realms. The application uses the headers that appear in bold face to distinguish between the two users. The host, or default realm, in this case is mycompany.com.
Figure 10-2 mod_osso Headers for Users with the Same Name

Configuring the single sign-on server for multiple realms involves creating an entry for each realm in the single sign-on schema. Every realm that you create in Oracle Internet Directory must have a corresponding entry in the single sign-on schema.
|
Note:
|
To configure the single sign-on server for multiple realms, complete the steps that follow. Steps 1, 2, and 5 must be completed only once because these steps enable the server for multiple realms. Steps 3 and 4 must be completed each time you add a realm.
Ensure that you have installed the OracleAS infrastructure and the single sign-on server.
Go to ORACLE_HOME/sso/admin/plsql/wwhost.
Run the enblhstg.csh script using the syntax that follows. See Table 10-1 for an explanation of script parameters:
enblhstg.csh -mode sso
             -sc sso_schema_connect_string
             -ss orasso
             -sw sso_schema_password
             -h oid_host_name
             -p oid_port
             -d "cn=orcladmin"
             -w oid_bind_password
|
Note: If the single sign-on server is part of a distributed deployment, make sure that you run the script on the computer that contains the metadata repository for OracleAS. |
Here is an example:
enblhstg.csh -mode sso
             -sc webdbsvr2:1521:s901dev3
             -ss orasso
             -sw xyz
             -h dlsun670.us.oracle.com
             -p 389
             -d "cn=orcladmin"
             -w welcome123
Add realms to Oracle Internet Directory. To do this, follow the instructions in Oracle Internet Directory Administrator's Guide.
Create an entry for the realm in the single sign-on database. Use the script ORACLE_HOME/sso/admin/plsql/wwhost/addsub.csh. Again, if your single sign-on server is part of a distributed deployment, run the script on the computer that contains the metadata repository for OracleAS.
Use the following syntax to execute the script:
addsub.csh -name realm_nickname
           -id realm_ID
           -mode sso
           -sc sso_schema_connect_string
           -ss sso_schema_name
           -sw sso_schema_password
           -h oid_host_name
           -p oid_port
           -d oid_bind_dn
           -w oid_bind_dn_password
           -sp sys_schema_password
Table 10-1 defines parameters for both enblhstg.csh and addsub.csh.
Table 10-1 Parameters for enblhstg.csh and addsub.csh
| Parameter | Description |
|---|---|
-mode |
The value here must be |
-sc |
The connect string for the single sign-on schema. Use the format |
-ss |
The name of the single sign-on schema. This parameter must be |
-sw |
The password for the single sign-on schema. See Appendix B to learn how to obtain it. |
-h |
The host name for the Oracle Internet Directory server. |
-p |
The port number for the Oracle Internet Directory server. |
-d |
The bind DN for the Oracle Internet Directory server. The value of this parameter is |
-w |
The password for the Oracle Internet Directory super user, |
-name |
The realm nickname. This is the value that you enter into the company field on the login page. |
-id |
The realm ID. Choose any integer greater than 1 that was not previously passed to |
-sp |
The |
|
Note:
|
Update the sample login page with the multiple realm version of the page. You do this by editing ORACLE_HOME/j2ee/OC4J_SECURITY/applications/sso/web/jsp/login.jsp.
|
Note: In a distributed deployment, this file is located on the single sign-on middle tier. |
After making a backup copy of the file, uncomment this section:
<!-- UNCOMMENT TO ENABLE MULTIPLE REALM SUPPORT
   <tr>
   <th id="c4" ALIGN="RIGHT"><label for="c4"><font class="OraFieldText">
   <%=msgBundle.getString(ServerMsgID.COMPANY_LBL)%></font></label></th>
   <td headers="c4"> <INPUT TYPE="text" SIZE="30" MAXLENGTH="50" ID="c4"
   NAME="subscribername" value="<%=str_subscriber%>"></td>
   </tr>
   -->
Oracle Internet Directory propagates the DIT structure of the default realm across realms when it creates these realms. Note, however, that the users, groups, and privileges that exist in the DIT of the default realm are not propagated. The directory super user or realm administrator must assign, or reassign, privileges, using Oracle Directory Manager. To learn how to use the tool for this purpose, see "Granting Administrative Privileges" in Chapter 2.