|
Oracle® Application Server Adapter for J.D. Edwards OneWorld User's Guide
10g Release 2 (10.1.2) B14059-02 |
|
 Previous |
 Next |
|
Oracle® Application Server Adapter for J.D. Edwards OneWorld User's Guide
10g Release 2 (10.1.2) B14059-02 |
|
 Previous |
 Next |
This chapter contains the following examples:
Prerequisites
The following components must be configured:
OracleAS Adapter for J.D. Edwards OneWorld installed on Oracle Application Server.
OracleAS Integration InterConnect Adapter Plugin for EIS.
|
See Also: Oracle Application Server Adapters Installation Guide |
Configuration Steps
The examples present all the configuration steps necessary for demonstrating service and event integration with J.D. Edwards. The following cross references are given to identify where more information can be obtained.
Configure the OracleAS Adapter for J.D. Edwards OneWorld for services and events. See Chapter 2, "Configuring OracleAS Adapter for J.D. Edwards One World" for more information.
Configure OracleAS Integration InterConnect iStudio for service and event interactions. For more information, see the following service and event steps.
This topic illustrates J.D. Edwards service integration. The procedures describe design time and runtime.
The following procedures describe how to start the repository and create a common view and then, invoke and implement a procedure.
Starting the Repository
To start the repository, double-click the start.bat file located in the following directory:
OracleAS_home\repository\start.bat
Where OracleAS_home is the directory where Oracle Application Server is installed.
Creating a Common View
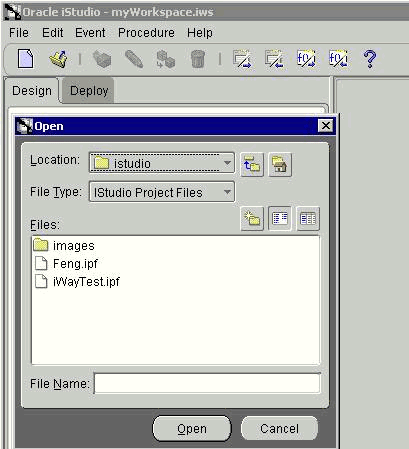
Open a new project.
Open Common Views and Business Objects.
Create a Business Object called JDEAddressFL and a new procedure under GetEAddress.

Click Import and select XML from the list.
Open the DTD generated from Application Explorer.
Click OK.
Choose the IN arguments radio button, and click OK.
Select jdeRequest.
Ensure your parameters are similar to Figure 6-1 for both the In and Out parameters.
Click Save.
Invoking a Procedure
Create a new application called DBAPP.
Right-click Invoked Procedures and select New.
The Invoke Wizard - Select a Procedure dialog box is displayed.

As the procedure, choose GetEAddress under JDEAddressFL.
Click Import and select Common View.
The structure is loaded as follows. Because this is a request and response, ensure that Synchronous is selected.

Click Next, and then New to create a mapping between the Common View and the Application View for the In parameters.

In this case, the Application View and the Common View have the same structure and can be mapped using the ObjectCopy transformation.
Click Apply and then OK.
The second Mapping Parameters dialog box is displayed.

Click Apply and then OK.
The Define Stored Procedures dialog box is displayed.

Some SQL code is automatically generated.
Click Finish.
Implementing a Procedure
In this implemented procedure, a new application called JDEAddressBook is created.
Create a new application named JDEAddressBook.
Expand the application and right-click Implemented Procedure.
To create an implemented procedure, select New.
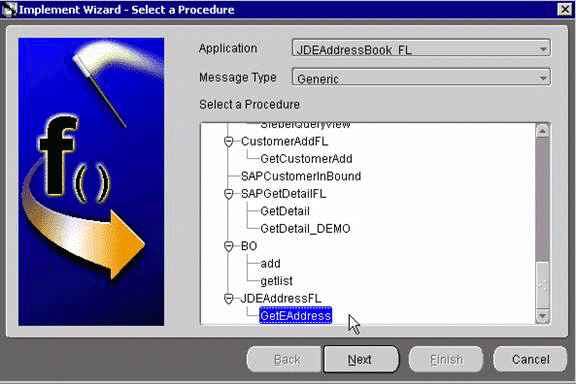
Select Generic as the message type.
Expand JDEAddressFL and select GetEAddress.
Click Next.
Click Import and select XML.
Navigate to the location of the request and response DTDs generated by Application Explorer and import both into iStudio.
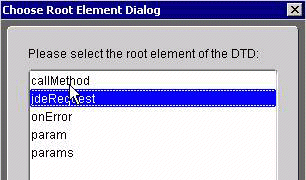
Select jdeRequest as the root element of the DTD.
Choose the IN arguments option button, and click OK.
The Implement Wizard - Define Application View window is displayed.

Click Import, then click Next.
The Choose Root Element Dialog pane is displayed.

Choose jdeResponse and click Next.
The Choose Import Type dialog box is displayed.

Select OUT arguments, and click Next.
The Define Application View window is displayed.

Click Next.
The Mapping Parameters window is displayed.

In this example, the Application View and Common View have the same structure. All the attributes can be mapped by using the ObjectCopy transformation.
Select Copy Fields in the Transformations field, and click OK.
The Define Mapping:IN Arguments window is displayed.

Click Next.
The Mapping Parameters window is displayed for the OUT parameters.

Ensure Copy Fields is selected in the Transformation field, then click OK.
The Define Mapping:OUT arguments window is displayed.

Click Next, then Finish.
The application definition for annvoked procedure is now complete.
Exporting PL/SQL Code from iStudio
You must export the PL/SQL code created in "Invoking a Procedure" and execute it against the appropriate schema. In this example, the schema used is DBAPP_JDEAddressFL.
To export PL/SQL code from iStudio:

In iStudio, click File and Export PL/SQL.
The Export Application dialog box is displayed.

Perform the following steps:
Select the application from which to export PL/SQL.
Type or browse to the file prefix (path to the application).
Click OK.
In this example, two SQL scripts are created:
DBAPP_JDEAddressFLTYPES.sql
DBAPP_JDEAddressFL.sql
Log on to the database with the appropriate privileges (in this example, DBAPP_JDEAddress) and execute the following in the order given:
DBAPP_JDEAddressFLTypes.sql
DBAPP_JDEAddressFL.sql
Create another stored procedure, JDEADDRESSFL_EXE, in the same schema. It executes at runtime to create the database message that is sent to the hub.
CREATE OR REPLACE  PROCEDURE "DBAPP"."JDEADDRESSFL_EXE" (
servicename LONG,
methodname  LONG,
license     LONG,
customerid  LONG
)
AS
  moid NUMBER;
  aoid NUMBER;
  coid NUMBER;
  businessname LONG;
  address LONG;
  city LONG;
  state LONG;
  phone LONG;
  country LONG;
  detailid NUMBER;
BEGIN
  JDEAddressFL.crMsg_GetEAdress_OAI_V1(moid, aoid);
  jdeid := JDEAddressFL.cr_jdeRequest_jdeRequest
(servicename,methodname,license,username,sessionidle, calltype, sessionid, environment, pwd, callmethod, moid,aoid);
  coid := JDEAddressFL.inv_GetEAddress_OAI_V1(moid,'DBAPP','',customername,street,city,state,zipcode);
COMMIT;
END;
Edit Adapter.ini
Add the following two lines to adapter.ini for the Oracle Application Server Adapter for J.D. Edwards OneWorld:
//Bridge Class
bridge_class=com.iwaysoftware.iwbridge.IWBridge

//IBSE URL
ibse_url=http://hostname:port/ibse/IBSEServlet/XDSOAPRouter
Where hostname is the URL of the server and port is the port number.
The following topic describes how to verify service integration using the OracleAS Adapter for J.D. Edwards OneWorld.
Verifying Service Integration
To verify service integration:
Start Oracle Application Server or ensure that the server is running.
Restart OC4J, if required, by executing the following command:
\OracleAS_home\opmn\bin\opmnctl  stopproc process-type=home
\OracleAS_home\opmn\bin\opmnctl  startproc process-type=home
Check the status of OC4J by executing the following command:
\OracleAS_home\opmn\bin\opmnctl status
The expected output is a list of the processes in the instance, as in the following:
| iAS-component | Process-type | PID | Status |
|---|---|---|---|
| DSA | DSA | N/A | Down |
| HTTP_Server | HTTP_Server | 1592 | Alive |
| LogLoader | logloaderd | N/A | Down |
| dcm-daemon | dcm-daemon | 3016 | Alive |
| OC4J | home | 3496 | Alive |
| WebCache | WebCache | 1800 | Alive |
| WebCache | WebCacheAdmin | 1804 | Alive |
Invoke and implement the adapter by executing the following commands:
\InterConnect_HOME\oai\9.0.4\adapters\JDEAddressBook_FL\start.bat
\InterConnect_HOME\oai\9.0.4\adapters\DBAPP\start.bat
Log on to SQL*Plus with DBAPP and execute the following command:
exec
jdeaddressfl_exe
('GetEffectiveAddress','GetEffectiveAddress','test','JDE',"'callmethod',"'DV7333','JDE','GetEffectiveAddress','4242','mnAddressNumber');
Figure 6-2 shows the JDEAddress_FL example. It receives a reply from J.D. Edwards OneWorld and returns the reply to the hub.
Figure 6-3 shows the DBAPP example. It receives a reply from the hub and writes the data to the database table.
This topic and the example illustrate how the OracleAS Adapter for J.D. Edwards OneWorld integrates with J.D. Edwards OneWorld to receive event data. The procedures describe design time and runtime. In the example, a JDE event occurs as a result of a sales order event in the J.D. Edwards OneWorld system. The adapter receives the J.D. Edwards OneWorld event customer data and disposes the data to an RMI event port. The RMI server resides on the OracleAS Integration InterConnect Hub. An OracleAS Database Adapter on the OracleAS Integration InterConnect Hub subscribed to this event receives the customer data, transforms the event data, and then inserts the data into a database table. The design time and runtime procedures are outlined in the following sections.
To create a DTD for a J.D. Edwards event, you must:
Create a port in Application Explorer. See "Creating a Port in Application Explorer".
Create a channel in Application Explorer. See "Creating a Channel in Application Explorer".
Trigger an event from the J.D. Edwards system.
Capture the XML event payload in the BSE log.
Create a DTD based on the J.D. Edwards XML message using third party tools, such as XML Spy.
Creating a Port in Application Explorer
In Application Explorer, expand the JDEdwards node.
Right-click the Ports node, and select Add Port.
The Edit Port dialog box is displayed.

Enter a description in the Description field (optional).
Enter the URL for the server in the URL field, and click OK.
The port is created, and shows under the Ports node.
Creating a Channel in Application Explorer
In Application Explorer, expand the JDEdwards node.
Right-click the Channels node, and select Add Channels.
The Add Channel dialog box is displayed.

In the Name field, enter a descriptive name for the channel.
Enter a description in the Description field (optional).
In the Available Port(s) field, select the port or ports you wish to associate with the channel, and click the right arrow (>) button. To add all the ports, click the double right arrow button (>>).
Click Next.
The dialog box for the selected listener is displayed.

Enter the port number of the channel in the Port Number field.
Select the Synchronization type from the Synchronization Type list.
Select Is Length Prefix for events that send data which is not in XML format. The TCP/IP event application must prefix the data with a 4-byte binary length field when writing the data to the TCP/IP port.
Select Is XML for events that send data back in XML format. No preparser is required.
Select Is Keep Alive to maintain a continuous communication between the event transaction and the channel.
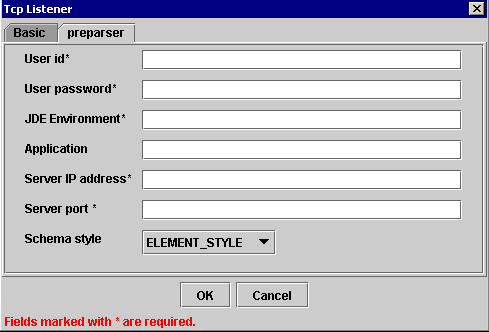
Enter values based on the following table.
Click OK.
The channel is created and shows under the Channels node.
Check the BSE log located at:
OracleAS_HOME\j2ee\home\applications\ws-app-adapter\ibse\ibselogs
for the XML event message.
Starting the Repository
To start the repository, double-click the start.bat file located in the following directory:
OracleAS_home\repository\start.bat
Where OracleAS_home is the directory where Oracle Application Server is installed.
Creating a Common View

Open a new project.
Open Common Views and Business Objects.
Create a Business Object called JDE and a new event under SalesOrder.
The Create Event dialog box is displayed.
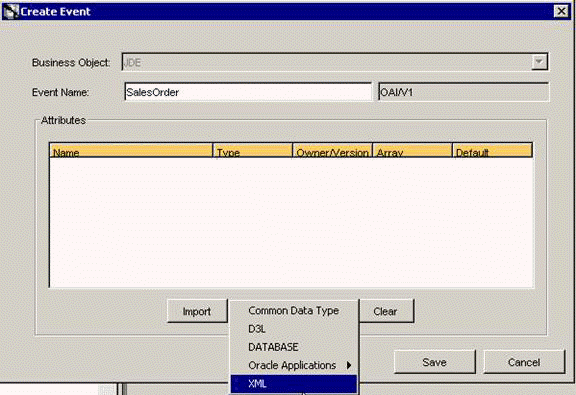
Click Import, then select XML as the import type.
The Open dialog box is displayed.

Select the DTD generated from Application Explorer, and click OK.
The Choose Root Element Dialog pane is displayed.

Choose the Root element of the importing DTD, and click OK.
Click Save.
Publishing an Event Using OracleAS Adapter for J.D. Edwards OneWorld
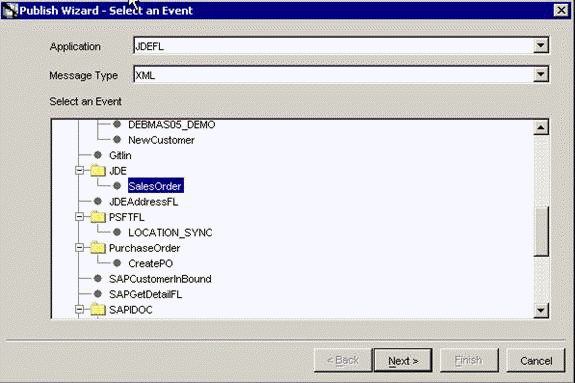
Create a new application named JDEFL. The application name must be uppercase.
Right-click Publish Events and select New to create a Publish Event.
The Publish Wizard - Select an Event dialog box is displayed.

From the Message Type list, select XML.
In the Select an Event field, expand the JDE node.
Select SalesOrder as the Event.
Click Next.
The Publish Wizard - Define Application View dialog box is displayed.

Click Import, and select Common View.
|
Note: If the application message structure is different from the Common View structure, select XML to load an Application-specific schema. |
In the Root Element field, enter the root element of the XML message, jdeResponse in this example.
Click Next.
Click New to create a mapping between the Common View and Application View. In this example, the Application and Common View have the same structure. All attributes can be mapped using the ObjectCopy Transformation.
Click OK.
Click Finish.
The Application definition for the Publishing Event is now complete.
Perform the following steps:
Start Oracle Application Server or ensure that the server is running.
Restart OC4J, if required, by executing the following command:
\OracleAS_home\opmn\bin\opmnctl  stopproc process-type=home
\OracleAS_home\opmn\bin\opmnctl  startproc process-type=home
Check the status of OC4J by executing the following command:
\OracleAS_home\opmn\bin\opmnctl status
In Application Explorer, expand the JDEdwards node.

Expand the Channels node.
Right-click the channel you wish to use, and select Start.
Invoke and implement the adapter by executing the following commands:
OracleAS_home\integration\interconnect\adapters\AQAPP\start.bat
OracleAS_home\integration\interconnect\adapters\JDEFL\start.bat
Triggering an Event in J.D. Edwards OneWorld
To trigger an event in J.D. Edwards OneWorld:
Log in to your J.D. Edwards OneWorld system.
In the Fast Path field of the J.D. Edwards OneWorld Explorer window, type G4211 and press Enter.
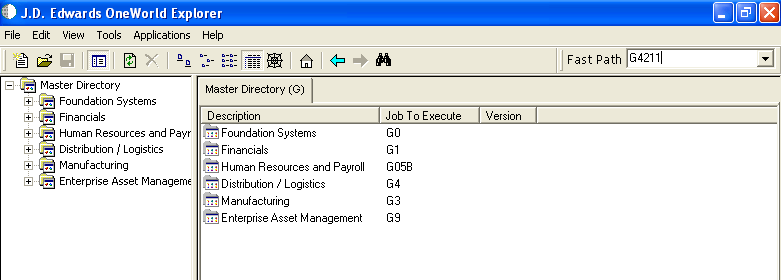
Right-click Sales Order Detail (P4210).

Select Prompt for > Values.
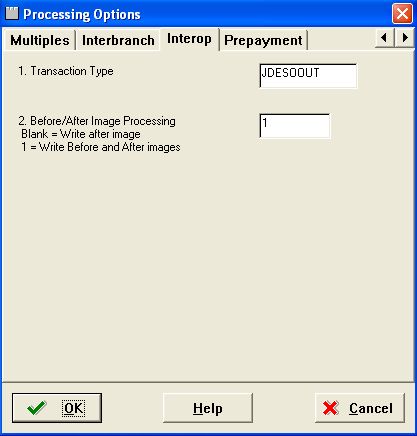
The Processing Options dialog box is displayed.
Perform the following steps:
Click the Interop tab.
In the Transaction Type field, type JDESOOUT.
Verify that the value in the Before/After Image Processing Blank field is 1.
Click OK.
The Sales Order Detail - (Customer Service Inquiry) window is displayed.
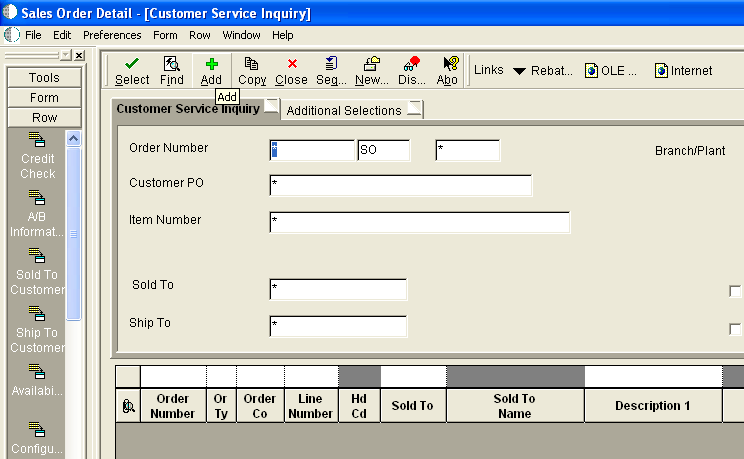
Click the Add icon (third icon from left).
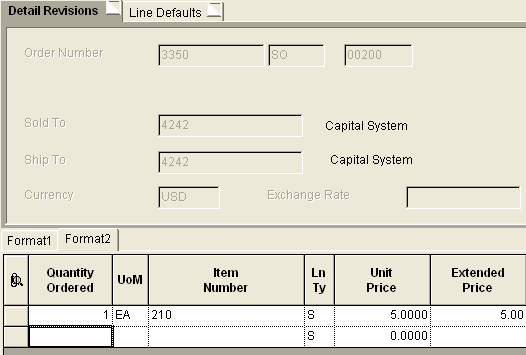
Enter the values as shown in the following screen.
To move to a different field, use the Tab key on your keyboard.

Enter a value for Quantity Ordered and Item Number.
For example:

Click the first field in the second row and allow a few seconds for processing.
Click OK.
The following topic describes how to verify event integration using the OracleAS Adapter for J.D. Edwards OneWorld.
Publishing Adapter (JDEFL) Log File
Tue Nov 16 18:42:05 GMT-05:00 2004: The message was sent to topic(s) {oai_hub_queue=[AQAPP, DBAPP]}. Processing Time = 25,796 ms.
<?xml version = '1.0' encoding = 'UTF-8'?>
<!DOCTYPE MSG>
<MSG>
  <H>
     <BO>JDE</BO>
     <EN>SalesOrder</EN>
     <EV>OAI/V1</EV>
     <MV>OAI/V1</MV>
     <T>0</T>
     <SN>JDEFL</SN>
     <SA>JDEFL</SA>
     <SAID>21</SAID>
     <CI>JDEFL1100648500828</CI>
  </H>
  <B>
    <AO N = "SalesOrder_CO">
      <AO N = "jdeResponse">
        <A N = "type">trans</A>
        <A N = "user">jde</A>
        <A N = "xmlns">urn:Schemas-jdedwards-com:trans.response.JDESOOUT</A>
        <A N = "session">212.1100644166.9</A>
        <A N = "environment">DV7333</A>
        <AO N = "transaction">
          <A N = "type">JDESOOUT</A>
          <A N = "action">transactionInfo</A>
          <AO N = "returnCode">
            <A N = "code">0</A>
            <A N = "PCDATA">XML Request OK</A>
          </AO>
          <AO N = "key">
            <AO N = "column">
              <A N = "name">EdiUserId</A>
              <A N = "PCDATA">JDE</A>
            </AO>
            <AO N = "column">
              <A N = "name">EdiBatchNumber</A>
              <A N = "PCDATA">13484</A>
            </AO>
            <AO N = "column">
              <A N = "name">EdiTransactNumber</A>
              <A N = "PCDATA">104336</A>
            </AO>
          </AO>
          <AO N = "table">
            <A N = "name">F4201Z1</A>
            <A N = "type">Header</A>
            <AO N = "column">
              <A N = "name">EdiUserId</A>
              <A N = "PCDATA">JDE</A>
            </AO>
            <AO N = "column">
              <A N = "name">EdiBatchNumber</A>
              <A N = "PCDATA">13484</A>
            </AO>
            <AO N = "column">
              <A N = "name">EdiTransactNumber</A>
              <A N = "PCDATA">104336</A>
            </AO>
            <AO N = "column">
              <A N = "name">EdiLineNumber</A>
              <A N = "PCDATA">1.000</A>
            </AO>
            <AO N = "column">
              <A N = "name">EdiDocumentType</A>
              <A N = "PCDATA">SO</A>
            </AO>
            <AO N = "column">
              <A N = "name">TypeTransaction</A>
              <A N = "PCDATA">JDESOOUT</A>
            </AO>
            <AO N = "column">
              <A N = "name">EdiTranslationFormat</A>
...
Tue Nov 16 18:42:33 GMT-05:00 2004: AQ Adapter: received the message from the Agent and will now write it to AQ.
Tue Nov 16 18:42:33 GMT-05:00 2004: AQ Adapter: created a writer for queue xml_raw_q1.
Tue Nov 16 18:42:34 GMT-05:00 2004: AQ Adapter: successfully converted the OAI message to XML
<?xml version = '1.0' encoding = 'UTF-8' standalone = 'yes'?>
<jdeResponse type="trans" user="jde" xmlns="urn:Schemas-jdedwards-com:trans.response.JDESOOUT" session="212.1100644166.9" environment="DV7333">
   <transaction type="JDESOOUT" action="transactionInfo">
      <returnCode code="0">XML Request OK</returnCode>
      <key>
         <column name="EdiUserId">JDE</column>
         <column name="EdiBatchNumber">13484</column>
         <column name="EdiTransactNumber">104336</column>
      </key>
      <table name="F4201Z1" type="Header">
         <column name="EdiUserId">JDE</column>
         <column name="EdiBatchNumber">13484</column>
         <column name="EdiTransactNumber">104336</column>
         <column name="EdiLineNumber">1.000</column>
         <column name="EdiDocumentType">SO</column>
         <column name="TypeTransaction">JDESOOUT</column>
         <column name="EdiTranslationFormat"></column>
         <column name="EdiTransmissionDate"></column>
         <column name="DirectionIndicator">2</column>
         <column name="EdiDetailLinesProcess">0</column>
         <column name="EdiSuccessfullyProcess">Y</column>
         <column name="TradingPartnerId"></column>
         <column name="TransactionAction">A</column>
         <column name="CompanyKeyOrderNo">00200</column>
         <column name="DocumentOrderInvoiceE">3146</column>
         <column name="OrderType">SO</column>
         <column name="OrderSuffix">000</column>
         <column name="CostCenter">         M30</column>
         <column name="Company">00200</column>
         <column name="CompanyKeyOriginal"></column>
         <column name="OriginalPoSoNumber"></column>
         <column name="OriginalOrderType"></column>
         <column name="CompanyKeyRelated"></column>
         <column name="RelatedPoSoNumber"></column>
         <column name="RelatedOrderType"></column>
         <column name="AddressNumber">4242</column>
         <column name="AddressNumberShipTo">4242</column>
        ...