|
Oracle® BPEL Process Manager Developer's Guide
10g Release 2 (10.1.2) B14448-02 |
|
 Previous |
 Next |
|
Oracle® BPEL Process Manager Developer's Guide
10g Release 2 (10.1.2) B14448-02 |
|
 Previous |
 Next |
This chapter provides an overview of key BPEL process deployment and domain management concepts. An overview of Oracle BPEL Console from which you can manage processes and domains is also provided. In addition, an overview of several build and command line tools is also provided.
This chapter contains the following topics:
|
See Also: The following documentation for tutorials in which you deploy BPEL processes: |
After you complete the design of your BPEL process, you compile and deploy the process to Oracle BPEL Server. If compilation and deployment are successful, you can run and manage the BPEL process from Oracle BPEL Console.
Deployment sends the Oracle BPEL Process Manager archive (a set of files in a JAR file with a directory structure similar to the project directory structure) to Oracle BPEL Server. The deployment operation automatically validates and compiles the project directory into the BPEL archive. Therefore, you do not need to explicitly validate, compile, and recompile a project before deployment. Use Oracle BPEL Console to view any currently running BPEL processes before compiling and deploying additional processes.
BPEL processes can be compiled and deployed in two types of BPEL designer environments:
To compile and deploy a BPEL process on JDeveloper BPEL Designer, right-click the BPEL project (for this example, named OrderBooking) and select Deploy in the Applications Navigator section:
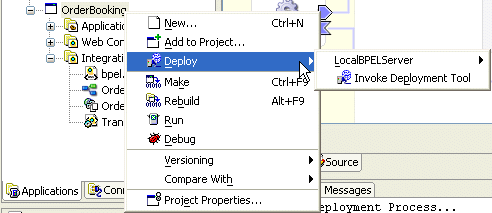
You have two deployment methods from which to choose:
You can deploy directly to the default domain or any other domain you have created by using the Oracle BPEL Server connection automatically created during Oracle BPEL Process Manager installation (named LocalBPELServer). You can create additional server connections by performing the following steps:
Select Connection Navigator from the View main menu in JDeveloper BPEL Designer.
Right-click BPEL Process Manager Server.
Select New BPEL Process Manager Connection.
This starts the BPEL Process Manager Connection wizard. After completion, this new connection appears when you right-click the process and select Deploy.
Domains enable you to partition and manage instances of your processes. A discussion on the importance of domains is provided later in this chapter.
If this is the first time you have deployed this BPEL process to Oracle BPEL Server, a default version label of 1.0 is automatically created. A version identifies a specific deployed instance of a BPEL process. The version label is appended to the end of the JAR file name created when you deploy the BPEL process.
If this label version is already deployed and the server mode is production, you are prompted to either overwrite the existing version or enter a different version label. If you overwrite the version, the old process definition on the server is replaced by the new definition. You cannot revert to the old definition. In addition, any process instances that ran under the old definition are marked as stale. The stale instances cannot be examined, and all flow and audit information is lost. If you enter a different version label for the new process definition (for example, 2.0), it is deployed to Oracle BPEL Server, while the older, deployed process definition (1.0) also continues to run simultaneously on Oracle BPEL Server. The instances that ran under the old definition are retained, and not marked as stale. You can still examine the flow and audit information for these instances.
If the server mode is development, you are not prompted and the version is automatically overwritten.
This is a key benefit of versioning. For example, you may have an older instance of a BPEL process running with one customer that is still valid. You then begin a partnership with a different customer that requires a slight modification to the design of this BPEL process. At some point you plan to migrate the old customer to the newer version of the BPEL process, but for now that is not necessary. Versioning enables you to run both processes.
If you want to use a more descriptive version name for a process, right-click the process again in the Applications Navigator and select Deploy, then connection_name, and then Deploy to default domain. Provide a more descriptive name when prompted in the Your Version field of the Deploy Properties window (for example, sales_div_1.0). You can then retire the other process version on Oracle BPEL Console.
If you select Invoke Deployment Tool, the Deploy Properties window opens. This window enables you to customize your settings by selecting a different or creating a new Oracle BPEL Console connection and deploying to domains other than default. If this process version is already deployed, you can also select to overwrite the existing version or enter a different version label to enable both to run simultaneously.
After you select a deployment method, the Log Window at the bottom of JDeveloper BPEL Designer displays messages about the status of the deployment. For example, the following message indicates that deployment was successful.

If deployment is unsuccessful, errors display in the Log Window. Click the error to display the line of code that caused deployment to fail.
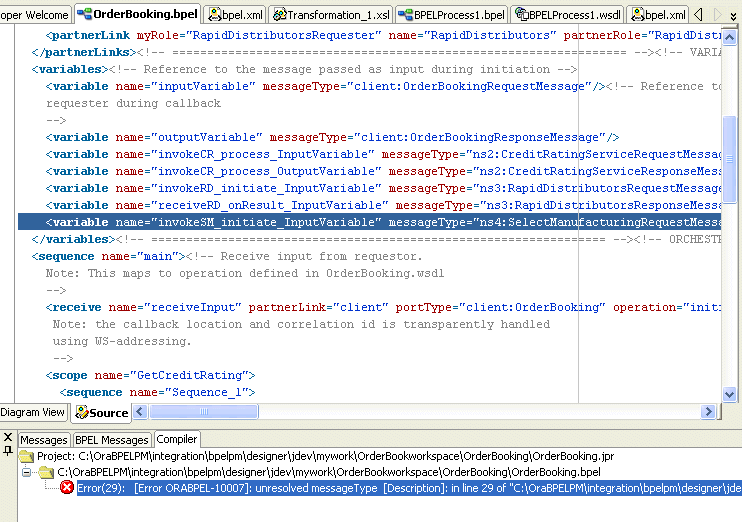
Make corrections and redeploy.
You can also compile without immediately deploying an Oracle BPEL Process Manager archive to Oracle BPEL Server. Perform this action by right-clicking the BPEL process and selecting Make or Rebuild. This places the Oracle BPEL Process Manager archive in the following directory:
Oracle_Home\integration\jdev\jdev\default\mywork\workspace_name\project_name\output
From this directory you can deploy the process in either of two ways:
Copy the archive to the appropriate domain directory (for this example, default)
Oracle_Home\integration\orabpel\domains\default\deploy
or
Log into Oracle BPEL Console using Internet Explorer 6.0 or Mozilla Firefox 1.0.4 by selecting Start, then All Programs, then Oracle - Oracle_Home, then Oracle BPEL Process Manager 10.1.2, and then BPEL Console.
Click BPEL Processes.
Click Deploy New Process in the Related Tasks section.
Click Browse to select the process, then click Open.
Click Deploy.
Click the Dashboard tab to view the newly deployed process.
To compile and deploy a BPEL process on Eclipse BPEL Designer, you click the Build BPEL Project icon in the tool bar:

If you want to change the domain to which to deploy the process or the version label of the process, you must edit properties in the project's build.xml file. In this example, the domain is named default and the label version is 1.0.
     Name of the domain the generated BPEL suitcase will be deployed to
 ~~~~~~~~~~~~~~~~~~~~~~~~~~~~~~~~~~~~~~~~~~~~~~~~~~~~~~~~~~~~~~~~~~~~~~ -->
<property name="deploy" value="default"/>
<!-- ~~~~~~~~~~~~~~~~~~~~~~~~~~~~~~~~~~~~~~~~~~~~~~~~~~~~~~~~~~~~~~~~~~~~~~
     What version number should be used to tag the generated BPEL archive?
     ~~~~~~~~~~~~~~~~~~~~~~~~~~~~~~~~~~~~~~~~~~~~~~~~~~~~~~~~~~~~~~~~~~~~~~ -->
    <property name="rev" value="1.0"/>
As with JDeveloper BPEL Designer, if you overwrite the version, the old version is made stale, and the new version is made active. You cannot revert to the stale definition. In addition, the stale version cannot be examined, and all flow and audit information is lost. If you enter a different version label in the build.xml file (for example, 2.0), it is deployed to Oracle BPEL Server, while the older, deployed version (1.0) continues to run simultaneously on Oracle BPEL Server.
After you deploy the BPEL process, the Log Window at the bottom of Eclipse BPEL Designer displays messages about the status of the deployment. For example, the following message indicates that deployment was successful.

If deployment is unsuccessful, errors display at the bottom of the window. Click the error next to the BUILD FAILED message to display the line of code that caused deployment to fail.
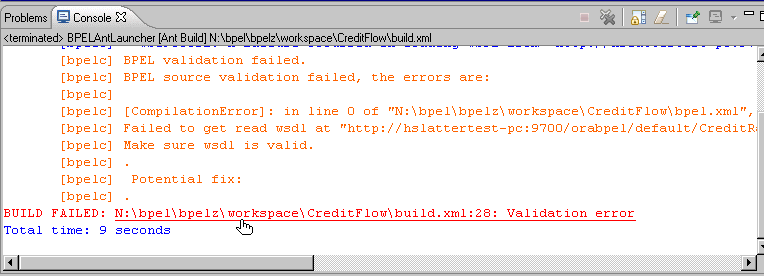
Make corrections and redeploy.
You may have noticed the words BPEL suitcase that appeared in the successful deployment Log Window messages shown for both JDeveloper BPEL Designer and Eclipse BPEL Designer.
During compilation and deployment, the BPEL process archive and its components are compiled and packaged into a JAR file known as a BPEL suitcase. This JAR file includes the following files:
project_name.bpel file implementation of the process
project_name.wsdl file
bpel.xml deployment descriptor file
Any other local resources that are required, such as XML schemas, Java classes or libraries, and so on
The suitcase JAR file is deployed to the following directory. Note that the directory named default in these directory paths refers to the domain in which you deployed the suitcase JAR file. If you deploy your BPEL process to a domain named qa, that name displays instead of default. The concepts of domains are described in later sections of this chapter.
On JDeveloper BPEL Designer
Oracle_Home\integration\orabpel\domains\default\deploy
On Eclipse BPEL Designer
c:\orabpel\domains\default\deploy
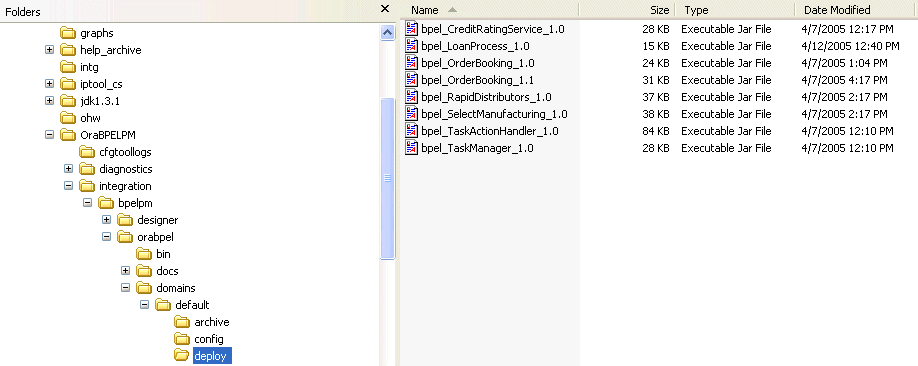
The suitcase JAR file name follows the convention of bpel_projectname_versionnumber.jar. For example:
bpel_LoanProcess_1.0.jar
Figure 19-1 shows an example of deployed suitcase JAR files in JDeveloper BPEL Designer. Note that different version labels of OrderBooking are deployed simultaneously.
Figure 19-1 Deployed BPEL Suitcase JAR Files
BPEL processes (specifically, the suitcase JAR file) are deployed to domains. A BPEL domain allows a developer or administrator to partition a single instance of Oracle BPEL Process Manager into multiple virtual BPEL sections. A BPEL domain is identified by an ID and protected by a password. When Oracle BPEL Process Manager is installed, an initial domain named default is created. The initial password of the default domain is set to bpel.
Here are some examples of how to use BPEL domains:
Partition a single Oracle BPEL Process Manager instance into a multideveloper environment. In this case, the domain ID typically identifies the developer owning that domain.
Partition a single Oracle BPEL Process Manager instance into both a development and QA environment. In this case, the domain IDs can be test and qa.
Partition a single Oracle BPEL Process Manager instance into an environment used by multiple departments or partners. In these cases, the domain IDs are the names of the departments or partners.
The following sections describe key BPEL domain issues:
A domain named default is automatically installed with Oracle BPEL Process Manager. The initial password for this domain is bpel. You can change this password.
Log in to Oracle BPEL Console using Internet Explorer 6.0 or Mozilla Firefox 1.0.4 by selecting Start, then All Programs, then Oracle - Oracle_Home, then Oracle BPEL Process Manager 10.1.2, and then BPEL Console.
Click Manage BPEL Domain at the top of the page.
Click Password.
Enter a new domain password and click Apply.
You create BPEL domains and configure Oracle BPEL Server properties from Oracle BPEL Admin Console. The initial password for Oracle BPEL Admin Console is listed in the Oracle Application Server Integration Installation Guide. You must change this password immediately after installation.
Follow these instructions to change Oracle BPEL Admin Console password.
Use Internet Explorer 6.0 or Mozilla Firefox 1.0.4 to access Oracle BPEL Admin Console:
http://locahost:9700/BPELAdmin
You can also access Oracle BPEL Admin Console by clicking Go to BPEL Admin at the bottom of the login page for Oracle BPEL Console.
Enter the default password.
Click the Password link in the upper left corner of the window.
Enter and re-enter the new administrator password.
Enter the existing administrator password.
Click Apply.
A message appears indicating that the password has been changed.
You can create additional domains by performing the following procedures.
Use Internet Explorer 6.0 or Mozilla Firefox 1.0.4 to access Oracle BPEL Admin Console:
http://locahost:9700/BPELAdmin
You can also access Oracle BPEL Admin Console by clicking Go to BPEL Admin at the bottom of the login page for Oracle BPEL Console.
Enter the password.
Click the BPEL Domains tab.
Click Create New BPEL Domain.
The Create New BPEL Domain window appears.
Follow the on-screen instructions to create a new domain with an ID and a password. When you log in to Oracle BPEL Console, you can select this domain.
Stop and restart Oracle BPEL Server before deploying a BPEL process.
Return to the Applications Navigator.
Right-click a process.
Select Deploy, and then connection_name (for example, LocalBPELServer), and then Refresh.
Right-click the process again.
Select Deploy, and then connection_name (for example, LocalBPELServer).
The new domain is now available for selection.
Oracle BPEL Server is automatically installed in production mode. If you attempt to deploy a process in production mode and a label version of that process is already deployed, you are prompted to either overwrite the existing version or enter a different version label.
Follow these instructions to see the current mode of your server in JDeveloper BPEL Designer.
Right-click the BPEL process in the Applications Navigator.
Select Deploy, and then Invoke Deployment Tool.
The Server Mode field of the Deploy Properties window displays the mode.
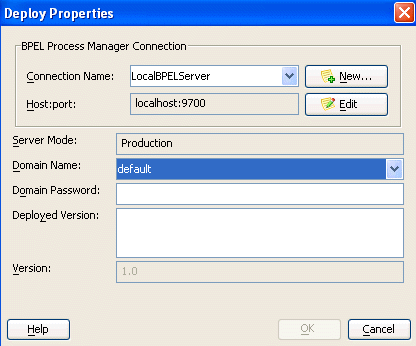
You can change this mode to development. When you attempt to deploy a process in development mode and a label version of that process is already deployed, it is automatically overwritten and you are not prompted to make a decision.
Follow these instructions to see the current mode of your server in JDeveloper BPEL Designer.
Use Internet Explorer 6.0 or Mozilla Firefox 1.0.4 to access Oracle BPEL Admin Console:
http://locahost:9700/BPELAdmin
You can also access Oracle BPEL Admin Console by clicking Go to BPEL Admin at the bottom of the login page for Oracle BPEL Console.
Enter the password.
Change the productionServer property value to false.
Click Apply.
Return to the Deploy Properties window. The Server Mode field now displays as Development.
In addition to the domain deployment methods described in "Compiling and Deploying a BPEL Process", there are other methods for deploying a BPEL suitcase into a domain:
If the domain is local, configure the deploy option of the bpelc Ant task to perform local deployment to a specific domain. The following example shows an Ant build script deploying the BPEL suitcase to a domain named qa:
<?xml version="1.0"?>
<project name="LoanFlow" default="main" basedir=".">
<property name="deploy" value="qa"/>
<property name="rev" value="1.0"/>
<target name="main">
<bpelc orabpelhome="${orabpelHome}" rev="${rev}" deploy="${deploy}"/>
</target>
</project>
If the domain is not local to the environment in which to compile the BPEL suitcase, use the Deploy New Process link under the Dashboard tab in Oracle BPEL Console to remotely upload and deploy a BPEL JAR. Links to this task are located in the bottom-left portion of the Dashboard tab and bottom-left portion of the BPEL Processes tab. You can simply run the bpelc task without the deploy option to create the BPEL suitcase JAR in the current directory. If you have already deployed the BPEL suitcase locally, you can upload it from your local deployment directory. See "Location of BPEL JAR Suitcase Files in a Specific Domain" for more information on where deployed BPEL suitcases can be found.
Deploying a BPEL process is equivalent to copying the BPEL suitcase JAR file into the deploy directory of the appropriate BPEL domain. Even if you are accessing the domain remotely, all you need is disk sharing, FTP, secure copy (SCP), or some other access to the server hosting the domain. You can add this to your Ant build.xml script to remove the deploy option as described above and then add your own task to perform the remote copy of the generated JAR file into the appropriate location.
For a domain named qa and a default Oracle BPEL Process Manager installation into the C:\ directory on Windows, BPEL JAR files for the qa domain reside in the following directories:
On JDeveloper BPEL Designer
Oracle_Home\integration\orabpel\domains\qa\deploy
On Eclipse BPEL Designer
Orabpel\domains\qa\deploy
If you use the bpelc task with a deploy property value of qa, the BPEL suitcase JAR file is automatically copied to this directory. If you want to manually or remotely deploy a BPEL JAR suitcase file to a BPEL domain, you can also copy the JAR file into that directory. The file is automatically detected and loaded into that domain by the Oracle BPEL Process Manager.
Oracle BPEL Console enables you to manage the life cycle and state of a deployed BPEL process. Select the name of the BPEL process on the Dashboard tab and then select the Manage tab on the left. On this page you can first retire and then undeploy the selected BPEL process. Retiring a process prevents any new instances of that process from being created. If a specific version of a BPEL process is undeployed before all pending in-flight instances are completed, those instances are marked as stale and their execution is cancelled. Note that every task that can be performed in Oracle BPEL Console can also be performed programmatically.
If compilation and deployment are successful, you can run and manage the BPEL process from Oracle BPEL Console. This section provides an overview of the main pages of Oracle BPEL Console.
Log into Oracle BPEL Console using Internet Explorer 6.0 or Mozilla Firefox 1.0.4 by selecting Start, then All Programs, then Oracle - Oracle_Home, then Oracle BPEL Process Manager 10.1.2, and then BPEL Console.
Select the domain and enter the password. If this is the default domain, the password is initially set to bpel.
See the following sections for an overview of Oracle BPEL Console:
The Dashboard tab displays by default. This page displays the currently deployed BPEL processes and instances of BPEL processes that are currently running (in-flight) and that have recently completed. Click a deployed BPEL process in the Name column to access a page for creating an instance and testing your process. Use Oracle BPEL Console to view any currently running BPEL processes before compiling and deploying additional processes. The asterisk indicates that OrderBooking version 1.0 is the default process. Default processes are described later in this chapter.
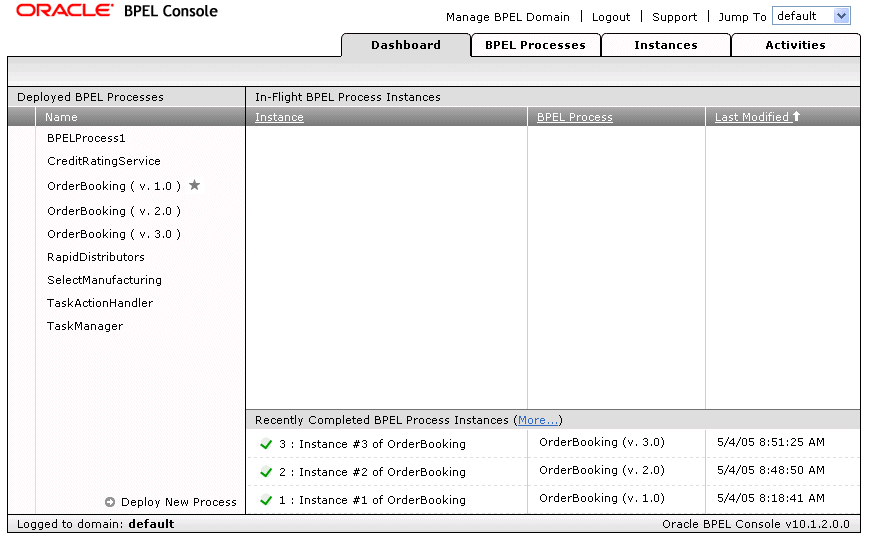
Note that each Oracle BPEL Console page includes links at the top for managing BPEL domains and accessing the BPEL site on the Oracle Technology Network, and a drop-down list for switching to another domain.
Click the BPEL Processes tab to view BPEL process life cycles and states. Note that different version labels of OrderBooking are currently active. A process identified with an asterisk (for this example, OrderBooking version 1.0) is the default process).
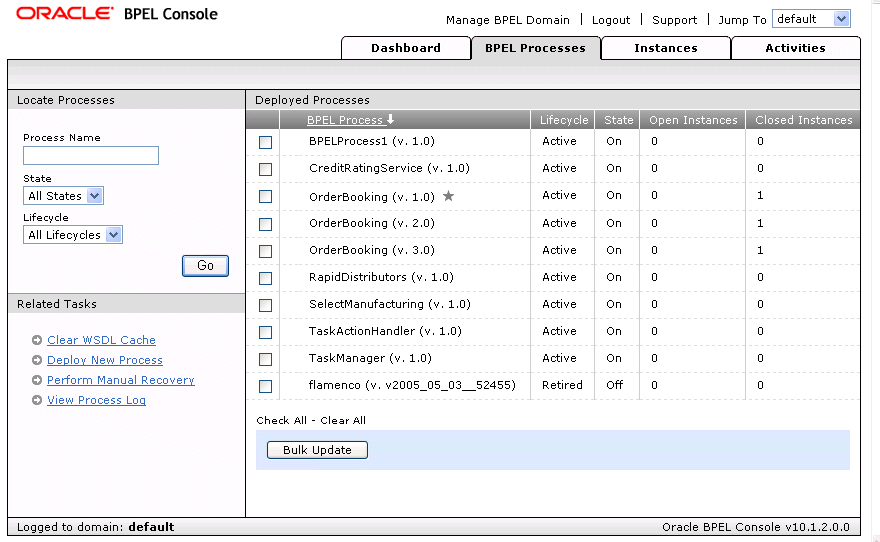
For each BPEL process, Oracle BPEL Console shows the following status indicators:
Life cycle
A process life cycle can be active or retired. If the process life cycle is retired, you cannot create a new instance.
State
A process state can be on or off. If the process state is off, you cannot access instances or create new ones.
Open Instances
The number of open instances. An open instance is an instance that is currently being processed.
Completed Instances
The number of completed instances. A completed instance is an instance that has completed processing, either successfully or due to an error.
Click a specific process in the BPEL Process list.
This window enables you to manage the life cycle and state of the BPEL process.
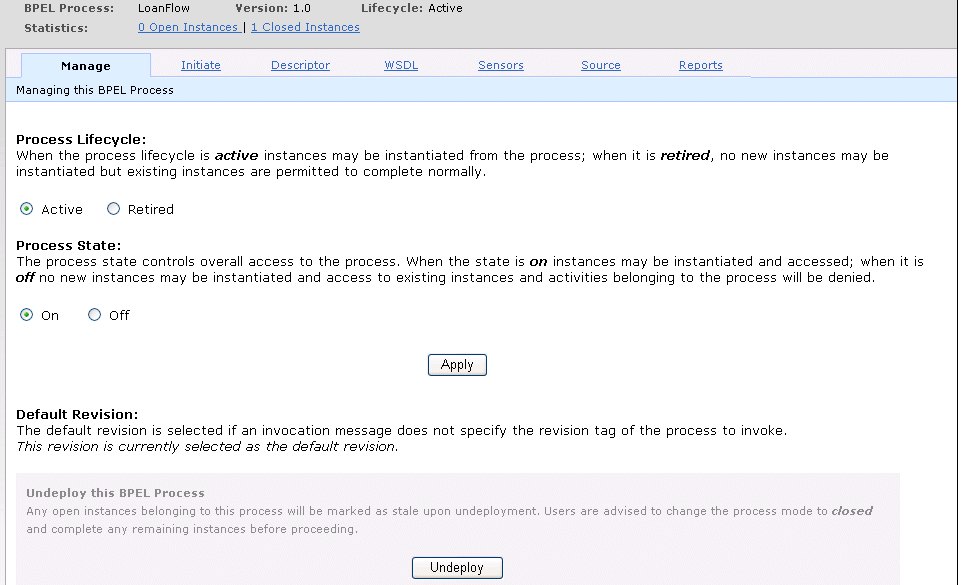
Perform the following process management tasks from this window:
Manage the process life cycle (either Active or Retired)
Manage the process state (either On or Off)
Explicitly change the default process
Undeploy the process
Ensure that you understand the following process life cycle and state concepts:
In a development environment, Oracle recommends that you always deploy processes to the same version on Oracle BPEL Server. This way, you do not need to be concerned about marking processes explicitly as default. The life cycle to follow for this environment is as follows:
Design your process.
Deploy the process to Oracle BPEL Server (version is 1.0). This becomes the default process for any new instances.
Redesign the process as needed.
Redeploy the process as version 1.0 (this is a newer version that overwrites the older version, but version 1.0 remains the default process).
In a production environment, Oracle recommends that you increment version numbers as you deploy newer versions. For example, if OrderBooking version 1.0 is running in a production environment, then deploy the newer version of OrderBooking to version 2.0. It is your decision as to when to mark a process as default; new instances are started using this definition. When you are certain that you have adequately tested and verified your process, select Mark as Default on the Manage window shown in Step 2. All version 1.0 instances switch seamlessly to version 2.0. This enables you to decide when a process is ready for production mode. The life cycle to follow for this scenario is as follows:
Design your process.
Deploy the process to Oracle BPEL Server with a different version number (for example, use version 2.0 if the older default version is 1.0).
Test version 2.0 of the process.
Activate version 2.0 by marking it as the default process.
This section provides a brief example of the various life cycle states of two process versions. In the first stage, two versions of the same processes are created, as shown in Table 19-1. OrderBooking version 1.0 receives two messages, which results in the creation of two instances.
Table 19-1 Stage 1: Two Process Versions Created
| Stage | Action | Life Cycle | State | Default Process | On Arrival of New Message Request |
|---|---|---|---|---|---|
|
1 |
Deploy OrderBooking version 1.0 |
Active=1.0 |
On=1.0 |
Version 1.0 (automatically set) |
Create an instance for OrderBooking version 1.0 |
|
1 |
Deploy OrderBooking version 2.0 |
Active=2.0 |
On=2.0 |
Version 1.0 |
Create another instance for OrderBooking version 1.0 |
The life cycle and state of the two OrderBooking versions displays in the BPEL Processes tab shown in Figure 19-2. Because OrderBooking version 1.0 was the first deployed version of this process, it automatically became the default process (indicated by the asterisk). The two messages that resulted in the creation of two OrderBooking version 1.0 instances have both completed.
The two completed instances of OrderBooking version 1.0 display in the Instances tab shown in Figure 19-3.
In stage 2, you change OrderBooking version 2.0 to be the default and retire OrderBooking version 1.0, as shown in Table 19-2.
Table 19-2 Stage 2 Change the Default Process and Retire a Process
| Stage | Action | Life Cycle | State | Default Process | On Arrival of New Message Request |
|---|---|---|---|---|---|
|
1 |
Deploy OrderBooking version 1.0 |
Active=1.0 |
On=1.0 |
Version 1.0 (automatically set) |
Create an instance for OrderBooking version 1.0 |
|
1 |
Deploy OrderBooking version 2.0 |
Active=2.0 |
On=2.0 |
Version 1.0 |
Create another instance for OrderBooking version 1.0 |
|
2 |
Change default process to OrderBooking version 2.0 |
Active=1.0 |
On=1.0 |
Version 2.0 |
Create an instance for OrderBooking version 2.0 |
|
2 |
Retire OrderBooking version 1.0 |
Retired=2.0 |
On=2.0 |
Version 2.0 |
No action |
Figure 19-4 shows Mark as Default being selected for OrderBooking version 2.0.
The modified life cycle and state of the two OrderBooking versions displays in the BPEL Processes tab shown in Figure 19-5. Because OrderBooking version 2.0 was explicitly selected as the default process, it now displays the asterisk. The message that resulted in the creation of an OrderBooking version 1.0 instance has completed. OrderBooking version 1.0 displays as Retired.
The completed instance of OrderBooking version 2.0 displays in the Instances tab shown in Figure 19-6.
If you click the Dashboard tab, the retired OrderBooking version 1.0 no longer appears. This means you can no longer create an instance for this version.
In stage 3, you make OrderBooking version 1.0 inactive and then undeploy it, as shown in Table 19-3.
Table 19-3 Stage 3 Deactivate and Undeploy a Process
| Stage | Action | Life Cycle | State | Default Process | On Arrival of New Message Request |
|---|---|---|---|---|---|
|
1 |
Deploy OrderBooking version 1.0 |
Active=1.0 |
On=1.0 |
Version 1.0 (automatically set) |
Create an instance for OrderBooking version 1.0 |
|
1 |
Deploy OrderBooking version 2.0 |
Active=2.0 |
On=2.0 |
Version 1.0 |
Create another instance for OrderBooking version 1.0 |
|
2 |
Change default process to OrderBooking version 2.0 |
Active=1.0 |
On=1.0 |
Version 2.0 |
Create an instance for OrderBooking version 2.0 |
|
2 |
Retire OrderBooking version 1.0 |
Retired=2.0 |
On=2.0 |
Version 2.0 |
No action |
|
3 |
Make OrderBooking version 1.0 inactive |
Retired=2.0 |
Off=2.0 |
Version 2.0 |
No action |
|
3 |
Undeploy OrderBooking version 1.0 |
Retired=2.0 |
Off=2.0 |
Version 2.0 |
No action |
The state of OrderBooking version 1.0 is changed to Off.
The state of OrderBooking version 1.0 displays as Off in the BPEL Processes tab shown in Figure 19-8. Because you initially retired this process, any live instances had already completed normally. If you had instead made this version inactive before retiring it, any live instances would have faulted and been aborted.
OrderBooking version 1.0 is then undeployed, as shown in Figure 19-9.
The BPEL Processes tab in Figure 19-10 no longer displays OrderBooking version 1.0. Note also that the asterisk no longer displays for OrderBooking version 2.0. However, this version is still the default. If you click this instance in the BPEL Process list, you see that no Mark as Default button displays in the Manage window. This indicates that this is the default process. If you deploy an OrderBooking version 3.0, the asterisk again appears next to OrderBooking version 2.0.
The two completed instances of the undeployed OrderBooking version 1.0 display as disabled in the Instances tab shown in Figure 19-11.
Figure 19-11 Stage 3 Instance of Undeployed Process

Clicking one of the completed instances displays the status as Stale in Figure 19-12.
Figure 19-12 Stage 3 Status Message of Undeployed Process

Click the Instances tab to view BPEL process instances.
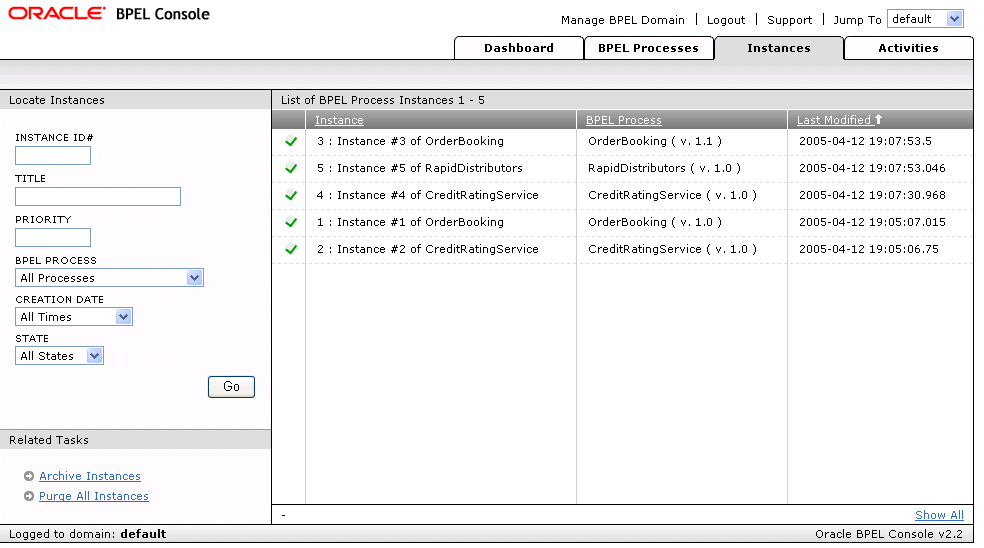
Click an instance in the Instance column (for example, Instance #3 of OrderBooking). From this page, you can perform the following tasks:
View the state of the instance (for example, COMPLETED or ACTIVE)
Click Flow to view a visual representation of the history of the activities in this instance.
Click Debug to view the code of the BPEL file.
Click Interactions to view details about the activities in this instance.
Click Sensor Values to view the results of any activity, fault, or variable sensors you created in this instance.
|
See Also: The following documentation for additional details about sensors: |
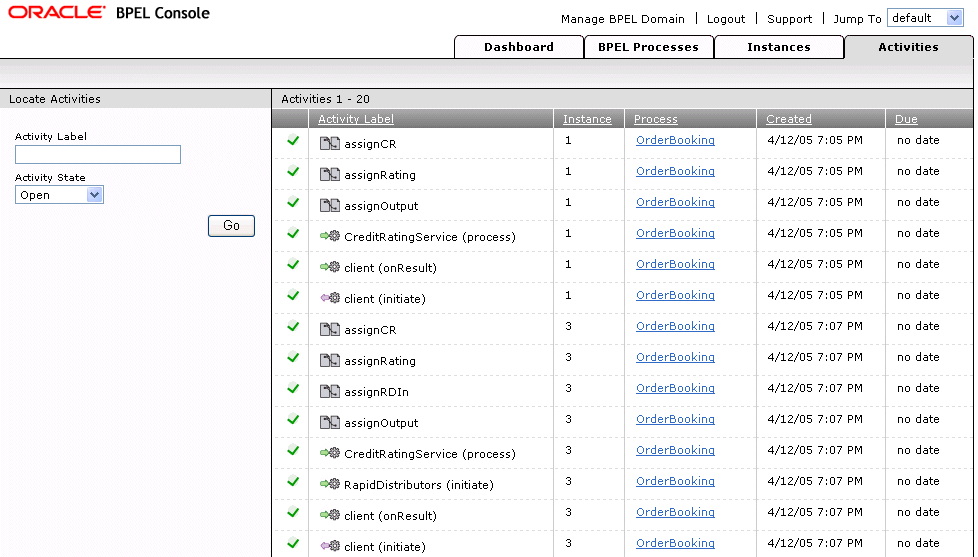
Click the Activities tab to view the status of activities in the deployed BPEL process instance.
|
See Also: The following documentation for tutorials in which you run processes from Oracle BPEL Console and view their results from the Audit and Flow links: |
When you deploy a BPEL process, several build and compiler command line tools are automatically invoked. This section provides an overview of these tools, plus an additional command line tool for generating XML facades:
Apache Ant is a Java-based build tool used by Oracle BPEL Process Manager for compiling and deploying the BPEL process. Ant is similar to a make file. However, instead of being extended with operating system-dependent, shell-based commands, Ant is extended using Java classes. The configuration files are XML-based and call out a target tree where various tasks are executed.
|
See Also: http://ant.apache.org/
|
bpelc (or bpelc.sh for UNIX operating systems) is the Oracle BPEL Process Manager tool that compiles and deploys BPEL processes. For example, when you compile and deploy a BPEL process, you see bpelc being invoked as a task inside the Apache Ant build.xml file in the Log Window of Eclipse BPEL Designer.
Table 19-4 shows the supported bpelc options:
Table 19-4 Parameters
| Attribute | Description | Required |
|---|---|---|
|
|
The |
No |
|
|
The deployment descriptor location path, By default, it looks for |
No |
|
|
The revision (version) tag for the deployed process. |
No |
|
|
Deploys the BPEL process archive to the specified domain in the local Oracle home. The domain must be accessible through the file system for this option to work. |
No |
|
|
Includes the BPEL process Java classes in the generated BPEL archive. The value defaults to |
No |
|
|
Generates additional debugging messages about compiler actions. The value defaults to |
No |
|
|
Always compiles the process; the compiler does not check the time stamp of |
No |
|
|
Specifies where to find user class files. This attribute is similar to a |
No |
|
|
Oracle BPEL Process Manager system |
No |
|
|
Displays the help message. This value defaults to |
No |
|
|
Specifies the location in which to deploy the BPEL archive. This option is used when the
|
No |
The following Ant task compiles and generates a BPEL archive file in the current directory using the default bpel.xml deployment descriptor.
Use the following bpelc task sample to deploy a BPEL archive into the default domain deploy directory:
<bpelc home="${home}" rev="${rev}" deploy="default"/>
To deploy the BPEL archive into the c:\myproject directory:
<bpelc home="${home}" rev="${rev}" out="C:\myproject"/>
Specify a deployment descriptor file name:
<bpelc home="${home}" rev="${rev}" deploy="default" input="orderdd.xml"/>
Specify a user classpath for bpelc:
<bpelc home="${home}" rev="${rev}" deploy="default"/>
<classpath>
<pathelement location="dist/test.jar"/>
<pathelement path="${java.class.path}"/>
</classpath>
</bpelc>
schemac (or schemac.sh for UNIX operating systems) is a schema compiler utility provided with Oracle BPEL Process Manager. You use this utility to generate XML facades. XML facades are a set of Java interfaces and classes through which you can access and modify BPEL (and other XML) variables and map individual XML values to Java variables with get and set methods. Classes are generated only for the complexTypes schema types and element with an anonymous complexType. This is similar to the jaxb compiler.
You can invoke schemac from the operating system command prompt to perform specific tasks. schemac command line syntax uses the following format.
schemac optionsfilename|classname(s)
where filename is the name of a file ending with .xsd and containing a valid XML schema definition and classname is the name of a valid Java class (without the .java suffix). Only use this argument when the -R option is supplied.
Table 19-5 describes the supported options:
Table 19-5 Parameters
| Attribute | Description | Required |
|---|---|---|
|
|
The XML schema is the name of a file (ending with |
Yes |
|
|
Specify where to place generated facade class files. This value defaults to the current directory. |
No |
|
|
Generates Javadoc for the generated classes and redirects it to the specified location. |
No |
|
|
Archives the generated classes into the specified JAR file name. |
No |
|
|
Generates more debugging messages about the compiler actions. Defaults to |
No |
|
|
Generates only the Java source files and does not compile the generated sources when set to |
No |
|
|
Displays the help message. This value defaults to |
No |
|
|
Specifies the location in which to redirect the generated Java files. For example:
|
No |
|
|
To override the default Java package name, specify the namespace to the Java package mapping file. For example:
The content of
Note: If it is a name-value property file, you must escape the colon ( |
No |
Generate the facade classes from an XSD and place them under the current directory:
<schemac input="${basedir}/Order.xsd "/>
Generate the facade classes from a WSDL schema file:
<schemac input="${basedir}/PurchaseOrder.wsdl "/>
Generate the Javadoc into the c:\myjavadoc directory:
<schemac input="${basedir}/Order.xsd" doc="c:\myjavadoc"/>
Archive the generated facade classes into a .jar file:
<schemac input="${basedir}/XPath.wsdl" jar="myorderfacade.jar"/>
Redirect the generated facade classes into a specific directory:
<schemac input="${basedir}/Order.xsd " out="${basedir}/BPEL-INF/classes"/>
Specify the namespace Java package mapping file to override the default behavior:
<schemac input="${basedir}/Order.xsd " out="${basedir}/BPEL-INF/classes"
 nsMap="mynsmap.txt"/>
|
See Also:
|
This chapter describes how to compile and deploy BPEL processes. It describes key features of BPEL suitcase JAR files. It also describes how to create and manage BPEL domains, including changing domain and BPEL Admin Console passwords, creating domains, changing Oracle BPEL Server modes (production or development), managing BPEL suitcase JAR files, and undeploying processes. An overview of Oracle BPEL Console is also provided, including a detailed description of managing different versions of BPEL processes. Finally, a discussion on how to use the Apache Ant, bpelc, and schemac build tools is provided.