|
Oracle® BPEL Process Manager Developer's Guide
10g Release 2 (10.1.2) B14448-02 |
|
 Previous |
 Next |
|
Oracle® BPEL Process Manager Developer's Guide
10g Release 2 (10.1.2) B14448-02 |
|
 Previous |
 Next |
A company's business processes drive the integration of systems and people that participate in it. The business process and associated systems have a life cycle and certain behavior. The users who participate in the business process have roles and privileges to perform tasks in the business process. Using the workflow services of Oracle BPEL Process Manager, you can blend the integration of systems and services with human workflow into a single end-to-end process flow, while providing visibility and enabling exception handling and optimization at various levels.
This chapter contains the following topics:
|
See Also: Appendix F, "Demo User Community" for the organizational hierarchy of the demonstration user community used in examples throughout this chapter |
Workflow services enable you to interleave human interactions with connectivity to systems and services within an end-to-end process flow. As shown in Figure 16-1, workflow services are linked to a BPEL process through a WSDL contract, like any other Web service. The process assigns a task to a user or role and waits for a response. The users act on the task using Oracle BPEL Worklist Application (Worklist Application).
Figure 16-1 High-Level View of Workflow Services in Oracle BPEL Process Manager

Terms used in workflow services include:
Notification—an e-mail, voice, fax, pager, or short message service (SMS) message that is sent when a user is assigned a task or informed that the status of the task has changed
Worklist—an enumeration of the tasks, or work items, assigned to or of interest to a user
Features of workflow services include:
Task assignment and routing—includes creating tasks from the business process and assigning the tasks to users or roles. Other task assignment and routing features include:
Multiple workflow patterns—includes standard patterns such as simple approval, sequential approval, parallel approval, and so on. Variations on workflow patterns such as automatic escalation, renewal, and reminders are also supported. You can also mix and match patterns to create complex patterns.
Identity service—interacts with back-end identity management systems to capture all user information from Java AuthoriZatioN (JAZN) and LDAP. Identity services provide role-based access control; you can assign permissions to roles and link an organizational hierarchy to a role model for authorization. You can also do the following:
Assign worklist privileges to users, roles, or groups
Maintain user properties such as name, location, phone, fax, and e-mail.
Capture organizational hierarchy (reporting structure) and group information
Integrate with standard (for example, LDAP-based) directory services for user and role provisioning
Notification service—notifies users of assigned tasks and task changes using various delivery channels, such as e-mail, voice message, fax, pager, or SMS. With notification service, you can also do the following:
Customize the notification content for different types of tasks
Perform actions on tasks using e-mail
The Worklist Application—enables you to access tasks and act on them. The Worklist Application can be extended or customized based on the application. With the Worklist Application, you can do the following:
View tasks assigned to a user or role
Perform authorized actions on tasks in the worklist
Filter tasks based on various criteria
Acquire and check out shared tasks
The functionality of workflow services can be illustrated using a simple procurement business process, as shown in Figure 16-2. The business process receives a purchase list of items from an employee and invokes the approved vendor's pricing service to determine the total cost to purchase those items. Then a task is assigned to the employee's manager. The manager reviews the total purchase cost and approves or rejects the request. The activities related to task assignment and getting the outcome of the task are performed within a scope to separate human workflow from the automated workflow. If the request is approved, then the vendor's order service is invoked to place the order for the requested items. The employee is notified whether the request is approved (with the order confirmation number received from the order service) or rejected. This requires a directory service lookup to determine user information. When the task is assigned to the manager, the manager may need to be notified that a task is waiting for approval. This requires the invocation of a notification service. The manager uses the Worklist Application to determine the details of the task (what approval is being requested and the amount requested) and then approves it.
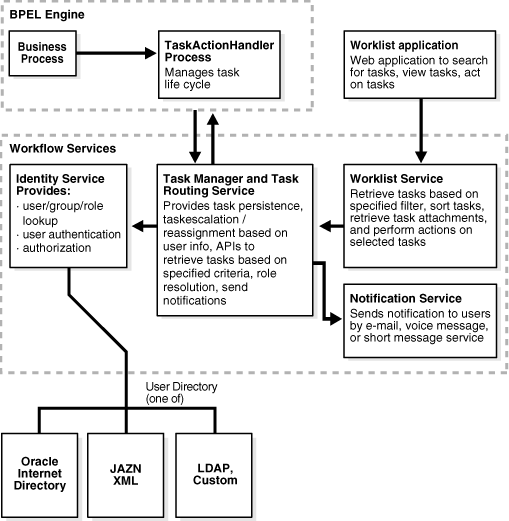
Figure 16-3 shows the following workflow services components:
All workflow business processes use the services of a business process called TaskActionHandler to put items on a user's worklist and get responses from users. This process also maintains the timer events like task expiration, task reminder, and so on. This business process is predeployed in Oracle BPEL Server. See Appendix B, "Workflow and Notification Reference" for more information.
This task service provides task state management and persistence of tasks. In addition to these services, the task service exposes operations to update a task, complete a task, escalate/reassign tasks, and so on. The task service is used by the Worklist Application to retrieve tasks assigned to users. This service also determines if notifications are to be sent to users and groups when the state of the task changes. Task service consists of the following services.
See Appendix B, "Workflow and Notification Reference" for more information.
The TaskRoutingService offers services to route, escalate, and reassign the task. See Appendix B, "Workflow and Notification Reference" for more information.
Identity service is a thin Web service layer on top of the Oracle Application Server 10g security infrastructure or any custom user repository. It enables authentication and authorization of users and the lookup of user properties, roles, group memberships and privileges. See "Identity Service" for more information.
The Worklist Application is a sample Web-based application that provides the ability to retrieve tasks based on a variety of filter criteria and to perform task actions on the selected tasks. See Chapter 17, "Worklist Application" for more information.
Notification service delivers notifications with the specified content to the specified user to any of the following channels: e-mail, telephone voice message, pager, fax, and SMS. See Chapter 15, "Oracle BPEL Process Manager Notification Service" for more information.
Figure 16-4 shows the interactions between the services and the business process.
Figure 16-4 Workflow Services and Business Process Interactions
Using workflow services is demonstrated in the VacationRequest, LoanDemoPlusWithWorkflow, DocumentReview, and HelpDeskServiceRequest demos.
|
See: Oracle_Home\integration\orabpel\samples\demos
|
The following sections describe multiple use cases for workflow services.
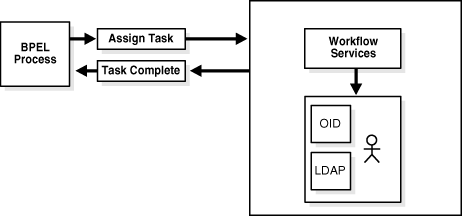
A vacation request process may start with getting the vacation details from a user and then routing the request to their manager for approval. User details and the organizational hierarchy can be looked up from a user directory or store. This scenario, shown in Figure 16-5, is described in the VacationRequest sample.
Figure 16-5 Assigning Tasks to a User or Role from a Directory
A task may be routed through multiple users through a sequential flow, a parallel flow, or an adhoc flow. For example, consider a loan request that is part of the loan approval flow. The loan request may first be assigned to a loan agent role. After a specific loan agent acquires and accepts the loan, the loan may be routed further through multiple levels of management if the loan amount is greater that $100,000. This scenario, shown in Figure 16-6, is described in the LoanDemoPlusWithWorkflow sample.
Figure 16-6 Flow Patterns and Routing Policies
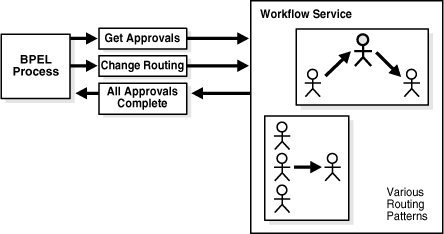
See "Workflow Patterns" for the various flow patterns supported by workflow services. You can use these patterns as building blocks to create complex workflows.
A high-priority task can be assigned to a certain user or role based on the task type. However, if the user does not act on it in a certain time, the task may expire and in turn be escalated to the manager for further action. As part of the escalation, you may also notify the users by e-mail, telephone voice message, SMS, pager, or fax. Similarly, a manager may delegate tasks from one reportee to another to balance the load between various task assignees. All tasks defined in BPEL have an associated expiration date. Additionally, you may specify escalation or renewal policies, as shown in Figure 16-7. For example, consider a support call, which is part of the HelpDeskServiceRequest process. A high-priority task may be assigned to a certain user and if the user does not respond in 2 days, then the task is routed to the manager for further action.
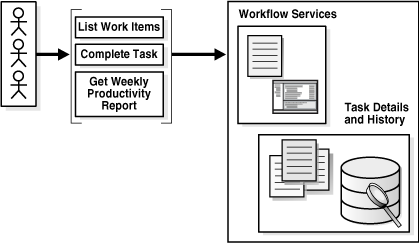
Users typically access tasks assigned to them by using the Worklist Application, as shown in Figure 16-8. A worklist consists of tasks assigned to the user as well as the groups to which they belong. A task may also include forms and attachments in addition to other task details such as history, comments, and approval sequence. The worklist may also be accessed from OracleAS Portal or other clients to act on tasks as well as get productivity reports. The Worklist Application can be customized and extended based on the specific needs of an application. See Chapter 17, "Worklist Application" for details about worklist functionality and the sample Worklist Application.
Figure 16-8 Oracle BPEL Worklist Application—Access Tasks, Forms, Attachments, and Reports
Oracle BPEL Process Manager provides a library of workflow patterns. You can choose a pattern that meets your business requirement and model your workflow based on the pattern. Oracle BPEL Process Manager supports the following patterns:
Simple workflow (single-user task)—used for a business process that requires a user's action (or inaction if the user does not act on the task within the allotted time). Based on the user's action or inaction, the business process modeler defines what the business process does. See "Simple Workflow" for more information.
Simple workflow with escalation (extension of a single-user task)—used to escalate the task, to the user's manager for example, if the user does not respond within the allotted time. See "Simple Workflow with Automatic Escalation" for more information.
Simple workflow with renewal (extension of a single-user task)—used to extend the expiration period if the user does not respond within the allotted time. The business process modeler specifies how many times the task can be renewed before it expires. See "Simple Workflow with Automatic Renewal" for more information.
Sequential workflow—used to route tasks to multiple users in a sequence. The business process modeler specifies the participants for the task as a list or a management chain. See "Sequential Workflow" for more information.
Sequential workflow with escalation (extension of a sequential workflow)—used to escalate the task if a user does not take action within the allotted time. See "Sequential Workflow with Escalation" for more information.
Parallel workflow—used when multiple users, working in parallel, must take action, such as in a hiring situation when multiple users vote to hire or reject an applicant. The business process modeler specifies the voting percentage that is needed for the outcome to take effect, for example, a majority vote or a unanimous vote. See "Parallel Workflow" for more information.
Parallel workflow with final reviewer (extension of parallel workflow)—used when a task is first sent to multiple users in parallel and then sent to a final reviewer for a decision. See "Parallel Workflow with Final Reviewer" for more information.
Adhoc (or dynamic) workflow—used to assign a task to one user first, who then decides where the task goes next. The task is routed until one of the assignees completes it and does not route it further. See "Adhoc Workflow" for more information.
FYI task—used when a task is sent to a user, but the business process does not wait for a user response; it just continues. See "FYI Tasks" for more information.
User Task 2.0 Macro—supports user tasks from Oracle BPEL Process Manager release 2.0. This user task requires the business process modeler to explicitly assign task properties and also requires a custom application to view and act on tasks. The User Task 2.0 Macro is available for backward compatibility and is replaced with the new workflow services and patterns in this release. See "The User Task 2.0 Macro" for more information.
Task continuation—used to build complex workflow patterns using the task continuation (extension) concept. Task continuation allows one workflow to be continued with another workflow, thus creating a mix of the previously described patterns to create complex workflows. See "Task Continuations" for more information.
Using the JDeveloper BPEL Designer component of Oracle BPEL Process Manager, you can model workflow by specifying parameters and answering questions posed by the Workflow wizard.
Modeling a workflow is a five-step process:
Specify the workflow pattern.
Specify task details and configurations.
Add the task title, payload, expiration parameter, outcomes, and so on.
Specify the assignment policy.
Assign the task to the user, role, or group, and indicate whether it is a static or dynamic assignment.
See "Task Assignment" for more information.
Specify the pattern-specific policies.
Each pattern defines policies specific to the pattern. For example, sequential workflow requires routing rules, which may be based on management levels, titles, and the outcomes that cause a task to be routed further.
Specify task notification.
Notifications are sent to alert users of changes to the state of a task. Notifications can be sent by e-mail, telephone voice message, fax, pager, or SMS.
See "Task Notifications" and Chapter 15, "Oracle BPEL Process Manager Notification Service" for more information.
The end result of specifying the parameters is the generation of a BPEL scope that uses BPEL constructs to orchestrate the workflow. The Workflow wizard in JDeveloper BPEL Designer automatically generates the BPEL fragment and task configuration, as shown in Figure 16-9.
To edit a workflow, you manually edit the invoke and assign activities that are created when you configure the workflow pattern. For each workflow pattern described in this chapter, see the discussion on customization for more information.
To delete a workflow, you delete the scope and search block, which automatically deletes the variables, partner links, and so on.
When you model a workflow, you specify the values for task attributes such as title, payload, expiration, and configuration for the task. The configuration includes possible outcomes of the task, payload display, and so on. The task attributes are assigned using the BPEL assign activity. The task configuration is captured in an XML file. The XML file is named taskConfigworkflow_name.xml and is available as part of the JDeveloper project.
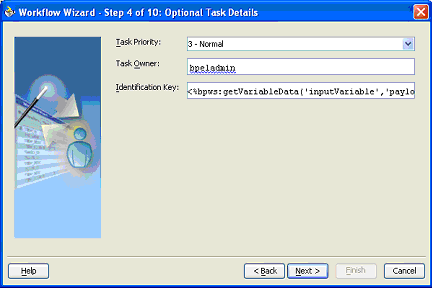
The following task attributes are shown in Figure 16-10 and Figure 16-11.
The task title is used to display the task in Oracle BPEL Worklist Application. The title can include static strings and data from other business process variables.
The task payload is the data in the task. The payload is restricted to BPEL variables and its substructures.
The payload display identifies the display mechanism for the payload in the Worklist Application. Auto generated JSP form is the default option in which a JSP is generated by inferring the schema of the selected payload.
Use the XSL file option to specify an XSL file for the payload display. If you select to use an XSL style sheet generated by an external utility, you must make the following modifications:
Add namespaces relating to the task and its requirements to the generated XSL.
Ensure that all XPath queries start with the task payload in place of the root of the XML.
Use the JSP URL option to specify your own JSP that can be used to display the payload. See "Payload Display" for more information.
The creator of the task is the user who initiates the task. The creator can be defined using the XPath Expression Builder. The creator can view the tasks they created from the Worklist Application if they have access to the application. The creator can perform some actions specific to the creator from the Worklist Application, such as withdraw the task. If the creator is not specified, it defaults to the task owner.
The expiration duration is the maximum duration that the task can be open. This is optional for some workflow patterns and is required for other workflow patterns (such as auto-escalate).
If you select the advanced options in the Workflow wizard, you can specify the priority of the tasks. Priority can be 1 through 5, with 1 being the highest. By default, the priority of a task is 3.
Task Owner (optional)
The task owner can view the tasks belonging to business processes they own and perform operations on behalf of any of the task assignees. Additionally, the owner can also reassign, withdraw, or escalate tasks. This optional attribute defaults to the system user bpeladmin if not specified. The task owner can be specified in the advanced screens.
The identification key can be used as a user-defined identification for the task. For example, if the task is meant for approving a purchase order, the purchase order id can be set as the identification key of the task. Tasks can be searched from the Worklist Application by the identification key. This attribute has no default value.
Figure 16-10 Workflow Wizard: Task Details
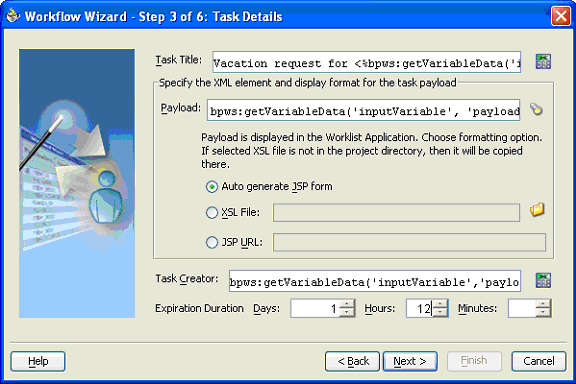
Figure 16-11 Workflow Wizard: Optional Task Details
The task outcomes capture the possible outcomes of a task such as Accept, Reject, and Approve. The outcomes of the task are specified during the creation of the workflow. The Worklist Application displays these outcomes as the possible actions that a user can perform. You can select one of the seeded outcomes as the possible actions that a user can perform. The task outcomes can also have display values that are different from the actual outcome value. This permits outcomes to be internationalized. See "Resource Bundles" for more information about internationalization.
Figure 16-12 shows where the conclusions are added. By default, JDeveloper BPEL Designer displays common outcomes from the following file, which can be changed to modify the default list of outcomes:
Oracle_Home\integration\jdev\jdev\system10.1.2.1.0.1915\TaskConclusion.xml
After the workflow is created, you can change the custom actions in the conclusions element of the task configuration XML file, as shown in bold in the following code example.
<taskType ....>
  <task ...>
    <conclusions>
      <conclusion name="ACCEPT">
        <displayValue>Accept</displayValue>
      </conclusion>
      <conclusion name="REJECT">
        <displayValue>Reject</displayValue>
      </conclusion>
    </conclusions>
        ...
  </task>
  <notifications>
      ...
  </notifications>
</taskType>
The task also has the following optional configurations. All these configurations are captured in the task configuration file. The following configurations are available through the advanced options in the workflow.
The task object contains flex fields for extending the task to capture any data in addition to the payload. These flex fields are treated like other header attributes in the worklist. Tasks can be searched based on data in any of the flex fields. Flex fields are available for each of the following data types: string, double, long, and date. When modeling the business process, you can specify which flex fields are used and a display string for the flex fields. The display value is used by the Worklist Application for the data (instead of using the name of the flex field itself). This also permits display values to be internationalized. See "Resource Bundles" for more information on internationalization. Figure 16-13 shows how you configure flex fields. Only the flex fields that are configured in this window are displayed in the Worklist Application.
You can change flex field information in the flexFields element of the task configuration XML file, as shown in bold in the following code example.
<taskType ....>
  <task ...>
    ...
    <flexFields>
      <flexField name="flexString2">
        <displayValue>displayfor flex string</displayValue>
      </flexField>
    </flexFields>
   ...
  </task>
  <notifications>
      ...
  </notifications>
</taskType>
The following flex fields are available:
flexString1
flexString2
flexString3
flexString4
flexLong1
flexLong2
flexDouble1
flexDouble2
flexDate1
flexDate2
flexDate3
The Workflow wizard in JDeveloper BPEL Designer does not capture the assignment to the flex fields. The assignments to the flex fields can be manually added in the workflow BPEL scope. In every workflow that is generated, an assign named setUserDefinedAttributes in the scope is generated for the workflow. The assignments to the flex fields can be added in this assign, as shown in the following BPEL code example.
<sequence>
  <assign name="setUserDefinedAttributes">
       ...
    <copy>
      <from expression="string('value of flex string 1')"/>
      <to variable="WorkflowVar1" query="/task:task/task:flexString1"/>
    </copy>
  </assign>
     ...
<sequence>
The actions that are performed from the Worklist Application are common to all business processes. However, you can restrict some actions in a particular business process. For example, assume that in a loan approval process, the business requirement is never to suspend a loan application. To model this scenario, at design time, you can mark Suspend as a restricted action. When an action is marked as restricted, the Worklist Application does not display the action for this task. Figure 16-14 shows how restricted actions are configured.
The following actions can be restricted:
Auto Release
Reassigned
Escalated
Renewed
Info Requested
After the workflow is created, you can configure restricted actions in the restrictedActions element of the task configuration XML file, as shown in the following code example.
<taskType ...>
  <task ...>
    ...
    <restrictedActions>
      <restrictedAction>AUTO RELEASE</restrictedAction>
      <restrictedAction>ESCALATED</restrictedAction>
      <restrictedAction>REASSIGNED</restrictedAction>
      <restrictedAction>RENEWED</restrictedAction>
      <restrictedAction>INFO REQUESTED</restrictedAction>
      <restrictedAction>SUSPENDED</restrictedAction>
    </restrictedActions>
  </task>
  <notifications>
     ...
  </notifications>
</taskType>
When a task is modified, Oracle BPEL Process Manager creates a new version of the task as part of the task history. Changes to some of the task attributes, such as status, assignees, payload, and attachments, are always tracked with a new version. In addition, you can mark other attributes of the task as version tracked, including the title of the task, any flex attributes, and comments. Figure 16-15 shows where the version tracking attributes are specified.
The following attributes can be version tracked:
flexString1
flexString2
flexString3
flexString4
flexLong1
flexLong2
flexDouble1
flexDouble2
flexDate1
flexDate2
flexDate3
title
payload
identificationKey
comments
attachments
After the workflow is created, you can change version tracked attributes in the versionTracking element of the task configuration XML file, as shown in the following code example.
<taskType ....>
  <task ...>
    ...
    <versionTracking>
      <attribute>attachments</attribute>
      <attribute>payload</attribute>
      <attribute>flexString2</attribute>
      <attribute>comments</attribute>
    </versionTracking>
      ...
  </task>
  <notifications>
   ...
  </notifications>
</taskType>
As part of workflow modeling, you can optionally specify notifications and reminders to be sent to users if the task is not acted upon in a certain time. See "Task Notifications" for more information.
Resource bundles can be specified in the task configurations. Resource bundles are used for the following task configurations:
Display value for outcomes
Display values for the outcomes can be plain text or keys in the resource bundle specified. When the display value is for the format message(key), the display value is fetched from the resource bundle specified for the task configuration.
Display value for flex strings
Display values for the flex strings are treated like the display value for task outcomes.
Notification messages
Notification messages for e-mails can also be internationalized. To get the internationalized message for notifications, use the XPath extension function orcl:get-localized-string().
The resource bundle can be part of the BPEL suitcase or in some other location that can be looked up by the BPEL run-time server. To make the resource bundle available as part of the BPEL suitcase, add the resource bundle files to the project before deploying the project.
Resource bundle information is captured in the task configuration file as shown in the following code example. If the resource bundle is available as part of the project, then resourceBundleLocation need not be set.
<taskType ...
        resourceBundleName="VacationRequestResource"
        resourceBundleLocation=" VacationRequestResourceLocation"
        ...
 ...
</taskType>
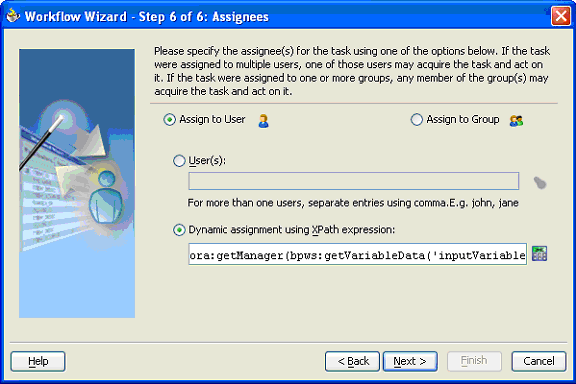
Tasks can be assigned to both groups and users, as shown in Figure 16-16. When tasks are assigned to groups, the task can be seen by any user in the group. For a user to act on a task assigned to a group, the user must acquire the task first. Task assignees can be specified in one of the following ways.
In a static assignment, the assignees are specified at design time. The users can be typed in or they can be selected by browsing the identity service-supported user directories.
Dynamic assignment using XPath expressions
The assignees of the task can be assigned from other business process variables using the bpws:getVariableData(…) expression and other XPath expressions. For example, the task can be assigned to the manager of the vacation requester using the expression
ora:getManager(bpws:getVariableData('inputVariable','payload','/client:
VacationRequestProcessRequest/client:creator'))
Figure 16-16 Dynamic Assignment Using an XPath Expression
The assignee is captured as a node set. In the two modes for specifying the assignees, the assignee information is represented as follows:
When the assignment is specified by browsing the user directory, the assignees are visually represented as a comma-separated string. In BPEL, a node set is created with a node created for each user specified.
Dynamic Assignment
The XPath expression evaluates to a node set. The value of each node represents a user in the assignee list. There can be only one node in the node set, but the value of each node must be a valid user name. It cannot be a comma-separated string. If the input expression is a comma-separated string, XSLT can be used to create a node set from it.
The assignee list is interpreted in different ways for different types of assignments, as follows:
The task is assigned to all the assignees in the node set. Each of the assignees can see and approve the task after acquiring it.
Sequential task
The task is assigned sequentially to each of the assignees in the node set. For example, if the assignee is set to a node set, as in
<user xmlns="ns1-namespace>jstein</user>
<user xmlns="ns1-namespace>jcooper</user>
<user xmlns="ns1-namespace>wfaulk</user>
then the task is first assigned to jstein. On their approval, it is assigned to jcooper, and on jcooper's approval, it is assigned to wfaulk.
In a parallel task, a subtask is created for each node in the node set, and the assignee of each subtask is the value of each node in the node set. For example, if the assignee is set to a node set, then a subtask is created for jstein, jcooper, and wfaulk, as follows:
<user xmlns="ns1-namespace>jstein</user>
<user xmlns="ns1-namespace>jcooper</user>
<user xmlns="ns1-namespace>wfaulk</user>
One exception is the sequential task with management chain, where all the assignees specified are treated as a single assignment for the first assignment. The management chain is computed from the previous approver of the task.
The DocumentReview demo demonstrates dynamic assignment from a node set. The DocumentReview process is modeled on the parallel task with the final approver pattern.
|
See: Oracle_Home\integration\orabpel\samples\demos
|
In a scenario where the task assignment is retrieved from an external service, the Dynamic assignment using XPath expression option can be used. The element being pointed to by the XPath expression must be either a node (if assigning to a single user or group) or a node set (if assigning to multiple users or groups).
Any complex task assignee computation must be done before the workflow is started. For example, if the assignee of the task should be the one with the least load of all the possible assignees, then a service can be implemented to compute the assignee, and the assignee returned from the service can be set as the task assignee using the XPath option.
When the task is assigned to a group or multiple users, the task must be acquired before a user can act on the task. It is also possible to set the task as acquired to a user from the business process. This can be done by adding a copy rule in the assign activity named setUserDefinedAttributes. This copy statement sets the /task:task/task:acquiredBy element of the task, as shown in Figure 16-17. The acquiredBy value can be computed from a service; for example, a service that does some load balancing among users computes the acquiredby value. This return value can be set to the acquiredBy element of the task.
In a scenario in which the assignees are represented as a delimited string (for example, a comma-separated string), the delimited string must be converted to a node set to set the task assignees from it. For this purpose, you can use orcl:create-nodeset-from-delimited-string. The arguments for this function are as follows:
QName in which each node in the node set must be created. The QName can be represented in two forms:
task:assignee
{http://mytask/task}assignee
Delimited string
The delimiter used to delimit the string, which can be , (comma) or ; (semicolon), for example.
For example, the BPEL variable inputVariable, part payload, and query /client:TestExtensionFunctionProcessRequest/client:input represent the assignees in a comma-separated format (example, jcooper,jstein,wfaulk) and this comma-separated list contains the assignees of the task. This string cannot be used as-is to set the task assignees because the task assignees are expected to be a node set. To set the assignees, select the dynamic assignment in the task assignees page, as shown in Figure 16-18, and set it to
orcl:create-nodeset-from-delimited-string('task:assignee',
bpws:getVariableData('inputVariable','payload',
'/client:TestExtensionFunctionProcessRequest/client:input'), ',')
Assignees can be selected by browsing the user directory (Oracle Internet Directory (OID), JAZN/XML, LDAP, and so on) that is configured for use by Oracle BPEL Process Manager. Clicking the flashlight icon to browse OID users (next to the User(s) or Group(s) text boxes) produces the Identity lookup dialog window.
In the identity lookup dialog window, shown in Figure 16-19, you can search by entering a search string such as jcooper, j*, *, and so on. Clicking Lookup fetches all the users that match the search criteria.
One or more users or groups can be highlighted and selected by clicking Select.
You can view the hierarchy of a user by highlighting the user and clicking Hierarchy, as shown in Figure 16-20. Similarly, clicking Reportees displays the reportees of a selected user or group.
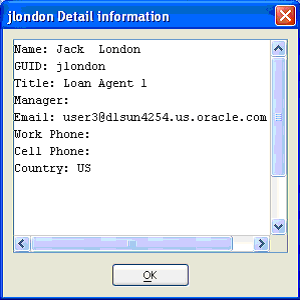
You can view the details of a user or group by highlighting the user or group and clicking Detail, as shown in Figure 16-21.
Figure 16-21 Detail Information for a User
You can add task attachments from the BPEL process and the Worklist Application. Task attachments can be one of the following types:
URI—A URI attachment is a reference to a URL or file location.
Content—A content attachment file is a file that is uploaded.
From the BPEL process, you can set attachments on the task variable by adding the following copy statements in the assign named setUserDefinedAttributes in the workflow scope.
In the Create Copy Rule window, set the From part to be the following XML Fragment:
<attachment xmlns="http://xmlns.oracle.com/pcbpel/taskservice/task">
  <name/>
  <URI/>
  <content/>
</attachment>
The attachment element in the task object is initially empty, so the attachment element must be initialized.
Select the To part to be the attachment element in the task variable.
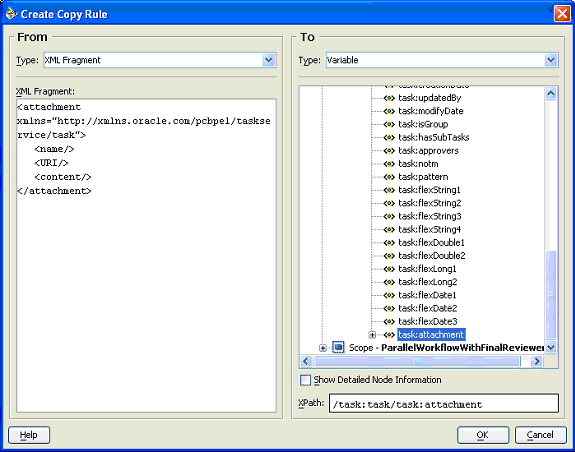
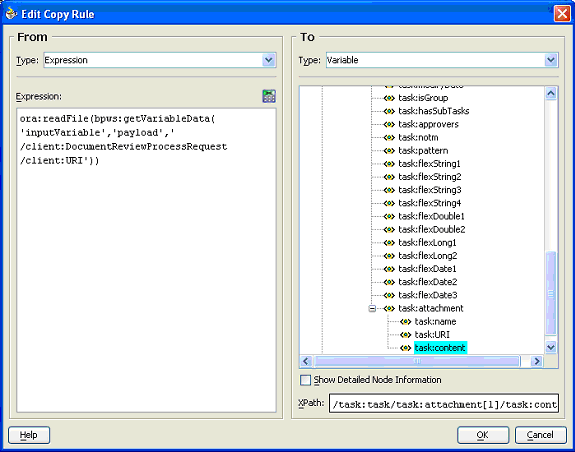
Add another copy statement that sets the attachment content. For example, if the attachment is available at a URI captured by the input message, the XPath extension function ora:readFile is as follows (this is the From expression):
ora:readFile(bpws:getVariableData('inputVariable','payload','/client:DocumentReviewProcessRequest/client:URI'))
Select the To part as /task:task/task:attachment[1]/task:content of the task variable that was created by the wizard.
By default, the tree does not add the index 1, so it must be added manually.
If the attachment is a URI attachment, the To is set to /task:task/task:attachment[1]/task:URI of the task variable.
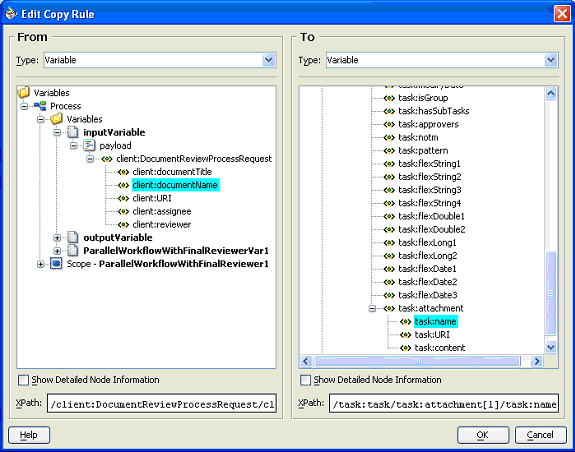
Add another copy statement that sets the attachment name.
For example, if the name is captured in a business process variable, select that element for the copy From.
Select the To as /task:task/task:attachment[1]/task:name of the task variable that was created by the wizard.
By default, the tree does not add the index 1, so it must be added manually.
The DocumentReview demo demonstrates adding task attachments from the BPEL process. The document review process sends a document to multiple users for their review. The document to be reviewed is set as a task attachment.
|
See: Oracle_Home\integration\orabpel\samples\demos
|
The Worklist Application enables users to participate in a BPEL process by performing tasks that require manual intervention. The worklist user interface displays tasks specific to the logged-in user based on the user's permissions and assigned groups and roles. The types of actions that the user can perform on a task include:
Update task details—The task form can include content that needs to be added or modified by the task reviewer. Additionally, a user can modify flex fields, task priority, or include comments or attachments to the task.
Change outcome for the task—As part of the process model, the workflow designer can include various custom outcomes for the task (for example, approve or reject, acknowledge, defer). If a user modifies a task outcome, it is removed from their worklist and routed to the next approver or back to the business process based on the workflow pattern.
Perform system actions—In addition to the custom actions specified as part of workflow modeling, the user can perform other system actions such as escalate or delegate. These actions are available on all tasks based on the user's privileges. The process owner or workflow administrator can always perform any of these operations on processes that they own. The various system actions allowed on a task are as follows:
Escalate—This operation enables a user to escalate a task to their manager for further action.
Reassign—A manager can delegate a task to reportees. Similarly, the process owner or a user with BPMWorkflowReassign privileges can delegate a specific task to any other person in the organization.
Request More Information—Any participant in the workflow can request more information from the task creator or any of the prior approvers of the task. When the requested information is submitted, the task is assigned to the user who requested the information.
Request More Information with Reapproval—Any participant in the workflow can request more information from the task creator or any of the prior approvers of the task and require the approvers who have approved the task reapprove it. This action is supported only if the current user task supports sequential approval. For example, assume jcooper created a task and jstein and wfaulk approved the task in the same order. When the next approver, cdickens, requests information with reapproval from jcooper and when jcooper submits the information, jstein and wfaulk approve the task before it comes to cdickens. If cdickens requests information with reapproval from jstein and then jstein submits the information, then wfaulk approves the task before it comes to cdickens. Suggest removing or clarifying the example
Submit More Information—This operation enables a user to respond to a request for additional information. This action is performed after the user has made the necessary updates to the task or has added comments or attachments containing additional information.
Route—This operation enables a user to enter an outcome and then route the task in an adhoc fashion to the next user who must review the task.
Suspend—This operation enables process owners (or users with the BPMWorkflowSuspend privilege) to put a workflow on hold temporarily. In this case, task expiration and escalation do not apply until the workflow is resumed. No actions are permitted on a task that has been suspended (except resume and withdraw).
Resume—This operation enables process owners (or users with the BPMWorkflowSuspend privilege) to remove the hold on a workflow. After a workflow is resumed, actions can be performed on the task.
Acquire—This operation enables a user to obtain an exclusive right to work on a task that is assigned to a group or multiple users. No action can be performed on a task assigned to a group or multiple users until it is acquired. Only one user can acquire a task at any given time.
Release—This operation enables a user to abandon the exclusive right to work on a task that is assigned to a group or multiple users. After a task is released, any other user who is assigned to the task can acquire it.
Renew—If a task is about to expire, a task assignee can renew the task and request more time to perform the task. This operation is not allowed if the process modeler has restricted task renewal on the workflow.
Withdraw—The creator of the task can withdraw any pending task if they are no longer interested in sending it further through the workflow. A process owner can also withdraw a task on behalf of the creator. When a task is withdrawn, the business process is called back with the state attribute of the task set to Withdrawn.
|
See Also:
|
If you set the validateXML property to true (the default is false) on the Manage BPEL Domain window of Oracle BPEL Console, each message exchanged with each of the Web services is validated against its schema. However, workflow services fail during XML validity checks at run time. This is because the BPEL variables exchanged with the workflow services are not completely initialized in the BPEL process. Part of the initialization happens in the service itself.
Simple workflow is used when a task must be acted on by one user. The task can be assigned to a set of users or groups. If the task is assigned to multiple participants, one of them must acquire the task and complete it. See "Actions Performed on a Task" for a description of the actions a user can perform from the Worklist Application.
Figure 16-22 shows how simple workflow is implemented in BPEL.
Figure 16-22 A Simple Workflow Implemented in Oracle BPEL Process Manager
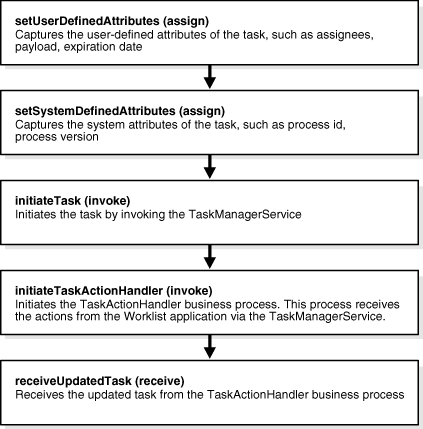
Figure 16-23 shows a user task modeled using the simple workflow in JDeveloper BPEL Designer.
Figure 16-23 A Simple Workflow Modeled in JDeveloper BPEL Designer
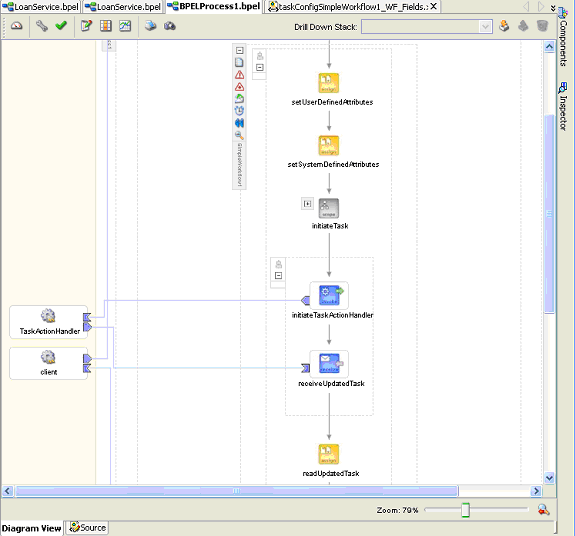
An employee, through the employee portal, submits a vacation request. The portal initiates a business process that includes a user task modeled using a simple workflow. The task is assigned to the manager of the employee. When the manager approves or rejects the vacation request, the employee is notified with the manager's decision by e-mail. See the VacationRequest example in the samples directory for an implementation of this use case.
|
See: Oracle_Home\integration\orabpel\samples\demos
|
The following customizations are possible:
Changing the assignee after creating the user task
The assign named setUserDefinedAttributes in the generated scope captures the setting of the task assignee. Depending on whether the task is assigned to a user or a group, the task attribute assigneeUsers or assigneeGroups is set. This assignment can be changed to modify the task assignee. For example, if you are using an external service that does load balancing or determines task assignee based on contents of the payload, you can call this service and set the assignees to a local variable. This variable can then be used to do a dynamic assignment based on an XPath expression.
Changing the outcomes after creating the user task
The outcomes are captured in the XML task configuration file, where they can be changed manually. See "Task Outcomes" for more information.
Changing the user task to support multiple approvals
A simple workflow (or any variation of simple workflow) does not support multiple approvals because it is intended for a single approval. If reapproval is required, change the user task to sequential workflow.
Simple workflow with automatic escalation is a variation of the simple workflow in which the task is escalated when the task expires. The rules of escalation are specified as part of creating the user task. As in a simple workflow, the task can be assigned to a set of users or groups. See "Actions Performed on a Task" for a description of the actions a user can perform from the Worklist Application. If the user does not perform any of the custom actions before the task expires, the task is escalated to their manager as specified in the user directory that is configured with the identity service.
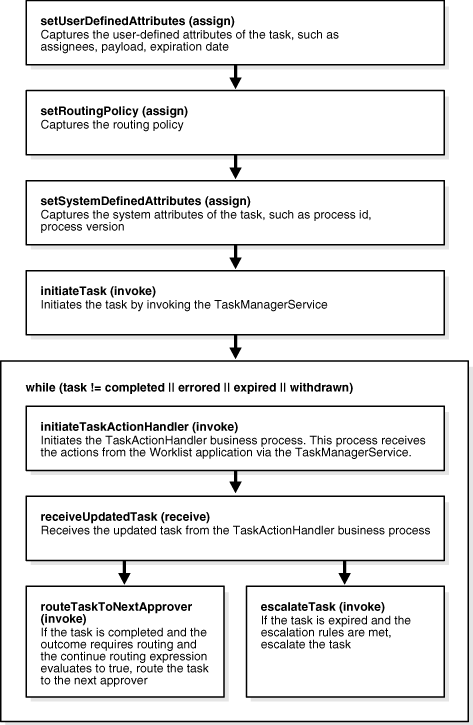
Figure 16-24 shows how simple workflow with automatic escalation is implemented in Oracle BPEL Process Manager.
Figure 16-24 Simple Workflow with Automatic Escalation
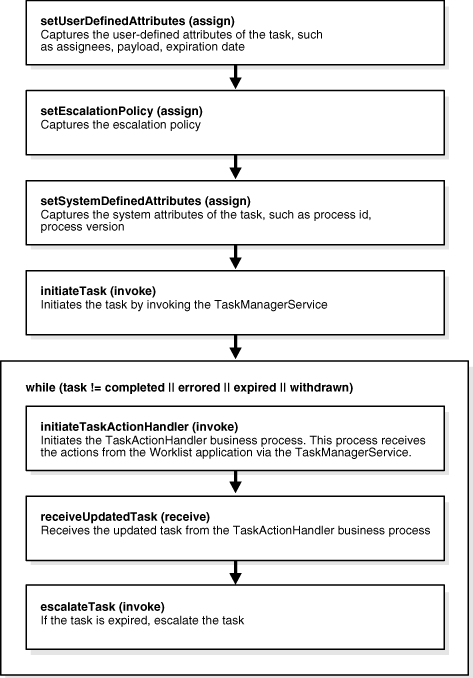
Figure 16-25 shows the user task scope modeled using the simple workflow with automatic escalation.
Figure 16-25 Simple Workflow with Automatic Escalation in JDeveloper BPEL Designer
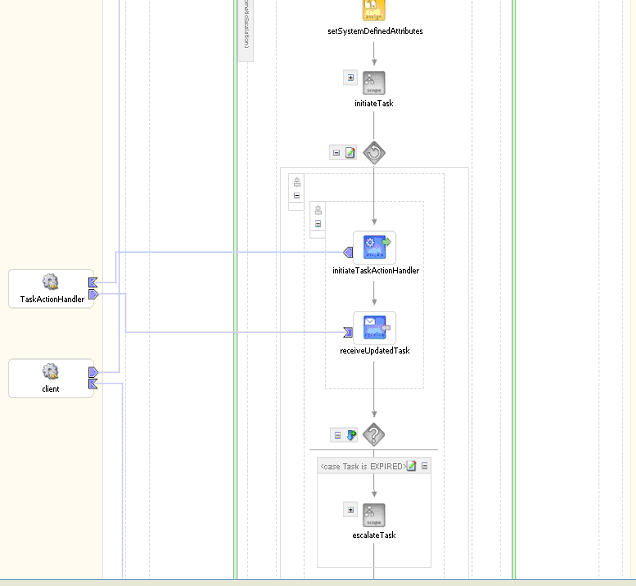
The HelpDeskServiceRequest process gives users the ability to file help desk service request tickets. If the person who receives the ticket does not act on it within a specified time period, the ticket is automatically escalated to their manager. The ticket is automatically escalated three times if no one has acted on it within a predefined time, until it gets to the CEO of the company. If the CEO also does not act on it, it expires.
|
See: Oracle_Home\integration\orabpel\samples\demos
|
Two parameters are specific to this pattern.
The maximum number of times the task can be escalated
This required parameter specifies how many times the task is escalated. For example, if this parameter to set to 2, then the task is assigned to the user jcooper. If none of the users acts on the task in time, the task is assigned to jcooper (initial assignee), user jstein (jcooper's manager) and user wfaulk (jstein's manager).
The title of a user to whom the task can be escalated
This optional parameter specifies the title of the last user to whom the task can be escalated. For example, if this parameter is set to Manager, the task is assigned to user jcooper. If none of the users acts on the task in time, the task is assigned to jcooper (initial assignee) and user jstein (jcooper's manager), whose title is Manager.
The title can be typed in or selected from a list of prespecified titles. The list of titles that are displayed is configured in defaultUserTitles.xml at
Oracle_Home\integration\jdev\jdev\system10.1.2.1.0.1915\
When both these parameters are specified, the task is escalated until one of the conditions causes the escalation to stop. For example, if the maximum number of times is 4 and the title is Manager, then the task is assigned to jcooper. If none of the users acts on the task in time, the task is assigned to jcooper (initial assignee), and user jstein (jcooper's manager), whose title is Manager.
Figure 16-26 shows where these parameters are specified.
The customizations in "Customizations for Simple Workflow" apply to this pattern, in addition to the following.
Changing the duration for the task assignment
When the task is expired and is escalated, the task is renewed for a duration equal to the initial expiration duration of the task. The BPEL assign named setEscalationPolicy in the user task scope sets the renewal duration in the variable oraBPMExpDuration. This copy statement can be changed to change the expiration duration for the subsequent task assignments.
Changing the number of levels of escalation
The BPEL assign named setEscalationPolicy in the user task scope captures the number of levels of escalation in the variable oraBPMManagementChain (the query for the copy is /identityservice:managementChain/identityservice:levels). This can be changed to any appropriate value.
Changing the title of the last user to whom the task is escalated
The BPEL assign named setEscalationPolicy in the user task scope stores the title of the last user in the variable oraBPMManagementChain (the query for the copy is /identityservice:managementChain/identityservice:uptoTitle). This can be changed to any appropriate value.
Changing the user to whom the task is escalated on task expiration
By default, on task expiration, the task is escalated to the user's manager. This can be changed by changing the generated BPEL scope. In the generated BPEL scope, there is another BPEL scope named escalateTask that performs the escalation. In the scope, change the escalateTask invoke to invoke the updateTask operation on the TaskManagerService instead of the escalateTask operation. The TaskManagerService.wsdl file defines the updateTask operation. The task assignees (users or groups) to whom the task is escalated must be set before the operation is invoked. In addition, the state of the task (task:task/task:state) must be set to ASSIGNED before the operation is invoked.
Simple workflow with automatic renewal is a variation of the simple workflow in which the task is renewed when the task expires. The rules of renewal are specified as part of creating the user task. As in a simple workflow, the task can be assigned to a set of users or groups. See "Actions Performed on a Task" for a description of the actions a user can perform from the Worklist Application. If the user does not perform any of the custom actions before the task expires, the task is renewed for a specific duration.
Figure 16-27 shows how simple workflow with automatic renewal is implemented in Oracle BPEL Process Manager.
Figure 16-27 Simple Workflow with Automatic Renewal
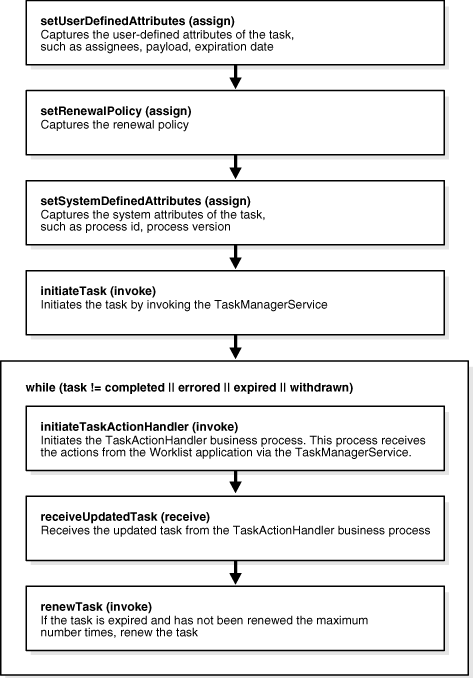
Figure 16-28 shows the user task scope modeled using the simple workflow with automatic renewal.
Figure 16-28 Simple Workflow with Automatic Renewal
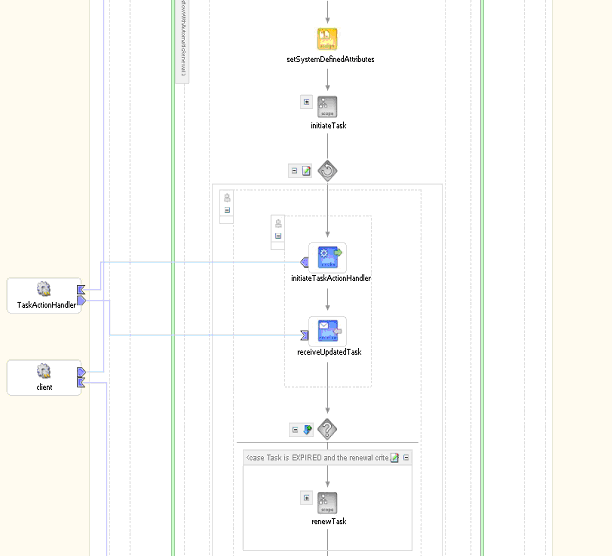
A business process manages renewal of magazine subscriptions. The rules of the subscription are that if the user cancels the subscription one month before the expiration date of the current subscription, then the subscription is cancelled free of charge. If the user cancels in the last month of the current subscription, then the subscription is cancelled with a charge. If the user does not cancel, it is renewed.
The process is initiated 60 days before the subscription is up for renewal. The process contains a user task modeled with the simple workflow with automatic renewal pattern. When the magazine subscription task is assigned to a user, an e-mail is sent to the user. The user can go to a portal and renew or cancel the subscription. Depending on the user action, the business process determines the cancellation or cancellation with charge or renewal.
One parameter is specific to this pattern.
The maximum number of times the task can be renewed
This required parameter specifies how many times the task is renewed.
The customizations in "Customizations for Simple Workflow" apply to this pattern, in addition to the following:
Changing the duration for the task assignment
When the task expires, it is renewed. The renewal duration of the task is the same as it was for the first task assignment. The BPEL assign named setRenewalPolicy in the user task scope sets the new expiration duration in the variable oraBPMRenewDuration. This copy statement can be changed to change the expiration duration for the subsequent task assignments.
Changing the number of levels of renewal
The BPEL assign named setRenewalPolicy in the user task scope stores the maximum number of levels of renewal in the variable oraBPMMaxTimesRenewed. This can be changed to any appropriate value.
Adding logic depending on number of times renewed
The BPEL scope level variable oraBPMNumOfTimesRenewed captures the number of times the task is renewed. This variable can be used to build additional logic in the business process.
Sequential workflow is used when a task must be approved by multiple users. The users or groups to whom the task is assigned can be specified in one of the following ways:
List of users in a management chain
List of users or groups from the identity service set during the design time of the process
Dynamic list of users or groups from another business process variable
In each of the preceding cases, the task is sequentially assigned to each of the users in the list. See "Actions Performed on a Task" for a description of the actions a user can perform from the Worklist Application. In a sequential workflow, a request for information with reapproval is permitted.
As part of modeling a sequential workflow, the list of outcomes that cause the task to be routed can also be specified. For example, if a task has two outcomes, ACCEPT and REJECT, the business logic might require the task to be routed to the next approver only if the current user accepts the task. A continue routing expression can also be specified. If this condition evaluates to true, the task is routed.
Figure 16-29 shows how the sequential workflow is implemented in Oracle BPEL Process Manager.
Figure 16-29 How Sequential Workflow Is Implemented in BPEL
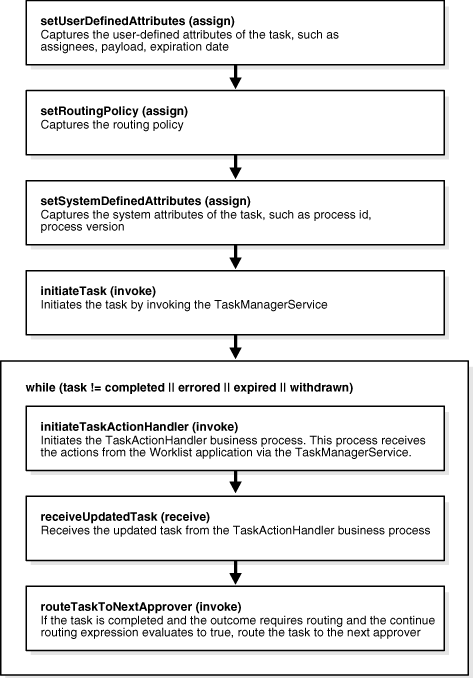
Based on the assignees, a future approver function is created to capture future approvers of the task. This function is persisted in the approvers element of the task. If the management chain assignment is used, the managementChain function is created. If a list of users is provided (either using static assignment from a user directory or an XPath function), a list function is created. The list function has a user or group function in it to represent the assignees. This approver function creation is done in the assign named setRoutingPolicy in the generated workflow scope. This function is not changed in normal circumstances; however, it can be changed if a complicated sequential assignment is being created. For example, first assign to users jcooper and jstein, then assign to wfaulk, and so on. (The complexity of this example is multiple users assignment—jstein and jcooper—for the first assignment).
Examples of approver functions are as follows:
managementChain("2", "Manager")
Routes the task to users in the management chain. The management chain includes users within two levels and up to a user whose title is Manager.
users("jcooper", "jstein")
Routes the task once to users jcooper and jstein.
users("jcooper", "jstein", acquiredBy("jcooper"))
Routes the task once to users jcooper and jstein. Also sets the acquiredBy to jcooper.
groups("LoanAgentGroup", "Supervisor", acquiredBy("jcooper"))
Routes the task once to groups LoanAgentGroup and Supervisor. Sets the acquired-by to jcooper.
list(users("jcooper", "jstein"), groups("LoanAgentGroup"), acquiredBy("jcooper"))
Routes the task once to users jcooper and jstein and group LoanAgentGroup and also sets the acquiredBy to jcooper.
list(users("jcooper","jstein")), list(groups("LoanAgentGroup"))
Routes the task to users jcooper and jstein. When one of those users acquires and acts on the task, routes the task to group LoanAgentGroup.
adhoc()
The task supports adhoc routing and the next users or groups are specified by the current approver of the task.
These functions are evaluated when the task must be routed to the next approver. See "Approver Functions" for more information, and for how to modify the value of the approvers element to achieve different results.
Figure 16-30 shows the user task scope modeled using the sequential workflow.
Figure 16-30 Sequential Workflow in JDeveloper BPEL Designer
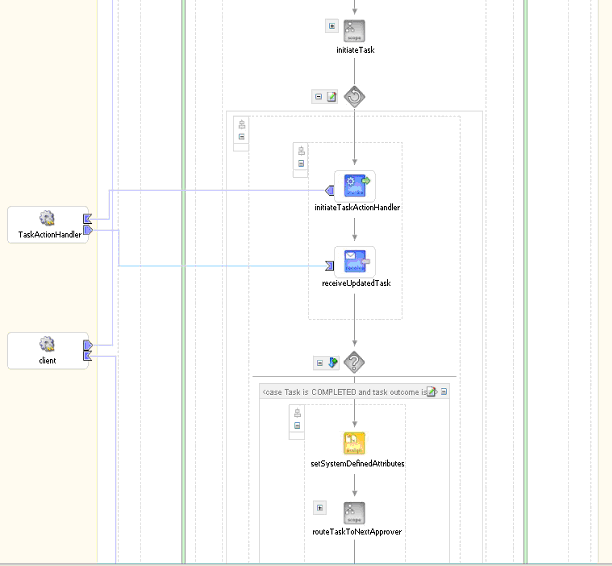
A loan application processing system receives loan applications. These loan applications are initially assigned a group called LoanAgentGroup. A user in this group evaluates and approves the loan application and provides a loan offer. If the loan application amount is greater than 100,000 US dollars, then the loan application and the initial loan offer are sent to the initial approver's manager. After they approve it, the loan application is routed to their manager. If the loan application amount is less than or equal to 100,000 US dollars, then the initial loan offer is sent back to the caller. This use case is demonstrated in the LoanDemoPlusWithWorkflow sample.
Another use case is when a purchase order approval system processes a purchase order using a business process. An employee belonging to a group named Supervisor initially evaluates the purchase order. After the initial user approves the purchase order, their manager approves it. After the manager approves the purchase order, the purchase order is forwarded to the billing and shipping departments. This use case is demonstrated in the Order Booking tutorial purchase order approval service.
The sequential workflow has the following pattern-specific parameters.
Outcome that results in the task being routed
Continue routing expression
In simple workflow, the assignees are specified for the only assignment of the task. In sequential workflow, the set of users to whom the task is routed is specified. There are two ways to specify this.
A list of users from a business process variable or a static list set at design time.
A management chain. This involves selecting the initial assignees (a set of groups or users) and parameters to select the management chain. The parameters to select the management chain include specifying the following attributes:
The number of levels in the management chain
This required parameter specifies how many levels in the management chain are included in the list. For example, if this parameter to set to 2 and the task is initially assigned to a user jcooper, then both the user jstein (jcooper's manager) and user wfaulk (jstein's manager) are included in the list, apart from jcooper (the initial assignee).
The title of the last user in the management chain
This optional parameter specifies the title of the last user in the management chain. For example, if this parameter is set to Manager and the task is assigned to a user jcooper, user jstein (jcooper's manager) is included in the list, apart from jcooper (the initial assignee).
The title can be typed in or selected from a list of prespecified titles. The list of titles is configured in defaultUserTitles.xml at
Oracle_Home\integration\jdev\jdev\system10.1.2.1.0.1915\
When both these parameters are specified, then the task routing is determined by both the title and the number of levels. The routing continues until one of the conditions—title or the number of levels—no longer applies. The following examples illustrate this.
Example: If the maximum level in the management chain is four and the title is Manager and the task is assigned to a user jcooper, then the list includes jcooper (initial assignee) and user jstein (jcooper's manager), whose title is Manager. The task is not be routed beyond the Manager, even though the maximum number of levels is set to 4. This is useful in cases where you want the approvals to go up to a certain management level (for example, Director).
Example: If the maximum level in the management chain is 1 and the title is Director and the task is assigned to a user jcooper, then the list includes jcooper (initial assignee) and user jstein (jcooper's manager, whose title is Manager). It does not include wfaulk (jstein's manager, whose title is Director) because the task was already routed to one user beyond the initial assignee.
There are also two parameters that determine if the task must be routed.
The list of outcomes that cause the task to be routed can also be specified. For example, if a task has two outcomes, ACCEPT and REJECT, the business logic might require the task to be routed to the next approver only if the current user accepted the task.
A continue routing expression can also be specified. If this expression evaluates to true, the task is routed further after a specific user acts on it. This expression can be used to dynamically control how many approvals are required. Examples of this expression are as follows:
The task is routed only if the loan amount is greater than 1000; otherwise it is approved only once.
bpws:getVariableData('loan', '/auto:loan/auto:loanApplication/auto:loanAmount') > number(10000)
The task is routed until it is approved by a manager.
ora:getPreviousApproversTitle('/task:task/task:taskId') = string('Manager')
The task is approved at most three times.
ora:getNumberOfTimesApproved('/task:task/task:taskId') < 3
The task is approved at most three times when the loan amount is greater than 10000; otherwise it should be approved only once.
ora:getNumberOfTimesApproved('/task:task/task:taskId') < 3 and
bpws:getVariableData('loan', '/auto:loan/auto:loanApplication/auto:loanAmount') > number(10000)
The extension function ora:getPreviousApproversTitle() gets the title of the previous task approver. The function getNumberOfTimesApproved() gets the number of times a task was approved. See "Workflow-Related XPath Extension Functions" for a list of the extension functions.
Figure 16-31 shows the routing parameters.
Changing the initial assignee in the management chain after creating the user task
The assign named setUserDefinedAttributes in the generated scope captures the assignment of the task assignee. Depending on whether the task was assigned to a user or a group, the task attribute assigneeUsers or assigneeGroups is set. This assignment can be changed to modify the task assignee.
Changing the management chain parameters after creating the user task
The assign named setRoutingPolicy in the generated scope sets the approver function in the task attribute approvers. The approver function contains the management chain parameters. The parameters can be changed in this function. See "Approver Functions" for more information.
Changing the assignees in the list after creating the user task
The assign named setUserDefinedAttributes in the generated scope captures the assignment of the task assignee. The assignment to the oraBPMRouteAssignees variable attributes /taskmngr:assigneeEntities/taskmngr:assignee captures the list of users or groups.
Changing the outcomes after creation of the user task
Task outcomes are captured in the XML task configuration file, where outcomes can be changed manually. See "Task Outcomes" for more information.
The assign named setRoutingPolicy captures the routing policy. The future assignees of a task in a sequential workflow are captured in the approvers attribute of the task object. This assign sets the approvers attribute to an approver function depending on the assignment policy chosen—management chain or list of users. See "Approver Functions" for more information.
Changing continue routing expression
In the generated scope, the continue routing expression is evaluated in the assign named evaluateRoutingCriteria. The condition that is set in the wizard is negated with a not() in this expression. This expression can be changed as needed.
Adding continue routing expression
The response from each user is received in the receive activity receiveUpdatedTask. The receive activity follows a switch activity in which one of the case statements is:
Task is COMPLETED and the task outcome is one of the outcomes specified in the routing policy
The expression on this case statement can be changed to add any continue routing expression.
In the management chain routing policy, approvers can be added by changing the management chain parameters as described previously. Similarly, by changing the assignees in the list of users as described previously, approvers can be added.
Changing the user or group to whom the task is routed based on output of an external system
In the generated BPEL, there is a scope named routeTaskToNextApprover. This scope is responsible for routing the task to the next user or group. By default, this routing is based on the approver function. In a scenario where the next task assignee is determined by an external system, the activities in the routeTaskToNextApprover scope can be modified to achieve that. The TaskRoutingService exposes an operation called routeTask that routes the task to a specified user or group. The input message for this operation includes the task, an id that identifies either a user or a group, and a Boolean flag that identifies the entity as a group or a user. After a message is created, change the routeTaskToNextApprover invoke and its input variable accordingly to use the routeTask operation instead of the routeTaskToNextApprover operation.
The sequential workflow with escalation is used when a task must be approved by multiple users and the task must be escalated when it expires. This pattern is an extension of the sequential workflow and all that applies to the sequential workflow also applies to this pattern.
Figure 16-32 shows how sequential workflow is implemented in Oracle BPEL Process Manager.
Figure 16-32 Sequential Workflow with Escalation
An employee (for example, jcooper) requests a new laptop urgently. The sequential workflow first routes the task to their manager for approval (for example, jstein) and then to a person in the procurement department (for example, jlondon) to acquire the laptop. If the workflow is set up with automatic escalation after two days, then the request first goes to the manager for approval and if it is not approved in two days, then the task can be automatically routed to the next person in the management hierarchy (jstein's manager, wfaulk). Similar escalation can also be done for the procurement representative. This enables the workflow to complete without long delays in the approval process.
All the parameters that apply to the sequential workflow apply to this pattern as well. In addition to those parameters, the following parameters are specific to this pattern.
The maximum number of times the task can be escalated
This required parameter specifies how many times the task is escalated for each assignment. For example, if this parameter to set to 2, the task is assigned to user jcooper. If jcooper does not act on the task in time, then the task is escalated to user jstein (jcooper's manager). If jstein does not act on the task, then the task is escalated to user wfaulk (jstein's manager).
The title of a user up to whom the task can be escalated
This optional parameter specifies the title of the last user to whom the task can be escalated. For example, if this parameter is set to Manager, then the task is assigned to a user jcooper. If none of the users act on the task in time, then the task is assigned to jcooper (initial assignee) and user jstein (jcooper's manager), whose title is Manager.
The title can be typed in or selected from a list of prespecified titles. The list of titles is configured in defaultUserTitles.xml at
Oracle_Home\integration\jdev\jdev\system10.1.2.1.0.1915\
When both these parameters are specified, the task is escalated until one of the conditions causes the escalation to stop. For example, if the maximum number of times is 4, and the title is Manager, then the task is assigned to user jcooper. If none of the users act on the task in time, then the task is assigned to jcooper (initial assignee), user jstein (jcooper's manager), whose title is Manager.
All the customizations that apply to the sequential workflow apply to this pattern also.
Changing the escalation policy
The assign named setRoutingPolicy in the generated scope sets the escalation policy. The title of the last user to escalate up to is set to the attribute /identityservice:managementChain/identityservice:uptoTitle of the variable oraBPMManagementChain. The level of escalation is set to the attribute /identityservice:managementChain/identityservice:levels of the variable oraBPMManagementChain. These assignments can be changed as required.
Changing the expiration duration of the task when escalated
By default, the expiration duration of the task when escalated is the initial expiration duration of the task. Changing the assignment to the variable oraBPMExpDuration in the assign setRoutingPolicy changes the expiration duration when the task is escalated.
Changing the user to whom the task is escalated on task expiration
By default, on task expiration, the task is escalated to the user's manager. This can be changed by changing the generated BPEL scope. In the generated BPEL scope, another BPEL scope named escalateTask performs the escalation. In the scope, change the escalateTask invoke to invoke the updateTask operation on the TaskManagerService instead of the escalateTask operation. The TaskManagerService.wsdl defines the updateTask operation. The task assignees (users or groups) to whom the task is escalated must be set before the operation is invoked. In addition, the state of the task (task:task/task:state) should be set to ASSIGNED before the operation is invoked.
Parallel workflow is used when a task must be approved by multiple users or groups simultaneously. Each user views a subtask, which is a clone of the task at the time of creation. Each user can add attachments and comments independent of the other users. The users reviewing the task in parallel are not able to see the tasks of the other users. This includes the comments, attachments, and outcomes of the other tasks. The owner of the task can see all the subtasks. When the creator withdraws the parent task, all the subtasks are withdrawn as well.
The users and groups that review the task can be specified in one of the following ways. In each of the preceding cases, a subtask is created for each of the users or groups in the list.
List of users or groups from OID set during the process design time
List of users or groups from another business process variable
The outcome of the final task is selected based on the outcomes of each of the subtasks. The outcome of the task is selected based on the following criteria:
Percentage an outcome requires for it to be selected as the final outcome of the task. For example, assume there are two possible outcomes, ACCEPT and REJECT, and there are five subtasks. If two of the subtasks are accepted and three are rejected, and the acceptance percentage required for an outcome is 50%, then the outcome of the task is rejected.
If none of the outcomes have the required percentage, a default outcome can be specified as the outcome of the task.
Parallel workflow can be configured for early completion. When early completion is specified, that is, when the outcome of the task can be computed with the outcomes of the completed subtasks, then the pending subtasks are withdrawn. If no early completion is specified, the workflow waits for all the responses.
Figure 16-33 shows how parallel workflow is implemented in Oracle BPEL Process Manager.
Figure 16-34 shows the subtask execution process.
Figure 16-34 The Parallel Workflow Subtask Process
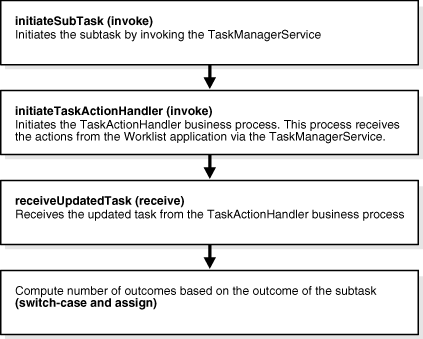
Figure 16-35 shows the user task scope modeled using parallel workflow.
Figure 16-35 Parallel Workflow in JDeveloper BPEL Designer
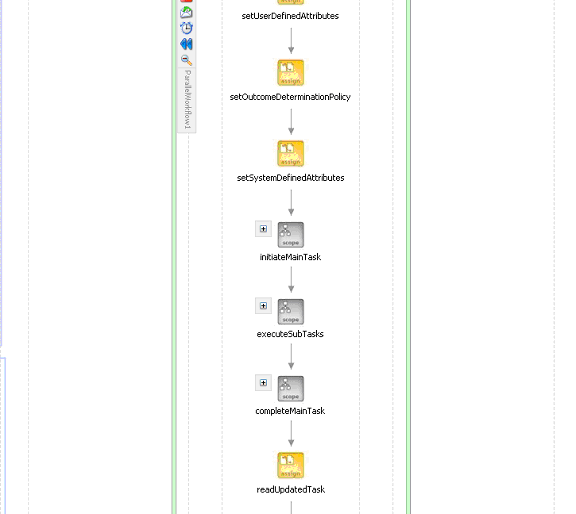
You cannot use a concat function to assign a parallel task to each user in a group. Instead, use the ora:getUsersInGroup(groupName) extension function to perform this task (for example, assign the parallel task to users fkafka, szweig, and mmitch in group LoanAnalyticGroup). This extension function gets the users in a group as a node-set. In this case, specify the XPath expression as follows in the Dynamic assignment using XPath expression field in the Assignees window of the Workflow wizard:
ora:getUsersInGroup('LoanAnalyticGroup')
The use of the ora:getUsersInGroup function is described on Oracle BPEL Console under Manage BPEL Domain > XPath Library and also in Appendix G, "XPath Extension Functions".
Oracle BPEL Process Manager does not provide built-in functionality for explicitly assigning a task to each user in multiple groups. For example, if group LoanAgentRole has users jcooper, jstein, and wfaulk and group Supervisor has users jlondon and cdickens, then creating a parallel task to assign to users jcooper, jstein, wfaulk, jlondon, and cdickens is not directly supported. As a workaround, you can write your own bpelx:exec (Java inside BPEL) to create a node-set that contains all the users from both groups and assign the parallel task to that node-set.
A hiring process is used to hire new employees. Each interviewer votes to hire or not hire a candidate. If 75% of the votes are to hire, then the candidate is hired; otherwise, the candidate is rejected. The process is modeled using the parallel workflow, where each interviewer can vote independently from the other interviewers.
Parallel workflow has the following pattern-specific parameters.
The percentage required for an outcome to be chosen as the final outcome
The default outcome
Configuration if early completion is enforced
Figure 16-36 shows where these parameters are configured.
Changing the outcomes after creation of the user task
The outcomes are captured in the XML task configuration file, where they can be changed manually. See "Task Outcomes" for more information.
Changing the parameters of the outcome determination policy
The assign named setUserDefinedAttributes in the generated scope captures the outcome determination policy. The percentage required for the final outcome is assigned to the BPEL variable oraBPMConclusionPercentage and the default outcome is set in the BPEL variable oraBPMDefaultConclusion.
Parallel workflow with a final reviewer is an extension of the parallel workflow in which, after users review the task in parallel, the task is assigned to a final reviewer. The final reviewer can be users or groups. When there is more than one final reviewer or if the task is assigned to a group, one of the users must acquire the task before reviewing it. All that applies to the parallel workflow applies to the parallel workflow with final reviewer as well. The final reviewer can see all the subtasks, where each subtask is a task that was acted on by a user in the parallel workflow.
The final reviewer (users or groups) of the task can be specified in one of the following ways:
List of users or groups from OID set during the process design time
List of users or groups from another business process variable
The outcome of the final task is selected based on the outcomes of each of the subtasks, as in the parallel workflow. The final reviewer can check the outcome that is selected based on the outcome determination policy from the history of the task from the Worklist Application.
Parallel workflow with final reviewer is implemented using the task continuation concept. See "Task Continuations" for more information. Parallel workflow with final reviewer is a parallel workflow continued by a simple task.
A DocumentReview process is used to review a document. The document creator creates the document and initiates a process by specifying the document and the reviewers of the document. Each reviewer can review the document simultaneously and independently of the other reviewers. After all the reviewers are done reviewing, the creator of the document gets to review the comments of the reviewers. See the DocumentReview example in the samples directory for an implementation of this use case.
|
See: Oracle_Home\integration\orabpel\samples\demos
|
Parallel workflow with final reviewer has the same pattern-specific parameters as parallel workflow. In addition to choosing the parallel participants, the final reviewer must also be set. Figure 16-37 shows where the final reviewer is selected.
All the customizations for the parallel workflow apply to this pattern, in addition to the following:
Changing the final reviewer of the task
The assign named setUserDefinedAttributes in the generated scope captures the reviewers. The reviewers are set in the /taskmngr:assigneeEntities/taskmngr:assignee attribute of the oraBPMReviewers variable. This assignment can be changed to change the final reviewer.
Adhoc workflow is used when each user selects users or groups as the next assignee when approving the task. As part of configuring the workflow, only the initial assignee is set. A user can choose either to complete the task by selecting an outcome or to set an outcome and send the task to other users or groups.
Figure 16-38 shows how sequential workflow is implemented in Oracle BPEL Process Manager.
This pattern is typically used when a sequence of users or roles that need to act on the task is not determined automatically by the workflow process, but instead by the user who is currently assigned the task. Each user decides whether the task must be routed further or if it is complete. For example, an HR representative writes a new policy document and has it reviewed by their manager. The manager may decide that another person should also review it before it is accepted. This person may in turn forward the task to others before approving it. Hence, the task may be routed to multiple users before coming back to the original reviewer, who then finally approves it based on comments from others.
Changing the initial assignee of the task
The assign named setUserDefinedAttributes in the generated scope captures the assignment of the task assignee. Depending on whether the task is assigned to a user or a group, the task attribute assigneeUsers or assigneeGroups is set. This assignment can be changed to modify the initial assignee.
The FYI task is a nonblocking task that is listed as an assigned task for the assignee in the Worklist Application. The process that created the task does not wait for a response from the user. The process continues after creating the task. From the Worklist Application, the user can perform the available custom action so that the task no longer appears in the assigned list.
The FYI task cannot be extended. Any other workflow can be extended with an FYI task, but the FYI task itself cannot be extended.
Figure 16-39 shows how the FYI task is implemented in Oracle BPEL Process Manager.
A purchase order approval system processes purchase orders. When the system processes approvals over $100,000, a supervisor must be notified, but without stopping the processing. This information is used by the supervisor to monitor the system.
Changing the assignee after creating the FYI task
The assign named setUserDefinedAttributes in the generated scope captures the assignment of the task assignee. Depending on whether the task was assigned to a user or a group, the task attribute assigneeUsers or assigneeGroups is set. This assignment can be changed to modify the task assignee.
The User Task 2.0 Macro supports the user task from earlier releases. This user task requires the business process modeler to assign task properties explicitly and also requires a custom application to view and act on tasks. The User Task 2.0 Macro is available for backward compatibility and is replaced with the workflow services and patterns in this release.
Tasks created using the User Task 2.0 Macro cannot be viewed in the Worklist Application. These tasks cannot be continued with the continue task concept.
Complex workflow patterns can be built using the task continuation (extension) concept. Task continuation allows one workflow to be continued with another workflow. For example, if you have a document review workflow that goes through a voting process followed by two level manager approvals before the document is published, you can start with the Parallel Workflow pattern and select the Extend Existing Workflow check box to add the Sequential Workflow pattern. The second workflow shares the task details and history with the first workflow. The Extend Existing Workflow check box is disabled if there are no existing workflows.
When a workflow is continued with another workflow, the following information is carried over to the new workflow:
Task payload and the changes made to the payload in the previous workflow
Task history
Comments added to the task in the previous workflow
Attachments added to the task in the previous workflow
Task configuration such as outcomes and notification messages
When a workflow is being created, the first window in the wizard (see Figure 16-40) enables you to determine if a new workflow should be created or a previous workflow should be extended. When Extend Existing Workflow is selected, all the existing workflows are listed. Selecting a particular workflow permits the user to extend (continue) the selected workflow.
Any workflow pattern can be extended with any other workflow pattern, with the following restrictions:
The FYI task cannot be extended. Any other workflow can be extended with an FYI task, but the FYI task itself cannot be extended.
The User Task 2.0 Macro cannot be extended.
No workflow can be extended with the User Task 2.0 Macro.
When a task is extended, the previous task's expiration date is also carried over. This has the following impact:
If no expiration duration was set in the old task, and
if there is no expiration duration set in the extended workflow, then the task does not expire.
if a new expiration duration is set in the extended workflow, then this expiration duration is based on the time the extended task is initiated.
If an expiration duration was set in the old task, and
if there is no expiration duration set in the extended workflow, then the expiration date of the old task is the expiration date of the current task.
if a new expiration duration is set in the extended workflow, then this expiration duration is based on the previous expiration date (task:task/task:expirationDate).
If the expiration date carry over is not required for the scenario being modeled, then the expirationDate element must be cleared. You can add a copy in the setUserDefinedAttributes of the generated scope to set the /task:task/task:expirationDate element to the expression string(''). Figure 16-41 shows the copy wizard with such an assignment.
The first workflow from which others are extended must have a union of all the conclusions of all the workflows.
For example, if the first workflow has conclusions of yes and no, the second workflow has conclusions of yes and maybe, and the third workflow has conclusions of no and let's see, then design the first workflow with conclusions of yes, no, maybe, and let's see.
A hiring process is used to hire new employees. Each interviewer votes to hire or not hire a candidate. If 75% of the votes are to hire, then the candidate is hired; otherwise, the candidate is rejected. If the candidate is to be hired, then the human resources contact completes the hiring process. The HR contact also needs to see the interviewers and the comments they made about the candidate. This process can be modeled using a parallel workflow for the hiring. If the candidate is hired, then a simple workflow can extend the parallel workflow so that the hiring request, history, and the interviewer comments are carried over. This simple workflow is assigned to the HR contact.
There are no parameters specific to the extended workflow. The parameters are driven by the pattern chosen for the extended workflow.
The follow customization applies:
Customization applicable to the workflow pattern also applies to the extended workflow.
Changing a new workflow to an extended workflow
Any new workflow can be changed to an extended workflow. For example, if Workflow1 uses the BPEL variable Workflow1Var and Workflow2 uses Workflow2Var, and Workflow2 must be changed to extend Workflow1, then do the following:
Delete the BPEL variable Workflow2Var.
Replace all occurrences of Workflow2Var in the BPEL with Workflow1Var.
In the generated scope, after the BPEL assign activities, there is a scope named initiateTask. In this scope, there is an invoke initiateTask activity that calls the TaskManagerService in the operation initiateTask. Change this operation to reinitiateTask.
This customization is useful when two workflows that have different payloads must carry the same history information. When modeled as new workflows, the modeler can take advantage of the autogenerated JSP for display purposes and then change the new workflow to an extended workflow.
In many cases, the outcome of a task determines the flow of the business process. To facilitate modeling of the business logic, when a user task is generated, a BPEL switch activity is also generated with prebuilt BPEL case activities. By default, one case branch is created for each outcome selected during creation of the task. An otherwise branch is also generated in the switch to represent cases when the task is withdrawn, expired, or errored.
The task carries a payload in it. If the payload is set from a business process variable, then an assign with the name copyPayloadFromTask is created in each of the case and otherwise branches to copy the payload from the task back to its source. If the payload is expressed as other XPath expressions (such as ora:mergeChildNodes(...), ora:getNodes(...)), then this assign is not created because of the lack of a process variable to copy the payload back. If the payload need not be modified, then this assign can be removed.
By default, the switch activity contains case statements for the outcomes only. The other task conclusions are captured in the otherwise branch. These conclusions are as follows:
The task is withdrawn
The task is errored
The task is expired
If business logic must be added for each of these other conclusions, then case statements can be added for each of the preceding conditions. The case statements can be created as shown in the following BPEL segment. The XPath conditions for the other conclusions in the case activities for each of the preceding cases are shown in bold.
<switch name="taskSwitch">
  <case condition="bpws:getVariableData('SequentialWorkflowVar1',
'/task:task/task:state') = 'COMPLETED' and
bpws:getVariableData('SequentialWorkflowVar1', '/task:task/task:conclusion') = 'ACCEPT'">
    <bpelx:annotation>
      <bpelx:pattern>Task outcome is ACCEPT
      </bpelx:pattern>
    </bpelx:annotation>
      ...
  </case>
  <case condition=
"bpws:getVariableData('SequentialWorkflowVar1', '/task:task/task:state') = 'WITHDRAWN'">
    <bpelx:annotation>
      <bpelx:pattern>Task is withdrawn
      </bpelx:pattern>
    </bpelx:annotation>
     ...
  </case>
  <case condition=
"bpws:getVariableData('SequentialWorkflowVar1', '/task:task/task:state') = 'EXPIRED'">
    <bpelx:annotation>
      <bpelx:pattern>Task is expired
      </bpelx:pattern>
    </bpelx:annotation>
     ...
  </case>
  <case condition=
"bpws:getVariableData('SequentialWorkflowVar1', '/task:task/task:state') = 'ERRORED'">
    <bpelx:annotation>
      <bpelx:pattern>Task is errored
      </bpelx:pattern>
    </bpelx:annotation>
     ...
  </case>
  <otherwise>
    <bpelx:annotation>
      <bpelx:pattern>Task is EXPIRED, WITHDRAWN or ERRORED
      </bpelx:pattern>
    </bpelx:annotation>
      ...
  </otherwise>
</switch>
Notifications are sent to alert users of changes to the state of a task. Notifications can be sent through any of the following channels: e-mail, telephone voice message, fax, pager, or SMS.
The notifications for a task can be configured during the creation of a task. Notifications can be sent to different types of participants for different actions. The actions for which a task notification can be sent are as follows:
Assigned—when the task is assigned to users or a group. This action captures the following actions:
Task is assigned to a user
Task is assigned to a new user in a sequential workflow
Task is renewed
Task is delegated
Task is reassigned
Task is escalated
Task is resumed (from a suspension)
Information for a task is submitted
Information is requested for a task
Task is suspended
Task is errored
Task is expired
Task is completed
Task is withdrawn
Reminder
Notifications can be sent to users involved in the task in various capacities. This includes:
Assignees—the users or groups to whom the task is currently assigned
Creator—the user who created the task
Approvers—the users who have approved the task so far
This applies in a sequential workflow where multiple users have approved the task and a notification must be sent to all of them.
When the task is assigned to a group, each user in the group is sent a notification if there is no notification endpoint available for the group.
The channel through which a user is notified is determined by the notification preference attribute of the user as specified in JAZN. The notification preference is identified by the attribute orclWorkflowNotificationPreference. In a JAZN file-based system, the value for this attribute can be changed in users-properties.xml at
Oracle_Home\integration\orabpel\system\services\config
In an OID-based system, the user properties can be changed using Oracle Delegated Administration Service. If this attribute is not set, the e-mail channel is used as the default.
Notification messages can include static strings and XPath expressions as follows:
<html>
<body>
<%bpws:getVariableData('TaskNotification',
 '/taskNotification:taskNotification/taskNotification:
recipientDisplayName')%>
<br>
<%bpws:getVariableData('taskObject', '/task:task/task:title')%>
 is assigned to
 you. Please act on the task from the <A
 href="<%bpws:getVariableData('TaskNotification', '/taskNotification:taskNotification/taskNotification:
worklistApplicationLink')%>Ó>
Worklist Application</A>
</body>
</html>
In creating the messages, only two BPEL variables are available to the user—the task variable and a task notification variable. This restriction is because the messages are evaluated outside the context of the BPEL process. The payload in the task variable is also strongly typed to contain the type of the payload for the XPath tree browsing. The task notification variable is a transient variable available to get information about the recipient and assignees.
Table 16-1 lists the elements that are available when using the task notification variable.
Table 16-1 Elements for the Task Notification Variable
| Element Name | Description |
|---|---|
|
|
The recipient id |
|
|
The locale of the recipient to use in getting messages from resource bundles for internationalization. Messages from bundles can be retrieved using the |
|
|
The display name of the recipient as in the user store (OID, Active directory, and so on). If no display name is specified, the convention |
|
|
A comma-separated string of all the assignee ids. |
|
|
A comma-separated string of all the assignee display names. |
|
|
The link to the Worklist Application. This link takes the user to the particular task for which the e-mail is sent. |
|
|
If actionable notifications are enabled, the actions link has text to create HTML links of the format |
|
|
The process URL is useful to look up a resource bundle that is deployed with the BPEL suitcase. Messages from resource bundles can be retrieved using the |
Any XPath extension function that can only be evaluated within the context of a business process such as ora:getProcessURL() or ora:getInstanceId() cannot be evaluated in the task notifications. Task attributes such as processName, processVersion, instanceId, and domainId can be used for these purposes.
Task actions can be performed through e-mail, if the task is set up to enable e-mail actions. (The same actions can also be performed from the Worklist Application.) An actionable e-mail account is the account in which task action-related e-mails are received and processed. This e-mail account name is identified by the element actionableEmailAccount in the XML file Oracle_Home\integration\orabpel\system\services\config\wf_config.xml.
For example:
<workflowConfigurations
   xmlns="http://xmlns.oracle.com/pcbpel/humanworkflow/configurations">

   <actionableEmailAccount>AccountReceiving</actionableEmailAccount>
    ...
</workflowConfigurations>
Figure 16-42 shows where you specify if the e-mail message is an actionable message.
Figure 16-42 Notification Service Wizard - Step 1 of 1: Specify Email Parameters
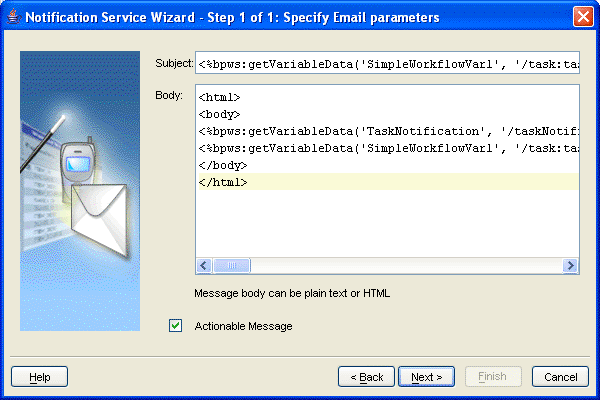
Tasks can be configured to send reminders, which can be based on the time the task was assigned to a user or the expiration time of a task. The number of reminders and the interval between the reminders can also be configured. The message marked for reminders (REMINDER) is used, and if there is no such message, the message meant for the assignees when the task is assigned is used to send reminders.
Reminders can be added in the task configuration file. In the task configuration file, the reminder element is added inside the notifications element as follows:
<taskType ......... >

    <task actionableNotifications="YES">
    ..........
    </task>

    <notifications>
        <reminder recurrence="1" relativeDate="ASSIGNED">PT3H</reminder>

        <action name="REMINDER">
            <messages recipient="ASSIGNEES"

xmlns:ns="http://xmlns.oracle.com/ias/pcbpel/NotificationService">

            .............

            </messages>
        </action>
        <action name="ASSIGNED">
            <messages recipient="ASSIGNEES"

xmlns:ns="http://xmlns.oracle.com/ias/pcbpel/NotificationService">

            .............

            </messages>
        </action>
    </notifications>
</taskType>
The recurrence specifies the number of times reminders are sent. The possible values for recurrence are EVERY, NEVER, 0, 1, 2 …, 10.
The relativeDate specifies if the reminder duration is computed relative to the assigned date or to the expiration date of the task. The possible values for the relativeDate are ASSIGNED and EXPIRATION.
The value for the reminder element itself is the duration from the relativeDate and the first reminder and each reminder since then. The data type of duration is xsd:duration, whose format is defined by ISO 8601 under the form PnYnMnDTnHnMnS. The capital letters are delimiters and can be omitted when the corresponding member is not used. Examples include PT1004199059S, PT130S, PT2M10S, P1DT2S, -P1Y, or P1Y2M3DT5H20M30.123S.
The following examples illustrate when reminders are sent.
The relativeDate is ASSIGNED, the recurrence is EVERY, and the reminder duration is PT1D. If the task is assigned at 3/24/2005 10:00 AM, then reminders are sent at 3/25/2005 10:00 AM, 3/26/2005 10:00 AM, 3/27/2005 10:00 AM, and so on until the user acts on the task.
If the relativeDate is EXPIRED, the recurrence is 2, the reminder duration is PT1D, and the task expires at 3/26/2005 10:00 AM, then reminders are sent at 3/24/2005 10:00 AM and 3/25/2005 10:00 AM if the task was assigned before 3/24/2005 10:00 AM.
If the relativeDate is EXPIRED, the recurrence is 2, the reminder duration is PT1D, the task expires at 3/26/2005 10:00 AM, and the task was assigned at 3/24/2005 3:00 PM, then only one reminder is sent at 3/25/2005 10:00 AM.
The task payload is an XML structure that must be displayed in a usable form in the Worklist Application. You have three options for displaying the payload in the Worklist Application:
As Figure 16-43 shows, any of these options can be selected as the payload display mechanism in the Workflow wizard. The Payload field is expecting a bpws:getVariableData function that gets the payload root from a BPEL process's variable data.
Figure 16-43 Workflow Wizard - Step 3 of 6: Task Details
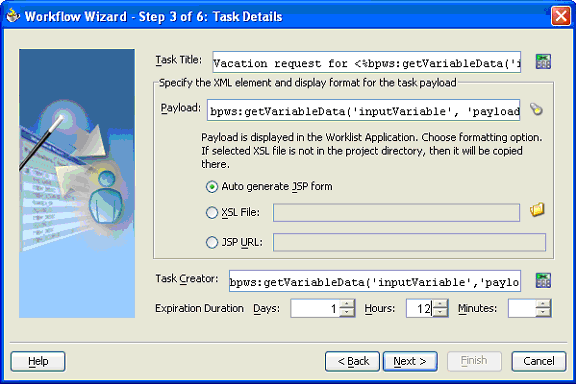
When the Auto generate JSP form option is selected, two files, a default JSP file and a mapping file, are automatically generated to display the payload at the end of the Workflow wizard.
The name of the default JSP file, task_name_WF_Form.jsp, is generated based on your task name. The file is added to the HTML root directory of your project, which is by default the public_html directory.
Along with the default JSP file, a mapping XML file is also generated. It is named task_name_WF_Fields.xml, and is added to the root directory of your project.
Behind the scenes, the JSP run-time library and the OraBPEL library are automatically added to your BPEL project for compilation of the JSP file.
The default JSP was designed with two goals in mind:
To present you with a simple form; that is, an XSD tree with a depth of more than three must be shown in a more readable way in the JSP.
The default JSP must require minimum modification. If modification is unavoidable, it can be easily performed with a WYSIWYG tool.
To attain these goals, instead of presenting a tree structure that mimics the payload XSD structure, the default JSP groups the entire payload structure in sections. It groups simple types that belong to the same parents and makes them sections.
For example, assume you provide the following payload XSD:
<schema xmlns="http://www.w3.org/2001/XMLSchema"
        targetNamespace="http://www.mycompany.com/mycompany"
        xmlns:mp="http://www.mycompany.com/mycompany">

  <element name="myCompany" type="mp:myCompanyType"/>

  <complexType name="myCompanyType" >
    <sequence>
      <element name="board" type="mp:boardType" />
      <element name="CEO" type="string"/>
      <element name="department" type="mp:departmentType" maxOccurs="unbounded"/>
    </sequence>
  </complexType>

  <complexType name="boardType">
    <sequence>
      <element name="size" type="int" />
      <element name="head" type="string" />
    </sequence>
  </complexType>

  <complexType name="departmentType">
    <sequence>
      <element name="size" type="int" />
      <element name="head" type="string" />
      <element name="function" type="string" />
    </sequence>
  </complexType>

</schema>
This XSD has the structure shown in Figure 16-44.
Figure 16-44 Structure of the XSD for myCompanyType
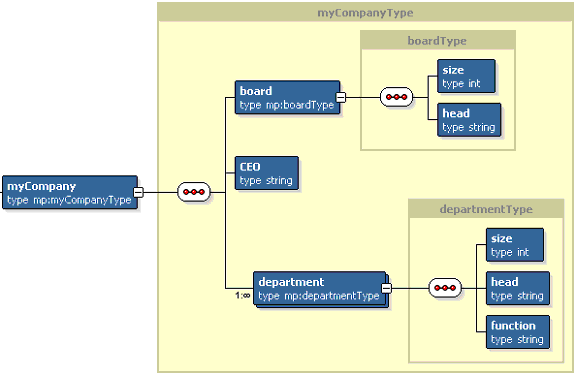
In the default JSP, based on the structure of the leaf nodes, there are three sections: {size, head}, {CEO}, and {size, head, function}. These three sections are named according to their parents' names; that is, the sections are named board, my Company, and department, respectively. In the board section, there are two fields, size and head. Each of these fields are in an editable HTML input type.The section department is different from other sections and can have multiple occurrences (maxOccurs > 1). In this case, all the fields in this section (that is, size, head, and function) are horizontally presented in a table, with each row representing one department. This is called a table section. There is a plus (+) button for adding a row (department) and a minus (-) button for subtracting a row (department) for the department table section.Unlike a regular section, it is not necessarily true that all the fields belong to the same XSD parent in a table section. For example, suppose the head element has two elements: employeeNumber and dateOfBirth. Since these two elements have maxOccurs set to less than or equal to 1, they are shown in the same department table section. This is a desired behavior, because adding a row in the department table not only adds a size and a function field, but also adds the head information fields in the same department row. This makes it easy to move through complicated payload instances.
Nested multiple (maxOccurs > 1) elements are supported. Assume the department element has a groupMember child element whose maxOccurs is unbounded. In that case, the parent element department is presented in a table section while the child groupMember elements are presented in different child table sections. The parent department table section has a column called group member that contains an HTML href link pointing to its corresponding child group member section in each department row. Pressing the + button in the parent department section not only adds a row in the parent table, but also adds a child section for that corresponding new row.
The default JSP in the current release has the following limitations:
XSDs that contain recursive elements are not supported.
The default JSP shows all the simple types defined in the payload XSD. If multiple simple types belong to the same XSD choice block, all these simple types are shown in the default JSP. Although simple types are preserved in the JSP, XSD restrictions are not relevant.
Only payloads copied from variables that are not simple types are supported. As an example, in the payload field in Figure 16-43, if the query is bpws:getVariableData(var) or bpws:getVariableData(var, part) and the variable is a simple type, then JSP generation fails. Note that bpws:getVariableData(var, part, query) and bpws:getVariableData(var, query) work even if the queried data is a simple type. You only need to make sure the variable itself is not a simple type.
XSI extensions are not supported
No special handling of XSD order indicators occurs (that is, choice, all, and sequence). For example, the default JSP does not check if you entered both firstname and lastname:
<xs:element name="person">
 <xs:complexType>
   <xs:all>
     <xs:element name="firstname" type="xs:string"/>
     <xs:element name="lastname" type="xs:string"/>
   </xs:all>
 </xs:complexType>
</xs:element>
The autogenerated default JSP is generic, and so may require changes to improve its look and feel. The JSP works in conjunction with the mapping file to determine which elements in the payload are displayed in the form.
The mapping file gives you control of the presentation. The mapping file is an XML file that contains a list of showable fields. The root element in the mapping file contains its targetNameSpace, other namespaces, showXmlView, and xmlEditable as its attributes.
The payload, by default, shows only the HTML form view. It also has an XML source view that can be used to set payload XML directly. ShowXmlView identifies if the XML source view is enabled, while xmlEditable identifies if the XML source view in the payload presentation is editable or not. ShowXmlView is set to false by default, while xmlEditable is set to true.
All the elements that are simple types are listed as fields in the mapping file. Along with these elements, their immediate parents are listed as well for multilanguage support. Each field has three properties defined in the mapping file. They are xpath, editable, and resource_key.
The xpath property defines the XPath of this field. It is always prefixed by /ns0:task/ns0:payload. This is the XPath to the root of the payload object. When maxOccurs is greater than 1, it is denoted by [*]. For example, /ns0:task/ns0:payload/company[*]/ceo shows that maxOccurs is greater than 1 for the company field.
|
Note: Do not modify this XPath field because it is also a unique key that determines the identity of the field. |
The editable property defines if this field is editable. It defaults to true. If the value of this field is changed to false, the default JSP shows a disabled text field that disallows value changes.
The resource_key property is for multilanguage support. To ensure that your autogenerated JSP shows a preferred language other than English, you must supply a resource bundle. To do that, you modify your taskConfigtaskName.xml file. Add two attributes—resourceBundleName and resourceBundleLocation—to the top element, task. The resourceBundleLocation attribute points to a JAR file, and resourceBundleName specifies the resource bundle's file name in the JAR file. The resourceBundleLocation attribute is optional for globalization purposes.
The following code shows an example of taskConfig<taskName>.xml:
<taskType name="taskConfigSimpleWorkflow2.xml"
     resourceBundleName="MyBundle"
     targetNamespace="http://taskTypes/taskConfigSimpleWorkflow2.xml"
     features="xpathNotification"
     xmlns:tns="http://taskTypes/taskConfigSimpleWorkflow2.xml"
     xmlns:bpws="http://schemas.xmlsoap.org/ws/2003/03/business-process/"
     xmlns:xp20="http:
//www.oracle.com/XSL/Transform/java/oracle.tip.pc.services.functions.Xpath20"
     xmlns:ldap="http://schemas.oracle.com/xpath/extension/ldap"
     xmlns:xsd="http://www.w3.org/2001/XMLSchema"
     xmlns:Notification="http:
//xmlns.oracle.com/pcbpel/taskservice/taskNotification"
     xmlns:client="http://xmlns.oracle.com/i18nProcess"
     xmlns:ora="http://schemas.oracle.com/xpath/extension"
     xmlns="http://xmlns.oracle.com/pcbpel/taskservice/tasktype"
     xmlns:ns="http://xmlns.oracle.com/ias/pcbpel/NotificationService"
     xmlns:bpelx="http://schemas.oracle.com/bpel/extension"
     xmlns:task="http://xmlns.oracle.com/pcbpel/taskservice/task"
     xmlns:orcl="http:
//www.oracle.com/XSL/Transform/java/oracle.tip.pc.services.functions.ExtFunc">
  <task actionableNotifications="YES"
     xmlns="http://xmlns.oracle.com/pcbpel/taskservice/tasktype">
    <conclusions>
      <conclusion name="ACCEPT">
        <displayValue>getMessage(ACCEPT_MSG)</displayValue>
      </conclusion>
...
</taskType>
MyBundle points to a properties file that resides at the root of the project. The following code shows an example of MyBundle_en-US.properties:
ACCEPT_MSG = Accept0
REJECT_MSG = Reject0
FLEX_STRING1_MSG = Flex String1
FLEX_LONG1_MSG = Flex Long1
FLEX_DATE1_MSG = Flex Date1
TASK_TITLE = i18n Task
In this case, if a field is defined in your mapping file as follows
   <field>
      <xpath>/ns0:task/ns0:payload/taskTitle</xpath>
      <editable>true</editable>
      <resourceKey>TASK_TITLE</resourceKey>
   </field>
then calling
PayloadUtil.getElementDisplayName("/ns0:task/ns0:payload/taskTitle", ,
form, context.getLocale(), task)
in the default JSP returns the string i18n Task if your locale is set to en-US. Similarly, if your locale is set to French, the proper properties file (MyBundle_fr.properties) is picked up.
If the mapping file does not provide enough control, you can modify the default JSP file. Only modify the section after the label:
/* Modify the code below when necessary */
Most JSP modifications can be made in the JSP design view of JDeveloper BPEL Designer.
By default, all the fields are set to text field. If you want to change text field to text area, you can do the following. In the Component Palette, select Text Area, as shown in Figure 16-45. Drop it into the position of the text field you want to replace. Note that the name of the text field is set by calling the function PayloadFormGenerator.constructName(String xpath), and the value of the field is set by PayloadFormGenerator.selectNodeValue(Element payload, String xpath, Map namespace). These functions must be used to construct form field names and to retrieve form field values. Set the text area's name and value to the same name and value as text field. Delete the text field.
Figure 16-45 JDeveloper BPEL Designer JSP Design View
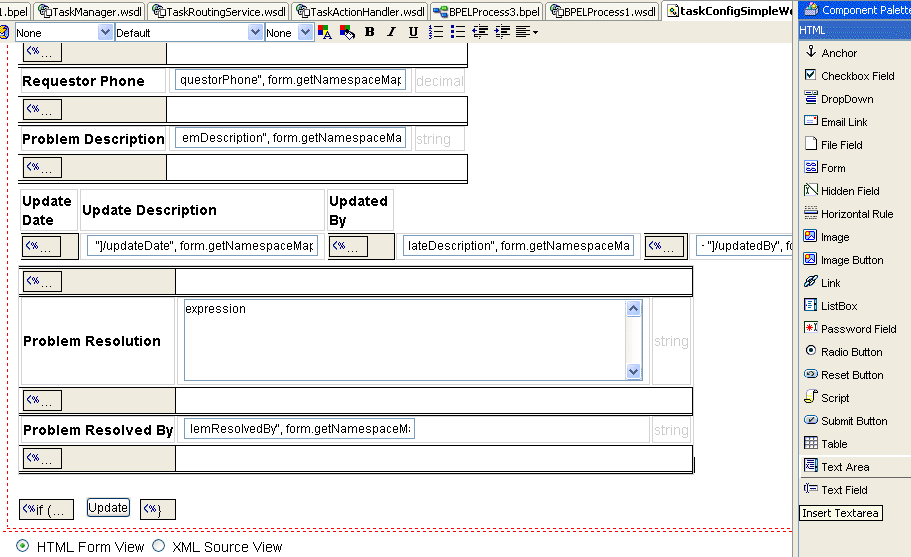
In the place you want to insert text or other HTML elements that are not in a table, add text by typing it or add an HTML element by dragging and dropping the HTML component from the Component Pallet.
If the place you want to insert HTML elements that is in an HTML table, to insert text or a horizontal rule, first add a table row by clicking a row, right-clicking, and selecting Insert Row. After a row is inserted, you may need to merge all the cells in the row by selecting all the cells in the row and right-clicking to select Merge Cells. Then you can either type your text or drag and drop your HTML component.
If you want to change the layout of the table or form, highlight the section you want to modify, right-click, and select table or form. If you want to format the text, use the toolbar's color and style buttons.
It is recommended that you modify the default JSP's look and feel only. You should preserve the functions being used in the JSP. You must not alter the hidden parameters being submitted in the HTML form, because the Update button invokes form submission to the UpdateServlet that expects certain values. If your change is complicated and has programming logic in it, you must switch to the source view and modify the JSP code directly. See "The Custom JSP URL" for a lightweight code analysis of the JSP.
|
See Also: TheHelpDeskServiceRequest demo in Oracle_Home\integration\orabpel\samples\demos for an example of an autogenerated JSP and how to change the payload presentation
|
By putting the statement <%@ page pageEncoding="UTF-8" %> in the default JSP, UTF-8 is set as the default encoding. If you want to modify this statement to set the JSP to other encoding, for example ISO, then you must also change UpdateServlet. To do this, add one encoding element in the taskConfigtask_name.xml file. The modified file looks as follows:
<taskType>
   <task>
      ...
      <payloadDisplay>
         <jsp>defaultWFPayloadJSP</jsp>
         <xpathFile>taskConfigSimpleWorkflowWithAutomaticEscalation
            1_WF_Fields.xml</xpathFile>
         <encoding>ISO</encoding>
      </payloadDisplay>
    </task>
</taskType>
To ensure that a multibyte payload is correctly displayed on the Task Detail page, modify the TaskConfigtask_name.xml file that is generated during design time by adding the following element as a child element of PayloadDisplay:
<encoding>character_set_used_for_JSP</encoding>
If this element is not specified, UTF-8 is used by default.
Using JDeveloper BPEL Designer, you can deploy your BPEL project directly to OC4J. When you deploy your project, the default JSP file is deployed at
Oracle_Home\integration\orabpel\system\appserver\oc4j\j2ee\home\applications\hw_
services\
worklistxpress\payload\bpel_process_name_bpel_process_version\
Because every autogenerated JSP is named based on its task name only, by deploying the JSPs under their corresponding bpel_process_name_bpel_process_version directories, there are no collisions.
On other platforms, the same directory structure is used.
If you choose to deploy your project on OC4J by using obant, ensure that you copy the autogenerated JSP file to the preceding directory by inserting a copy statement like the following to your project's build.xml file.
        <copy todir="${home}/system/appserver/oc4j/j2ee/home/applications/hw_
services/worklistxpress/payload/bpel_HelpDeskServiceRequest_1.0">
            <fileset dir="public_html">
                <include name="*.jsp" />
            </fileset>
        </copy>
If you make changes to your JSP or mapping file, you must deploy your BPEL project after the modifications.
|
See Also: TheHelpDeskServiceRequest demo in Oracle_Home\integration\orabpel\samples\demos for more information on the build.xml file
|
Another payload display option is to provide an XSL file that transforms the payload XML instance to HTML. The root of the XML instance that is to be transformed is the {http://xmlns.oracle.com/pcbpel/taskservice/task}payload element. The payload itself cannot be updated using this option.
|
See Also: Oracle_Home\integration\orabpel\samples\demos\OrderApproval for an example in which an XSL file is used to display the payload
|
A custom JSP can display the payload in the Worklist Application. This section describes how to write a JSP for payload presentation. Before deciding on writing a custom JSP, evaluate if the default payload JSP can be modified to suit your needs, since modifying the default JSP is the easiest way to construct your JSP. See "Customizing the Autogenerated JSP" for how to generate and modify the default payload JSP.
Code analyzing an autogenerated payload JSP helps you formalize how to write your JSP. The autogenerated JSP imports oracle.tip.pc.api.worklist.payload.*. This package contains classes used to access payload values.
The first section of the default JSP gets the payload object from the task object. No null checking is done for these variables in the JSP file because these checks are done before calling the JSP.
A form object is created from the task object. This form object represents the mapping file. The optional login page, next page, and error page are received from the parameter list in case they are needed in the JSP.
The call to PayloadFormGenerator.getRequiredFormParameters() returns a map of required parameters that must be sent to the JSP and the update payload servlet. This map contains parameter names (keys) and parameter values (values). Ensure that, in the payload JSP, you call this method and send these parameters so that the update payload servlet functions properly.
The next section contains code that presents the payload. The first div block gives the XML view of the payload, while the second div block provides the HTML form view. Notice that the name of every form parameter is the result of calling PayloadFormGenerator.constructName(xpath). This is because there are illegal characters in XPath while used as HTTP parameters. Ensure that the JSP calls this function to construct parameter names for the particular XPath.
Form.getField(xpath) gets the field from the mapping file. Since the custom JSP does not use a mapping file, this function need not be called.
PayloadFormGenerator.selectNodeValue() is the function that gets the value of the given XPath from the payload. The namespace map must be passed to this function.
Your JSP can use the update servlet provided in the application.
PayloadConstant.UPDATE_SERVLET_URL stores the URL of the payload update servlet.
The update servlet expects the following required parameters to be set:
PayloadConstant.WORKLIST_CONTEXT_PARAMETER_NAME
PayloadConstant.WORKLIST_TASKID_PARAMETER_NAME
And these optional parameters:
PayloadConstant.WORKLIST_TASK_VERSION_PARAMETER_NAME (optional)
PayloadConstant.WORKLIST_ERROR_PAGE_PARAMETER_NAME (optional)
PayloadConstant.WORKLIST_LOGIN_PAGE_PARAMETER_NAME (optional)
PayloadConstant.WORKLIST_NEXT_PAGE_PARAMETER_NAME (optional)
The preceding parameter names and their corresponding values can be obtained by calling the PayloadFormGenerator.getRequiredFormParameters() function.
It also expects certain parameters to be defined in the servlet's session object, but you need not be concerned about these parameters in your JSP file.
For all payload updates, the custom JSP must send the names and values of the fields that have to be updated. The names are constructed by calling PayloadFormGenerator.constructName(String xpath).
The update servlet must know what the prefixes represent in the XPath. Therefore, a namespace map must be sent to the servlet. Any parameter whose name starts with ns and is followed by a numeric number is assumed to be a namespace prefix. Its value is the namespace value. You should always send parameter ns0 with its value PayloadConstant.NS_ROOT_URL.
As with the autogenerated JSP, the JSP run-time library and the OraBPEL library are automatically added to your BPEL project for compilation of the custom JSP file.
The previous sections described how you can customize the look and feel of the payload portion of the task using a custom JSP, XSL, or by modifying the autogenerated JSP. You can also override the complete JSP, including the header (task attributes and actions section) and the footer (attachment, comments section) by specifying a custom JSP to display the entire task details. The payload JSP URL is captured in the task configuration XML file in the element payloadDisplay, as follows:
<taskType ...>
  <task ...>
   ...
    <payloadDisplay>
      <jsp>http://localhost:9700/payloads/vacationrequest/payload.jsp</jsp>
    </payloadDisplay>
      ...
  </notifications>
</taskType>
The following sections discuss how to configure task services.
If a task is assigned to groups or multiple users, one of the users in the group or the list of users must acquire the task before acting on it. After the task is acquired, none of the initial assignees can see the task if the task was assigned to them. If the user does not act within a given time, the task is automatically released so that all the other users in the group or list of users can see it. A particular business process can disable the autorelease by making autorelease a restricted action. See "Restricted Actions" for more information.
The release duration is configurable in the file wf_config.xml at
Oracle_Home\integration\orabpel\system\services\config
The configurations for the autorelease durations are in the element taskAutoReleaseConfiguration. The release durations can be configured for tasks of each priority. For each priority, the autorelease duration can be specified as a percentage of the expiration (the percentageOfExpiration attribute) duration or a default value (the default attribute). The default values are used when the task does not have an expiration duration. The datatype of default is xsd:duration, whose format is defined by ISO 8601 under the form PnYnMnDTnHnMnS. The capital letters are delimiters and can be omitted when the corresponding member is not used. Examples include PT1004199059S, PT130S, PT2M10S, P1DT2S, -P1Y, or P1Y2M3DT5H20M30.123S.
For example, if the task of priority 3 is acquired at 3/24/2005 10:00 AM and the task expires at 3/31/2005 10:00 AM, then the time left for expiration is 7 days. If the percentageOfExpiration for priority 3 tasks were 50, then the task is released at 3/37/2005 10:00 PM (3 ½ days from when it was acquired).
The taskAutoReleaseConfiguration element in the configuration file is shown as follows:
<workflowConfigurations
   xmlns="http://xmlns.oracle.com/pcbpel/humanworkflow/configurations">

   <taskAutoReleaseConfigurations>
      <taskAutoRelease priority="1" default="P1D" percentageOfExpiration="30"/>
      <taskAutoRelease priority="2" default="P2D" percentageOfExpiration="40"/>
      <taskAutoRelease priority="3" default="P3D" percentageOfExpiration="50"/>
      <taskAutoRelease priority="4" default="P4D" percentageOfExpiration="60"/>
      <taskAutoRelease priority="5" default="P5D" percentageOfExpiration="70"/>
   </taskAutoReleaseConfigurations>

</workflowConfigurations>
Task actions can be performed through e-mail. The actionable e-mail account is the account in which task action-related e-mails are received and processed. This e-mail account name is identified by the property oracle.tip.pc.services.hw.taskservice.actionableEmailAccount at
Oracle_Home\integration\orabpel\system\services\config\pc.properties
In the e-mails that are sent for tasks, the link to the Worklist Application is read from the XML file wf_config.xml at
Oracle_Home\integration\orabpel\system\services\config\
The element worklistApplicationURL identifies the URL. Configuring this is useful if the custom Worklist Application is built. The tag PC_HW_TASK_ID_TAG in this URL is replaced with the task id when constructing the URL for the e-mail.
<workflowConfigurations
   xmlns="http://xmlns.oracle.com/pcbpel/humanworkflow/configurations">

   <worklistApplicationURL >
http://localhost:9700/integration/worklistapp/TaskDetails?taskId=PC_HW_TASK_ID_TAG
</worklistApplicationURL >
...
</workflowConfigurations>
This section describes the identity service component of Oracle BPEL Process Manager. Identity service is a thin Web service layer on top of the Oracle Application Server 10g security infrastructure, namely OracleAS JAAS Provider (JAZN), or any custom user repository. It enables authentication and authorization of users and the lookup of user properties, roles, group memberships, and privileges.
Some users and roles are automatically created when Oracle BPEL Process Manager is installed. Seeded users include:
guest
default
bpeladmin
Identity service predefines the following roles, which can be granted to users to perform workflow-related operations:
PUBLIC—This role is an implicit JAZN role; it need not be granted explicitly to any of the users. If any user can authenticate with the worklist, then they can see tasks assigned to them or groups they belong to and act on these tasks.
|
Note: The BPMPublic role can be used and explicitly granted to each user if a third-party provider does not support an implicit PUBLIC role. |
BPMWorkflowReassign—This role enables a user to reassign tasks to any other user in the organization. A manager can always delegate tasks to any users under him in the organization hierarchy without any Reassign privileges. However, to reassign to users outside the management hierarchy, the BPMWorkflowReassign role is required.
BPMWorkflowSuspend—This role enables users to suspend a process. If a process is suspended, then the expiration time does not apply. When the process is resumed, then the expiration date is recomputed. Users cannot suspend the workflow if the process designer has designated Suspend as a restricted action, even if the user has the BPMWorkflowSuspend role.
BPMWorkflowViewHistory—In general, a user can see only the task assignment sequence as part of their worklist. This role enables a user to drill down further into the BPEL business process audit trail from the task approval sequence.
BPMWorkflowAdmin—This role enables a user to perform system actions on any workflow in the system. This role does not allow you to change the outcome of the task (such as approve or reject); it only allows you to perform actions such as delegate, escalate, and suspend. Only the task assignee or the process owner can change the outcome of the task.
BPMSystemAdmin—Both BPMWorkflowAdmin and BPMSystemAdmin have the same level of workflow privileges.
Some of these roles are nested. The BPMWorkflowReassign, BPMWorkflowSuspend, and BPMWorkflowViewHistory roles are granted to the BPMWorkflowAdmin role. The BPMSystemAdmin role is granted to the seeded bpeladmin user.
The following table represents the relationship between the grantees and roles:
| Role\Grantee | bpeladmin | default | guest | BPMWorkflowAdmin | BPMSystemAdmin |
|---|---|---|---|---|---|
| BPMSystemAdmin | Directly | -- | -- | -- | -- |
| BPMWorkflowAdmin | Indirectly through BPMSystemAdmin | -- | -- | -- | Directly |
| BPMWorkflowReassign | Indirectly through BPMSystemAdmin | -- | -- | Directly | Indirectly through BPMWorkflowAdmin |
| BPMWorkflowSuspend | Indirectly through BPMSystemAdmin | -- | -- | Directly | Indirectly through BPMWorkflowAdmin |
| BPMWorkflowViewHistory | Indirectly through BPMSystemAdmin | -- | -- | Directly | Indirectly through BPMWorkflowAdmin |
Oracle BPEL Process Manager identity service supports three types of providers: JAZN, third-party LDAP, or custom plug-in, as shown in Figure 16-46.
The identity service providers are used to perform the following operations:
Authentication—authenticates users given their username and password
Authorization—determines roles and group memberships for a specific user. These roles are then used to control access to various work items and operations on the worklist.
Retrieve user properties—includes contact information such as first name, last name, phone, e-mail, preferred notification channel, language preference, time zone, and organization details such as manager name and reportees.
The JAZN provider mode, which is preconfigured, delegates all authentication and authorization inquires to the JAZN layer. Two JAAS providers are supplied as part of the OC4J security infrastructure: the XML-based file and LDAP-based OID.
The XML-based provider type is used for lightweight storage of information in the XML files. All the user names, roles, and permissions are stored in XML files. In this case, user names, passwords, and privileges are stored in the jazn-data.xml file. In addition, Oracle BPEL Process Manager uses a user-properties.xml file that works in conjunction with this file to store detailed user properties such as name, e-mail, phone, and manager.
The LDAP-based provider type is based on the Lightweight Directory Access Protocol (LDAP) for centralized storage of information in a directory. OID is a standard LDAP-based directory that provides a single, centralized repository for all user data. It allows sites to manage user identities, roles, authorization, and authentication credentials, as well as application-specific preferences and profiles in a single repository.
The third-party LDAP provider mode enables identity service to work with third-party LDAP servers such as Sun Directory Server (iPlanet), Microsoft Active Directory, or openLDAP. In this mode, identity service assumes that the directory is the central repository of all user data, including authentication credentials, roles, and profiles. The standard organizationalPerson, inetOrgPerson objects from the LDAP schema are used to retrieve these details.
This mode enables UPI to define a new custom identity service provider to plug in a specific non-LDAP-based user repository. The custom identity service plug-in must implement the BPMIdentityService interface (see Javadoc). This identityservice class name must be registered in is_config.xml. See "User and Role Properties" for more information.
You use directory-specific tools to create realms, users, or groups. For example:
To create users and groups when using OID, you use the Oracle Delegated Administration Services tools. See Oracle Identity Management Guide to Delegated Administration for more information.
To create users and groups credentials when using the XML-based JAZN provider, you use the JAZN Admintool to modify the jazn-data.xml file. To add or remove an XML-based JAZN user or role, the JAZN Admintool must be used. You can manually edit the users-properties.xml file to specify detailed user properties that JAZN does not support.
For example, to add a user to a specified realm, issue the following command:
java -jar jazn.jar -user adminUser -password adminPassword -adduser realmName newUser newUserPassword
The JAZN Admintool provides different command options. You can list all the options and their syntax with the -help option, as in:
java -jar jazn.jar -help
If you are using the XML-based provider, then you must supply a username and password to the Admintool. If you are using the LDAP-based provider, you need not specify the -user and -password arguments.
If you are using a third-party LDAP server or a custom user repository, you must use the specific tools available for that directory.
Identity service supports the following user properties:
Display name
Given name, middle name, and last name
Description
Title
E-mail address
Telephone number
Home phone number
Mobile phone number
Fax number
Pager number
Manager id
Time zone
Preferred language
Preferred notification channel
The preceding properties are optional for Oracle BPEL Process Manager users. However, some features, such as task notification, are not available if the contact information is not present in the directory. Also, automatic escalation and manager views are not available if the manager field is not available to identity service.
The following OID objectClasses are used to specify user and role properties such as mail, manager, and telephoneNumber.
top
person
cn
sn
description
telephoneNumber
organizationalPerson
title
telephoneNumber
facsimileTelephoneNumber
inetOrgPerson
displayName
givenName
manager
homePhone
mobile
pager
preferredLanguage
orclUserV2
middleName
orclTimeZone
orclWorkflowNotificationPref
orclGroup
Identity service maintains a connection pool to retrieve these properties from the LDAP directory.
If you are using the XML-based JAZN provider, the same entries are represented as XML elements in the users-properties.xml file in
Oracle_Home\integration\orabpel\system\services\config
The following sections describe how to configure identity services.
Identity service configuration is defined in the is_config.xml file. The file must be located in a directory that is included in the CLASSPATH of Oracle BPEL Process Manager. By default, it is stored in
Oracle_Home\integration\orabpel\system\services\config
The XML schema for the is_config.xml file is stored in
Oracle_Home\integration\orabpel\system\xmllib\workflow\xsd
Figure 16-47 shows the structure of the BPMIdentityService configuration.
Figure 16-47 BPMIdentityService Configuration
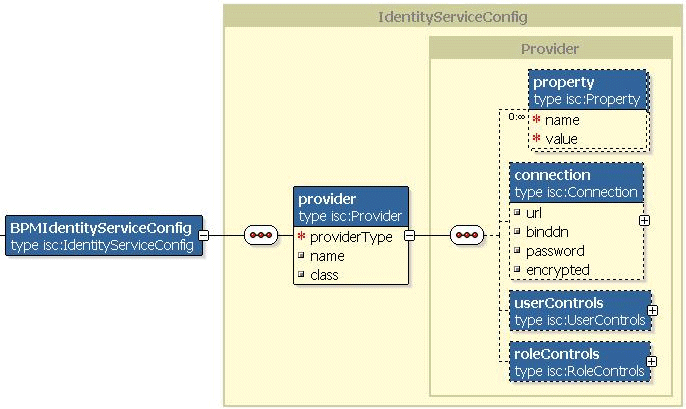
The identity service configuration file (as defined by is_config.xsd) consists of a root element BPMIdentityServiceConfig, which can have only one provider. As discussed previously, identity service supports the following main plug-in types: JAZN provider, third-party LDAP directories, or custom repository plug-ins.
The provider element specifies the providerType, which can be JAZN, LDAP, or CUSTOM, provider name (optional), and any provider-specific properties.
For example, in the case of the JAXN XML provider, you must set the providerType attribute to JAZN and specify the value of the userPropertiesFile attribute. See "Configuration for the XML-Based JAZN Provider" for more information about userPropertiesFile.
Similarly, if you use a custom plug-in to the identity service, you must set the providerType attribute to CUSTOM. You then specify the class name for custom identity service plug-in implementation, as follows:
<BPMIdentityServiceConfig mlns="http://www.oracle.com/pcbpel/identityservice/isconfig" >
  <provider providerType="CUSTOM"
    name="CustomPlugIn"
    class="package.name.CustomIdentityService"
  </provider>
</BPMIdentityServiceConfig>
In addition, the provider can define the following optional parameters in the configuration file. Most of these parameters apply to JAZN-based or LDAP-based providers, but can be used by custom providers also.
The connection element is used to specify the URL, admin username (binddn- bind as this Distinguished name), the credential (password) for the LDAP or RDBMS connection used by the identity service, and a Boolean flag (encrypted) to specify that the password is either in plain text or is encrypted. Identity service overwrites the is_config.xml file after reading the configuration and encrypts the user password if it finds the password in plain text. Figure 16-48 shows the structure of the connection configuration.
The connection can specify connection pool properties by setting the following attributes on the pool element:
initsize—initial size of the connection pool
maxsize—maximum size of the connection pool
prefsize— preferred size of the pool
timeout—time after which the connection is released if there is no activity (in seconds)
The LDAP plug-in for identity service uses the following default values:
initsize="2"
maxsize="25"
prefsize="10"
timeout="60"
If you are using a custom identity service plug-in, you can also specify any additional connection-specific properties as name-value pairs.
The userControls element is used to define user controls and to restrict the LDAP user search. Figure 16-49 shows the structure of the userControls element.
The roleControls element is used to define role controls and restrict the LDAP role search. Figure 16-50 shows the structure of the roleControls element.
Both userControls and roleControls can have a search element that has the following optional attributes:
searchbase—a list of LDAP entries, the distinguished names (DNs) of user or group containers.
maxSizeLimit—the maximum number of elements that are fetched from LDAP during a search operation
maxTimeLimit—the maximum time to wait to retrieve elements from an LDAP search
scope—determines the search level. The value can be onelevel, in which the search descends one level from the supplied DN or subtree, in which the search descends the hierarchy from the DN to the lowest level in the tree.
By default, the LDAP provider for identity service uses the following values: maxSizeLimit ="1000", maxTimeLimit ="120" (sec), and scope="subtree".
The provider element enables specifying additional property elements, which can be used by custom plug-ins. An example follows:
<BPMIdentityServiceConfig xmlns="http://www.oracle.com/pcbpel/identityservice/isconfig" >
  <provider providerType="CUSTOM" name="db2"
      class="package.name.CustomIdentityService"
    <property name="customProperty" value="customValue" />
  </provider>
</BPMIdentityServiceConfig>
In addition, the property element can be defined as part of any of the other elements (userControls, searchControls, search, and so on) in the configuration file.
The JAZN element jazn provider="XML" location="./jazn-data.xml"/ is in
Oracle_Home\integration\orabpel\system\appserver\oc4j\j2ee\home\
application-deployments\hw-services\orion-application.xml
and
Oracle_Home\integration\orabpel\system\appserver\oc4j\j2ee\home\config\jazn.xml
The identity service configuration file must specify the userPropertiesFile property and provide the value of the file name where all user properties are stored:
<IdentityServiceConfig
          xmlns="http://www.oracle.com/pcbpel/identityservice/isconfig"
          xmlns:isc="http://www.oracle.com/pcbpel/identityservice/isconfig"
          providerType="jazn">
  <provider name="xml"
    <property name="userPropertiesFile" value="users-properties.xml"/>
  </provider>
</IdentityServiceConfig>
Note that the users-properties.xml file from that example stores all extended user's properties. This is not required for JAZN authorization or authentication. However, the BPEL identity service requires this file to get contact details and the organizational hierarchy for users. If this file is not created, then certain workflow functionality such as notifications, manager views, or task escalation may not work. By default, the identity service looks for users-properties.xml in the Oracle BPEL Process Manager classpath. Oracle Universal Installer stores the default users-properties.xml in
Oracle_Home\integration\orabpel\system\services\config
|
See Also: JAZN documentation for how to configure the middle tier to use the XML-based JAZN provider |
If you select the Identity Management Access option during BPEL Process Manager for OracleAS Middle Tier installation, the identity service is automatically configured with OID. For all other installation scenarios, you must manually configure the LDAP-based JAZN provider (OID) in two steps:
Use the OID Migration Tool to load Oracle BPEL Process Manager users and roles into OID. The OID Migration Tool can produce LDIF files for system and demo users, which are suitable for loading into a directory server by using standard command-line tools. The input to this tool is a pseudo-LDIF file containing substitution variables. The tool is called ldifmigrator and is found in Oracle_Home/bin. (See Oracle Identity Management Integration Guide for more information.)
The following predefined substitution variables are used in the file:
| Substitution Variable | Value | Description |
|---|---|---|
%s_UserContainerDN%
|
Distinguished name of the entry under which all users are added. | This is assigned the value of the attribute: orclCommonUserSearchBase from the entry cn=Common,cn=Products under the realm-specific Oracle context.
|
%s_GroupContainerDN%
|
Distinguished name of the entry under which all public groups are supposed to be added. | This is assigned the value of the attribute: orclCommonGroupSearchBase from the entry cn=Common,cn=Products under the realm-specific Oracle context.
|
|
Note: The system and demo users must have passwords consistent with password policy. Password policy can be verified with Oracle Directory Manager. See the Password Syntax tab page of the Password Policies page. See Oracle Internet Directory Administrator's Guide for additional details. |
You can use the command-line variable s_UserCommonNamingAttribute with the migration tool, which substitutes all occurrences of it with the value provided in the command-line.
For example:
$ldifmigrator "input_file=system-oid.sbs" "output_file=system-oid.ldif" -lookup
"host=ldap.acme.com" "port=389" "subscriber=acme" "s_UserCommonNamingAttribute=cn"
dn="cn=admin" password=welcome

$ldifmigrator "input_file=demo-oid.sbs" "output_file=demo-oid.ldif"
-lookup dn="cn=admin" password=welcome "host=ldap.acme.com" "subscriber=acme"
"s_UserCommonNamingAttribute=cn"
where the subscriber is the JAZN realm and its name is acme, and cn is used to construct the user's DN.
The system-oid.ldif file can be loaded to OID with the ldapadd utility. Optionally, you can load demo-oid.ldif with the ldapmodify command.
For example:
$ldapadd -c -h ldap.acme.com -p 389 -D "cn=admin" -w welcome -f system-oid.ldif
$ldapmodify -c -h ldap.acme.com -p 389 -D "cn=admin" -w welcome -f demo-oid.ldif
|
See Also: Oracle Identity Management Application Developer's Guide for information about theldapadd and ldapmodify commands
|
|
Note: By default, when a user enters a search request, OID searches based on thecn, firstname, lastname, and email attributes. You can customize the attributes that can be searchable. The user manager attribute from inetOrgPerson objectClass should be searchable to allow workflow escalation. Use Oracle Delegated Administration tools to set it up. The recommended searchable attribute list is cn, sn, givenName, uid, manager, title, mail, and telephoneNumber.
See Oracle Identity Management Guide to Delegated Administration for more information. |
Middle-tier configuration consists of the following steps:
Configuring the middle tier to use the LDAP-based JAZN provider
In general, a JAZN XML-based definition should be commented and a new LDAP-based provider definition is specified in both files:
Oracle_Home\integration\orabpel\system\appserver\oc4j\j2ee\home\config\jazn.xml
where us is a default realm name for this example.
Oracle_Home\integration\orabpel\system\appserver\oc4j\j2ee\home\application-deployments\hw-services\orion-application.xml
<!-- jazn provider="XML" location="./jazn-data.xml"/ -->
<jazn provider="LDAP" location="ldap://host:port" default-realm="us" />
where us is a default realm name for this example.
Do not place user and password information in orion-application.xml.
Also add the following directive to Oracle_Home\integration\orabpel\system\appserver\oc4j\j2ee\home\config\application.xml to allow password indirection management:
<password-manager>
  <jazn provider="XML" location="./jazn-data.xml" />
</password-manager>
|
See Also:
|
Configuring identity service configuration file
Open is_config.xml in
Oracle_Home\integration\orabpel\system\services\config
and define OID provider properties:
<BPMIdentityServiceConfig
 xmlns="http://www.oracle.com/pcbpel/identityservice/isconfig">
  <provider providerType="JAZN" name="oid" >
    <connection url="ldap://host:port"
      binddn="cn=orcladmin"
      password="welcome1" encrypted="false" />
  </provider>
</BPMIdentityServiceConfig>
The providerType must point to the JAZN mode. The provider must contain connection specifications to define OID location, admin user, password and encrypted flag.
|
Note: Setting thecredentials element as follows enables you to use clear (readable) passwords in the jazn-data.xml file the first time:
<credentials>!welcome</credentials> This enables the administrator to edit If the password is written in plain text, specify an exclamation point in front of it. |
Configuring the middle tier to use the LDAP-based JAZN provider with Secure Socket Layer (SSL) Support
With 10g Release 2 (10.1.2), you must use NULL authentication when communicating with Oracle Internet Directory. NULL authentication means that data is encrypted with the Anonymous Diffie-Hellman cipher suite, but no certificates are used for authentication.
If you choose SSL at install time, SSL is automatically enabled with NULL authentication in place. You must manually enable SSL only if you did not choose SSL as part of your installation.
In that case, for NULL authentication, add a <property> element to the <jazn> element in jazn.xml and to the <connection> element in is_config.xml to specify a protocol. You do not need to specify a wallet location or password, because NULL authentication does not use certificates.
Add the following property element to jazn.xml (shown in bold):
<jazn provider="LDAP" location="ldap://example.com:636" default-realm="us">
    <property name="ldap.user" value="cn=orcladmin"/>
    <property name="ldap.password" value="!welcome1"/>
   <property name="ldap.protocol" value="ssl"/>
</jazn>
Add the following connection element to is_config.xml (shown in bold):
<BPMIdentityServiceConfig xmlns="http://www.oracle.com/pcbpel/identityservice/isconfig">
     <provider providerType="JAZN" name="oid" >
          <connection url="ldap://example.com:636" binddn="cn=orcladmin"
                                   password="welcome1" encrypted="false">
               <property name="securityProtocol" value="ssl" />
           </connection>
     </provider>
 </BPMIdentityServiceConfig>
See the Oracle Application Server Containers for J2EE Security Guide for additional details about JAZN configuration.
Note the following considerations when using a third-party LDAP server. The configuration for Active Directory is slightly different. These differences are also described.
|
Note: This section only describes Active Directory configuration on Windows 2003. This is because Windows 2000 does not permit nested security groups. |
The third-party LDAP servers must be configured to use the following standard objectClasses:
| For Active Directory | For Other Third-Party LDAP Servers |
|---|---|
top
|
top
|
person
|
person
|
organizationalPerson
|
organizationalPerson
|
| user | inetOrgPerson
|
| group | groupOfUniqueNames
|
Usually LDAP servers predefine the list of searchable attributes based on the cn, firstname, lastname, and email attributes. You can customize the attributes that can be searchable. The user manager attribute from inetOrgPerson objectClass should be searchable to allow workflow escalation. See the documentation for the third-party LDAP server you are using for how to set up the searchable attribute.
The recommended searchable attribute list is cn, sn, givenName, uid, manager, title, mail, and telephoneNumber.
When you seed Oracle BPEL Process Manager users and roles into the LDAP server, the process assumes that the users' and groups' container is created in LDAP. To create system and optionally demo ldif files, open the following template files in:
Oracle_Home\integration\orabpel\system\services\config\ldap
| For Active Directory | For Other Third-Party LDAP Servers |
|---|---|
system-winServer2003-ActDir.sbs
|
system-ldap.sbs
|
demo-winServer2003-ActDir.sbs
|
demo-ldap.sbs
|
demo-roleGrants-winServer2003-ActDir.sbs
|
|
Replace the substitution variables with the appropriate values, as shown in the following examples. The actual values to enter depend upon your domain:
| LDAP Server | Substitution Variable | Replace With Value |
|---|---|---|
| Active Directory | %s_UserContainerDN%
|
cn=Users,dc=us,dc=oracle,dc=com
|
|
|
%s_GroupContainerDN%
|
cn=Users,dc=us,dc=oracle,dc=com
|
| Other Third-Party LDAP Servers | %s_UserCommonNamingAttribute%
|
cn |
|
|
%s_UserContainerDN%
|
ou=People,dc=ldap,dc=acme,dc=com
|
|
|
%s_GroupContainerDN%
|
|
where:
%s_UserContainerDN% with a DN value of the entry under which all users are supposed to be added. The users container with:
dn: cn=Users,dc=us,dc=oracle,dc=com is used in this example for Active Directory
dn: ou=People,dc=ldap,dc=acme,dc=com is used in this example for other third-party LDAP servers
%s_GroupContainerDN% with a DN value of the entry under which all public groups are supposed to be added. The groups' container with:
dn: cn=Users,dc=us,dc=oracle,dc=com is used in this example for Active Directory
dn: ou=Groups,dc=ldap,dc=acme,dc=com is used in this example for other third-party LDAP servers
%s_UserCommonNamingAttribute% with the value used to construct the user's DN. In this example for other third-party LDAP servers, the cn value is used. %s_UserCommonNamingAttribute% and value are not applicable to Active Directory.
Perform the following steps based on your type of third party LDAP server:
For Active Directory:
Run the following commands at the DOS command prompt on Windows 2003:
ldifde.exe -i -k -f system-winServer2003-ActDir.ldif
ldifde.exe -i -k -f demo-winServer2003-ActDir.ldif
ldifde.exe -i -k -f demo-roleGrants-winServer2003-ActDir.ldif
See the following Microsoft Active Directory Documentation for details about all bulk import options for Active Directory's ldifde.exe:
http://www.microsoft.com/technet/prodtechnol/windowsserver2003/technologies
/directory/activedirectory/stepbystep/adbulk.mspx#ECAA
The Windows system administrator must set passwords for all seeded users; otherwise, worklist application authentication does not work for those users.
For other third-party LDAP servers:
Store changes in the system-ldap.ldif and demo-ldap.ldif files. Then load the system-ldap.ldif file to the LDAP server by using the ldapadd utility. Optionally, load demo-ldap.ldif with the ldapmodify utility.
For example:
$ldapadd -c -h ldap.acme.com -p 389 -D "cn=admin" -w welcome -f system-oid.ldif
$ldapmodify -c -h ldap.acme.com -p 389 -D "cn=admin" -w welcome -f demo-oid.ldif
See the documentation for the third-party LDAP server you are using for information about the ldapadd and ldapmodify commands.
The identity service third-party LDAP provider must specify connection, userControls, and roleControls elements in the identity service configuration file.
Identity service third-party LDAP provider implementation defines a set of user search properties that must be configured:
nameattribute—the name of the LDAP attribute that uniquely identifies the name of the user. In Sun Directory Server, it is uid; in Active Directory, it is user.
objectClass—the LDAP schema object class used to represent a user. In Sun Directory Server, it is inetOrgPerson.
And set of role search properties:
nameattribute—the name of the LDAP attribute that uniquely identifies the name of the role. In Sun Directory Server, it is uniqueMember; in Active Directory, it is member.
objectclass—the LDAP schema object class that is used to represent a group. In Sun Directory Server, it is groupOfUniqueNames. In Active Directory, it is group.
membershipsearchscope—specifies how deep in the LDAP directory tree to search for role membership. Supported values: onelevel or subtree.
memberattribute—The attribute of a static LDAP group object specifying the distinguished names (DNs) of the members of the group. In Sun Directory Server, it is uniqueMember; in Active Directory, it is member.
Both userControls and roleControl must define a search element with the searchbase attribute.
The searchbase attribute of the userControls search element is a space-separated list of DNs in the LDAP directory that contains users; for example, cn=users,dc=us,dc=abc,dc=com.
The searchbase attribute of the roleControls search element is a space-separated list of DNs in the LDAP directory that contains roles; for example, cn=Groups,dc=us,dc=abc,dc=com
An example of the LDAP server Sun Directory Server configuration follows:
<BPMIdentityServiceConfig xmlns="http://www.oracle.com/pcbpel/identityservice/isconfig">
  <provider providerType="LDAP" name="iplanet"
    <property name="realmName" value="iPlanetRealm"/>
      <connection url="ldap://host:port"
         binddn="uid=admin,ou=administrators,ou=topologymanagement,o=netscaperoot"
         password="welcome" encrypted="false" >
        <pool initsize="2" maxsize="25" prefsize="10" timeout="60"/>
      </connection>
    <userControls >
      <property name="nameattribute" value="uid"/>
      <property name="objectclass" value="inetOrgPerson"/>
        <search searchbase="ou=People,dc=us,dc=oracle,dc=com"
maxSizeLimit="1000" maxTimeLimit="120" scope="onelevel" />
    </userControls>

    <roleControls >
      <property name="nameattribute" value="cn"/>
      <property name="objectclass" value="groupOfUniqueNames"/>
      <property name="membershipsearchscope" value="onelevel"/>
      <property name="memberattribute" value="uniquemember"/>
      <search searchbase="ou=Groups,dc=us,dc=oracle,dc=com"
             maxSizeLimit="1000" maxTimeLimit="120" scope="onelevel" />
    </roleControls>
  </provider>
</BPMIdentityServiceConfig>
An example for Microsoft Active Directory follows:
<BPMIdentityServiceConfig xmlns="http://www.oracle.com/pcbpel/identityservice/isconfig">
  <provider providerType="CUSTOM" name="Active Directory"
    <property name="realmName" value="ActiveDirectoryRealm"/>
    <connection url="ldap://host:port"
          binddn="cn=administrator,cn=Users,dc=us,dc=oracle,dc=com"
          password="welcome" encrypted="false" />
    <userControls >
      <property name="nameattribute" value="cn"/>
      <property name="objectclass" value="user"/>
      <search searchbase="cn=Users,dc=us,dc=oracle, dc=com",
            maxSizeLimit="1000" maxTimeLimit="120 " scope="onelevel" />
    </userControls>

    <roleControls >
      <property name="nameattribute" value="cn"/>
      <property name="objectclass" value="group"/>
      <property name="membershipsearchscope" value="onelevel"/>
      <property name="memberattribute" value="member"/>
      <search searchbase="cn=Users,dc=us,dc=oracle,dc=com"
           maxSizeLimit="1000" maxTimeLimit="120" scope="onelevel" />
    </roleControls>
  </provider>
</BPMIdentityServiceConfig>
The following example shows how to use configuration properties to configure custom plug-ins. In this example, the CustomIdentityService class is used to demonstrate custom repository plug-ins. This class implements the BPMIdentityService interface.
<BPMIdentityServiceConfig mlns="http://www.oracle.com/pcbpel/identityservice/isconfig">
  <provider providerType="CUSTOM" name="CustomProvider"
        class="custompakage.CustomIdentityService">
    <property name="realmName" value="CustomRealm"/>
    <property name="CustomProviderProperty1" value="CustomProviderValue1"/>
    <property name="CustomProviderProperty2" value="CustomProviderValue2"/>
    <connection url="ldap://host:port"
             binddn="uid=admin password="welcome" encrypted="false" >
      <property name="CustomConnProperty1" value="CustomConnValue1"/>
      <property name="CustomConnProperty2" value="CustomConnValue2"/>
    </connection>

    <userControls>
      <property name="CustomControlsProperty1" value="CustomControlsValue1"/>
      <property name="CustomControlsProperty2" value="CustomControlsValue2"/>
      <search searchbase="ou=UserContainer,dc=us,dc=oracle,dc=com">
        <property name="CustomSearchProperty1" value="CustomSearchValue1"/>
        <property name="CustomSearchProperty2" value="CustomSearchValue2"/>
      </search>
    </userControls>

    <roleControls >
      <property name="CustomControlsProperty1" value="CustomControlsValue1"/>
      <property name="CustomControlsProperty2" value="CustomControlsValue2"/>
      <search searchbase="ou=GroupContainer,dc=us,dc=oracle,dc=com">
        <property name="CustomSearchProperty1" value="CustomSearchValue1"/>
        <property name="CustomSearchProperty2" value="CustomSearchValue2"/>
      </search>
    </roleControls>
  </provider>
</BPMIdentityServiceConfig>
In addition to existing provider properties, you can define custom property elements that can be added to provider, connection, userControls, roleControls, and search elements in the configuration file to extend provider definitions.
You can write a custom identity service plug-in to integrate into specific third-party repositories.
The custom identity service plug-in must implement the BPMIdentityService interface. This is the entry point for any identity service provider. See "Implementing the Identity Service Plug-in" for details.
See the sample implementation of a custom database plug-in in the Oracle_Home\integration\orabpel\samples\hw\isplugin\db directory.
Table 16-2 describes the available interfaces.
Table 16-2 Interfaces
| Interface | Description |
|---|---|
|
This is the main interface defining the Oracle BPEL Process Manager identity service. For any plug-in, this is the main class that is instantiated by the Identity Service Manager. |
|
|
This defines an Oracle BPEL Process Manager user. A user is identified by a logical name and has various associated attributes such as first name, last name, e-mail, and so on. |
|
|
This defines an Oracle BPEL Process Manager role. A role is defined as the permissions or privileges required by a user to perform the tasks related to their job. Roles are granted to users and groups of users. Roles can be nested (that is, a role itself can be granted to another role, and so on). BPMRole defines methods to find all users and roles that are granted a role. |
|
|
This defines an Oracle BPEL Process Manager application role. Derived from BPMRole, application roles are defined for tasks supported by an application. This enables users and groups that are granted these roles to perform all of the tasks related to the application. |
|
|
This defines an Oracle BPEL Process Manager group. Derived from BPMRole, BPMGroup is a convenient way to assign rights and permissions to several users at one time. All users who belong to a user group are granted all of that group's permissions or access rights. |
|
|
This defines the set of methods and APIs that must be supported for any third-party repository. This is a convenience interface. This interface makes it possible to have one identity service implementation that can plug into different custom providers. You only need to implement this interface for each of your custom repositories. |
|
|
This defines the common set of methods and APIs for roles and users. Both |
|
|
This represents an identity and defines the common methods for any identity in the Oracle BPEL Process Manager identity service. BPMIdentity derives from the BPMPrincipal interface. |
See the Javadoc for the different interfaces of identity service at ORACLE_HOME\integration\orabpel\docs\workflow.
The identity service plug-in can be implemented in one of two ways:
For simple implementations, you can use the framework provided in the database plug-in sample to plug in your providers. This implementation is most suitable for the following:
For simple repositories, in which you can implement just one interface and have the plug-in up and running.
For supporting multiple providers, in which you can use the supplied framework and easily add in the providers.
For complex repositories, in which you can build your own framework and implement all of the essential interfaces.
The database plug-in sample provides a generic implementation that can be reused with any custom third-party repository.
The easiest way to write an identity service for a custom plug-in is to take the existing database plug-in sample and add the implementation of the BPMProvider interface for the new custom repository. The BPMProvider interface defines the minimum set of essential operations that must be defined over a custom repository for the identity service to function correctly. The database plug-in sample implementation has a DBProvider class to use as a reference. The rest of the code in the database plug-in sample can be used for any identity service.
The database plug-in sample is located in the ORACLE_HOME\integration\orabpel\samples\hw\isplugin\db directory. Two identity service configuration files are provided in the config subdirectory: is_config.xml and is_config_standalone.xml (for standalone testing with no Oracle BPEL Server).
The sample is written as a custom plug-in based on a database-based repository. All the database-related queries are localized to the DBProvider code. The rest of the classes in the sample are generic and independent of the provider. This design permits reuse of the database plug-in code for different plug-ins. See the dbplugin.htm file in the ORACLE_HOME\integration\orabpel\samples\hw\isplugin\db directory for more details on the database structure and tables.
The database plug-in sample includes the following key files in ORACLE_HOME\integration\orabpel\samples\hw\isplugin\db\src:
CustomIdentityService.java
This class is the implementation of BPMIdentityService. This is the entry point for instantiation of IdentityService. At instantiation, this class invokes the ProviderFactory::getInstance method to get an instance of the current BPMProvider. All other methods in this class delegate the request to the BPMProvider instance, as shown in this example:
public class CustomIdentityService implements
BPMIdentityService {
 private BPMProvider m_provider;
. . .
. . .
 public CustomIdentityService() throws
       BPMIdentityException {

  Logger.debugLog("about to load provider");
. . .
. . .
  ProviderFactory provFactory =
            ProviderFactory.getInstance();
  m_provider =
           (BPMProvider)provFactory.getProvider();

  Logger.debugLog("provider initialization complete");
. . .
. . .
 }. . .. . .public List getUsers()  throws BPMIdentityException {
      return m_provider.getUsers();
}
DBProvider.java
This class is the implementation of the BPMProvider interface. The BPMProvider defines the minimal set of methods that must be defined for any custom repository for an identity service plug-in. This class implements all database-related queries so that the rest of the classes are generic. The getInstance() method is called by the ProviderFactory to get an instance of this class. See the Javadoc for the complete definition of the BPMProvider interface.
ProviderFactory.java
This class is the factory class responsible for creating instances of the currently active custom provider. The current provider is determined by the <provider> element specified in the identity service configuration file. Users can switch to different providers by updating the configuration file. The ProviderFactory provides a getProvider() method that returns an instance of the currently active custom provider (of type BPMProvider). This method only supports custom providers. For all other providers, this method returns null. Because the current provider is determined from the configuration, you can add different provider implementations to the sample and switch to required providers as necessary without recompilation.
The following code instantiates the currently active BPMProvider:
public static BPMProvider getProvider() throws Exception
{
......
......
   // Currently supports DB Provider
   // Extend for other providers
   if( provCfg.getProviderType().equals(ISConfigSchemaConstants.CUSTOM_PROVIDER))
   {
      Class providerClass;
      String packNm = provCfg.getProviderClass();
      int len = packNm.lastIndexOf('.');
      String providerClsName = provCfg.getProviderName();

      // Provider name is fully qualified
      if( providerClsName.lastIndexOf('.') > 0 )
             providerClass = Class.forName(providerClsName);
      // Provider is in the same package as IdentityService
      else providerClass = Class.forName(packNm.substring(0,len +1) +
                     providerClsName);
      Method m = providerClass.getDeclaredMethod("getInstance", null);
      BPMProvider provider = (BPMProvider)m.invoke(null, null);
      return provider;
   }
   return null;
}
The following configuration file example provides additional details about getProvider().
<provider providerType="CUSTOM" name="DBProvider" class = "IdentityServiceCustomPlugin.CustomIdentityService">
The getProvider() code performs the following tasks:
Determines the type of provider
If the type is a CUSTOM provider, then:
Gets the class name
This is the fully-qualified name of the class that implements BPMIdentityService. For example, IdentityServiceCustomPlugin.CustomIdentityService is the fully-qualified class for this example.
Gets the name of the custom provider
The ProviderFactory uses the name to determine the class that implements the BPMProvider interface. In the database plug-in example above:
name="DBProvider"
The getProvider() method then appends the classpath to the name to get the fully qualified class name. In the example above, the fully qualified class name becomes IdentityServiceCustomPlugin.DBProvider. The method implicitly assumes that the DBProvider class is in the same package as CustomIdentityService.
Invokes the getInstance() method on the loaded class.
The getInstance() method returns a newly created instance of the BPMProvider implementation. In the example above, the getProvider() method returns an instance of the DBProvider.
This class is an implementation of BPMRole. This is an abstract class. CustomAppRoleImpl and CustomGroupImpl are subclasses of this class that use this implementation. This implements methods such as toNode() and equals(Object obj). For all other methods, this class delegates or calls the corresponding method on the DBProvider class. See the Javadoc for the complete definition of the BPMRole interface.
This is an implementation of the BPMUser interface. This class implements methods to get and set user attributes such as name, first name, e-mail, and so on. This class delegates all provider-related requests to DBProvider.
Using the database plug-in generic implementation, you can develop a custom plug-in by performing the following tasks:
Implement the BPMProvider interface for the new provider. DBProvider can be used as a reference implementation. This can be in a new package or in the same package as the database plug-in.
Add the new BPMProvider code to the database plug-in code. It is best to copy all of the sample files to a new directory, along with the provider code.
Optionally modify the ant build script to rename the IS-DBPlugin.jar file (created by the database plug-in sample) for the new provider.
Follow the steps outlined in "Deploying the Identity Service Plug-in" and "Registering and Configuring Identity Service for the Custom Plug-in" for the new provider.
You can implement all of the essential interfaces such as BPMIdentityService, BPMUser, and BPMRole for the custom repository. This may be necessary for advanced use cases or complex repositories. In these cases, use the database plug-in as a sample implementation.
Implement all of the following interfaces for the custom plug-in:
See the Javadoc for the different interfaces of the identity service at Oracle_Home\integration\orabpel\docs\workflow.
For the workflow services to instantiate and invoke the plug-in, it must be deployed to a location in the library path of Oracle BPEL Process Manager. For example, for the database plug-in:
The command obant deploy compiles the sample files and then assembles a JAR file that is copied to the Oracle_Home\integration\orabpel\services\lib location. The database plug-in is assembled into a JAR file named IS-DBPlugin.jar and deployed to the Oracle_Home\services\lib location. See the Oracle_Home\integration\orabpel\samples\hw\isplugin\db\build.xml file for more details.
The plug-in must be deployed and the library path must point to this JAR file. The IS-DBPlugin.jar file is added to the library path by adding the following lines to the application.xml file (found in the Oracle_Home\system\appserver\oc4j\j2ee\home\config directory)
<library path="D:\OraBPELPM_1\integration\orabpel\system\services/lib/IS-DBPlugin.jar"/>
The same scheme of deployment can be used for any custom plug-in, with minor changes such as the name of the provider JAR file.
Identity service configuration in defined in the is_config.xml file. The file must be located in a directory that is in the classpath of Oracle BPEL Process Manager. By default, it is stored in Oracle_Home\system\services\config.
The identity service configuration file consists of a root element BPMIdentyServiceConfig, which can have only one provider. For any custom service, the providerType attribute is set to CUSTOM (since this is a custom provider).
The following sample configuration file describes the database plug-in implemented as a custom provider (for more details, see the configuration file in ORACLE_HOME\integration\orabpel\samples\hw\isplugin\db).
<BPMIdentityServiceConfig xmlns =
 "http://www.oracle.com/pcbpel/identityservice/isconfig"><provider providerType="CUSTOM" name="DBProvider" class =
 "IdentityServiceCustomPlugin.CustomIdentityService">
      <connection>
         <property name="dataSource" value="jdbc/BPELSamplesDataSource"/>
      </connection>
   </provider>
</BPMIdentityServiceConfig>
Table 16-3 describes the components of the sample configuration file.
Table 16-3 Components
| Component | Description |
|---|---|
|
|
The provider element specifies the |
|
|
The class attribute is used to instantiate an |
|
|
The connection element specifies the data source to which to connect. For custom providers, this is defined by custom properties. |
|
|
This defines the JNDI name of the data source to which to connect. This data source is defined in the <property name="dataSource" value="jdbc/BPELSamplesDataSource"/> |
Custom plug-ins can define name-value properties as required for their data source.
The identity service plug-in only provides interfaces for the following:
User authentication
User properties lookup
Group membership
Workflow
Actions permitted
The identity service plug-in does not include creation of users and roles or granting of roles to users. You must use tools specific to the user repository to accomplish this task. For OID, the users and roles can be created using the Directory Administration Service (DAS) tool.
XPath extension functions mimic XPath 2.0 standards. The following extension functions are available.
This extension function is used to look up a user. The function returns an XML element of complex type as defined by the schema in LocalIdentityService.xsd at
http://hostname:port/orabpel/xmllib/workflow/
The following code example demonstrates how to use the extension function.
<process...
    xmlns:idservice= http://xmlns.oracle.com/pcbpel/identityservice/local
...
<variables>
...
    <variable name="user" element="idservice:user"/>
</variables>
  <sequence>
...
    <assign name="lookupUser">
      <!-- get the user-->
      <copy>
        <from expression="ora:lookupUser(bpws:getVariableData('input', 'payload',
 '/tns:input/tns:userId'))"/>
          <to variable="user"/>
      </copy>
    </assign>
...
  </sequence>
</process>
If userId is not a valid user, the function returns null.
This extension function is used to look up a group. The function returns an XML element of complex type as defined by the schema in LocalIdentityService.xsd at
http://hostname:port/orabpel/xmllib/workflow/
The following code example demonstrates how to use the extension function.
<process …
    xmlns:idservice= http://xmlns.oracle.com/pcbpel/identityservice/local
...
<variables>
...
    <variable name="group" element="idservice:group"/>
</variables>
  <sequence>
...
    <assign name="lookupGroup">
      <!-- get the group-->
      <copy>
        <from expression="ora:lookupGroup(bpws:getVariableData('input', 'payload',
 '/tns:input/tns:groupId'))"/>
          <to variable="group"/>
      </copy>
    </assign>
...
  </sequence>
</process>
If groupId is not a valid user, the function returns null.
ora:getUserProperty(userId, attributeName)
This function can be used to get any property of the user. The arguments to the function are as follows:
userId—String or element containing the user whose attribute is to be retrieved
attributeName—String or element containing the name of the user attribute. The attribute name is one of the following values:
givenName
middleName
sn
displayName
mail
telephoneNumber
homephone
mobile
facsimileTelephoneNumber
pager
preferredLanguage
preferredLanguage
manager
If the user with the given userId does not exist, the function returns null. If the user does not have the given property, or the value for the property is empty, then the function returns the string undefined.
ora:getGroupProperty(groupId, attributeName)
This function can be used to get any property of the group. The arguments to the function are as follows:
groupId—String or element containing the group whose attribute is to be retrieved
attributeName—String or element containing the name of the group attribute. The attribute name should be one of the following values:
displayName
mail
If the group with the given groupId does not exist, the function returns null. If the group does not have the given property, or the value for the property is empty, then the function returns the string undefined.
This extension function is used to get the manager of a user identified by the userId. This function returns a string identifying the manager of the user. If the user is not valid, or if the user does not have a manager, then the function returns null.
This function gets the direct reportees of a user identified by the userId. The function returns a list of nodes. Each node in the list is called user. The namespace URI of the node is
http://oracle.tip.pc.services.identity/RemoteIdentityService.xsd
If the user does not exist, then the function returns null.
This function gets the users in a group. The function returns a list of nodes. Each node in the list is called user. The namespace URI of the node is
http://oracle.tip.pc.services.identity/RemoteIdentityService.xsd
If the group does not exist, then the function returns null.
ora:getUserRoles(userId, roleType, direct)
This function gets the user roles. The function returns a list of objects, either role objects or group objects, depending on the roleType. The arguments to the function are as follows:
userId—String or element containing the user whose roles are to be retrieved.
roleType—The role type, which has one of three values: ApplicationRole, EnterpriseRole, or AnyRole.
direct—String or element indicating if direct or indirect roles are to be fetched. This is optional and, if not specified, only direct roles are fetched. It is either xsd:boolean or string true/false.
The function returns a list of nodes. Each node in the list is called group or role, depending on the roleType. The namespace URI of the node is
http://oracle.tip.pc.services.identity/RemoteIdentityService.xsd
ora:isUserInRole(userId, roleName)
This function verifies if a user identified by the userId has a given role identified by roleName. The function returns a Boolean true or false.
ora:getNumberOfTaskApprovals(taskId)
This extension function returns the number of times (an integer) that a task identified by the given taskId is approved (approved in a generic sense, not the outcome approve) by users. The function returns null if there is no task with the given taskId.
ora:getPreviousTaskApprover(taskId)
This extension function returns the previous user who approved (approved in a generic sense, not the outcome approve) a task identified by the given taskId. The function returns a string userId that identifies the previous approver. The function returns null if there is no task with the given taskId. The return of this function can be used to get the title of the previous approver, for example, as follows:
ora:getUserProperty(ora:getPreviousTaskApprover(tasked), 'title')
ora:getTaskAttachmentsCount(taskId)
This function returns the number of attachments (an integer) in a task that is identified by the given taskId. The function returns null if there is no task with the given taskId.
ora:getTaskAttachmentByIndex(taskId, attachmentIndex)
This function returns the attachment for the task identified by the given taskId at the given attachmentIndex. The function returns an element of the type {http://xmlns.oracle.com/pcbpel/taskservice/task}attachment. This type is defined in WorkflowTask.xsd. Each attachment has either content or a URI. The content, if any, in the element returned by the function is a Base64-encoded string.
The following BPEL code example demonstrates how to use the getTaskAttachmentsCount and getTaskAttachmentByIndex functions. The BPEL shown gets all the attachments in the task and writes to a file using the file adapter.
<process .......
xmlns:ora="http://schemas.oracle.com/xpath/extension"
xmlns:task="http://xmlns.oracle.com/pcbpel/taskservice/task">
...
<variables>
...
<variable name="SimpleWorkflowVar1" element="task:task"/>
<variable name="TaskAttachment" element="task:attachment"/>
</variables>
<sequence name="main">
...
<assign name="Assign_1">
<copy>
<from expression="number(0)"/>
<to variable="AttachmentIndex"/>
</copy>
</assign>
<while name="While_1"
condition="bpws:getVariableData
('AttachmentIndex') < ora:getTaskAttachmentsCount
(bpws:getVariableData('SimpleWorkflowVar1','/task:task/task:taskId'))">
<sequence name="Sequence_1">
<assign name="Assign_2">
<copy>
<from expression="ora:getTaskAttachmentByIndex(bpws:getVariableData
('SimpleWorkflowVar1','/task:task/task:taskId'),(bpws:getVariableData
('AttachmentIndex') + number(1)))"/>
<to variable="TaskAttachment" query="/task:attachment"/>
</copy>
<copy>
<from expression="bpws:getVariableData('AttachmentIndex') + number(1)"/>
<to variable="AttachmentIndex"/>
</copy>
<copy>
<from variable="TaskAttachment"
query="/task:attachment/task:content"/>
<to variable="Invoke_1_Write_InputVariable" part="opaque"
query="/ns2:opaqueElement"/>
</copy>
</assign>
<invoke name="Invoke_1" partnerLink="File" portType="ns1:Write_ptt"
operation="Write" inputVariable="Invoke_1_Write_InputVariable"/>
</sequence>
</while>
...
</sequence>
</process>
ora:getTaskAttachmentByName(taskId, attachmentName)
This function returns the attachment for the task identified by the given taskId at the given attachmentName. The function returns an element of the type {http://xmlns.oracle.com/pcbpel/taskservice/task}attachment. This type is defined in WorkflowTask.xsd. Each attachment has either content or a URI. The content, if any, in the element returned by the function is a Base64-encoded string.
The following BPEL code example demonstrates how to use the getTaskAttachmentByName function. The BPEL shown gets the attachment with the name utplan.doc and writes to a file using the file adapter.
<process ........
      xmlns:ora="http://schemas.oracle.com/xpath/extension"
      xmlns:task="http://xmlns.oracle.com/pcbpel/taskservice/task">

...

  <variables>
  ...
  <variable name="SimpleWorkflowVar1" element="task:task"/>
  <variable name="TaskAttachment" element="task:attachment"/>
  </variables>

<sequence name="main">
...

    <assign name="Assign_3">
      <copy>
        <from expression="ora:getTaskAttachmentByName(bpws:getVariableData
('SimpleWorkflowVar1','/task:task/task:taskId'), string('utplan.doc'))"/>
        <to variable="TaskAttachment" query="/task:attachment"/>
      </copy>
      <copy>
        <from variable="TaskAttachment" query="/task:attachment/task:content"/>
        <to variable="Invoke_2_Write_InputVariable" part="opaque"
query="/ns2:opaqueElement"/>
      </copy>
    </assign>
    ...
  </sequence>
</process>
ora:getTaskAttachmentContents(taskId, attachmentName)
This function returns the attachment for the task identified by the given taskId at the given attachmentName. The function returns a Base64-encoded string of either the attachment content or the URL (each attachment has either a content or a URI). The difference between this function and the getTaskAttachmentByName function is that the getTaskAttachmentByName function returns a complex element, whereas this function returns the contents only. The following BPEL code example demonstrates how to use the getTaskAttachmentContents functions. The BPEL shown gets the attachment with the name utplan.doc and writes to a file using the file adapter.
<process ........
        xmlns:ora="http://schemas.oracle.com/xpath/extension"
        xmlns:task="http://xmlns.oracle.com/pcbpel/taskservice/task">

...

  <variables>
   ...
    <variable name="SimpleWorkflowVar1" element="task:task"/>
  </variables>

  <sequence name="main">
   ...

    <assign name="Assign_4">
      <copy>
        <from expression="ora:getTaskAttachmentContents(bpws:getVariableData
('SimpleWorkflowVar1','/task:task/task:taskId'), string('utplan.doc'))"/>
        <to variable="Invoke_2_Write_InputVariable" part="opaque"
query="/ns2:opaqueElement"/>
      </copy>
    </assign>
    <invoke name="Invoke_3" partnerLink="File" portType="ns1:Write_ptt"
operation="Write" inputVariable="Invoke_2_Write_InputVariable"/>
  ...
  </sequence>
</process>
orcl:get-localized-string(resourceURL,resourceLocation,resourceBundleName,language,country,variant,messageKey)
This extension function can be used to get localized messages for notifications for internationalization.
orcl:format-string(string,string,string,string, …..)
The format-string extension function can be used to format strings during construction of messages for notifications. This can be useful if the localized message must be formatted with data from the payload.
In a sequential workflow scenario, the users or groups to whom the task is routed are captured using functions. The function is stored in the approver element of the task object. These functions are evaluated at run time to determine the next approvers.
The approver functions are governed by the following grammar.
approverFunction := (managementChainFunction | listFunction | adhocFunction | usersFunction | groupsFunction)*
A comma-separated list of approver functions.
managementChainFunction := managementChain(level, title)
Represents a management chain. The management chain includes users within a number of levels and up to a user whose title is specified. level is a required argument and title is an optional argument.
listFunction := list(usersFunction*, groupsFunction*, acquiredByFunction)
Represents a single assignment to multiple users or groups. This function can be used to assign the task to a mix of users and groups. Optionally, the function can also specify the acquirer of the task when the task is assigned to a group or multiple users. The acquiredBy in this function overwrites the acquiredBy in usersFunction and groupsFunction.
Allows the current approver to specify who the next approver is. When the user completes the task without specifying the next approvers, the function is no longer evaluated.
usersFunction := users(userId*, acquiredByFunction)
Represents a single task assignment to one or more users. Optionally the function can also specify the acquirer of the task when the task is assigned to multiple users. Each argument in this function must be a valid user id from the user store (OID, LDAP, and so on).
groupsFunction := groups(groupId*, acquiredByFunction)
Represents a single task assignment to one or more groups. Optionally, the function can also specify the acquirer of the task when the task is assigned to groups. Each argument in this function must be a valid group id from the user store (OID, LDAP, and so on).
acquiredByFunction := acquiredBy(userId)
Captures the acquirer when the task is assigned to a set of users or groups. The argument in this function must be a valid user id from the user store (OID, LDAP, and so on).
Where
# userId is a string argument representing the id of the user.
groupId is a string argument representing the id of the group.
level is a number argument that represents the levels in the management chain.
title is a string argument that represents the title of the last user in the management chain.
All arguments should be wrapped in quotes (" ").
The arguments are separated by commas.
The management chain function is always evaluated with respect to the previous approver of the task.
The following examples show how to use the approver functions.
managementChain("2", "Manager")
Routes the task to users in the management chain. The management chain includes users within 2 levels and up to a user whose title is Manager.
list(users("jcooper", "jstein"), groups("LoanAgentGroup"), acquiredBy("jcooper"))
Routes the task once to users jcooper and jstein and group LoanAgentGroup and also sets acquiredBy to jcooper.
list(users("jcooper", "jstein")), list(groups("LoanAgentGroup"))
Routes the task to users jcooper and jstein. When one of those users acquires and acts on the task, routes the task to the group LoanAgentGroup.
adhoc()
The task supports adhoc routing and the next users or groups are specified by the current approver of the task.
users("jcooper", "jstein")
Routes the task once to users jcooper and jstein.
users("jcooper", "jstein", acquiredBy("jcooper"))
Routes the task once to users jcooper and jstein. Also sets acquiredBy to jcooper.
users("jcooper"), users("jstein")
Routes the task first to user jcooper, and after jcooper acts on the task, routes the task to jstein.
groups("LoanAgentGroup", "Supervisor")
Routes the task once to the groups LoanAgentGroup and Supervisor.
groups("LoanAgentGroup"), groups("Supervisor")
Routes the task first to the group LoanAgentGroup and after a user from the LoanAgentGroup acts on the task, routes the task to the group Supervisor.
groups("LoanAgentGroup", "Supervisor", acquiredBy("jcooper"))
Routes the task once to groups LoanAgentGroup and Supervisor. Sets acquiredBy to jcooper.
managementChain("2", "Manager"), groups("LoanAgentGroup")
Routes the task to users in the management chain. The management chain includes users within two levels and up to a user whose title is Manager. After the users in the management chain are exhausted, routes the task to the group LoanAgentGroup.
managementChain(Ò2Ó, ÒManagerÓ), groups(ÒLoanAgentGroupÓ), adhoc()
Routes the task to users in the management chain. The management chain includes users within two levels and up to a user whose title is Manager. After the users in the management chain are exhausted, routes the task to the group LoanAgentGroup. When a user in the LoanAgentGroup acquires the task and acts on it, the task can still be routed to other users as specified by the approver of the task.
This example describes how to create a vacation request business process. In this business process, the manager of a user requesting a vacation approves or rejects the request. The approval or rejection is a one-step process.
This example highlights the use of the following:
Modeling a simple workflow using JDeveloper BPEL Designer
Using the Worklist Application to view and respond to tasks
This example assumes the following:
You should be familiar with basic BPEL constructs, including BPEL activities and partner links, and basic XPath functions. Familiarity with JDeveloper BPEL Designer—the Oracle JDeveloper environment for creating and deploying BPEL processes—is also assumed.
You must change the e-mail address for the user jstein. If the XML-based JAZN provider is used, these properties can be changed in
Oracle_Home\integration\orabpel\system\services\config\users-properties.xml
The following XML segment from the users-properties.xml file shows where the e-mail is configured:
<bpm:BPMUser userName="jstein" >
<bpm:properties>
<bpm:givenName>John</bpm:givenName>
<bpm:sn>Steinbeck</bpm:sn>
<bpm:title>Manager2</bpm:title>
<bpm:manager>wfaulk</bpm:manager>
<bpm:mail>user2@dlsun4254.us.oracle.com</bpm:mail>
<bpm:timeZone>GMT-8</bpm:timeZone>
<bpm:preferredLanguage>en-US</bpm:preferredLanguage>
<bpm:orclWorkflowNotificationPref>Mail</bpm:orclWorkflowNotificationPref>
</bpm:properties>
</bpm:BPMUser>
You must configure the e-mail server settings for the account Default, if it is different from the default values. The Default account is used to send e-mails. The e-mail server configuration is in
Oracle_Home\integration\orabpel\system\services\config\ns_emails.xml
The following code example from the file shows the parameters that may require configuration in bold.
<EmailAccount>
<Name>Default</Name>
<GeneralSettings>
<FromName>Oracle BPM</FromName>
<FromAddress>bpm1@dlsun4254.us.oracle.com</FromAddress>
</GeneralSettings>
<OutgoingServerSettings>
<SMTPHost>dlsun4254.us.oracle.com</SMTPHost>
<SMTPPort>225</SMTPPort>
</OutgoingServerSettings>
<IncomingServerSettings>
<Server>dlsun4254.us.oracle.com</Server>
<Port>2110</Port>
<Protocol>pop3</Protocol>
<UserName>bpm1</UserName>
<Password ns0:encrypted="false" xmlns:ns0="http://xmlns.oracle.com/ias/pcbpel/NotificationService">welcome
/Password>
<UseSSL>false</UseSSL>
<Folder>Inbox</Folder>
<PollingFrequency>1</PollingFrequency>
<PostReadOperation>
<MarkAsRead/>
</PostReadOperation>
</IncomingServerSettings>
</EmailAccount>
You must restart Oracle BPEL Process Manager after making any of the preceding changes.
Verify that the task payload is displayed in the Worklist Application using the XSL file vacationRequest.xsl. This file is needed to complete the tutorial and is available in the VacationRequest sample business process.
Create a business process called VacationRequest.
When prompted for a template, select Asynchronous BPEL Process.
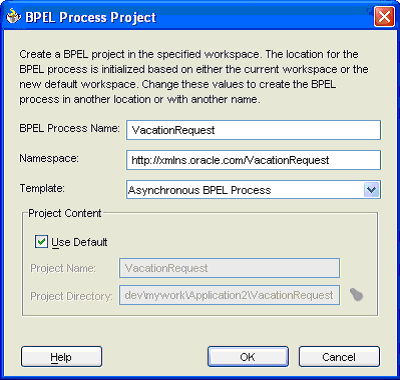
After creating the new process, change the message structure of the vacation request in the VacationRequest.wsdl to be more relevant to a vacation request process. The message structure by default is
<element name="VacationRequestProcessRequest">
  <complexType>
    <sequence>
      <element name="input" type="string"/>
    </sequence>
  </complexType>
</element>
Replace the element called input with the four elements shown in bold in the following:
<element name="VacationRequestProcessRequest">
  <complexType>
    <sequence>
      <element name="creator" type="string"  />
      <element name="fromDate" type="date" />
      <element name="toDate" type="date" />
      <element name="reason" type="string" />
    </sequence>
  </complexType>
</element>
Copy vacationRequest.xsl to the project location and add the file to the project.
Drop a User Task activity between the Receive activity and the callbackClient activity.
In the Workflow wizard, leave the default selected for Create New Workflow and click Next.
From Workflow Pattern, select Simple Workflow and click Next.
Use the autocomplete feature to assign a value to the title. For example, use Vacation Request for
<%bpws:getVariableData('inputVariable','payload','/
client:VacationRequestProcessRequest/client:creator')%>
Use the autocomplete feature to assign the payload as
bpws:getVariableData('inputVariable','payload','/
client:VacationRequestProcessRequest')
Leave Auto generate JSP form as the payload display option.
With this option, a JSP is autogenerated based on the XML type of the payload chosen in the previous step.
Leave the Task Creator field blank.
Set Expiration Duration Days to 1.
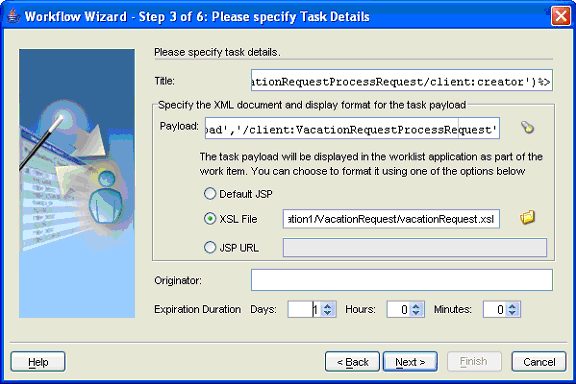
Click Next.
By default, there are two outcomes: accept and reject. Delete ACCEPT and add APPROVE. Click Next.
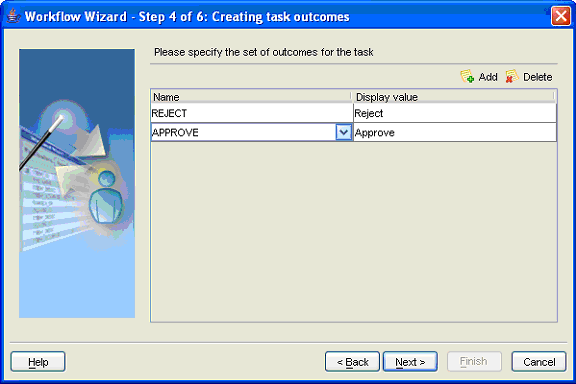
On the Notification page, select Assigned for Task Status, Assignees for Recipient, and Email for Notification.
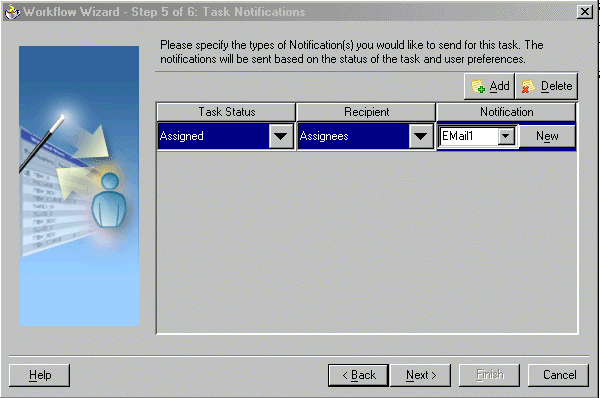
You can also use the e-mail wizard to change default e-mail content.
Click New to start the wizard.
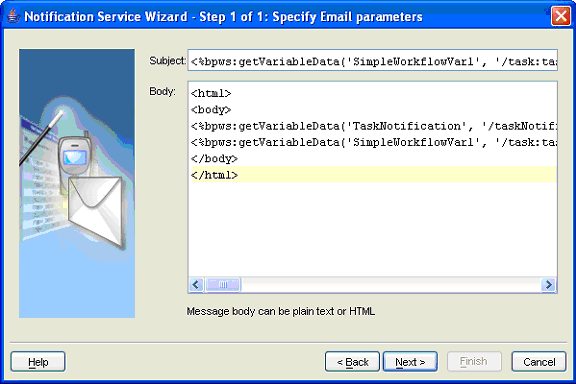
Click Next.
In the Assignees page, select Dynamic user assignment using XPath expression. Use autocomplete to set the assignee to
ora:getManager(bpws:getVariableData('inputVariable','payload','/
client:VacationRequestProcessRequest/client:creator'))
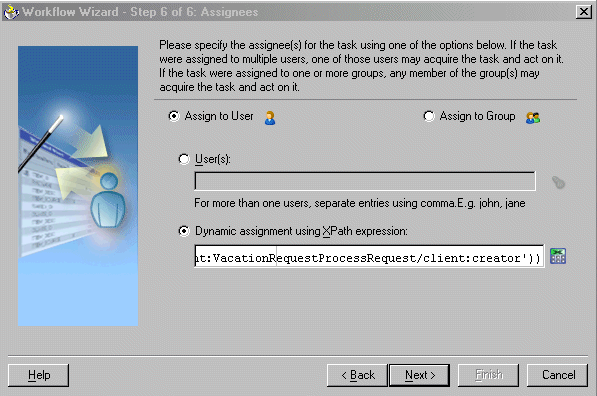
Click Next.
Click Finish.
You should see a Scope and a Switch activity. The Switch activity has three cases associated with it. Each of the case statements represents the possible outcome specified (approve and reject in this tutorial), plus an otherwise section to represent any other conclusion of the task (errored, expired, and so on). Inside each of the case activities, you can add activities to complete modeling the business process. By default, there is an Assign activity named copyPayloadFromTask in each of the branches. This Assign copies the payload back to its source.
Add an Assign activity to the case for Task outcome is APPROVE.
In the Assign window (double-click Assign to invoke this window), click the Copy Rules tab and click Create.
In the Create Copy Rule window, do the following:
In the From section, click Expression and enter string('APPROVED').
In the To section, for Variable, select outputVariable.
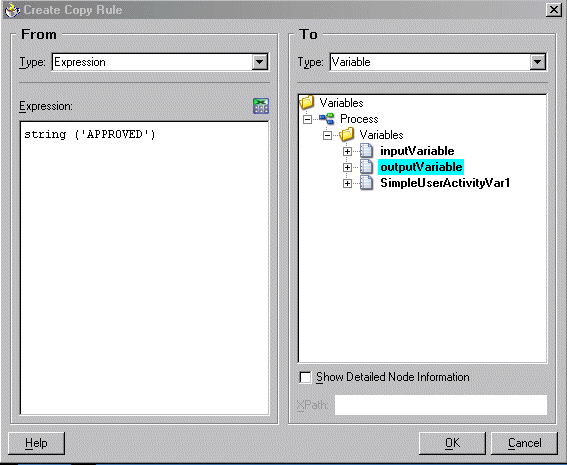
Click OK.
For both branches in the switch—the case for reject and the case for otherwise—add an Assign activity with a copy rule, as you did for the approve case, but set the expression to string('REJECTED') instead of string('APPROVED').
The business process modeling is completed. You can now deploy and test the BPEL process, which looks as follows:
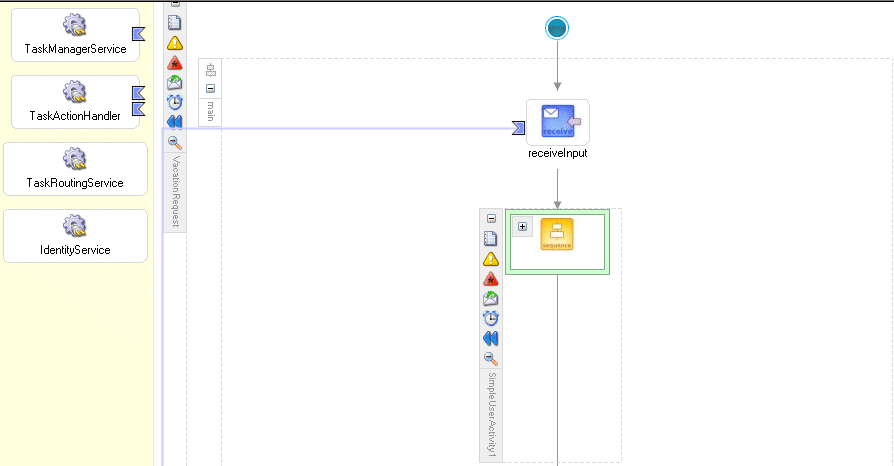
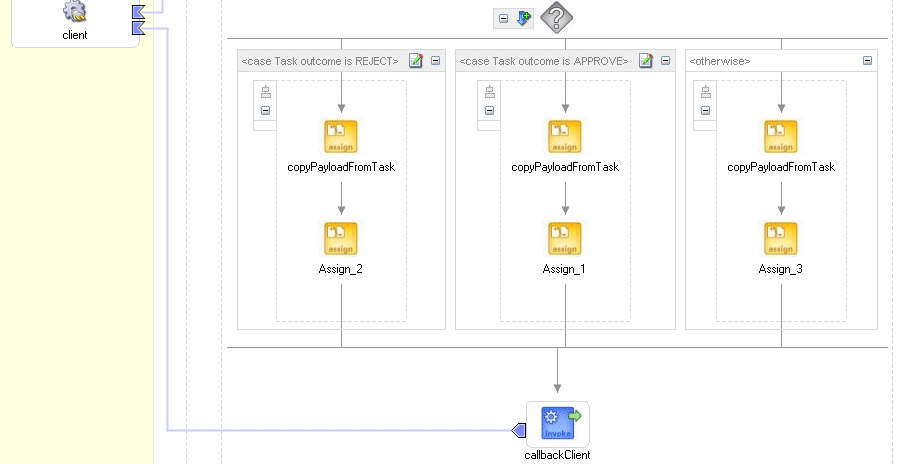
Log in to Oracle BPEL Console, select the VacationRequest process, and go to the Initiate tab.
Enter appropriate values in each of the fields.
Set the creator to jcooper.
The approval task is assigned to jstein, who is the manager of jcooper.
Click Post XML Message.
Examine the flow of the generated instance. It is still waiting for a response from the workflow service.
Log in to the Worklist Application as user jstein and with the password welcome, at
http://localhost:portnumber/integration/worklistapp/Login
You can also select Start, then All Programs, then Oracle - Oracle_Home, then Oracle BPEL Process Manager 10.1.2, and then Sample Worklist Application.
Perform any action on the task.
You can view the task details and payload information before performing any action on the task. If the task is approved, then the business process is notified that the task has been approved. The business process determines that no additional approval is needed and marks the vacation request as approved. If the task is rejected, then the business process is notified that the task has been rejected. The business process in turn marks the vacation request as rejected. The business process is now completed.
Go to Oracle BPEL Console and confirm that the VacationRequest process has completed.
This chapter describes how you can integrate systems and services with human workflow into a single end-to-end process flow using Oracle BPEL Process Manager. The predefined workflow patterns are described, as are the components of workflow services—the task action handler, task management service, task routing service, identity service, worklist service, and notification service.