|
Oracle® BPEL Process Manager Order Booking Tutorial
10g Release 2 (10.1.2) B15813-02 |
|
 Previous |
 Next |
|
Oracle® BPEL Process Manager Order Booking Tutorial
10g Release 2 (10.1.2) B15813-02 |
|
 Previous |
 Next |
This chapter of the tutorial describes how to invoke a synchronous service.
This chapter contains the following topics:
In the first phase of this tutorial, you learn how to build a simple asynchronous BPEL process for receiving an order from a client and obtaining a credit rating. You perform the following key tasks:
Deploy (start) a synchronous Credit Rating service.
Create a new BPEL process named OrderBooking.
Create a partner link to interact with the Credit Rating service.
Design the BPEL process to invoke the Credit Rating service.
Deploy the BPEL process.
Run the deployed BPEL process from Oracle BPEL Console and submit a social security card number to the Credit Rating service to check the client's credit history.
Review the credit rating results returned from the Credit Rating service to the client.
This section contains the following topics:
Creating an Initial Assign Activity to Send Request Data to the Credit Rating Service
Creating a Second Assign Activity to Receive Response Data from the Credit Rating Service
Validating, Compiling, and Deploying the Order Booking Process
Ensure that Oracle BPEL Server and JDeveloper BPEL Designer are started. See "Starting Oracle BPEL Process Manager Components" for instructions.
During this tutorial, the BPEL process that you design communicates with the Credit Rating service. You must first deploy this service and test that it is running.
Select Start > All Programs > Oracle - Oracle_Home > Oracle BPEL Process Manager 10.1.2 > Developer Prompt to open up an operating system command prompt at the Oracle_Home\integration\orabpel\samples directory.
Change directories to the utils\CreditRatingService subdirectory:
cd utils\CreditRatingService
Enter the following command:
obant
This deploys and starts the required services for using this tutorial. If successful, a message similar to the following appears at the end:
BUILD SUCCESSFULTotal time: 3 secondsoraBPELPM\integration\orabpel\samples\utils\CreditRatingService>ENDLOCAL
If you receive an error saying the path was not found, ensure that your environment path is set to the Oracle_Home\integration\orabpel\bin directory.
Access Oracle BPEL Console using Internet Explorer to see if all required services are running. Select Start > All Programs > Oracle - Oracle_Home > Oracle BPEL Process Manager 10.1.2 > BPEL Console.
Click Login with default selected from the Domain list. The password is bpel.
The services for this tutorial are running if CreditRatingService, TaskActionHandler, and TaskManager display in the Dashboard tab.
|
See Also: "Connecting to Oracle BPEL Server" for instructions on creating a connection to Oracle BPEL Console |
Follow these instructions to create a new workspace and Order Booking project.
Return to JDeveloper BPEL Designer.
Select File > New from the main menu.
Double-click Workspace in the Items window to display the Create Workspace window.
Enter OrderBookworkspace in the Workspace Name field and accept the default path in the Directory Name field.
Deselect the Add a New Empty Project check box.
Click OK.
Right-click OrderBookworkspace in the Applications Navigator section of the designer window. If the Applications Navigator section does not currently appear, select Application Navigator from the View main menu.
Select New Project.
Double-click BPEL Process Project in the Items window to display the BPEL Process Project window.
Enter OrderBooking in the BPEL Process Name field. All other fields default to the correct values for creating an asynchronous BPEL process.
Click OK.
The bpel.xml, OrderBooking.bpel, and OrderBooking.wsdl files are created.
|
Summary: You now import the GlobalCompany schema into your project. This schema defines the structure of the purchase order to submit. |
Copy OrderBookingPO.xsd and OrderBookingPO_1.xml from the Oracle_Home\integration\orabpel\samples\tutorials\127.OrderBookingTutorial\PracticeFiles directory to the Oracle_Home\integration\jdev\jdev\mywork\OrderBookworkspace\OrderBooking directory.
Double-click OrderBooking.bpel in the Applications Navigator section of the designer window to display the Structure section in the lower left of the window.
|
Note: The Diagram View tab must be enabled to see the Structure section. |

Select and right-click Project Schemas in the Structure section.
Select Import Schema.
The Import Schema window appears.
Click the flashlight icon to access the Open window.
Select OrderBookingPO.xsd from the OrderBooking directory in which you placed it in Step 1 and click Open.
The file is added to the URL field of the Import Schema window.
Click OK.
Verify that OrderBookingPO.xsd appears under OrderBooking > Web Content > Miscellaneous Files in the Applications Navigator section of the designer window. OrderBookingPO.xsd also appears under Project Schemas in the Structure section. If you want, you can double-click OrderBookingPO.xsd under Miscellaneous Files to view the design and source modes of this file.
If you view OrderBookingPO.xsd, close the window when done by clicking the x button on the Title tab.

Double-click OrderBooking.bpel in the Applications Navigator section of the designer window to display the Structure section in the lower left section of the designer window.
Expand Message Types > Process WSDL - OrderBooking.wsdl > OrderBookingRequestMessage > payload in the Structure section.
Right-click payload and select Edit Message Part to display the Edit Message Part window.
Select Element and click the flashlight icon to the right of the Element field.
Expand Project Schema Files > OrderBookingPO.xsd.
Select PurchaseOrder.
Click OK to close the Type Chooser window and the Edit Message Part window.
This defines the input parameter (payload) of the PurchaseOrder type.
Expand Message Types > Process WSDL - OrderBooking.wsdl > OrderBookingResponseMessage > payload in the Structure section.
Right-click payload and select Edit Message Part to display the Edit Message Part window.
Select Element and click the flashlight icon to the right of the Element field.
Expand Project Schema Files > OrderBookingPO.xsd.
Select PurchaseOrder.
Click OK to close the Type Chooser window and the Edit Message Part window.
This defines the output parameter (payload) of the PurchaseOrder type.
Select Save from the File main menu.
|
Summary: You now create a partner link for the Credit Rating service. This is the service you started when you ranobant in "Starting and Testing Your Services". A partner link enables you to define the external services with which the OrderBooking BPEL process is to interact. A partner link type characterizes the conversational relationship between two services by defining the roles played by each service in the conversation and specifying the port type provided by each service to receive messages within the context of the conversation.
|
Ensure that Process Activities is selected in the drop-down list of the Component Palette section in the upper right section of JDeveloper BPEL Designer.
Drag and drop a PartnerLink activity onto the right side of the designer window anywhere beneath the header Partner Links. Note that both sides of the designer window have sections in which partner links can be placed.

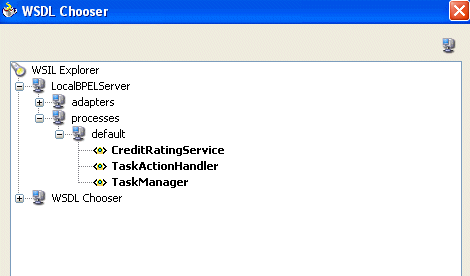
Enter the following values to create a partner link for the Credit Rating service. For the WSDL File field below, click the flashlight (the second icon from the left named WSIL Browser) to access the WSDL Chooser window for automatically selecting the Credit Rating service deployed in "Starting and Testing Your Services":

| Field | Value |
|---|---|
| Name | CreditRatingService |
| WSDL File | Access this URL by clicking the WSIL Browser flashlight icon and expanding and selecting LocalBPELServer > processes > default > CreditRatingService.
http://localhost:9700/orabpel/default/CreditRatingService/CreditRatingService?wsdl See Also: "Setting the Hostname in Your JDeveloper BPEL Designer Web Browser Preferences" if you receive a parsing error when attempting to add a WSDL file in the WSDL Chooser window. |
| Partner Link Type | CreditRatingService |
| My Role | Leave unspecified since this is a synchronous service. |
| Partner Role | CreditRatingServiceProvider |
Click OK.
Select Save from the File main menu.
|
Summary: You now create the Invoke activity that sends request data from the OrderBooking process to the synchronous Credit Rating service and receives a response. The customer custID variable from the Order Booking schema is used to obtain the credit rating. When you run the OrderBooking process, you specify a value for CustID in Step 3 of "Running the Order Booking Process". |
Drag and drop a Scope activity from the Component Palette section to below the receiveInput Receive activity. Always pay careful attention to where you place the Scope activity; throughout all phases of this tutorial, you drag and drop activities many times.

Note that the first time your drag and drop an activity, it has a generic name such as Scope_1.
Double-click the scope icon to display the Scope window.
Enter GetCreditRating in the Name field of the General tab.
Click OK.
Click the + sign to expand the Scope activity. You now add an Invoke activity and two Assign activities to this Scope activity.
Drag and drop an Invoke activity from the Component Palette section to inside the GetCreditRating Scope activity.

Double-click the Invoke icon to display the Invoke window.
Enter the following details:
| Field | Value |
|---|---|
| Name | invokeCR |
| Partner Link | CreditRatingService |
The Operation (process) field is automatically filled in.
Click the first icon to the right of the Input Variable field. This is the automatic variable creation icon.

Click OK on the Create Variable window that appears.
A variable named invokeCR_process_InputVariable is automatically created in the Input Variable field. This variable is automatically assigned a message type of CreditRatingServiceRequestMessage.
Click the first icon to the right of the Output Variable field.
Click OK on the Create Variable window that appears.
A variable named invokeCR_process_OutputVariable is automatically created in the Output Variable field. This variable is automatically assigned a message type of CreditRatingServiceResponseMessage.
Click OK.
Select Save from the File main menu.
|
Summary: You now create the first of two Assign activities in this phase. This Assign activity takes the customer custID element from the Order Booking schema and assigns it to invokeCR_process_InputVariable. This is the variable used for sending a request to the Credit Rating service. |
Drag and drop an Assign activity from the Component Palette section to above the invokeCR Invoke activity and inside the GetCreditRating Scope activity.
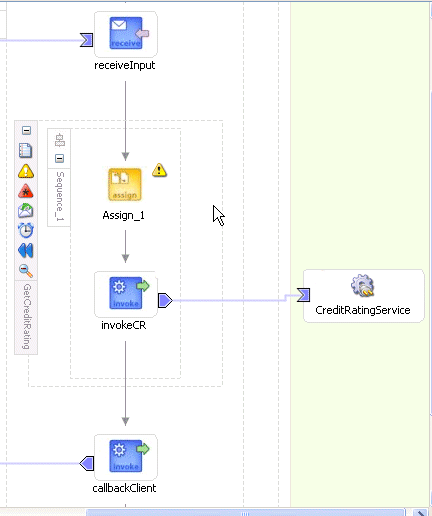
Double-click the assign icon to display the Assign window.
Click the General tab.
Enter assignCR in the Name field.
Click Apply.
Click the Copy Rules tab.
Click Create to display the Create Copy Rule window.

| Field | Value |
|---|---|
| From |
|
|
Variable |
|
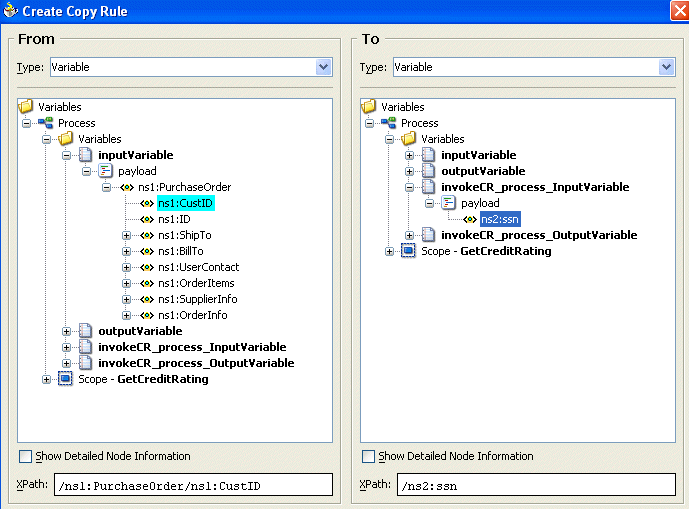
Expand and select Variables > inputVariable > payload > ns1:PurchaseOrder > ns1:CustID
Note: The namespace number values (for example, ns1, ns2) can vary. |
| To |
|
|
Variable |
|
Expand and select Variables > invokeCR_process_InputVariable > payload > ns2:ssn |
The Create Copy Rule window appears as follows:
Click OK to close the Create Copy Rule window and the Assign window.
Select Save from the File main menu.
|
Summary: This Assign activity takes the response received from the Credit Rating service and places it in the comment field. |
Drag and drop an Assign activity from the Component Palette section to below the invokeCR Invoke activity and inside the GetCreditRating Scope activity.
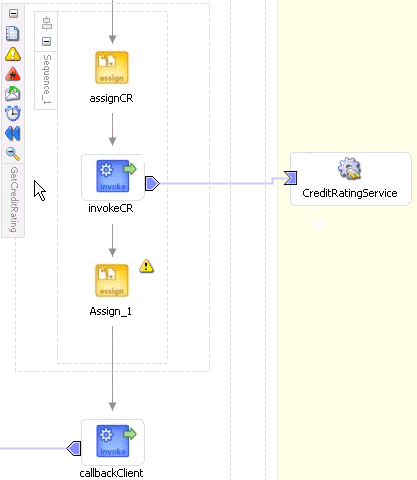
Double-click the assign icon to display the Assign window.
Click the General tab.
Enter assignRating in the Name field.
Click Apply.
Click the Copy Rules tab.
Click Create to display the Create Copy Rule window.
| Field | Value |
|---|---|
| From |
|
|
Expression |
|
concat('Good credit, Rating = ', bpws:getVariableData('invokeCR_process_OutputVariable','payload','/ns2:rating'))
Note: Press Ctrl and then the space bar to display a list for selecting (double-clicking) this syntax. The namespace number values (for example, ns1, ns2) can vary. Use the namespace values that automatically appear. |
| To |
|
|
Variable |
|
Expand and select Variables > inputVariable > payload > ns1:PurchaseOrder > ns1:OrderInfo > ns1:OrderComments |
Click OK to close the Create Copy Rule window and the Assign window.
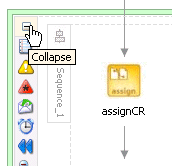
Click the - sign to close the GetCreditRating Scope activity.
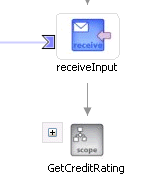
When closed, the GetCreditRating Scope activity looks as follows:
Select Save from the File main menu.
Drag and drop an Assign activity from the Component Palette section to below the GetCreditRating Scope activity and above the callbackClient activity.

Double-click the assign icon to display the Assign window.
Click the General tab.
Enter assignOutput in the Name field.
Click Apply.
Click the Copy Rules tab.
Click Create to display the Create Copy Rule window.
Enter the following details to create a statement:
| Field | Value |
|---|---|
| From |
|
|
Variable |
|
Expand and select Variables > inputVariable > payload |
| To |
|
|
Variable |
|
Expand and select Variables > outputVariable > payload |
Click OK to close the Create Copy Rule window and the Assign window.
Select Save from the File main menu.
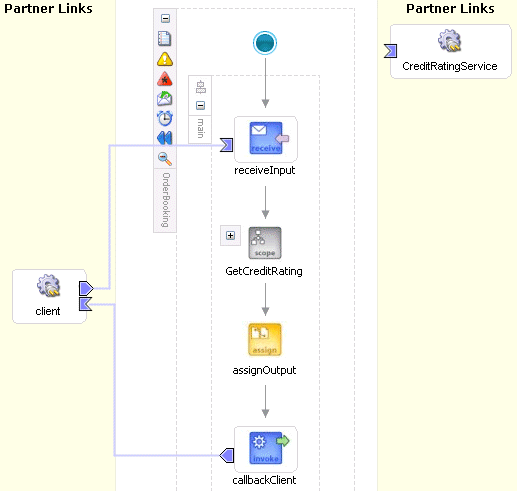
When complete, the designer window looks as follows:
Go to the Applications Navigator section.
Right-click OrderBooking.
Select Deploy > LocalBPELServer > Deploy to default domain.
Enter the domain password of bpel when prompted.
This compiles the BPEL process. Review the bottom of the window for any errors. If there are no errors, deployment was successful.

If there are errors, click BPEL Validation Errors to display details about the type and location of the error.
Make corrections and deploy again.
You are now ready to begin the process of applying for a new order.
Log into Oracle BPEL Console using Internet Explorer or refresh the page if it is already open. Select Start > All Programs > Oracle - Oracle_Home > Oracle BPEL Process Manager 10.1.2 > BPEL Console.
The Dashboard tab of Oracle BPEL Console appears.
Click OrderBooking in the Deployed BPEL Processes list.
Enter a nine-digit integer value that does not begin with zero in the CustID field of the HTML Form and click Post XML Message. Ignore the other fields.
The BPEL Processes tab displays a message similar to the following:
Test Instance Initiated

Instance '39e706a46ad531be:858bf1:fcc240f310:-7ffc' is being processed asynchronously.
Click the Instances tab at the top.
Verify that the OrderBooking and CreditRatingService instances were created. Both should appear in the Instance list. The Last Modified list displays the times at which they were created.

Click the OrderBooking instance.
A message appears stating the following:
The state of this instance is Completed
Click the Audit link to follow the instance execution process. The Audit link displays the following details:
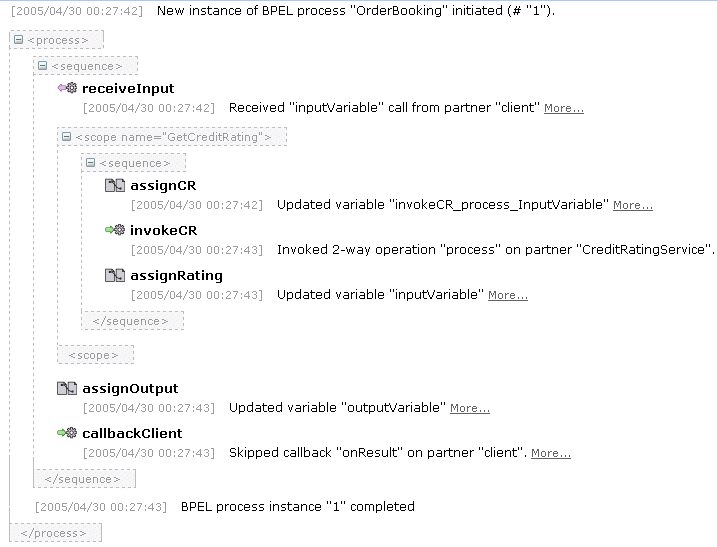
Click callbackClient at the bottom of the flow to see the results.
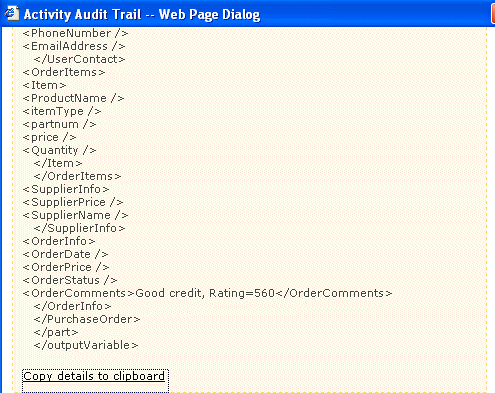
Verify the credit rating value. The comment field shows that the credit rating is returned as 560; this is also returned in the variable invokeCR_process_OutputVariable.
You have now built a simple asynchronous BPEL process that received an order from a client and obtained a credit rating from a Credit Rating service. You performed the following key tasks:
Deployed a synchronous Credit Rating service.
Created a new project named OrderBooking, which automatically created a BPEL process of the same name.
Created a partner link that enabled you to define the external service (the deployed Credit Rating service) with which your BPEL process interacted.
Designed the BPEL process and invoked the Credit Rating service by creating all necessary activities.
Deployed the BPEL process to Oracle BPEL Console.
Ran the BPEL process from Oracle BPEL Console and submitted a social security card number to the Credit Rating service, which checked the client's credit history.
Reviewed the credit rating results returned from the Credit Rating service to the client.