|
Oracle® BPEL Process Manager Order Booking Tutorial
10g Release 2 (10.1.2) B15813-02 |
|
 Previous |
 Next |
|
Oracle® BPEL Process Manager Order Booking Tutorial
10g Release 2 (10.1.2) B15813-02 |
|
 Previous |
 Next |
This chapter of the tutorial describes how to add transformation logic to a BPEL process.
This chapter contains the following topics:
This phase of the tutorial adds to the process you designed in Chapter 6, "Creating Fault Handling and Exception Management". Ensure that you have successfully completed that phase before performing this one. In this phase of the tutorial, you add transformation logic to a new BPEL process. You perform the following key tasks:
Create a new BPEL process named POAcknowledge.
Design the BPEL process to add transformation logic to transform incoming purchase order data into outgoing purchase order acknowledgement data.
Test the transformation logic. This is a standalone test, and does not involve designing or deploying the complete process. You simply build and test the transformation logic from JDeveloper BPEL Designer.
This section contains the following tasks:
You must create a POAcknowledge project.
Right-click OrderBookworkspace in the Applications Navigator section of the designer window.
Select New Project.
Double-click BPEL Process Project in the Items window to display the BPEL Process Project window.
Enter POAcknowledge in the BPEL Process Name field. All other fields default to the correct values for creating an asynchronous BPEL process.
Click OK.
This creates the bpel.xml, POAcknowledge.bpel, and POAcknowledge.wsdl files in the Applications Navigator section of the designer window.
Copy OrderBookingPO.xsd and POAcknowledge.xsd from the Oracle_Home\integration\orabpel\samples\tutorials\127.OrderBookingTutorial\PracticeFiles directory to the Oracle_Home\integration\jdev\jdev\mywork\OrderBookworkspace\POAcknowledge directory.
Double-click POAcknowledge.bpel in the Applications Navigator section of the designer window to display the Structure section in the lower left section of JDeveloper BPEL Designer.
Select and right-click Project Schemas in the Structure section of the designer window.
Select Import Schema.
The Import Schema window appears.
Click the flashlight icon to access the Open window.
Select OrderBookingPO.xsd from the POAcknowledge directory in which you placed it in Step 1 and click Open.
The file is added to the URL field of the Import Schema window.
Click OK.
Verify that OrderBookingPO.xsd appears under POAcknowledge > Web Content > Miscellaneous Files in the Applications Navigator section of the designer window. OrderBookingPO.xsd also appears under Project Schemas in the Structure section.
Select Save from the File main menu.
Expand Message Types > Process WSDL - POAcknowledge.wsdl > POAcknowledgeRequestMessage > payload in the Structure section.
Right-click payload and select Edit Message Part to display the Edit Message Part window.
Select Element and click the flashlight icon to the right of the Element field.
Expand Project Schema Files > OrderBookingPO.xsd.
Select PurchaseOrder.
Click OK to close the Type Chooser window and the Edit Message Part window.
This defines the input parameter (payload) of the PurchaseOrder type.
Select and right-click Project Schemas in the Structure section of the designer window.
Select Import Schema.
The Import Schema window appears.
Click the flashlight icon to access the Open window.
Select POAcknowledge.xsd from the POAcknowledge directory in which you placed it in Step 1 and click Open.
The file is added to the URL field of the Import Schema window.
Click OK.
Verify that POAcknowledge.xsd appears under POAcknowledge > Web Content > Miscellaneous Files in the Applications Navigator section of the designer window. POAcknowledge.xsd also appears under Project Schemas in the Structure section.
Select Save from the File main menu.
Expand Message Types > Process WSDL - POAcknowledge.wsdl > POAcknowledgeResponseMessage > payload in the Structure section.
Right-click payload and select Edit Message Part to display the Edit Message Part window.
Select Element and click the flashlight icon to the right of the Element field.
Expand Project Schema Files > POAcknowledge.xsd.
Select POAcknowledge.
Click OK to close the Type Chooser window and the Edit Message Part window.
Select Save from the File main menu.
|
Summary: You now use a Transform activity to create a transformation that maps incoming purchase order data into outgoing purchase order acknowledgement data. |
Drag and drop a Transform activity between the receiveInput Receive activity and the callbackClient Invoke activity.
Double-click the Transform activity.
Click the General tab.
Enter transformPO in the Name field.
Click the Transformation tab to display the Transformation window.
Select inputVariable in the Source Variable field (this automatically selects payload in the Source Part field).
Select outputVariable in the Target Variable field (this automatically selects payload in the Target Part field).
Click the second icon (the Create Mapping icon) to the right of the Mapper File field.

A window for graphically mapping source and target elements appears. This window enables you to drag (map) a source element to a target element. If you instead receive a message saying the file already exists, click the third icon to access the transformation window.
Right-click the source and target schemas (the top-most elements in both lists) and select Expand All.
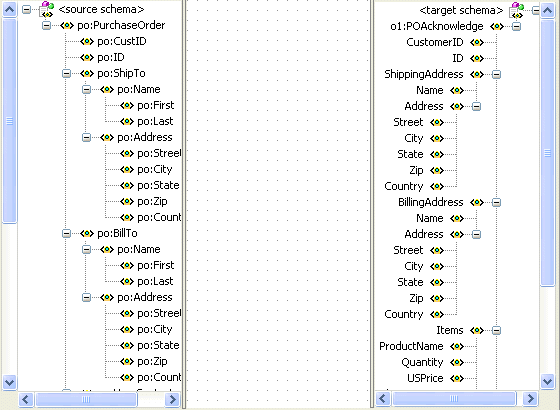
Drag and drop the following source elements to the following target elements. As you perform this task, a line connects each source to its target.
|
Note: The namespace values that appear for the source (for example, ns1, po) can vary. Use the namespace values that automatically appear. |
| Drag the Source... | To the Target... |
|---|---|
| po:CustID | CustomerID |
| po:ID | ID |
| po:ShipTo | ShippingAddress
Note: Click OK when prompted to confirm your mapping. Connecting this source and target automatically connects all subelements. |
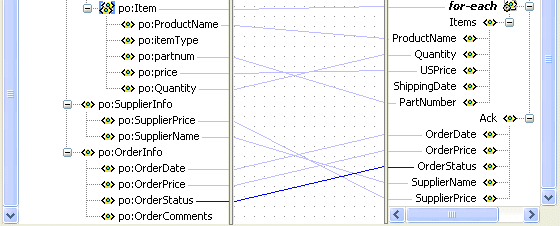
The Transformation window appears as follows:
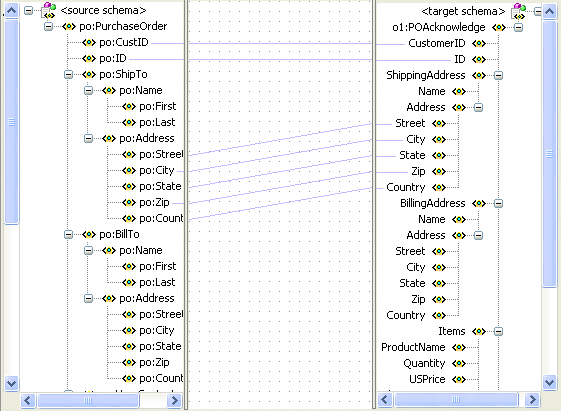
|
Note: If you drag and drop a source element to the wrong target element, right-click the connecting line and select Delete. |
Select String Functions from the Component Palette section.
Drag and drop a concat function into the middle of the transformation window.
Go to the po:ShipTo > po:Name source section.
Drag the po:First and po:Last source elements below po:ShipTo > po:Name into the concat function. This connects two source lines to the concat function.
Go to the ShippingAddress target section.
Drag the Name target element into the concat function. This connects the target line to the concat function and concatenates the first and last names from the source elements into a single name in the target element.
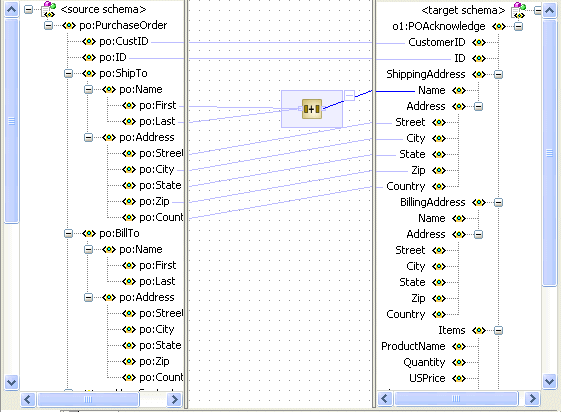
Drag and drop another concat function into the middle of the transformation window to map source BillTo to target BillingAddress.
Go to the po:BillTo > po:Name source section.
Drag the po:First and po:Last source elements below po:BillTo > po:Name into the concat function. This connects two source lines to the concat function.
Go to the BillingAddress target section.
Drag the Name target element into the concat function. This connects the target line to the concat function and concatenates the first and last names from the source elements into a single name in the target element.

Select and right-click the target Items. This displays a list of XSL functions.
Select Add XSL Node > for-each.
Go to the source po:OrderItems section.
Drag and drop the source po:Item onto the for-each link.
Drag and drop the source po:Item onto the target Items (below the for-each link).
Click OK when prompted to confirm your mapping. This automatically maps all subelements.
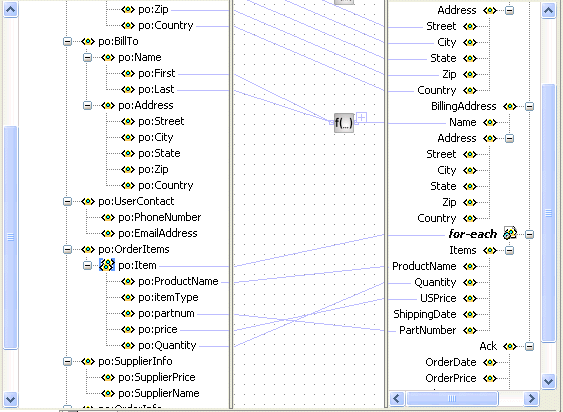
This defines a relationship that specifies a one-to-many (1:M) mapping between the source and target.
Drag and drop the remaining source purchase order elements to the target purchase order acknowledge elements:
| Drag the Source... | To the Target... |
|---|---|
| po:SupplierPrice | SupplierPrice |
| po:SupplierName | SupplierName |
| po:OrderDate | OrderDate |
| po:OrderPrice | OrderPrice |
| po:OrderStatus | OrderStatus |
Select Save from the File main menu.
Right-click in the transformation mapping window and select Test.
This displays the Test XSL Map window.
Select Generate to create sample XML test data.
Test data appears in the upper left corner in the Source XML section.
Click Test at the bottom right to test the translation logic.
Sample test results appear in the upper right corner in the Target XML section.
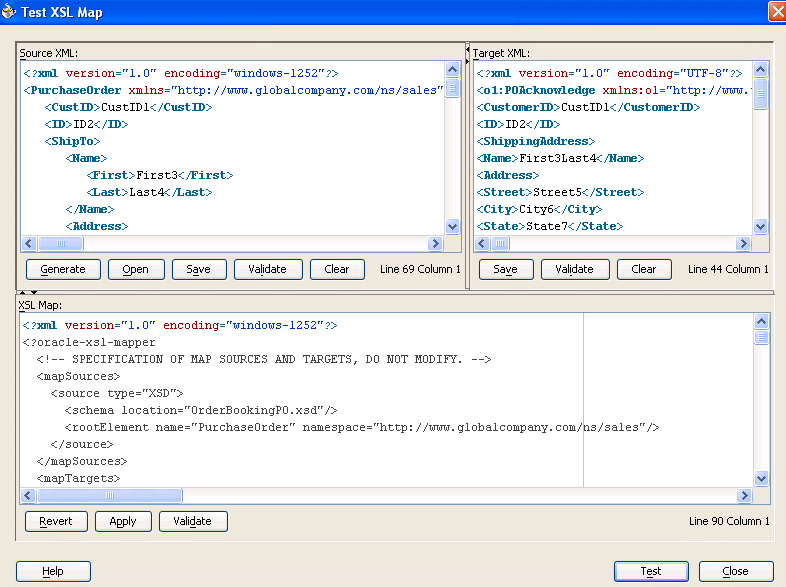
Verify the results.
Click Close to close the test window.
Click Yes if prompted to save your transformation details.
Close the Transformation window by clicking the x button on the Title tab.
A translation file named Transformation_1.xsl appears under POAcknowledge > Integration Content in the Applications Navigator section.
You have now added transformation logic to a BPEL process. You performed the following key tasks:
Created a new BPEL process named POAcknowledge.
Designed the BPEL process to add transformation logic that transformed incoming purchase order data into outgoing purchase order acknowledgement data.
Tested the transformation logic and reviewed the results. You did not design or deploy the complete process. That comes in later phases of this tutorial.