|
Oracle® Reports Building Reports
10g Release 2 (10.1.2) B13895-01 |
|
 Previous |
 Next |
|
Oracle® Reports Building Reports
10g Release 2 (10.1.2) B13895-01 |
|
 Previous |
 Next |
In this chapter, you will learn about single-query group reports. By following the steps in this chapter, you can generate the report output shown in Figure 10-1.
Concepts
Group left and group above reports divide the rows of a report into "sets," based on common values in one or more of the columns, such as the department number in the preceding example. Notice that each department number prints only once. If the report above was not a group report, the department number would print once for each employee in the department rather than just once for the whole department.
Example Scenario
In this example, you will create a group left report that lists employees with their jobs and salaries by department. As you build this example report, you will:
Create a data model with a break group and group left layout.
Use the Property Inspector to add white space between rows.
Then, you will add another column to the break group:
Then, you will add a second break group:
To see a sample across report with control breaks, open the examples folder called break, then open the Oracle Reports example report named grp_lft2.rdf. For details on how to open it, see "Accessing the Example Reports" in the Preface.
Table 10-1 Features demonstrated in this example
| Feature | Location |
|---|---|
|
Create a data model with a break group and default the layout |
Section 10.2.1, "Create a data model with a break group and group left layout" |
|
Format a field |
Section 10.2.2, "Format a field" |
|
Add white space between records |
Section 10.2.3, "Use the Property Inspector to add white space" |
|
Add another column to the break group |
Section 10.3, "Group report with two break columns" |
|
Add a second break group |
Section 10.4, "Group report with two break groups" |
To build the example in this chapter, you must have access to the Human Resources sample schema (HR) provided with the Oracle Database. If you do not know if you have access to this sample schema, contact your database administrator.
The most basic case of a group left or above report is to have one break group with one break column in it. This means that a single master field value will print once for many detail field values.
To see a sample group left report with one break column, open the examples folder named break, then open the Oracle Reports example named grp1col_lft1.rdf. For details on how to access it, see "Accessing the Example Reports" in the Preface.
Concepts
Create a group left (or above) report when you want to prevent a column from repeatedly displaying the same value while other column values in the rows change.
You can build a group left or above report with either a single-query or multiple queries. A single-query report typically runs faster than a multiquery report.
You must ensure that your SELECT statement includes a column, called a break column, containing at least one value which repeats over multiple records (for example, department number in the example report above). With the break column, you will create a second group, called a break group, to create the breaks in the data.
This report uses a default tabular format. You will improve the readability of the report by changing the vertical spacing for a repeating frame to insert a space between each set of department information (for example, between the last record of Department 10 and the first record of Department 20, as shown in the example report above). You will also add a format mask.
When you are creating a single-query report, such as this one, you can use the Report Wizard to create the data model and layout simultaneously.
To create a data model and layout:
Launch Reports Builder (or, if already open, choose File > New > Report)
In the Welcome or New Report dialog box, select Use the Report Wizard, then click OK.
If the Welcome page displays, click Next.
On the Report Type page, select Create Paper Layout Only, then click Next.
On the Style page, type a Title for your report, select Group Left, then click Next.
On the Data Source page, click SQL Query, then click Next.
On the Data page, enter the following SELECT statement in the Data Source definition field:
SELECT EMPLOYEE_ID, FIRST_NAME, LAST_NAME,
JOB_ID, SALARY, DEPARTMENT_ID
FROM EMPLOYEES
|
Note: You can enter this query in any of the following ways:
|
Click Next.
|
Note: If you are not already connected to a database, you will be prompted to connect to the database when you click Query Builder or Next. Ensure that you connect to a database that has the appropriate schema for this example. Section 10.1, "Prerequisites for this example" describes the sample schema requirements for this example. |
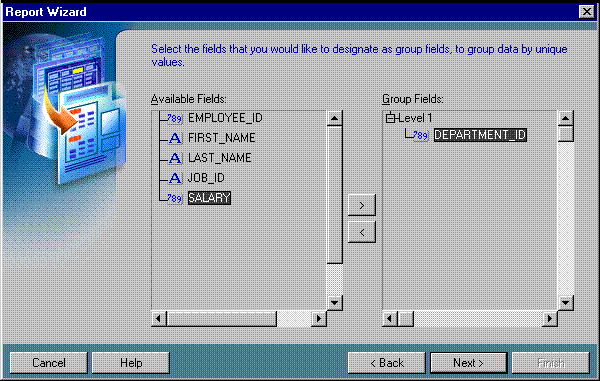
On the Groups page, click DEPARTMENT_ID and click the right arrow (>) to move this field to the Group Fields list, then click Next.
Figure 10-2 Groups page of the Report Wizard
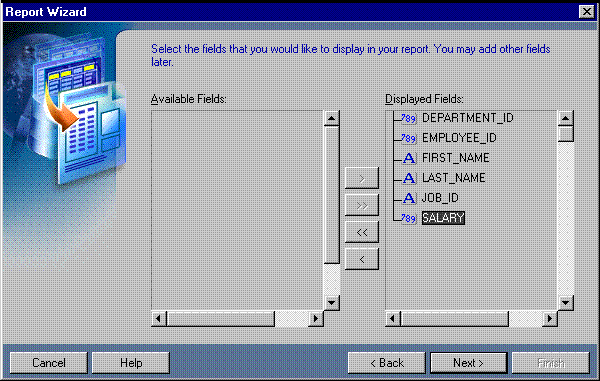
On the Fields page, click the double right arrows (>>) to move all of the fields to the Displayed Fields list.
Figure 10-3 Fields page of the Report Wizard
Click Next until you reach the Template page of the Report Wizard.
On the Template page, select Predefined Template and click Beige, then click Finish to display your report output in the Paper Design view. It should look something like this:
Figure 10-4 Paper Design view for the single-query group left report
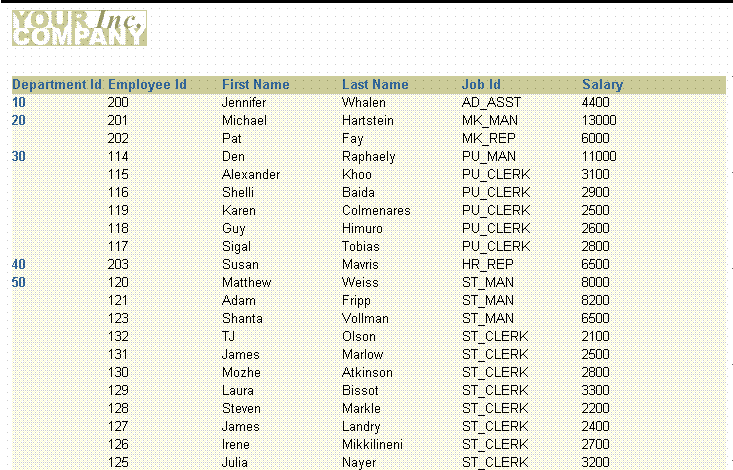
In the Paper Design view, notice the Salary field. The values are neither aligned nor displayed as monetary amounts. You can quickly rectify this in the Paper Design view.
To assign a format mask to monetary values:
In the Paper Design view, click the first number value underneath the Salary label. Notice that all of the values are immediately selected, indicating that you can change their properties simultaneously.
Click the Currency button in the toolbar. A currency symbol immediately appears next to all of the values.
Click the Add Decimal Place button twice. Two decimal places are added to the right of the decimal point.
Resize the fields. Click and drag the rightmost handle of the cell value under the Salary label about 0.5 inches (1.5 centimeters) to the left.
Shift-click the Salary label.
Click the Align Right button in the toolbar.
Click in an open area of the Paper Design view to deselect all of the objects.
Save the report as grp_lft2_your_initials.rdf.
If you examine your report output in the Paper Design view, you will notice that it can be difficult to distinguish where one department's data ends and the next department's data begins. To make the report more readable, you want to add some white space between the departments, but you want to retain the same spacing between employee rows. For this report, you will change a repeating frame property for the master repeating frame to create some white space between the department records.
To create white space between the departments:
In the Paper Design view, click the first number value underneath the Department Id label. Notice that all of the department numbers are immediately selected.
Click the Select Parent Frame button in the toolbar. Notice how the border of the repeating frame that contains the Department Id field is now highlighted.
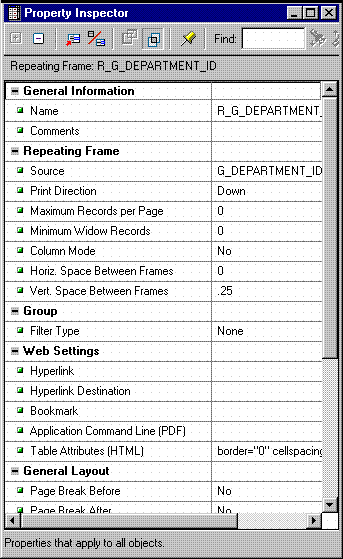
Choose Tools > Property Inspector to display the Property Inspector, and set the following properties:
Under Repeating Frame, set the Vert. Space Between Frames property to 0.25.
Figure 10-6 Property Inspector for master repeating frame
Click the title bar of the Report Editor to make it the active window again.
Save your report.
Figure 10-7 Paper Design view after white space is added
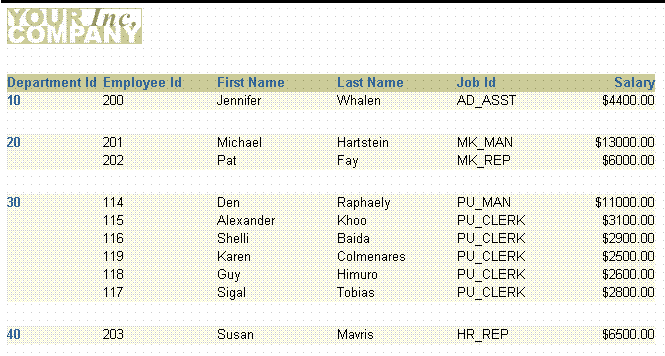
Figure 10-8 Group left report output with two break columns
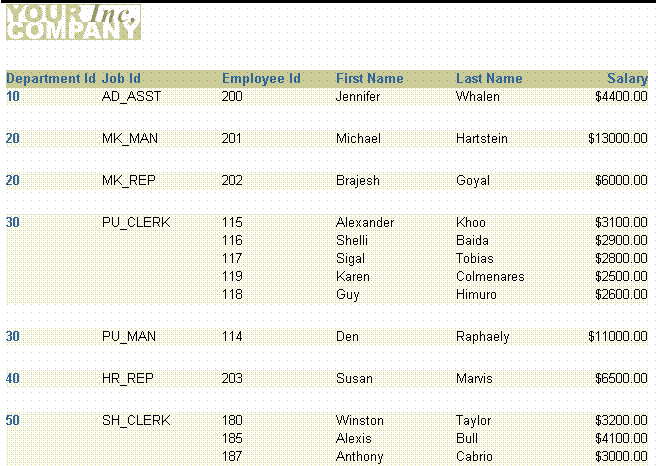
The report above looks similar to the group left report you built in Section 10.2, "Group report with one break column". However, notice that DEPARTMENT_ID values sometimes print more frequently than they did in the previous report. The DEPARTMENT_ID value repeats for each unique value of JOB_ID within the department. This behavior occurs because DEPARTMENT_ID is now grouped with JOB_ID and must print with JOB_ID. While DEPARTMENT_ID values may repeat several times, not until the position of PU_CLERK in department 30 does a job repeat, and not until that point can the break group actually break.
Concepts
You can specify that your report break on certain combinations of information by varying the columns you include in the break group.
You can modify your previous report by moving JOB_ID into the break group, so that your report has two break columns instead of one.
After changing the data model, redefault the layout to incorporate your changes, then specify the format mask again.
To see a sample group left report with two break columns, open the examples folder named break, then open the Oracle Reports example named grp2col_lft1.rdf. For details on how to access it, see "Accessing the Example Reports" in the Preface.
The first task in changing your previous report is to modify the data model by placing an additional column in the break group.
To add a column to the break group:
Open the report you created in the previous section.
In the Object Navigator, double-click the view icon next to the Data Model node to display the Data Model view.
In the Data Model view, click the break group, G_DEPARTMENT_ID, then click and drag the handle on the bottom center of the G_DEPARTMENT_ID group box down about 0.25 inches (0.5 centimeters) to resize it.
Click and drag the JOB_ID column in the G_EMPLOYEE_ID group and move it into the G_DEPARTMENT_ID group, underneath the DEPARTMENT_ID column.
Figure 10-9 Data model with two break columns
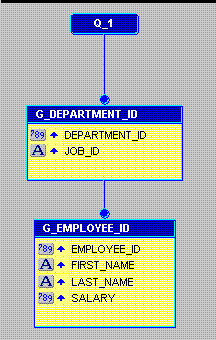
In order for your data model change to be reflected in your output, you need to redefault the layout for your report using the Report Wizard.
To redefault the layout with the Report Wizard:
Click the title bar of the Report Editor to make it the active window. The Report Editor must be the active window for you to access the Report Wizard.
Choose Tools > Report Wizard.
Select Create Paper Layout only.
Click Finish. Notice the changes to the output in the Paper Design view. Also note how the formatting of the Salary field and the additional spacing between records is retained. When possible, Reports Builder will retain your manual modifications between uses of the Report Wizard.
Save your report.
Figure 10-10 Group left report output with two break groups
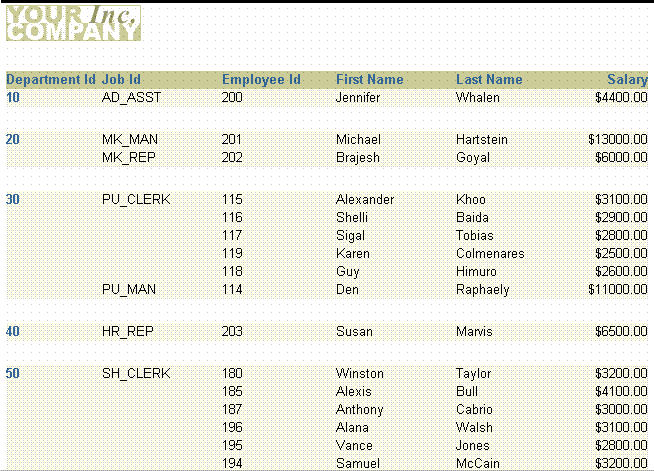
The figure above shows a further modification of your group left report. In this version, DEPARTMENT_ID prints only once for each department. JOB_ID also prints only once when more than one employee in a department has the same job. Both columns are now in separate break groups and DEPARTMENT_ID is in the higher group. Hence, it does not repeat for each unique value of JOB_ID within a department any more.
Concepts
You can also create reports that include multiple break groups and assign one or more columns to each break group.
You will further modify the data model to include two break groups: G_DEPARTMENT_ID and G_JOB_ID.
After changing the data model, redefault the layout to incorporate your changes, then specify the format mask again.
To see a sample group left report with two break groups, open the examples folder named break, then open the Oracle Reports example named grp_lft2.rdf. For details on how to access it, see "Accessing the Example Reports" in the Preface.
The first task in changing your previous report is to modify the data model by creating another break group.
To add another break group:
Open the report you created in the previous section.
In the Object Navigator, double-click the view icon next to the Data Model node to display the Data Model view.
In the Data Model view, click and drag the group, G_EMPLOYEE_ID, down about 0.25 inches (0.5 centimeters).
Click the JOB_ID column in G_DEPARTMENT_ID and drag it to a spot somewhere in between G_DEPARTMENT_ID and G_EMPLOYEE_ID. Another break called G_JOB_ID is created.
In order for your data model change to be reflected in your output, you need to redefault the layout for your report using the Report Wizard.
To redefault the layout with the Report Wizard:
Click the title bar of the Report Editor to make it the active window. The Report Editor must be the active window for you to access the Report Wizard.
Choose Tools > Report Wizard.
Select Create Paper Layout only.
Click Finish. Notice the changes to the output in the Paper Design view.
Save your report.
Congratulations! You have successfully created a single-query group report. You now know how to:
create a data model and layout with the Report Wizard.
format fields in the Paper Design view.
add white space between records with the Property Inspector.
add another column to the break group and redefault the layout.
add another break group and redefault the layout.
For more information on any of the wizards, views, or properties used in this example, refer to the Oracle Reports online Help, which is available in Reports Builder or hosted on the Oracle Technology Network (OTN), as described in Section 3.1.1, "Using the Oracle Reports online Help".