|
Oracle® Reports Building Reports
10g Release 2 (10.1.2) B13895-01 |
|
 Previous |
 Next |
|
Oracle® Reports Building Reports
10g Release 2 (10.1.2) B13895-01 |
|
 Previous |
 Next |
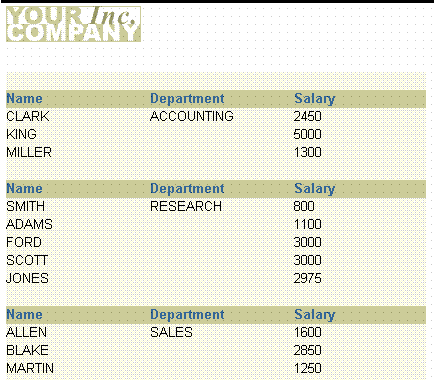
In this chapter, you will learn about reports that display group fields in different positions. By following the steps in this chapter, you can generate the report output shown in Figure 20-1.
Figure 20-1 Group with master record in the middle of report output

Concepts
Normally, a group (break) field appears to the left of (in group left report) or above (in group above report) its related fields. In this example, the group field appears between its related fields.
Data Relationships
To create this type of report you need to build a data model with two groups.
A formula column in the detail group returns the value of the group column. The formula column is moved to the middle position of its group.
Layout
This report uses a group above layout. In the Paper Layout view, the break column is deleted from its defaulted position.
A format trigger is created to suppress redundant printing of the formula column group value in the detail group.
Example Scenario
In this example, you will create a report that displays salary data by employee and department. Your users have indicated to you that they prefer the group value (that is, department name) to appear in the middle of the layout with employee names to the left and employee salaries to the right.
As you build this example report, you will:
Create a data model and a layout using the Report Wizard.
Add a formula column to the detail group.
Add a field in the Report Wizard.
Remove a redundant field in the Paper Design view.
Suppress redundant valuesin a Format Trigger.
To see a sample report that intermixes fields, open the examples folder named intermix, then open the Oracle Reports example named intermixb.rdf. For details on how to access it, see "Accessing the Example Reports" in the Preface.
To build the example in this chapter, you must have access to the SCOTT sample schema provided with the Oracle Database. If you do not know if you have access to this sample schema, contact your database administrator.
When you are creating a single-query report, such as this one, you can use the Report Wizard to create the data model and layout simultaneously.
To create a data model and group above layout:
Launch Reports Builder (or, if already open, choose File > New > Report).
In the Welcome or New Report dialog box, select Use the Report Wizard, then click OK.
If the Welcome page displays, click Next.
On the Report Type page, select Create Paper Layout Only, then click Next.
On the Style page, type a Title for your report, select Group Above, then click Next.
On the Data Source page, click SQL Query, then click Next.
On the Data page, enter the following SELECT statement in the Data Source definition field:
SELECT DEPT.DNAME, EMP.ENAME, EMP.SAL
FROM DEPT, EMP
WHERE (EMP.DEPTNO = DEPT.DEPTNO)
|
Note: You can enter this query in any of the following ways:
|
Click Next.
|
Note: If you are not already connected to a database, you will be prompted to connect to the database when you click Query Builder or Next. Ensure that you connect to a database that has the appropriate schema for this example. Section 20.1, "Prerequisites for this example" describes the sample schema requirements for this example. |
On the Groups page, click DNAME in the Available Fields list and click the right arrow (>) to move this field to the Group Fields list.
Click Next.
On the Fields page, click the double right arrows (>>) to move all of the fields to the Displayed Fields list, then click Next.
On the Totals page, click Next.
On the Labels page, change the labels as follows, then click Next:
| Fields | Labels |
|---|---|
| DNAME | Dept.
|
| ENAME | Name
|
| SAL | Salary
|
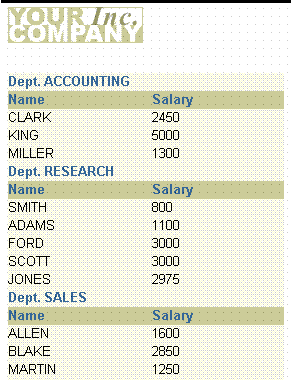
On the Template page, click Finish to display your report output in the Paper Design view. It should look something like this:
Figure 20-3 Paper Design view for intermixing fields report

Save the report as intermixb_your_initials.rdf.
To have the department names appear in the center of this group report, it is simplest to have a column in the detail group for the department names. To achieve this result, you must create a formula column in the detail group that will display the department names.
To add a formula column:
Click the Data Model tool in the toolbar to display the Data Model view.
In the Data Model view, resize the G_ENAME group to be large enough to contain a third column.
Click the Formula Column tool in the tool palette.
Click in the G_ENAME group to create a formula column.
Double-click the new formula column object (CF_1) to display the Property Inspector, and set the following properties:
Under General Information, set the Name property to DEPARTMENT.
Under Column, set the Datatype property to Character, and set the Width property to 14.
Under Placeholder/Formula, double-click the PL/SQL Formula property field to display the PL/SQL Editor.
In the PL/SQL Editor, at the flashing cursor (after the word begin), type the following:
return(:dname);
Click Compile.
Click Close.
Click the title bar of the Report Editor to make it the active window again.
Now that you have added the formula column to the data model, you need to add a corresponding field to display it. You can easily do this by invoking the re-entrant Report Wizard.
To add a field:
Choose Tools > Report Wizard.
On the Report Type page, select Create Paper Layout Only.
On the Fields page:
Click DEPARTMENT in the Available Fields list and click the right arrow (>) to move it to the Displayed Fields list.
Click and drag DEPARTMENT in the Displayed Fields list until it is located between ENAME and SAL.
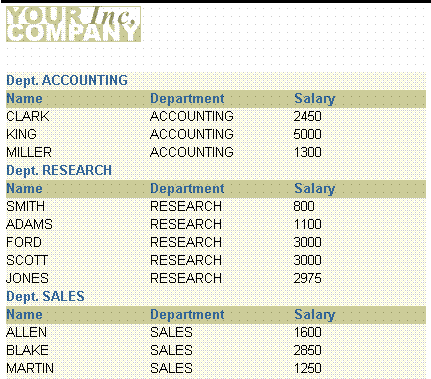
Click Finish to preview your report output in the Paper Design view. It should look something like this:
Figure 20-4 Paper Design view of the intermixing fields report

After you have added a field for the formula column, you will notice that the department values appear in two places. To eliminate this redundancy, you need to remove the master field and its heading.
To remove a field and its label:
In the Paper Design view, shift-click on the first instance of the label Dept. and the value next to it.
Choose Edit > Delete.
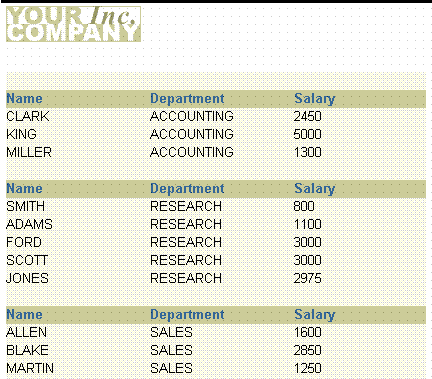
Figure 20-5 Output displayed in Paper Design view

Notice in your output that the department values are properly positioned, but they repeat for every record in the department. What you really want is for the department values to appear once for each department. To accomplish this task, you will first create a global variable to be used in comparing the current department value to the previous one. You will then write a Format Trigger to determine which values to suppress based upon the comparison within each department's records.
To create a global variable:
In the Object Navigator, click the Program Units node.
Click the Create button in the toolbar. The New Program Unit dialog box displays.
Type global in the Name field and select Package Spec.
Click OK.
In the PL/SQL Editor, type the following PL/SQL:
PACKAGE global IS
  prev_val varchar2(14);
END;
Click Compile
Click Close.
To add the format trigger:
In the Object Navigator, type F_DEPARTMENT in the Find field to select it.
Double-click the properties icon to the left of F_DEPARTMENT to display the Property Inspector, and set the following properties:
Under Advanced Layout, double-click the Format Trigger property field to display the PL/SQL Editor.
In the PL/SQL Editor, use the template to enter the following PL/SQL code:
function F_DEPARTMENTFormatTrigger return boolean is
begin
If global.prev_val = :department then
  return(false);
  Else
    global.prev_val := :department;
    return(true);
  END IF;
end;
Click Compile.
Click Close.
Click the title bar of the Report Editor to make it the active window. Return to the Paper Design view if you are not already there. Notice the change in your report output.
Figure 20-7 Final report output displayed in the Paper Design view

Save the report.
Congratulations! You have successfully created an intermixed fields report. You now know how to:
create a data model and layout in the Report Wizard.
add a formula column to the detail group.
add a field in the Report Wizard.
remove a redundant field in the Paper Design view.
suppress values in a Format Trigger.
For more information on any of the wizards, views, or properties used in this example, refer to the Oracle Reports online Help, which is available in Reports Builder or hosted on the Oracle Technology Network (OTN), as described in Section 3.1.1, "Using the Oracle Reports online Help".