|
Oracle® Reports Building Reports
10g Release 2 (10.1.2) B13895-01 |
|
 Previous |
 Next |
|
Oracle® Reports Building Reports
10g Release 2 (10.1.2) B13895-01 |
|
 Previous |
 Next |
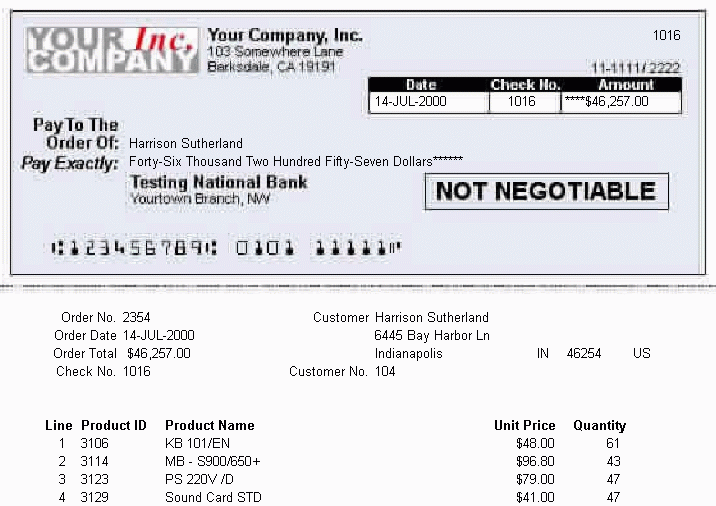
In this chapter, you will learn about reports that format output as checks with cash amounts spelled out in words. By following the steps in this chapter, you can generate the report output shown in Figure 31-1.
Concepts
To spell out the value of a check, you use a PL/SQL function to split the number into its constituent numerals, then use a formula column to combine the words into the spelled-out cash amount.
|
Note: Many of the concepts in this example are used in the following example reports:
|
Data Relationships
This report uses two linked queries. The first query retrieves the information necessary for the check, and the second query retrieves the order details that will be printed on the check stub.
One of the queries you will create assumes that the numbers to be spelled are stored in the TOTAL column of the ORDERS table. The text of the spelled-out number will be fetched from the table called Lookup, and returned in the Thousands_text, Thousands_Symbol, Ones_text, and Decimal_Text columns
Layout
This report uses a default Form style.
Example Scenario
In this example, you will use the Report Wizard to create your basic report definition. You will create a PL/SQL function that spells out the numerical value of the check amount. You will also create a formula column that formats the dollar amounts on your checks. You will import an image of a blank check image, and use the tools in the Paper Layout and Paper Design views to rearrange the fields in your report according to how you want them to display on the resulting check printing report. You will also use these tools to create a stub for every check.
As you build this example report, you will:
Create a report using the Report Wizard to create a simple form report.
Create a formula column that returns the spelled-out cash amounts using the PL/SQL Editor and the Data Model view.
Create a query that will return the items in the order using the Data Model view to create a second query and link the two queries together.
Import a check image and arrange fields for printing using the Paper Layout view to import a blank check image and add fields necessary for printing the check and check stub. Use the Paper Design view to arrange the new fields on the blank check image.
Create a check stub with payment information and order details using the Paper Design view to create a check stub and the Report Block Wizard to create a simple tabular report that displays order details.
To see a sample report where the cash amounts are spelled out, open the examples folder named spellcash, then open the Oracle Reports example named spellcash.rdf. For details on how to open it, see "Accessing the Example Reports" in the Preface.
To build the example in this chapter, you must have access to the Order Entry sample schema provided with the Oracle Database. If you do not know if you have access to this sample schema, contact your database administrator.
The steps in this section will show you how to use the Report Wizard to create a simple report definition.
To create a report definition:
Launch Reports Builder (or, if already open, choose File > New > Report).
In the Welcome or New Report dialog box, select Use the Report Wizard, then click OK.
If the Welcome page displays, click Next.
On the Report Type page, select Create Paper Layout Only, then click Next.
On the Style page, type a Title for your report, select Form, then click Next.
On the Data Source page, click SQL Query, then click Next.
On the Data page, enter the following SELECT statement in the Data Source definition field:
SELECT ALL ORDERS.ORDER_ID, TO_CHAR(ORDERS.ORDER_DATE, 'DD-MON-YYYY')
ORDER_DATE, ORDERS.CUSTOMER_ID, ORDERS.ORDER_TOTAL,
CUSTOMERS.CUST_FIRST_NAME || ' ' || CUSTOMERS.CUST_LAST_NAME CUSTOMER_NAME,
CUSTOMERS.CUST_ADDRESS, (ROWNUM + 1000) AS CHECK_NO
FROM ORDERS, CUSTOMERS
WHERE CUSTOMERS.CUSTOMER_ID = ORDERS.CUSTOMER_ID
ORDER BY ORDERS.ORDER_ID ASC
|
Note: You can enter this query in any of the following ways:
|
Click Next.
|
Note: If you are not already connected to a database, you will be prompted to connect to the database when you click Query Builder or Next. Ensure that you connect to a database that has the appropriate schema for this example. Section 31.1, "Prerequisites for this example" describes the sample schema requirements for this example. |
On the Fields page, click the double right arrows (>>) to move all of the fields to the Displayed Fields list, then click Next.
On the Totals page, click Next.
On the Labels page, change the labels and field widths as follows, then click Next:
Table 31-1 Field description of Labels page
| Fields | Labels | Width |
|---|---|---|
|
ORDER_ID |
|
|
|
ORDER_DATE |
|
|
|
CUSTOMER_ID |
|
|
|
ORDER_TOTAL |
|
|
|
CUSTOMER_NAME |
|
|
|
C_STREET_ADDRESS |
|
|
|
C_POSTAL_CODE |
|
|
|
C_CITY |
|
|
|
C_STATE_PROVINCE |
|
|
|
C_COUNTRY_ID |
|
|
|
CHECK_NO |
|
|
On the Template page, select No Template, then click Finish to preview your report output in the Paper Design view.
Since you have only created the initial report definition, the formatting will not display like a check. It should look something like this:
Figure 31-2 Paper Design view of the simple report

Save your report as spellcash_your_initials.rdf.
The steps in this section will show you how to create a formula column that is based on a function. The function you create will return verbal or word value for the numerical value of the check. You will then create a formula column that will spell out the numerical value in the designated currency. In this case, we will use dollars and cents.
In this section, you will create a function that simply returns the check amount in word format, such as "twenty-four sixty-five." The formula column you create in the next section will use the information retrieved by this function to spell out the cash amounts on your checks.
To create a PL/SQL function:
In the Object Navigator, under your report name, double-click Program Units.
In the New Program Unit dialog box, type Spell in the Name box.
Select Function, then click OK.
In the PL/SQL Editor, type the following code:
FUNCTION Spell (val number) RETURN CHAR IS
  sp varchar2(100);
BEGIN
  if val > 0 then
  	 return(initcap(to_char(to_date(val, 'SSSSS'), 'SSSSSSP')));
  else
  	 return('');
  end if;
END;
|
Note: You can enter this code by copying and pasting it from the provided text file calledspellcash_code.txt into the PL/SQL Editor.
|
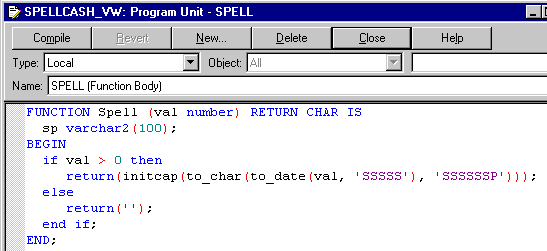
Click Compile. If you see any errors, compare your code against the code shown in the image below:
Figure 31-3 PL/SQL Editor displaying the SPELL function
When your code successfully compiles, click Close.
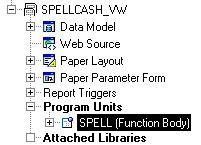
Your new function now displays in the Object Navigator:
Figure 31-4 Object Navigator with SPELL PL/SQL function
Save your report.
In this section, you will create a formula column that uses the information retrieved by the Spell function you created in Section 31.3.1, "Create a PL/SQL function". This formula column will use the verbal values of the check amounts and combine the words with the correct currency. For example, the "twenty-four sixty-five" returned by the Spell function will be turned into "twenty-four dollars and sixty-five cents".
To create a formula column:
In the Object Navigator, under your report name, double-click the view icon next to the Data Model node to display the Data Model view.
Your data model should look like this:
Resize the G_ORDER_ID box by clicking at the top, then dragging the bottom center resize handle downwards. Your data model should now look something like this:
Click the Formula Column tool in the tool palette.
Click in the G_ORDER_ID group, in the space you just created, to create a new formula column.
Double-click the new formula column object (CF_1) to display the Property Inspector, and set the following properties:
Under General Information, set the Name property to SPELLED_AMOUNT.
Under Column, set the Datatype property to CHARACTER, and the Width property to 100.
Under Placeholder/Formula, click the PL/SQL Formula property field to display the PL/SQL Editor.
In the PL/SQL Editor, use the template to enter the following PL/SQL code:
function SPELLED_AMOUNTFormula return Char is
cents number;
c_str varchar2(80);
val number;
begin
  val := :order_total;
  cents := (val mod 1) * 100;
  if cents > 0 then --creates string for cents
  c_str := ' and ' || TO_CHAR(cents) || '/100 Dollars******';
   else
  c_str := ' Dollars******';
  end if;
  if val < 1000 and val > 1 then
  return (initcap(spell(floor(val))) || c_str);
  elsif val > 1000 then
   return(initcap(spell(floor(val/1000))) || ' Thousand ' ||
   spell(floor(val mod 1000)) || c_str);
  else
   return('Zero'||c_str);
  end if;
end;
|
Note: You can enter this code by copying and pasting it from the provided text file calledspellcash_code.txt into the PL/SQL Editor.
|
Click Compile. If you see any errors, compare your code against the code we have provided.
When your code successfully compiles, click Close.
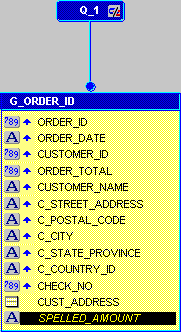
Your new formula column, called SPELLED_AMOUNT, now displays in the data model.
Figure 31-7 Data Model with SPELLED_AMOUNT formula column
Save your report.
The steps in this section will show you how to manually create a query in the Data Model view that will return the items in the customer's order. This data retrieved will be used to display the order details in the check stub.
To manually create a query:
In the Data Model view, click the SQL Query tool in the tool palette, then click an open area in the Data Model view to display the SQL Query Statement dialog box.
InIn the SQL Query Statement field, enter the following SELECT statement:
SELECT ALL
    ORDER_ITEMS.LINE_ITEM_ID,
    ORDER_ITEMS.ORDER_ID,
    ORDER_ITEMS.PRODUCT_ID,
    ORDER_ITEMS.UNIT_PRICE,
    ORDER_ITEMS.QUANTITY,
    PRODUCT_INFORMATION.PRODUCT_NAME
FROM ORDER_ITEMS, PRODUCT_INFORMATION
WHERE PRODUCT_INFORMATION.PRODUCT_ID=ORDER_ITEMS.PRODUCT_ID
ORDER BY ORDER_ITEMS.LINE_ITEM_ID ASC
|
Note: You can enter this query in any of the following ways:
|
Click OK. Your query displays in the Data Model view, and should look something like this:
In the Data Model view, click the Data Link tool in the tool palette.
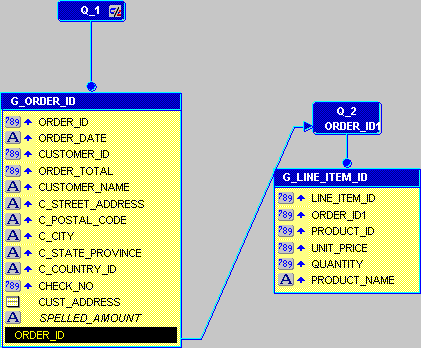
In the first query, Q_1, under G_ORDER_ID, click ORDER_ID, then drag the line to ORDER_ID1 in Q_2.
Your data model should now look like this:
Figure 31-9 Data Link between two queries
Save your report.
The steps in this section will show you how to adjust the margins of your check printing report and align the fields with an image of a check. You can scan any check and use its image to lay out the objects of your check report. In this section, we use the image we have provided to you, called blankcheck.jpg. This image is located in the spellcash example folder.
Before you can insert the check image, you must first rearrange the layout objects.
To rearrange the layout objects:
Click the Paper Layout button in the toolbar to display the Paper Layout view.
The layout currently looks like this:
Figure 31-10 Paper Layout view of your report

Click the Edit Margin button in the toolbar.
In the Paper Layout view, click the margin frame (the heavy black line) to select it.
At the top of the frame, click the center black resizing square and drag it up, so that the margin is 0.25 inches (0.5 centimeters).
|
Tip: When you click the center square, notice that a dotted guideline displays while your mouse button is depressed. You can use these guidelines to help place objects exactly where you want them in the Paper Layout view. |
When you are done, it should look something like this:
Figure 31-11 Paper Layout view with resized margin

Save your report.
In this section, you will import an image of a blank check. You can use any check you like. For this example, we have provided an image called blankcheck.jpg in the spellcash example directory.
To import the blank check image:
While the frame is still selected, choose Insert > Image.
In the Import Image dialog box, make sure that File is selected.
In the text box next to File, type or browse for the location of the image, blankcheck.jpg, then click OK to display the blank check image in the Paper Layout view.
Click the Edit Margin button in the toolbar to return to edit mode. Notice that the image no longer displays.
The steps in this section will show you how to use the various tools in the Paper Layout view to modify the look and feel of your check report. Here, you will learn how to add and modify layout objects and fields according to how you want them to display on the resulting checks. You will create copies of certain fields that you will then use in Section 31.6, "Create a check stub with payment information and order details" to create the check stub.
To set up the check printing fields:
In the Paper Layout view, click the Order No. boilerplate text.
Click the Select Parent Frame button in the toolbar.
The repeating frame called R_G_ORDER_ID should now be selected in the Paper Layout view. You can also look in the Object Navigator, under Paper Layout, to make sure R_G_ORDER_ID is selected.
While R_G_ORDER_ID is selected, click and drag the bottom center resize handle to 8.75 inches (22 centimeters), or the bottom of the page.
|
Tip: When you click and drag a resize handle in the Paper Layout view, guidelines display along the ruler to help you place your objects. In this case, drag the bottom center resize handle down the page until the horizontal guideline reaches 8.75 inches (22 centimeters). |
Click the Flex Off button in the toolbar to set Flex mode off.
In the Paper Layout view, click F_ORDER_TOTAL, then press CTRL+C on your keyboard.
Click in the area below your layout objects and press CTRL+V.
You should see a new field called F_ORDER_TOTAL1. If this field displays on top of the other layout objects, click and drag it down below the other layout objects so that your Paper Layout view now looks something like this:
Figure 31-12 Partial Paper Layout view with F_ORDER_TOTAL1

Copy the F_ORDER_DATE field and paste it below the other fields, so that your layout now looks like this:
Figure 31-13 Partial Paper Layout view with F_ORDER_DATE1

|
Note: When you copy and paste a field, Reports Builder maintains the size of the field. So, when you copy and paste F_ORDER_DATE, you may not see the full name of the field. While the field is selected, you can click and drag the right border of the field to the right so that you can see the full name of the field, F_ORDER_DATE1. |
Copy F_CUSTOMER_NAME and paste the field below the other layout objects, so that your layout looks like this:
Figure 31-14 Partial Paper Layout view with F_CUSTOMER_NAME1

Make two copies of F_CHECK_NO by pressing CTRL+C on your keyboard once, then CTRL+V twice.
|
Note: Since this field is small, it may be difficult to find. You can use the Object Navigator to find and select the field. When you click a field in the Object Navigator, under Paper Layout, the corresponding field is also selected in the Paper Layout view. |
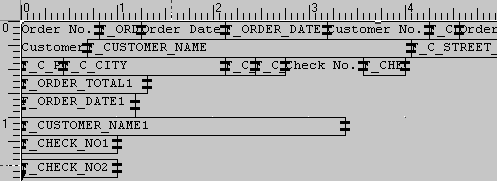
Position these two new fields below the other layout objects, so that your layout looks like this:
Figure 31-15 Partial Paper Layout view with F_CHECK_NO1 and F_CHECK_NO2
|
Note: We have expanded the size of the two new fields (F_CHECK_NO1 and F_CHECK_NO2) to make them easier to see, but you do not need to resize these fields. |
Click the Field tool in the tool palette.
Draw a field below the other layout objects about 5 inches (12.5 centimeters) long, so that your layout now looks like this:
Figure 31-16 Partial Paper Layout view with F_1 field
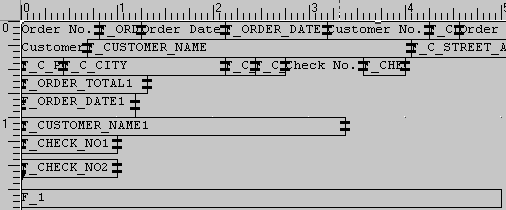
While the new field, F_1, is still selected, click the Fill Color tool in the tool palette, and choose No Fill.
Click the Line Color tool in the tool palette, and choose No Line.
Double-click the field F_1 display the Property Inspector.
Set the Name property to F_SPELLED_AMOUNT.
Under Field, set the Source property to SPELLED_AMOUNT (the formula column you created in Section 31.3.2, "Create a formula column in your data model").
Save your report.
The steps in this section will show you how to use the Paper Design view to rearrange the fields you just created. You will use the blank check image we have provided as a guide.
Click the Paper Design button in the toolbar to display your report in the Paper Design view.
|
Note: When you click the Paper Design button while you are in another view (that is, Paper Layout view or Data Model view), Reports Builder runs your query and your layout. If you receive any error messages when you click the Paper Design button, go back to your original view to verify your changes. You can always compare your report against the sample report we have provided, calledspellcash.rdf.
|
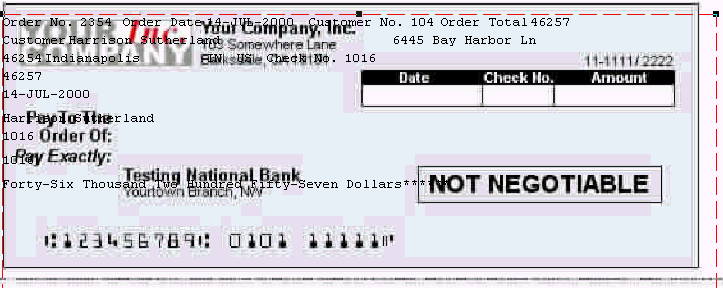
You will see your layout objects, as well as the blank check image:
Figure 31-17 Partial Paper Design view of the check report
|
Note: You will see that the preview does not quite look like a check report. The steps in this section will show you how to move your fields so that your report looks like a proper check. |
In the Paper Design view, position the F_ORDER_TOTAL field in the "Amount" box in the blank check image.
|
Note: If you closed Reports Builder for any reason and are returning to building this report, make sure you click the Flex Off button in the toolbar so that you can move the fields around in the Paper Design view. |
Click the Align Right button in the toolbar, so that this portion of the check looks like the following:
Position the F_CHECK_NO field in the "Check No." box on the blank check, and center-align the text.
Position the F_ORDER_DATE field in the "Date" box on the blank check, and center-align the text.
Position the F_CHECK_NO2 field in the upper right-hand corner of the check image, and right-align the text.
Position the F_SPELLED_AMOUNT field next to the "Pay Exactly:" text on the blank check image.
Position the F_CUSTOMER_NAME field next to the "Pay To The Order Of:" text on the blank check image.
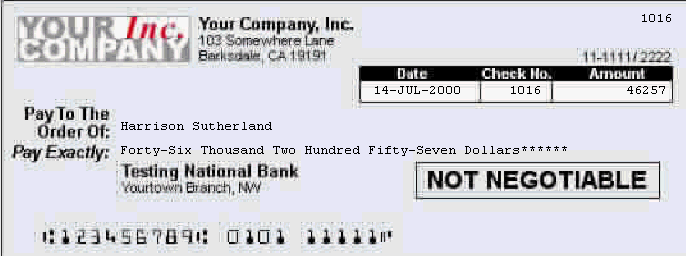
The check should now look like this:
Figure 31-19 Check image with fields positioned
Save your report.
The steps in this section will show you how to change the font, alignment, and formatting of the data on your check.
To modify the look and feel of the check:
In the Paper Design view, choose Edit > Select All (or press CTRL+A).
Choose Format > Font.
In the Font dialog box, choose Arial font, Regular style, Size 10, then click OK.
In the Paper Design view, click anywhere to deselect all the objects.
|
Tip: If you have trouble deselecting the objects, go to the Object Navigator and click any item. The objects that were selected in the Object Navigator should display as deselected. |
In the Paper Design view, click F_CHECK_NO2 (the check number in the upper right-hand corner of the check) and change the font to Arial, Bold, 12 point.
Click the F_ORDER_TOTAL field (the number in the Amount box on the check).
Click the Currency button in the toolbar, then click the Commas button.
While F_ORDER_TOTAL is still selected, click the Add Decimal Place button in the toolbar twice, so that the amount now displays like this: $46,257.00.
Choose Tools > Property Inspector to display the Property Inspector for F_ORDER_TOTAL.
Under Field, next to the Format Mask property, add to the beginning of the existing format mask "****", then close the Property Inspector.
The amount should now display like this: ****$46,257.00.
Select the F_CUSTOMER_NAME and F_SPELLED_AMOUNT fields by Shift-clicking them, then change the font to Times New Roman, 12 point.
Your report should now look something like this:
|
Note: You will notice that the other boilerplate text is still overlaying the image. We will rearrange this text later in the chapter. |
Save your report.
When you create a check printing report, you will sometimes want to create a check "stub" that contains the payment information on the check, as well as the details of the order. The steps in this section will show you how to create a check stub that contains the payee, amount, date, check number, and other payment information.
You will then use the information retrieved by the second query in your data model to print a simple tabular report on the check stub that displays the order information associated with the check.
The steps in this section will show you how to use the tools in the Paper Design view to create a check stub for your check report. You will rearrange the fields you created in the previous section so that every time you run the report, a corresponding check stub will display for every check.
You will also create guidelines in the Paper Design view to help you align the check stub information with the data in the check report.
To create a check stub:
Click the Flex Off button in the toolbar.
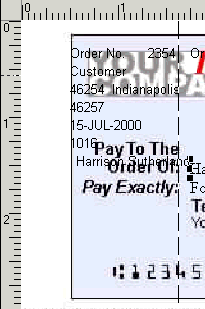
Click in the left, vertical ruler and drag your mouse to the right, so that the line is flush with the text "Pay Exactly."
When you release your mouse button, you will notice that a guideline displays, like the one in the following image:
Figure 31-21 Partial Paper Design view of the check report with horizontal guideline
|
Note: The guideline is a broken black line spanning across this image, to the right of "Pay Exactly." |
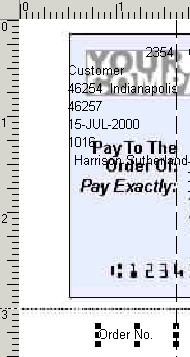
Click the Order No. boilerplate object (located in the upper left-hand corner of the check) and position it along the new guideline, and below the check image at 3.25 inches (8.5 centimeters), like this:
Figure 31-22 Partial Paper Design view of the check with Order No. boilerplate text
Create another vertical guideline that is aligned next to the first one.
Click the F_ORDER_ID field (in the above image, it is the field with "2354") and position it next to the Order No. field, like this:
Figure 31-23 Order No. and F_ORDER_ID fields in the Paper Design view

|
Note: You can always select your fields in the Object Navigator, under Paper Layout > Main Section > Body, and these fields will appear selected in the Paper Design view. |
Now, click the Order Date boilerplate text and position it directly below "Order No.", like this:
Figure 31-24 Order Date field in the Paper Design view

Click F_ORDER_DATE1 (the copy you made of the F_ORDER_DATE field), which you can locate using the Object Navigator, and position the field next to the Order Date boilerplate text, like this:
Figure 31-25 F_ORDER_DATE1 field next to Order Date text

Position the Order Total boilerplate text directly below the Order Date boilerplate text.
Position the F_ORDER_TOTAL1 field next to the Order Total boilerplate text.
Position the Check No. boilerplate text directly below the Order Total boilerplate text.
Position F_CHECK_NO1 next to the Check No. boilerplate text.
The check stub should now look like this:
Figure 31-26 Partial check stub in Paper Design view

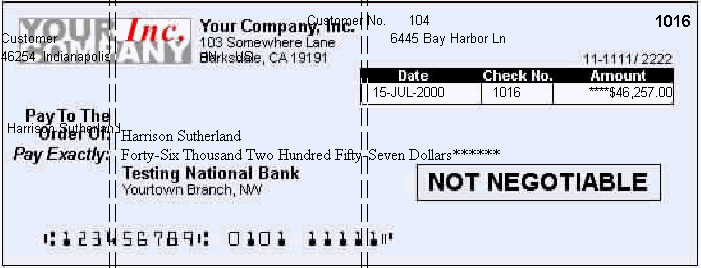
Create another pair of vertical guidelines that are aligned with the box containing the date, amount, and check number. The guidelines should appear here:
Figure 31-27 Second vertical guideline in the Paper Design view
|
Note: To create this guideline, click in the left-hand ruler, then drag your mouse until the line is aligned to the left of box containing Date, Check No., and Amount. |
Click the Customer boilerplate text, and position it so that it is vertically aligned with the second guideline, and horizontally aligned with the Order No. text (at 3.25 inches (8.5 centimeters)), like this:
Figure 31-28 Customer field in the Paper Design view

Position the F_CUSTOMER_NAME1 field next to the Customer boilerplate text so that these layout objects look like this:
Figure 31-29 Customer and F_CUSTOMER_NAME1 fields

|
Tip: If you have difficulty fitting the F_CUSTOMER_NAME1 field into the provided space, you may need to resize the field. To do so, select the field, then drag the right middle resize handle to the left, making sure that there is still enough space for the customer name (Harrison Sutherland). |
Position the F_C_STREET_ADDRESS field directly below F_CUSTOMER_NAME1.
Position F_C_CITY directly below F_C_STREET_ADDRESS.
Position the F_C_STATE_PROVINCE field next to F_C_CITY.
Position the F_C_POSTAL_CODE field next to F_C_STATE_PROVINCE.
Position the F_C_COUNTRY_ID field next to F_C_POSTAL_CODE.
Position the F_CUSTOMER_ID field directly below the F_C_CITY field.
Position the Customer No. boilerplate text (B_CUSTOMER_ID) directly to the left of the F_CUSTOMER_ID field, so that this portion of the check stub should now look like this:
Figure 31-30 Partial check stub in the Paper Design view

Now, let us format the information you have just added. Select the following boilerplate text objects in the check stub:
Order No.
Order Date
Order Total
Check No.
Customer
Customer No.
Change the font to Bold, then right-align the text.
Click F_ORDER_TOTAL1, then click the Currency button and the Commas button in the toolbar.
Click the Add Decimals button in the toolbar twice.
Your check stub should now look like this:
Save your report.
In the previous section, you created a check stub that displays the payment information, that is a copy of the information on the check itself. The steps in this section will show you how to add the details of the order to the check stub by creating a simple tabular report. You will use the Report Block Wizard to create the simple tabular report, then format the data in the Paper Design view.
To add order details:
In the Paper Layout view, click the Report Block tool in the tool palette.
Drag a rectangular area for the new layout to display the Report Block Wizard.
In the Report Block Wizard, on the Style page, select Tabular, then click Next.
On the Groups page, click G_LINE_ITEM_ID and click Down in the Available Groups list to specify the Print Direction and move this group to the Displayed Groups list, then click Next.
On the Fields page, click each of the following fields in the Available Fields list, then click the right arrow (>) to move them to the Displayed Fields list, then click Next:
LINE_ITEM_ID
PRODUCT_ID
PRODUCT_NAME
UNIT_PRICE
QUANTITY
On the Labels page, change the labels and field widths as follows, then click Next:
| Fields | Labels | Width |
|---|---|---|
| LINE_ITEM_ID | Line
|
2
|
| PRODUCT_ID | Product ID
|
4
|
| PRODUCT_NAME | Product Name | 40 |
| UNIT_PRICE | Unit Price | 4 |
| QUANTITY | Quantity | 4 |
On the Template page, select No template, then click Finish to display your report layout in the Paper Layout view, with the new fields and layout objects displaying below the original layout objects.
In the Paper Layout view, make sure the new fields and layout objects are located within the R_G_ORDER_ID repeating frame, and that all the layout objects fit on a single page (within 8.75 inches (22 centimeters)).
Click the Paper Design button in the toolbar to run and display your report in the Paper Design view. It should look something like this:
Figure 31-32 Check printing report with non-formatted order details
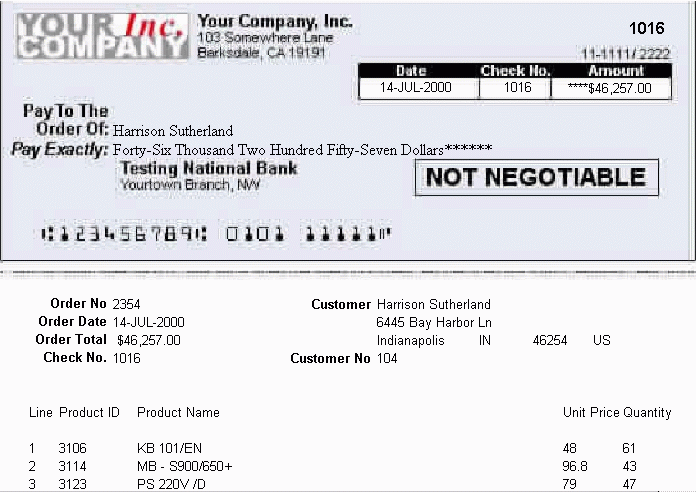
Since the new report block is not formatted, let us format the data to look like the rest of the report.
Shift-click the following new labels, then click the Bold button in the toolbar and change the font to Arial, 10 point:
Line
Product ID
Product Name
Unit Price
Quantity
Click the data under Line (F_LINE_ITEM_ID), then click the Align Center button in the toolbar.
Click the data under Unit Price (F_UNIT_PRICE), then click the Align Right button in the toolbar.
While the data is still selected, click the Currency button, Commas button, then click the Add Decimal button twice in the toolbar.
Click the right resize handle and align the right edge of the data field with the Unit Price label.
Click the data under Quantity (F_QUANTITY), then click the Align Right button in the toolbar, then resize the field so that the right edge of the data field is aligned with the Quantity label.
Save your report.
Your report should now look like this:
Figure 31-33 Final check report with spelled-out cash amounts and stub
|
Note: You can also compare your results with the example report we have provided, calledspellcash.rdf.
|
Congratulations! You have successfully built a report with spelled-out cash amounts on the check, as well as the payment and order details on the check stub. You now know how to:
use the Report Wizard to create a simple report definition.
use the tools in the Paper Layout view to import a blank check image and add fields to the report.
create a PL/SQL function that returns spelled-out numbers.
create a formula column based on a PL/SQL function.
use the tools in the Data Model view to link two queries.
use the tools in the Paper Design view to format your check printing report to print on a desired check.
create a check stub that displays a duplicate of the information on the check.
use the Report Block Wizard to create a simple tabular report that displays order details on a check stub.
For more information on any of the wizards, views, or properties used in this example, refer to the Oracle Reports online Help, which is available in Reports Builder or hosted on the Oracle Technology Network (OTN), as described in Section 3.1.1, "Using the Oracle Reports online Help".