|
Oracle® Application Server Containers for J2EE Services Guide
10g Release 2 (10.1.2) for Windows or UNIX B14012-02 |
|
 Previous |
 Next |
|
Oracle® Application Server Containers for J2EE Services Guide
10g Release 2 (10.1.2) for Windows or UNIX B14012-02 |
|
 Previous |
 Next |
This chapter describes Oracle Application Server Containers for J2EE (OC4J) support for allowing EJBs to invoke one another across different containers using the standard Remote Method Invocation (RMI)/Internet Inter-Orb Protocol (IIOP).
This chapter covers the following topics:
Java Remote Method Invocation (RMI) enables you to create distributed Java-based to Java-based applications, in which the methods of remote Java objects can be invoked from other Java virtual machines (JVMs), possibly on different hosts.
Version 2.0 of the EJB specification adds features that make it easy for EJB-based applications to invoke one another across different containers. You can make your existing EJB interoperable without changing a line of code: simply edit the bean's properties and redeploy. "Switching to Interoperable Transport" discusses redeployment details.
EJB interoperability consists of the following:
Transport interoperability, through CORBA IIOP (Internet Inter-ORB Protocol, where ORB is Object Request Broker)
Naming interoperability, through the CORBA CosNaming Service (CORBA Object Service Naming, part of the OMG CORBA Object Service specification)
Security interoperability, through Common Secure Interoperability Version 2 (CSIv2)
Transaction interoperability, through the CORBA Transaction Service (OTS)
OC4J furnishes transport, naming, and security interoperability.
By default, OC4J EJBs use RMI/Oracle Remote Method Invocation (ORMI), a proprietary protocol, to communicate as described in Chapter 5, "Oracle Remote Method Invocation".
|
Note: For the OC4J 10g Release 2 (10.1.2) implementation, load balancing and failover are supported only for ORMI, not IIOP. |
In OC4J, you can easily convert an EJB to use RMI/IIOP, making it possible for EJBs to invoke one another across different EJB containers. This chapter describes configuring and using RMI/IIOP.
OC4J supports the CORBA CosNaming service. OC4J can publish EJBHome object references in a CosNaming service and provides a JNDI CosNaming implementation that allows applications to look up JNDI names using CORBA. You can write your applications using either the JNDI or CosNaming APIs.
OC4J supports Common Secure Interoperability Version 2 (CSIv2), which specifies different conformance levels; OC4J complies with the EJB specification, which requires conformance level 0.
The EJB2.0 specification stipulates an optional transactional interoperability feature. Conforming implementations must choose one of the following:
Transactionally interoperable: transactions are supported between beans that are hosted in different J2EE containers.
Transactionally noninteroperable: transactions are supported only among beans in the same container.
The current release of OC4J is transactionally noninteroperable, so when a transaction spans EJB containers, OC4J raises a specified exception.
To access EJBs, you must do the following on the client-side:
Download the oc4j_client.zip file from
http://www.oracle.com/technology/software/products/ias/devuse.html
Unzip it into a client-side directory. (for example, d:\oc4jclient).
Add d:\oc4jclient\oc4jclient.jar to your CLASSPATH.
The oc4j_client.zip file contains all the JAR files required by the client (including oc4jclient.jar and optic.jar). These JAR files contain the classes necessary for client interaction. You need to add only oc4jclient.jar to your CLASSPATH, because all other JAR files required by the client are referenced in the oc4jclient.jar manifest classpath.
If you download this file into a browser, you must grant certain permissions as described in the "Granting Permissions" section of the Security chapter in the Oracle Application Server Containers for J2EE Enterprise JavaBeans Developer's Guide.
To invoke or be invoked by CORBA objects, RMI objects must have corresponding stubs, skeletons, and Internet Description Language (IDL). Use the rmic.jar compiler to generate stubs and skeletons from Java classes or to generate IDL, as described in "Configuring OC4J for RMI".
For use with RMI/IIOP, be sure to compile using the -iiop option.
In OC4J, EJBs use RMI/ORMI, a proprietary protocol, to communicate (as described in Chapter 5, "Oracle Remote Method Invocation"). You can convert an EJB to use RMI/IIOP, making it possible for EJBs to invoke one another across EJB containers.
|
Note: RMI/IIOP support is based on the CORBA 2.3.1 specification. Applications that were compiled using earlier releases of CORBA may not work correctly. |
The following four sections provide details on making the conversions.
Follow these steps to convert an EJB to use RMI/IIOP in a standalone environment:
Restart OC4J with the -DGenerateIIOP=true flag.
Deploy your application using admin.jar. You must obtain the client's stub JAR file, using the -iiopClientJar switch. Here is an example:
java -jar $J2EE_HOME/admin.jar ormi://localhost admin welcome -deploy -file filename -deploymentName application_name -iiopClientJar stub_jar_filename
|
Note: You must use the-iiopClientJar switch to enable interoperability (IIOP) for the application you are deploying. In OC4J, interoperability is enabled on a per-application basis.
|
Change the client's classpath to include the stub JAR file that was obtained during deployment, by running admin.jar with the -iiopClientJar switch.
A copy of the stub JAR file that was generated by OC4J can also be found in the server's deployment directory at:
application_deployment_directory/appname/ejb_module/module_iiopClient.jar
Edit the client's JNDI property java.naming.provider.url to use a corbaname URL instead of an ormi URL. For details on the corbaname URL, see "The corbaname URL".
|
Note: IIOP stub and tie class code generation occurs at deployment time, unlike ORMI stub generation, which occurs at runtime. This is why you must add the JAR file to theclasspath yourself. If you run in the server, a list of generated classes required by the server and IIOP stubs is made available automatically.
|
(Optional) To make the bean accessible to CORBA applications, run rmic.jar to generate IDL describing its interfaces. See "Configuring OC4J for Interoperability" for a discussion of command-line options.
This section expands upon the preceding section, describing how to convert an EJB to use RMI/IIOP in a standalone environment.
Specify CSIv2 security policies for the bean in orion_ejb_jar.xml and in internal_settings.xml. See the Oracle Application Server Containers for J2EE Security Guide for more information on these security-related topics.
Restart OC4J with the -DGenerateIIOP=true flag.
Deploy your application using admin.jar. You must obtain the client's stub JAR file using the -iiopClientJar switch. Here is an example:
java -jar $J2EE_HOME/admin.jar ormi://localhost admin welcome -deploy -file filename -deployment_name application_name -iiopClientJar stub_jar_filename
|
Note: You must use the-iiopClientJar switch to enable interoperability (IIOP) for the application that you are deploying. In OC4J, interoperability is enabled on a per-application basis.
|
Change the client's classpath to include the stub JAR file that was obtained during deployment, by running admin.jar with the -iiopClientJar switch.
You can also find a copy of the stub JAR file that was generated by OC4J in the server's deployment directory at:
application_deployment_directory/appname/ejb_module/module_iiopClient.jar
Edit the client's JNDI property java.naming.provider.url to use a corbaname URL instead of an ormi URL. For details on the corbaname URL, see "The corbaname URL".
|
Note: IIOP stub and tie class code generation occurs at deployment time, unlike ORMI stub generation, which occurs at runtime. This is why you must add the JAR file to theclasspath yourself. If you run in the server, a list of generated classes required by the server and IIOP stubs is made available automatically.
|
(Optional) To make the bean accessible to CORBA applications, run rmic.jar to generate IDL describing its interfaces. See "Configuring OC4J for Interoperability" for a discussion of command-line options.
You can access an EJB using RMI/IIOP in an Oracle Application Server environment in two ways:
You can configure an EJB to be accessible by means of RMI/IIOP in an Oracle Application Server environment by using Oracle Enterprise Manager 10g. Follow these steps:
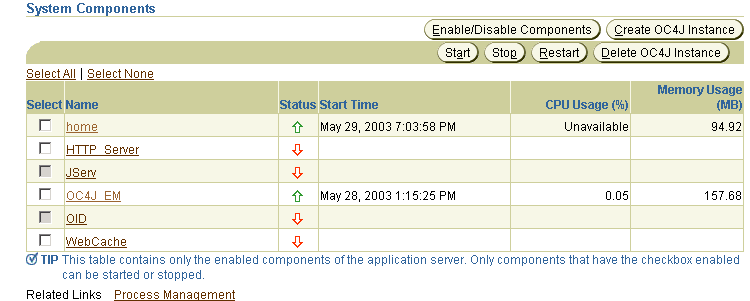
Navigate to an OC4J instance in which you want to allow access to applications through RMI/IIOP. Figure 6-1 shows an OC4J instance named home.
Figure 6-1 Oracle Enterprise Manager 10g System Components
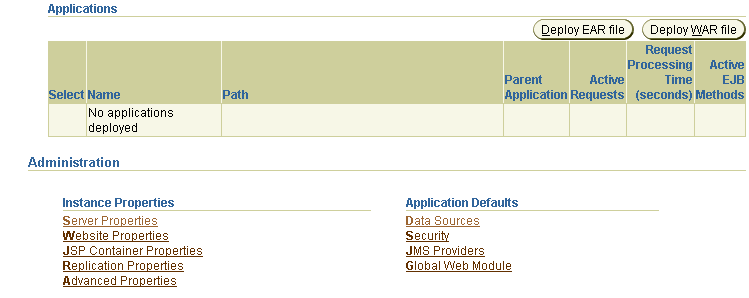
Click Server Properties in the Administration section for this OC4J instance. Figure 6-2 illustrates this.
Figure 6-2 Oracle Enterprise Manager 10g Server Properties
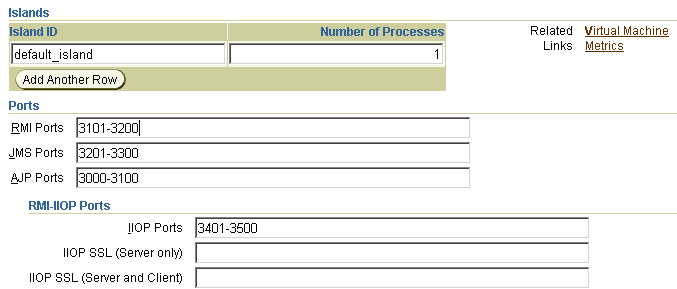
By default, RMI/IIOP is disabled in an Oracle Application Server environment. To enable RMI/IIOP, ensure that a unique IIOP port (or port range) exists for each OC4J instance by entering the value in the IIOP ports field, as shown in Figure 6-3. Then click Apply.
Figure 6-3 Oracle Enterprise Manager 10g Port Configuration
Use the Oracle Enterprise Manager 10g deployment wizard to deploy your application.
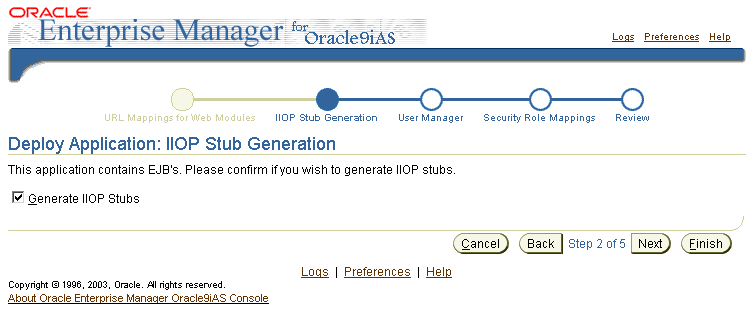
Enable generation of client IIOP stubs for this application by selecting Generate IIOP stubs, as shown in Figure 6-4.
Figure 6-4 Oracle Enterprise Manager 10g Stub Generation
Finish deploying your application using the Oracle Enterprise Manager 10g deployment wizard.
Follow these steps to manually configure an EJB for remote access by RMI/IIOP in an Oracle Application Server environment:
By default, RMI/IIOP is disabled in an Oracle Application Server environment. To enable RMI/IIOP, confirm in OPMN's configuration file, J2EE_HOME/opmn/conf/opmn.xml, that a unique IIOP port (or port range) exists for each OC4J instance to be managed by OPMN.
|
Note: You must specify an IIOP port (or port range) for each OC4J instance in which interoperability is to be enabled. Failure to do so causes OC4J to not configure an IIOP listener, thus automatically disabling interoperability, regardless of the configuration in theinternal-settings.xml file of OC4J.
|
Here is an example:
<ias-component id="OC4J">
          <process-type id="home" module-id="OC4J">
               <port id="ajp" range="3000-3100"/>
               <port id="rmi" range="23791-23799"/>
               <port id="jms" range="3201-3300"/>
               <port id="iiop" range="3401-3500"/>
               <process-set id="default_island" numprocs="1"/>
          </process-type>
 </ias-component>
If you modify any configuration file manually, you must update the configuration with dcmctl. Use the following command:
dcmctl updateConfig
Using opmnctl or Oracle Enterprise Manager 10g, restart all OC4J instances that are managed by OPMN.
For information on opmnctl, use the following command:
opmnctl help
To stop and restart OPMN and all OPMN-managed processes, first use the following command:
opmnctl stopall
Then use this command:
opmnctl startall
For information on Oracle Enterprise Manager 10g, see the Oracle Application Server Containers for J2EE User's Guide.
Deploy your application using dcmctl, specifying the -enableIIOP option. Here is an example:
dcmctl deployApplication -f filename -a application_name -enableIIOP
Change the client's classpath to include the stub JAR file that was generated by OC4J. This file is normally found in the server's deployment directory:
application_deployment_directory/appname/ejb_module/module_iiopClient.jar
Edit the client's JNDI property java.naming.provider.url to use an OPMN or corbaname URL instead of an ormi URL. For details on the corbaname URL, see "The corbaname URL". For details on the OPMN URL, see "The OPMN URL".
|
Note: IIOP stub and tie class code generation occurs at deployment time, unlike ORMI stub generation, which occurs at runtime. This is why you must add the JAR file to theclasspath yourself. If you run in the server, a list of generated classes required by the server and IIOP stubs is made available automatically.
|
(Optional) To make the bean accessible to CORBA applications, run rmic.jar to generate IDL describing its interfaces. See "Configuring OC4J for Interoperability" for a discussion of command-line options.
You can access an EJB using RMI/IIOP in an Oracle Application Server environment in two ways:
The advanced configuring for interoperability using Oracle Enterprise Manager 10g differs from the simple configuring described under "Configuring for Interoperability Using Oracle Enterprise Manager 10g" only in the specification of ports. That is, you must specify an iiop, iiops1, and iiops2 port (or port range) for each OC4J instance in which interoperability with CSIv2 is to be enabled. Failure to do so causes OC4J to not configure an IIOP listener, thus automatically disabling interoperability, regardless of the configuration in the internal-settings.xml file of OC4J. Figure 6-5 shows this.
Figure 6-5 Oracle Enterprise Manager 10g Port Specifications
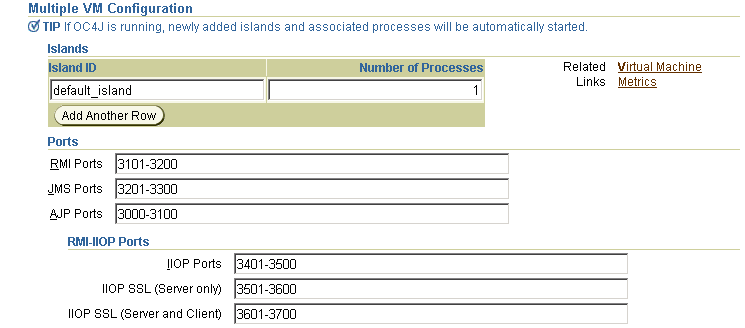
This section expands upon the preceding section, describing how to convert an EJB to use RMI/IIOP in an Oracle Application Server environment.
Specify CSIv2 security policies for the bean in orion_ejb_jar.xml and in internal_settings.xml. See the Oracle Application Server Containers for J2EE Security Guide for more information on these security-related topics.
By default, RMI/IIOP is disabled in an Oracle Application Server environment. To enable RMI/IIOP, confirm in the OPMN configuration file, J2EE_HOME/opmn/conf/opmn.xml, that a unique iiop, iiops1, and iiops2 port (or port range) exists for each OC4J instance to be managed by OPMN. These are the port meanings:
iiop—standard IIOP port
iiops1—IIOP/SSL port used for server-side authentication only
iiops2—IIOP/SSL port used for both client and server authentication
|
Note: You must specify aniiop, iiops1, and iiops2 port (or port range) for each OC4J instance in which interoperability with CSIv2 is to be enabled. Failure to do so causes OC4J to not configure an IIOP listener, thus automatically disabling interoperability, regardless of the configuration in the internal-settings.xml file of OC4J.
|
Here is an example:
<ias-component id="OC4J">
    <process-type id="home" module-id="OC4J">
        <port id="ajp" range="3000-3100"/>
        <port id="rmi" range="23791-23799"/>
        <port id="jms" range="3201-3300"/>
        <port id="iiop" range="3401-3500"/>
        <port id="iiops1" range="3501-3600"/>
        <port id="iiops2" range="3601-3700"/>
        <process-set id="default_island" numprocs="1"/>
    </process-type>
</ias-component>
|
Note: If you choose to configure your client's JNDI propertyjava.naming.provider.url to use an OPMN URL, then your client cannot connect to iiops1 or iiops2 ports because OPMN-allocated ports are not reported to OC4J.
|
Using opmnctl or Oracle Enterprise Manager 10g, restart all OC4J instances that are managed by OPMN.
For information on opmnctl, use the following command:
opmnctl help
To stop and restart OPMN and all OPMN-managed processes, first use the following command:
opmnctl stopall
Then use this command:
opmnctl startall
For information on Oracle Enterprise Manager 10g, see the Oracle Application Server Containers for J2EE User's Guide.
Deploy your application using dcmctl, specifying the -enableIIOP option. Here is an example:
dcmctl deployApplication -f filename -a application_name -enableIIOP
Change the client's classpath to include the stub JAR file that was generated by OC4J. This is normally found in the server's deployment directory:
application_deployment_directory/appname/ejb_module/module_iiopClient.jar
Edit the client's JNDI property java.naming.provider.url to use an OPMN or corbaname URL instead of an ormi URL. For details on the corbaname URL, see "The corbaname URL". For details on the OPMN URL, see "The OPMN URL".
|
Note: IIOP stub and tie class code generation occurs at deployment time, unlike ORMI stub generation, which occurs at runtime. This is why you must add the JAR file to theclasspath yourself. If you run in the server, a list of generated classes required by the server and IIOP stubs is made available automatically.
|
(Optional) To make the bean accessible to CORBA applications, run rmic.jar to generate IDL describing its interfaces. See "Configuring OC4J for Interoperability" for a discussion of command-line options.
To interoperate, an EJB must look up other beans using CosNaming. This means that the URL for looking up the root NamingContext must use the corbaname URL scheme instead of the ormi URL scheme. This section discusses the corbaname subset that EJB developers use most often. For a full discussion of the corbaname scheme, see section 2.5.3 of the CORBA Naming Service specification. The corbaname scheme is based on the corbaloc scheme, which section 13.6.10.1 of the CORBA specification discusses.
The most common form of the corbaname URL scheme is:
corbaname::host[:port]
This corbaname URL specifies a conventional DNS host name or IP address, and a port number. For example,
corbaname::example.com:8000
A corbaname URL can also specify a naming context by following the host and port by # and NamingContext in string representation. The CosNaming service on the specified host is responsible for interpreting the naming context.
corbaname::host[:port]#namingcontext
For example:
corbaname::example.com:8000#Myapp
This section describes OPMN URL details that are specific to RMI/IIOP. For general information about the OPMN URL, see "JNDI Properties for RMI".
In an Oracle Application Server environment, IIOP ports for all OC4J processes within each Oracle Application Server instance are dynamically managed by OPMN. Because of this, it may not be possible for clients to know the ports on which OC4J processes are actively listening for IIOP requests. To enable clients to successfully make RMI/IIOP requests in an Oracle Application Server environment without having to know the IIOP ports for all active OC4J processes, modify the jndi.naming.provider.url property (in the client's jndi.properties file) with a URL of the following format:
opmn:corbaname::opmn_host[:opmn_port]:]:OC4J_instance_name#naming_context
For example:
opmn:corbaname::dlsun74:6003:home#stateless
|
Notes:
|
When EJBs are invoked over IIOP, OC4J must map system exceptions to CORBA exceptions. Table 6-1 lists the exception mappings.
Table 6-1 Java-CORBA Exception Mappings
| OC4J System Exception | CORBA System Exception |
|---|---|
javax.transaction.
|
TRANSACTION_ROLLEDBACK
|
javax.transaction.
|
TRANSACTION_REQUIRED
|
javax.transaction.
|
INVALID_TRANSACTION
|
java.rmi.NoSuchObjectException
|
OBJECT_NOT_EXIST
|
java.rmi.AccessException
|
NO_PERMISSION
|
java.rmi.MarshalException
|
MARSHAL
|
java.rmi.RemoteException
|
UNKNOWN
|
EJBs that are not hosted in OC4J must add the file oc4j_interop.jar to the classpath to invoke OC4J-hosted EJBs. OC4J expects the other container to make the HandleDelegate object available in the JNDI name space at java:comp/HandleDelegate. The oc4j_interop.jar file contains the standard portable implementations of home and remote handles, and metadata objects.
To add interoperability support to your EJB, you must specify interoperability properties. Some of these properties are specified when starting OC4J and others in bean properties that are specified in deployment files.
The following security-related topics are now covered in the Oracle Application Server Containers for J2EE Security Guide:
EJB Server Security Properties (internal-settings.xml)
CSIv2 Security Properties
CSIv2 Security Properties (internal-settings.xml)
CSIv2 Security Properties (ejb_sec.properties)
CSIv2 Security Properties (orion-ejb-jar.xml)
EJB Client Security Properties (ejb_sec.properties)
The following OC4J startup flags support RMI interoperability:
-DGenerateIIOP=true generates new stubs and skeletons whenever you redeploy an application.
-Diiop.debug=true generates deployment-time debugging messages, most of which have to do with code generation.
-Diiop.runtime.debug=true generates runtime debugging messages.
Before EJBs can communicate, you must configure the parameters in the configuration files listed in Table 6-2.
Table 6-2 Interoperability Configuration Files
| Context | File | Description |
|---|---|---|
| Server | server.xml
|
The <sep-config> element in this file specifies the path name, normally internal-settings.xml, for the server extension provider properties. For example:
<sep-config path="./internal-settings.xml"> |
|
|
internal-settings.xml
|
This file specifies server extension provider properties that are specific to RMI/IIOP. See the Oracle Application Server Containers for J2EE Security Guide for more information on these security-related topics. |
| Application | orion-ejb-jar.xml
|
The <ior-security-config> subentity of the <session-deployment> and <entity-deployment> entities specifies Common Secure Interoperability Version 2 (CSIv2) security properties for the server.
See the Oracle Application Server Containers for J2EE Security Guide for more information on these security-related topics. |
|
|
ejb_sec.properties
|
This file specifies client-side security properties for an EJB. See the Oracle Application Server Containers for J2EE Security Guide for more information on these security-related topics. |
|
|
jndi.properties
|
This file specifies the URL of the initial naming context used by the client. See "JNDI Properties for Interoperability (jndi.properties)" for details. |
The following RMI/IIOP properties are controlled by the client's jndi.properties file:
java.naming.provider.url may be an OPMN or a corbaname URL for the bean to be interoperable. For details on corbaname URLs, see "The corbaname URL". For details on the OPMN URL, see "The OPMN URL".
contextFactory can be either ApplicationClientInitialContextFactory or the class IIOPInitialContextFactory.
If your application has an application-client.xml file, then leave contextFactory set to ApplicationClientInitialContextFactory. If your application does not have an application-client.xml file, then change contextFactory to IIOPInitialContextFactory.
com.evermind.server.ApplicationClientInitialContextFactory is used when looking up remote objects from standalone application clients. It uses the refs and ref-mappings found in application-client.xml and orion-application-client.xml. It is the default initial context factory when the initial context is instantiated in a Java application.
com.oracle.iiop.server.IIOPInitialContextFactory is used when looking up remote objects between different containers using the IIOP protocol.
This tutorial describes the steps necessary to enable IIOP applications in OC4J. After completing this exercise you should be able to:
Access a remote EJB over IIOP
Secure EJB invocations with IIOP over SSL
Secure corbaname lookups by remote clients with IIOP over SSL
To minimize deployment and configuration changes, the tutorial uses the demo "helloworld" EJB application available through the installation and on Oracle's OTN site:
http://www.oracle.com/technology/sample_code/tech/java/ejb_corba/index.html
Building and deploying the helloworld application with a default OC4J installation results in an application that is only accessible over ORMI. To enable IIOP for a given application you must make the following changes to OC4J's server configuration and the client application. The required changes include:
Configure the IIOPServerExtensionProvider
Change the java.naming.provider.url
Deploy the application using the -iiopClientJar argument
The following sections describe the steps in more detail.
Getting Started
Expand the EJB demos to your development environment. The helloworld application should be under <install-dir>/demo/ejb/helloworld with the following structure:
|-------dist
|-------etc
|       |-------application-client.xml
|       |-------application.xml
|       |-------ejb-jar.xml
|       |-------jndi.properties
|-------src
|       |-------ejb
|       |       |-------client
|       |       |       |-------HelloClient.java
|       |       |-------helloworld-ejb
|       |               |-------Hello.java
|       |               |-------HelloBean.java
|       |               |-------HelloHome.java
|       |               |-------HelloLocal.java
|       |               |-------HelloLocalHome.java
|------build.xml
Applications other than the helloworld example can be ignored for the remainder of the tutorial, but should be unaffected by changes required for enabling IIOP. This tutorial installs the demos to the root partition, so the application is under /demo/ejb/helloworld.
The supplied Ant build file provides targets for compiling the src, building the jar and ear, and running the client application. This tutorial assumes you are familiar with Ant build files. If you are unfamiliar with Ant, please see Apache's Ant documentation site: http://ant.apache.org/manual/index.html
Configure IIOP in OC4J
Edit the server.xml file as follows:
<install-dir>j2ee/home/config/internal-settings.xml
Make sure the server.xml file contains the following line:
<sep-config path="./internal-settings.xml" />
If the line is missing, or commented out, remove the comments or add the line below the following line:
<rmi-config path="./rmi.xml" />
This configures the IIOPServerExtensionProvider for OC4J.
Now edit the internal-settings.xml file as follows to configure your IIOP settings:
<install-dir>j2ee/home/config/internal-settings.xml
Make sure the file contains the following settings:
<server-extension-provider name="IIOP"
   class="com.oracle.iiop.server.IIOPServerExtensionProvider">
   <sep-property name="port" value="5555" />
   <sep-property name="host" value="localhost" />
   <sep-property name="ssl" value="false" />
   <sep-property name="trusted-clients" value="*" />
</server-extension-provider>
If necessary, you can modify the host and port to match your environment. If your file contains entries for SSL, temporarily comment them out:
<!--
   <sep-property name="ssl-port" value="5556" />
   <sep-property name="ssl-client-server-auth-port" value="5557" />
   <sep-property name="keystore" value="keystore.jks" />
   <sep-property name="keystore-password" value="->pwForSSL" />
   <sep-property name="truststore" value="truststore.jks" />
   <sep-property name="truststore-password" value="->pwForSSL" />
-->
Now OC4J is configured for IIOP. The final step to enable IIOP on the server side is to start OC4J with the JVM argument: -DgenerateIIOP=true. This can be done on the command line for OC4J standalone, and in the ${ORACLE_HOME}/opmn/opmn.xml file for Oracle Application Server installs.
Configure the JNDI provider URL
Edit the jndi.properties file as follows for the helloworld application:
<install-dir>/demo/ejb/helloworld/etc/jndi.properties

java.naming.factory.initial=com.evermind.server.ApplicationClientInitialContextFactory
java.naming.provider.url=corbaname:iiop:localhost:5555#helloworld
#java.naming.provider.url=ormi://localhost:23791/helloworld
java.naming.security.principal=admin
java.naming.security.credentials=welcome
Comment out the line containing the ORMI provider URL, and add a line matching the corbaname provider URL in the example.
Build and deploy the application
From the <install-dir>/demo/ejb/helloworld directory, run the default ant target to build the application:
<install-dir>/demo/ejb/helloworld > ant
Start OC4J if you have not done so already, then execute the following deploy command:
java -jar ${J2EE_HOME}/admin.jar ormi://localhost:23791 admin welcome -deploy -file dist/helloworld.ear -deploymentName helloworld -iiopClientJar dist/helloworld_iiop_client.jar
This deploys the helloworld application and generates the client EJB JAR containing the client IIOP stubs in dest/helloworld_iiop_client.jar.
Run the application
Edit the <install-dir>/demo/ejb/common.xml file, and make sure the environment settings for ORACLE_HOME, JAVA_HOME, and J2EE_HOME match your environment.
Execute > ant run
You should see the appropriate "Hello ..." response from the client application. To verify that communication is running over IIOP, you can set the following JMV arg on both the client and the server:
-Diiop.runtime.debug=true
Enable IIOP over SSL on the server
Edit the internal-settings.xml file and uncomment or add the SSL settings (indicated by the bold lines in the following example):
<server-extension-provider name="IIOP"
   class="com.oracle.iiop.server.IIOPServerExtensionProvider">
   <sep-property name="port" value="5555" />
   <sep-property name="host" value="localhost" />
   <sep-property name="ssl" value="true" />
   <sep-property name="trusted-clients" value="*" />
   <sep-property name="ssl-port" value="5556" />
   <sep-property name="ssl-client-server-auth-port" value="5557" />
   <sep-property name="keystore" value="keystore.jks" />
   <sep-property name="keystore-password" value="yourPWD" />
   <sep-property name="truststore" value="truststore.jks" />
   <sep-property name="truststore-password" value=" yourPWD " />
</server-extension-provider>
If necessary, you can modify the host and port to match your environment. The keystore and truststore files may be the same physical file. The names above are only for illustration. If you do not have a keystore file, you can use the following Sun example for using the keytool:
http://java.sun.com/docs/books/tutorial/security1.2/summary/tools.html
Add the absolute path and filename to the keystore and truststore properties in the example.
Enable SSL on the client
Edit the jndi.properties file for the helloworld application:
<install-dir>/demo/ejb/helloworld/etc/jndi.properties
java.naming.factory.initial=com.evermind.server.ApplicationClientInitialContextFactory
java.naming.provider.url=corbaname:iiop:localhost:5556#helloworld
java.naming.security.principal=admin
java.naming.security.credentials=welcome
Change the port in the provider URL to be the SSL port from internal-settings.xml.
Create a file called ejb_sec.properties for the helloworld application:
oc4j.iiop.trustedServers=*
nameservice.useSSL=true
oc4j.iiop.trustStoreLoc=<path to server's keystore>
oc4j.iiop.trustStorePass=<password for server's keystore file>
This file communicates the applications security requirements to the OC4J client bootstrap classes. The properties in this example indicate that SSL should be used for EJB lookups, and that all servers supporting SSL should be trusted. The truststore setting is a quick way of using the same keystore configured for OC4J instead of exporting the certificate in the servers keystore and importing it into a second truststore file.
Run the application with IIOP over SSL
Execute > ant run
You should see the appropriate "Hello ..." response from the client application. To verify that communication is running with IIOP over SSL, set the -Diiop.runtime.debug=true for both the client and the server.