|
Oracle® Business Intelligence Discoverer Configuration Guide
10g Release 2 (10.1.2.1) for Microsoft Windows and Solaris Operating System (SPARC) B13918-03 |
|
 Previous |
 Next |
|
Oracle® Business Intelligence Discoverer Configuration Guide
10g Release 2 (10.1.2.1) for Microsoft Windows and Solaris Operating System (SPARC) B13918-03 |
|
 Previous |
 Next |
Note: This chapter only applies if the Discoverer installation is associated with an OracleAS Infrastructure. For more information, see Section 2.1, "About installing Oracle Business Intelligence".
If the Discoverer installation is associated with a 9.0.4 OracleAS Infrastructure, the Metadata Repository (MR) must be configured to work with 10.1.2 Discoverer portlets (for more information, see Section 2.3, "How to upgrade a 9.0.4 metadata repository to work with Discoverer Portlet Provider Version 10.1.2 and Oracle Portal 10.1.2").
This chapter describes how to use OracleBI Discoverer with OracleAS Portal, and contains the following topics:
Section 11.2, "How to use OracleBI Discoverer with OracleAS Portal"
Section 11.3, "How to register Discoverer Portlet Provider with OracleAS Portal"
Oracle Application Server Portal is a component of Oracle Application Server that is used for the development, deployment, administration, and configuration of enterprise-class portals. OracleAS Portal incorporates a portal-building framework with self-service publishing features that enable you to create, publish, and manage information within your portal. Your portal can publish information from your database and other sources, provide and gather information from internal and external customers, and manage the content they will consume.
A portal is made up of groups of pages hosting many different types of content that come from many different sources, all presented from a single location, the portal. The basic structural components of a portal built with OracleAS Portal include page groups, pages, tabs, regions, portlets, and items.
Portlets are reusable information components that summarize or provide access to different types of information sources. You can customize the appearance of portlets on a per user or per group basis. Examples of portlets include a dynamically updated report of quarterly earnings, a Discoverer worksheet, a search field and button, or a simple user poll.
The Discoverer Portlet Provider is the content delivery mechanism used to publish Discoverer data in OracleAS Portal. The Discoverer Portlet Provider enables portal users to publish three types of Discoverer portlet:
a Worksheet portlet, which displays a Discoverer worksheet and an Analyze link that displays the worksheet in Discoverer Viewer
a List of Worksheets portlet, which displays links to Discoverer worksheets
a Gauges portlet, which displays Discoverer worksheet data as one or more semi-circular gauges. The gauges have a similar appearance to a speedometer.
Note: For information about how to create Discoverer portlets, see Oracle Business Intelligence Discoverer Plus User's Guide.
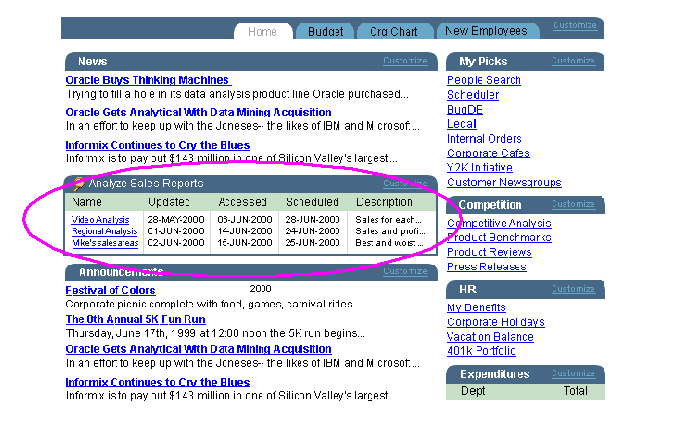
The figure below shows a portal page containing a Discoverer List of Worksheets portlet called Analyze Sales Reports (highlighted). Analyze Sales Reports contains links to Discoverer worksheets that enable portal users to start Discoverer Viewer and quickly access Discoverer reports.
Figure 11-1 An OracleAS Portal containing a List of Worksheets portlet
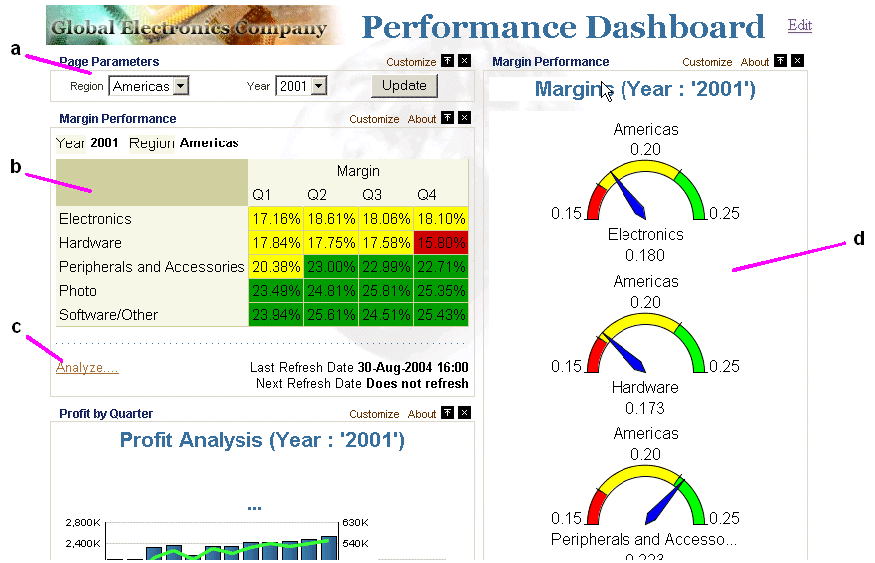
You can also use Discoverer portlets in dashboard applications (see figure below).
Figure 11-2 A dashboard application featuring Discoverer portlets
Notes
For more information about OracleAS Portal, see Oracle Application Server Portal Configuration Guide.
For relational worksheets, you can display worksheet data and/or graph data. For multidimensional worksheets, you display worksheet data and graph data.
For more information about how OracleBI Discoverer works with OracleAS Portal and OracleAS Single Sign-On, see Section 14.7.2.3, "An example showing how Discoverer works with OracleAS Portal and Single Sign-On".
To use Discoverer with OracleAS Portal, make sure that the OssoIPCheck parameter value in the mod_osso.conf file is set to FALSE (for more information about the location of configuration files, see Section A.1, "List of Discoverer file locations").
Before portal users can add Discoverer portlets in OracleAS Portal, you must register the Discoverer Portlet Provider with OracleAS Portal.
You register the Discoverer Portlet Provider using the Add Portlet Provider page in OracleAS Portal.
To use OracleBI Discoverer with OracleAS Portal, do the following:
(optional) Make sure that Discoverer Portlet Provider is installed correctly by entering the following URL in an Internet browser:
http://<host.domain>:<port>/discoverer/portletprovider/
If Discoverer Portlet Provider is installed correctly, you will see the JPDK Test Page, which displays the message 'Congratulations! You have successfully reached your Provider's Test Page', and lists the Discoverer portlet types available.
Register Discoverer Portlet Provider with OracleAS Portal (for more information, see Section 11.3, "How to register Discoverer Portlet Provider with OracleAS Portal").
Note: This task must be done once during or after an Oracle Business Intelligence standalone CD installation.
Use OracleAS Portal to add Discoverer portlets to portal pages, which is typically done by Discoverer Plus or Discoverer Viewer users
For more information about how to add Discoverer portlets to portal pages, see Oracle Business Intelligence Discoverer Plus User's Guide.
You register Discoverer Portlet Provider to enable OracleAS Portal end users to add Discoverer business intelligence portlets to their portal pages.
To register Discoverer Portlet Provider with OracleAS Portal:
Start a Web browser and enter the URL for OracleAS Portal.
For example:
http://<host.domain>:<port>/pls/portal
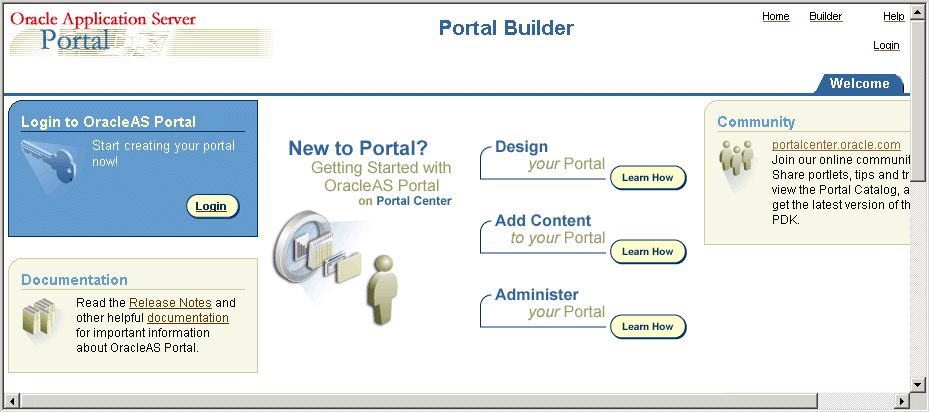
If you have difficulty displaying the OracleAS Portal main page, contact the OracleAS Portal administrator.
Select the Login link and connect as a Portal administrator.
Display the Administer tab.
Display the Portlets sub-tab.
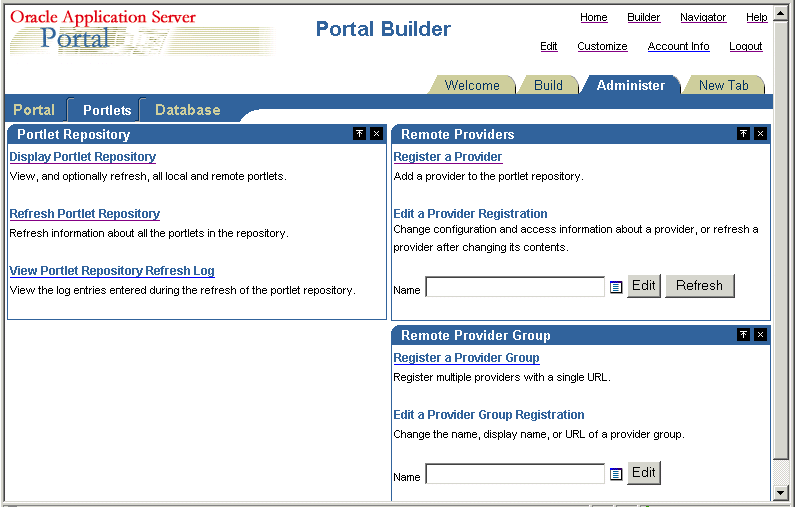
Select the Register a Provider link to display the Provider Information page.
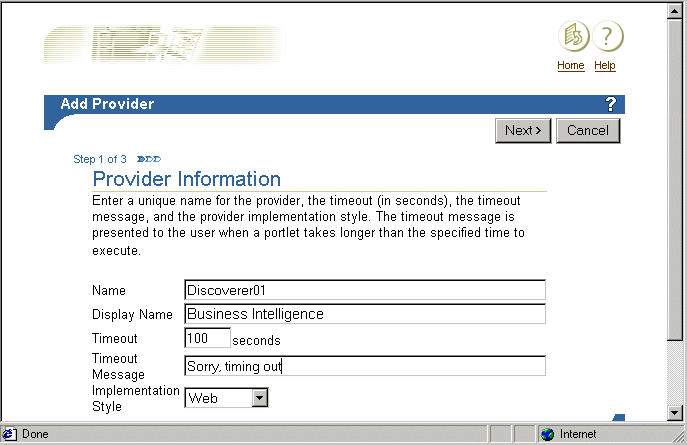
Enter the Discoverer Portlet Provider details.
You can enter any name and display name for the Discoverer Portlet Provider as required. The name and display name can be different.
Hint: Give the Portlet Provider a useful display name because users will see this when they add a Discoverer portlet to a portal page.
Choose Web from the Implementation Style drop down list.
Click Next to display the Define Connection - General Properties page.
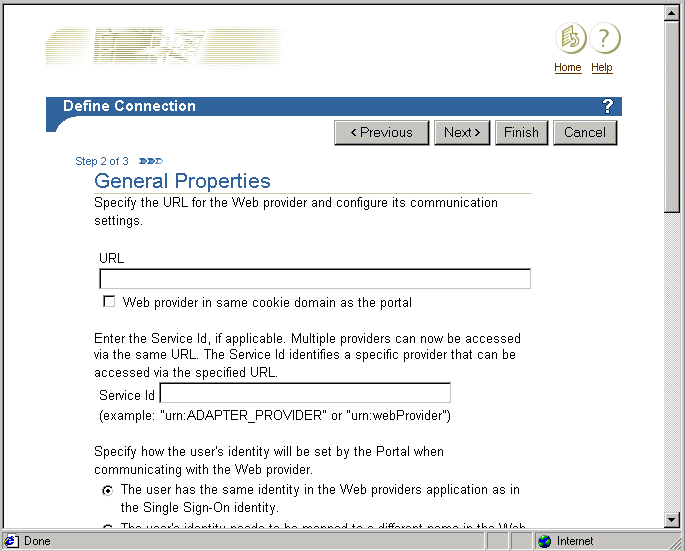
Enter the Portlet Provider general properties as follows:
Enter the URL of the Discoverer Portlet Provider in the URL field, in the form:
<http | https>://<host.domain>:<port>/discoverer/portletprovider
For example, http://myserver:80/discoverer/portletprovider.
Note: If you are deploying Oracle Business Intelligence in a HTTPS environment, specify a HTTPS URL in the URL field here. In other words, when an OracleAS Portal user selects the Analyze link beneath a Discoverer portlet, Discoverer Viewer will be invoked in HTTPS mode.
Clear the Web Provider in same cookie domain as the portal check box.
Select the The user has the same identity in the Web providers application as in the Single Sign-On identity radio button.
In the User/Session Information area, select the User radio button, and select the Once Per User Session option from the Login Frequency field.
Note: Do not change the default value of other fields.
Click Next to display the Control Access page.
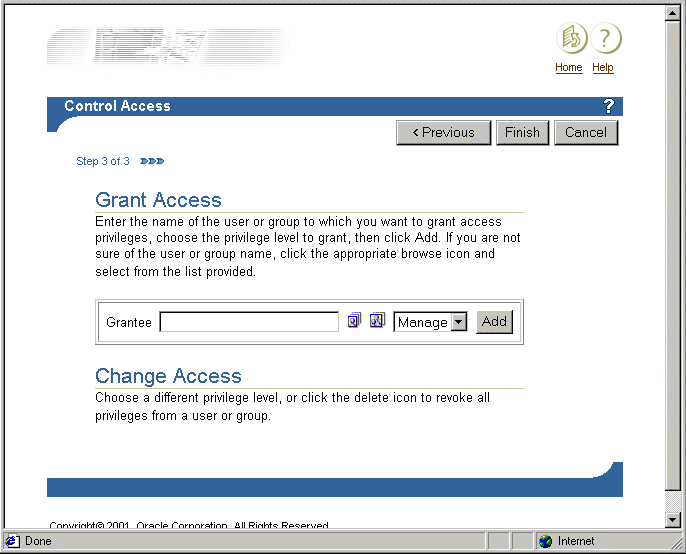
(optional) Change the default access control settings if necessary.
Click Finish.
End users can now use the Discoverer Portlet Provider to add portlets to an OracleAS Portal page.
Note: For information about how to create Discoverer portlets, see Oracle Business Intelligence Discoverer Plus User's Guide.
Notes
If Discoverer end users need to publish workbooks and worksheets using a public connection, use Oracle Application Server Control to create a public connection that they can use (for more information about creating public connections, see Section 4.6, "How to create public connections").
You edit the Discoverer Portlet Provider when you want to change the way that it works. For example, you might want to change the Discoverer Portlet Provider Display Name, or change its Control Access settings.
To edit the Discoverer Portlet Provider:
Start a Web browser and enter the URL for the OracleAS Portal main page main page.
For example:
http://<host.domain>:<port>/pls/portal

If you have difficulty displaying the OracleAS Portal main page, contact the OracleAS Portal administrator.
Select the Login link and connect as a Portal administrator.
Display the Administer tab.
Display the Portlets sub-tab.

In the Remote Providers area, enter the name of the Discoverer Portlet Provider (i.e. its display name) in the Name field, and click Edit to display the Provider Information page.
Hint: If you are not sure of the display name of the Discoverer Portlet Provider, do the following:
Click the Browse Providers icon to the right of the Name field.
Choose the Discoverer Portlet Provider name from the list of Portlet Providers displayed.
Hint: The name that you choose is the display name that was specified when you registered the Discoverer Portlet Provider (for more information, see Section 11.3, "How to register Discoverer Portlet Provider with OracleAS Portal").
Click Edit to display the Edit Portlet Provider page.
Make the necessary changes, as follows:
use the Main tab to change provider information (e.g. the display name of the Discoverer Portlet Provider)
use the Connection tab to change general properties (e.g. the URL of the Discoverer Portlet Provider)
use the Access tab to change the access privileges (e.g. the control access settings of the Discoverer Portlet Provider)
Click OK to save the changes you have made.
The Discoverer Portlet Provider is updated according to the changes you have made.