|
Oracle® Application Server Single Sign-On Administrator's Guide
10g Release 2 (10.1.2) B14078-02 |
|
 Previous |
 Next |
|
Oracle® Application Server Single Sign-On Administrator's Guide
10g Release 2 (10.1.2) B14078-02 |
|
 Previous |
 Next |
This chapter explains how to use Oracle Enterprise Manager, the Oracle system management console, to monitor the single sign-on server.
The chapter contains the following topics:
Interpreting and Using the Home Page on the Standalone Console
Updating the Port Property for the Single Sign-On Monitoring Target
The single sign-on monitoring UI on the standalone console consists of two pages: the home page and the Details of Login Failures page. The first provides general information about server load and user activity. The second provides a login failure profile for a particular user.
To access the home page for single sign-on monitoring:
Go to the standalone console for the instance of Oracle Enterprise Manager that you want to administer. This is effected by entering the host name of the computer hosting the OracleAS instance and the port number of Oracle Enterprise Manager. The default port number is 1810, but it may be configured in increments of one, up to 1816. To pinpoint it, examine the file ORACLE_HOME/install/portlist.ini.
Log in using the credentials of an OracleAS administrator.
From the Standalone Instances section of the Farm page, choose the appropriate OracleAS instance.
From the System Components list of the Application Server page, choose the single sign-on server.
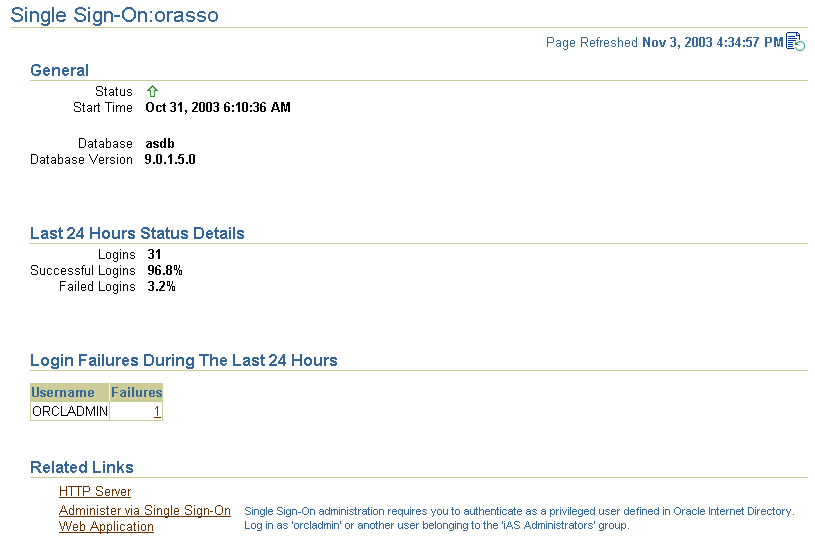
The home page, reproduced in Figure 11-1, displays the following metrics in the General section:
Status
A green "up" arrow signifies that the single sign-on server is running. A red "down" arrow signifies that the server is not running.
Start Time
The start time of the database serving the single sign-on schema.
Database
SID/instance name of the database serving the single sign-on schema.
Database Version
Version of the database serving the single sign-on schema.
The Last 24 Hours Status Details section contains the following metrics:
Logins
Successful Logins
Failed Logins
As the heading implies, the statistics displayed are for the previous 24 hours.
The Login Failures During the Last 24 Hours section enables you to determine the number of login failures that have occurred during the previous 24 hours. You choose a name from the Login Failures During the Last 24 Hours table. You then choose the associated link under the Failures heading. When populated, this link contains the number of login failures for the user. Clicking it takes you to the Details of Login Failures page.
Figure 11-1 Monitoring Home Page for OracleAS Single Sign-On

The Related Links section contains the following links:
HTTP Server
Takes you to the monitoring home page for the Oracle HTTP Server
Administer via Single Sign-On
Takes you to the home page for single sign-on administration
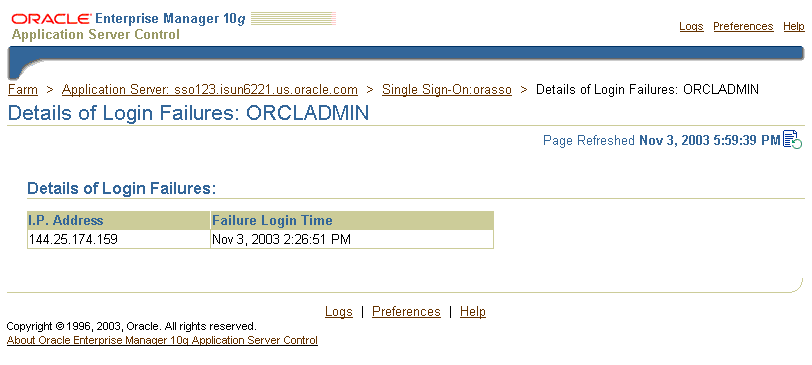
Clicking a link in the Login Failures During the Last 24 Hours table takes you to the Details of Login Failures page (Figure 11-2). This page contains a table that displays login failure times and associated IP addresses for a particular user.
Figure 11-2 Details of Login Failures Page

A change in the port number of the Oracle HTTP Server requires a change in the port property of the single sign-on monitoring target on that server. Perform these steps to effect the change:
cp ORACLE_HOME/sysman/emd/targets.xml ORACLE_HOME/sysman/emd/
targets.xml.backup
This file is the configuration file for the various "targets" that Oracle Enterprise Manager monitors, one of which is OracleAS Single Sign-On.
In targets.xml, find the target type oracle_sso_server; then locate and edit the HTTP port value associated with this target type:
<Property NAME="HTTPPort" VALUE="7777"/>
Save and close the file.
ORACLE_HOME/bin/emctl reload
|
Note: For more information about port dependency changes, see the appendix about port numbers in Oracle Application Server Administrator's Guide. |
If you are using OracleAS Web Cache as a load balancer for multiple single sign-on instances, you can monitor the single sign-on server from the OracleAS Web Cache computer. At the same time, you can use the monitoring pages on any one of the single sign-on instances to monitor that instance.
Follow these steps to add a single sign-on target to the OracleAS Web Cache instance:
Back up the file ORACLE_HOME/sysman/emd/targets.xml located on the OracleAS Web Cache instance.
Copy the single sign-on target definition from a targets.xml file located on a single sign-on instance. Paste the definition to the end of the targets.xml file on the OracleAS Web Cache instance, inserting it just before the closing tag </Targets>.
In the Target TYPE tag, replace the name of the oracle_ias target for single sign-on instance with the name of the oracle_ias target for the OracleAS Web Cache instance.
Replace the single sign-on OracleHome value with the OracleAS Web Cache OracleHome value.
Change HTTPMachine, HTTPPort, and HTTPProtocol to values that correspond to the OracleAS Web Cache instance.
Run this command to incorporate the changes:
ORACLE_HOME/bin/emctl reload
If you are monitoring a single sign-on server enabled for SSL:
The oracle_sso_server target type in the ORACLE_HOME/sysman/emd/targets.xml file on the single sign-on middle tier must have the appropriate HTTP attributes. If, for example, you connect to an SSL-enabled single sign-on server with this URL:
http://myhost.us.oracle.com:4443/pls/orasso
then HTTPPort is 4443 and HTTPProtocol is https.
For details, see "Update targets.xml" in Chapter 7.
The certificate configuration file for Oracle Enterprise Manager must contain the certificate of the infrastructure server. To learn how to add the certificate to the configuration file, see the chapter about Oracle Enterprise Manager security in Oracle Enterprise Manager Advanced Configuration. See specifically the section about Configuring Beacons to monitor Web applications over HTTPS.