|
Oracle® Application Server Adapter for J.D. Edwards OneWorld User's Guide
10g Release 2 (10.1.2) B14059-02 |
|
 Previous |
 Next |
|
Oracle® Application Server Adapter for J.D. Edwards OneWorld User's Guide
10g Release 2 (10.1.2) B14059-02 |
|
 Previous |
 Next |
This chapter describes how to use OracleAS Adapter Application Explorer (Application Explorer) to define a target to connect to a J.D. Edwards OneWorld system, view system objects, and create XML schemas and Web services. This chapter also explains how to configure an event adapter.
This chapter discusses the following topics:
Establishing a Connection (Target) for J.D. Edwards OneWorld
Creating and Testing a Web Service (BSE Configurations Only)
To start Application Explorer:
Ensure the server is started where Application Explorer is deployed.
On Windows, select Start >Programs > OracleAS_home Adapters > Application Explorer.
On Windows, iaexplorer.bat is found under OracleAS_home\adapters\application\tools, where OracleAS_home is the directory where Oracle Application Server is installed.
On UNIX, load the iwae script, iwae.sh, found under OracleAS_home/adapters/application/tools, where OracleAS_home is the directory where Oracle Application Server is installed.
Where OracleAS_home is the directory where Oracle Application Server is installed.
Application Explorer is displayed. You are ready to define new targets to your Enterprise Information System (EIS).
Before a repository configuration can be created, you must configure OracleAS Adapter Business Services Engine (BSE). You need not configure the Connector for J2CA because the ra.xml file is configured automatically during installation.
After BSE is deployed to Oracle Application Server, you can configure it through the BSE configuration page.
To configure BSE:
Display the following page in your browser:
http://hostname:port/ibse
Where hostnameis the hostname of Oracle Application Server andportis the HTTP port for Oracle Application Server.
For example,
http://localhost:7777/ibse
|
Note: The first time you access this page, it may take time to load. |
When prompted, log on.
When first installed, the user ID and the password are:
User name: iway
Password: iway
The BSE configuration page is displayed.
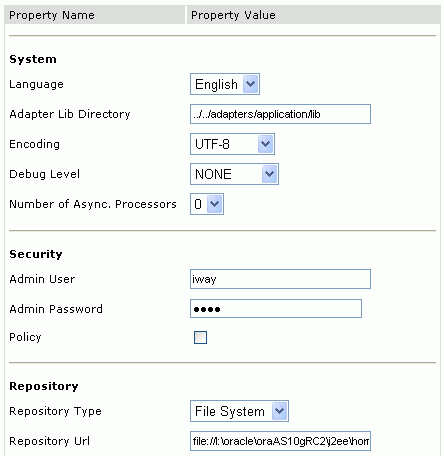
Ensure that the Adapter Lib Directory parameter specifies the path to the lib directory, for example:
OracleAS_home\adapters\application\lib
After you specify the path, adapters in the lib directory are available to BSE.
|
Note: The Repository URL field specifies where the file system repository is located. To use a database repository, you must enter the repository connection information. For the initial verification, use a file system repository. See "Configuring an Oracle Repository" for information on switching to a database repository. |
Click Save.
To configure BSE system settings:
Display the BSE configuration page by entering the following URL:
http://hostname:port/ibse/IBSEConfig
WhereHostname is the machine where BSE is installed and port is the port number on which BSE is listening.
|
Note: The server to which BSE is deployed must be running. |
The BSE configuration page is displayed, as shown inthe following figure.
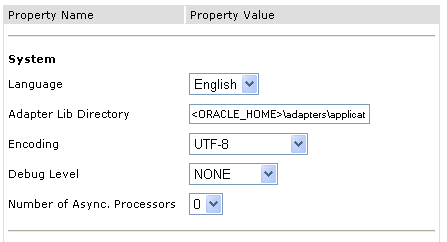
Configure the system settings according to the information in the following table.
The following image shows the Security pane of the BSE configuration page.

| Parameter | Description |
|---|---|
| Admin User | Provide a BSE administrator ID. |
| Admin Password | enter the password associated with the BSE administrator ID. |
| Policy | Select the check box to enable policy security. |
The following image shows the Repository pane of the BSE configuration page.
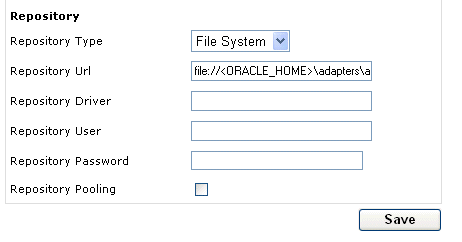
BSE requires a repository to store transactions and metadata required for the delivery of Web services. For more information, see "Configuring a File System Repository" and "Configuring an Oracle Repository".
Configure the repository settings according to the information in the following table.
Configuring a File System Repository
If you do not have access to a database for the repository, you can store repository information in an XML file on your local machine. However, a file system repository is less secure and efficient than a database repository. When BSE is first installed, it is automatically configured to use a file system repository.
|
Note: Do not use a file repository for BSE in production environments. |
The default location for the repository on Windows is:
OracleAS_home\config\base\ibserepo.xml
On other platforms, use the corresponding location.
If you are using a file system repository, you are not required to configure any additional BSE components.
Configuring an Oracle Repository
To configure an Oracle repository:
Contact your database administrator to obtain an Oracle user ID and password to create the BSE repository.
This user ID should have rights to create and modify tables as well as the ability to create and execute stored procedures.
Open a command prompt and navigate to the setup directory. Its default location on Windows is:
OracleAS_home\iWay55\etc\setup
For other platforms, see the corresponding location.
This directory contains SQL to create the repository tables in the following file:
iwse.ora
sqlplus userid/password @database @ iwse.ora
During the J2CA deployment of OracleAS Adapter for J.D. Edwards OneWorld, OC4J generates a deployment descriptor called oc4j-ra.xml. This descriptor provides OC4J-specific deployment information for resource adapters. See Chapter 3, "OC4J Deployment and Integration" for more information on J2CA deployment and configuration.
No configuration changes are necessary if you are using the default file based repository with J2CA deployment.
Configuring a Database Repository for J2CA
To configure a database repository for J2CA:
Execute the iwse.ora SQL statement on the machine where the database is installed.
Copy the jcatransport.properties file to the following directory:
OracleAS_home\adapters\application\config\jca_sample
Uncomment the following fields and enter details for them in the jcatransport.properties file. For example:
iwafjca.repo.url=jdbc:oracle:thin:@90.0.0.51:1521:orcl
iwafjca.repo.user=scott
iwafjca.repo.password=scott1
Alter the JDBC driver path in Application Explorer's lcp. For example:
lcp=..\lib\orabpel-adapters.jar;C:\jdev\jdbc\lib\classes12.jar;C:\jdev\jdbc\lib\nls_charset12.jar;%lcp%
to
lcp=..\lib\orabpel-adapters.jar;..\..\..\jdbc\lib\classes12.jar;..\..\..\jdbc\lib\nls_charset12.jar;%lcp%
Before you use Application Explorer with OracleAS Adapter for J.D. Edwards OneWorld, you must create a repository configuration. You can create two kinds of repository configurations, Web services and J2CA, depending on the container to which the adapter is deployed. During design time, the repository is used to store metadata created when using Application Explorer to configure adapter connections, browse EIS objects, configure services, and configure listeners to listen for EIS events. The information in the repository is also referenced at runtime.
A default J2CA repository is created for the default ManagedConnectinFactory. The name of this configuration is jca_sample.
See "Adapter Features" for more information.
To create a configuration for BSE using Application Explorer, you must first define a new configuration.
Defining a New Configuration for BSE
To define a new configuration for BSE:
Right-click Configurations and select New.
The New Configuration dialog box is displayed.
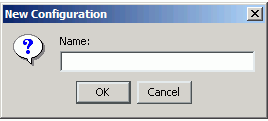
Enter a name for the new configuration (for example, SampleConfig) and click OK.
The New Configuration dialog box is displayed.
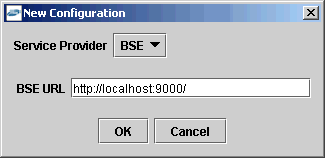
In the BSE URL field, accept the default URL or replace it with a different URL with the following format:
http://hostname:port/
Where hostname is the machine where your application server resides.
Click OK.
A node representing the new configuration appears beneath the root Configurations node.

To create a configuration for J2CA using Application Explorer, you must first define a new configuration.
Defining a New Configuration for J2CA
To define a new configuration for J2CA:
Right-click Configurations and select New.
The New Configuration dialog box is displayed.
Enter a name for the new configuration (for example, myConfig) and click OK.
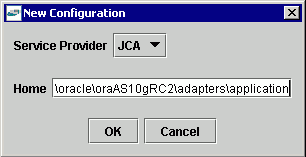
In the Home field, enter a path to your J2CA configuration directory where the repository, schemas, and other information is stored, for example:
OracleAS_home\adapters\application
Click OK.
A node representing the new configuration appears beneath the root Configurations node.

To connect to a new configuration:
Right-click configuration to which you want to connect, for example, myConfig.
Select Connect.
Nodes appear for Adapters, Events, and Business Services (also known as Web services).

Use the Adapters folder to create inbound interaction with J.D. Edwards. For example, you use the J.D. Edwards node in the Adapters folder to configure a service that updates J.D. Edwards.
Use the Events folder to configure listeners that listen for events in J.D. Edwards OneWorld.
Use the Business Services folder (available for BSE configurations only) to test Web services created in the Adapters folder. You can also control security settings for the Web services by using the security features of the Business Services folder.
You are now ready to define new targets to J.D. Edwards OneWorld.
Part of the application definition includes adding a target for the adapter. Setting up the target in Application Explorer requires information which is specific to the target.
To browse the available Master Business Functions (MBF), you must first define a target to the system you use. After you define the target, it automatically is saved. You must connect to the system every time you start Application Explorer or after you disconnect.
When you launch Application Explorer, the left pane displays (as nodes) the application systems supported by Application Explorer, based on the adapters that are installed.
To connect to an application system for the first time, you must define a new target.
In the left pane, expand the Adapters node.
The applications systems supported by Application Explorer appear as nodes based on the adapters that are installed.
Right-click JDEdwards node and select Add Target.
The Add Target dialog box is displayed.
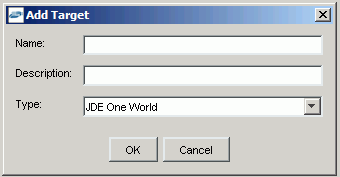
Perform the following steps:
Click OK.
The JDE One World dialog box appears.
On the Repository tab, enter the path to the GenJava repository.
This is the location of the Java files created by the GenJava program.
|
Note: Generating agent schemas requires the GenJava repository. For more information on building the J.D. Edwards OneWorld Master Business Function repository, see the J.D. Edwards Interoperability Guide for OneWorld Xe. |
Click the Logon tab and enter the appropriate information for your target type based on the information in the following table. Fields with an asterisk are required.
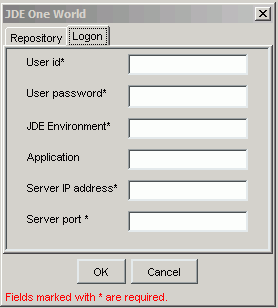
Click OK.
After the extraction finishes, the new target, JDEConnection, appears under the JDEdwards node.
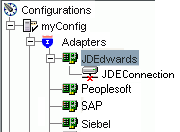
For information on how to create schemas for the adapter, see "Creating an XML Schema".
Connecting to a Defined J.D. Edwards OneWorld Target
To connect to a target:
Expand the Service Adapters node.
Expand the JDEdwards node.
The disconnected target is displayed.

Click the target name (for example, JDEConnection) under the JDEdwards node.
The Connection dialog box displays the values you entered forconnection parameters.
Verify your connection parameters.
Provide the correct password.
Right-click the target name and select Connect.
The x icon disappears, indicating that the node is connected.

Disconnecting from J.D. Edwards OneWorld
Expand the Adapters node.
Expand the JDEdwards node.
Right-click the target to which you are connected (for example, JDEConnection), and select Disconnect.
The x icon appears, indicating that the node is disconnected.

Editing a Target
In the left pane, ensure the target you wish to edit is disconnected.
Right-click the target and select Edit.
The Edit pane is displayed on the right.
Modify the target information.
Click OK.
Deleting a Target to J.D. Edwards OneWorld
You can delete a target, rather than just disconnecting and closing it. When you delete the target, the node disappears from the list of J.D. Edwards OneWorld targets in the left pane of the explorer.
Expand the Adapters node.
Expand the JDEdwards node.
Right-click the target to which you are connected (for example, JDEConnection), and select Delete.
The node disappears from the list of available connections.
For information on how to view application system objects, see the J.D .Edwards Interoperability Guide Release OneWorld XE.
To execute a Master Business Function (MBF), the adapter must receive a request document through the J.D. Edwards OneWorld ThinNet API. The agent processes the request and sends an XML response document indicating the result. Application Explorer creates both the XML request schema and the XML response schema.
The following procedure explains how to create request and response schemas for a J.D. Edwards OneWorld business function. Application Explorer enables you to create XML schemas for this function.
Connect to a J.D. Edwards OneWorld target as described in "Connecting to a Defined J.D. Edwards OneWorld Target".
Expand the Services node.
Expand the node of the Master Business Function (MBF) for which you want to create the schema.
Expand and then select the node beneath the MBF.
The following image shows the tabs that appear on the right.

Click the parameters tab to view the parameter information.
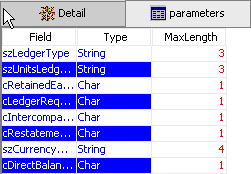
Click Request Schema to view the request schema information.
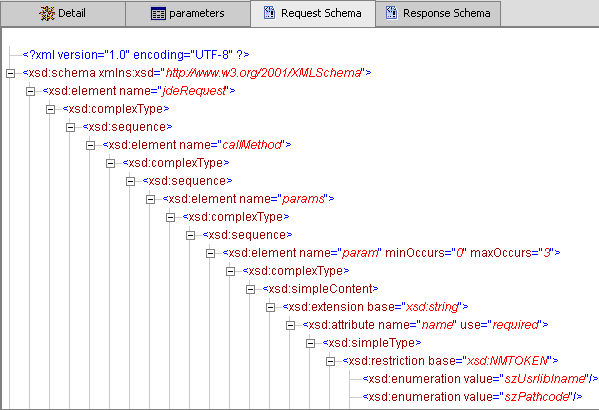
Click Response Schema to view the response schema information.
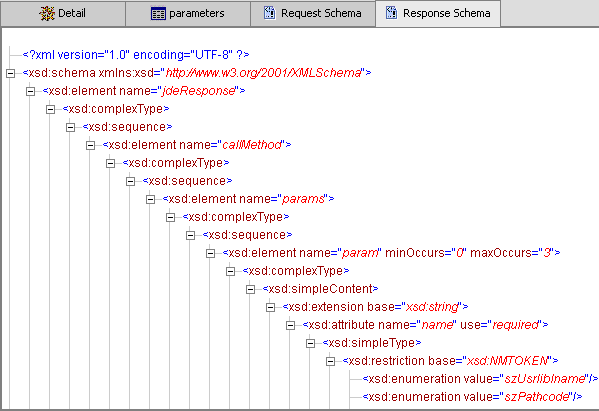
To create schemas for the adapter, you must use GenJava wrappers. You create the GenJava wrappers using the OneWorld utility called GenJava. You use Application Explorer to generate schemas against OneWorld GenJava wrappers. GenJava is supplied as a command line process with several run-time options. For more information on GenJava, see the J.D. Edwards Interoperability Guide for OneWorld Xe.
The process of generating WSDL for request-response (outbound) services differs from that of generating WSDL for event notification (inbound) J2CA services of the adapter. See the following sections for more details.
Generating WSDL for Outbound Interaction
To generate a WSDL file for request-response service:
Start Application Explorer and connect to a defined J.D. Edwards target.
Expand Services > JDEJAVA_CFIN > B0100033, and select GetEffectiveAddress.
Right-click GetEffectiveAddress.
The following menu is displayed.

Select Create Outbound JCA Service (Request/Response).
The Export WSDL dialog box is displayed.

Accept the default name and location for the file.
The .wsdl file extension is added automatically. By default, the names of WSDL files generated for request-response services end with _invoke, while those generated for event notification end with _receive.
|
Note: You can organize your WSDL files in subfolders, creating your own WSDL hierarchy structure. Create the folders underOracleAS_home\adapters\application\wsdls\. The WSIL browser in JDeveloper will display the full tree structure of your WSDL hierarchy.
|
Click OK.
The WSDL file is saved in the specified location.
Generating WSDL for Inbound Interaction
You can create inbound J2CA service only if the node you have selected supports events. To generate a WSDL file:
Verify that orabpel-adapters.jar is in your classpath.
Run obadapter.bat to set the environment.
From the Windows Start menu, select OraBPELPM_Home > Oracle BPEL Process Manager > Developer Prompt.
At the prompt, enter the following command:
java oracle.tip.pc.infra.wsil.IWayWSILBrowser jcaHome\jcaConfig adapter target channel schemaPrefix wsdlFileName
Where:
jcaHome is the path to your J2CA configuration
jcaConfig is the directory where your J2CA configuration is saved
adapter is the name of the adapter
target is the name of the target you are connected to in Application Explorer
channel is the name of the channel you have selected in Application Explorer
schemaPrefix is the prefix of your schema
wsdlFileName is the name of your WSDL file
For example:
I:\oracle\AS\adapters\application\tools>java oracle.tip.pc.infra.wsil.IWayWSILBrowser
I:\oracle\AS\adapters\application\
jca_sample JDEdwards JDE_target JDE_channel SalesOrder SalesOrder.wsdl
It is good practice to append _receive to the names of WSDL files generated for event notification services. This will allow you to easily differentiate between them and those generated for request-response services.
|
Note: You can organize your WSDL files in subfolders, creating your own WSDL hierarchy structure. Create the folders underOracleAS_home\adapters\application\wsdls\. The WSIL browser in JDeveloper will display the full tree structure of your WSDL hierarchy.
|
You can generate a Web service (also known as a business service). You can explore the business function repository and generate Web services for the functions you want to use with the adapter. The following procedure uses an example called BusinessUnitExistenceCheck.
|
Note: In a J2EE Connector Architecture (J2CA) implementation, Web services are not available. When the adapters are deployed to use J2CA, the Common Client Interface (CCI) provides integration services. |
Creating a Web Service
To create a Web service for a business function:
Expand the JDEdwards node and then, expand the Services node.
Expand the Master Business Function (MBF), B1000012, also called BusinessUnitExistenceCheck.
Right-click the node from which you want to create a business service and select Create Business Service.
The Create Business Service dialog box is displayed.
You can add the business function as a method for a new Web service or as a method for an existing one.
From the Existing Service Names list, select either <new service> or an existing service.
Specify a service name if you are creating a new service. This name identifies the Web service in the list of services under the Business Services node.
Enter a description for the service (optional).
Select one of the available licenses.
Click Next.
The license and method dialog box is displayed.
In the License field, select one or more license codes to assign to the Web service. To select more than one, hold down the Ctrl key and click licenses.
In the Method Name field, enter a descriptive name for the method.
In the Description field, enter a brief description of the method.
Click OK.
Application Explorer switches the view to the Business Services node, and the new Web service appears in the left pane.
Testing a Web Service
After a Web service is created, you can test it to ensure it functions properly. A test tool is provided for testing the Web service.
To test a Web service:
If you are not on the Business Services node of Application Explorer, click the node to access Web services.
If it is not expanded, expand the list of Web services under Business Services.
Expand the Services node.
Select the name of the business service you want to test.
The business service name appears as a link in the right pane.
In the right pane, click the named business services link.
The test option appears in the right pane. If you are testing a Web service that requires XML input, an input field appears.
Enter the appropriate input.
Click Start.
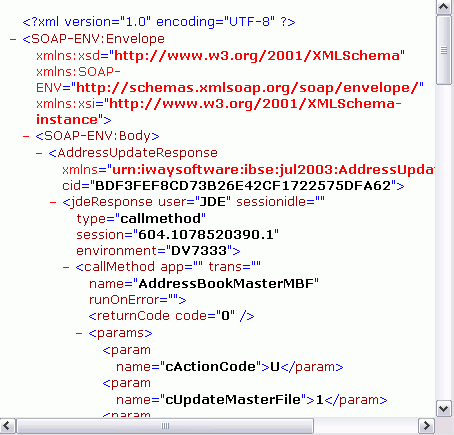
Application Explorer displays the results.
Identity Propagation
If you test or execute a Web service using a third party XML editor, for example XMLSPY, the Username and Password values that you specify in the SOAP header must be valid and are used to connect to J.D. Edwards OneWorld. The user name and password values that you provided for J.D. Edwards OneWorld during target creation using Application Explorer are overwritten for this Web service request. The following is a sample SOAP header that is included in the WSDL file for a Web service:
<SOAP-ENV:Header>
  <m:ibsinfo xmlns:m="urn:schemas-iwaysoftware-com:iwse">
    <m:service>String</m:service>
    <m:method>String</m:method>
    <m:license>String</m:license>
    <m:disposition>String</m:disposition>
    <m:Username>String</m:Username>
    <m:Password>String</m:Password>
    <m:language>String</m:language>
  </m:ibsinfo>
</SOAP-ENV:Header>
You can remove the <m:disposition> and <m:language> tags from the SOAP header, since they are not required.
Events are generated as a result of activity in a database or in an application system. You can use events to trigger an action in your application. For example, an update to a database can reflect an update to customer information. If your application must perform when this happens, your application is a consumer of this event.
After you create a connection to your application system, you can add events using Application Explorer. To create an event, you must create a port and a channel.
|
Note: If using a J2CA configuration, you must create a new channel for every event and select this channel when creating an inbound service. Additionally, you do not create or configure ports for use with BPEL Process Manager. |
Port
A port associates a particular business object exposed by the Adapter with a particular disposition. A disposition is a URL that defines the protocol and location of the event data. The port defines the end point of the event consumption. For example, you can use the MSMQ protocol to route the result of a Purchase Order update in the J.D. Edwards OneWorld system to a queue hosted by your application server. See "Creating an Event Port" for more information.
Channel
A channel represents configured connections to particular instances of back-end systems. A channel binds one or more event ports to a particular listener managed by the adapter. See "Creating a Channel" for more information.
|
Note: Oracle Containers for J2EE (OC4J) currently conforms to J2CA 1.0, which does not call for event capabilities. When conforming to J2CA 1.0, only service interactions are supported. |
You must create event ports from the Events node in Application Explorer.
|
Note: Do not create event ports for J2CA configurations. You must create event ports for BSE configurations only. |
The following procedure describes how to create an event port from the Events node for a disposition using Application Explorer. You can switch between a BSE and a J2CA deployment by choosing one or the other from the menu in the upper right of Application Explorer.
Creating an Event Port for RMI
To create a specific event port for RMI:
Expand the Events node.
Expand the JDEdwards node.
Right-click Ports and select Add Port.
The Add Port dialog box is displayed.
Enter a name for the event port and provide a brief description.
In the URL field, specify a destination file to which the event data is written.
When pointing Application Explorer to a J2CA deployment, provide the full path to the directory.
From the Disposition protocol list, select RMI.
The following table defines the parameters for the disposition.
| Parameter | Description |
|---|---|
| location | Destination and file name of the document where event data is written, for example,
ifile://D:\in\x.txt;errorTo=ifile://D:\error |
| errorTo | Predefined port name or another disposition URL to which error logs are sent. |
Click OK.
The port appears under the ports node in the left pane. In the right pane, a table appears that summarizes the information associated with the event port you created.
You are ready to associate the event port with a channel. For more information, see "Creating a Channel" .
To edit an event port using Application Explorer:
Expand the Event Adapters node.
Expand the JDEdwards node.
Right-click the event port you want to edit and select Edit.
The Edit Port pane is displayed.
Make the required changes and click OK.
The following procedure describes how to create a channel for your event. All defined event ports must be associated with a channel.
|
Note: If using a J2CA configuration, you must create a new channel for every event and select this channel when creating an inbound service. Creating a channel is required for both BSE and J2CA configurations. |
To create a channel:
Expand the JDEdwards node.
The ports and channels nodes appear in the left pane.
Right-click Channels and select Add Channel.
The Add Channel dialog box is displayed.
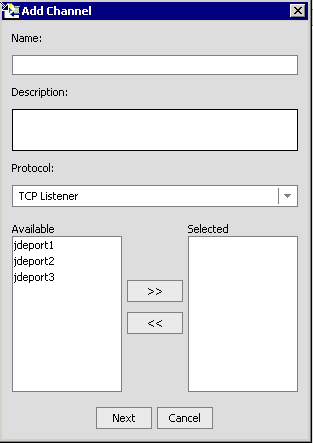
Perform the following steps:
Click Next.
The TCP Listener dialog box is displayed with the Basic tab active. Perform the following steps:
Enter the parameters that are specific to your J.D. Edwards environment.
Click the preparser tab.
Enter the required parameters.
The following table lists the parameters with their descriptions. Parameters with an asterisk are required.
For additional parameters, see your J.D. Edwards OneWorld Administrator.
Click OK.
The channel appears under the channels node in the left pane.
An X over the icon indicates that the channel is currently disconnected. You must start the channel to activate your event configuration.
|
Note: If you are planning to integrate OracleAS Adapter for J.D. Edwards OneWorld with BPEL Process Manager, do not start the channel, as it is managed by the BPEL PM Server. If you start the channel for testing and debugging purposes, stop it before runtime. |
Right-click the channel node and select Start.
The channel becomes active.

The X over the icon disappears.
To stop the channel, right-click the connected channel node and select Stop.
The channel becomes inactive and an X appears over the icon.
Editing a Channel
In the left pane, locate the channel you want to edit.
Right-click the channel and select Edit.
The Edit channels pane is displayed.
Make the required changes to the channel configuration and click Finish.
Deleting a Channel
To delete a channel:
Oracle Application Server Adapter for J.D. Edwards OneWorld Event Listener is designed specifically to provide J.D. Edwards approved access to your OneWorld business events. The OneWorld Event Listener refers to a specialized application that runs in conjunction with OneWorld business functions and is called by the OneWorld application system.
The OneWorld application system provides the Event Listener with the information required to retrieve the event information for only the desired events. For information about configuring the OneWorld environment, see the J.D. Edwards Interoperability Guide for OneWorld.
The OneWorld Event Listener is called directly from the OneWorld application and is passed a Z-file record identifier. This identifier then generates a request document that is passed to the server for processing. The server retrieves the event information from the J.D. Edwards OneWorld system and propagates the information for integration with other application systems.
The OneWorld Event Listener is installed as part of the basic installation. The OneWorld Adapter is automatically installed in the appropriate directory. If the integration server is not installed on the same computer as the J.D. Edwards application server, you must configure the OneWorld Event Listener. For more information, see the J.D. Edwards Interoperability Guide for OneWorld.
The OneWorld Event Listener is started by J.D. Edwards for specific business functions as configured in the OneWorld environment.The OneWorld Event listener includes the following components:
The listener exit (IWOEvent).
The file extension you use depends on your operating system, for example, for Windows, the exit is IWOEvent.dll.
The listener configuration file (iwoevent.cfg).
The outbound agent (XDJdeOutboundAgent).
The OneWorld Event listener exit is the function that passes the key fields for a record in the OneWorld outbound transaction tables to the integration server for processing by the outbound agent. The OneWorld Event listener is deployed under the J.D. Edwards OneWorld Server. The Java class for the OneWorld Event listener is called IWOEvent (the file extension depends on the operating system) and is case-sensitive.
After OneWorld starts the OneWorld Event listener, the listener accesses the configuration file, called iwoevent.cfg (case-sensitive). Based on the information in the configuration file, the listener sends the event notification to the integration server. If the integration server is unavailable or some exception occurs, the OneWorld Event listener saves the event information in a file called batch.log. After the server becomes available, the listener sends the information. All of the log information is saved in a file called iwoevent.log.
To create the iwoevent.cfg file:
On the J.D. Edwards OneWorld Server, create an iwoevent.cfg file in the defined directory. See "Adding Connection Information"for information about the contents of this file.
Create an environment variable, IWOEVENT_HOME, to point to the directory containing the iwoevent.cfg file.
On Windows: Add IWOEVENT_HOME to the system environment variables.
On UNIX: Add the following command to your start-up script:
export IWOEVENT_HOME =/directory_name
The OneWorld Event listener requires connection information for the associated adapter to initiate events properly. This information is contained in the iwoevent.cfg file. You must create this file and add the connection information to it.The OneWorld Event listener requires connection information for the associated integration server to function properly. This information is contained in the iwoevent.cfg file.A sample iwoevent.cfg file is installed on the J.D. Edwards server and is in the root path. The iwoevent.cfg file has three distinct sections:
The common section of the configuration file contains basic configuration options. Currently, only the trace option is supported.The alias section of the configuration file contains the connection information required to send transactions to specific servers. The alias values to these entries are as follows:
Alias.aliasname={ipaddress|dsn}:port, trace={on|off}
Where aliasname is the symbolic name given to the connection.
Where ipaddress|dsn is the IP address or DSN name for the server containing the Adapter for J.D. Edwards OneWorld (required).
Where portis the port defined for the Adapter for J.D. Edwards OneWorld (required).
Wheretrace={on|off} sets the tracing to on for the particular alias.
The trans section of the configuration file contains transaction information required to route J.D. Edwards OneWorld transactions to specified servers. If a particular J.D. Edwards OneWorld transaction is not defined to an alias, it is sent to all aliases. The trans values to these entries are as follows:
trans.jdeTransactionName=alias1,alias2,aliasn
WherejdeTransactionName is the JDE-defined name for the outbound transaction and alias1,alias2,aliasn is the list of aliases to which the transactions are sent.
Adding Connection Information to iwoevent.cfg
To add connection information to the iwoevent.cfg file:
Add the server and port entries to the iwoevent.cfg file.
To set the trace option, select on or off.
common.trace=on|off
Where on sets the tracing to on and off sets the tracing to off. Off is the default value.
The following is a sample entry from iwoevent.cfg that supplies connection information:
common.trace=on
alias.edamcs1=172.1.1.1:3694
alias.edamcs1t=172.1.1.1:3694, trace=on
alias.edamcs2=222.2.2.2:1234
trans.JDESOW=edamcs1t,edamcs2
trans.JDEPOOUT=edamcs1