|
Oracle® BPEL Process Manager Developer's Guide
10g Release 2 (10.1.2) B14448-02 |
|
 Previous |
 Next |
|
Oracle® BPEL Process Manager Developer's Guide
10g Release 2 (10.1.2) B14448-02 |
|
 Previous |
 Next |
The notification service in Oracle BPEL Process Manager enables you to send notifications from a BPEL process using a variety of channels. Oracle BPEL Process Manager can deliver these notifications by e-mail, voice message, fax, pager, or short message service (SMS).
This chapter contains the following topics:
Various scenarios may require sending e-mail messages or other types of notifications to users as part of the process flow. For example, certain types of exceptions that cannot be handled automatically may require manual intervention. In this case, JDeveloper BPEL Designer uses the notification service to alert users by voice or e-mail. In an approval workflow (for example, an expense report approval), you can send notifications to the task assignee when a specific task requires action, or you can notify the task creator by e-mail when the approval is complete. In some cases, contact information (e-mail address or telephone number) is obtained dynamically as part of the process and in other cases the details are looked up from a user directory.
The tutorial 130.SendEmailWithAttachments demonstrates how to model a notification in JDeveloper BPEL Designer and send an e-mail with an attachment.
|
See: Oracle_Home\integration\orabpel\samples\tutorials\
|
The OrderBooking tutorial demonstrates how to add an e-mail notification to the POAcknowledge process.
Terms used for the notification service include:
Notification—an asynchronous message sent to a user by a specific channel. The message can be sent as an e-mail message, a voice message, a fax message, a pager message, or an SMS message.
Actionable notification—a notification to which the user can respond. For example, workflow sends an e-mail message to a manager to approve or reject a purchase order. The manager approves or rejects the request by replying to the e-mail with appropriate content.
Oracle Application Server Wireless—the wireless and voice component of Oracle Application Server. OracleAS Wireless includes a messaging component that handles the sending and receiving of messages to and from devices. When you install OracleAS Wireless, you can specify one of the following notification service options:
Connect to an external server to deliver messages, such as e-mail, SMS, fax, or pager.
Use Oracle's hosted service at
Oracle BPEL Process Manager is preconfigured to send notifications using Oracle's hosted wireless service.
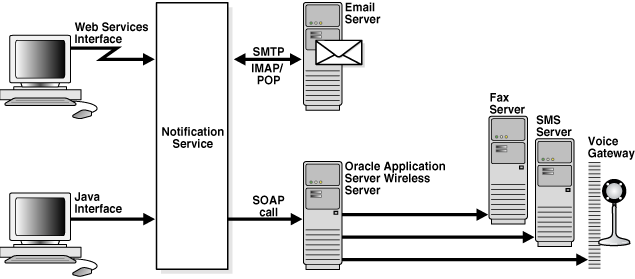
The notification service supports sending e-mail through the SMTP protocol and receiving e-mail from IMAP- and POP-based e-mail accounts.
Figure 15-1 shows the notification service interfaces and supported service types.
Figure 15-1 Notification Service Interfaces and Supported Service Types
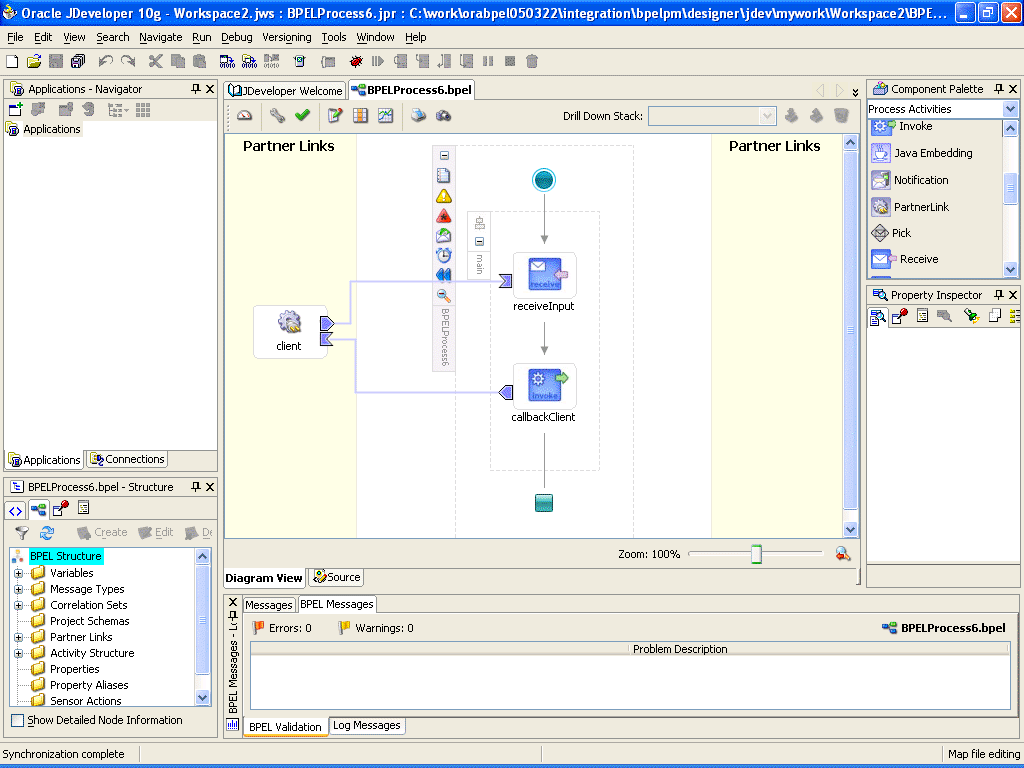
The diagram view in JDeveloper BPEL Designer includes a Notification activity in the Component Palette, as shown in Figure 15-2.
Figure 15-2 Diagram View in JDeveloper BPEL Designer—Notification Activity
To use the notification service, do the following:
In Diagram View, select Process Activities from the Component Palette list.
Drag and drop a Notification activity from the Process Activities list (for this example, to a position below receiveInput and above callbackClient in the diagram).
The Notification Service wizard starts.
Click Next on the Welcome window.
The Step 1 of 2: Select a Notification channel window appears.
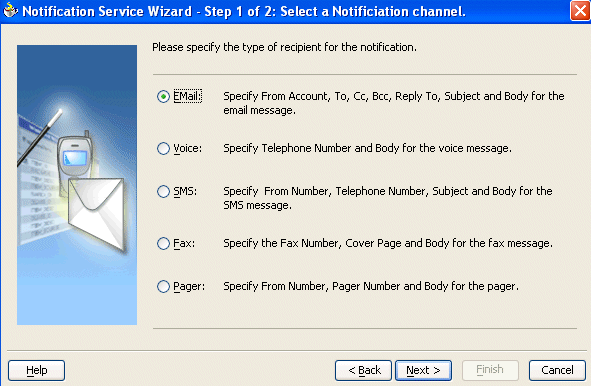
Description of the illustration notif2.gif
Select a notification channel from the following options and click Next.
Voice
SMS
Fax
Pager
The next step depends on which notification channel you select.
|
See:
|
When you select Email for the notification channel, the Notification Service Wizard - Step 2 of 2: Specify Email Parameters window appears. Figure 15-3 shows the required e-mail notification parameters.
Figure 15-3 Notification Service Wizard - Step 2 of 2: Specify Email Parameters Window
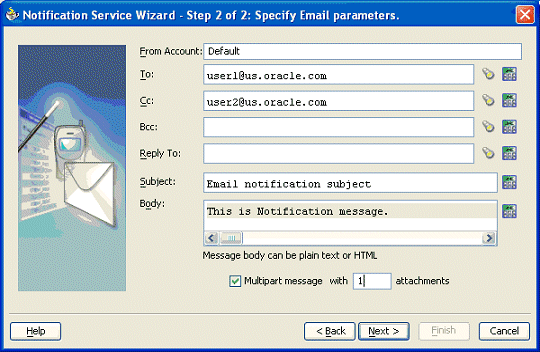
Enter information for each field as described in Table 15-1.
Table 15-1 E-mail Notification Parameters
| Name | Description |
|---|---|
|
From Account |
The name of the account used to send this message. The configuration details for this e-mail account name must exist on Oracle BPEL Server. |
|
To |
The e-mail address to which the message is to be delivered. This can be a) a static e-mail address entered at the time the message is created, or b) an e-mail address looked up using the identity service, or c) a dynamic address from the payload. The XPath Expression Builder can be used to get the dynamic e-mail address from the input. See "Setting E-mail Addresses and Telephone Numbers Dynamically". |
|
CC and Bcc |
The e-mail addresses to which the message is copied and blind copied. This can be a static or dynamic address as described for the To address. |
|
Reply To |
The e-mail address to use for replies. This can be a static or dynamic address as described for the To address. |
|
Subject |
Subject of the e-mail message. This can be free text or dynamic text, or a combination. The XPath Expression Builder can be used to set dynamic text based on data from process variables that you specify. Dynamic data is automatically enclosed in < |
|
Body |
Message body of the e-mail message. This can be plain text, XML, free text, or dynamic text, as described for the Subject parameter. |
|
Multipart message with n attachments |
Select to specify e-mail attachments. See "Setting E-mail Attachments". The number of attachments if Multipart message is selected. The number includes the body. For example, if you have a body and one attachment, specify |
Click Next, then Finish.
The BPEL fragment that invokes the notification service to send the e-mail message is created.
When you send e-mail attachments, you mark the e-mail as a multipart message and set the number of attachments to send. The number of attachments includes the body plus the attachments. (For example, to send an e-mail message with one file as an attachment, set the number to 2.) When sending attachments, set the content body to have a MultiPart element that contains as many BodyPart elements as the number of attachments. Each BodyPart has three elements: ContentBody, MimeType, and BodyPartName. All three elements must be set for each attachment.
To add one attachment to an e-mail message, do the following:
Run the Notification Service wizard and select Email for the channel.
Specify values for To, Subject, and Body.
Select Multipart and enter 2 for the number of attachments. (Note that the number of attachments must include the body part.)
The Notification Service wizard generates the MultiPart element with two body parts. The first body part is for the message body and the other is used for the attachment. The Notification Service wizard generates the BPEL fragment with an assign activity with multiple copy rules. One of the copy rules copies the attachment, as follows:
<assign name="Assign">
<copy>
<from expression="string('Default')"/>
<to variable="varNotificationReq" part="EmailPayload"
query="/EmailPayload/ns1:FromAccountName"/>
</copy>
...
<!-- copy statements relate to body and attachment -->
<copy>
<from>
<Content xmlns="http://xmlns.oracle.com/ias/pcbpel/NotificationService">
<MimeType
xmlns="http://xmlns.oracle.com/ias/pcbpel/NotificationService">multipart/mixed
</MimeType>
<ContentBody
xmlns="http://xmlns.oracle.com/ias/pcbpel/NotificationService">
<MultiPart
xmlns="http://xmlns.oracle.com/ias/pcbpel/NotificationService">
<BodyPart
xmlns="http://xmlns.oracle.com/ias/pcbpel/NotificationService">
<MimeType
xmlns="http://xmlns.oracle.com/ias/pcbpel/NotificationService"/>
<ContentBody
xmlns="http://xmlns.oracle.com/ias/pcbpel/NotificationService"/>
<BodyPartName
xmlns="http://xmlns.oracle.com/ias/pcbpel/NotificationService"/>
</BodyPart>
</MultiPart>
</ContentBody>
</Content>
</from>
<to variable="varNotificationReq" part="EmailPayload"
query="/EmailPayload/ns1:Content"/>
</copy>
<copy>
<from expression="string('text/html')"/>
<to variable="varNotificationReq" part="EmailPayload" query="/EmailPayload/ns1:Content/ns1:ContentBody/ns1:
MultiPart/ns1:BodyPart[1]/
ns1:MimeType"/>
</copy>
<copy>
<from expression="string('NotificationAttachment1.html')"/>
<to variable="varNotificationReq" part="EmailPayload" query="/EmailPayload/ns1:Content/ns1:ContentBody/ns1:
MultiPart/ns1:BodyPart[1]/ns1:BodyPartName"/>
</copy>
<copy>
<from expression="string('This is a test message from John Cooper')"/>
<to variable="varNotificationReq" part="EmailPayload" query="/EmailPayload/ns1:Content/ns1:ContentBody/ns1:
MultiPart/ns1:BodyPart[1]/
ns1:ContentBody"/>
</copy>
<copy>
<from expression="string('text/html')"/>
<to variable="varNotificationReq" part="EmailPayload" query="/EmailPayload/ns1:Content/ns1:ContentBody/ns1:
MultiPart/ns1:BodyPart[2]/
ns1:MimeType"/>
</copy>
<copy>
<from expression="string('NotificationAttachment2.html')"/>
<to variable="varNotificationReq" part="EmailPayload" query="/EmailPayload/ns1:Content/ns1:ContentBody/ns1:
MultiPart/ns1:BodyPart[2]/
ns1:BodyPartName"/>
</copy>
<copy>
<from expression="string('message2')"/>
<to variable="varNotificationReq" part="EmailPayload" query="/EmailPayload/ns1:Content/ns1:ContentBody/ns1:
MultiPart/ns1:BodyPart[2]/
ns1:ContentBody"/>
</copy>
</assign>
Search for BodyPart[2] and set the required values. The steps to send the attachment MyImage.gif, for example, are as follows:
Search for BodyPart[2] MimeType and change the from expression to copy 'image/gif' as the MimeType (instead of the autogenerated 'text/html').
Search for BodyPart[2] BodyPartName and change the from expression to copy 'MyImage.gif' (instead of the autogenerated 'NotificationAttachment2.html').
Search for BodyPart[2] ContentBody and change the from expression to copy the content of MyImage.gif (instead of the autogenerated expression string('message2')).
You can use the readFile XPath function to read the contents of the file:
ora:readFile('<name of the file in the project | HTTP URL | File URL>')
Examples:
ora:readFile('MyImage.gif') will read the file from the bpel project directory
ora:readFile('file://c:/MyImage.gif') will read file from c:\ directory
ora:readFile('http://www.oracle.com/MyImage.gif')
The new BPEL copy statement is as follows:
<copy>
    <from expression="string('image/gif')"/>
    <to variable="varNotificationReq" part="EmailPayload" query="/EmailPayload/ns1:Content/ns1:ContentBody/ns1:MultiPart/ns1:BodyPart[2]/ns1:MimeType"/>
  </copy>
  <copy>
    <from expression="string('MyImage.gif')"/>
    <to variable="varNotificationReq" part="EmailPayload" query="/EmailPayload/ns1:Content/ns1:ContentBody/ns1:MultiPart/ns1:BodyPart[2]/ns1:BodyPartName"/>
  </copy>
  <copy>
    <from expression="ora:readFile('file://c:/MyImage.gif')"/>
    <to variable="varNotificationReq" part="EmailPayload" query="/EmailPayload/ns1:Content/ns1:ContentBody/ns1:MultiPart/ns1:BodyPart[2]/ns1:ContentBody"/>
  </copy>
|
See: Oracle_Home\integration\orabpel\samples\tutorials\130.SendEmailWithAttachments for an example of sending attachments using e-mail
|
The file ns_emails.xml in the directory Oracle_Home\integration\orabpel\system\services\config contains the configuration for e-mail accounts. Each EmailAccount element sets the configuration of a specific e-mail account. The name attribute in the EmailAccount element is the name of the account.
A default e-mail account is specified in the e-mail configuration file. This account is used when there is no account specified to send an e-mail notification. This account is also used to send task-related notifications. A default e-mail account must always be specified in the configuration file.
The EmailAccount element contains the OutgoingServerSettings and IncomingServerSettings attributes. For actionable notifications in a workflow, both IncomingServerSettings and OutgoingServerSettings are required.
Table 15-2 describes the XML elements for the e-mail notification configuration stored in the ns_emails.xml file.
Table 15-2 XML Elements for the E-mail Notification Configuration File
| Name | Description |
|---|---|
EmailAccount/Name |
Name of the account. This can be any name, but must be unique within this server. |
EmailAccount/GeneralSettings/FromName |
Name of the |
EmailAccount/GeneralSettings/FromAddress |
E-mail address for the |
EmailAccount/OutgoingServerSettings/SMTPHost |
Name of the outgoing SMTP server |
EmailAccount/OutgoingServerSettings/SMTPPort |
Port of the outgoing SMTP server |
EmailAccount/IncomingServerSettings/Server |
Name of the incoming e-mail server |
EmailAccount/IncomingServerSettings/Port |
Port of the incoming e-mail server |
EmailAccount/IncomingServerSettings/UserName |
User ID of the e-mail address |
EmailAccount/IncomingServerSettings/Password |
User password |
EmailAccount/IncomingServerSettings/Password[encrypted |
Encrypted attribute of the password. It is |
EmailAccount/IncomingServerSettings/UseSSL |
Secure sockets layer (SSL) attribute. It is |
EmailAccount/IncomingServerSettings/Folder |
Name of the folder from which to read the incoming messages |
EmailAccount/IncomingServerSettings/PollingFrequency |
Polling interval for reading messages from the incoming messages folder |
EmailAccounts xmlns="http://xmlns.oracle.com/ias/pcbpel/NotificationService">
   <EmailAccount>
       <Name>Default</Name>
      <GeneralSettings>
         <FromName>Oracle BPM</FromName>
         <FromAddress>bpm1@dlsun4254.us.oracle.com</FromAddress>
      </GeneralSettings>
      <OutgoingServerSettings>
         <SMTPHost>dlsun4254.us.oracle.com</SMTPHost>
         <SMTPPort>225</SMTPPort>
      </OutgoingServerSettings>
      <IncomingServerSettings>
         <Server>dlsun4254.us.oracle.com</Server>
         <Port>2110</Port>
         <Protocol>pop3</Protocol>
         <UserName>bpm1</UserName>
         <Password ns0:encrypted="false"
xmlns:ns0="http://xmlns.oracle.com/ias/pcbpel/NotificationService">welcome
</Password>
         <UseSSL>false</UseSSL>
         <Folder>Inbox</Folder>
         <PollingFrequency>1</PollingFrequency>
         <PostReadOperation>
            <MarkAsRead/>
         </PostReadOperation>
      </IncomingServerSettings>
   </EmailAccount>
</EmailAccounts>
When you select Voice for the notification channel, the Notification Service Wizard - Step 2 of 2: Specify Voice Parameters window appears. Figure 15-4 shows the required voice notification parameters.
Figure 15-4 Notification Service Wizard - Step 2 of 2: Specify Voice Parameters Window
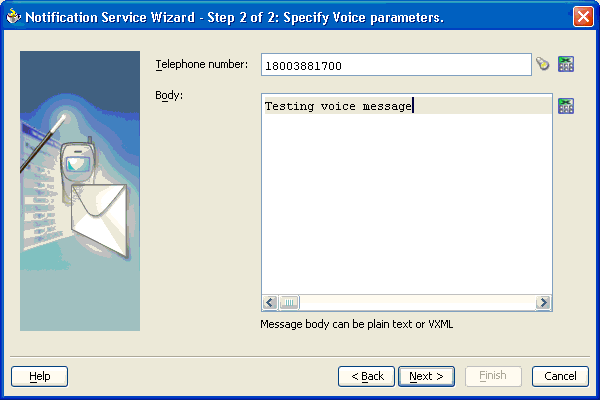
Enter information for each field as described in Table 15-3.
Table 15-3 Voice Notification Parameters
| Name | Description |
|---|---|
|
Telephone number |
The telephone number to which the message is to be delivered. This can be a) a static telephone number entered at the time the message is created, or b) a telephone number looked up using the identity service, or c) a dynamic telephone number from the payload. The XPath Expression Builder can be used to get the dynamic telephone number from the input. |
|
Body |
Message body. This can be plain text or XML. Also, this can be free text or dynamic text, or a combination. The XPath Expression Builder can be used to set dynamic text based on data from process variables that you specify. Dynamic data is automatically enclosed in < |
Click Next, then Finish.
The BPEL fragment that invokes the notification service for voice notification is created.
The configuration for the wireless service provider is stored in an XML file, ns_iaswconfig.xml, which is in
Oracle_Home\integration\orabpel\system\services\config
Table 15-4 describes the XML elements for the voice notification configuration stored in ns_iaswconfig.xml on the Oracle_Home server.
Table 15-4 XML Elements for the Voice Notification Configuration File
| Name | Description |
|---|---|
/IASWConfiguration/SoapURL |
URL of the wireless service provider |
/IASWConfiguration/UserName |
Name of the user account with the wireless service provider |
/IASWConfiguration/Password |
User password |
/IASWConfiguration/Password[encrypted |
Encrypted attribute of the password. It is |
/IASWConfiguration/ProxyHost |
Name of the proxy server |
/IASWConfiguration/ProxyPort |
Port number of the proxy server |
|
Note: The username and password are intentionally left blank at installation. If a username or password is not specified, the wireless server allows up to 50 notifications from a specific IP address. After 50 notifications, you must get a paid account fromYou then specify the appropriate username and password in the configuration file, |
<?xml version = '1.0' encoding = 'UTF-8'?>
<!--This XML file stores the details of the IAS Wireless Notification Service-->
<IASWConfiguration xmlns="http://xmlns.oracle.com/ias/pcbpel/NotificationService">
  <!-- URL to the SOAP Service -->
  <SoapURL>http://messenger.oracle.com/xms/webservices</SoapURL>

  <!-- UserName - this username should exist in iAS Wireless schema -->
  <UserName>username</UserName>

  <Password ns0:encrypted="false"
xmlns:ns0="http://xmlns.oracle.com/ias/pcbpel/NotificationService">password
</Password>
</IASWConfiguration>
When you select SMS for the notification channel, the Notification Service Wizard - Step 2 of 2: Specify SMS Parameters window appears. Figure 15-5 shows the required SMS notification parameters.
Figure 15-5 Notification Service Wizard - Step 2 of 2: Specify SMS Parameters Window
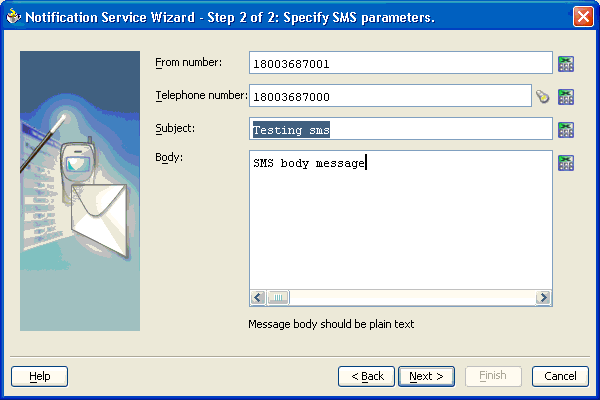
Enter information for each field as described in Table 15-5.
Table 15-5 SMS Notification Parameters
| Name | Description |
|---|---|
|
From number |
The telephone number from which to send the SMS notification. This can be a static telephone number entered at the time the message is created or a dynamic telephone number from the payload. The XPath Expression Builder can be used to get the dynamic telephone number from the input. See "Setting E-mail Addresses and Telephone Numbers Dynamically". |
|
Telephone number |
The telephone number to which the message is to be delivered. This can be a) a static telephone number entered at the time the message is created, or b) a telephone number looked up using the identity service, or c) a dynamic telephone number from the payload. The XPath Expression Builder can be used to get the dynamic telephone number from the input. |
|
Subject |
Subject of the SMS message. This can be free text or dynamic text, or a combination. The XPath Expression Builder can be used to set dynamic text based on data from process variables that you specify. Dynamic data is automatically enclosed in < |
|
Body |
SMS message body. This must be plain text. This can be free text or dynamic text as described for the Subject parameter. |
Click Next, then Finish.
The BPEL fragment that invokes the notification service for SMS notification is created.
As with the voice notification channel, the configuration for the wireless service provider for SMS is stored in the XML file ns_iaswconfig.xml, which is in
Oracle_Home\integration\orabpel\system\services\config
See "Configuring the Wireless Service Provider for Voice" to configure a wireless service provider for SMS.
When you select Fax for the notification channel, the Notification Service Wizard - Step 2 of 2: Specify Fax Parameters window appears. Figure 15-6 shows the required fax notification parameters.
Figure 15-6 Notification Service Wizard - Step 2 of 2: Specify Fax Parameters window
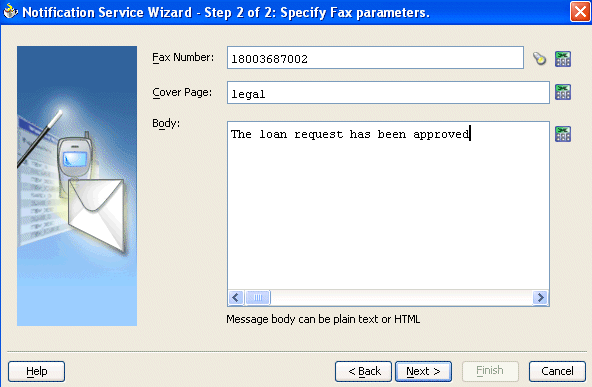
Enter information for each field as described in Table 15-6.
Table 15-6 Fax Notification Parameters
| Name | Description |
|---|---|
|
Fax Number |
The fax number to which the message is to be delivered. This can be a) a static fax number entered at the time the message is created, or b) a fax number looked up using the identity service, or c) a dynamic fax number from the payload. The XPath Expression Builder can be used to get the dynamic fax number from the input. |
|
Cover Page |
The cover page name. The cover page details must exist on the server. The cover page can be in PDF, Microsoft Word, HTML, or plain text format. (This field is optional.) The XPath Expression Builder can be used to set dynamic text based on data from process variables that you specify. Dynamic data is automatically enclosed in < |
|
Body |
Fax message body. This must be plain text or HTML. This can be free text or dynamic text as described for the Cover page parameter. |
Click Next, then Finish.
The BPEL fragment that invokes the notification service for fax notification is created.
To add cover pages for a fax, you must edit the Oracle_Home\integration\orabpel\system\services\config\ns_faxcoverpages.xml. Use the cover page name to specify the cover page in the fax message.
<FaxCoverPages xmlns="http://xmlns.oracle.com/ias/pcbpel/NotificationService">
  <FaxCoverPage>
     <Name>legal</Name>
     <MimeType>application/pdf</MimeType>
<FileLocation>C:\orabpel\integration\bpm\runtime\config\faxcoverpages\003288.pdf</FileLocation>
  </FaxCoverPage>
</FaxCoverPages>
As with the voice notification channel, the configuration for the wireless service provider for fax is stored in the XML file ns_iaswconfig.xml, which is in
Oracle_Home\integration\orabpel\system\services\config
See "Configuring the Wireless Service Provider for Voice" to configure a wireless service provider for fax. Note that you cannot use the Oracle Enterprise Manager 10g Application Server Control Console to configure a fax provider for this release.
When you select Pager for the notification channel, the Notification Service Wizard - Step 2 of 2: Specify Pager Parameters window appears. Figure 15-7 shows the required pager notification parameters.
Figure 15-7 Notification Service Wizard - Step 2 of 2: Specify Pager Parameters window
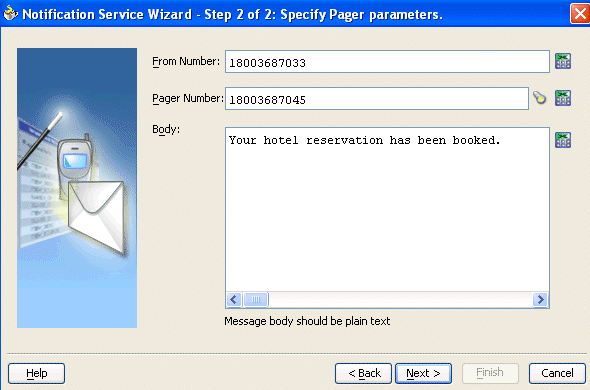
Enter information for each field as described in Table 15-7.
Table 15-7 Pager Notification Parameters
| Name | Description |
|---|---|
|
From Number |
The pager number from which the message is to be sent. This can be a) a static pager number entered at the time the message is created, or b) a dynamic pager number from the payload. The XPath Expression Builder can be used to get the dynamic pager number from the input. |
|
Pager Number |
The number of the recipient of this message. This can be a) a static pager number entered at the time the message is created, or b) a pager number looked up using the identity service, or c) a dynamic pager number from the payload. The XPath Expression Builder can be used to get the dynamic pager number from the input. |
|
Body |
Pager message body. This must be plain text. This can be free text or dynamic text as described for the From Number parameter. |
Click Next, then Finish.
The BPEL fragment that invokes the notification service for pager notification is created.
As with the voice notification channel, the configuration for the wireless service provider for pager is stored in the XML file ns_iaswconfig.xml, which is in
Oracle_Home\integration\orabpel\system\services\config
See "Configuring the Wireless Service Provider for Voice" to configure a wireless service provider for pager. Note that you cannot use the Oracle Enterprise Manager 10g Application Server Control Console to configure a pager provider for this release.
You may need to set e-mail addresses or telephone numbers dynamically based on certain process variables. You can also look up contact information for a specific user using the built-in XPath functions for the identity service.
To get the e-mail address or telephone number directly from the payload, use the following XPath:
bpws:getVariableData('<variable name>', '<part>','<input xpath to get an address>')
For example, to get the e-mail address from variable inputVariable and part payload based on XPath /client/BPELProcessRequest/client/mail:
<%bpws:getVariableData('inputVariable','payload','/client:BPELProcessRequest/client:email')%>
You can use the XPath Expression Builder to select the function and enter the XPath expression to get an address from the input variable.
To get the e-mail address or telephone number dynamically from the payload, use the following XPath:
ora:getUserProperty(userID, propertyName)
The first argument evaluates to the user ID. The second argument is the property name. Table 15-8 lists the property names that can be used in this XPath function.
Table 15-8 Properties for the Dynamic User XPath Function
| Property Name | Description |
|---|---|
|
|
Look up a user's e-mail address |
|
|
Look up a user's telephone number |
|
|
Look up a user's mobile telephone number |
|
|
Look up a user's home telephone number |
The following example gets the e-mail address of the user identified by the variable inputVariable, part payload, and query /client:BPELProcessRequest/client:userID:
ora:getUserProperty(bpws:getVariableData('inputVariable', 'payload','/client:BPELProcessRequest/client:userid'), 'mail')
You can select users or groups to whom you want to send notifications by browsing the user directory (OID, JAZN/XML, LDAP, and so on) that is configured for use by Oracle BPEL Process Manager. Click the first icon (the flashlight) to the right of To (or any recipient field) on any assignee window to start the Identity lookup dialog. See "Selecting Users or Groups by Browsing the User Directory" for more information on the Identity lookup dialog.
You use the e-mail activation agent element activationAgents to start business processes by e-mail. The following steps are required to design a business process to start by e-mail.
Create a business process.
Add the e-mail activation agent activationAgents element to bpel.xml.
Include a corresponding account name configuration file in the project.
Name the file the same as the name of the accountName attribute of activationAgents in bpel.xml. See "The accountName XML File Structure".
Table 15-9 describes the activationAgents element and activationAgent attributes of the activation fragment contained in the bpel.xml file.
Table 15-9 E-mail Activation Element and Respective Attributes in bpel.xml
| Element/Attribute Name | Description |
|---|---|
|
|
Name of the activation agent class. Use the |
|
|
Polling interval of the messages in seconds |
|
|
Name of the e-mail configuration file. For example, if the account name is |
The activationAgents Element Structure in bpel.xml
The following code example shows the structure of the activationAgents element contained in bpel.xml.
<activationAgents>
  <activationAgent

className="com.collaxa.cube.activation.mail.MailActivationAgent"
      heartBeatInterval="60">
     <property name="accountName">test_account</property>
  </activationAgent>
</activationAgents>
The accountName XML File Structure
The following code example shows the structure of the accountName XML file.
<mailAccount xmlns="http://services.oracle.com/bpel/mail/account">
   <userInfo>
         <displayName>[display name]</displayName>
         <organization>[organization name]</organization>
         <replyTo>[replyTo email address]</replyTo>
   </userInfo>

   <outgoingServer>
         <protocol>smtp</protocol>
         <host>[outgoing smtp server]</host>
         <authenticationRequired>false</authenticationRequired>
   </outgoingServer>

   <incomingServer>
         <protocol>pop3</protocol>
         <host>[incoming pop3 server]</host>
         <email>[pop user name]</email>
         <password>[plain text email password]</password>
   </incomingServer>

   <!-- IMAP server config -->
   <!--
    <incomingServer>
        <protocol>imap</protocol>
        <host>[incoming imap server]</host>
        <email>[imap user name]</email>
        <password>[plain text email password]</password>
        <folderName>InBox</folderName>
    </incomingServer>
    -->

</mailAccount>
If you set the validateXML property to true (the default is false) on the Manage BPEL Domain window of Oracle BPEL Console, each message exchanged with each of the Web services is validated against its schema. However, notification services fail during XML validity checks at run time. This is because the BPEL variables exchanged with the notification service are not completely initialized in the BPEL process. Part of the initialization happens in the service itself.