Release 9.2 for Windows
Part Number A92157-01
Home |
Book List |
Contents |
Index |
 Master Index |
 Feedback |
| SQL*Plus Getting Started Release 9.2 for Windows Part Number A92157-01 |
|
This chapter explains how to start and use SQL*Plus from both the command-line interface and the graphical user interface, and describes the graphical user interface menu options. It also describes how to use and configure the iSQL*Plus Extension for Windows.
Specific topics discussed are:
The SQL*Plus command-line interface is standard on all operating systems.
If you are connecting to a remote Oracle database, make sure your Oracle Net software is installed and working properly. For more information, see the Oracle9i Net Services Administrator's Guide and the Oracle9i Database Administrator's Guide for Windows.
To start the SQL*Plus command-line interface:
C:\> SQLPLUS
You can optionally include your login username and password separated by a slash (/), and a remote database name to connect to, for example:
C:\> SQLPLUS username/password@connect_identifier
Otherwise you will be prompted to enter your username and password.
The rules for interpreting arguments in Windows commands are:
The following SET MARKUP command illustrates white space to separate arguments, the single string argument for HEAD surrounded by single quotes, and the escaped double quotes around Employees so that the characters are printed and not interpreted as string delimiters.
SET MARKUP HTML HEAD '<TITLE>Annual Report "Employees"</TITLE>'
For more information about SQL*Plus command-line arguments, see the SQL*Plus User's Guide and Reference.
You can use the Windows Command Prompt Properties dialog to set the font and font size used in the SQL*Plus command-line interface.
For more information about changing Windows Command Prompt properties, see Windows Help or click Help in the Command Prompt Properties dialog. For information about changing font face and size in the Windows Graphical User Interface (GUI), see "Changing the GUI Font and Font Size" later in this chapter.
To check if a font contains a particular character, for example, the Euro sign, enter the character's decimal number equivalent in the SQL*Plus command-line interface. For example, the decimal number equivalent for the Euro sign is 128, so you would enter Alt+0128 (hold Alt while pressing 0, 1, 2 and 8) to display it. If it appears correctly, the font contains the Euro sign, otherwise you need to try another font.
You can use the Windows Character Map utility to view the characters available in a font. Character Map also shows the decimal number equivalent for extended ASCII characters. You access the Character Map utility by selecting Start, Programs, Accessories and then clicking Character Map.
While the command-line interface is a standard feature of SQL*Plus on all operating system platforms, the graphical user interface is a feature of SQL*Plus only available in Windows. The Windows Graphical User Interface will be obsoleted in favor of the iSQL*Plus browser-based user interface in future releases of SQL*Plus.
If you are connecting to a remote Oracle database, make sure your Oracle Net software is installed and working properly. For more information, see the Oracle9i Net Services Administrator's Guide and the Oracle9i Database Administrator's Guide for Windows.
The graphical user interface can be started from the Windows menus, or from a Windows command prompt.
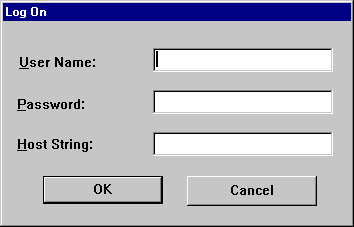
The SQL*Plus window appears displaying the Log On dialog.

Text description of the illustration logon.gif
Enter a valid user name and password. If you are connecting to a remote Oracle database, enter the Oracle Net connect_identifier in the Host String field. To connect to the default database, leave the Host String field blank. See the Oracle9i Net Services Administrator's Guide for more information about configuring and using Oracle Net connect_identifiers.
C:\> SQLPLUSW
The SQL*Plus graphical user interface starts. The -LOGON option is not supported in the Windows GUI. You can optionally include your login username and password separated by a slash (/), and a remote database to connect to, for example:
C:\> SQLPLUSW username/password@connect_identifier
Otherwise enter the required information in the login dialog as described earlier. The Oracle SQL*Plus application window appears.

SQL*Plus displays the SQL command prompt in the application window.
To enter SQL and SQL*Plus commands, type each command at the SQL*Plus command prompt and press Enter.
You can use the mouse buttons to copy text from anywhere in the SQL*Plus interface to the SQL*Plus prompt in the same interface.
To copy text, select the text by clicking and dragging with the left mouse button. While still holding down the left mouse button, click the right mouse button. SQL*Plus copies the selected text to the SQL*Plus prompt.
The following command keys have special functions in SQL*Plus:
This section describes menus in the SQL*Plus graphical user interface (GUI). Bracketed entries show keyboard shortcuts to that File Menu command. The rightmost column shows the equivalent command-line interface command where applicable.
The File menu has the following options:
The Edit menu has the following options:
The Search menu has the following options:
The Options menu has the following options:
| Option | Description of Options Menu Option | Command-line |
|---|---|---|
|
Environment |
The Environment option enables you to set system variables to alter the SQL*Plus environment for your current session. This dialog has three areas: Set Options, Value, and Screen Buffer. Note: See "Setting Options and Values Using the Environment Dialog" for examples of how these controls interact. |
|
|
This area has a list of variables you can select to establish aspects of the SQL*Plus environment for your current session, such as:
See the "Command Reference" chapter in the SQL*Plus User's Guide and Reference for descriptions of each system variable in the SET command. |
SET variable value |
|
|
The Value area has four options: Default, Custom, On, and Off. Note: When Custom is selected, the On and Off buttons and the text field may or may not be enabled for user selection. The availability of these fields depends on the item selected in the Set Option. |
SET variable value |
|
|
This area has two text boxes: Buffer Width and Buffer Length. |
SET variable value |
|
|
||
|
Notes: When you change the Screen Buffer option, SQL*Plus displays a dialog to alert you that if you shorten the size of your screen buffer, some data may not be displayed on your screen. Click OK to proceed. |
||
|
If you use SET MARKUP to send output to a HTML table, the number of lines specified in the Buffer Length variable specifies the number of HTML table rows. Each HTML table row may contain more than one text line. |
The Help menu has the following option:
| Option | Description of Help Menu Option | Command-line |
|---|---|---|
|
About SQL*Plus |
Displays the SQL*Plus version number and copyright information. You access SQL*Plus help from the SQL*Plus prompt. See "Accessing SQL*Plus Help". |
not applicable |
Choose Environment from the Options menu to display the Environment dialog which you can use to create a SQL environment statement for the current session.
Choose an item from the Set Options list to begin. You can use the default settings, or you can customize the settings by using the other dialog controls. The available controls vary with the options you choose. You can make multiple changes to options and values. When the text box is available, you can enter appropriate text or appropriate numeric values. Click OK to commit your settings.
|
Note: Options introduced in SQL*Plus Release 8.1 can only be accessed through the command-line and are not available in the SQL*Plus for Windows Environment dialog. These options are: SET SQLPLUSCOMPATIBILITY {ON|OFF} See "Command Reference" in the SQL*Plus User's Guide and Reference for descriptions of these SET commands. |
The ARRAYSIZE is set to 15, the default value.

Text description of the illustration 32.gif
There are three registry entries that set the font and font size used in the SQL*Plus Windows GUI. SQLPLUS_FONT sets the font face, and SQLPLUS_FONT_SIZE sets the font size in pixels. For Windows NT/98, SQLPLUS_FONT_CHARSET sets the font subset to use. If not set, the default font subset is used. It may be important to set the SQLPLUS_FONT_CHARSET registry entry particularly when specifying a font to support a national language. Not all font subsets may contain the characters you expect or want to make available.
You use the Windows Registry Editor to create these three registry entries and define values for them. Ensure that you create the correct entries in uppercase, and that the values (font names, sizes, subset names) you enter are correct. If you enter an incorrect name, the default font Fixedsys, and size 16, are used. If you enter an incorrect font subset name, the default subset is used.
You can choose any fixed-pitch TrueType font available in your Windows system such as Courier New or Lucida Console. If you choose a proportional pitch font such as Arial or Times New Roman, or if you enter an unavailable font, the registry entry is ignored and the default font and size, Fixedsys 16, are used. If you choose an unavailable font size, the default font size, 16, is used. If you choose an unavailable font subset, the default subset for the selected font is used.
If you do not create the SQLPLUS_FONT registry entry, or if you do not specify a value for SQLPLUS_FONT, the default font and size, Fixedsys 16, are used.
If you want to use particular characters, such as the Euro sign, you should make sure that the fixed pitch font you choose contains those characters.
regedit in the Open field.or
Enter SQLPLUS_FONT_SIZE as the name of the new font size string value. If you miskey the name or inadvertently enter it in mixed or lower case, you can edit the name by selecting Rename from the Edit menu.
or
Enter SQLPLUS_FONT_CHARSET as the name of the new font subset string value. If you miskey the name or inadvertently enter it in mixed or lower case, you can edit the name by selecting Rename from the Edit menu.
or
Enter the font size you want to use in pixels, such as 14, in the Value Data: field. SQL*Plus will use the new font size the next time you start a SQL*Plus Windows GUI. The size must be a size that exists on the client machine for the specified font)
or
For Windows NT/98, enter the font subset you want to use, such as TURKISH, in the Value Data: field. SQL*Plus will use the new font subset the next time you start a SQL*Plus Windows GUI. While there may be other font subsets available if you have installed additional fonts, the following valid values for SQLPLUS_FONT_CHARSET are available:
DEFAULT
SYMBOL
SHIFTJIS
HANGEUL
GB2312
CHINESEBIG5
OEM
JOHAB
HEBREW
ARABIC
GREEK
TURKISH
VIETNAMESE
THAI
EASTEUROPE
RUSSIAN
MAC
BALTIC
To check if a font contains a particular character such as the Euro sign, enter the character's decimal number equivalent in the SQL*Plus Windows GUI. For example, the decimal number equivalent for the Euro sign is 128, so you would enter Alt+0128 (hold Alt while pressing 0, 1, 2 and 8) to display it. If it appears correctly, the font contains the Euro sign, otherwise you need to try another font.
You can also use the Windows Character Map accessory to view the characters available in a font. Character Map also shows the decimal number equivalent for extended ASCII characters. You access the Character Map accessory by selecting Start, Programs, Accessories and then Character Map.
You enter EXIT or QUIT at the SQL*Plus prompt to exit SQL*Plus from the command-line interface or from the GUI.
You return to the Windows Command Prompt when you exit either the command-line interface, or the GUI if you started it from the command-line with SQLPLUSW.
Click Exit from the File menu to exit from the GUI. The GUI closes and you return to Windows when you exit SQL*Plus from the GUI.
The iSQL*Plus Extension for Windows provides a context menu to load or execute local SQL scripts in iSQL*Plus. The iSQL*Plus Extension for Windows works with .SQL files and is activated by right clicking a .SQL file in Windows Explorer.
The utility is installed during Oracle9i Database and Oracle9i Client for Windows installations. After installation, you can configure access to one or more iSQL*Plus Servers. For more information about the iSQL*Plus User Interface, see the SQL*Plus User's Guide and Reference.
After you have configured an iSQL*Plus Server, you can use the context menu to:
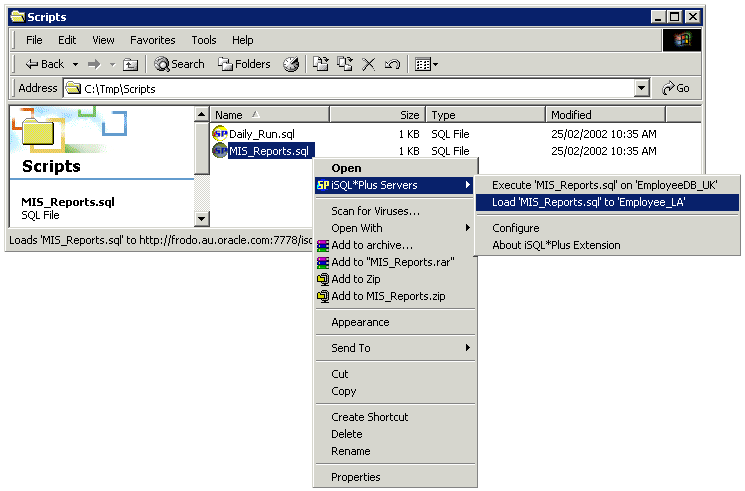
The following shows a typical view of the context menu with iSQL*Plus Servers configured.

Text description of the illustration isenew.gif
The highlighted iSQL*Plus Server is configured to start iSQL*Plus in a browser and load MIS_Reports.sql into the Input area of the iSQL*Plus Server named Employee_LA.
The iSQL*Plus Extension for Windows is accessed through extended menus in Windows platforms. The iSQL*Plus Extension for Windows extended menu is accessed by right clicking files with the .SQL file extension.
If you have installed the Oracle9i Server, iSQL*Plus Server entries for your Oracle HTTP Server are created by default. If you have installed the Oracle9i Client, no iSQL*Plus Server entries are created. You can use the Configuration dialog to configure the available iSQL*Plus Servers that you want.
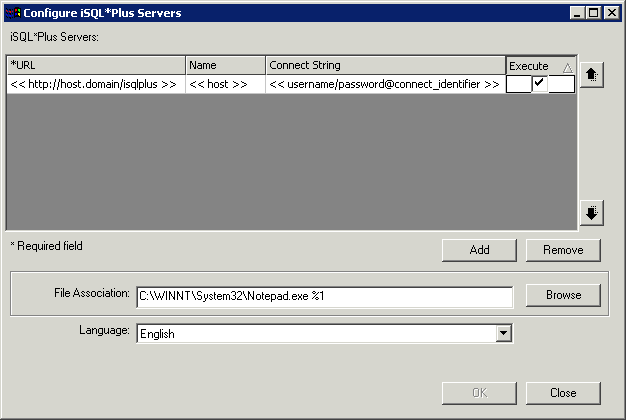
Open the Configuration dialog by right clicking a .SQL file in Windows Explorer, then select iSQL*Plus Servers, and then Configure. The Configure iSQL*Plus Servers dialog is displayed.
When the column is narrower than the field it contains, tool tips show the full text in the field, but to edit or copy a field, make sure that the column width is wide enough to display the full field. You can widen the column by selecting and dragging the heading column separator.
You can sort the list of iSQL*Plus Servers in ascending or descending field name order by clicking the field name column heading. You can also manually sort the server definitions by using the up and down arrow buttons on the right side of the list of iSQL*Plus Servers.

Text description of the illustration iseconf.gif
Enter a valid iSQL*Plus Server URL in the form:
http://host.domain/isqlplus
This field is mandatory.
Enter a name for this iSQL*Plus Server. The name, if entered, is used in the context menu, otherwise the full iSQL*Plus Server URL is used.
Enter a connect string to specify your username and password and the database you want to connect to. If you omit a username and password you are prompted for them when iSQL*Plus starts. If you omit a database connection identifier or Oracle Net alias, you are connected to the default database.
Clear the Execute checkbox to change the action performed on the selected file. The default action is Execute, the alternative is Load. Execute runs the selected file in the iSQL*Plus Server and displays the results in your browser. Load opens the iSQL*Plus Server and loads the selected file into the Input area.
Click Add to add a new iSQL*Plus Server.
Click Remove to delete a selected iSQL*Plus Server definition.
Enter a path and arguments for the application you want to associate with the .SQL file extension when you double click. The default application is Windows Notepad. This definition does not affect the iSQL*Plus Server definitions.
Click Browse to find an application you want to associate with the .SQL file extension when you double click.
Select a language you want to use in the iSQL*Plus Extension from the Language box:
Brazilian Portuguese
English
French/Canadian French
German
Italian
Japanese
Korean
Simplified Chinese
Spanish/LA Spanish
Traditional Chinese
This language setting only affects the iSQL*Plus Extension, not iSQL*Plus.
Click OK to save your changes and close the Configure iSQL*Plus Servers dialog.
Click Cancel to quit your changes and close the Configure iSQL*Plus Servers dialog. You are prompted once more before your changes are lost.
When you first open the Configure iSQL*Plus Servers dialog, the OK button is unavailable and the Cancel button is labelled Close. Once you make changes, OK is enabled and Close is renamed Cancel.
You must configure at least one iSQL*Plus Server before you can use the iSQL*Plus Extension. To add an iSQL*Plus Server, perform the following steps:
URL: << http://host.domain/isqlplus >>
Name: << host >>
Connect String: << username/password@connect_identifier >>
You must enter a URL for your iSQL*Plus Server, the other fields are optional. This may be different if iSQL*Plus Servers have been configured during an Oracle9i Server installation.
The new iSQL*Plus Server Name appears in the context menu. When you select a server from the context menu, the full iSQL*Plus Server URL is shown in the status bar.
To modify an iSQL*Plus Server, perform the following steps:
The modified iSQL*Plus Server name appears in the context menu.
Select the server you wish to remove from the list of available servers. The server's details will appear in the following text boxes. Click the Remove button to remove it from the list of available servers.
To remove an iSQL*Plus Server, perform the following steps:
The iSQL*Plus Server is removed from the context menu.
|
 Copyright © 1996, 2002 Oracle Corporation. All Rights Reserved. |
|