|
Oracle® Reports Tutorial
10g Release 2 (10.1.2) B14364-01 |
|
 Previous |
 Next |
|
Oracle® Reports Tutorial
10g Release 2 (10.1.2) B14364-01 |
|
 Previous |
 Next |
Estimated completion time: 5 minutes
In Chapter 2, "Adding Data to a Report", you added a data model to your Web page. Here, we show the relationship between the entries you made in the wizard and the data model you created, as well as the JSP and XML code.
You will also examine the custom JSP tags that Reports Builder inserted into your JSP. These custom JSP tags enable Oracle Reports to add the data you have chosen in the Data Wizard to the JSP-based Web report.
To view the Web source of your report in Reports Builder
Make sure the report emprev_your initials.jsp is open in Reports Builder.
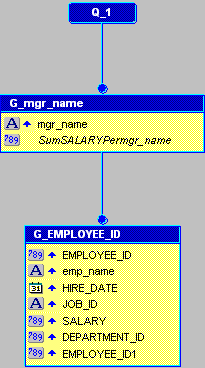
In the Object Navigator, double-click the Data Model node to display the data model for this report. Your data model should look like this:
Figure 3-1 Data Model View for the Report

In the Data Model view, click the Web Source button in the toolbar.
|
Note: You can also double-click the Web Source icon under the report name in the Object Navigator. |
The source code displays in the Web Source view. Scroll through the code and note the following items:
The @ taglib line references the reports JSP library for all tags starting with rw. The <%...%> tags mark JSP-relevant tags, and point to the JSP Custom Tag Library.
Notice the opening rw:report tag and the opening and closing rw:objects tags.
The rw:report tag appears after the library call. In a report, all Reports Builder JSP tags must appear between an opening and closing rw:report tag. If the closing rw:report tag comes before the data is used, the report will be empty.
The rw:objects tags appear in the Web Source. Note that you do not see any text between the opening and closing tags. When you save the report to your file system, Reports Builder encodes the data model and other elements in a language called XML, and places the data model between these tags. Reports Builder hides the XML code between these tags to maintain XML integrity.
|
Note: Unless you are comfortable using XML and JSPs, it is recommended that you do not type anything between the(rw:objects) tags in this view.
|
If you have gone through this chapter and are still not sure whether your JSP is correct, open the emprev.jsp file. This file is located in the tutorial examples directory you created.
Congratulations! You have finished reviewing the data you added to your Web report in Chapter 2, "Adding Data to a Report". You now know how to view the source code in the Reports Builder Web Source view and have learned about these Oracle Reports custom JSP tags:
rw:report
rw:object
Continue to Chapter 4, "Creating a Report Block for the Web Report" to add a report block and finish your Web report.
For more information on Oracle Reports JSP tags, see the Oracle Reports online Help.