|
Oracle® Application Server Web Cache Administrator's Guide
10g Release 2 (10.1.2) B14046-04 |
|
 Previous |
 Next |
|
Oracle® Application Server Web Cache Administrator's Guide
10g Release 2 (10.1.2) B14046-04 |
|
 Previous |
 Next |
This chapter introduces the various administration tools of OracleAS Web Cache. It discusses the main administration applications and tells you how to launch it and navigate through it. It also introduces the command line tool.
This chapter contains these topics:
Oracle offers the following options for managing OracleAS Web Cache within an Oracle Application Server installation:
Managing OracleAS Web Cache with Oracle Enterprise Manager 10g Application Server Control Console
Managing Processes with Oracle Process Manager and Notification (OPMN)
|
See Also:
|
Oracle Enterprise Manager 10g Application Server Control Console (Application Server Control Console) enables you to manage Oracle Application Server components, including OracleAS Web Cache.
Application Server Control Console enables you to manage an Oracle Application Server instance. From the Application Server Control Console, you can configure OracleAS Web Cache, monitor cache and origin server status, and perform operational tasks, such as starting and stopping the cache, invalidate content, propagate configuration among cache cluster members, and manage log files.
Application Server Control is installed with every instance of Oracle Application Server. As a result, you can immediately begin managing your application server and its components from your Web browser.
To view the OracleAS Web Cache pages:
Display the Oracle Application Server Welcome Page by entering the following URL in your Web browser:
http://hostname.domain:port
For example, if you installed Oracle Application Server on a host called sys42, you would enter the following address in your Web browser:
http://sys42.acme.com:7777
|
Note: The default port for Oracle HTTP Server (and, as a result, the Welcome page) is described in the text file (setupinfo.txt) that is generated and displayed at the end of the Oracle Application Server installation. This file is located in $ORACLE_HOME/install on UNIX and ORACLE_HOME\install on Windows.
|
Click Log on to the Oracle Enterprise Manager 10g Application Server Control Console.
Enterprise Manager displays the administrator logon dialog box.
Enter the Oracle Application Server administrator user name and password and click OK.
The user name for the administrator user is ias_admin. The password is the one you supplied during the installation of Oracle Application Server.
From the System Components table in the Application Server home page, click Web Cache.
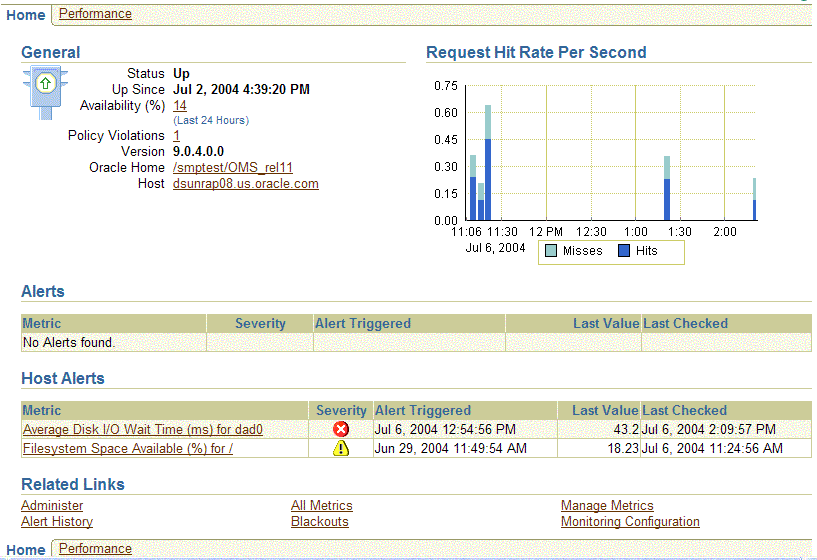
The Web Cache Home page (Figure 6-1) appears.
Table 6-1 describes the main OracleAS Web Cache pages in the Application Server Control Console.
Table 6-1 Application Server Control Console Tabbed Pages for Managing OracleAS Web Cache
| Enterprise Manager Web Cache Page | Description |
|---|---|
|
Use this home page to monitor OracleAS Web Cache and its activity. See Also: "Using the Web Cache Home Page" |
|
|
Use this page to monitor the efficiency of the cache. See Also: "Using the Web Cache Performance Page" |
|
|
Use this page to perform configuration and administrative actions. |
From the Web Cache Home page (Figure 6-1), you can start and stop the cache, monitor the overall performance of the server, and monitor the activity level of the cache.
Figure 6-1 Application Server Control Console: Web Cache Home Page

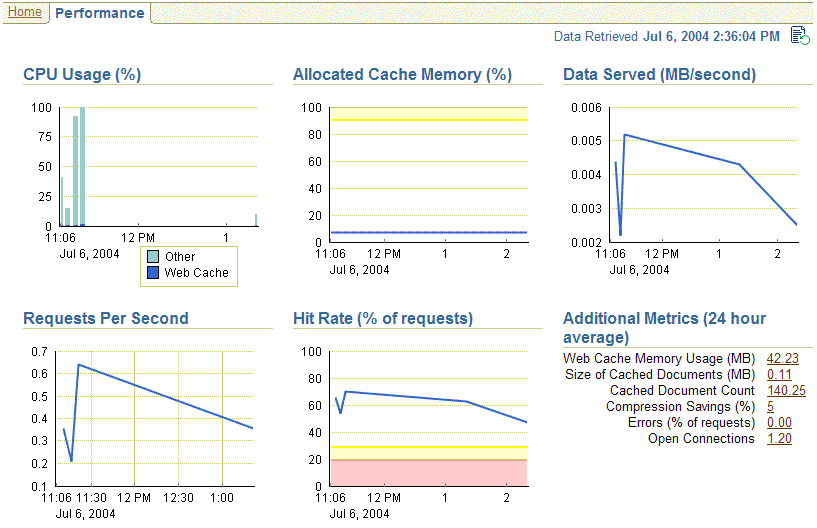
From the Web Cache Performance page (Figure 6-2), you can monitor the efficiency of the cache. Specifically, you can view the high-level metrics you are interested in viewing: requests served in the Requests section, cache hits and misses in the Hits and Misses sections, compression performance in the Compression sections, and errors in the Errors section.
Figure 6-2 Application Server Control Console: Web Cache Performance Page

From the Web Cache Administration page (Figure 6-3), you can configure basic and advanced configuration functions to be stored in configuration file webcache.xml. The Web Cache Administration page contains links to property pages for editing this configuration file.
Figure 6-3 Application Server Control Console: Web Cache Administration Page

The page contains links for the following major categories:
Operations: This category contains pages that enable you to:
Invalidate objects in the cache
Roll over log files
Cluster Properties: This category contains pages that enable you to:
Configure a cache cluster
Check the status of the cache cluster members and perform operations on the current cache and other cluster members.
Properties: Application: This category contains pages that enable you to:
Specify origin servers
Configure settings for sites, including site definitions and mappings to origin servers, session binding, and error pages
Configure session definitions
Configure caching rules
Properties: Web Cache: This category contains pages that enable you to:
Configure OracleAS Web Cache listening ports and operation ports for administration, statistics, and invalidation requests
Configure security settings, such as usernames and passwords for administrators and invalidation users, and the process identity for OracleAS Web Cache processes
Specify the size of the cache and the number of connections and network time-outs
Specify settings for the auto-restart mechanism
Configure event and access logging settings
Configure diagnostic information
Configure end-user performance monitoring
You can click Help at the top of the page to get more information. In most cases, the Help window displays a help topic about the current page. Click Help Contents in the Help window to browse the list of help topics or to search for a particular word or phrase.
Oracle Enterprise Manager 10g Grid Control is installed separately from the Oracle Enterprise Manager 10g installation CD-ROM. The Grid Control Console provides a wider view of your network so you can manage multiple Oracle Application Server instances. In addition, the Grid Control Console provides a robust feature set designed to help you manage all aspects of your enterprise, including your Oracle databases, hosts, listeners, and other components.
The Grid Control Console enables you to view historical metrics for multiple Oracle Application Server targets. For OracleAS Web Cache, use the Grid Control Console to view the overall status of OracleAS Web Cache and view OracleAS Web Cache performance metrics. Based on the metric data, you can make changes to the configuration with Grid Control Console.
To view the OracleAS Web Cache pages:
Log in to the Grid Control Console by entering the following URL in your Web browser:
http://grid_control_hostname.domain:port/em
If you are uncertain about the port number, you can refer to one of the following files:
ORACLE_HOME/install/setupinfo.txt, which includes information displayed by the Oracle Universal Installer at the end of the Grid Control install
ORACLE_HOME/install/portlist.ini on the Management Service host
When the Grid Control login page appears, enter the username and password for the Super administrator SYSMAN account, which you defined during the Grid Control installation.
The Grid Control Console Home page appears.
From the Target Search section, select Web Cache from the Search list, and then click Go to display the OracleAS Web Cache targets.
Enterprise Manager displays the the list of caches in the enterprise.
Select the cache you want to monitor.
The Web Cache Home page (Figure 6-4) appears.
Table 6-2 describes the main OracleAS Web Cache pages in the Grid Control Console.
Table 6-2 Grid Control Console Tabbed Pages for Managing Oracle Application Server
| Enterprise Manager Web Cache Page | Description |
|---|---|
|
Use this page to gather overall status for the cache, such as its running status, availability, basic configuration settings, and hit rate. See Also: "Using the Grid Control Console: Web Cache Home Page" |
|
|
Use this page to monitor the efficiency statistics of the cache. See Also: "Using the Grid Control Console: Web Cache Home Page" |
From the Web Cache Home page (Figure 6-4), you can start and stop the cache, monitor the overall performance of the server, and monitor the hit rate of the cache.
Figure 6-4 Grid Control Console: Web Cache Home Page

From the Web Cache Performance page (Figure 6-5), you can view metrics related to the efficiency of the cache:
CPU used by the cache
Amount of data memory allocated for cache storage and operation
Data served by the cache
Client requests for data
Percentage of requests which are served by cached content
You can also drill down to specific metrics dealing with data in the cache, including:
Data stored in the cache
Origin server usage by the cache
Cached content served by the cache
Error pages served by the cache
Invalidation requests to cache and results
Figure 6-5 Grid Control Console: Web Cache Performance Page

You can click Help at the top of the page to get more information. In most cases, the Help window displays a help topic about the current page. Click Help Contents in the Help window to browse the list of help topics or to search for a particular word or phrase.
Oracle Process Manager and Notification (OPMN) Server manages Oracle Application Server processes, including Oracle HTTP Server, OC4J, and OracleAS Web Cache processes, and channels all notifications from different components instances to all interested in receiving them.
With OPMN, you can administer the OracleAS Web Cache processes, including the admin server process and cache server process:
The executable used for managing these process is webcached, which resides in $ORACLE_HOME/webcache directory on UNIX and the ORACLE_HOME\bin directory on Windows.
In addition, if auto-restart is enabled for the cache, OPMN monitors the cache server process. If the cache server process fails, OPMN restarts the process. The executable used for managing auto-restart is webcachemon, which resides in $ORACLE_HOME/webcache directory on UNIX and the ORACLE_HOME\bin directory on Windows.
To use OPMN, you use the opmnctl utility. First, you must start OPMN, using the following command:
opmnctl start
Then, you use OPMN to control OracleAS Web Cache. The following shows the format of the opmnctl commands:
opmnctl command [parameter=value] [parameter=value]
Table 6-3 shows the commands of the opmnctl utility that are applicable to OracleAS Web Cache.
Table 6-3 Commands of the opmnctl Utility
| Command | Description |
|---|---|
|
Starts the specified process or component. |
|
|
Stops the specified process or component. If used to stop the cache server process, this command also clears the cache of all content and all statistics. It waits for all currently accepted requests to be served, or until the user-specified timeout, before stopping the cache. To stop the specified process immediately, use the |
|
|
Stops, then restarts the specified process or component. |
|
|
Starts all processes controlled by OPMN. |
|
|
Stops all processes controlled by OPMN. |
|
|
Shows the status of the processes controlled by OPMN. For more information about the options for the status command, at the command line, enter: opmnctl status -help |
Table 6-4 shows the parameters for the opmnctl utility. It also shows the valid values that are applicable for OracleAS Web Cache. Unless otherwise noted, you can use any parameter with any command, except for status, listed in Table 6-3.
Table 6-4 Parameters for the opmnctl Utility
| Parameter | Valid Values | Description |
|---|---|---|
|
|
|
Takes the specified action for the OracleAS Web Cache
You must always specify this parameter to administer any OracleAS Web Cache process. |
|
|
|
Takes the specified action for the process specified in the value:
The parameter
|
|
|
|
Used only with the During an normal shutdown, OracleAS Web Cache does not accept any new connections, but it satisfies the request for connections that were made before receiving the During an abort shutdown, OracleAS Web Cache does not accept any new connections. In addition, it drops all existing connections, even if the requests have not been satisfied. Then, the cache shuts down. The parameter |
|
|
Enables OracleAS Web Cache to produce a core dump. The parameter If OracleAS Web Cache generates a |
The opmn executable is located in the $ORACLE_HOME/opmn/bin directory on UNIX and the ORACLE_HOME\bin directory on Windows.
|
Note: If you are running OracleAS Web Cache in a standalone environment (that is, you installed OracleAS Web Cache from a kit that included only this product; you did not install OracleAS Web Cache as part of an Oracle Application Server installation), you must use thewebcachectl utility to administer OracleAS Web Cache processes.
See Appendix B for information on using the |
|
See Also:
|
If you installed OracleAS Web Cache from a kit that included only this product or you did not install OracleAS Web Cache as part of an Oracle Application Server installation), then you must use the following standalone tools:
OracleAS Web Cache Manager is a graphical user interface tool that combines configuration and monitoring options to provide an integrated environment for configuring and managing OracleAS Web Cache and the Web sites for which it caches content. With OracleAS Web Cache Manager, you can easily:
Start, stop, and restart OracleAS Web Cache
Administer invalidation or rollover log files
Monitor performance and requests
Configure general properties of the cache
Configure log settings
Configure listening and operation port settings
Configure origin server settings
Configure site-specific settings
Configure caching rules
Associate caching rules with URLs
This section introduces you to the features of OracleAS Web Cache Manager. However, the primary documentation for using OracleAS Web Cache Manager is the accompanying online help. This section contains these topics:
To start OracleAS Web Cache Manager:
Start the admin server process with the following command:
opmnctl startproc ias-component=WebCache process-type=WebCacheAdmin
|
See Also: "Managing Processes with Oracle Process Manager and Notification (OPMN)" for information about theopmnctl command
|
Point your browser to the following URL:
http://web_cache_hostname:web_cache_port/webcacheadmin
By default, OracleAS Web Cache listens for administrative requests on port 9400. If this port is in use, the installation procedure attempts to assign other port numbers from a range from 9400 to 9499.
Enter either the Enterprise Manager user name, ias_admin, or the OracleAS Web Cache administrator user name, administrator and password.
The password is the one you supplied during the installation.
Note that changing the password for ias_admin through Enterprise Manager has no effect on the password for the OracleAS Web Cache.
|
Note: You can also point your browser tohttp://web_cache_hostname:web_cache_port to link to OracleAS Web Cache Manager, information about examples, user documentation, and the Oracle Technology Network.
|
|
See Also:
|
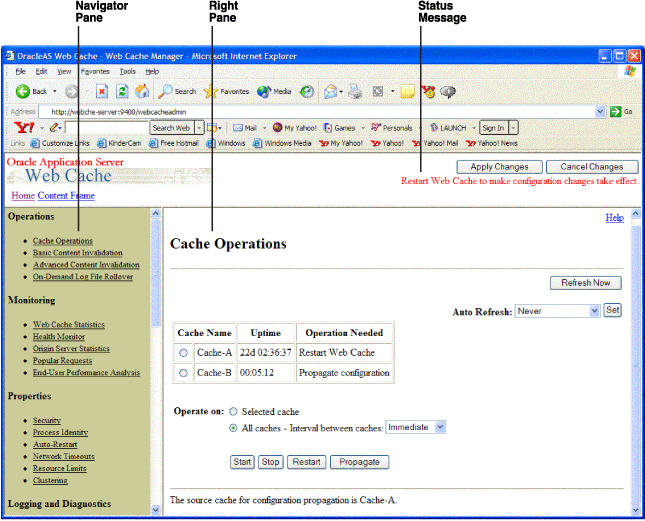
The OracleAS Web Cache Manager interface includes:
Top frame containing Apply Changes and Cancel Changes buttons and OracleAS Web Cache status message
Navigator frame with configuration and monitoring menu items
Right frame with property sheet for selected menu item
Figure 6-6 shows the OracleAS Web Cache Manager interface.
Figure 6-6 OracleAS Web Cache Manager Interface

The Apply Changes button applies submitted static and dynamic configuration changes to OracleAS Web Cache; the Cancel Changes button cancels submitted static and dynamic configuration changes to OracleAS Web Cache.
|
See Also: "Applying Static and Dynamic Configuration Changes" for further information about applying static and dynamic configuration changes |
Status messages appear beneath the Apply Changes and Cancel Changes buttons. Table 6-5 describes the possible status messages.
Table 6-5 OracleAS Web Cache Manager Status Messages
| Message | Description |
|---|---|
|
|
This message appears if OracleAS Web Cache is running with an up-to-date configuration. |
|
|
This message appears if OracleAS Web Cache is running as a software load balancer with an up-to-date configuration. See Also: "OracleAS Web Cache Solely as a Software Load Balancer or Reverse Proxy" for information about configuring this mode |
|
|
This message appears if Submit has been selected in some dialog box, but the Apply Changes button has not been chosen. |
|
|
This message appears if OracleAS Web Cache is running with an older version of the configuration. This can happen when static configuration changes have been applied to |
|
|
This message appears if one or more dynamic configuration changes were applied. See Also: "Applying Static and Dynamic Configuration Changes" |
|
|
This message appears if the cache has been recently upgraded to the current version of OracleAS Web Cache but the configuration has not been copied to the local cache configuration file. |
In addition, information about any needed operation is displayed in the Cache Operations page.
The navigator frame provides a graphical tree view of configuration, administration, and performance monitoring capabilities for OracleAS Web Cache and its supported Web sites.
The navigator frame contains the following major categories:
Operations: This category contains pages that enable you to:
Start, stop, and restart OracleAS Web Cache
Invalidate objects in the cache
Rollover log files
Monitoring: This category contains pages that enable you to:
Monitor the performance of OracleAS Web Cache
Monitor the performance of origin servers
View the contents of a cache
Analyze the performance of pages configured for end-user performance monitoring
Properties: This category contains pages that enable you to:
Configure security settings such as usernames and passwords for administrators and invalidation users
Specify the process identity for OracleAS Web Cache processes
Specify settings for the auto-restart mechanism
Specify network time-outs
Specify the size of the cache and the number of connections
Configure a cache cluster
Logging and Diagnostics: This category contains pages that enable you to:
Configure event logging settings
Configure access logging settings
Configure end-user performance monitoring
Configure diagnostic information
Ports: This category contains pages that enable you to:
Configure OracleAS Web Cache listening ports
Configure listening ports for administration, statistics, and invalidation requests
Origin Servers, Sites, and Load Balancing: This category contains pages that enable you to:
Specify origin servers
Configure site definitions
Map site definitions to origin servers
Configure error pages
Configure session binding
Specify the location of the wallet used for communication to an origin server
Rules for Caching, Personalization, and Compression: This category contains pages that enable you to:
Configure caching rules
Specify expiration policies
Configure session definitions
Configure cookie definitions
Rules Association: This category contains pages that enable you to associate caching rules with:
Compression
Expiration policies
Session policies
Cookies
HTTP request headers
HTTP errors
ESI propagation policies
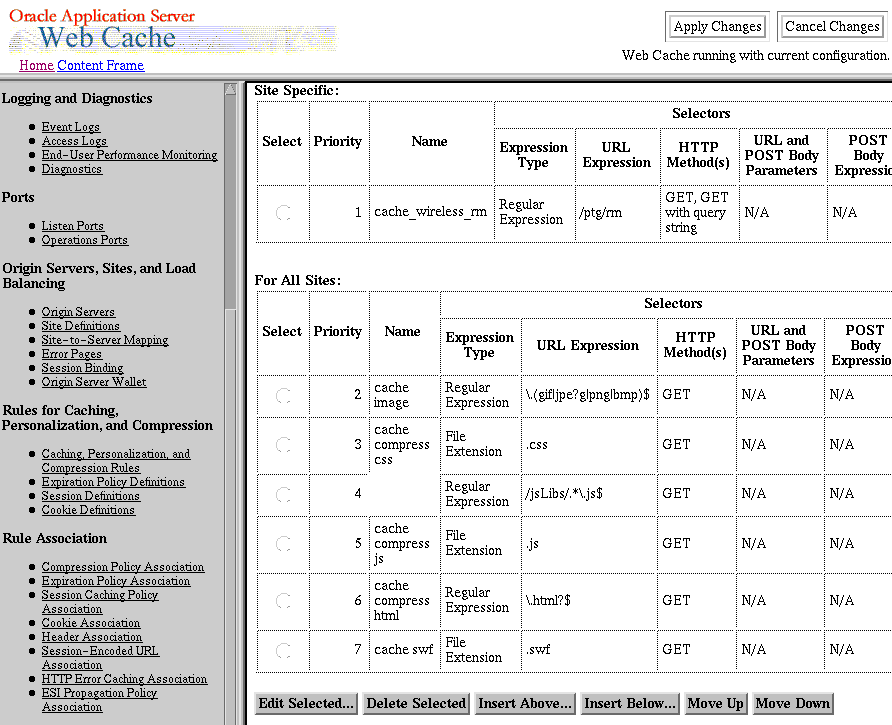
The right frame contains property sheets that enable you to configure and administer OracleAS Web Cache. Figure 6-7 shows an excerpt of the Caching, Personalization, and Compression Rules page used for viewing caching rules.
Figure 6-7 Caching, Personalization, and Compression Rules Page

The Cache Operations page, shown in Figure 6-6, of OracleAS Web Cache Manager (Operations > Cache Operations) provides information about the status of a cache and what operations are needed. From this page, you can start, stop, or restart a cache.
If the cache is part of a cache cluster, all caches in the cluster are listed on the Cache Operations page. In addition to starting, stopping, and restarting a cache, you can propagate the configuration to other cluster members from this page. You can perform the operations on a selected cache or on all caches in the cluster. To minimize disruption in your Web site, you can specify an interval to stagger the times that the operations begin on the caches.
|
See Also: "Starting and Stopping OracleAS Web Cache In an Oracle Application Server Configuration" for further information about using the Cache Operations page |
Using the following menus in the navigator frame, you can change the configuration for OracleAS Web Cache:
Properties
Logging and Diagnostics
Ports
Origin Servers, Sites, and Load Balancing
Rules for Caching, Personalization, and Compression
Rule Association
Configuration changes are saved in a temporary configuration file, before they are applied to the webcache.xml file in the $ORACLE_HOME/webcache directory on UNIX or ORACLE_HOME\webcache directory on Windows.
Most configuration changes are static. When static changes are applied with Apply Changes, OracleAS Web Cache saves the temporary configuration file to the webcache.xml file. You must restart OracleAS Web Cache to apply changes.
However, OracleAS Web Cache recognizes some changes as dynamic. OracleAS Web Cache Manager provides dynamic configuration for the following features:
Setting buffering and verbosity detail level in the Event Logs page (Logging and Diagnostics > Event Logs)
Setting buffering in the Access Logs page (Logging and Diagnostics > Access Logs)
Enabling and disabling of diagnostics information in the HTML response body of an object in the Diagnostics page (Logging and Diagnostics > Diagnostics)
Setting routing to origin servers in the Origin Servers page (Origin Servers, Sites, and Load Balancing > Origin Servers)
OracleAS Web Cache Manager displays the icon, shown in Figure 6-8, to distinguish dynamic configuration from static configuration changes.
Figure 6-8 OracleAS Web Cache Manager Dynamic Configuration Icon
When dynamic changes are applied with Apply Changes, OracleAS Web Cache immediately applies the configuration changes and saves the temporary configuration file to the webcache.xml file. No restart is needed.
If you use OracleAS Web Cache Manager to apply both a dynamic and static configuration change, you must restart OracleAS Web Cache.
|
See Also: "Starting and Stopping OracleAS Web Cache In an Oracle Application Server Configuration" for further information about restarting OracleAS Web Cache |
OracleAS Web Cache uses two configuration files: webcache.xml and internal.xml. Both Oracle Enterprise Manager 10g Application Server Control Console and OracleAS Web Cache Manager write configuration information to the webcache.xml file. OracleAS Web Cache uses internal.xml file for internal settings. These files are located in the $ORACLE_HOME/webcache directory on UNIX and ORACLE_HOME\webcache directory on Windows. Do not edit these configuration files manually, except in those special cases described in this guide, or when directed to do so by Oracle Support Services. Improper editing of these configuration files can cause result in errors.
OracleAS Web Cache configuration and administration tasks are described throughout this guide and in the OracleAS Web Cache Manager online help system. Table 6-6 lists the common tasks, and points you to the topic in this guide that describes the task.
Table 6-6 Common Administrative Tasks for OracleAS Web Cache
|
Note: Except for those tasks listed under the Administering OracleAS Web Cache and Monitoring Performance rows, most tasks require stopping and then restarting OracleAS Web Cache. See "Applying Static and Dynamic Configuration Changes" for exceptions, and "Starting and Stopping OracleAS Web Cache In an Oracle Application Server Configuration" for further information about restarting OracleAS Web Cache. |
For UNIX operating systems, you can use the webcache_setuser.sh script to set the file permissions according to the mode in which in you need to run OracleAS Web Cache. The file webcache_setuser.sh is located in the directory $ORACLE_HOME/webcache/bin.
Prior to running the webcache_setuser.sh script, stop both the cache and admin server processes, using the OPMN utility command:
opmnctl stopproc ias-compononent=WebCache
You cannot use the options in the Cache Operations page to stop or start the admin server process. See "Starting and Stopping OracleAS Web Cache In an Oracle Application Server Configuration" for more information on starting and stopping OracleAS Web Cache.
The following shows the format of the webcache_setuser.sh syntax:
webcache_setuser.sh command user_ID
Table 6-7 describes the commands.
Table 6-7 Commands of the webcache_setuser.sh Script
| Command | Description |
|---|---|
|
Sets the ownership of the |
|
|
Changes the ownership of the runtime OracleAS Web Cache user. This command adds set-user ID permission to the |
|
|
Reverts the file permissions back to the installation state. It is necessary to revert permissions if you used the |
The parameter user_ID is the user ID associated with the OracleAS Web Cache processes. (By default, that user ID is the ID of the user that performed the installation.) For setroot and revert modes, the user ID must be the ID of the user that performed the installation. The user ID must match the user ID specified in Security page (Web Cache Home page > Administration tab > Properties > Application > Origin Servers) of Application Server Control Console or the Process Identity page (Properties > Process Identity) of OracleAS Web Cache Manager.
|
See Also: "Task 2: Modify Security Settings" and "Running webcached with Root Privilege" for further information about when running thewebcache_setuser.sh script is necessary
|