|
Oracle® BPEL Process Manager Developer's Guide
10g Release 2 (10.1.2) B14448-02 |
|
 Previous |
 Next |
|
Oracle® BPEL Process Manager Developer's Guide
10g Release 2 (10.1.2) B14448-02 |
|
 Previous |
 Next |
Oracle Workflow Bridge allows you to enable BPEL processes to invoke Oracle Workflow processes. Oracle Workflow Bridge also monitors the execution status of the invoked workflow processes and reports back to the invoking BPEL process with data when a workflow process execution is complete or has errored out.
This appendix contains the following topics:
Designing a BPEL Process to Interact with Oracle Workflow Bridge
|
Caution: This is a preview release of Oracle Workflow Bridge. If you intend to use this preview release in a production environment, be aware that limited support is available. |
|
Note: Oracle Workflow Bridge is a completely separate feature from the Oracle BPEL Process Manager Workflow services described in Chapter 16, "Oracle BPEL Process Manager Workflow Services". |
Using Oracle Workflow Bridge is demonstrated in OWFDemo1. This tutorial guides you through the design of a BPEL process that uses Oracle Workflow Bridge. Go to
Oracle_Home\integration\orabpel\samples\demos\OWFBridge
An overview of the design phase of this tutorial is provided in "Designing a BPEL Process to Interact with Oracle Workflow Bridge".
|
Note: To compile and runOWFDemo1, you must change the Oracle Workflow Bridge partner link in the demonstration to use a valid WSDL URL. The current URL does not point to the data source you configured with Oracle Workflow Bridge. See "Locating Oracle Workflow Databases" to add a data source to the Oracle Workflow Bridge application. After configuring the data source, replace the wsdlLocation value jdbc/ejb/OracleBPEL in bpel.xml with your Oracle Workflow Bridge data source ejb location. You can then compile and deploy the project.
|
Oracle Workflow Bridge works with Oracle Workflow version 2.5 and higher.
Oracle Workflow is a business process management feature embedded in the Oracle database. Oracle Workflow technology enables modeling, automation, and continuous improvement of business processes, routing information of any type according to user-defined business rules. Oracle Workflow provides a scalable, production workflow system tuned for the high volumes associated with enterprise applications.
Oracle Workflow Bridge functions in the following ways:
Enables you to browse Oracle Workflow processes through the WSIL browser and select the WSIL file associated with a workflow process, using a BPEL designer.
Enables a BPEL process to start Oracle Workflow processes in both synchronous and asynchronous modes
Monitors the execution status of workflow processes that are invoked from Oracle BPEL Process Manager and reports back to the invoking BPEL process with associated item attributes when the workflow process execution is successful
Reports back to the invoking BPEL process with the error messages of an invoked workflow process in an errored state
Enables a BPEL process to stop a workflow root process
Oracle Workflow Bridge invokes Oracle Workflow processes associated with specific item types. If an item type does not have a select function, an invoke call from Oracle BPEL Process Manager produces an exception. You must specify a select function. See Oracle Workflow User's Guide for more information about item types.
Use Oracle Workflow Bridge to pass information such as document ID, role name, and event name to a BPEL process. These attributes must be created in Oracle Workflow. (A BPEL process cannot create a role, a document, or an event through Oracle Workflow Bridge.) See Oracle Workflow Administrator's Guide for more information about Oracle Workflow attributes.
Oracle Workflow Bridge can be used to create and start processes; however, it cannot trigger an Oracle Workflow business event directly. To trigger events, you must create a workflow process that in turn triggers an event. See Oracle Workflow Developer's Guide for more information about business events in Oracle Workflow.
Oracle Workflow Bridge is installed separately from Oracle BPEL Process Manager. See "Installing Oracle Workflow Bridge" for more information.
For more information on Oracle Workflow, go to
http://www.oracle.com/technology/products/ias/workflow/index.html
For Oracle Workflow Bridge to find the Oracle Workflow database, the database must be declared in the ejb location of the datasources.xml file installed with Oracle Workflow Bridge. (Oracle Workflow does not have to run on Oracle BPEL Server.) The datasources.xml file is associated with the Oracle Workflow Bridge application installed on Oracle BPEL Server along with other services. If you are running OC4J, you can use Oracle Enterprise Manager to add data sources.
If the data source lookup fails, check the JNDI settings in owf_jndi.properties, found at
Oracle_Home\integration\orabpel\system\services\config
Update the values for url, principal, and credentials as follows:
java.naming.provider.url=
java.naming.security.principal=
java.naming.security.credentials=
For example, for an OC4J middle tier, the provider URL is
opmn:ormi://hostname:opmn_request_port:OC4J_BPEL/owi
After installing Oracle BPEL Process Manager, use the owf.ear file to install Oracle Workflow Bridge where Oracle BPEL Process Manager is installed. The goal is to deploy Oracle Workflow Bridge as a child application of Oracle BPEL Process Manager. See Oracle Application Server Integration Installation Guide for information on installing Oracle BPEL Process Manager.
To install Oracle Workflow Bridge on the OC4J middle tier of Oracle Application Server, version 10.1.2, use one of the following methods:
This method can be used with BPEL Process Manager for OracleAS Middle Tier or BPEL Process Manager for Developers installations.
This method can only be used with BPEL Process Manager for OracleAS Middle Tier installations.
Command Line Deployment
To use the command line to install Oracle Workflow Bridge:
If you installed BPEL Process Manager for OracleAS Middle Tier, run the following:
ORACLE_HOME\dcm\bin\dcmctl deployApplication -f
ORACLE_HOME\integration\orabpel\system\services\lib\owf.ear -a owf –pa orabpel
 -co OC4J_BPEL
If you installed BPEL Process Manager for Developers, run the following:
java -jar ORACLE_HOME\integration\orabpel\system\appserver\oc4j\j2ee\home\admin.jar
 ormi://localhost:23791/ admin welcome -deploy -file owf.ear -deploymentName
 owf -parent orabpel";

java -jar ORACLE_HOME\integration\orabpel\system\appserver\oc4j\j2ee\home\admin.jar
 ormi://localhost:23791/ admin welcome -bindWebApp owf owf http-web-site
 /integration/owf
ORACLE_HOME points to the location of Oracle BPEL Server and admin and welcome are the standalone OC4J user name and password.
Enterprise Manager Deployment
To use Enterprise Manager to install Oracle Workflow Bridge:
Log on to Enterprise Manager.
On the Home page, click the OC4J_BPEL component.
Click the Applications tab.
Click Deploy EAR File.
Do the following and click Continue:
Give your owf.ear file.
Name the application owf.
Set orabpel to be its parent application.
The section provides an example of how to design a BPEL process to communicate with Oracle Workflow in JDeveloper BPEL Designer. This example uses the source files located in the following directory:
Oracle_Home\integration\orabpel\samples\demos\OWFBridge\OWFDemo1
You design the following activities in this section. These activities display in the following order in your BPEL process flow:
An assign activity with multiple copy rule statements for copying data to the input variable
An invoke activity to invoke the Oracle Workflow process for communication
A receive activity to receive results from the Oracle Workflow process. If your BPEL process must wait for a result from the invoked Oracle Workflow process, a receive activity is needed. This activity checks if the Oracle Workflow process errored out. If your BPEL process does not need to know the result, you do not need to create this activity. However, it is recommended that you create this activity.
If needed, you can also add another invoke activity to stop an Oracle Workflow process. That task is not described in this section.
|
Note: These steps assume you have created a connection to Oracle BPEL Server or are using the default connection automatically created during installation. If not, perform the following steps:
|
Drag and drop a PartnerLink activity onto the designer window.
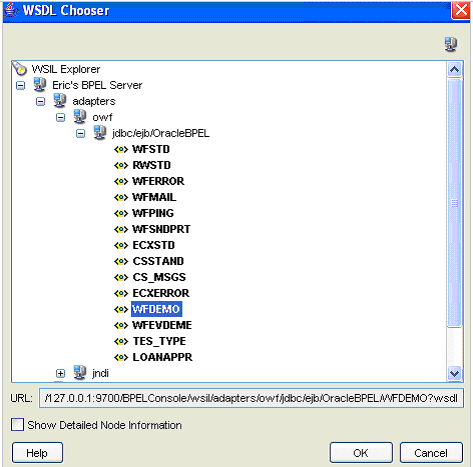
Enter the following values to create an Oracle Workflow partner link. For the WSDL File field, click the flashlight (the second icon from the left named WSIL Browser) to access the WSDL Chooser window.
| Field | Value |
|---|---|
| Name | owf |
| WSDL File | Access the Oracle Workflow data source URL by clicking the WSIL Browser flashlight icon and expanding and selecting server_connection, then adapters, then owf, then jdbc/ejb/OracleBPEL, and then WFDEMO.
where server_connection is the name of the Oracle BPEL Server connection. Your selection here completes the directory path to this URL. |
| Partner Link Type | owfBridgePortTypeLink |
| My Role | receivePortTypeProvider |
| Partner Role | invokePortTypeProvider |
The window now appears as follows:
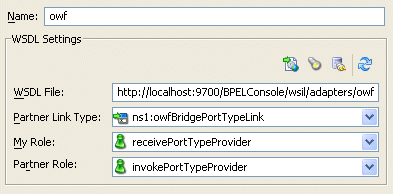
Click OK.
Select Save from the File main menu.
Drag and drop an Invoke activity from the Component Palette section.
Double-click the invoke icon to display the Invoke window.
Enter the following details:
| Field | Value |
|---|---|
| Name | invokeOWF |
| Partner Link | owf |
The Operation (invokeProcess) field is automatically filled in.
Click the first icon to the right of the Input Variable field. This is the automatic variable creation icon.
Click OK on the Create Variable window that appears.
A variable named invokeOWF_invokeProcess_InputVariable is automatically created in the Input Variable field.
Click the first icon to the right of the Output Variable field.
Click OK on the Create Variable window that appears.
A variable named invokeOWF_invokeProcess_OutputVariable is automatically created in the Output Variable field.
Click OK.
Drag and drop a Receive activity below the invokeOWF Invoke activity you just created.
Double-click the receive icon to display the Receive window.
Enter the following details:
| Field | Value |
|---|---|
| Name | receiveOWF |
| Partner Link | owf |
The Operation (receiveProcess) field is automatically filled in.
Click the first icon to the right of the Variable field.
Click OK on the Create Variable window that appears.
A variable named receiveOWF_receiveProcess_InputVariable is automatically created in the Variable field.
Click OK.
Select Save from the File main menu.
You now create an assign activity with multiple statements to copy all data to the input variable you automatically created in Step 4. An example of the assign section of the BPEL file as it appears after you create this assign activity is shown in Step 35.
If necessary for your environment, change the isAsync value described in Step 8, the OWFDataSource value described in Step 11, and the attribute value described in Step 30.
Drag and drop an Assign activity from the Component Palette section to above the invokeOWF Invoke activity you just created.
Double-click the assign icon to display the Assign window.
Click the General tab.
Enter assignOWF in the Name field.
Click Apply.
Click the Copy Rules tab.
Click Create to display the Create Copy Rule window.
Enter the following details:
| Field | Value |
|---|---|
| From |
|
|
Expression |
|
boolean(false)
Note: Press Ctrl and then the space bar to display a list for selecting (double-clicking) this syntax. The namespace number values (for example, ns1, ns2) can vary. Use the namespace values that automatically appear. Remove any trailing forward slashes (/) that appear at the end. |
| To |
|
|
Variable |
|
Expand and select Variables, then invokeOWF_invokeProcess_InputVariable, then ns1:inputElement, then ns1:WFHeader, and then ns1:isAsync |
Click OK to close the Create Copy Rule window.
Click Create to return to the Create Copy Rule window and create a second copy rule statement.
Enter the following details:
| Field | Value |
|---|---|
| From |
|
|
Expression |
|
string('jdbc/ejb/OracleBPEL')
where 'jdbc/ejb/OracleBPEL' represents the data source. |
| To |
|
|
Variable |
|
Expand and select Variables, then invokeOWF_invokeProcess_InputVariable, then ns1:inputElement, then ns1:WFHeader, and then ns1:OWFDataSource |
Select Save from the File main menu.
Click OK to close the Create Copy Rule window.
Click Create to return to the Create Copy Rule window and create a third copy rule statement.
Enter the following details:
| Field | Value |
|---|---|
| From |
|
|
Expression |
|
ora:getDomainId() |
| To |
|
|
Variable |
|
Expand and select Variables, then invokeOWF_invokeProcess_InputVariable, then ns1:inputElement, then ns1:WFHeader, and then ns1:processDomain |
Click OK to close the Create Copy Rule window.
Click Create to return to the Create Copy Rule window and create a fourth copy rule statement.
Enter the following details:
| Field | Value |
|---|---|
| From |
|
|
Expression |
|
ora:getProcessId() |
| To |
|
|
Variable |
|
Expand and select Variables, then invokeOWF_invokeProcess_InputVariable, then ns1:inputElement, then ns1:WFHeader, and then ns1:processID |
Click OK to close the Create Copy Rule window.
Click Create to return to the Create Copy Rule window and create a fifth copy rule statement.
Enter the following details:
| Field | Value |
|---|---|
| From |
|
|
Expression |
|
ora:getProcessVersion() |
| To |
|
|
Variable |
|
Expand and select Variables, then invokeOWF_invokeProcess_InputVariable, then ns1:inputElement, then ns1:WFHeader, and then ns1:revisionTag |
Click OK to close the Create Copy Rule window.
Click Create to return to the Create Copy Rule window and create a sixth copy rule statement.
Enter the following details:
| Field | Value |
|---|---|
| From |
|
|
Expression |
|
string('owf') |
| To |
|
|
Variable |
|
Expand and select Variables, then invokeOWF_invokeProcess_InputVariable, then ns1:inputElement, then ns1:WFHeader, and then ns1:partnerLink |
Click OK to close the Create Copy Rule window.
Click Create to return to the Create Copy Rule window and create a seventh copy rule statement.
Enter the following details:
| Field | Value |
|---|---|
| From |
|
|
Expression |
|
ora:getInstanceId() |
| To |
|
|
Variable |
|
Expand and select Variables, then invokeOWF_invokeProcess_InputVariable, then ns1:inputElement, then ns1:WFHeader, and then ns1:instanceID |
Click OK to close the Create Copy Rule window.
Click Create to return to the Create Copy Rule window and create an eighth copy rule statement.
Enter the following details:
| Field | Value |
|---|---|
| From |
|
|
Variable |
|
Expand and select Variables, then input, then client:OWFDemo1ProcessRequest, and then client:input |
| To |
|
|
Variable |
|
Expand and select Variables, then invokeOWF_invokeProcess_InputVariable, then ns1:inputElement, and then ns1:attribute |
Click OK to close the Create Copy Rule window.
Click Create to return to the Create Copy Rule window and create a ninth copy rule statement.
Enter the following details:
| Field | Value |
|---|---|
| From |
|
|
Expression |
|
string('procName')
where 'procName' represents the process identity type. |
| To |
|
|
Variable |
|
Expand and select Variables, then invokeOWF_invokeProcess_InputVariable, then ns1:inputElement, then ns1:WFHeader, and then ns1:OWFProcess |
Select Save from the File main menu.
Click the BPEL file in the Applications Navigator and select Source.
The assign section of the BPEL file now appears as follows:
<assign name="assignOWF">
  <copy>
    <from expression="boolean(false)"/>
    <to variable="invokeOWF_invokeProcess_InputVariable" part="invokeInputMessage"
 query="/ns1:inputElement/ns1:WFHeader/ns1:isAsync"/>
  </copy>
  <copy>
    <from expression="string('jdbc/ejb/OracleBPEL')"/>
    <to variable="invokeOWF_invokeProcess_InputVariable" part="invokeInputMessage"
 query="/ns1:inputElement/ns1:WFHeader/ns1:OWFDataSource"/>
  </copy>
  <copy>
    <from expression="ora:getDomainId()"/>
    <to variable="invokeOWF_invokeProcess_InputVariable" part="invokeInputMessage"
 query="/ns1:inputElement/ns1:WFHeader/ns1:processDomain"/>
  </copy>
  <copy>
    <from expression="ora:getProcessId()"/>
    <to variable="invokeOWF_invokeProcess_InputVariable" part="invokeInputMessage"
  query="/ns1:inputElement/ns1:WFHeader/ns1:processID"/>
  </copy>
  <copy>
    <from expression="ora:getProcessVersion()"/>
    <to variable="invokeOWF_invokeProcess_InputVariable" part="invokeInputMessage"
 query="/ns1:inputElement/ns1:WFHeader/ns1:revisionTag"/>
  </copy>
  <copy>
    <from expression="string('owf')"/>
    <to variable="invokeOWF_invokeProcess_InputVariable" part="invokeInputMessage"
 query="/ns1:inputElement/ns1:WFHeader/ns1:partnerLink"/>
  </copy>
  <copy>
    <from expression="ora:getInstanceId()"/>
    <to variable="invokeOWF_invokeProcess_InputVariable" part="invokeInputMessage"
 query="/ns1:inputElement/ns1:WFHeader/ns1:instanceID"/>
  </copy>
  <copy>
    <from variable="input" part="payload" query="/client:OWFDemo1ProcessRequest/client:input"/>
<to variable="invokeOWF_invokeProcess_InputVariable" part="invokeInputMessage"
 query="/ns1:inputElement/ns1:attribute"/>
  </copy>
  <copy>
    <from expression="string('procName')"/>
    <to variable="invokeOWF_invokeProcess_InputVariable" part="invokeInputMessage"
 query="/ns1:inputElement/ns1:WFHeader/ns1:OWFProcess"/>
  </copy>
</assign>
If this is a synchronized Oracle Workflow call (that is, you created a receive activity), you must add a correlation set for the BPEL process to receive the correct message from Oracle Workflow processes.
Go to the Structure section in the lower left section of JDeveloper BPEL Designer.
Right-click Properties and select Create Property.
Enter the following details:
| Field | Value |
|---|---|
| Name | itemKeyProperty |
| Type | Click the flashlight icon and select string |
Click OK to close the Type Chooser window and Create Correlation Set Property window.
Right-click Property Aliases in the Structure section and select Create Property Alias.
The Create Property Alias window appears.
Enter the following details:
| Field | Value |
|---|---|
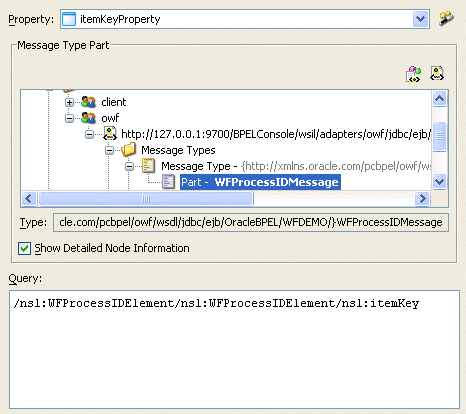
| Property | itemKeyProperty |
| Message Type Part | Expand and select WFProcessIDMessage |
| Query | Select ns1:WFProcessIDElement, then ns1:WFProcessIDElement, and then ns1:itemKey |
The window now appears as follows:
Click OK.
Right-click Property Aliases again and select Create Property Alias.
Enter the following details:
| Field | Value |
|---|---|
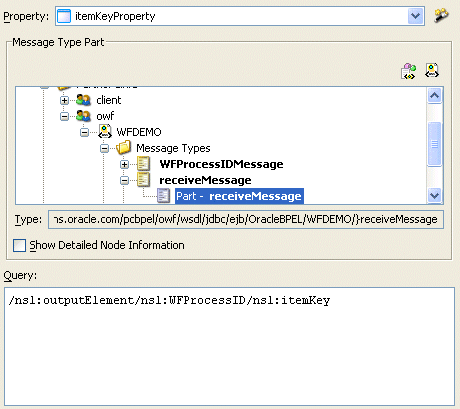
| Property | itemKeyProperty |
| Message Type Part | Expand and select Part - receiveMessage |
| Query | Press Ctrl and then the space bar to select ns1:outputElement, then ns1:WFProcessID, and then ns1:itemKey |
The window now appears as follows:
Click OK.
This correlation set is used in the invoke and the receive activities you just created.
Double-click the invokeOWF Invoke activity.
Click the Correlations tab.
Click Add.
Click Correlations Sets, then Create on the Correlation Set Chooser window.
Enter owfIdentifier in the Name field of the Create Correlation Set window.
Click Add.
Select itemKeyProperty on the Property Chooser window and click OK.
Click OK on the Create Correlation Set window and the Correlation Set Chooser window.
Select Yes in the Initiate column of the Invoke window. This is because the correlation is initiated here.
Select in in the Pattern column because this is the output variable of the invoke activity.
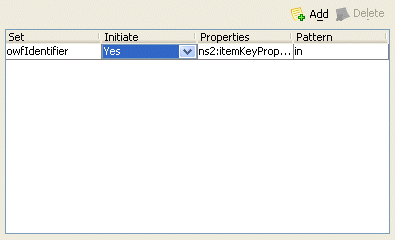
Double-click the receiveOWF Invoke activity.
Click the Correlations tab.
Click Add.
Click owfIdentifier on the Correlation Set Chooser window.
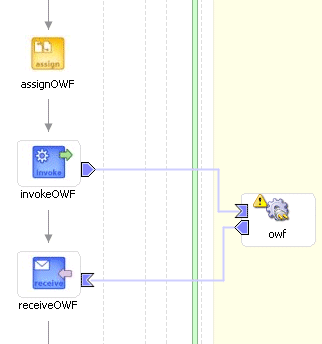
Ensure that No is the value in the Initiate column of the Receive window.
When complete, the designer window looks as follows:
Select Save from the File main menu.
Oracle Workflow Bridge Monitor collects Oracle Workflow data and reports it back to the BPEL process when the monitored Oracle Workflow processes are completed or error out. The monitor reports back to the BPEL process once every minute, although you can change this default by modifying the following variable and then restarting Oracle BPEL Server:
oracle.tip.pc.services.owf.callback.quartz_interval=1.0
The variable is located at
Oracle_Home\integration\orabpel\system\services\config\pc.properties
|
Note: Oracle recommends that you do not change the default setting. |
Oracle Workflow Bridge Monitor also reports run-time errors. If a run-time error occurs during an Oracle Workflow process, then a message with a WFProcessErrorMessage component is sent to the BPEL receive activity. The message format is specified in the WSDL file.
Oracle Workflow Bridge keeps a log of current, active, synchronous (but not asynchronous) Oracle Workflow process invocations. After a completed or errored process is reported to the BPEL process, the invocation is dropped from the log.