|
Oracle® BPEL Process Manager Developer's Guide
10g Release 2 (10.1.2) B14448-02 |
|
 Previous |
 Next |
|
Oracle® BPEL Process Manager Developer's Guide
10g Release 2 (10.1.2) B14448-02 |
|
 Previous |
 Next |
This appendix describes the User Task 2.0 macro.
This appendix contains the following topics:
The User Task 2.0 macro supports user tasks from release 2.0. The User Task 2.0 macro is available for backward compatibility and is replaced in this release. See Chapter 16, "Oracle BPEL Process Manager Workflow Services" to learn about the new system for handling user tasks.
BPEL processes compose multiple services into one process flow. There are frequently tasks in that flow that require user input. For example:
A customer fills out a form
A loan offer approves an application
An error appears that requires a human decision to resolve
This appendix discusses the tools available for adding user tasks to a BPEL process, as well as designing interfaces to collect data from users.
This appendix uses an example of a loan officer reviewing a loan application and then approving or denying it.
Oracle BPEL Process Manager provides a TaskManager service to help model user interactions with the BPEL process. The asynchronous TaskManager service has a WSDL interface so that a BPEL process can initiate a user task by calling the TaskManager, and receive a response, just as with any other Web service. The TaskManager has a Java Worklist API that you can use to build graphical user interface applications that show users which information is needed and return user input to the TaskManager (and then on to the BPEL process). The WSDL interface also allows the BPEL process to update a task in process, for example, to assign it to a different user if the first user is unavailable. Figure D-1 provides an overview.
A task document includes all information about a task. The task document in wrapped in a taskMessage, and all inbound and outbound operations use the same taskMessage to exchange information about the task. Figure D-2 provides an overview.
Task.xsd at http://localhost:9700/orabpel/default/TaskManager/Task.xsd is a sample task document.
   <xs:element name="task">
    <xs:complexType>
      <xs:sequence>
        <xs:element name="taskId" type="xs:string" minOccurs="0"/>
        <xs:element name="title" type="xs:string" minOccurs="0"/>
        <xs:element name="creationDate" type="xs:dateTime" minOccurs="0"/>
        <xs:element name="creator" type="xs:string" minOccurs="0"/>
        <xs:element name="modifyDate" type="xs:dateTime" minOccurs="0"/>
        <xs:element name="modifier" type="xs:string" minOccurs="0"/>
        <xs:element name="assignee" type="xs:string" minOccurs="0"/>
        <xs:element name="status" minOccurs="0">
          <xs:simpleType>
            <xs:restriction base="xs:string">
              <xs:enumeration value="active"/>
              <xs:enumeration value="completed"/>
            </xs:restriction>
          </xs:simpleType>
        </xs:element>
        <xs:element name="expired" type="xs:boolean" minOccurs="0"/>
        <xs:element name="expirationDate" type="xs:dateTime" minOccurs="0"/>
        <xs:element name="duration" type="xs:duration" minOccurs="0"/>
        <xs:element name="priority" type="xs:int" minOccurs="0"/>
        <xs:element name="template" type="xs:string" minOccurs="0"/>
        <xs:element name="customKey" type="xs:string" minOccurs="0"/>
        <xs:element name="conclusion" type="xs:string" minOccurs="0"/>
        <xs:element name="attachment" type="xs:anyType"/>
      </xs:sequence>
    </xs:complexType>
  </xs:element>
Table D-1 describes the fields in the task document.
Table D-1 Task Document Fields
| Field | Description |
|---|---|
|
|
ID used to identify a task; automatically set by the TaskManager service when the task is created. See Also: customKey (string) |
|
|
Typically used when you are presented with a list of the tasks you need to complete, for example, |
|
|
Automatically set by the TaskManager service when the task is created. |
|
|
ID of the application, system, or (sometimes) user initiating the task; typically used by the graphical user interface to partition the complete worklist into categories. When the BPEL designer (Eclipse BPEL Designer or JDeveloper BPEL Designer) is used to integrate the TaskManager service into a process, it sets this value to the name of the process initiating the task. |
|
|
Managed by the TaskManager service; defines when the task was last modified. |
|
|
ID of the user or role performing the task update or completion operation. The semantics of the ID are owned by the application. |
|
|
ID of the user, role, or group responsible for completing the task. The semantics of the ID are opaque to both Oracle BPEL Process Manager and the TaskManager service: the BPEL process sets the assignee ID, and the graphical user interface queries the list of tasks, passing in the ID. |
|
|
Managed by the TaskManager service; equal to |
|
|
Managed by the TaskManager service; indicates whether or not the task has expired. |
|
|
Optional; defines when the task expires. See Also: duration (duration) |
|
Optional; the duration after which the task expires. When both an |
|
|
|
Optional; an integer marking the priority of the task. The semantics are left to the BPEL process and graphical user interface application. |
|
Optional; an application-specific key. The BPEL process and graphical user interface application can use either |
|
|
|
Optional; an application-specific field used to tell the BPEL process how the task was completed; for example, |
|
|
Optional; application-specific data of any type, for any purpose of the application. |
The general steps for integrating the TaskManager service into a BPEL process are:
Define a partner link for the TaskManager service.
Declare and initialize the task document.
Invoke the initiateTask operation of the TaskManager service just like any other standard Web service, using an invoke activity.
Wait for the onTaskResult callback from the TaskManager service, using a receive activity.
Read the updated task document from the callback message.
You need a partner link in your process to indicate that you are calling the TaskManager service from your BPEL process (just as for any other Web service). The WSDL file for the TaskManager service can be found on your local Oracle BPEL Process Manager installation at this location:
http://localhost:9700/orabpel/default/TaskManager/TaskManager.wsdl
The outcome of adding the partner link is as illustrated in the TaskSample process referenced in the See Also note. The deployment descriptor bpel.xml file references the TaskManager service WSDL file, as shown below.
<properties id="reviewManager">
   <property name="wsdlLocation">
      http://localhost:9700/orabpel/default/TaskManager/TaskManager?wsdl
   </property>
</properties>
The BPEL process definition in the TaskSample.bpel file uses this property to define a partner link for the TaskManager.
xmlns:task="http://services.oracle.com/bpel/task"
.
<partnerLink name="reviewManager"
             partnerLinkType="task:TaskManager"
             partnerRole="TaskManager"
                myRole="TaskManagerRequester"/>
Before the TaskManager service can be invoked, a taskMessage must be constructed. The following BPEL code from TaskSample.bpel shows how to construct this message using the BPEL assign activity.
<scope name="review" variableAccessSerializable="no">
   <variables>
      <variable name="reviewTask"
                element="task:task"/>
...
</variables>
<sequence>
...
<assign name="configureTask">
   <!-- Assign 'title' in task document -->
   <copy>
      <from variable="input" part="payload"
         query="/stockReviewSheet/symbol"/>
      <to variable="reviewTask" query="/task/title"/>
   </copy>
   <!-- Assign 'assignee' in task document -->
   <copy>
      <from expression="string('jsmith@finance.com')"/>
      <to variable="reviewTask" query="/task/assignee"/>
   </copy>
   <!-- ... See the full source for the other field settings -->
   <!-- Assign 'attachment' in task document -->
   <copy>
      <from variable="input" part="payload"/>
      <to variable="reviewTask" query="/task/attachment"/>
   </copy>
</assign>
The next step in your BPEL process is to initiate the TaskManager by invoking its initiateTask operation, passing the data defined above. Specifically, you pass a taskMessage that you set up as a wrapper around the task document.
<scope name="reviewUserInteraction" variableAccessSerializable="no">
   <variables>
      <variable name="taskRequest" messageType="task:taskMessage"/>
      ...
   </variables>
   <sequence>
      <!-- Assign task document to taskMessage -->
      <assign name="setPayload">
         <copy>
            <from variable="reviewTask"/>
            <to variable="taskRequest" part="payload"/>
         </copy>
      </assign>
   <!-- Initiate task -->
   <invoke name="initiateTask"
           partnerLink="review"
           portType="task:TaskManager"
           operation="initiateTask"
       inputVariable="taskRequest"/>
      ...
   </sequence>
</scope>
This creates the task and assigns it to the assignee specified in the task document. The task is available to you through the Worklist Java API.
At this point, the task is created and assigned to the assignee specified in the task document and is available through the Worklist Java API.
The BPEL process waits for the TaskManager service to call it back. The callback passes back an updated taskMessage, indicating that the task has been completed or has expired.
<variable name=" taskResponse"
   messageType="task:taskMessage"/>
   ...
<!-- Receive the outcome of the task -->
<receive name="receiveTaskResult"
         partnerLink="review"
         portType="task:TaskManagerCallback"
         operation="onTaskResult"
         variable="taskResponse"/>
<!-- Read task document from taskMessage -->
<assign name="readPayload">
   <copy>
      <from variable="taskResponse" part="payload"/>
      <to variable="reviewTask"/>
   </copy>
</assign>
The receive activity shown above does not complete until a callback is received from the TaskManager service. As with all asynchronous activities, the BPEL process is dehydrated reliably during this time, and rehydrated and executed when the task completion (or expiration) event occurs.The type for the TaskManager service response data is the same taskMessage message type that was used for the initiate message. However, because the type for the attachment field is an XML schema anyType and is application-defined, the attachment data returned can be any type and specifically does not need to be the same type as the initiate message attachment.Typically, the conclusion field contains information that tells the BPEL process how the task was completed (for example, Approved, Rejected, or Canceled). This kind of information can also be passed through the attachment; it is up to the programmer to pass task data in the preferred manner.
This section reviews how to integrate the TaskManager service into a BPEL process using Eclipse BPEL Designer (based on version 0.6). It assumes you are already familiar with the basics for creating an asynchronous process, as discussed in Tutorial 2, Developing a Credit Flow BPEL Process at http://www.oracle.com/technology/bpel.Eclipse BPEL Designer simplifies matters considerably for you by generating much of the code described earlier in this chapter. This enables you to drag a user task from the BPEL Palette into your process. The following steps describe how to add a user task named review to a new asynchronous BPEL process (called TestTask) created in Eclipse BPEL Designer; in actual practice, of course, your starting point is a process that you are developing.
In the Process Map view of the BPEL file, drag a user task from the BPEL Palette (specifically, the last item in the More Activities list) to the transition arrow between the initiate (client) receive activity and the onResult (client) invoke callback activity.
In the User Task window that appears, enter review as the task name and click Done.
A scope activity named review appears in Eclipse BPEL Designer. This scope is the currently selected element, so the BPEL Inspector displays information about it. For example, it defines an XML variable named reviewTask (which is the task document).
|
Note: All names beginning with review in this example generally begin with the task name you specify in the User Task window. |
Expand the newly created scope by clicking the + icon to the left of it in the Process Map view. Within the expanded scope, you see an assign activity (named configureTask) and a task that can be expanded further.
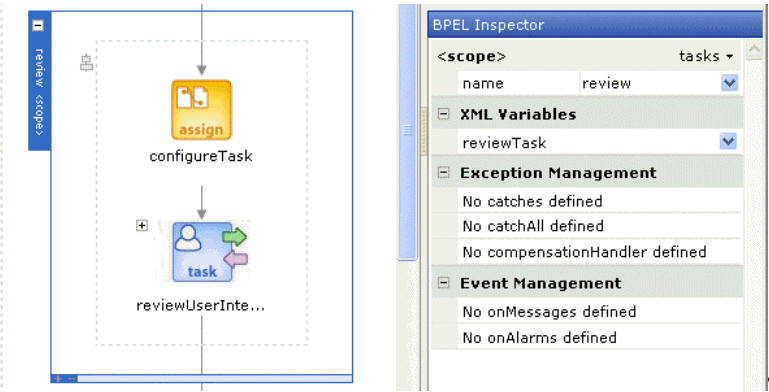
The configureTask assignment initializes the task document; however, before going to that level, you do one more expansion, to get an overview of the process.
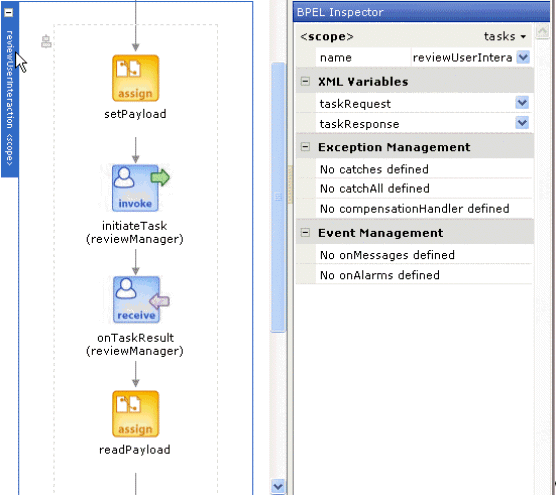
Expand the task (reviewUserInteraction) by clicking its + icon and notice that it expands into a scope containing the invoke and receive activities for the task, along with two assign activities. Click the label along the left edge of this scope. This selects the scope and enables you to see its contents in the BPEL Inspector.
Scroll back in the Process Map if necessary to the outer scope (named review) and click the configureTask assignment within it. Listed under Copy Rules in the BPEL Inspector are the fields of the reviewTask task document.
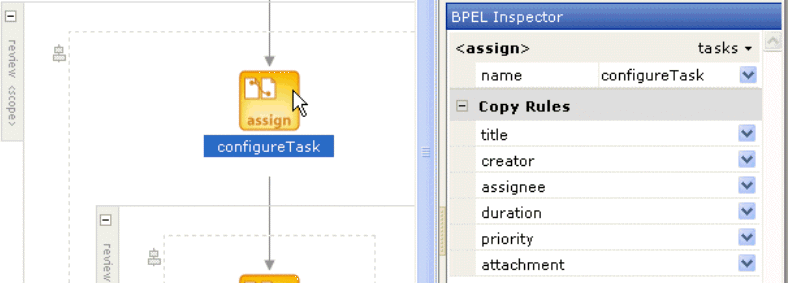
You can view the Copy Rule window for each field either by selecting Edit Rule in its drop-down list or by clicking the field name (which is a link). For every field except the last one, attachment, the Copy Rule window shows an assignment being made to that field. In actual practice, you change the values being assigned to the fields title through priority as appropriate, and optionally pass custom data to the task through the attachment field (as in the next step).
To pass data to the task, click Edit Rule in the drop-down list for the attachment field in the BPEL Inspector (or click attachment) and complete the From part of the Copy Rule window (for example, to pass the payload part of the input variable as described in "Declare and Initialize the Task Document"). If you do not want to pass anything in the attachment field, you must click Delete Element in the field's drop-down list (or the process does not compile because of the incomplete assignment).
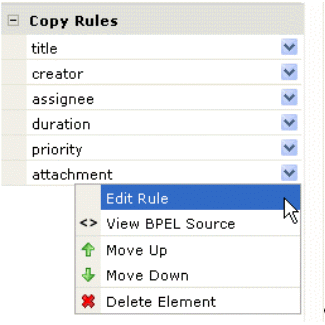
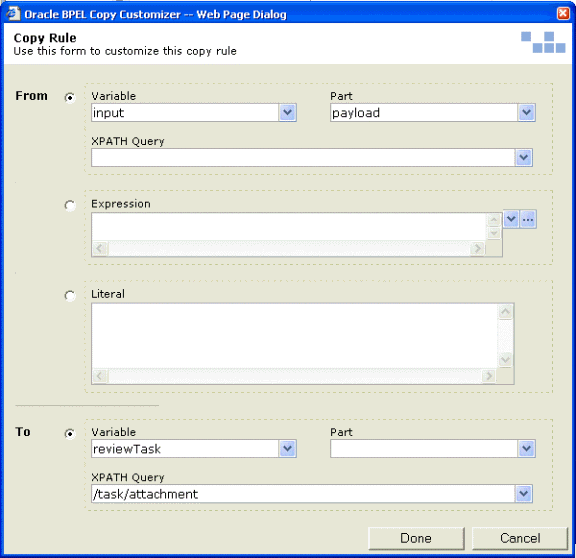
Click Done to complete the configuration of the attachment copy rule.
Click the next assign activity in the Process Map: setPayload, inside the reviewUserInteraction scope. You see that only payload is listed under Copy Rules. If you look at the Copy Rule window, reviewTask (the task document from the outer scope) is assigned to the payload part of the taskRequest variable as the final step before initiating the task.
Click the final assign activity (readPayload).
Explore this activity in the BPEL Inspector to see that this is where the task data returned in a taskMessage (that is, in the payload part of the taskResponse variable) is read and stored in the variable reviewTask.
Note that while the above may seem complex at first, it is because the TaskManager service is a complex service. The Designer User Task Palette entry is merely a preconfigured template that encapsulates the normal patterns for use of the TaskManager service in a BPEL flow. However, Eclipse BPEL Designer continues to improve as a means of integrating the TaskManager service into a BPEL process. You also have the option of working directly in the BPEL source code.
On the other side of a TaskManager service is typically a user interface in which the assigned users can view, update, and complete tasks. Figure D-3 provides an overview.
Figure D-3 TaskManager and a Custom Web Application
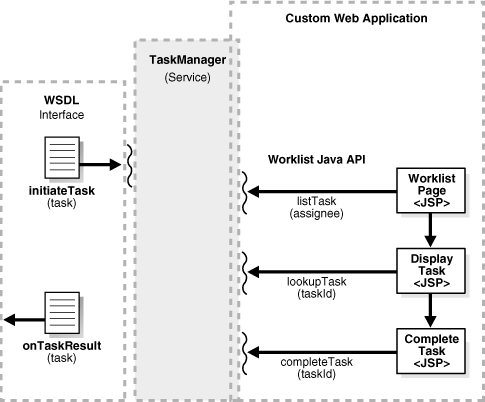
The typical steps for accessing task information from the user side are:
A graphical user interface uses the Java Worklist API to list the tasks assigned to a user or role.
The user selects a task and reviews its detail information.
The user updates any editable data associated with the task and saves or completes the task.
Using the Java Worklist API to the TaskManager service from the client perspective involves the following high-level steps. The code shown in this section is taken from C:\orabpel\samples\tutorials\110.UserTasks\TaskSampleUI\listTasks.jsp.
Use the com.oracle.bpel.client.Locator class to return a worklist service handle (an IWorklistService).
<%@page import="com.oracle.bpel.client.Locator" %>
<%@page import="com.oracle.bpel.services.task.IWorklistService" %>
   ...
   // Obtain a reference to BPEL domain 'default' using password 'bpel'
   Locator locator=new Locator("default", "bpel");
   IWorklistService worklist =
     (IWorklistService)
         locator.lookupService(IWorklistService.SERVICE_NAME);
Use the com.oracle.bpel.services.task.IWorklistService interface to fetch com.oracle.bpel.services.task.ITask objects, manipulate them, complete them, and so on.
<%@page import="com.oracle.bpel.services.task.ITask" %>
   ...
   ITask[] tasks=
      worklist.listTasksByAssignee("jsmith@finance.com");
   ...
You can fetch tasks by other criteria as well. For example, you can look up a task by its unique taskId assigned by the TaskManager service or based on a specified creator attribute (which is programmer-defined). You can also build an arbitrary search criterion using the com.oracle.bpel.client.util.WhereCondition utility class (for example, to fetch all the expired tasks assigned to a particular user). For more information, including full documentation on the interfaces for the classes used in the code in this section, see Oracle BPEL Process Manager API Javadocs (located at C:\orabpel\docs\apidocs\index.html).The code below shows how to iterate through the list of tasks in the JSP page and, for each task, display some basic descriptive information and a link that displays a details page (displayTask.jsp) for the task.
<h1>My Custom Task List Page</h1>
<table border="1">
<tr>
   <th>Title</th>
   <th>Due Date</th>
   <th>Priority</th>
</tr>
<%
   // Iterate through the list of tasks
   for (int i=0; i < tasks.length; i ++)
   {
      ITask thisTask=tasks[i];
      // We are interested in tasks assigned to "jsmith@finance.com"
      // and generated by the TaskSample BPEL process. Often the BPEL
      // process initiating a task will assign its name to the
      // creator field of the task document. This is at least the
      // case with the TaskSample BPEL process.
      if (! "TaskSample".equals(thisTask.getCreator()))
   {
      // This task has been generated by another BPEL process
      // and should therefore not be in the list.
      continue;
      }
      // Read the title assigned to the task. The title is to
      // a task what a subject would be to an email.
      String title=thisTask.getTitle();

      // Get the unique ID/key associated with this task.
      // This is passed from page to page to identify the
      // task the user is reviewing and completing.
      String taskId=thisTask.getTaskId();

      // Read the expiration date assigned to the task.
      Date expiration=null;
   if (thisTask.getExpirationDate() != null)
      expiration=thisTask.getExpirationDate().getTime();
   // Read priority associated with the task
   int priority=thisTask.getPriority();
%>
   <tr>
      <td>
      <a href="displayTask.jsp?taskId=<%= taskId %>">
         <%= title %></a>
      </td>
      <td>
      <%= expiration %>
      </td>
      <td>
      <%= priority %>
      </td>
   </tr>
<%
   }
%>
</table>
The displayTask.jsp page invoked from the hyperlink in the code above gets passed a taskId (again, a unique string identifier generated by the TaskManager service) and uses the same Locator and IWorklistService objects as above to fetch the task associated with that taskId. Then, to manipulate the payload data associated with a task, it uses the facade capability, which provides a thin Java interface on top of arbitrary XML data. Note that facades are not at all like JAXB-style bindings because they do not attempt to fully map XML to Java. They merely provide a Java envelope for XML data that is then accessed through JavaBeans-style getter and setter functions. This enables facades to avoid all of the problems associated with JAXB bindings as schemas get complex.The facade construct is described in more detail in "Using an XML Facade to Simplify DOM Manipulation"; however, at a very high level, the basic steps for working with the XML facade are as follows:
Use the schemac Ant task (or command-line tool) in your build.xml script to generate facade classes for XML schema types. For example:
<schemac input="${basedir}/TaskSample.wsdl"
         out="${basedir}/TaskSampleUI/WEB-INF/classes"/>
This command generates the facade classes for the XML schema types described in TaskSample.wsdl, namely:
<element name="stockReviewSheet" type="finance:StockReviewSheetType" />
<complexType name="StockReviewSheetType">
   <sequence>
      <element name="symbol" type="string" />
      <element name="targetPrice" type="float" />
      <element name="currentPrice" type="float" />
      <element name="action" type="string" />
      <element name="quantity" type="int" />
      </sequence>
</complexType>
The facade classes generated include a factory for creating new instances of the StockReviewSheet element and then getter and setter methods for manipulating the data fields within the instances. If you want to review the exact interfaces exposed by the generated classes, you can either view the generated Java classes or create Javadocs for them by using the -j option to the schemac command.
Within your code, you can use the generated classes to manipulate instances of XML data types through a simple Java interface. The code below from C:\orabpel\samples\tutorials\110.UserTasks\ TaskSampleUI\displayTask.jsp uses the Locator and IWorklistService objects to fetch a particular task by taskId. It then gets the payload of the task, which is a W3C DOM element type, and uses that and the facade StockReviewSheetFactory class to instantiate a StockReviewSheet facade instance. Finally, the facade class getter and setter methods are used to fetch appropriate data fields from the payload and display them in the JSP page.
<%@ page import="com.otn.samples.finance.StockReviewSheet" %>
<%@ page import="com.otn.samples.finance.StockReviewSheetFactory" %>...

Locator locator=new Locator("default", "bpel");

IWorklistService worklist=(IWorklistService)
   locator.lookupService(IWorklistService.SERVICE_NAME);

ITask task=worklist.lookupTask(taskId);

// Get a reference to the XML StockReviewSheet document attached to the
// task. If you look at the implementation of the TaskSample BPEL
// process, you will notice that a StockReviewSheet element is assigned
// to the task as an attachment.
Element rsElement=(Element) task.getAttachment();

StockReviewSheet srs =
   StockReviewSheetFactory.createFacade(rsElement);
// Use the friendly bean interface of the XML facade to access the data
// contained in the XML attachment.
String symbol=srs.getSymbol();
float targetPrice=srs.getTargetPrice();
float currentPrice=srs.getCurrentPrice();
...
<tr>
   <td>Symbol</td>
   <td><input type="text" name="Symbol"
              value="<%= symbol %>"/></td>
   <td>(String)</td>
</tr>
...
The displayTask JSP page provides an HTML form that enables the user to fill in the action and quantity fields for the stock review sheet, as well as to edit any of its other fields. When the form is submitted, it passes these values, along with the taskId, to completeTask.jsp.
The final step is to use the generated facade classes to create the appropriate attachment data element (the task document) to be returned to the task and then pass it to the TaskManager service along with an indication that the task has been completed.
In this example, this is done in completeTask.jsp, which creates a new instance of the StockReviewSheet element and fills it in with the form data passed to it. It then looks up the task by taskId, as before. What is new about this code from completeTask.jsp is shown below. It sets some fields of the task object (including the updated attachment) and then informs the worklist service that the task has been completed.
StockReviewSheet srs=StockReviewSheetFactory.createFacade();

// Populate symbol from data submitted as part of the post
srs.setSymbol(request.getParameter("symbol"));
..
ITask task=worklist.lookupTask(taskId);

task.setAttachment(srs.getRootElement());

// Conclusion is user-defined – here it is ÒbuyÓ or ÒsellÓ
task.setConclusion(strAction);

worklist.completeTask(task);

out.println("This task has been successfully completed.");
At this point, the TaskManager service calls back asynchronously to the process that is waiting for this task, passing it the updated task attributes and attachment data.
This final section looks at some additional capabilities related to working with the TaskManager service: expirations and timeouts, notification to the assignee, task reassignment, and task assignment to groups (and role resolution).
The TaskManager service has a built-in expiration and timeout capability. You can specify the timeout period for a task as a period of time (duration field) or a specific point in time (expirationDate field). In either case, when the specified time is reached and the task has not yet been completed, an expiration event is sent as a BPEL event to the process that is waiting for completion of that TaskManager service. The waiting BPEL process then uses a BPEL event handler. At that point, the process can take any desired action (including sending a reminder e-mail, reassigning the task to someone else, canceling the task, and so on).The duration and expirationDate fields are specified as having the XML schema types duration and dateTime, respectively. For example, a duration of one hour is specified as PT1H (meaning a period of time of 1 hour). In addition to H for hours, you can also use M for minutes, S for seconds, and so on. For more information on the format of the duration and dateTime data types, see the XML schema specification:
http://www.w3.org/TR/2001/REC-xmlschema-2-20010502/#duration
and
http://www.w3.org/TR/2001/REC-xmlschema-2-20010502/#dateTime
First, in the BPEL source you specify a duration or expiration date, as follows:
<!-- Assign 'duration' in task document -->
<copy>
   <from expression="string('PT5M')"/>
   <to variable="reviewTask" query="/task/duration"/>
</copy>
After initiating the task, do the following:
Wrap the TaskManager service receive activity in a scope.
Add an event handler to the scope to handle onTaskExpired events.
Within that event handler, do whatever you like in response to the expiration event. The code below reassigns the task to someone else and sets a new expiration time of one more hour.
<invoke name="initiateTask" partnerLink="review" portType="task:TaskManager"
operation="initiateTask" inputVariable="taskRequest"/>

<!-- Receive the outcome of the task -->
<scope name="reviewTask">
     <eventHandlers>
        <onMessage partnerLink="review" portType="task:TaskManagerCallback"
         operation="onTaskExpired" variable="taskRequest">
           <sequence>
              <assign name="reassignTask">                <!-- Assign NEW 'assignee' in task document -->
                   <copy>
                      <from expression= "string('director@oracle.com')"/>
                      <to variable="taskRequest" part="payload"
                       query="/task/assignee"/>
                   </copy>
                <!-- Assign NEW 'duration' in task document -->
                   <copy>
                      <from expression="string('PT1H')"/>
                      <to variable="taskRequest" part="payload"
                       query="/task/duration"/>
                   </copy>
                   <copy>
                      <from expression="string('Escalated')"/>
                      <to variable="taskRequest" part="payload"
                       query="/task/status"/>
                   </copy>
                </assign>
       <invoke name="reassign" partnerLink="review" portType="task:TaskManager"
        operation="updateTask" inputVariable="taskRequest"/>
      </sequence>
    </onMessage>
  </eventHandlers>
 <receive name="receiveTaskResult" partnerLink="review"
 portType="task:TaskManagerCallback" operation="onTaskResult"
 variable="taskResponse"/>
</scope>
If you want to run the entire example, see the from the TimeOffRequestFlow sample available in c:\orabpel\samples\demos\TimeOffRequestDemo.
It is common to send a notification message to a user when a task is assigned to that user (or when the timeout duration is reached, when the task is reassigned, or in other situations). This notification can be done in BPEL at the same time that the TaskManager service is initiated; therefore, anything that can be done in BPEL (invoking a Web service, sending an e-mail message or a JMS message, executing some Java code, and so on) can be done to notify a user of a task-related event.The TimeOffRequestFlow sample includes a code example of using the Oracle BPEL Process Manager Mail Service to send an e-mail notification to a user when a time-off request approval task has been assigned to that user. In this case, the e-mail includes an XML document attachment describing the time-off request and contains a link to a JSP page where the request can be approved or rejected.
Reassigning a task is as simple as changing the assignee field in the task document and then invoking the updateTask operation on the TaskManager service. A code example of this is shown in the "Enabling Expiration/Timeouts for Tasks". If the application requires that once a task is reassigned it cannot be completed by the original assignee, then the user interface that completes a task must first fetch the task document and check that the assignee has not changed before completing a task.
The TaskManager service has a very simple construct for the assignee attribute of a task: it is a string identifier that is not interpreted by the TaskManager service to have any special meaning. Although simple, this construct is powerful and flexible. In particular, it allows for role resolution and the concept of group worklists to be implemented in a straightforward manner.When a task is assigned to a group, this typically means that several users can see the task in their worklists. When one of them selects the task on which to work, it disappears from the worklists of the other users in the group. Additionally, it is common to set up a timeout period such that if the individual working on the task does not complete it within a specified time, it may revert back to group assignment and then reappear on the group worklists.The most common way to implement this use case with the TaskManager service is as follows:
The task is assigned to the group identifier.
The worklist user interfaces for members of the group show all tasks assigned to the group.
When a user selects a task on which to work, it is checked to ensure it has not already been reassigned. If not, it is reassigned to the individual's user ID.
Optionally, notifications and timeouts can be used effectively here.
Role resolution works in much the same way. Because special interpretation is not given to the assignee for a task, the assignee can actually be a role, and resolution can happen on the user interface side. Alternatively, it is fairly simple to integrate a BPEL process with directory services such as LDAP and perform dynamic role resolution at the time the task is created.
BPEL includes a TaskManager service that acts as an intermediary between BPEL and a user interface for performing user tasks. This appendix discusses how to create a partner link to the TaskManager service, and how to build a JSP user interface to view task information and complete the task.