|
Oracle® Application Server Adapter for IMS/TM User's Guide
10g Release 2 (10.1.2) B15805-01 |
|
 Previous |
 Next |
|
Oracle® Application Server Adapter for IMS/TM User's Guide
10g Release 2 (10.1.2) B15805-01 |
|
 Previous |
 Next |
This chapter describes how to install Oracle Connect and Oracle Studio from the CD-ROM and how to configure Oracle Connect using Oracle Studio.
|
Note: In addition to the installation procedures described in this chapter, the J2CA 1.0 IMS/TM adapter must be installed with Oracle Application Server. Installing the J2CA 1.0 IMS/TM adapter is described in Oracle Application Server Adapter Installation Guide. |
This chapter includes the following sections:
Installing Oracle Connect on an IBM OS/390 or z/OS Series Platform
Updating an Existing Oracle Connect Installation with IMS/TM
Before installing OracleAS Adapter for IMS/TM, ensure that your computer meets the following requirements:
This section describes the following requirements for installing Oracle Connect on an IBM OS/390 or z/OS platform:
The following table summarizes the hardware requirements for Oracle Connect.
This section describes the following requirements for installing Oracle Studio:
|
Note: If you have an Oracle Connect back-end adapter already installed on the IBM OS/390 or z/OS platform, then follow the instructions described in "Updating an Existing Oracle Connect Installation with IMS/TM".The other back-end adapters that run on an IBM OS/390 or z/OS platform are:
|
This section explains how to install Oracle Connect from the CD-ROM. This section includes the following:
Verify that you have all the information detailed in the following installation worksheets, so you can refer to it during the configuration process.
Table 2-1 Preinstallation Information
| Topic | Required Information | Default | Comment |
|---|---|---|---|
| General | Operating system | - | OS/390 V2R5 or higher, or z/OS Series V1R0 or higher |
| - | Disk space | - | 150 cylinders |
| - | Memory | - | The minimum requirement is 4MB for each connection. A connection is defined as a connection to a server process or daemon. The actual memory requirement depends on such things as the size of the database and the number of databases accessed. |
| - | Installation high-level qualifier | OCL1012 | - |
| - | Volume | - | - |
| - | Unit | 3390 | SMS only: unit where SMS resides. |
| - | Output class | A | - |
| - | JCL job card | - | An optional card (up to 6 lines) to replace the prefix job (entered as it will appear in the job) |
| - | ISPF load library name | ISP.SISPLOAD | - |
Table 2-2 Required Permissions
| Permission |
|---|
| Permission to define an APF-authorized library |
| Permission to write to an active proclib, such as user.proclib |
| Permission to update the security manager, such as RACF |
| Optionally, permission to specify an output class for Oracle Connect output |
Table 2-3 Installation Checklist
| Step | Comment/Outputs |
|---|---|
| tso profile prefix | Ensures that the user name is not used as part of the dataset name allocated in the next steps |
| Allocate dataset: {HLQ}.TRANSMIT.KIT | 130 tracks (3390), format=FB, record length=80, block size=3120 |
| Allocate dataset: {HLQ}.TRANSMIT.LOAD | 420 tracks (3390), format=FB, record length=80, block size=3120 |
| Copy files to OS/390 (or z/OS) | FTP using binary mode |
| RECEIVE INDSNAME('{HLQ}.TRANSMIT.KIT') | - |
| da('{HLQ}.TRANSMIT.LIB') UNIT(unit) VOLUME(volume) | - |
| EX {HLQ}.TRANSMIT.LIB(PREPARE) | Successful MAXCC is 0, 4 or 8
BUILDKIT.SRC and BUILDKIT.LOAD created |
| EX {HLQ}.BUILDKIT.SRC(NAVINST) | Successful MAXCC is 0 or 4 |
Before starting the installation, ensure that the following information is available:
The output class for the installation output if you do not want to use the default value, which is A.
If you use SMS to manage all datasets, then you cannot provide unit and volume information, the unit where SMS resides.
Before starting the installation, ensure that you have the following permissions:
Permission to define an APF-authorized library.
Permission to write to an active proclib, such as user.proclib.
Permission to update the security manager, such as RACF.
|
Note: Optionally, ensure that you have permission to specify an output class for Oracle Connect output. Assigning a device that is set onHOLD prevents the loss of log information when Oracle Connect started tasks finish.
|
Oracle Connect for the IBM OS/390 or z/OS platform is contained in the following datasets:
OCL1012.TRANSMIT.KIT
OCL1012.TRANSMIT.LOAD
These datasets are provided on a CD-ROM in the following directory:
Oracle_Connect\IMSTM_Legacy_Adapter
Perform the following steps on the mainframe:
Run the following command:
tso profile noprefix
The user name will not be used as part of the dataset name. On some systems this is the default.
Allocate datasets with the following space for each of these files:
OCL1012.TRANSMIT.KIT = 130 tracks (3380 and 3390 disks)
OCL1012.TRANSMIT.LOAD = 420 tracks (3380 and 3390 disks)
For each dataset: RECFM=FB and LRECL=80. The block size is 3120.
Using FTP, copy OCL1012.TRANSMIT.KIT and OCL1012.TRANSMIT.LOAD in the binary mode from the installation CD to the mainframe. You can replace the OCL1012 high-level qualifier to any qualifier you want.
Perform the following steps to install Oracle Connect:
Run the following command at the TSO prompt:
RECEIVE INDSNAME('nnn.TRANSMIT.KIT')
Where nnn represents the high-level qualifier you want to assign for the Oracle Connect installation. Assign the high-level qualifier you specified in step 7 of the preinstallation procedure. The default value is OCL1012.
|
Note: You can use more than one high-level qualifier (such asACME.DEV.OCL1012) with the following conditions:
|
Enter the following when prompted for the restore parameters:
da('nnn.TRANSMIT.LIB') [UNIT(unit) VOLUME(volume)]
This extracts the nnn.TRANSMIT.LIB library from the nnn.TRANSMIT.KIT kit to the specified unit and volume. If a unit and volume are not specified, then the library is extracted to the current unit and volume.
Run the PREPARE member of the nn.TRANSMIT.LIB library:
ex PREPARE
Follow the instructions in the Response column in Table 2-4 for each entry in the Screen column.
Table 2-4 Installation Prepare Job Prompts and Responses
| Screen | Response |
|---|---|
| DO YOU WANT TO USE SMS MANAGED STORAGE FOR THIS INSTALLATION Y/N [N]: | If you want to manage the storage using SMS, then answer Y, otherwise answer N. |
| ENTER THE STORCLASS FOR INSTALLATION TEMP DATASETS [ ]: | This prompt is displayed only if SMS is used to manage the installation (you answered Y to the first prompt).
Enter the storage class |
| ENTER THE UNIT NAME FOR INSTALLATION TEMP DATASETS [3390]: | If a storage class is not specified, then enter the unit name for temporary datasets used during the installation procedure |
| ENTER THE VOLUME NAME FOR INSTALLATION TEMP DATASETS: | This prompt is displayed only if SMS is not used to manage the installation (you answered N to the first prompt).
The volume name for temporary datasets used during the installation procedure |
| ENTER THE OUTPUT CLASS FOR INSTALLATION OUTPUT [A] : | Enter the output class only if you do not want the default class used (the default is A) |
| DO YOU WANT TO USE THE DEFAULT JOB CARD Y/N [Y] | A job card is displayed. If you want to use a replacement card, then it must be entered as it will appear in the job. You can enter up to six lines. Enter a blank card to end input.
If you do not enter a card, then the Oracle Connect default card is used. |
| DO YOU WANT TO PERFORM A MANUAL (M) OR AUTOMATIC (A) INSTALLATION [A]: | If you want to review the JCL used to install Oracle Connect, before it is submitted, then respond M for a manual installation. |
| PLEASE REVIEW AND SUBMIT FOR EXECUTION THE HLQ.TRANSMIT.LIB(INSTJO) | This prompt is displayed only if a manual installation is requested (you answered M to the previous prompt). |
The following libraries are generated:
nnn.BUILDKIT.LOAD
nnn.BUILDKIT.SRC
nnn.BUILDKIT.GENDEMO
Where nnn is the high-level qualifiers you assigned in step 1.
In the nnn.BUILDKIT.SRC library, run the NAVINST member:
ex NAVINST
Follow the instructions in the Response column in Table 2-5 for each entry in the Screen column.
Table 2-5 Installation Prompts and Responses
| Screen | Response |
|---|---|
| DO YOU WANT TO USE SMS MANAGED STORAGE FOR THIS INSTALLATION Y/N [N]: | If you want to manage the storage using SMS, then answer Y, otherwise answer N. |
| THE SOFTWARE WILL BE INSTALLED UNDER THE HIGH LEVEL QUALIFIER THAT YOU WILL CHOOSE.
ENTER THE HIGH LEVEL QUALIFIER ["QUALIFIER"]: |
The high-level qualifier for the installation (referred to as INSTROOT throughout this guide)
You can use more than one high-level qualifier (such as The words transmit and buildkit cannot be used as high-level qualifiers. |
| ENTER THE STORCLASS FOR TEMP DATASETS ['STORCLASS']: | This prompt is displayed only if SMS is used to manage the installation (you answered Y to the first prompt).
Enter the storage class |
| ENTER THE UNIT NAME FOR INSTALLATION TEMP DATASETS [3390]: | The unit name for temporary datasets used during the installation procedure. |
| ENTER THE VOLUME NAME FOR INSTALLATION TEMP DATASETS | This prompt is displayed only if SMS is not used to manage the installation (you answered N to the first prompt).
The volume name for temporary datasets used during the installation procedure |
| PLEASE CONFIRM (YES/NO/QUIT) [YES]: | Confirm the entered details |
| ENTER THE OUTPUT CLASS FOR INSTALLATION OUTPUT [A : | Enter the output class for Oracle Connect output. Assigning a device that is set on HOLD prevents the loss of log information when the Oracle Connect started tasks finish (the default is A).
|
| DO YOU WANT TO USE THE DEFAULT JOB CARD Y/N [Y] | A job card is displayed. If you want to use a replacement card, then it must be entered as it will appear in the job. You can enter up to six lines. Enter a blank card to end input.
If you do not enter a card, then the Oracle Connect default card is used. |
| ADDING AND UPDATING ORACLE CONNECT FOR IMS/TM CONFIGURATION ON THIS MACHINE, FROM A REMOTE ORACLE ADMINISTRATION CONSOLE, CAN ONLY BE DONE BY SOMEONE DEFINED AS AN ADMINISTRATOR FOR ORACLE CONNECT ON THIS MACHINE.
ENTER A VALID USER NAME FOR AN ORACLE CONNECT ADMINISTRATOR [ALL]: |
To manage Oracle Connect on this computer from Oracle Studio, you need to enter a user account of a user who will have administrative authorization, or press Enter to enable any user to administer Oracle Connect on this computer. The administrative rights can be changed from within Oracle Studio after the installation. |
| DO YOU WANT TO PERFORM A MANUAL (M) OR AUTOMATIC (A) INSTALLATION [A]: | If you want to review the JCL used to install Oracle Connect, before it is submitted, then respond M for a manual installation. |
| PLEASE REVIEW AND SUBMIT FOR EXECUTION THE DSN1 (INSTJBOR) | This prompt is displayed only if a manual installation is requested (you answered M to the previous prompt).
DSN1 is the dataset name where INSTJBOR is located. |
In the nnn.BUILDKIT.SRC library, run the IMSTM member:
ex IMSTM
Follow the instructions in the Response column in Table 2-6 for each entry in the Screen column.
Table 2-6 IMS/TM Adapter-Specific Installation Prompts and Responses
| Screen | Response |
|---|---|
| ENTER THE ISPF LOAD LIBRARY NAME [ISP.SISPLOAD] : | Enter the ISPF load library name only if you do not want the default |
| PLEASE CONFIRM (YES/NO/QUIT) [YES] : | Confirm the entered details |
| ENTER THE OUTPUT CLASS FOR INSTALLATION OUTPUT [A] : | Enter the output class for Oracle Connect output. Assigning a device that is set on HOLD prevents the loss of log information when the Oracle Connect started tasks finish (the default is A).
|
| DO YOU WANT TO USE THE DEFAULT JOB CARD Y/N [Y] | A job card is displayed. If you want to use a replacement card, then it must be entered as it will appear in the job. You can enter up to six lines. Enter a blank card to end input.
If you do not enter a card, then the Oracle Connect default card is used. |
The installation is completed. All JCL jobs and REXX procedures are written to the INSTROOT.USERLIB library. INSTROOT is the high-level qualifier for the installation.
The following postinstallation tasks must be done to work with Oracle Connect:
Perform the following procedures after completing the installation to configure Oracle Connect.
Allocate a dataset for INSTROOT.DEF.BRANDBIN, using 1 track and with RECFM=VB and LRECL=256. The block size is 6233.
INSTROOT is the high-level qualifier where Oracle Connect is installed.
Using FTP, copy the BRANDBIN file, in binary mode, from the Oracle Connect\IMSTM Legacy Adapter directory in the installation CD to the mainframe, to INSTROOT.DEF.BRANDBIN.
Define the LOADAUT library as an APF-authorized library
|
Note: To define a DSN as APF-authorized, in the SDSF screen enter the following command:"/setprog apf,add,dsn=INSTROOT.loadaut,volume=vol002"
Where vol002 is the volume where you installed Oracle Connect and If the site uses SMS, then when defining APF-authorization in the SDSF screen, enter the following command: "/setprog apf,add,dsn=INSTROOT.loadaut,SMS"
Ensure that the library is APF-authorized, even after an IPL (restart) of the computer. |
Move the INSTROOT.USERLIB(ATTDAEMN) and INSTROOT.USERLIB(ATTSRVR) members to any active proclib (such as user.proclib). ATTDAEMN and ATTSRVR are run as started tasks.
If you decide to change the name of the ATTSRVR member when you move it to a general high-level qualifier, then change the name specified in the StartupScript parameter in the daemon configuration to the new name:
Run INSTROOT.USERLIB(NAVCMD) and enter EDIT DAEMON IRPCDINI at the prompt.
Change the startupScript parameter from ATTSRVR to the new name for the server:
<Workspace name="Navigator"
           startupScript="NEW_NAME"
           serverMode="reusable"
           ... />
Exit and save the changes.
Change the following line in the ATTDAEMN script to include the IP address and port of the IBM OS/390 or z/OS platform.
For example, before:
// PARM='-B START IRPCDINI'
After:
// PARM='-B -L ip_address:2252 START IRPCDINI'
Where ip_address is ip address of the computer, 2552 is the default port for starting the daemon and IRPCDINI is the default daemon configuration.
The ATTDAEMN and ATTSRVR started tasks need permission to use an Open Edition TCP/IP stack. The owner must be a user with OMVS segment defined and the OMVS UID should be 0000000000.
In the security manager, such as RACF, define ATTDAEMN and ATTSRVR with a started task class and a general profile that enables the following:
Permission to issue master console commands.
START authority for the ATTSRVR job.
Access to an Open OS/390 segment (that defines access to TCP/IP OA sockets).
ALTER authority on datasets under INSTROOT to access to read, write, allocate and delete datasets under INSTROOT.
The installation includes a PS, INSTROOT.DEF.GBLPARMS, that contains global environment information. This PS is read at startup and the correct software version is used, based on the details provided in the startup task.
If you change the location of this member, then you must also change the relevant cards in the following jobs to the new locations:
ATTSRVR: Located in an active proclib, such as user.proclib
ATTDAEMN: Located in an active proclib, such as user.proclib
NAVSQL: Located in INSTROOT.USERLIB
The input during the installation procedure is written to nnn.BUILDKIT.SRC(PARS). You can use this file to provide the same inputs if you rerun the installation, where nnn is the high-level qualifier you assign for the installation.
For information about specifying Oracle Connect as the service using port 2552 in the TCP/IP network services file, refer to the TCP/IP documentation.
Activate INSTROOT.USERLIB(ATTDAEMN) as a started task to invoke the daemon. For example, in the SDSF screen enter the following:
'/s ATTDAEMN'
Where INSTROOT is the high-level qualifier where Oracle Connect is installed.
To submit the daemon as a job, remove comments from the first two lines of the ATTDAEMN JCL, change the PARM line as described earlier, and run the job using the sub command. The following is a sample ATTDAEMN JCL.
//*ATTDAEMN JOB 'RR','TTT',MSGLEVEL=(1,1),CLASS=A,
//* MSGCLASS=A,NOTIFY=&SYSUID,REGION=8M
//STEP1 EXEC PGM=IRPCD,
// PARM='-B  START IRPCDINI'
//* PARM='-B -L :8883 START'
//STEPLIB DD DSN=INSTROOT.LOADAUT,DISP=SHR
//SYSPRINT DD SYSOUT=A
//GBLPARMS DD DSN=INSTROOT.DEF.GBLPARMS,DISP=SHR
// EXEC PGM=IRPCD,COND=((1,EQ,STEP1),(2,EQ,STEP1)),
// PARM='-KATTDAEMN START ''INSTROOT.DEF.IRPCDINI'''
//STEPLIB DD DSN=INSTROOT.LOADAUT,DISP=SHR
//SYSPRINT DD SYSOUT=A
//GBLPARMS DD DSN=INSTROOT.DEF.GBLPARMS,DISP=SHR
//SYSDUMP DD DUMMY
To run an IMS transaction, set OTMA (Open Transaction Manager Access), as follows:
Install OTMA with OTMA C/I where IMS resides, as OTMA is not automatically installed using the IMS INSTALL/IVP Dialog.
During IMS system definition, set the startup parameter in the IMS procedure to OTMA=YES. In addition, set additional OTMA-related parameters such as GRNAME for the XCF group name and OTMANM for the IMS member name in that XCF group, as in the following example:
EDIT       IMS.PROCLIB(DFSPBIV1) - 01.03
command ===>
000082 AOIS =,
000083 GRNAME=IMSATT01,
000084 OTMA=YES,
000085 MAXPST=
000086 OTMANM=
Start the OTMA Callable Interface (C/I).
Add an entry in the program properties table (PPT) for the OTMA C/I initialization program as follows:
Edit the SCHEDxx member of the SYS1.PARMLIB data set by adding the following entry:
PPT PGMNAME(DFSYSVI0) /*PROGRAM NAME =DFSYSVI0 */
CANCEL    /*PROGRAM CAN BE CANCELED */
KEY(7)    /*PROTECT KEY ASSIGNED IS 7 */
SWAP      /*PROGRAM IS SWAPPABLE */
NOPRIV    /*PROGRAM IS NOT PRIVILEGED */
DSI       /*REQUIRES DATA SET INTEGRITY */
PASS      /*CANNOT BYPASS PASSWORD PROTECTION */
SYST      /*PROGRAM IS A SYSTEM TASK */
AFF(NONE) /*NO CPU AFFINITY */
NOPREF    /*NO PREFERRED STORAGE FRAMES */
To make the SCHEDxx changes take effect, perform one of the following tasks:
Re-IPL the system.
Issue the SET SCH= command.
Edit and submit the following JCL procedure to run DFSYSVI0:
//OTMAINIT PROC RGN=3000K,SOUT=A,
/PARM1=
//*
//IEFPROC EXEC PGM=DFSYSVI0,
//REGION=&RGN
//*
//STEPLIB DD DISP=SHR,UNIT=SYSDA,
//DSN=IMSVS.RESLIB
//*
//SYSPRINT DD SYSOUT=&SOUT
//SYSUDUMP DD SYSOUT=&SOUT
//*
Run DFSYSVI0 after the IPL, to initialize the OTMA C/I.
Copy INSTROOT.LOAD(ATYDBDC)to an IMS/TM program library, such as IMS.PGMLIB.
All Oracle Connect load modules are reentrant to enable subtasking. Therefore, move INSTROOT.LOAD to the Link Pack Area (LPA).
WhereINSTROOT is the high-level qualifier where Oracle Connect is installed.
Using the LPA reduces real storage usage, because everyone shares the LPA copy, and fetch time.
|
Note: If you intend using impersonation, so that you can run in a security context that is different than the context of the process that owns the server, then do the following:
Where |
Verify that you have all the information detailed in the following installation worksheets. You can refer to it during the configuration process.
Table 2-7 Preinstallation Information
| Topic | Required Information | Default | Comment |
|---|---|---|---|
| CICS | CICS EXCI load library name | CICS.CICS.SDFHEXCL | To access IMS/DB or VSAM data under CICS |
Table 2-8 Required Permissions
| Permission |
|---|
| Permission to read the CICS EXCI library (when accessing IMS/DB or VSAM data under CICS) |
In the nnn.BUILDKIT.SRC library, run the CUSTOCL member:
ex CUSTOCL
Follow the instructions in the Response column in Table 2-9 for each entry in the Screen column.
Table 2-9 IMS/TM Adapter Installation Prompts and Responses
| Screen | Response |
|---|---|
| DO YOU WANT ORACLE CONNECT FOR LEGACY ADAPTER TO WORK WITH IMS/DB (YES/NO) [YES] : | Answer YES to this prompt if you have Oracle Connect for IMS/DB already installed. |
| ENTER DBD LIBRARY NAME [IMS.DBDLIB] : | If you responded YES to working with IMS/DB, then enter the library where database definition (DBD) files are located. |
| ENTER PSB LIBRARY NAME [IMS.PSBLIB] : | If you responded YES to working with IMS/DB, then enter the library where Program Specification Blocks (PSBs) are located. |
| ENTER YOUR PSB NAME [HOSPPSB] : | If you responded YES to working with IMS/DB, then enter the name of the PSB file to use. |
| PLEASE CONFIRM (YES/NO/QUIT) [YES]: | If you responded YES to working with IMS/DB, then confirm the entered details. |
| DO YOU WANT ORACLE CONNECT FOR LEGACY ADAPTER TO WORK WITH IMS/DB UNDER CICS (YES/NO) [NO]: | If you want to access IMS/DB data under CICS, using OracleAS Adapter for IMS/DB, then respond YES. |
| ENTER THE CICS EXCI LOAD LIBRARY NAME [CICSTS13.CICS.SDFHEXCI]: | If you responded YES to working with IMS/DB under CICS, then enter the CICS EXCI load library name only if you do not want the default. |
| PLEASE CONFIRM (YES/NO/QUIT) [YES]: | If you responded YES to working with IMS/DB under CICS, then confirm the entered details. |
| DO YOU WANT ORACLE CONNECT FOR LEGACY ADAPTER TO WORK WITH CICS APP ADAPTER (YES/NO) [YES]: | Answer YES to this prompt |
| ENTER THE CICS EXCI LOAD LIBRARY NAME [CICSTS13.CICS.SDFHEXCI]: | Enter the CICS EXCI load library name only if you do not want the default. |
| PLEASE CONFIRM (YES/NO/QUIT) [YES] | Confirm the entered details |
| THE VSAM DRIVER IS INSTALLED AUTOMATICALLY. DO YOU ALSO WANT ORACLE CONNECT FOR LEGACY ADAPTER TO WORK WITH VSAM UNDER CICS (YES/NO) [NO]: | Answer YES to this prompt if you have Oracle Connect for VSAM already installed and you want to access VSAM data under CICS. |
| ENTER THE CICS EXCI LOAD LIBRARY NAME [CICSTS13.CICS.SDFHEXCI]: | If you responded YES to working with VSAM under CICS, then enter the CICS EXCI load library name only if you do not want the default. |
| PLEASE CONFIRM (YES/NO/QUIT) [YES]: | If you responded YES to working with VSAM under CICS, then confirm the entered details. |
| ENTER THE ISPF LOAD LIBRARY NAME [ISP.SISPLOAD]: | Enter the ISPF load library name only if you do not want the default. |
| PLEASE CONFIRM (YES/NO/QUIT) [YES]: | Confirm the entered details |
| ENTER THE OUTPUT CLASS FOR INSTALLATION OUTPUT [A]: | Enter the output class for Oracle Connect output. Assigning a device that is set on HOLD prevents the loss of log information when the Oracle Connect started tasks finish (the default is A).
|
| DO YOU WANT TO USE THE DEFAULT JOB CARD Y/N [Y] | A job card is displayed. If you want to use a replacement card, then it must be entered as it will appear in the job. You can enter up to six lines. Enter a blank card to end input.
If you do not enter a card, then the Oracle Connect default card is used. |
The installation is completed. All JCL jobs and REXX procedures are written to the INSTROOT.USERLIB library. INSTROOT is the high-level qualifier for the installation.
After completing the installation, perform postinstallation tasks, as described in "Postinstallation Instructions".
This section explains how to install Oracle Studio from the CD-ROM.
|
Note: If Oracle Studio is already installed because you are also using another legacy adapter, then you do not need to reinstall it.The other legacy adapters are:
|
Assuming that the CD-ROM drive is D:, the installation file is located in the D:\Oracle_Studio directory. Install Oracle Connect from the CD-ROM by running the self-extracting executable installation file, OSL904-win32.exe.
|
Note: If you are installing Oracle Studio on a Windows XP computer, you cannot specify a logical drive as the Destination folder for the installation. |
All modeling of Oracle Connect is performed using Oracle Studio. To use Oracle Studio, you first configure it to enable access to the IBM OS/390 or z/OS platform where IMS/TM runs.
To configure Oracle Connect, refer to the following sections:
|
Note: The following tasks assume you have permission to access the IBM OS/390 or z/OS platform and that the Oracle Connect daemon is running on this computer.Check with the system administrator to ensure these requirements are fulfilled. |
Perform the following steps to configure the IBM OS/390 or z/OS, using Oracle Studio:
From the Start menu, select Programs, Oracle, and then select Studio.
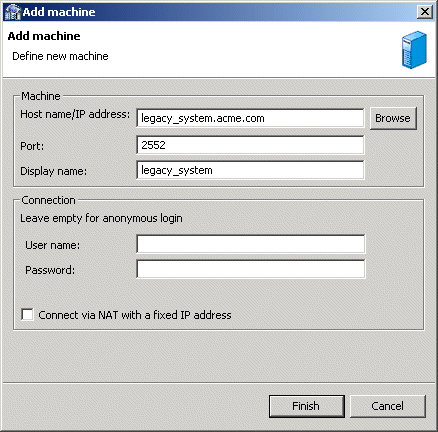
Right-click Machines in the Configuration Explorer and select Add Machine The Add Machine screen is displayed.
Enter the name of the computer you want to connect to, or click Browse to select the computer from the list of computers that is displayed and which use the default port (2552).
Specify the username and password of the user who was specified as the administrator when Oracle Connect was installed.
|
Note: Selecting Anonymous connection enables anyone having access to the computer to be an administrator. |
The Add Machine screen is shown in the following figure.
Click Finish.
The computer is displayed in the Configuration Explorer.
Oracle Studio includes mechanisms to secure access to Oracle Connect both during modeling and during run time.
During modeling the following security mechanisms can be applied:
During run time client access to Oracle Connect is provided by the user profile:
Initially, any operation performed using Oracle Studio does not require a password. You can set a password so that the first operation that involves accessing the server from Oracle Studio requires a password to be entered.
Perform the following steps:
From the Start menu, select Programs, Oracle and then select Studio. Oracle Studio opens.
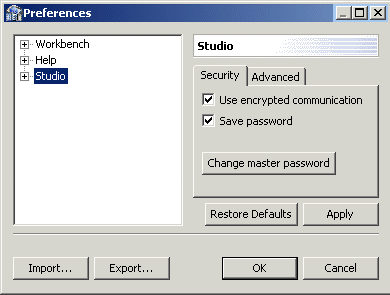
Select Window from the menu bar and then select Preferences.
The Preferences screen is displayed, as shown in the following figure:
Select the Studio node.
Click Change master password to display the Change master password screen.
In the Change master password screen, leave the Enter current master password field empty and type a new master password.
Confirm the password.
Click OK.
By default, only the user who was specified during the installation as an administrator has the authorization to modify settings on that computer from Oracle Studio. This user can then authorize other users to make changes or to view the definitions for a selected computer. Adding a computer to Oracle Studio is described in "Setting Up the IBM OS/390 or z/OS Platform in Oracle Studio".
|
Note: The default during installation is to enable all users to be administrators. |
Perform the following steps to specify a user with administrative rights:
From theStart menu, select Programs, Oracle, and then select Studio. Oracle Studio is displayed.
Right-click the computer in the Configuration Explorer and select Administration Authorization. The Administration Authorization screen is displayed, as shown in the following figure:

Add users or groups of users by clicking Add User or Add Group for the relevant sections. The user or group that is added must be recognized as a valid user or group for the computer.
Once a name has been added to a section, only the user or group who logs on with that user name has the relevant authorization.
During run time, client access to Oracle Connect is provided by the user profile. A user profile contains name and password pairs that are used to access a computer, data source or application at run time, when anonymous access is not allowed.
In the Configuration Explorer, expand the node of the computer for which you want to set the user name and password.
Expand the Users node.
Right-click the NAV user profile and select Edit User. The User Editor pane is displayed, as shown in the following figure:

In the User editor, click Add to display the Add Authenticator screen.
Select Remote Machine from the Resource type list as shown in the following figure:
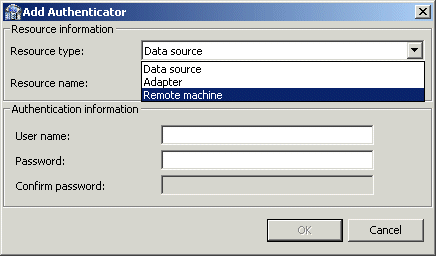
Enter the name of the IBM OS/390 or z/OS computer defined in Oracle Studio.
Enter the name and password used to access the computer and confirm the password.
Click OK.
Modeling interactions for OracleAS Adapter for IMS/TM involves defining an Oracle Connect back-end adapter using Oracle Studio. All the definitions specified in Oracle Studio are written to the IBM OS/390 or z/OS platform.
This section contains the following:
To work with the Oracle Connect, you need to set up an adapter definition on the IBM OS/390 or z/OS platform to handle the interactions to and from an IMS/TM transaction. You use Oracle Studio to specify these definitions.
Perform the following steps:
From the Start menu, select Programs, Oracle, and then select Studio.
In the Configuration Explorer, expand the node of the computer defined in "Setting Up the IBM OS/390 or z/OS Platform in Oracle Studio".
Expand the Bindings node. The binding configurations available on this computer are listed.
Expand the NAV binding node. The NAV binding configuration includes branches for data sources and adapters that are located on the computer.
Right-click Adapters and select New Adapter to open the New Adapter wizard.
Enter a name for the back-end adapter.
|
Note: The word event is a reserved word and cannot be used when naming an adapter. |
Select IMS/TM as the back-end adapter type from the Type list as shown in the following figure:
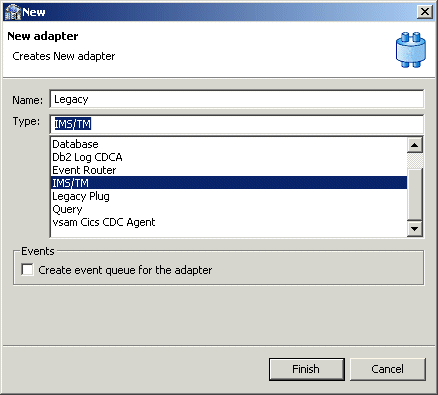
Select Events.
Click Finish. The back-end adapter is added to the list and the definition opens for editing.
|
Note: Other adapters that are displayed in theType list are not supported with the version of Oracle Connect installed at the site.
|
Select the Properties tab and change any of the properties for the adapter, as required.
The Properties tab is shown in the following figure:

The Properties tab comprises fields, as listed in the following table:
| Property | Description |
|---|---|
| cachLastTpipe | Cache the last transaction pipe used. |
| cacheXcfConnection | Cache the XCF connection information. |
| maxSessions | The maximum number of sessions allowed. The default value is 5. |
| racfGroupId | The RACF facility group identification. |
| racfUserId | The RACF facility user identification. |
| tpipePrefix | The transaction pipe prefix used to associate between the transaction and the transaction pipe it is using. The default is ATTU. |
| xcfClient | The Cross System Coupling Facility client name. |
| xcfGroup | The Cross System Coupling Facility collection of XCF members to which the connection belongs. A group may consist of up to eight characters, and may span between multiple systems. |
| xcfImsMember | The Cross System Coupling Facility group member. |
Oracle Connect requires metadata describing the adapter interactions, including the structures used to pass information to and from the adapter.
If COBOL copybooks describing the adapter input and output structures are available, then you can import the adapter definition using the Metadata Import wizard in Oracle Studio Design perspective to generate interaction metadata. If the metadata is provided in a number of COBOL copybooks, with different filter settings (such as whether the first six columns are ignored or not), then you first import the metadata from copybooks with the same settings and later import the metadata from the other copybooks.
If COBOL copybooks describing the input and output structures are not available, then you need to manually define the metadata.
The following information is required during the import procedure:
The COBOL copybooks: These are copied to the computer running Oracle Studio as part of the import procedure.
The names of the IMS/TM transactions to be executed through the application adapter.
Use the Metadata Import procedure to generate interaction metadata, as follows:
In the Configuration explorer, right-click the IMS/TM back-end adapter defined in "Setting Up an Oracle Connect Adapter".
Select Edit metadata, to display the Metadata tab, with the IMS/TM back-end adapter displayed under the Adapters list.
Right-click the Imports node and select New Import. The New Metadata Import screen is displayed.
Enter a name for the import. The name can contain letters and numbers and the underscore character only.
Select ImsTm Import Manager from the Import type list as shown in the following figure:
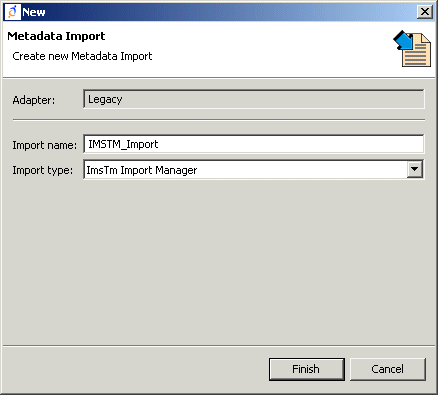
Click Finish. The Metadata Import wizard is displayed.
Click Add. The Select Resources screen is displayed, which provides the option to select files from the local computer or copy the files from another computer.
If the files are on another computer, then right-click My FTP Sites and select Add. Optionally, double-click Add FTP site. The Add FTP Site screen is displayed.
Enter the server name or IP address where the COBOL copybooks reside and enter a valid username and password to access the computer (if anonymous access is used, then click Anonymous connection) then click OK.
The FTP site is added to the list of available sites as shown in the following figure:
|
Note: The selected server is accessed using the username as the high-level qualifier, enabling you to browse and transfer files. |
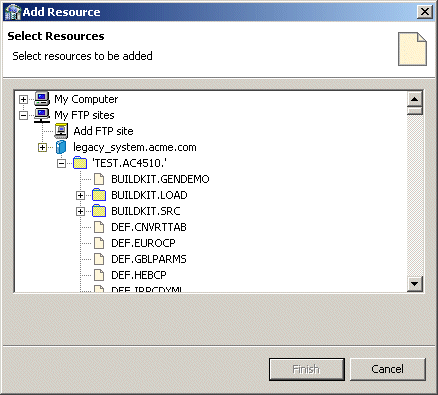
Right-click the computer and select Set Transfer Type. Enter the transfer type (ASCII or BINARY) and click OK.
Expand the list of the added site until you find the necessary COBOL files. To change the high-level qualifier, right-click the computer and select Change Root Directory. Enter the new high-level qualifier enclosed in quotes, and click OK.
Select the required COBOL copybook file or files and click Finish. The selected file or files are displayed in the Metadata Import wizard.
|
Note: You can import the metadata from one COBOL copybook and later add to this metadata by repeating the import procedure using different COBOL copybooks.The format of the COBOL copybooks must be identical. That is, you cannot import a COBOL copybook that uses the first six columns with a COBOL copybook that ignores the first six columns. In this type of case you must repeat the import procedure. |
Click Next. The Apply Filters screen is displayed, as shown in the following figure.
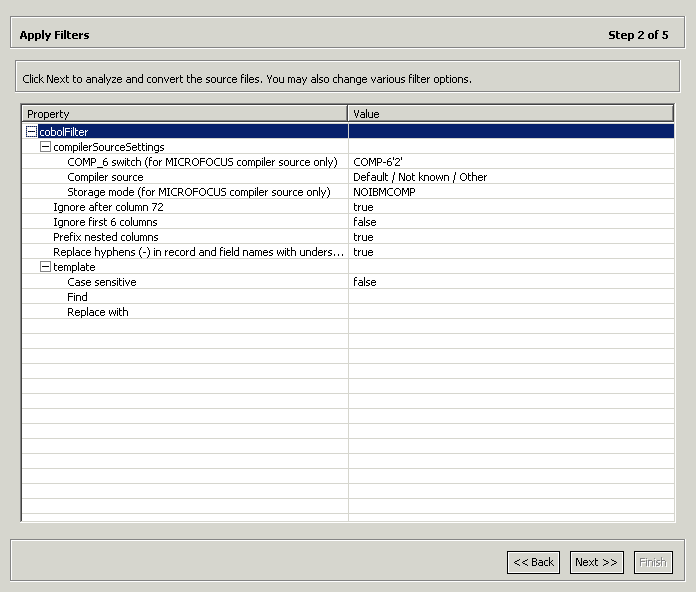
Apply filters to the copybooks, as needed.
The following table lists the available filters:
| Filter | Description |
|---|---|
| COMP_6 switch | The MicroFocus COMP-6 compiler directive. Specify either COMP-6'1' to treat COMP-6 as a COMP data type or COMP-6'2' to treat COMP-6 as a COMP-3 data type. |
| Compiler source | The compiler vendor. |
| Storage mode | The MicroFocus Integer Storage Mode. Specify either NOIBMCOMP for byte storage mode or IBMCOMP is for word storage mode. |
| Ignore after column 72 | Ignores columns 73 to 80 in the COBOL copybook. |
| IgnoreFirst6 | Ignores the first six columns in the COBOL copybook. |
| Replace hyphens (-) in record and field names with underscores (_) | Replaces all hyphens in either the record or field names in the metadata generated from the COBOL with underscore characters. |
| Prefix nested columns | Prefix all nested columns with the previous level heading. |
| Case sensitive | Specifies whether to be sensitive to the search string case. |
| Find | Searches for the specified value. |
| Replace with | Replaces the value specified for Find with the value specified here |
In the import wizard, click Next. The Add Interactions screen is displayed, as shown in the following figure:

Click Add to add an interaction for the IMS/TM adapter. Provide the information, as listed in the following table:
| Parameter | Description |
|---|---|
Name
|
The name of the interaction. You can change the default name specified. |
Mode
|
The interaction mode. You can select one of the following:
sync-send-receive: The interaction sends a request and expects to receive a response. This is the default mode. sync-receive: The interaction expects to receive a response sync-send: The interaction sends a request and does not expect to receive a response. |
Input
|
Identifies an input record. The input record is the data structure for the interaction. The records generated from the COBOL files specified at the beginning of the procedure are listed. Select the relevant record for the interaction.
Note: You must specify an input record for each interaction before you can click Next. If the interaction does not require an input record, then the record specified here is ignored. |
Output
|
Identifies an output record. The output record is the data structure for the results of the interaction. The records generated from the files specified at the beginning of the procedure are listed. Select the relevant record for the interaction.
Note: You must specify an output record for the interaction if the mode is set to sync-send-receive or sync-receive, before you can click Next. |
Description
|
Free text describing the interaction. |
| Interaction-Specific Parameters | IMS/TM specific parameters:
c: The interaction commit mode. maxSegmentSize: The maximum size of the segment. The default value is 32768 (bytes). transaction: The name of the transaction that is executed when the interaction is executed. You must specify a transaction name for each interaction. The maxSegmentSize parameter enables dynamically splitting large messages into smaller segments. Although the default value can be changed, the logic of IMS/TM transaction must correspond accordingly. The transaction must perform a GU call followed by a series of GN calls in order to compile the entire input message. A transaction output message, larger than 32K, is handled by the OTMS C/I interface which performs the task of assembling the output segments into a single buffer. |
Add as many interactions as necessary and click Next to generate the metadata definitions for the adapter.
Specify that you want to transfer the metadata from the Windows computer to the IBM OS/390 or z/OS platform and click Finish.
The metadata is imported based on the options specified and it is stored on the IBM OS/390 or z/OS platform. An XML representation of the metadata is also generated.
After performing the import, you can view the metadata in Oracle Studio Design perspective Metadata tab. You can also make any fine adjustments to the metadata and maintain it, as necessary.
|
See Also: Appendix A, "Advanced Tuning of the Metadata" for details about fine tuning the adapter metadata |
Inbound interactions are defined as events in Oracle Studio. When you defined the Oracle Connect for IMS/TM back-end adapter with Event selected, an event adapter was defined automatically. The event adapter is defined with the same name as the back-end adapter with the word event appended to it. The back-end adapter and the event adapter are linked by Oracle Studio.
You can skip from the adapter definition to the event definition by right-clicking the adapter or event in the Configuration Explorer list and choosing the Linked Event or Linked Adapter option respectively.
The event adapter requires metadata describing the inbound interactions, including the structure used to pass information.
|
Note: The generation of inbound interactions involves similar steps to the steps described to generate outbound interactions. |
Use the Metadata Import procedure in Oracle Studio to generate interaction metadata, as follows:
In the Configuration Explorer, right-click the IMS/TM back-end adapter defined in "Setting Up an Oracle Connect Adapter".
Select Linked Event, to skip to the event adapter.
Right-click the event adapter and select Edit Event.
Click the Properties tab to add the names of Oracle Application Server users who can retrieve inbound interactions and OS/390 users who can send inbound interactions.
To add Oracle Application Server users, expand the Routers node and right-click the users property to add the user.
The Properties tab is shown in the following figure:
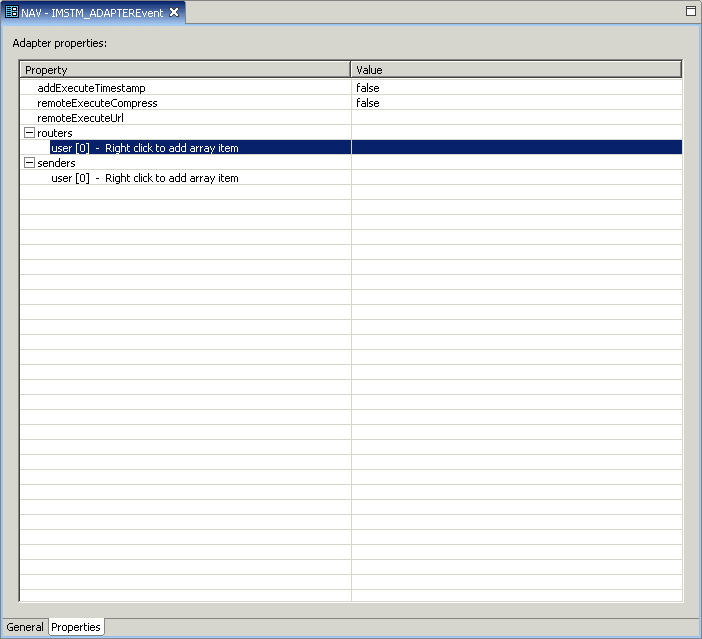
Enter the name of the Oracle Application Server user in the Value column for the item added.
To add OS/390 users, expand the Senders node and right click the users property to add the user.
Enter the name of the OS/390 user in the Value column for the item added.
Click Save to save the changes.
Right-click the event adapter in the Configuration Explorer and select Edit metadata, to display the Metadata tab, with the event adapter displayed under the Events list.
Right-click the Imports node and select New Import, to open the New Metadata Import wizard.
Enter a name for the import. The name can contain letters and numbers and the underscore character only.
Select Event Queue Import Manager Using Cobol COPYBOOK Input Files as the import type, and click Finish.
The New Import screen is shown in the following figure:
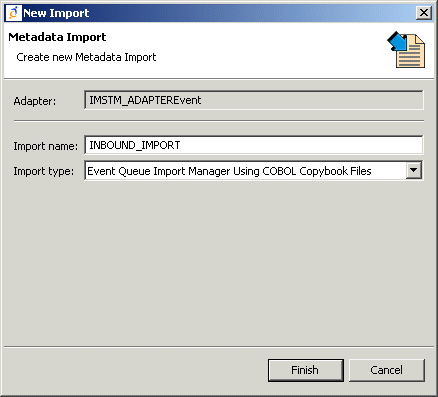
After defining an import type, the metadata import wizard opens in Oracle Studio. COBOL copybooks are used to create the metadata. The import wizard generates record structures, which are used for the record structures for inbound interactions.
Click Add in the metadata import wizard. The Select Resource screen provides the option to select files from the local computer or copy the files from another computer.
If the files are on another computer, then right-click My FTP Sites and select Add. Optionally, double-click Add FTP Site. The Add FTP Site screen is displayed.
Enter the server name or IP address where the COBOL copybooks reside and enter a valid username and password to access the computer (if anonymous access is used, then click Anonymous connection) then click OK. The FTP site is added to the list of available sites.
|
Note: The selected server is accessed using the username as the high-level qualifier, enabling you to browse and transfer files. |
The Select Resource screen is shown in the following figure:

Right-click the computer and select Set Transfer Type. Enter the transfer type (ASCII or BINARY) and click OK.
Expand the node of the added site and locate the necessary COBOL files. To change the high-level qualifier, right-click the computer and select Change Root Directory. Enter a high-level qualifier enclosed in quotes, and click OK.
Select the file or files and click Finish. The selected file or files are displayed in the metadata import wizard.
In the Import wizard, click Next.
The Apply Filters screen is displayed as shown in the following figure:

Apply filters to the copybooks.
The following table lists the available filters:
| Filter | Description |
|---|---|
| COMP_6 switch | The MicroFocus COMP-6 compiler directive. Specify either COMP-6'1' to treat COMP-6 as a COMP data type or COMP-6'2' to treat COMP-6 as a COMP-3 data type. |
| Compiler source | The compiler vendor. |
| Storage mode | The MicroFocus Integer Storage Mode. Specify either NOIBMCOMP for byte storage mode or IBMCOMP is for word storage mode. |
| Ignore after column 72 | Ignores columns 73 to 80 in the COBOL copybook. |
| IgnoreFirst6 | Ignores the first six columns in the COBOL copybook. |
| Replace hyphens (-) in record and field names with underscores (_) | Replaces all hyphens in either the record or field names in the metadata generated from the COBOL with underscore characters. |
| Prefix nested columns | Prefix all nested columns with the previous level heading. |
| Case sensitive | Specifies whether to be sensitive to the search string case. |
| Find | Searches for the specified value. |
| Replace with | Replaces the value specified for Find with the value specified here |
Click Next. The Add Events screen is displayed.
Click Add to add an event for the IMS/TM adapter. Provide the following information:
| Parameter | Description |
|---|---|
| Name | The name of the event. You can change the default name specified. |
| Mode | The event mode. You can select the following:
async-send: The event sends a request and does not expect to receive a response. |
| Input | Identifies an input record. The input record is the data structure for the event. The records generated from the COBOL files specified at the beginning of the procedure are listed. Select the relevant record for the event.
Note: You must specify an input record for each event before you can click Next. If the interaction does not require an input record, then the record specified here is ignored. |
| Description | Free text describing the event. |
The Add Events screen is shown in the following figure:
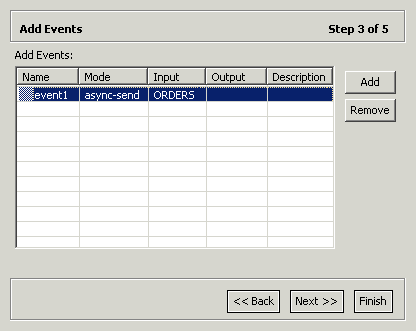
Add the required events.
Click Next to generate the metadata definitions for the adapter.
Specify that you want to transfer the data from the Windows computer to the IBM OS/390 or z/OS platform, as shown in the following figure:

Click Finish.
The metadata is imported based on the options specified and it is stored on the IBM OS/390 or z/OS platform. An XML representation of the metadata is also generated.
After performing the import, you can view the metadata in Oracle Studio Design perspective Metadata tab. You can also make adjustments to the metadata and maintain it, as necessary.
|
See Also: Appendix A, "Advanced Tuning of the Metadata" for details about fine tuning the adapter metadata. |
The XML describing the adapter interactions can be viewed in Oracle Studio Design perspective Metadata Source tab.
The XML schema describing the adapter interactions and the input and output records for these interactions are created automatically during the import procedure, as described in "Generating Outbound Interactions".