|
Oracle® BPEL Process Analytics Quick Start Guide
10g Release 2 (10.1.2) Part No. B15928-01 |
|
 Previous |
 Next |
|
Oracle® BPEL Process Analytics Quick Start Guide
10g Release 2 (10.1.2) Part No. B15928-01 |
|
 Previous |
 Next |
The LoanFlowPlus tutorial provides step-by-step instructions on setting up and using Oracle BPEL Process Analytics to monitor an Oracle BPEL Process Manager process flow.
The following topics are included in this chapter:
|
Note: The directory paths shown in this chapter follow Microsoft Windows conventions (using backslashes (\)). If you are running the tutorial on a Linux or Solaris operating system, modify the directory paths as required (using slashes (/)). |
To run the LoanFlowPlus tutorial, you must first deploy the LoanDemoPlus sample into Oracle BPEL Process Manager as described in the list that follows. In any step where it is mentioned, BPM_HOME is the Oracle home directory for Oracle BPEL Process Manager.
Make sure Oracle BPEL Process Manager Server is running.
For all files in the following directory, clear the read-only flag in the file properties:
BPM_HOME\integration\orabpel\samples\demos\LoanDemoPlusWithWorkFlow\LoanFlowPlus
From the command line, set the command path to the following directory:
BPM_HOME\integration\orabpel\bin
Run the obant command from the following directory:
BPM_HOME\integration\orabpel\samples\demos\LoanDemoPlusWithWorkFlow
Open the Oracle BPEL Process Manager Console, select default from the Domain box, then click Login.
On the Dashboard tab, make sure that the following processes are included in the Deployed BPEL Processes column:
CreditRatingService
LoanFlowPlusWorkFlow
StarLoanWithWorkFlow
UnitedLoan
|
Note: Leave Oracle BPEL Process Manager Server running for the duration of the tutorial. |
You insert sensors into the Oracle BPEL Process Manager LoanFlowPlus process flow, so that events are published to a JMS queue from which Oracle BPEL Process Analytics can capture them. Oracle BPEL Process Analytics uses the JMS queue to present the event metadata during composite event creation, and to capture the events in real time.
Use one of the methods described in the following sections to set up the event activity sensors:
Using the Preconfigured Event Activity Sensors
This method allows you to quickly move to the steps on using Oracle BPEL Process Analytics, but does not give you a complete understanding of what is involved in monitoring Oracle BPEL Process Manager events.
Using JDeveloper BPEL Designer
This is the preferred method. It provides a full demonstration of what is involved in monitoring Oracle BPEL Process Manager events.
Preconfigured event activity sensors are included in the LoanDemoPlus sample. If you do not want to use the tutorial to understand how to insert sensors into the process flow, proceed to: "Using Oracle BPEL Process Analytics to Model Events".
If you choose to insert event activity sensors using JDeveloper BPEL Designer, you need to insert the following sensors into the LoanFlowPlus process flow:
For the LoanRequest sensor, screenshots of how your window should look are provided for most steps. For the remaining sensors, screenshots are provided only when they vary substantially from the LoanRequest screenshots.
Before you can insert the sensors, you must load the LoanFlowPlus process into JDeveloper BPEL Designer.
This section includes the information about loading the process, inserting each of the required sensor actions and sensors, and deploying the modified LoanFlowPlus process as follows:
Follow these steps to load the process. In each step where it is mentioned, BPM_HOME is the directory specification for the Oracle home into which you installed Oracle BPEL Process Manager (on Microsoft Windows systems, for example, C:\OraHome_5).
Open JDeveloper BPEL Designer.
On the File menu, click New. The New Gallery dialog box opens.
In the Items box, select Application Workspace, then click OK. The Create Application Workspace dialog box opens.
Click OK.
In the Applications Navigator, select Application1.
On the File menu, click Open. The Open dialog box opens.
In the Open dialog box, specify the following file, then click Open.
BPM_HOME\integration\orabpel\samples\demos\LoanDemoPlusWithWorkFlow\LoanFlowPlus\LoanFlowPlusWithWorkflow.jpr
In the Applications – Navigator , expand LoanFlowPlusWithWorkflow, then Integration Content.
Double-click LoanFlowPlus.bpel.
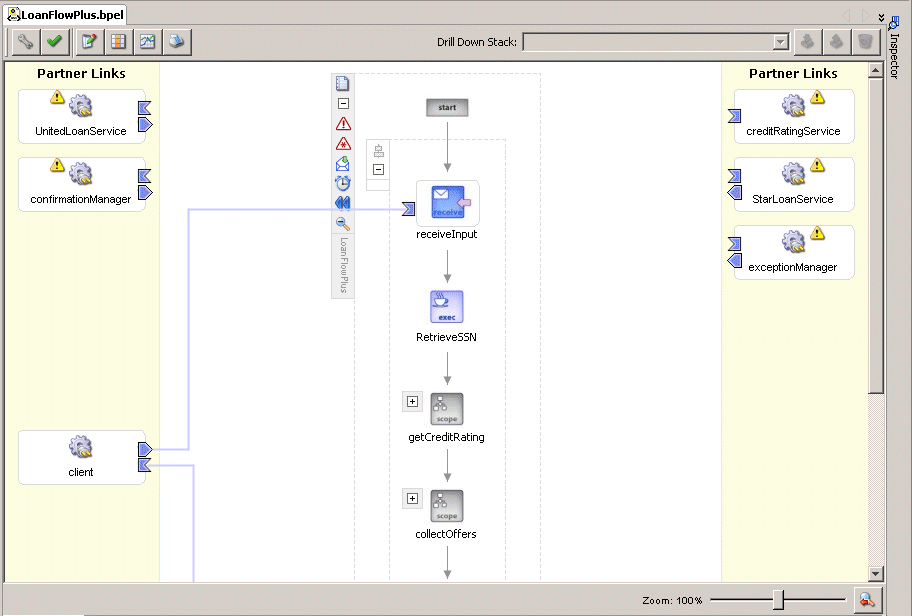
The JDeveloper BPEL Designer interface should contain a panel in the Diagram View similar to Figure 4-1.
Figure 4-1 JDeveloper BPEL Designer Opening Window - LoanFlowPlus.bpel Panel
Sensors are included in the sample, by default. To understand how to insert them manually, you first need to delete the preconfigured sensors, as follows:
In the LoanFlowPlus.bpel - Structure panel (as shown in Figure 4-2), expand Sensor Actions.
Right-click UTAction, then click Delete Sensor Action.
Right-click UTActionConsole, then click Delete Sensor Action.
In the LoanFlowPlus.bpel - Structure panel (as shown in Figure 4-3), expand Sensors, then Activity.
Delete each of the preconfigured activity sensors, as follows:
Right-click LoanRequest, then click Delete Activity Sensor.
Right-click LoanRequestApproved, then click Delete Activity Sensor.
Right-click LoanOfferSelected, then click Delete Activity Sensor.
Right-click LoanOfferAccepted, then click Delete Activity Sensor.
Figure 4-2 Structure Panel - Preconfigured Sensor Actions

Figure 4-3 Structure Panel - Preconfigured Activity Sensors

To run the tutorial, you must insert two sensor actions, as follows:
A sensor action for the database
This sensor action is used for Oracle BPEL Process Analytics debugging and Oracle BPEL Process Manager process reports.
A sensor action for the Java Message Service (JMS) queue
This sensor action is used for publishing Oracle BPEL Process Manager events to Oracle BPEL Process Analytics.
To create the sensor action for the database, follow these steps:
In the LoanFlowPlus.bpel - Structure panel (as shown in Figure 4-4), right-click Sensor Actions.
Click Create Sensor Action. The Create Sensor Action dialog box opens.
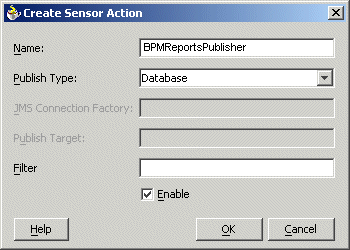
Change the Name field to BPMReportsPublisher.
Leave the Publish Type as Database, leave the Filter field empty, and leave Enable selected, as shown in Figure 4-5.
Click OK.
Figure 4-5 Create Sensor Action Dialog Box - BPMReportsPublisher
To create the sensor action for the JMS queue, follow these steps:
In the LoanFlowPlus.bpel - Structure panel, right-click Sensor Actions.
Click Create Sensor Action. The Create Sensor Action box opens.
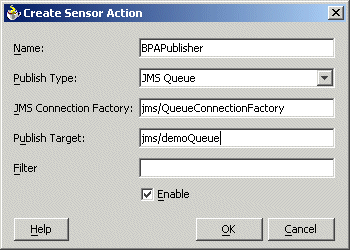
Specify the fields as described in the following table (and shown in Figure 4-6), then click OK.
| Page Element | Description |
|---|---|
| Name | Enter BPAPublisher. |
| Publish Type | Choose JMS Queue. |
| JMS Connection Factory | Enter jms/QueueConnectionFactory.
|
| Publish Target | Enter jms/demoQueue.
|
| Filter | Leave empty. |
| Enable | Leave selected. |
Figure 4-6 Create Sensor Action Dialog Box - BPAPublisher
This section describes how to insert the first of the four sensors required for the tutorial. A sensor is composed of the attributes described in the following table:
The steps that follow describe how to insert the LoanRequest sensor.
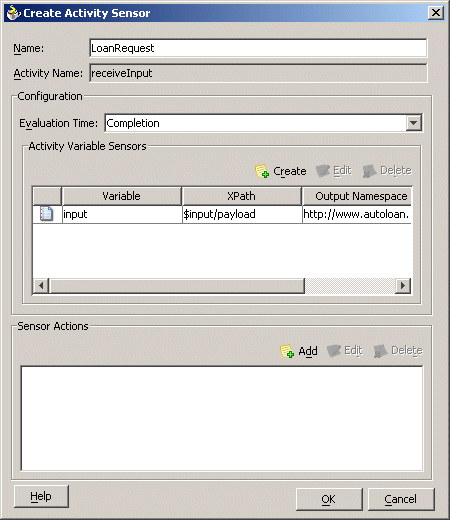
Using these steps, you will create a sensor named LoanRequest on the Oracle BPEL Process Manager process activity named receiveInput. The structure of the event associated with that activity will be held in the activity variable named input, and the activity will be evaluated when it completes. At that time, the event structure will be published to the JMS queue as defined by the BPAPublisher sensor action (for the Oracle BPEL Process Analytics monitor to receive), and will be published to the database as defined by the BPMReportsPublisher sensor action (for the BPEL reports).
In the LoanFlowPlus diagram, double-click receiveInput. The Receive property sheet opens.
Click Sensors, then click Create. The Create Activity Sensor box opens, as shown in Figure 4-7.
Figure 4-7 Create Activity Sensor Dialog Box
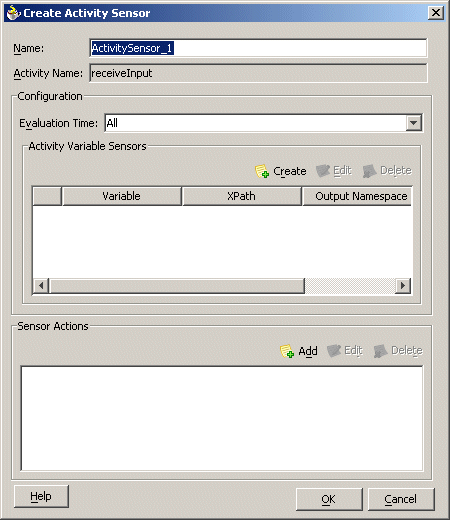
In the Name field, replace ActivitySensor_1 with LoanRequest.
In the Evaluation Time field, select Completion.
In the Activity Variable Sensors group, click Create. The Create Activity Variable Sensor dialog box opens.Click the pencil icon. The Variable XPath Builder dialog box opens.Under Variables/Process/Variables, expand input, then select payload (as shown in Figure 4-8), and then click OK. The Create Activity Sensor dialog box appears as shown in Figure 4-10
Figure 4-8 Variable XPath Builder Dialog Box - input Selected
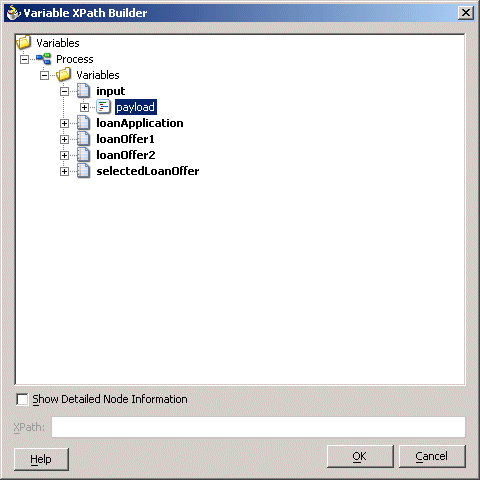
The Create Activity Variable Sensor dialog box appears as shown in Figure 4-9. Click OK. The Create Activity Sensor dialog box appears as shown in Figure 4-10
Figure 4-9 Create Activity Variable Sensor Dialog Box - Fields Populated
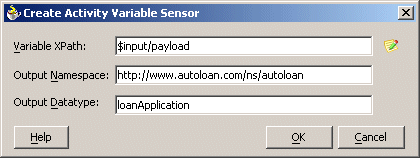
Figure 4-10 Create Activity Sensor Dialog Box - input Activity Variable Sensor
In the Create Activity Sensor dialog box, in the Sensor Actions group, click Add. The Sensor Action Chooser dialog box opens.
Select BPMReportsPublisher, and then click OK.
In the Create Activity Sensor dialog box, in the Sensor Actions group, click Add. The Sensor Action Chooser dialog box opens.
Select BPAPublisher, and then click OK.
The Create Activity Sensor dialog box should appear as shown in Figure 4-11; click OK.
In the Receive property sheet, click OK.
Figure 4-11 Create Activity Sensor Dialog Box - LoanRequest Completed

You have completed the insertion of the LoanRequest sensor.
The JDeveloper BPEL Designer indicates the presence of the sensor with a sensor icon, as shown in Figure 4-12.
To insert the LoanRequestApproved sensor, follow these steps:
In the LoanFlowPlus diagram, click the expand control (plus sign) associated with getCreditRating.
Double-click copyRating. The Scope property sheet opens.
Click Sensors, then click Create. The Create Activity Sensor dialog box opens.
In the Name field, enter LoanRequestApproved.
In the Evaluation Time field, select Completion.
In the Activity Variable Sensors group, click Create. The Create Activity Variable Sensor dialog box opens.
Click the pencil icon. The Variable XPath Builder dialog box opens.
Under Variables/Process/Variables/input, select payload, then click OK.
The Create Activity Variable Sensor dialog box is presented with $input/payload in the Variable XPath field, http://www.autoloan.com/ns/autoloan in the OutputNamespace field, and loanApplication in the Output Datatype field.
In the Create Activity Variable Sensor dialog box, click OK.
In the Create Activity Sensor dialog box, in the Sensor Actions group, click Add, then select BPMReportsPublisher, and click OK.
In the Create Activity Sensor dialog box, in the Sensor Actions group, click Add, then select BPAPublisher, and click OK.
The Create Activity Sensor dialog box should appear as shown in Figure 4-13; click OK.
In the Scope property sheet OK.
Figure 4-13 Create Activity Sensor Dialog Box - LoanRequestApproved

You have completed the insertion of the LoanRequestApproved sensor.
To insert the LoanOfferSelected sensor, follow these steps:
In the LoanFlowPlus diagram, click the expand control (plus sign) associated with collectOffers.
If it is expanded, click the collapse control (minus sign) associated with the question mark icon. The question mark icon is now labeled selectBestOffer.
Double-click selectBestOffer. The Switch property sheet opens.
Click Sensors, and then click Create. The Create Activity Sensor dialog box opens.
In the Name field, enter LoanOfferSelected.
In the Evaluation Time field, select Completion.
In the Activity Variable Sensors group, click Create. The Create Activity Variable Sensor dialog box opens.
Click the pencil icon. The Variable XPath Builder dialog box opens.
Under Variables/Process/Variables/selectedLoanOffer select payload, then click OK.
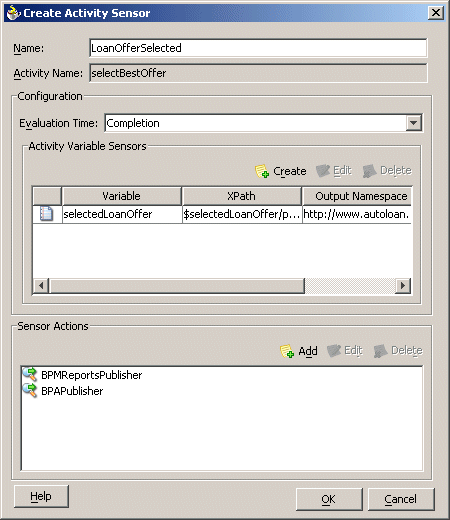
The Create Activity Variable Sensor dialog box is presented with $selectedLoanOffer/payload in the Variable XPath field, http://autoloan.com/ns/autoloan in the Output Namespace field, and loanOffer in the Output Datatype field.
In the Create Activity Variable Sensor dialog box, click OK.
In the Create Activity Sensor dialog box, in the Sensor Actions group, click Add, then select BPMReportsPublisher, and click OK.
In the Create Activity Sensor dialog box, in the Sensor Actions group, click Add, then select BPAPublisher, and click OK.
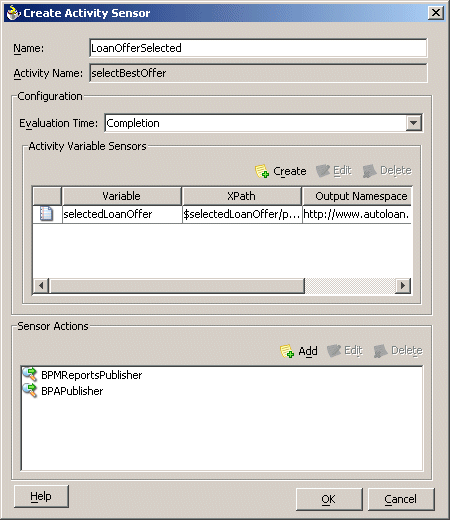
The Create Activity Sensor dialog box should appear as shown in Figure 4-14; click OK.
In the Switch property sheet, click OK.
Figure 4-14 Create Activity Sensor Dialog Box - LoanOfferSelected
To insert the LoanOfferAccepted sensor, follow these steps:
In the LoanFlowPlus diagram, double-click replyOutput. The Invoke property sheet opens.
Click Sensors, then click Create. The Create Activity Sensor dialog box opens.
In the Name field, enter LoanOfferAccepted.
In the Evaluation Time field, select Completion.
In the Activity Variable Sensors Group, click Create. The Create Activity Variable Sensor dialog box opens.
Click the pencil icon. The Variable XPath Builder dialog box opens.
Under Variables/Process/Variables/selectedLoanOffer select payload, and then click OK.
The Create Activity Variable Sensor dialog box is presented with $selectedLoanOffer/payload in the Variable XPath field, http://autoloan.com/ns/autoloan in the Output Namespace field, and loanOffer in the Output Datatype field.
In the Create Activity Variable Sensor dialog box, click OK.
In the Create Activity Sensor dialog box, in the Sensor Actions group, click Add, then select BPMReportsPublisher, and click OK.
In the Create Activity Sensor dialog box, in the Sensor Actions group, click Add, then select BPAPublisher, and click OK.
The Create Activity Sensor dialog box should appear as shown in Figure 4-15; click OK.
In the Invoke property sheet, click OK.
From the File menu, select Save All.
Figure 4-15 Create Activity Sensor Dialog Box - LoanOfferAccepted
You have completed the creation of all the sensors required for this tutorial. You are ready to deploy the modified LoanFlowPlus process, as described in the next section.
To deploy the modified LoanFlowPlus process, follow these steps:
Run the obant command from the following directory, where BPM_HOME is the Oracle home directory for Oracle BPEL Process Manager:
BPM_HOME\integration\samples\demos\LoanDemoPlusWithWorkFlow
Make sure the sensors are defined as expected by following these steps:
Open the Oracle BPEL Process Manager Console and log in.
Click the BPEL Processes tab, and then in the Deployed Processes column, click LoanFlowPlus (v. 1.0).
Click the Sensors tab. The activity sensors you created should be listed in the Activity Sensors column.
This portion of the tutorial describes how to start, log in to, and use Oracle BPEL Process Analytics to model composite events. It contains the following sections:
This section describes how to start Oracle BPEL Process Analytics and log in as Administrator. The instructions vary, depending on the operating system you are using, as follows:
On Microsoft Windows systems:
Ensure that Oracle HTTP Server is started.
From the desktop Start button, choose All Programs, then Oracle - Oracle Application Server home name, then Oracle BPEL Process Analytics, and then click Start BPA Server
After the server starts, from the desktop Start button, choose All Programs, then Oracle - Oracle Application Server home name, then Oracle BPEL Process Analytics, and then click BPA Console. Your default Web browser opens and displays the Oracle BPEL Process Analytics Console login page as shown in Figure 4-16.
Log in to the Oracle BPEL Process Analytics Console. By default, the user name and password are both Administrator for the administrative user.
On Unix systems:
From the Oracle Process Manager and Notification Server (OPMN) bin directory in the Oracle home where you installed Oracle BPEL Process Analytics, issue the opmnctl startall command.
> opmnctl startall
After the server starts, open a Web browser and specify the URL to access Oracle BPEL Process Analytics, as documented in bamsetupinfo.txt, in the following directory:
OAS_HOME/install
The Web browser displays the Oracle BPEL Process Analytics Console login page as shown in Figure 4-16.
Log in to the Oracle BPEL Process Analytics Console. By default, the user name and password are both Administrator for the administrative user.
After you log in, a page such as that shown in Figure 4-17 opens, displaying the Welcome page of the Admin Console.
You must connect to Oracle Process Manager before you can model and view events. Follow these steps:
In the Admin Console, click Admin.
In the Admin page, click Event Source.
In the Event Sources page, click the Create button associated with the Oracle BPEL Process Manager Sources table.
In the Add Event Source page, enter values as described in the following table, where BPM-system is the name or IP address of the system on which Oracle BPEL Process Manager is installed. When you are done, click Finish.
This portion of the tutorial describes how to create a composite event using the Oracle BPEL Process Analytics samples. Follow these steps:
In the Admin Console, click Modeling.
In the Modeling page, click Composite Events.
In the Composite Events and Groups page, click Add Composite Event.
In the Create Composite Event page, select Tutorial, then click Create. The Properties page of the Create Composite Event wizard opens.
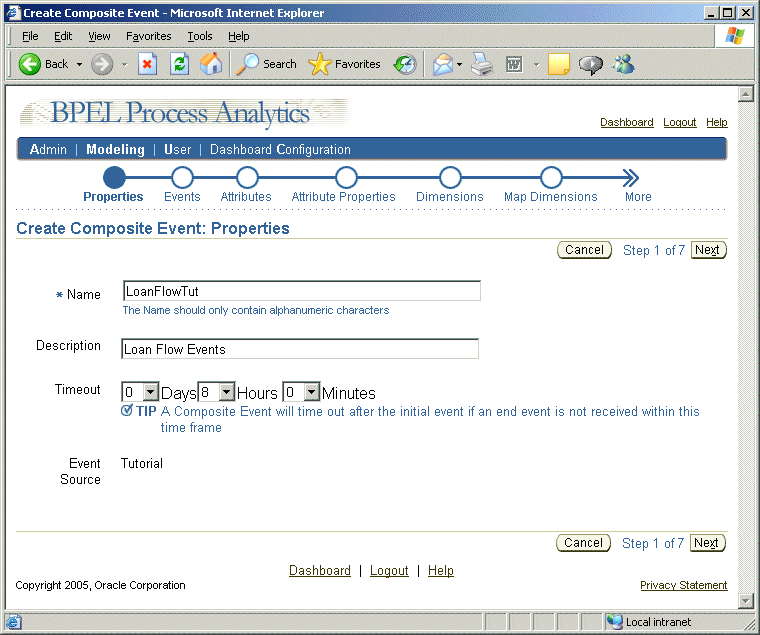
In the Properties page, follow these steps, as illustrated in Figure 4-18.
In the Name field, enter LoanFlowTut.
In the Description field, enter LoanFlow events.
In the Timeout field, leave the settings as 0 Days, 8 Hours, 0 Minutes.
Click Next. The Events page opens.
Figure 4-18 Add Composite Event Wizard - Properties Page
In the Events page of the wizard, follow these steps:
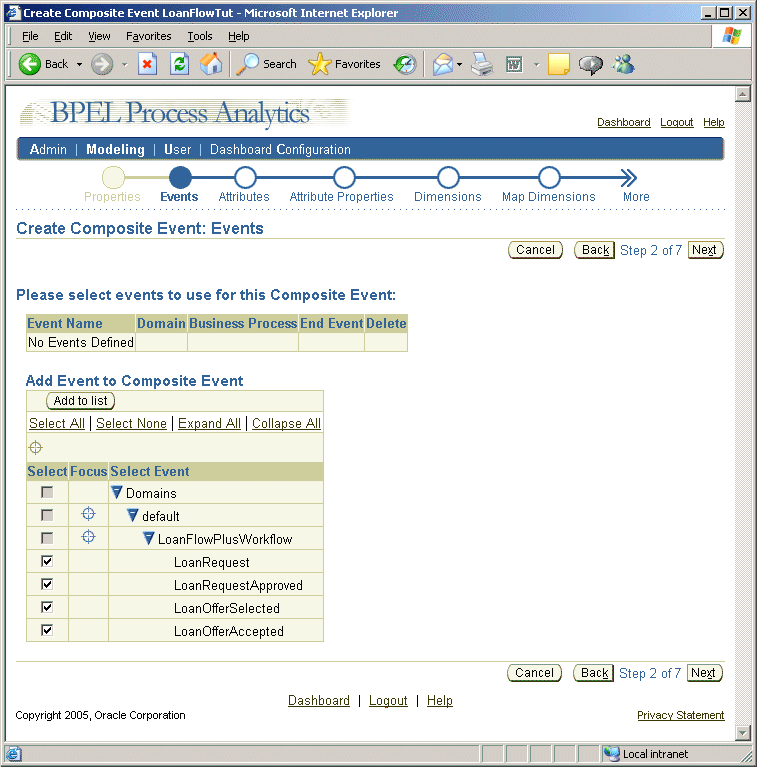
In the navigator, expand default, then LoanFlowPlusWorkflow.
Select each of the LoanFlowPlusWorkflow events. Your page should look similar to Figure 4-19.
Figure 4-19 Add Composite Event Wizard - Events Page After Step 6b
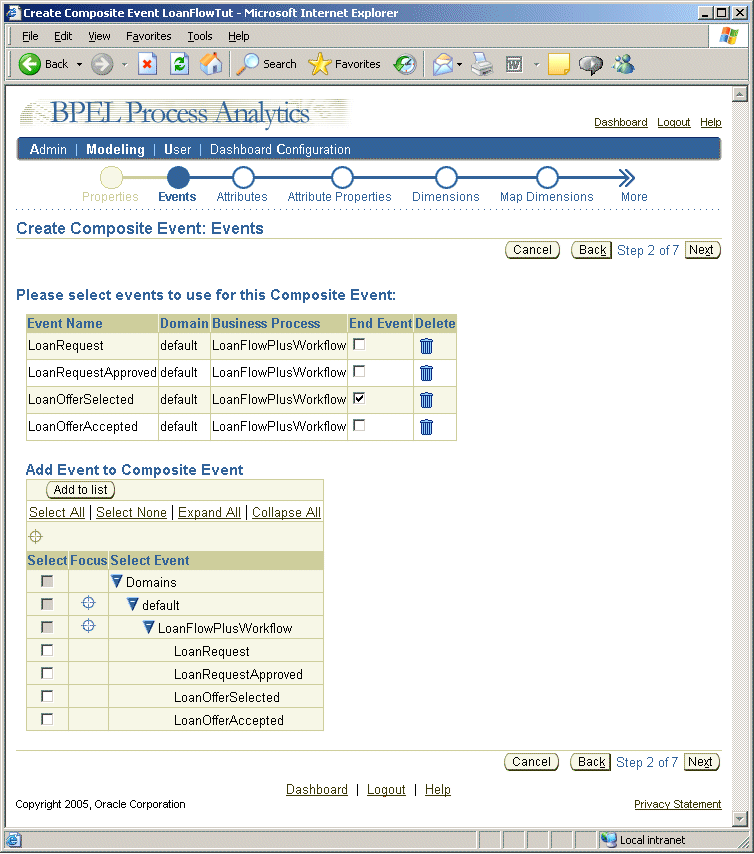
Click Add to list (at the top of the Add Event to Composite Event table).Select LoanOfferAccepted as the end event. Your page should look similar to Figure 4-20.
Figure 4-20 Add Composite Event Wizard - Events Page After Step 6d
Click Next. The Attributes page opens.
In the Attributes page of the wizard, you specify the event attributes to capture for each event.
For the LoanRequest event (preselected in the first table), expand loanApplication (in the second table) and select SSN, customerName, and loanAmount.
|
Note: If you used the predefined activity sensors, as described in "Using the Preconfigured Event Activity Sensors", you will see LoanApplicationType instead of loanApplication. |
Select the LoanRequestApproved event from the first table, expand loanApplication (in the second table) and select SSN, customerName, and loanAmount.
Select the LoanOfferSelected event from the first table, expand loanOffer (in the second table) and select providerName, selected, and approved, and APR.
Select the LoanOfferAccepted event from the first table, expand loanOffer (in the second table) and select providerName, selected, and approved, and APR.Figure 4-21 shows the results.
Click Next. The Attribute Properties page opens.
Figure 4-21 Add Composite Event Wizard - Attributes Page After Step 7d
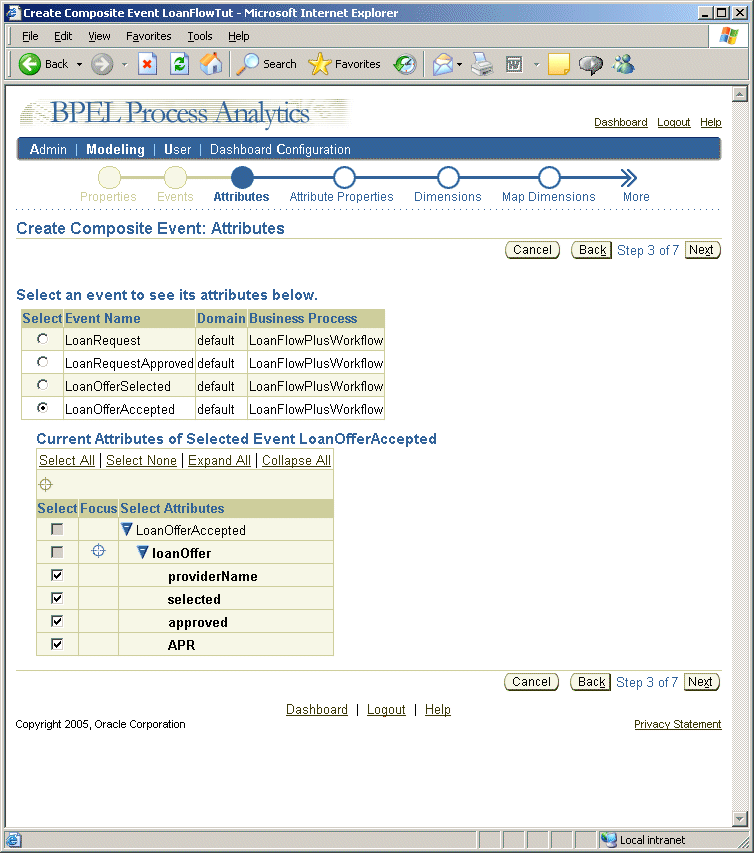
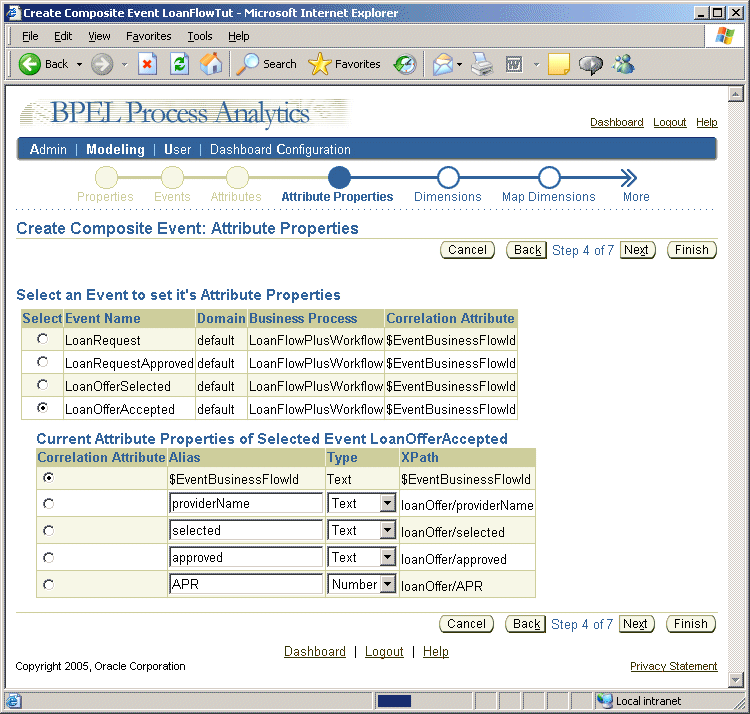
In the Attributes Properties page, select the correlation attribute for each of the events, as follows:
For the LoanRequest event (preselected in the first table), select $EventBusinessFlowId (in the second table).
Select LoanRequestApproved in the first table, then select $EventBusinessFlowId (in the second table).
Select LoanOfferSelected in the first table, then select $EventBusinessFlowId (in the second table).
Select LoanOfferAccepted in the first table, then select $EventBusinessFlowId (in the second table). Figure 4-22 shows the results.
Figure 4-22 Add Composite Event Wizard - Attribute Properties Page
Click Next. The Dimensions page opens
In the Dimensions page of the wizard, you can select dimensions for the composite event. For this tutorial, dimensions will not be specified. Click Finish.
The Composite Events and Groups page opens. Your page should look similar to Figure 4-23. (If you did not run the demo described in Chapter 3, you will not see the LoanFlow composite event.)
Oracle BPEL Process Analytics is now ready to capture event instances generated by the event source. Creating event instances is described in the next section.
|
Note: If you specified a value other than 9700 as the port for the WSIL URL when you specified the event source (as described in "Connecting to the Event Source" ), then replace 9700 with that value in each of the URLs mentioned in this section. |
In this section, you create event instances, which you can then monitor in the Oracle BPEL Process Analytics Dashboard. Follow these steps:
Open the following URL in a Web browser, where BPM-system is the name or IP address of the system where you installed Oracle BPEL Process Manager:
http://BPM-system:9700/LoanFlowPlusWFUI/Homepage.html
A page, such as that shown in Figure 4-24, opens. It allows you to initiate a new simulated BPEL loan flow.
Click Initiate New BPEL Loan Flow (beneath the tabs, on the upper-right side of the page).
In the Loan Center page, as shown in Figure 4-25, click Submit Loan Application.
The Loan Center page refreshes and indicates that the loan is being processed, as shown in Figure 4-26. Note that the tutorial mentioned in this Web page is not referring to this tutorial.
Go to the following URL to act as the Star Loan Provider:
http://BPM-system:9700/integration/worklistapp/Login
A page opens, such as that shown in Figure 4-27. Enter the requested values, as follows, then click Log In:
Username: jcooper
You can enter any one of the following: jcooper, istone, or mtwain; this tutorial uses jcooper.
Password: welcome
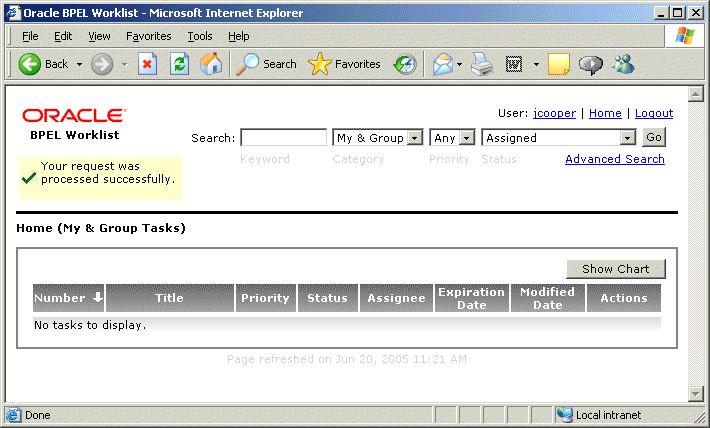
The BPEL Worklist page for the specified user opens, as shown in Figure 4-28.
Figure 4-28 Oracle BPEL Worklist Page for jcooper
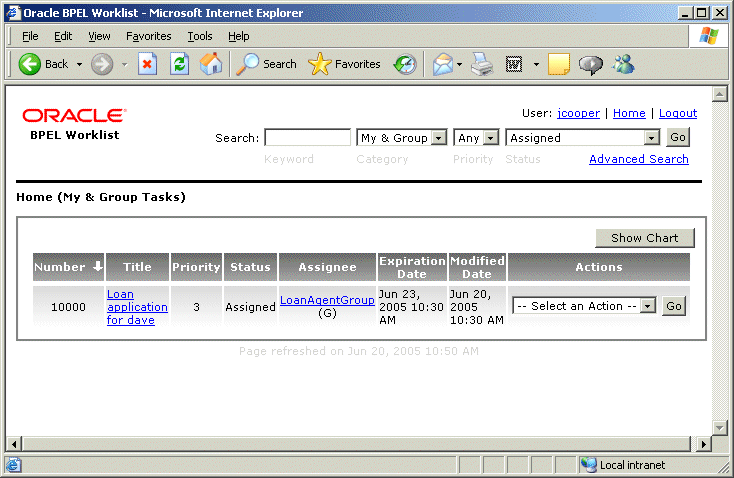
From the Actions drop-down list, select Acquire, and then click Go. The Task Details page opens, as shown in Figure 4-29.
Figure 4-29 Oracle BPEL Worklist - Task Details
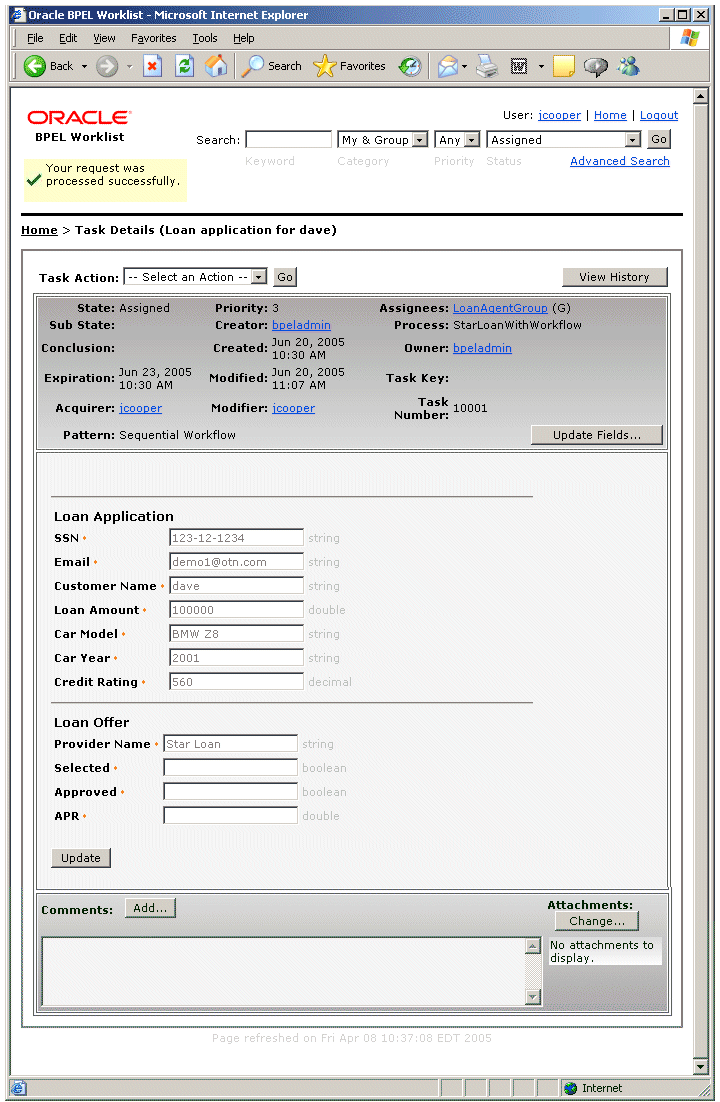
In the APR box, enter 2.2, then click Update. The page will refresh.
After the page refreshes, from the Task Action box, select Approve, and then click Go. Your page should look similar to Figure 4-30.
Note that these instructions do not include a step to change the loan amount. However, if you decided to change the loan amount, be aware of the following:
If the loan amount is less than or equal to 100,000 the approval process is complete.
If the loan amount is greater than 100,000, an e-mail message is sent to user jstein, who is the manager of jcooper and mtwain. User jstein can either approve the loan through e-mail or by opening the BPM Worklist page himself and approving the loan.
Following user jstein's approval, the task is routed to user wfaulk (who is user jstein's manager). User wfaulk can either approve the loan through e-mail or by opening the BPM Worklist page himself and approving the loan.
Figure 4-30 Oracle BPEL Worklist - No Tasks to Display
Return to the BPEL Loan Flow Plus page at the following URL:
http://BPM-system:9700/LoanFlowPlusWFUI/Homepage.html
Your page should look similar to Figure 4-31.
Click Received offer from Star Loan with APR 2.2. A page such as shown in Figure 4-32 opens.
Click Accept. The page refreshes to indicate that the policy is in the mail, as shown in Figure 4-33.
You can now repeat the steps in this section, changing values for the customer name and APR to create additional events, or you can continue to the next section and view the single event in the Oracle BPEL Process Analytics Dashboard.
Log in to the Oracle BPEL Process Analytics user interface, open the Dashboard, and view the event instance or instances you just created in the Real-Time Viewer by following these steps:
Depending on the system where Oracle BPEL Process Analytics is installed, open the Console, as follows:
On Microsoft Windows systems:
From the desktop Start button, select All Programs, then Oracle - Oracle Application Server home name, then Oracle BPEL Process Analytics, and then click BPA Console.
On Unix systems:
Open a Web browser and specify the URL to access Oracle BPEL Process Analytics as documented in bamsetupinfo.txt, in the following directory, where OAS_HOME is the directory specification for the home into which you installed Oracle BPEL Process Analytics:
OAS_HOME/install
Log in to the Oracle BPEL Process Analytics Console. Recall that the user name and password are both Administrator by default.
Click Dashboard in the upper-right corner of the page (above the tabs). The Dashboard opens.
In the Switch View box, select Real-Time Viewer. The Dashboard refreshes to display the Real-Time Viewer.
In the Composite Event box, select LoanFlowTut, if it is not already selected.
Your page should look similar to Figure 4-34. If the event or events that you just created are not in the chart, click Real-Time Refresh. For detailed information on the data presented in the Real-Time Viewer, see Oracle BPEL Process Analytics User's Guide.
You have completed the LoanFlowPlus tutorial.