|
Oracle® Application Server Portal Developer's Guide
10g Release 2 (10.1.4) B14135-02 |
|
 Previous |
 Next |
|
Oracle® Application Server Portal Developer's Guide
10g Release 2 (10.1.4) B14135-02 |
|
 Previous |
 Next |
For developers who want quick solutions for building components, OracleAS Portal provides the Portlet Builder. The Portlet Builder wizards guide you step-by-step through the process of creating portlets. The wizards enable even the novice business developer to begin creating portlets right away.
After answering a few basic questions, you can decide whether to continue with the wizard or to create the portlet based on information already collected. A Finish button appears as soon as the wizard has collected enough information, allowing you to create the portlet without having to traverse all the wizard's pages. When you're ready for other users to run the portlet, you need only assign portlet access privileges, publish the portlet, and add it to a page.
This appendix describes the process of creating a portlet through a wizard and steps you through creating, editing, managing, and running different types of portlets. It contains the following sections:
Portlets must be built under the ownership of a provider. This means that before you can build a portlet, you must first create a provider—or select an existing provider—to host (own or contain) the portlet. If you're creating a new provider, you may first want to create a schema against which to build the provider.
Although every portlet you create using OracleAS Portal requires that you build it under the ownership of a provider, it is not necessary that you build a provider each time you build a portlet. In fact, you can use an existing provider, or create one dedicated to the ownership of your locally built portlets, and then never have to create another provider again.
One provider can be used as a container that manages multiple portlets. A good rule is to use one provider per logical application, for example, a Human Resources application that consists of reports, forms, and charts.
This section steps you through the process of creating a schema, creating a provider, and building a portlet under the ownership of that provider in OracleAS Portal. It includes the following subsections:
A schema is an Oracle database user account under the ownership of which you can store database objects, applications, and components and control the schema's database privileges. Use a Portal schema to enforce password access to the schema, to set aside tablespace specifically for your locally built portlets, and to identify the temporary tablespace the schema should use.
Creating a schema involves three main tasks:
This section steps you through each of these tasks.
To create a schema in OracleAS Portal:
Log in to OracleAS Portal.
Click the Navigator link at the top of the page.
In the Navigator, click the Database Objects tab to bring it forward.
Click the Schema link next to Create New… (Figure A-1)
Figure A-1 The Schema Link on the Database Objects Tab in the Portal Navigator

On the Create Schema page (Figure A-2), enter a name to identify the schema in the Schema field.
The name must be unique within the portal. Blank and special characters are not allowed in the name. Type an underscore character to add a space in a name. For example, you can name a schema PORTLETS_SCHEMA, but not PORTLETS SCHEMA. Additionally, you cannot name a schema PORTLETS*SCHEMA nor PORTLETS%SCHEMA.
In the Password field, enter the password you will assign to the schema.
Asterisks appear for each character you enter. Users will enter this password when logging into the Oracle database as this schema.
Reenter the password in the Confirm Password field.
Select a default tablespace from the Default Tablespace list.
This will be used for storing any database objects created by the schema. We recommend that you select a tablespace created specifically for storing locally build portlet applications. If necessary, talk about this with your database administrator.
Select a temporary tablespace from the Temporary Tablespace list.
This will be used by the schema to create temporary storage for operations such as sorting table rows.
Select an Oracle resource profile for the new schema from the ORACLE Profile list.
The default profile is DEFAULT. Feel free to use this. If you plan to create a new profile, you must use Oracle SQL commands to do so. Refer to the Oracle database documentation for more information. You'll find this on the Oracle Technology Network at http://www.oracle.com/technology/index.html.
Select the Use this Schema for Portal Users check box to add the schema you are creating to the list of database schemas to which portal users can map for administrative purposes.
Every OracleAS Portal user must be associated with a database schema. By default, the name of this schema is <portal>_public, where <portal> is the name of the schema in which OracleAS Portal is installed. If you select this check box, a portal user can be mapped instead to the schema you are creating here.
Click Create to save your changes and return to the Portal Navigator.
Alternatively, click the link to your new schema that now appears at the top of the page to begin editing the new schema's properties. See Section A.1.1.2, "Granting and Revoking Privileges on Database Objects" and Section A.1.1.3, "Enrolling the Schema in One or More Roles" for more information.
You may need to increase or limit the access your users will have on some database objects associated with this schema. Once they are able to log in to this schema, users' access privileges are influenced by the roles of which this schema is a member (see Section A.1.1.3, "Enrolling the Schema in One or More Roles"). You can use grants to select specific database objects and specify which of those access privileges should be further limited or increased.
For example, imagine that you have a BASIC_USER role. This role allows users to SELECT from all tables in the database. You may want to restrict selections on some tables. You can use grants to select one or more database objects (such as specific tables, views, and the like) and remove the SELECT privilege. Conversely, if a role does not include all the access privileges you want a schema to have on one or more database objects, you can use grants to increase access privileges.
|
Note: By default, OracleAS Portal allows only SELECT on database objects. Other privileges must be granted explicitly. |
This section describes how to further control privileges on objects associated with your schema.
|
Note: If you have arrived at this task by clicking a link to edit the schema that appeared at the top of the Create Schema page, skip to step 5. |
To grant privileges to database objects associated with a schema:
Log in to OracleAS Portal.
Click the Navigator link at the top of the page.
Click the Database Objects tab to bring it forward.
On the Database Objects tab (Figure A-3), go to the Name column to locate the schema you will work with, and click the Edit link that is next to it.
Figure A-3 The Edit Link Next to a Schema in the Portal Navigator

On the resulting page, click the Grants tab (Figure A-4).
In the Object field, enter the name of a database object on which you want to control privileges.
Click the Browse icon to select from a list of objects. Prefix the name of the object with the schema that owns it. For example, add SCOTT to EMP (SCOTT.EMP) to indicate the EMP table in the SCOTT schema.
Click Add to add the object to the list at the bottom of the page.
Objects are grouped by object type. That is, tables are listed with tables, views with views, and so on.
Select or clear check boxes next to the object to increase or limit the access privileges on the object.
Figure A-5 The Check Boxes Next to a Table Object

Click Apply to save your changes, or click OK to save your changes and return to the Portal Navigator.
You will want to enroll your schema in one or more roles to provide the desired level of overall database access privileges. If you think of a schema as a super-user, created from a population of users who have password access to the schema, you enroll a schema in one or more roles to provide access privileges to the database to all users who in turn have login access to the schema.
The access privileges provided through the schema's membership in one or more roles can be overridden on specific database objects through grants (see "Granting and Revoking Privileges on Database Objects").
|
Note: If you have arrived at this task by clicking a link to edit the schema that appeared at the top of the Create Schema page or if you are continuing from editing the schema's Main or Grants tab, skip to step 5. |
To enroll a schema in one or more roles:
Log in to OracleAS Portal.
Click the Navigator link at the top of the page.
Click the Database Objects tab to bring it forward.
On the Database Objects tab, go to the Name column to locate the schema you will work with and click the Edit link that is next to it.
On the resulting page, click the Roles tab to bring it forward.
By default, the schema is enrolled in the CONNECT role, and may be enrolled in others.
Click the Browse icon next to the Role field.
Select a role to which you will enroll the schema.
Click the Add button next to the Role field to add the selected role to the Is Member Of list.
Continue selecting roles and clicking the Add button until you have enrolled the schema in all desired roles.
Click Apply to save your changes, or click OK to save your changes and return to the Portal Navigator.
Once you have created or identified an existing schema that will own your provider, you are ready to create a provider to host (own or contain) your locally built portlets.
To create a provider for locally build portlets:
Log in to OracleAS Portal.
Click the Navigator link at the top of the page.
In the Portal Navigator, click the Providers tab to bring it forward.
On the Providers tab, click the Locally Built Providers link.
On the resulting page, click the Database Provider link next to Create New…
|
Note: If you do not see the Create New link on the Locally Built Providers page, this means that the user name you used to log in does not have privileges in any schema. The capability to create a new provider is available only when the current user has some privilege in a database schema. In this case, you must have the Portal Administrator edit your user profile to grant you the privilege to create a schema. To do this:
When these steps are complete, you can log in again with your user name and create a schema on the Database Objects tab in the Portal Navigator. Once you have created a schema, you will see the Create New link on the Locally Built Providers page. |
In the Portal DB Provider Name field, enter an internal name to identify this provider to the portal.
Blank characters and special characters are not allowed. Type an underscore character to add a space, for example, portlet_provider.
In the Portal DB Provider Display Name field, enter a display name to identify this provider to users.
Select a schema, for example, the one you just created, from the Portal DB Provider Schema drop-down list.
This list of schemas includes only those on which you have the Manage privilege.
Click OK to save your changes and return to the Portal Navigator.
Before you can create and publish portlets under the auspices of a provider, you must ensure that the provider has been identified as a provider to OracleAS Portal. To expose a provider:
Create a provider, for example, as described in Section A.1.2, "Creating a Provider for Locally Built Portlets".
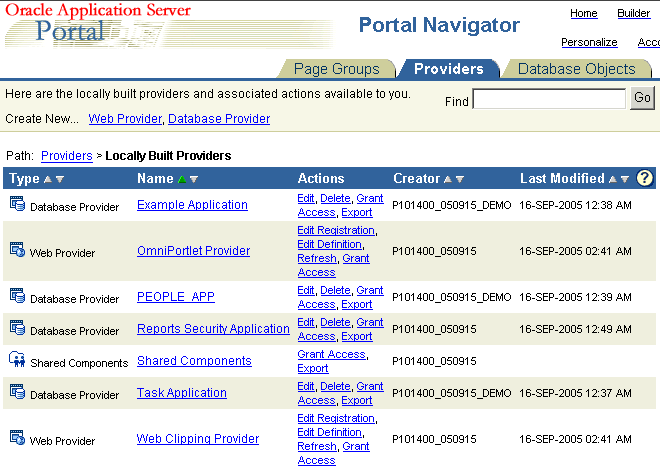
Locate the listing for your new provider in the Portal Navigator.
Click the Grant Access link next to your new provider (Figure A-7).
Figure A-7 The Grant Access Link Next to a Provider in the Portal Navigator
On the Grant Access page, verify that Expose as Provider is selected.
Figure A-8 The Expose as Provider Check Box on the Provider Grant Access Page
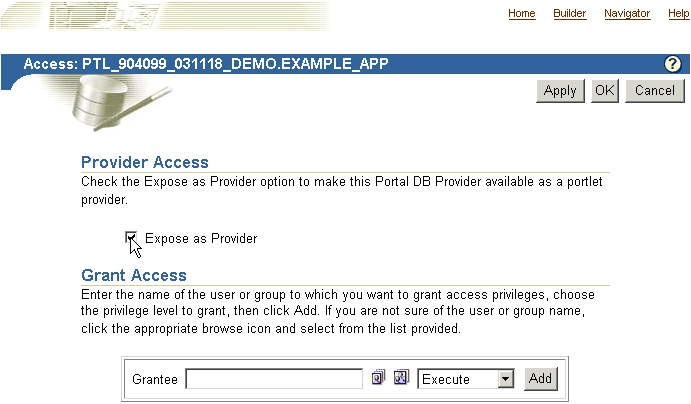
Click OK to save your change and exit the Grant Access page.
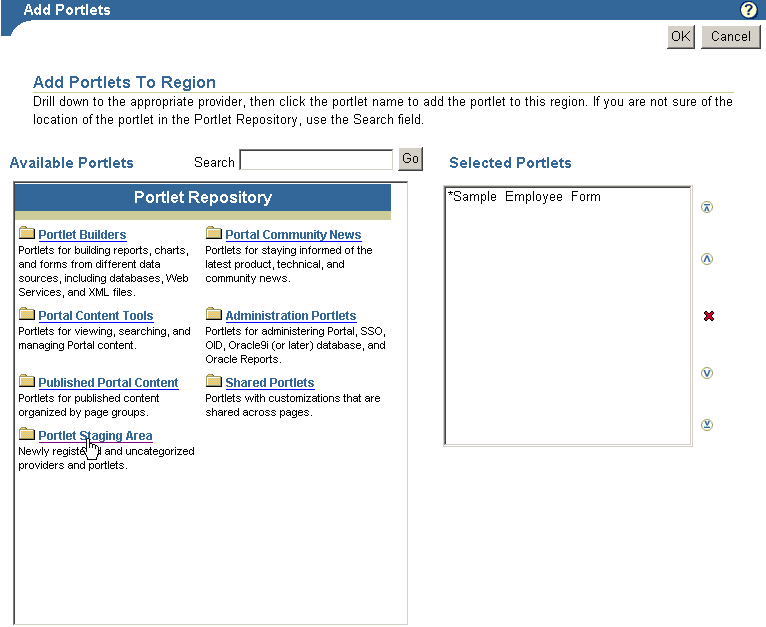
Selecting this check box enables users to publish portlets to the portlet repository under the auspices of this provider. Provided you have selected this box, the portlets you create using the Portlet Builder will be published to the portlet repository automatically (under the Portlet Staging Area node) when you finish them.
Figure A-9 The Portlet Staging Area Node in the Portlet Repository
This section lists and describes the types of portlets you can build using the portlet-building wizards available in OracleAS Portal. It provides general information on how to build a portlet and specific information on how to build forms, reports, charts, and lists of values.
Beginning with OracleAS Portal 10g (9.0.4), you can define portlets "in place" on a page. In other words, you can add a portlet to a page and define the complete portlet using the Portlet Builder without leaving the page. To add and create portlets in this way, you must have the required privileges: you must belong to the PORTAL_ADMINISTRATORS group and have the MANAGE CONTENT privilege on the page. This section describes how to define portlets outside of the page; then, you can modify and manage portlets independently, and later add the portlet to the page, as described in Section A.6.4, "Running the Component as a Portlet through the Portlet Personalization Form".
|
Note: If you are planning to build portlets in an OracleAS Portal database provider and accept the defaults in the wizards, you must ensure that the appropriate privileges have been granted on the objects of the SCOTT schema to the Portal database provider schema. Otherwise, you will receive errors when going through the wizards. |
This section contains the following subsections:
You can build additional types of portlets through the portlet-building wizards. Table A-1 lists and describes the types of portlets you can build.
Table A-1 Types of Portlets Available Through Portlet-Building Wizards
| Portlet Type | Description |
|---|---|
|
Displays a personalized form that can be used as an interface for updating tables, executing stored procedures, and generating other personalized forms. Through the OracleAS Portal portlet-building wizards, you can build three types of forms.
|
|
|
Displays the data that you select from a database table or view in report format. The report can have tabular, form, or custom layout. You can build three types of reports:
|
|
|
Displays data that you select from a database table or view as a bar chart. |
|
|
Displays the data that you select from a database table or view in calendar format. |
|
|
Displays dynamically-generated HTML content on a Web page. |
|
|
Displays an XML page. |
|
|
Displays the data that you select from a database table or view as a graphical hierarchy of items containing up to three levels. |
|
|
Displays an HTML-based menu that contains options that are linked to other menus, OracleAS Portal database portlets, or URLs. |
|
|
Renders the content of a URL target in a portlet. |
|
|
Displays a Web page with two frames. The queries entered in one frame control the content of the other. |
|
|
Displays a link that provides a hypertext jump between OracleAS Portal database portlets and other database portlets, database portlet personalization forms, or any HTML page. |
|
|
Use LOVs when creating database portlets to preselect the possible values in an entry field. Users select a value from the list rather than enter it manually. You can build LOVs based on other LOVs. |
|
|
Displays data in a spreadsheet format. |
|
Note: To build a portlet, you must have at least the Edit privilege on the provider that will own the portlet. For more information, see "Creating a Provider for Locally Built Portlets". |
To use a wizard to build a portlet:
Log in to OracleAS Portal.
Click the Navigator link at the top of the page.
Click the Providers tab to bring it forward.
Click the Locally Built Providers link.
Figure A-10 The Locally Built Providers Link in the Portal Navigator
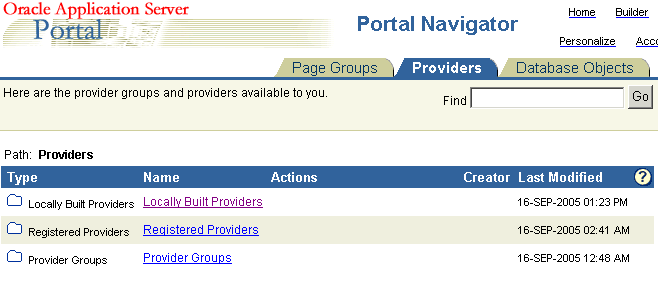
Click the name of the OracleAS Portal database provider you want to host the new portlet.
The Name column displays the names of all the providers on which you have privileges.
Next to Create New…, click the link for the type of portlet that you want to build, for example, Chart or Form (Figure A-11).
Figure A-11 The Form Link Next to Create New in the Portal Navigator
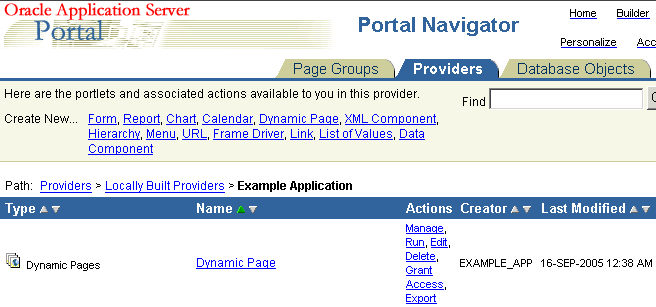
See Table A-1 for a list and description of the types of portlets you can build.
Depending on the type of portlet you are building, OracleAS Portal displays either the first step of the portlet build wizard or a menu of additional choices. If you click Form, for example, you have the option of creating a form based on a table or view, a master-detail form, or a form based on a procedure (Figure A-12).
Figure A-12 Choices Available for Creating a Form in the Portlet Builder
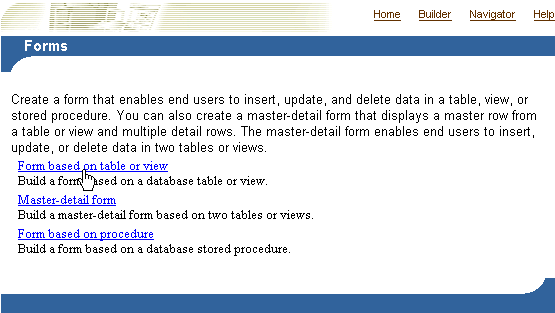
When the first step of the portlet build wizard displays, follow the instructions shown on each step.
A progress indicator displays how many wizard steps are left to complete. The Finish button becomes available when you have provided the wizard with sufficient information to build the portlet. The fields you don't complete will populate with default values or will remain null.
If you are unsure of how to complete the fields on a particular step of the wizard, click the online Help icon in OracleAS Portal for more information.
The next sections guide you through the specific steps required to build a particular type of portlet. For more information, see:
Forms provide a means of inserting, updating, and deleting content from your database through a user-friendly interface. You control form layout through options available in the Forms build wizard. Wizard options enable you to control the look and feel of the overall form as well as the form's individual entry fields and buttons.
You can perform JavaScript validation on user-specified values entered in any text field on the form. Additionally, you can add PL/SQL event handlers that run when a user clicks a button on the form. After successful submission of form content, you can specify a PL/SQL block or procedure that will execute.
The portlet-building wizards in OracleAS Portal provide three construction methods for building forms:
Forms based on tables or views
Master-detail forms
Forms based on a procedure
All of these forms are described in Table A-1. This section describes how to create a form based on a table or view (Figure A-13).
To create a form based on a table or view:
Follow the instructions detailed in "Building Portlets Declaratively".
Return to this section once you complete step 6.
On the Forms page, click Form based on table or view.
Figure A-14 The Form Based on Table or View Link in the Portlet Builder

In the Name field, enter an internal name for the form (Figure A-15).
The internal name is not published to users.
In the Display Name field, enter the name by which users will identify this form (Figure A-15).
The display name is used at runtime. It displays as the title of the browser window as well as in the banner of the form. When the form is published as a portlet, the display name is used as the title of the portlet and in the List of Available Portlets in the Portlet Repository.
In the Description field, enter a description of this form (Figure A-15).
The description displays below the portlet in the Portlet Repository. It can be a summary of the portlet's purpose, a classification of its type, or any other descriptive information. It may be useful within your organization to have a standard approach to what is included in the description.
From the list of Portal DB Providers, select the provider that will own this form (Figure A-15).
We recommend that you use a provider specifically created for owning, or hosting, your declaratively-built portlets. This list displays only those providers in which you have been granted privileges to build portlets.
Click Next.
Click the Browse icon next to the Table or View field, and choose a table or view on which to base your form (Figure A-16).
You can use a constant in this field (for example, #APP_SCHEMA#.EMP, #PORTAL_SCHEMA#.DEPT) in lieu of a fixed value. For more information, see "Referencing the OracleAS Portal Schema".
The tables and views that you can choose in this step are those that are accessible from the Portal DB Provider you selected in the previous step. You can also enter the table name directly into the field.
|
Note: If you are using the Example Application (based on the PORTAL_DEMO schema) to build a form, the default table on which to base the form is SCOTT.EMP. As the SCOTT table does not have PUBLIC EXEC privileges, the administrator must manually grant public access to the SCOTT schema to create a form based on the default table. If this is not done, and you choose the default table, the following error is generated:
|
Click Next.
Select a form layout.
Choose between Tabular or Custom. Tabular layouts are created automatically. Custom layouts are based on HTML code that you supply in a later step.
Click Next.
Set Formatting and Validation Options (Figure A-17):
Figure A-17 Form Formatting and Validation Options
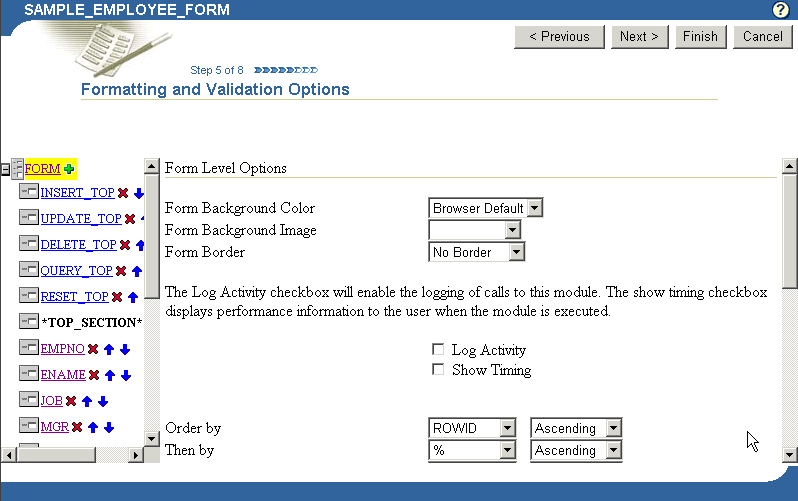
Click Form in the left column to set up the formatting and validation options for the entire form (Figure A-17).
The formatting and validation options that appear in the right column relate to the object you have selected in the left column.
Table A-2 lists and describes form-level formatting and validation options.
Table A-2 Form-Level Formatting and Validation Options
| Option | Description |
|---|---|
|
Form Background Color |
Choose the background color of the form. |
|
Form Background Image |
Choose an image that will appear in the background of the form. |
|
Form Border |
Choose a style for the border around the form background. |
|
Log Activity Check Box |
Select to record activity in the OracleAS Portal log. Log information includes performance statistics as well as the names of users who request the form. |
|
Show Timing Check Box |
Select to display the time elapsed, starting from when the server receives the request to generate HTML for the form. Timing displays at the bottom of the form. |
|
Order by |
Choose the column by which you will order the data returned by the SELECT statement. Select the percent sign (%) if you do not wish to specify a column for ordering. |
|
Then by |
Choose the column(s) for subsequent ordering of the data returned by the SELECT statement. Select the percent sign (%) if you do not wish to specify a column for ordering. |
|
Ascending |
Choose Ascending (from a to z/0 to 9) or Descending (from z to a/9 to 0), depending on how you want the column values ordered. |
|
On Successful Submission of a Form Execute this PL/SQL |
Enter optional PL/SQL code that will execute after a user clicks a button on the form. The button must cause an operation, such as INSERT, to be performed on the table or view on which the form is based. For example, you might enter code that causes a message to display to the user when a table row is successfully updated. |
Select a TOP_SECTION item in the left column (that is, INSERT_TOP, UPDATE_TOP, and the like) to set formatting and validation options in the right column for INSERT, UPDATE, and other like items that will display at the top of the form (Figure A-18).
Figure A-18 Button Formatting and Validation Options
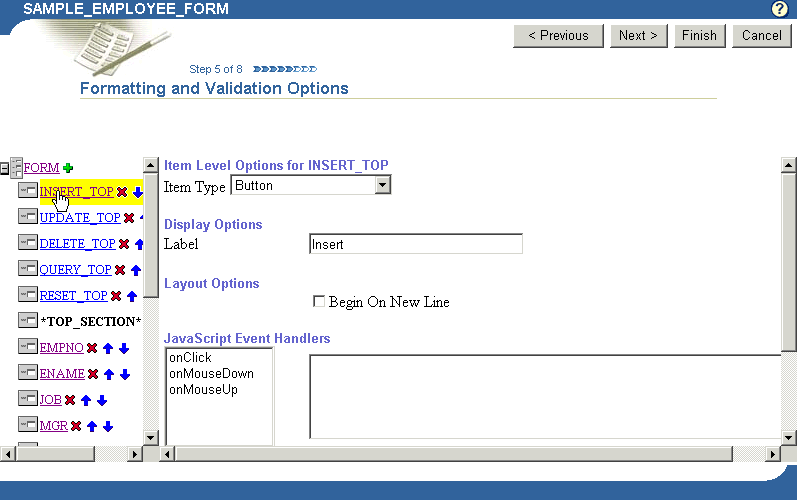
By default, insert, update, delete, query, and reset buttons appear at the top and bottom of each form. To prevent these buttons from displaying, click the Delete icon that appears next to the item in the left column.
Table A-3 lists and describes the formatting and validation options for buttons.
Table A-3 Formatting and Validation Options for Buttons
| Option | Description |
|---|---|
|
Item Type |
Select the method for displaying the selected item type on your form. Note that the default for items, such as INSERT_TOP, is button. For INSERT, UPDATE, DELETE, QUERY, and RESET, you will likely most often want to use the default. If you choose another item type, you will need to add code to invoke the item's functionality (for example, an insert) through a JavaScript or PL/SQL Event Handler. Item types include:
|
|
Display Options |
Label: Enter text that will display next to the button. |
|
Layout Options |
This section displays only if you selected Tabular in the Form Layout step. If you selected Custom, you can specify your own sophisticated layout in the next step using HTML code. Begin on New Line: Select this option to display the item on a new line on the form. Leaving this cleared will display the item on the same line as the previous item or column field. |
|
Choose an event and enter the JavaScript for the action you want to occur when that event happens. Refer to your JavaScript documentation for descriptions of the events on this list. |
|
|
Choose a button event and enter the PL/SQL code for the action you want to occur when the event happens. For advanced personalization, choose Custom from the drop-down list, and enter the PL/SQL code for the custom event. |
Select a column name in the left column to set formatting and validation options in the right column for table or view columns that will display in the form (Figure A-19).
Figure A-19 Column Formatting and Validation Options
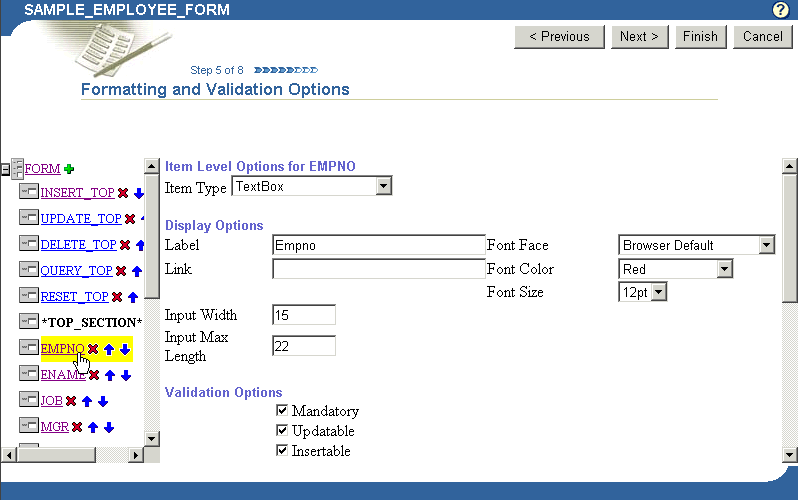
To prevent the display of a column, click the Delete icon next to it.
Table A-4 lists and describes the formatting and validation options available for table or view columns.
Table A-4 Formatting and Validation Options for Table or View Columns
| Option | Description |
|---|---|
|
Item Type |
Defines how the column you've selected on the left will display on your form. Options are listed and described in Table A-3. |
|
Display Options |
Label: Enter text to label this column on the form. Text will be display-only and will appear next to the field that represents this table or view column on the form. For example, you can add a label next to the field for the EMPNO column called Link: Specify a link to another OracleAS Portal portlet or URL. If you specify this option, the Label appears on the form as a hypertext link. If you want to link the form to another URL, type the URL location in the Link text box. If you want to link to an OracleAS Portal portlet, you can type the name of the package containing the portlet, for example:
Font Face, Color, Size: Specify the font characteristics for displaying text associated with the selected column on the form. Input Width: Enter the character width of the field associated with the selected column. Input Max Length: Enter the maximum length of the data that can be entered into the form field associated with the selected column. |
|
Validation Options |
Mandatory: Select to require that the user specify a value in the field associated with the selected column before submitting the form. Updatable: Select to enable the user to update the column. Leaving this blank prevents updates. This feature is useful when you want to allow users to update some table columns in the form, but only view others. For example, by clearing Updatable for employee names and ID numbers, and selecting Updatable for the employee's department, you can create a form that enables users to update an employee's department (for example, when the employee is transferred), but disables users from updating the employee name and ID number. When users display views, updatable columns display in black, non-updatable columns display in blue, and mandatory columns display in red. Insertable: Select to store the value of the column in the database when the user creates a new record. Leaving this blank prevents the value from being stored in the database (that is, it removes the column from the Default Value: Enter a default value for the field associated with the selected column. Users can accept this value or specify their own. Specify a constant, function, expression, or SQL query. Default Value Type: Specify a type for the default value entered in the previous field (Default Value). Format Mask: Enter an Oracle display format for columns containing numeric and date data types. For example, you could enter Note: Refer to the Oracle database documentation ( Field Level Validation: Choose a JavaScript validation routine that verifies whether the user enters a valid value in the field. For example, you could choose a JavaScript routine called IsNumber that verifies that a number has been typed in a SALARY field. Field validation providers are implemented in JavaScript and run when the OnChange condition occurs; for example, when the user presses the Return key after entering a value in the field. Form Level Validation: Choose a JavaScript validation provider that verifies whether the user enters a valid value in the field. Form validation providers run when the user submits the information, for example, after the user clicks the Insert button on the form. |
|
Layout Options |
This section displays only if you selected Tabular in the Form Layout step. If you selected Custom, you can specify your own sophisticated layout in the next step using HTML code. Begin on New Line: Select to create a line break before the field associated with the selected column. Leaving this cleared will display the column field on the same line as the previous column field. Row Span: Enter the number of HTML cells that can be used to display the field vertically on the browser page. Col Span: Enter the number of HTML cells that can be used to display the field horizontally on the browser page. |
|
Choose an event and enter the JavaScript for the action you want to occur when the event takes place. Refer to your JavaScript documentation for descriptions of the events in the list. |
Select a BOTTOM_SECTION item in the left column (that is, PREVIOUS, NEXT, INSERT_BOTTOM, UPDATE_BOTTOM, and the like) to set formatting and validation options in the right column for PREVIOUS, NEXT, INSERT, UPDATE, and other like items that will display at the bottom of the form.
See step b of this task for more information.
Click Next.
If you selected a Custom layout:
Enter the HTML code that will control the layout of your form. The text boxes on this page contain sample HTML code that creates a table. Using this model, each column you selected in the Tables or Views step of this wizard is formatted to display in a table row on the form.
Column labels are specified by the suffix .LABEL in the sample code. Column values are specified by the suffix .ITEM in the sample code.
You can update the sample code with any HTML of your own, provided you do not change the column values (.ITEM suffix) or labels (.LABEL suffix). You can, however, delete column values from this code.
If you selected a Tabular layout:
Enter descriptive text that you want to appear on the top or bottom of the form (Figure A-20). You can add a form title and help text for the form. You can also choose a template that controls the look and feel of the page on which the form appears.
Figure A-20 Entering Header, Footer, and Other Text for a Form

Table A-5 lists and describes the options available on this page.
Table A-5 Form Text Options on Tabular Format Forms
| Option | Description |
|---|---|
|
Template |
Choose a template to set the look and feel of form elements such as background colors and images and the image that appears in the upper left corner of the page. Templates are used only when your form is displayed in full-page view, and not when it is displayed as a portlet. When a form is displayed as a portlet, the host page's style controls the look and feel. |
|
Preview Template |
Click to view the appearance of the template currently selected in the Template drop-down list. |
|
Display Name |
Edit the display name of the form. You can specify HTML in this field. |
|
Header Text |
Enter any introductory text that you want to display at the top of the form, just below the title, but above any buttons. You can specify HTML in this field. |
|
Footer Text |
Enter any text that you want to display at the bottom of the form. You can specify HTML in this field. |
|
Help Text |
Enter any text that you want to display in a help page for the form. OracleAS Portal automatically adds a help button to the form. Users can click this button to link to a page displaying the help text that you enter here. You can specify HTML in this field. |
Click Next.
Optionally, enter the PL/SQL that will run at different points during the execution of the HTML code that creates this form (Figure A-21).
In the PL/SQL you enter into these fields, you can use constants for the OracleAS Portal schema, the application schema, and the application name. For more information, see "Referencing the OracleAS Portal Schema".
Figure A-21 Optional Fields for Entering Additional PL/SQL Code

Table A-6 lists and describes the options on this page.
Table A-6 Additional PL/SQL Code Options
| Option | Description |
|---|---|
|
… before displaying the page. |
Enter a PL/SQL procedure that will execute before the HTML for the form is generated (that is, before the <FORM> tag is generated). In spite of the name of this field, the PL/SQL procedure actually executes after the page itself is displayed. |
|
… before displaying the form. |
Enter a PL/SQL procedure that will execute after the <FORM> tag but before displaying any form elements. |
|
… after displaying the form. |
Enter a PL/SQL procedure that will execute after all form elements are displayed but before the ending </FORM> tag. |
|
… after displaying the page. |
Enter a PL/SQL procedure that will execute after the ending </FORM> tag. |
|
… before processing the form. |
Enter a PL/SQL procedure that will execute before the form is processed. |
|
… after processing the form. |
Enter a PL/SQL procedure that will execute after the form is processed. |
|
Note: If you want to display output from a PL/SQL procedure, you must enter the PL/SQL in one of these four fields:
You cannot display output from a PL/SQL procedure in the before/after processing the form fields; the output will not display. Additionally, if you want to display output from your PL/SQL procedure, you must specify the schema name with the procedure. This is required even if the form and the procedure are in the same schema. |
Click Finish to save your changes.
Once you click Finish, Portal jumps to a summary page from which you can manage your form (Figure A-22). These tasks are discussed in later sections in this appendix.
Click Close to return to the Portal Navigator.
Reports display data from tables and views (Figure A-23). You can base a report on multiple tables or views using a JOIN condition. You can highlight data that satisfies conditions you specify. For example, you can display in bold red text the records of all employees who have been employed less than two years. You can create hypertext links from values displayed in the report to other OracleAS Portal database portlets or URLs.
Additionally, the wizards enable you to specify other options to achieve the following results:
Limit data displayed in the report
Sum column values
Use logical operators to select data within the columns
Format data in the report
Format the report's personalization form
Specify PL/SQL code that executes at various points in the report.
The OracleAS Portal Portlet Builder wizards provide three construction methods for building reports:
Query By Example (QBE) Reports
Reports From Query Wizard
Reports From SQL Query
These reports are described in Table A-1. This section describes how to build a report using the Query Wizard.
To build a report using the Query Wizard:
Follow the instructions detailed in "Building Portlets Declaratively".
Return to this section once you complete step 6.
Click the Report link next to Create New…(Figure A-24)
Figure A-24 The Report Link in the Example Applications Portal DB Provider

On the Reports page, click Reports From Query Wizard (Figure A-25).
Figure A-25 The Reports From Query Wizard Link in the Portlet Builder

In the Name field, enter an internal name for the report (Figure A-26).
Figure A-26 The First Step in the Report From Query Wizard

The internal name is not published to users.
In the Display Name field, enter a display name for the report (Figure A-26).
The display name is used at runtime. It displays as the title of the browser window as well as in the banner of the report. When the report is published as a portlet, the display name is used as the title of the portlet and in the List of Available Portlets in the Portlet Repository.
From the list of Portal DB Providers, select the provider that will own this report (Figure A-26).
We recommend that you use a provider specifically created for owning, or hosting, your declaratively-built portlets. This list displays only those providers in which you have been granted privileges to build portlets.
Click Next.
From the Tables and Views list, choose one or more tables or views on which to base this report (Figure A-27).
|
Note: In the Tables and Views field, you can use constants for the OracleAS Portal schema and the application schema (for example, enter #APP_SCHEMA#.EMP). For more information, see "Referencing the OracleAS Portal Schema". |
Figure A-27 Selecting a Data Source for the Report
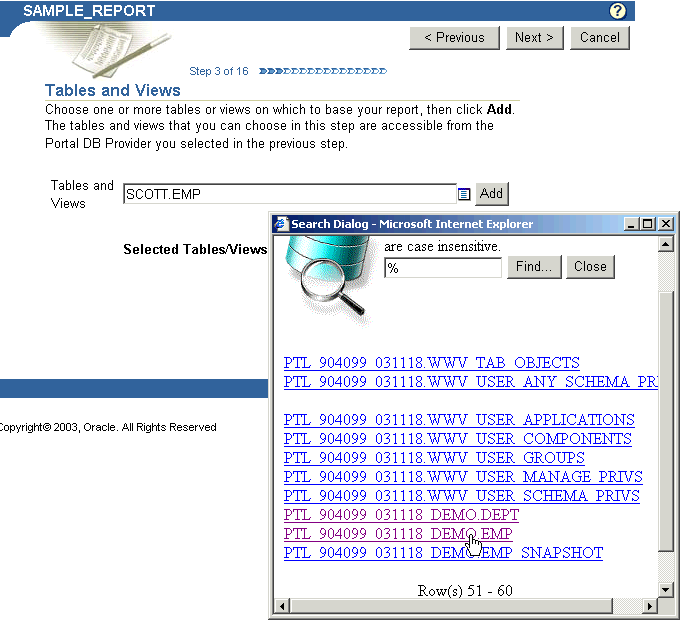
Click Add after each selection (Figure A-28).
Figure A-28 Clicking Add to Add a Data Source

Click Next.
If you are basing your report on multiple tables or views, identify the columns that will be joined to one another.
This page displays only when you have selected multiple columns or views in the previous step. Default join conditions are automatically generated. You can accept or modify these defaults.
Click Next.
Select the columns you want to display in your report (Figure A-29).
Figure A-29 Selecting the Columns that Will Display in the Report
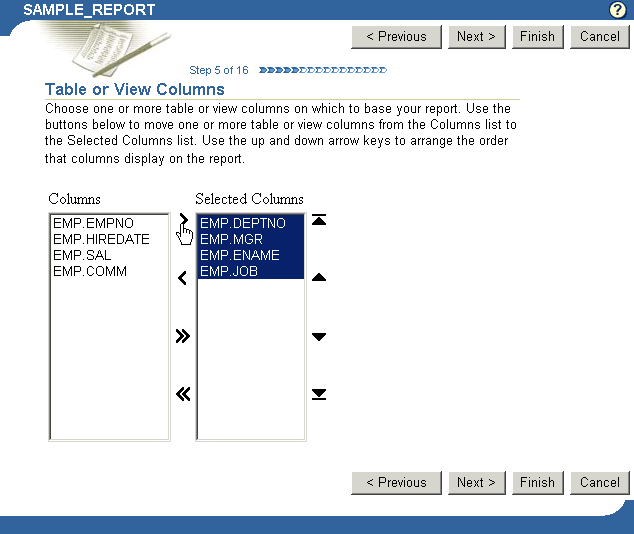
Click the arrows between the two columns to move individual selections or the entire list from one column to the other. Use the rearrange icons to the right of the Selected Columns list to set the order of appearance of your selected columns. Select no more than 255 columns.
Click Next.
Optionally, specify conditions that limit the data displayed in the report (Figure A-30).
Table A-7 lists and describes the options on this page.
Table A-7 Options on the Column Conditions Page
| Option | Description |
|---|---|
|
Column Name |
Choose a column if you want to specify a condition for the data in the report. The column need not be one that was selected for display. For example, you can choose a salary column that is not selected for display to limit the displayed data to only those employees that meet your specified salary condition, such as salary must be greater than $200. To set this condition, choose (for example) |
|
Condition |
Choose conditions that will define Column Name's relationship to Value. Choose from:
|
|
Value |
Enter a value that limits which rows of the identified column are displayed in the report. To specify multiple values after an |
|
More … |
Click to display more fields for adding more conditions on this page. |
Click Next.
Select from three report layout types: Tabular, Form, or Custom.
Tabular layouts are based on options you choose in the Report Building wizard. Results are displayed in a table format, where each record represents a row in the underlying table or view, and each data column displays as a column in the table.
Form layouts are based on options you choose in the Report Building wizard. Results are displayed in rows, where each data column is displayed in a separate row.
Custom layouts are based on HTML code that you supply in a later wizard step. Because you specify your own HTML code, you will have a greater level of control over the appearance of your report than you would using a structured (tabular or form) layout.
This description will proceed as if you have selected a tabular layout. Some of the wizard steps you would take with other types of layouts are not included in the construction of a tabular report. For example, with a custom layout, you would be given an opportunity to specify your custom HTML code. That step does not display in the wizard when you choose a tabular layout.
Click Next.
Specify column formatting (Figure A-31).
Table A-8 lists and describes the options presented on this page.
Table A-8 Column Formatting Options for a Tabular Report
| Option | Description |
|---|---|
|
Column |
Displays the names of the table or view columns you selected in a previous wizard step. |
|
Column Heading |
Enter the name you will use to identify this column in your report. For example, if your table has an |
|
Sum |
Select to add values together and display the result in the report. |
|
Data Type |
Displays the data type of the data in the associated column. |
|
Align |
Choose whether to align data to the left, center, or right margin of a report column. By default, numeric data aligns to the right, and alphabetical data aligns to the left. |
|
Display as |
Choose from:
|
|
Format Mask |
Enter an Oracle display format for columns that contain date and numeric data types. See Table A-9 and Table A-10 for examples of date and number format masks. You cannot use format masks in reports generated in Excel format. |
|
Link |
Create a link from the column to another OracleAS Portal portlet. The column value will display as a hypertext link. You can specify a link only if one has already been created for this column and has been stored in the database. |
|
Edit Link |
Click to display the Set Link Parameters window. In this window, you can set the values of the link parameters to pass to the target portlet. Enter a static value, such as 10 or KING, or select from the list of columns you identified in the table or view columns step earlier in this wizard. If you need the value of a column for a link parameter, but do not want that column displayed in the report, you can set the Display as value to Hidden. |
|
Width Type |
Specify one of the following:
|
|
Width |
Enter the numeric value for the width type. |
Table A-9 Examples of Date Format Masks
| Sample Date Format | Date Displayed |
|---|---|
|
MM/DD/RR |
03/04/85 |
|
Mon. DD, RRRR |
Mar. 4, 1985 |
|
Day Month DD fmHH:MI AM |
Monday March 4 11:35 PM |
|
Dy Mon ddth fmHH24:MI:SS |
Mon Mar 4th 23:35:22 |
|
Day "the" ddthsp "of" Month |
Monday the fourth of March |
Table A-10 Examples of Number Format Masks
| Sample Number Format | Number | Number Displayed |
|---|---|---|
|
-0000 |
7934 -7934 |
"7934" "-7934" |
|
-00000 |
7934 |
"07934" |
|
-NNNN |
7639 535 |
"7639" "535" |
|
+NNNN |
100 -99 |
"100" "-99" |
|
-%NN |
10 |
"%10" |
|
$<NNNNN.00> |
120014 |
" $1200.14" |
|
+KKNNNNN.00 |
1950 |
"+ 1950.00" |
|
$ <NNNNN.00> |
1200 400 |
"$ 1200.00 "$ 400.00" |
The quotation marks in Table A-10 will not appear in your output. They are used here to make it clear where there are leading spaces. See the Oracle Application Server documentation for more information on format masks. You'll find it on the Oracle Technology Network, http://www.oracle.com/technology/index.html.
Click Next.
Optionally, specify conditions and define special formatting for displayed report data that will be used whenever those conditions are met.
For example, specify that the background color of a particular row should become yellow whenever the JOB column equals PRESIDENT (Figure A-32).
Figure A-32 The Formatting Conditions Page

Table A-11 lists and describes the options on this page.
Table A-11 Options on the Formatting Conditions Page of the Report Wizard
| Option | Description |
|---|---|
|
Column |
Choose a column on which the condition will be applied. The column must be one of those selected for display in an earlier wizard step. |
|
Condition |
Choose conditions that will define Column's relationship to Value. Choose from:
|
|
Value |
Enter a column value to trigger the condition. There is no need to apply formatting masks to numeric values. For example, in a table with an To specify multiple values after an |
|
Row/Col |
Choose whether to apply the conditional formatting to an entire row or to just the affected column data. If you specify a condition, you must choose <Row> or a column name here. |
|
Color |
Choose a text color for displaying data that meets the specified condition. |
|
Background Color |
Choose a background color for the column or row that contains data that meets the specified condition. In some cases, the background color does not change as expected. This is a known issue with reports. |
|
Font Face |
Choose a font in which to display data that meets the specified condition. |
|
A |
Select to display results that meet the specified condition in bold. |
|
A |
Select to display results that meet the specified condition in italic. |
|
A |
Select to underscore results that meet the specified condition. |
|
Blink |
Select to cause results that meet the specified condition to blink on and off. |
|
Seq |
Enter a sequential number to establish an order of precedence for execution of the formatting. This is useful, for example, when a row contains data that meets more than one condition, and the formatting rules differ for each. The condition with the highest position in the order (that is, 1), takes precedence over all the others. |
Click Next.
Define display options for the various possible views of the report:
Table A-12 describes display options common to all views (Figure A-33).
Table A-13 describes display options for full-page views (Figure A-34).
Options for portlet views are the same as those for full-page views, with a few noted exceptions. See Table A-13 and Figure A-34.
Table A-14 describes display options for column breaks (Figure A-35).
Table A-15 describes display options for row order (Figure A-36).
Table A-16 describes display options for mobile devices (Figure A-37).
Figure A-33 Display Options Common to All Views

Table A-12 Report Display Options Common to All Views
| Option | Description |
|---|---|
|
Show Total Row Count |
Select to display the total number of rows in the report. |
|
Show Null Values as |
Enter the text string you want to display for all null values in the report, for example, |
|
Embed interMedia rich content in the report |
Select to generate report output that shows any interMedia data values, such as audio, video, or images. For more information, see "Building Forms and Reports against interMedia Rich Content". |
|
Expire After (minutes) |
Enter the number of minutes after the initial display to keep the report in the cache. When the time expires, the report data is refreshed from the database. |
|
Default Format |
Choose a display format for the report:
|
Figure A-34 Report Display Options for Full Web-Page and Portlet Views
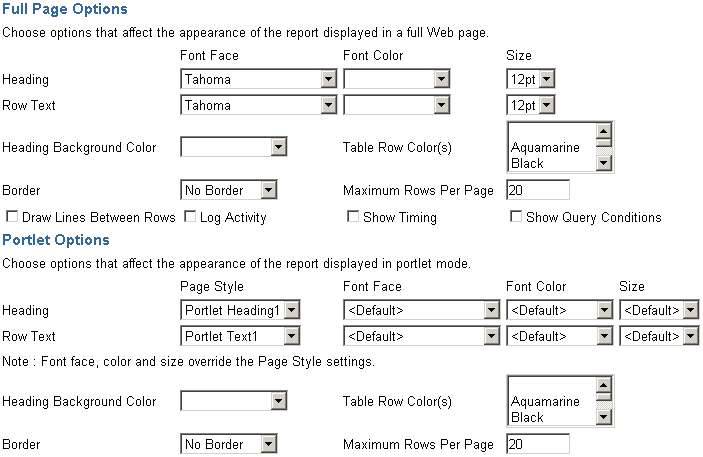
Table A-13 Report Display Options for Full Web-Page and Portlet Views
| Option | Description |
|---|---|
|
Font Face |
Specify a font for report text. |
|
Font Size |
Specify a font size for report text. Use relative values, such as +1, +2, and so on. Relative font size is the last font size specified in the HTML code for the page plus the relative value. For example, the last font size specified in HTML code is 14 points; a new heading is coded at +2 font size; the heading will display in 16-point type. |
|
Border |
Specify the thickness of border to display around the report. Choose No Border, Thin Border, or Thick Border. |
|
Font Color |
Specify a font color for report text. |
|
Page Style |
Choose the page style you wish to use for the report when it appears as a portlet. |
|
Heading Background Color |
Specify a background color for report column headings. |
|
Table Row Color(s) |
Specify a background color for report rows. To choose more than one color use CTRL-Click (Windows). Rows will display in alternating colors. |
|
Maximum Rows Per Page |
Enter the maximum number of rows you want to display in the report. |
|
Draw Lines Between Rows |
Select to display lines between report rows. |
|
Log Activity |
(Full page only.) Check to enter performance information and the names of users who request the report in the OracleAS Portal activity log. |
|
Show Timing |
(Full page only.) Check to display report timing at the bottom of the report. Timing runs from when the server receives the request to generate the report to when the HTML for the report is generated. |
|
Show Query Conditions |
(Full page only.) Check to display user-specified parameters that are passed to the query that created the report and the time when the report was created. |
Figure A-35 Report Display Options for Column Breaks

Table A-14 Report Display Options for Column Breaks
| Option | Description |
|---|---|
|
Break Style |
Choose a break style. |
|
First Break Column |
Choose the first column on which to break. For example, if you choose DEPTNO, the report will show all the rows associated with the first department number, followed by all the rows associated with the next department number, and so on. If you specify break columns, then you must also specify Order by values for the columns in the same order (see Table A-15). |
|
Second Break Column |
Choose the second column on which to break. If you do not require a second level break, choose %. |
|
Third Break Column |
Choose the third column on which to break. If you do not require a third level break, choose %. |
Figure A-36 Report Display Options for Row Order
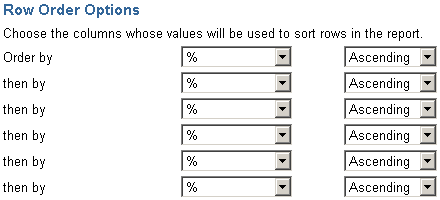
Table A-15 Report Display Options for Row Order
| Option | Description |
|---|---|
|
Order by |
Choose the table or view column whose values will be used to sort rows in the report. Choosing this option is equivalent to specifying a SQL ORDER BY clause. Choose Ascending to sort A to Z or 0 to 9. Choose Descending to sort Z to A or 9 to 0. |
|
then by |
Choose additional columns whose values will be used to sort report rows. For example, if you choose Order by Department ID, then by Employee Name, Oracle Portal sorts report rows numerically using department IDs. Rows containing the same Department ID are then sorted alphabetically using employee names. |
Figure A-37 Report Display Options for Mobile Devices

Table A-16 Report Display Options for Mobile Devices
| Option | Description |
|---|---|
|
Columns to Display |
Choose the columns you want to display on a mobile device. Use this feature to reduce the size of the report to better fit onto the smaller screens available on mobile devices. For example, you would probably want to limit the number of columns displayed to 2 or 3 for most mobile devices. |
|
Maximum Rows Per Page |
Enter the maximum number of rows you want to display on a single screen. For example, you probably ought to set this option to a relatively small value, such as 5, for most mobile devices. |
Click Next.
In the Personalization Form Display Options section, choose the parameters that you want to display on the report's personalization form (Figure A-38).
Figure A-38 Detail of the Personalization Form Display Options Page
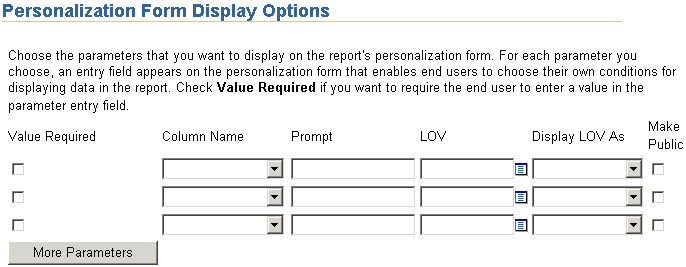
For each parameter you choose, an entry field appears on the personalization form that enables users to choose their own conditions for displaying data in the report. Check Value Required if you want to require the user to enter a value in the parameter entry field. If you wish, you can use bind variables to allow users to specify their own amounts. See "Using Bind Variables" for more information.
Table A-17 lists and describes the display options for the report personalization form.
Table A-17 Display Options for the Personalization Form Display Options Page
| Option | Description |
|---|---|
|
Value Required |
Select to require that the user specify a value for the column's entry field on the report personalization form. If you do not check this box, the user will not be required to specify a value. |
|
Column Name |
Choose a table or view column. An entry field will be added to the report personalization form. Users can specify values that limit the data displayed in the report. Entry fields appear only for the columns you select here. |
|
Prompt |
Enter the prompt text you want to display next to the entry field. The prompt text tells users what to enter in the field. For example:
|
|
LOV |
Select a list of values (LOV) for the column's entry field. Users of the personalization form can choose values from this list to limit the data displayed in the report. Click the Browse icon next to this field to locate an LOV. Note that the LOV must already be built and stored in the Portal Repository. For more information, see "Building Lists of Values Declaratively". In the LOV field, you can use a constant for the application name (for example, enter #APP_NAME#.dept_lov). For more information, see "Referencing the OracleAS Portal Schema". |
|
Display LOV As |
Choose a format for displaying your list of values. Choose from:
|
|
Make Public |
Select to allow values to be made public, that is, to allow non-authenticated users to see them. Be sure to make public any element that will be a variable in the list of portlet parameters associated with a page parameter. |
|
More Parameters |
Click to display more fields on this page to include more table or view columns on the report personalization form. |
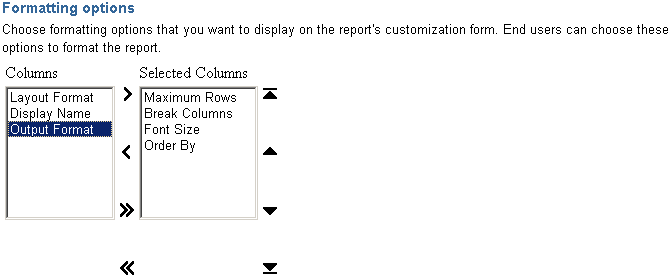
In the Formatting options section, choose formatting options to include on the report personalization form (Figure A-39).
Including one or more of these selections enables users to have a greater level of control over the final appearance of the report.
Figure A-39 The Formatting Options Section of the Personalization Form Display Options Page
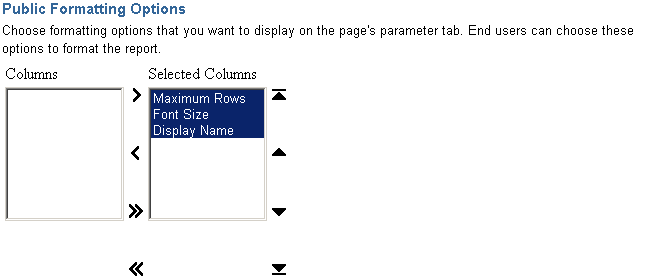
In the Public Formatting Options section, choose formatting options to include on the parameter tab for the page where the report is displayed (Figure A-40).
Figure A-40 The Public Formatting Options Section of the Personalization Form Display Options Page
In the Button Options section, select the buttons that will display on the report personalization form (Figure A-41).
Table A-18 lists and describes button display options for the report personalization form.
Figure A-41 The Button Options Section of the Personalization Form Display Options Page

Table A-18 Button Display Options for the Personalization Form Display Options Page
| Option | Description |
|---|---|
|
Button |
Select one or more buttons to display on the report personalization form:
|
|
Name |
Enter the label that will display on the selected button. Keep the name short to avoid displaying large buttons. You cannot change the label on the Reset to Defaults button. |
|
Location |
Specify the location of the button on the report personalization form. Choose from Top, Top and Bottom, or Bottom. |
|
Alignment |
Specify the alignment of the button on the report personalization form. Choose from Left, Center, or Right. |
Click Next.
Optionally, select a template to set the look and feel of the report and the report personalization form when they are displayed on a full Web page.
The template you choose here applies to both the report and the report personalization form when they are displayed on a full Web page. The template is not used when the report and report personalization form are displayed as portlets; in this case, the style of the page is used.
The template controls the look and feel of the page on which the report appears. In contrast, the display options you have specified on other pages in this wizard control the look and feel of the report itself.
Click the Preview button to see how the template elements will display (Figure A-42).
Figure A-42 Report and Personalization Form Text Page

Optionally, enter text for display on the top or bottom of the report or the report personalization form (Figure A-42).
Table A-19 lists and describes the options for including text. Enter text for the report in the left column. Enter text for the report personalization form in the right column.
Table A-19 Options for Including Text on a Report or a Report Personalization Form
| Option | Description |
|---|---|
|
Display Name |
Edit the display name for the report and the report personalization form. You can specify HTML in this field. |
|
Description |
(Report only.) Provide a description of the purpose of this report. This is an attribute that may or may not display, depending on which attributes have been selected for display in the region where the report or report portlet is placed. |
|
Header Text |
Enter any introductory text for display at the top of the report or report personalization form. Header Text displays below the display name or title. You can specify HTML in this field. |
|
Footer Text |
Enter any text for display at the bottom of the report or report personalization form.You can specify HTML in this field. |
|
Help Text |
Enter any text for inclusion on a help page for the report or report personalization form. OracleAS Portal automatically includes a help button with the report and the report personalization form when they are displayed on a full page. When they are displayed as a portlet, whether the help button displays is controlled by the way the host portlet region has been configured. Users click the help button to display the text you enter here. You can specify HTML in this field. |
|
About Text |
Enter any text for inclusion in an About box. OracleAS Portal automatically includes an About button with the report and the report personalization form when they are displayed on a full page. When they are displayed as a portlet, whether the about button displays is controlled by the way the host portlet region has been configured. Users click the about button to display the text you enter here. |
Click Next.
Optionally, enter PL/SQL code that runs during the execution of the report or report personalization form HTML (Figure A-43).
Table A-20 lists and describes the options available for running PL/SQL code at different points during the execution of the HTML code that creates the report or the report personalization form.
|
Note: In the PL/SQL you enter into these fields, you can use constants for the OracleAS Portal schema, the application schema, and the application name. For more information, see "Referencing the OracleAS Portal Schema". |
Table A-20 Options for Executing PL/SQL Code During Report Publication
| Option | Description |
|---|---|
|
… before displaying the page |
Enter a PL/SQL procedure that will execute before the page containing the report or the report personalization form displays. |
|
… after displaying the header |
Enter a PL/SQL procedure that will execute after the report or the report personalization form header displays. |
|
… before displaying the footer |
Enter a PL/SQL procedure that will execute before the report or the report personalization form footer displays. |
|
… after displaying the page |
Enter a PL/SQL procedure that will execute after the page containing the report or the report personalization form displays. |
Click Finish.
This saves the report and takes you to a summary page where you can manage and test run the report (Figure A-44). Subsequent sections in this appendix provide more detail about these tasks.
You can integrate interMedia rich content, such as such as images, audio, and video, into the reports and forms you build with OracleAS Portal. These objects are stored in the Oracle Database 10g.
The database column types for the interMedia rich content you can display include:
ORDIMAGE: This object type supports the storage, management, and manipulation of image data, such as GIF, JPEG, and BMP.
ORDAUDIO: This object type supports the storage and management of audio data, such as MP3, AU, WAV, and MPEG
ORDVIDEO: This object type supports the storage and management of video data such as REAL, QuickTime 3/4, AVI, and MPEG.
In addition to allowing the use of these interMedia rich content type columns in an OracleAS Portal report or form, object attributes can be displayed in join conditions, formatting, column conditions, and so on. For example, display a video clip's size or duration in a report, or set a report condition that specifies that only objects modified after a certain date will display.
Keep in mind that, although interMedia supports a variety of content types and formats, the browser being used to view this material must natively support the relevant MIME type or have an installed plug-in that displays rich content that is not typically supported on the Web. For example, most browsers can natively display GIF and JPEG images, but TIFF images are not displayed without an installed plug-in.
interMedia and Reports
Two OracleAS Portal Reports Wizards offer the opportunity to include interMedia rich content:
Reports from Query Wizard
Query By Example Report (QBE)
With QBE reports, object-type attributes will not display. Consequently, trying to provide a value for an interMedia-based column in a report personalization form results in an error. This means that you cannot use a report personalization form for a QBE report that runs against interMedia object-type columns.
You can display interMedia rich content in a report in one of two ways:
Embedded (inline)
The image, audio, or video runs in place within the report.
As a linked icon
When a user clicks the link, the content is displayed in a new browser window, or it may be handled by the associated source application. For example, it may display in a RealPlayer window.
These display options apply to all columns that contain interMedia content in the OracleAS Portal report. They can be selected on the Display Options tab in the OracleAS Portal Report Wizard. By default, interMedia rich content is represented by icons in a report. Users click an icon to view the actual content. If you plan to rely on the default, you do not need to do anything further. If you plan to embed interMedia rich content, select the Embed interMedia rich content in the report check box on the Display Options page in the Report Wizard. Refer to Table A-12.
For more information about the Report Wizard, see "Building Reports Declaratively".
interMedia and Forms
Two OracleAS Portal Form Wizards offer the opportunity to include interMedia rich content in your form:
Form based on table or view
Master-detail form
With either of these methods, you must make sure that the underlying database object you are changing through your form is based on columns of type ORDIMAGE, ORDAUDIO, or ORDVIDEO.
To include interMedia rich content in your form, on the Formatting and Validation Options page of the OracleAS Portal Form Wizard, select the column name in the left frame, and specify an Item Type of File Upload (interMedia) in the right frame.
|
Note: The assigning of column types is done outside of OracleAS Portal. Consult your database administrator if necessary to create a table with interMedia column types. |
One advantage of uploading images, audio, and video clips into interMedia-based columns over uploading into BLOB columns is that the data is automatically parsed to extract several attributes, such as MIME type, length, and any user-defined metadata that might be included in the original media file. For example, a QuickTime file might contain close-captioning, or a RealVideo file might have copyright information. With interMedia-based columns, these attributes are automatically extracted and stored in the interMedia object for indexing and querying.
Figure A-45 A Chart Built with the Portlet Builder Chart Wizard
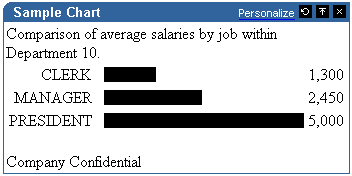
Charts display data from database tables or views as bar charts. They are based on at least two table or view columns:
Values in the Label column provide a display name for the bars on the chart.
Values in the Values column calculate the size of the bars on the chart relative to one another. Value columns must always contain numeric data.
You can also specify a Link column. Values in this column create hypertext links from the chart's labels to other OracleAS Portal database portlets or URLs. For example, with a link in place, users can click the label in a chart and jump to a form that enables them to update the data on which the chart is based.
Charts are also an effective way to display aggregate data. You can use Group By and Summary Options in the wizard to sum the column values returned by your query, for example, the minimum, maximum, or average value, or the number of values in a column.
The portlet-building wizards in OracleAS Portal provide two construction methods for charts:
Charts From Query Wizard
Charts From SQL Query
The Query Wizard provides a greater level of assistance in constructing a chart. The SQL Query method provides you with a greater level of control over the query that will be used to fetch data for the chart.
This section describes how to build a chart using the Query Wizard.
To create a chart using the Query Wizard:
Follow the instructions detailed in "Building Portlets Declaratively".
Return to this section once you complete step 6.
Click the Chart link next to Create New… (Figure A-46).
Figure A-46 The Chart Link Next to Create New …

On the Charts page, click Charts From Query Wizard (Figure A-47).
Figure A-47 The Charts From Query Wizard Link
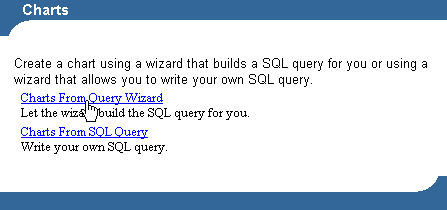
On the resulting page enter an internal name for the chart in the Name field (Figure A-48).
The internal name is not published to users.
Figure A-48 The First Step of the Chart Wizard
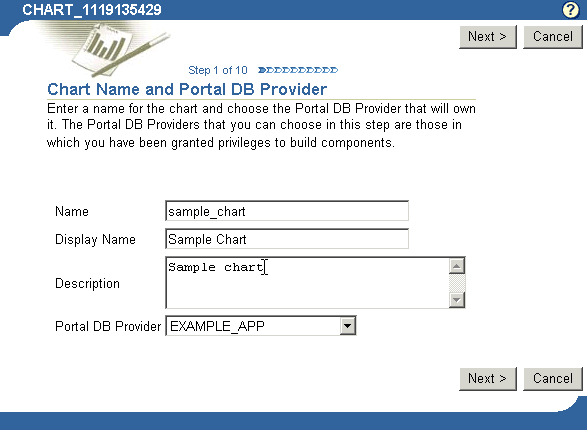
In the Display Name field, enter the name by which users will identify this chart (Figure A-48).
The display name is used at runtime. It displays as the title of the browser window as well as in the banner of the chart. When the chart is published as a portlet, the display name is used as the title of the portlet and in the List of Available Portlets in the Portlet Repository.
In the Description field, enter a description of this chart (Figure A-48).
The description displays below the portlet in the Portlet Repository. It can be a summary of the portlet's purpose, a classification of its type, or any other descriptive information. It may be useful within your organization to have a standard approach to what is included in the description.
From the list of Portal DB Providers, select the provider that will own this chart (Figure A-48).
This list displays only those providers in which you have been granted privileges to build portlets. We recommend that you use a provider specifically created for owning, or hosting, your declaratively-built portlets.
Click Next.
Click the Browse icon next to the Tables/Views field, and choose a table or view on which to base your chart (Figure A-49).
|
Note: In the Tables/Views field, you can use constants for the OracleAS Portal schema and the application schema (for example, enter #APP_SCHEMA#.EMP). For more information, see "Referencing the OracleAS Portal Schema". |
Figure A-49 Clicking the Browse Icon to Select a Table or View
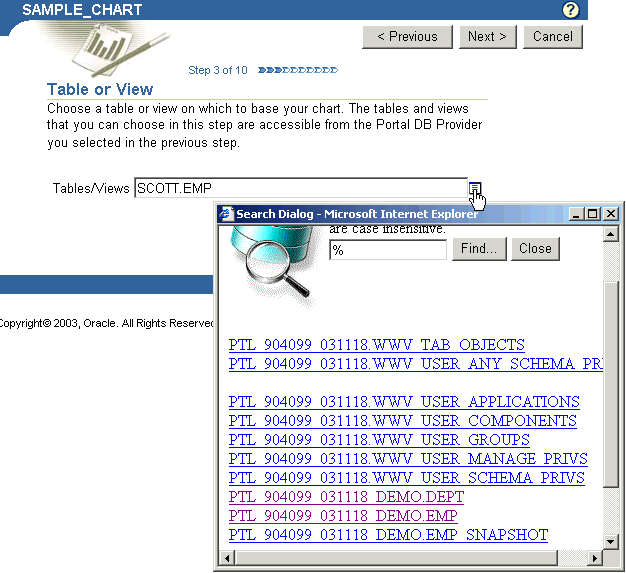
The tables and views that you can choose in this step are those that are accessible from the Portal DB Provider you selected in the previous step. Additionally, the list is limited to those tables and views on which you have the following privileges: all table views in the provider schema, granted select to public, granted select to the provider schema.
If clicking the Browse icon produces a "No response from Server" message, and you know the table you want to select, try entering the table name directly into the field.
|
Note: You can choose only one table or view using this wizard. If you want to base the chart on more than one table or view, you must use the Charts from SQL Query wizard to write your own SQL. |
Click Next.
Choose the column(s) that contain the values you will display as Labels, Links, and Values in the chart (Figure A-50).
Figure A-50 Columns to Be Used for Labels, Links, and Values in the Chart
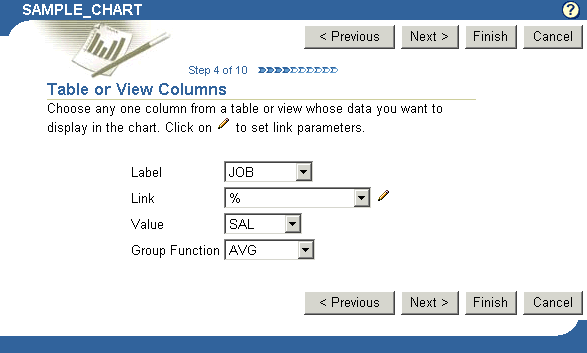
Table A-21 lists and describes the options on this page.
Table A-21 Data Selection Options for Charts
| Option | Description |
|---|---|
|
Choose the column that contains the values you will use as labels for different bars on the chart. For example, if you were going to create a chart that compared salaries of each job title in the department, you might choose the JOB column as the Label, |
|
|
Links must be preconstructed and stored in the database before you can use them here. Use this field to choose a preconstructed link that jumps from a chart bar's label to another OracleAS Portal portlet or URL. Click the Edit icon next to the Link field to set link parameters. If you do not set link parameters, the default values of the link are used. |
|
|
Choose the column that contains the values to be used to calculate the relative size of the bars in the chart. Value columns always contain numeric data. The default for Value is |
|
|
A group function calculates a single summary value (%, sum, count, average, maximum, minimum, standard deviation, or variance) from groups of numeric values in the Value column. OracleAS Portal uses values in the Label column to determine these groupings. For example, you can choose the |
Click Next.
Optionally, specify conditions that limit the data displayed in the chart.
For example, to display data from all employees in Department 10, choose DEPTNO from Column Name, choose = or like from Condition, and enter 10 in the Value field (Figure A-51).
Figure A-51 Defining Column Conditions for a Chart
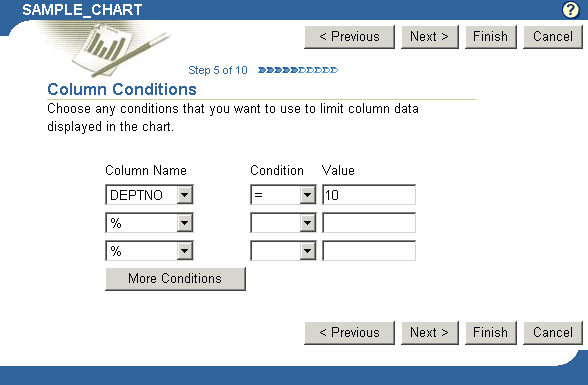
Table A-22 lists and describes the options that appear on the Column Conditions page.
Table A-22 Options on the Column Conditions Page
| Option | Description |
|---|---|
|
Column Name |
Choose columns whose values will be used to limit the data displayed in the chart. For example, if you want to display values greater than 3000 from the |
|
Condition |
Choose conditions that will define Column Name's relationship to Value. Choose from:
|
|
Value |
Enter a value that will limit the data displayed in the chart. To specify multiple values after an |
|
More Conditions |
Click to add more fields for specifying additional conditions. |
Click Next.
Optionally, specify conditions and define special formatting for chart data that will be used whenever those conditions are met.
For example, you can specify that a chart bar should be red if its related column value exceeds a particular amount (Figure A-52).
Figure A-52 Defining Formatting Conditions
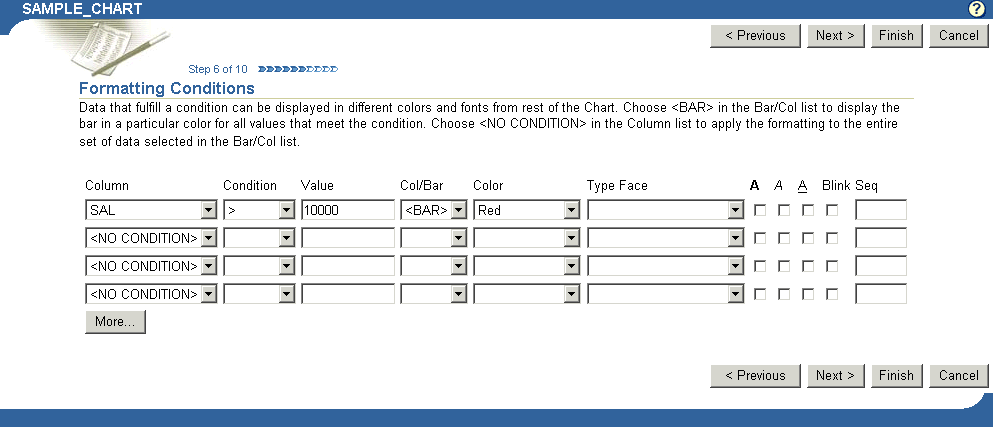
Table A-23 lists and describes the formatting condition options on this page.
Table A-23 Options on the Formatting Conditions Page of the Chart Wizard
| Option | Description |
|---|---|
|
Column |
Choose a column on which the condition will be applied. |
|
Condition |
Choose conditions that will define Column's relationship to Value. Choose from:
|
|
Value |
Enter a column value to trigger the condition. There is no need to apply formatting masks to numeric values. For example, in a table with an To specify multiple values after an |
|
Col/Bar |
Choose whether you want the conditional formatting to be applied to a displayed column name or to the For example, imagine that your chart uses the |
|
Color |
Choose a color for displaying data that meets the specified condition. The color will be applied to text or to the bar, depending on the choice you made in the Col/Bar field. |
|
Type Face |
Choose a font in which to display data that meets the specified condition. |
|
A |
Select to display results that meet the specified condition in bold. |
|
A |
Select to display results that meet the specified condition in italic. |
|
A |
Select to underscore results that meet the specified condition. |
|
Blink |
Select to cause results that meet the specified condition to blink on and off. |
|
Seq |
Enter a sequential number to establish an order of precedence for execution of the formatting. This is useful, for example, when a row contains data that meets more than one condition, and the formatting rules differ for each. The condition with the highest position in the order (that is, 1), takes precedence over all the others. |
Click Next.
Define display options for the various possible views of the chart:
Table A-24 describes display options common to all views of a chart (Figure A-53).
Table A-25 describes display options for full-page views of a chart (Figure A-54).
Table A-26 describes display options for charts displayed as portlets (Figure A-55).
Table A-27 describes display options for charts displayed on mobile devices (Figure A-56).
Figure A-53 Display Options Common to All Chart Views

Table A-24 Display Options Common to All Chart Views
| Option | Description |
|---|---|
|
Order By |
Choose a method for ordering the chart's data:
|
|
Include Null Values |
Select to display null values in the chart. |
|
Treat Null Values as |
Enter the text string you want to be displayed for any null values in the chart, for example: |
|
Expire After (minutes) |
Enter the number of minutes after the initial display to keep the chart in the cache. When the time expires, the chart data is refreshed from the database. |
Figure A-54 Display Options for Full Web Page Chart Views
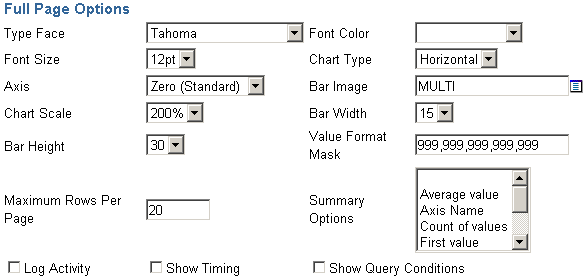
Table A-25 Display Options Applying to Full Web-Page Chart Views
| Option | Description |
|---|---|
|
Type Face |
Choose the font for displaying chart text. |
|
Font Color |
Choose the font color for displaying chart text. User-defined colors are not available for selection. |
|
Font Size |
Choose the font size for displaying chart text. |
|
Chart Type |
Choose whether to display the cart bars in a horizontal or vertical orientation. |
|
Axis |
Choose a method for displaying chart bars relative to the value of the chart's axis. For example, if you choose Zero, the value of the axis is set at 0. If you choose Average Value, the axis is set at the average of all values in the table or view column on which the Value section of the chart is based. |
|
Bar Image |
Choose an image that will be used to fill in the bars on the chart. Choose MULTI to display bars in different colors. |
|
Chart Scale |
Choose a percent (%) value to set the scale of chart bars relative to the Web page that will host the chart. Higher percentages display larger bars. |
|
Bar Width |
Choose a width in pixels for chart bars. This option applies to bars in both horizontally-and vertically-oriented charts. |
|
Bar Height |
Enter a height in pixels for chart bars. This option applies to bars in both horizontally-and vertically-oriented charts. |
|
Value Format Mask |
Enter a format for numeric values or dates that appear on the chart. |
|
Maximum Rows Per Page |
Enter the maximum number of bars you want to display per page. |
|
Summary Options |
Choose one or more options to display summary information about the chart. Each option you choose is included in the summary information box at the bottom of the chart. Windows users can choose more than one option by pressing the Ctrl key while clicking each option. |
|
Log Activity |
Select to enter information in the OracleAS Portal activity log. Information includes performance statistics and the names of users who request the chart. |
|
Show Timing |
Select to display the time when the server received the request to generate HTML for the chart. This information is displayed at the bottom of the chart. |
|
Show Query Conditions |
Select to display all user-specified parameters passed to the SQL query that created the chart and the time the chart was created. This information is displayed at the bottom of the chart. |
Figure A-55 Display Options for Charts Viewed As Portlets

Table A-26 Display Options for Charts Viewed as Portlets
| Option | Description |
|---|---|
|
Page Style |
Choose the page style element to use for displaying chart text. |
|
Type Face |
Choose a font to override the font of the chosen page style element. |
|
Font Color |
Choose a font color to override the font color of the chosen page style element. |
|
Font Size |
Choose a font size to override the font size of the chosen page style element. |
|
Bar Width |
Choose a width in pixels for bars on the chart. This option applies to bars in both horizontally- and vertically-oriented charts. |
|
Bar Height |
Choose a height in pixels for bars on the chart. This option applies to bars in both horizontally- and vertically-oriented charts. |
|
Maximum Rows Per Page |
Enter the maximum number of bars you want to display in the chart. |
Figure A-56 Display Options for Charts Viewed on Mobile Devices

Click Next.
Define the content for display on the chart personalization form.
Use the options on this page to give your users control over what data will appear in their view of the chart.
For example, if you choose the DEPTNO column from the SCOTT.EMP table as a Column Name in this step, OracleAS Portal adds an entry field for DEPTNO to the chart's personalization form. Users can type a department number in the field to limit the display to data relevant to that department.
Optionally, you can add a list of values to the entry fields. Instead of requiring users to type a numeric value for DEPTNO, you could add a list of values that enables them to choose, for example, 10, 20, or 30.
In portlet implementations, the chart personalization form displays when users click the Personalize link at the top of the portlet. In full-page implementations, you can provide users with a link to run the chart; the link can target the chart personalization form, which in turn can have a Run button. Users click this button to run the chart once they've set their personalization options.
If you wish, you can use bind variables to allow users to specify their own values in the personalization form. See "Using Bind Variables" for more information.
Table A-28 describes chart personalization form display options (Figure A-57).
Table A-29 describes chart personalization form formatting options (Figure A-58).
Table A-30 describes chart personalization form public formatting options (Figure A-59).
Table A-31 describes chart personalization form button options (Figure A-60).
Figure A-57 Chart Personalization Form Display Options
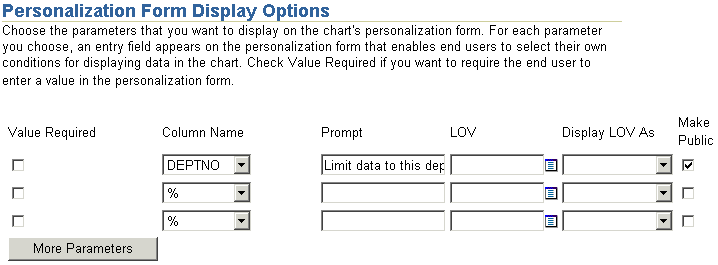
Table A-28 Chart Personalization Form Display Options
| Option | Description |
|---|---|
|
Value Required |
Select to require the user to specify a value for the column's entry field on the chart's personalization form. |
|
Column Name |
Choose a table or view column for inclusion on the chart personalization form. An entry field will display on the form that enables users to specify values that limit the data that will be displayed in the chart. If you do not choose a table or view column, no entry appears on the personalization form. |
|
Prompt |
Enter prompt text to display next to the entry field. The prompt text tells users what to enter in the field, for example: |
|
LOV |
Select a list of values (LOV) for the column's entry field. Users of the personalization form can choose values from this list to limit the data displayed in the report. Click the Browse icon next to this field to locate an LOV. Note that the LOV must already be built and stored in the Portal Repository. For more information, see "Building Lists of Values Declaratively". In the LOV field, you can use a constant for the application name (for example, enter #APP_NAME#.dept_lov). For more information, see "Referencing the OracleAS Portal Schema". |
|
Display LOV As |
Select a format for displaying your list of values. Choose from:
|
|
Make Public |
Check this field if you want this element to display on the chart personalization form. Be sure to make public any element that will be a variable in the list of portlet parameters associated with a page parameter. |
|
More Parameters |
Click to add more entry fields on the personalization form. |
Figure A-58 Chart Personalization Form Formatting Options

Table A-29 Chart Personalization Form Formatting Options
| Option | Description |
|---|---|
|
Axis |
Select to enable users of the chart personalization form to choose a method for displaying chart bars relative to the value of the chart's axis. For example, if users choose Zero, the value of the axis is set at 0. If users choose Average Value, the axis is set at the average of all values in the table or view column on which the Value section of the chart is based. |
|
Include Nulls |
Select to enable users of the chart personalization form to specify whether to display null values in the chart. |
|
Maximum Rows/Page |
Select to enable users of the chart personalization form to specify the maximum number of bars to display in the chart. |
|
Summary |
Select to enable users of the chart personalization form to choose one or more options that display summary information about the chart. Each option that users choose is included in the summary information box at the bottom of the chart. |
|
Type |
Select to enable users of the chart personalization form to choose a font for displaying chart text. |
|
Display Name |
Select to allow users of the chart personalization form to edit the display name for the chart. |
|
Order By |
Select to enable users of the chart personalization form to set the display order for chart data. |
Figure A-59 Chart Personalization Form Public Formatting Options

Table A-30 Chart Personalization Form Public Formatting Options
| Option | Description |
|---|---|
|
Type |
Select to enable unauthenticated users of the chart personalization form to choose a font for displaying chart text. |
|
Display Name |
Select to enable unauthenticated users of the chart personalization form to edit the display name of the chart. |
|
Maximum Rows |
Select to enable unauthenticated users of the chart personalization form to specify the maximum number of bars to display in the chart. |
|
Order By |
Select to enable unauthenticated users of the chart personalization form to set the display order for chart data. |
Figure A-60 Chart Personalization Form Button Options

Table A-31 Chart Personalization Form Button Options
| Option | Description |
|---|---|
|
Button |
(Full page only) Select one or more buttons to display on the chart personalization form:
|
|
Name |
Enter the label that will display on the selected button. Keep the name short to avoid displaying large buttons. You cannot change the label on the Reset to Defaults button. |
|
Location |
Specify the location of the button on the chart personalization form. Choose from Top, Top and Bottom, or Bottom. |
|
Alignment |
Specify the alignment of the button on the chart personalization form. Choose from Left, Center, or Right. |
Click Next.
Optionally, select a template to define the look and feel of the page that will host the chart, and enter text for display at the top and/or bottom of the chart and the chart personalization form.
The template is applied only when the chart is displayed on a full Web page. If the chart is displayed as a portlet, the template you select here will be ignored and the style of the host page will be used.
Table A-32 lists and describes the options available on this page (Figure A-61).
Figure A-61 Options Available on the Chart and Personalization Form Text Page

Table A-32 Options Available on the Chart and Personalization Form Text Page
| Option | Description |
|---|---|
|
Template |
Choose a template to set the look and feel of the page that will host the chart. The template is applied only when the chart is displayed on a full Web page. If the chart is displayed as a portlet, the template you select here will be ignored and the style of the host page will be used. Display options, which you specified on previous wizard pages, control the look and feel of the chart itself. |
|
Preview Template |
Click to view the appearance of the template that is currently selected in the Template list. |
|
Description |
(Chart only.) Provide a description of the purpose of this chart. This is an attribute that may or may not display, depending on which attributes have been selected for display in the region where the chart or chart portlet is placed. |
|
Display Name |
Edit the chart's display name or the title for the chart personalization form. You can specify HTML in this field. |
|
Header Text |
Enter any introductory text that you want to display at the top of the chart or the chart personalization form. This text displays below the display name or title. You can specify HTML in this field. |
|
Footer Text |
Enter any text that you want to display at the bottom of the chart or the chart personalization form. You can specify HTML in this field. |
|
Help Text |
Enter any text that you want to display in a help page for the chart or chart personalization form. OracleAS Portal automatically includes a help button with the chart and the chart personalization form when they are displayed on a full page. When they are displayed as a portlet, whether the help button displays is controlled by the way the host portlet region has been configured. Users click the help button to display the text you enter here. You can specify HTML in this field. |
Click Next.
Optionally, enter PL/SQL code to run at different points during the runtime creation of the chart or the chart personalization form.
Table A-33 lists and describes the options available on this page (Figure A-62).
Figure A-62 Additional PL/SQL Code Options for Charts
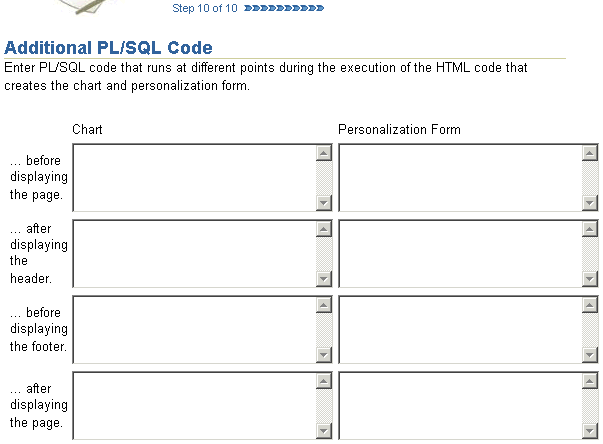
Table A-33 Options Available on the Additional PL/SQL Code Page
| Option | Description |
|---|---|
|
… before displaying the page. |
Enter a PL/SQL procedure that will execute before the page containing the chart or the chart personalization form displays. |
|
… after displaying the header. |
Enter a PL/SQL procedure that will execute after the chart or the chart personalization form header displays. If you want to display output in the chart from a PL/SQL procedure, you must enter the PL/SQL in the … after displaying the header field. |
|
… before displaying the footer. |
Enter a PL/SQL procedure that will execute before the chart or personalization form footer displays. |
|
… after displaying the page. |
Enter a PL/SQL procedure that will run after the page containing the chart or personalization form displays. |
Click Finish.
Clicking Finish saves your changes and takes you to a summary page where you can test your results (Figure A-63). See "Performing Test Runs on a Portlet" for more information on testing your results.
Figure A-64 Different Display Types for a Dynamic List of Values
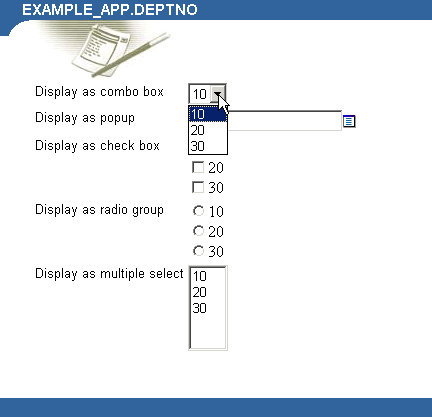
When you build a list of values using the OracleAS Portal List of Values Wizard, you have the option of creating two types of lists:
A dynamic list of values takes its content from a SELECT statement you build through the wizard. The content of the list may change, depending on the data that is available for selection from the source database. A static list of values takes its content from values you enter in the wizard. These values do not change unless you edit the list and specifically alter them.
This section describes how to create a dynamic list of values.
To create a dynamic list of values:
Follow the instructions detailed in "Building Portlets Declaratively".
Return to this section once you complete step 6.
Click the List of Values link next to Create New… (Figure A-65).
Figure A-65 The List of Values Link Next to Create New …

On the List of Values page, click Dynamic List of Values (Figure A-66).
Figure A-66 The Dynamic List of Values Link
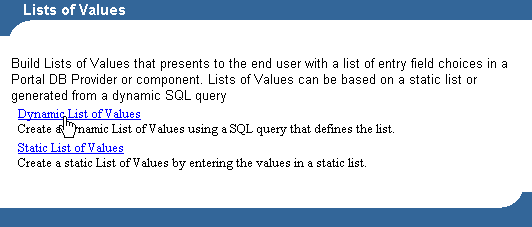
On the resulting page, select the Portal DB Provider that will own this list from the Owner drop-down list (Figure A-67).
Figure A-67 Defining List of Values Options
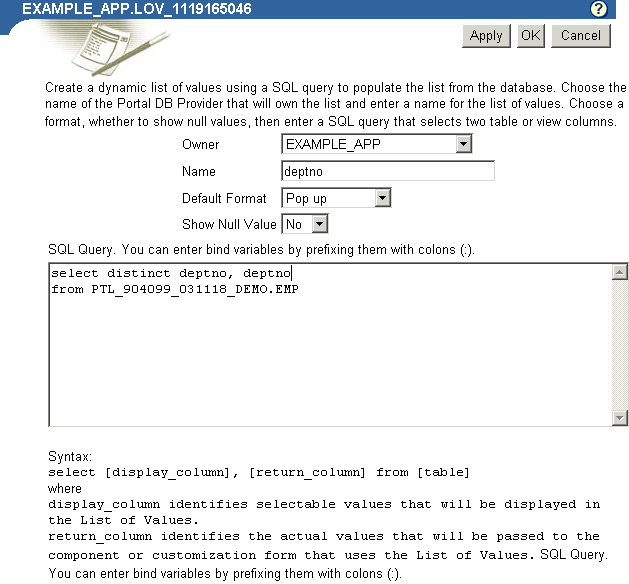
In the Name field, enter a name for this list of values (Figure A-67).
This name appears on the selection list when you insert a list of values.
From the Default Format drop-down list, choose a default format for the list of values (Figure A-67).
Choose from:
Check box: Each selection displays with a check box next to it. Users select or clear the box to indicate their preferred value.
Combo box: Combines a pop-up list and a manual entry field. Users can either select a provided value or enter their own.
Pop up: Provides a pop-up list from which users select a value.
Radio group: Lists each selection with a radio button next to it. Users select one of the buttons to indicate their preferred value.
Note that portlet developers who add the list of values to their portlet can override this default and display the list in a different format.
Specify whether to show null values by selecting either Yes, No, or % from the Show Null Value drop-down list (Figure A-67).
When you select Yes, null values display as Null in the list of values.
When you select No, null values display as blank spaces in the list of values.
When you select %, blank spaces are also displayed. The difference between % and No is that, with %, when you place the list of values on a form, the null value (the wildcard %) is available for the set up of dynamic transactions in the form's code.
Enter a SQL SELECT statement in the SQL Query text box (Figure A-67).
Select two values from two table or view columns (though you can select each value from the same column):
The first column specifies the values displayed in the list of values.
The second column specifies the actual values that are passed to the portlet.
For example, the query select ename, empno from scott.emp creates a list of values that displays employee names from the ENAME column. It passes the employee's associated ID number (EMPNO) to the portlet when a user chooses a name from the list of values.
Do not end your query with a semicolon.
|
Note: You can enter bind variables by prefixing them with colons (:), but only if the list of values is to be used in a form portlet. Lists of values with bind variables will not work in other kinds of OracleAS Portal portlets.In the SQL query, you can use constants for the OracleAS Portal schema and the application schema. For more information, see "Referencing the OracleAS Portal Schema". |
Click OK to save your changes.
Clicking OK takes you to a summary page where you can manage the list of values (Figure A-68). For example, from this page, you can run the list to see the different ways it can display.
Once you complete a list of values, it becomes available. It displays automatically on selection lists wherever you can add a list of values. For example, both the form and report personalization forms you construct with Portlet Builder wizards allow for the addition of lists of values. As you go through these wizards, you'll note that the list you created here now appears as a selection option.
After you build a portlet using a wizard, you can use options in the Navigator to edit it. You can edit the portlet and overwrite the current version with your changes, or you can edit the portlet as new, and create a new version of it (consequently leaving the old, original version unchanged).
Where the wizards step you through the creation of a portlet, the editor provides tabs that contain the options that were available in the wizard. Each tab corresponds to a step in the wizard that created the portlet. Entry fields on each tab contain the values that were specified during creation of the portlet, or by the user who last edited the portlet.
A portlet is locked while you edit it, preventing other users from making changes to it. The portlet remains locked until you click OK in the Edit page. For more information, see "Managing Locks on Portlets".
|
Note: To edit a portlet, you must have at least the Edit privilege on the portlet or the provider that owns it. |
To edit a portlet:
At the top of the Portal Builder page, click the Navigator link.
Click the Providers tab to bring it forward.
Click the Locally Built Providers link.
The Name column displays the names of all the providers on which you have privileges.
Click the name of the OracleAS Portal database provider that contains the portlet that you want to edit.
Click the name of the portlet.
On the resulting page, the Develop tab should be selected. Click the Edit link at the bottom of the tab.
To leave the original version of a portlet unchanged, click the Edit as New link instead of Edit.
Click one or more tabs to bring them forward and edit their associated options.
The tabs contain the same options that are available in the wizards. For more information about these options, see the previous sections that cover building portlets:
As you switch from tab to tab, OracleAS Portal keeps track of any changes you make. Click OK only after you have made all the changes on all the tabs that you want to make. If you decide you don't want to save your edits, click Cancel.
Note that it is important that you click either OK or Cancel. Simply closing the window will cause the component to remain locked. Special measures must be taken to unlock inappropriately locked portlets. For more information, see "Managing Locks on Portlets".
For each locally-built portlet, OracleAS Portal provides a central location from which you can perform management tasks: the management page. This section describes how to locate any locally built portlet's management page and how to perform various management tasks. It includes the following subsections:
|
Note: To rename, delete, or copy a portlet, you must have at least the Edit privilege on the provider that owns the portlet.To generate a portlet, you must have at least the View Source privilege on the portlet or on the provider that owns it. |
To navigate to the component management page:
Click the Navigator link at the top of the Portal Builder page.
Click the Providers tab to bring it forward.
On the Providers tab, click the Locally Built Providers link.
Click the name of the Database Provider that owns the portlet you want to manage, then click the Manage link next to the component you will manage.
Note the three tabs on this page:
Develop—Run, test, revise, delete and manage the various versions of a component.
Manage—Export, copy, rename (both internal and display names), generate, and monitor the performance of the component.
Access—Define security for the component within the OracleAS Portal framework. This includes publication of the component as a portlet, privilege inheritance from the provider, and cache invalidation.
Navigate to the component management page for the portlet you want to rename.
For information on how to navigate to this page, see "Navigating to the Component Management Page".
Click the Manage tab to bring it forward.
Click the Rename icon.
Rename the internal and/or the display name for the portlet:
For the internal name, in the New Component Name field enter a new name for the portlet.
For the display name, in the New Component Display Name field enter a new display name for the portlet.
Click OK.
The portlet is renamed with the name you provided.
To delete a portlet from the database:
Navigate to the component management page for the portlet you want to delete.
For information on how to navigate to this page, see "Navigating to the Component Management Page".
Click the Develop tab to bring it forward.
Click the Delete icon.
The Delete Portlet page displays the versions of the portlet that you are authorized to delete.
Select the check box next to each version of the portlet that you want to delete.
Click Yes.
Navigate to the component management page for the portlet you want to copy.
For information on how to navigate to this page, see "Navigating to the Component Management Page".
Click the Manage tab to bring it forward.
Click the Copy icon.
The Copy Portlet page displays.
From the New Owner list, choose the provider that will own the new copy of the portlet.
You can choose the same provider.
Provide new internal and display names for the portlet:
For the internal name, in the New Component Name field enter a new name for the portlet.
For the display name, in the New Component Display Name field enter a new display name for the portlet.
Click OK.
Use this feature to make sure that the portlet code compiles without errors and performs within a reasonable time. This is particularly useful if you've written more complex code than is currently supported in the portlet builder wizards. For example, you could create a package; base a form or report on the package; then, using this feature, verify that the form or report will compile.
To generate the PL/SQL package for a portlet:
Navigate to the component management page for the portlet with which you want to work.
For information on how to navigate to this page, see "Navigating to the Component Management Page".
Click the Manage tab to bring it forward.
Click the Generate icon.
OracleAS Portal generates the PL/SQL package using the most recent OracleAS Portal routines.
OracleAS Portal stores portlets in the database as PL/SQL packaged procedures. You can view the package spec and body for the portlet as well as its call interface.
The portlet call interface displays the arguments that can be set during run time. For example, if you created a report and selected HTML as a Default Format in the Display Options step of the Report build wizard, the call interface displays HTML as the default value for the _format_out argument.
When you run the package containing the portlet in PL/SQL or by calling it from a URL, you can edit the call interface to accept different arguments. You could change the _format_out argument to another report output format, such as ASCII.
This section describes how to view the package spec, body, and call interface for a portlet. It includes the following subsections:
|
Note: To view portlet source code, you must have at least the View Source privilege on the portlet or the provider that owns it. |
To view the package spec and body for a portlet:
Navigate to the component management page for the portlet with which you want to work.
For information on how to navigate to this page, see "Navigating to the Component Management Page".
Click the Develop tab to bring it forward.
Click the Package Spec link next to PL/SQL Source to view the portlet's spec; click the Package Body link next to PL/SQL Source to view the body.
To view the call interface for a portlet:
Navigate to the component management page for the portlet with which you want to work.
For information on how to navigate to this page, see "Navigating to the Component Management Page".
Click the Develop tab to bring it forward.
Click the Show link next to Call Interface.
A portlet lock prevents other developers from overwriting your changes while you are editing a portlet. No other developer can edit the portlet when it is locked. Portlets are locked automatically when they are being edited. You can determine who is doing the editing by taking the steps outlined in this section.
|
Note: To view a portlet lock or to unlock a portlet, you must have at least the Edit privilege on the portlet or the provider that owns it. |
To view the name of a user who has locked a portlet:
Navigate to the component management page for the portlet with which you want to work.
For information on how to navigate to this page, see "Navigating to the Component Management Page".
Click the Manage tab to bring it forward.
Click the Show Locks on this Component link.
Locked portlets show a Status of EDIT on the resulting page. In addition to status, this page also lists the user responsible for the lock, the length of time the version has been locked, and other information. It also provides an Unlock link you can click to unlock the portlet.
The Unlock link is useful if a developer has edited a component, then closed the browser window without clicking OK or Cancel. In such case, the component remains locked. Use the Unlock link to unlock the component.
OracleAS Portal enables you to store multiple versions of the same portlet in the database. Use the Edit as New link on the Develop tab (see Section A.3.1) to create a new version of the portlet that is based on the current production version. When you save your edits, you will be saving them to a new version, rather than overwriting any existing versions. The next time you edit the portlet, you can open the most current version or an earlier version of the portlet. This section describes how to access various versions of an OracleAS Portal component.
To access various versions of an OracleAS Portal component:
Navigate to the component management page for the portlet with which you want to work.
For information on how to navigate to this page, see "Navigating to the Component Management Page".
Click the Develop tab to bring it forward.
To access the production version:
Click the Edit link to make changes to the existing production version.
Click the Edit as New link to make changes to a new version that is based on the production version.
The production version is listed next to Production Version Status on the Develop tab. This field lists the production version, and indicates whether this version's code package is valid, that is, that it will run.
To access an archived version of the component:
Next to Archive Version(s), click the x (Archive) version with which you want to work.
The variable value (x) stands for the archive number.
On the resulting page, click Yes to make the selected version the production version.
Note that the version number listed next to Production Version Status changes to your selection.
On the Develop tab, click the Edit or the Edit as New link to edit the newly selected production version of the component.
You can delete portlet versions from the database at any time. Follow the steps outlined in "Deleting a Portlet", then check the box next to the version(s) you want to delete, and click Yes. If you delete the production version and leave an archive version intact, you may want to select the archive version on the Develop tab and make it the production version.
The most recent version of a portlet is called the production version. The production version can be valid or invalid, depending on whether the database package containing the portlet will run without errors. If a portlet has a version status of (PRODUCTION with INVALID package), you must either generate the portlet (see Section A.3.5) or edit the portlet (see Section A.2) to fix the errors before it will run.
The Actions column of the Navigator (Figure A-69) displays the actions you may perform on a portlet. The actions listed here depend on the access privileges you have been granted on the portlet.
By default, you have the Manage privilege on any portlet you create. The Manage privilege provides the highest level of access. This means you can run, edit, delete, or export the portlet. You can also grant access privileges to another user on any portlet that you create.
To build a portlet within OracleAS Portal, you must have at least the Edit privilege on the provider that will own the finished portlet. By default, portlets inherit whatever privileges are assigned to the provider that owns them. For example, after a component is created in the MY_APP provider, all developers with at least the Execute privilege on MY_APP can run the component after it is published as a portlet. Portlet owners can override these privileges and set access on a user-by-user level, rather than at the provider level.
Table A-34 lists the actions available for portlets and indicates which privileges enable a user to perform those actions.
Table A-34 Portlet Actions Associated with Portlet Privilege Levels
|
Note: To grant access privileges on a portlet to other users or groups, you must have at least the Manage privilege on the portlet or the provider that owns it. |
You can define access to your portlet at the provider level and at the portlet level. This section describes how to inherit provider access privileges or override them by setting privileges at the portlet level. It contains the following subsections:
By default, access to your portlet is inherited from the provider that owns it. For example, all users who have the Execute privilege on the owning provider are automatically able to execute your portlet. Users with the Edit provider privilege can edit all the portlets owned by the provider, and so forth. You can set provider access through the Grants tab (for more information, see "Granting and Revoking Privileges on Database Objects"). On the Grants tab, you can grant different privileges to different groups of users. Once privileges on the provider are established, you can specify that any portlets created under the provider must inherit the same set of privileges. This section describes how to specify that portlets should inherit privileges granted to their host providers.
|
Note: Before you can publish Portlet Builder components as portlets, the host provider must be exposed to OracleAS Portal as a provider. For information on how to enable this setting, see "Exposing a Provider". |
To inherit portlet access privileges from a provider:
Click the Navigator link at the top of the Portal Builder page.
Click the Providers tab to bring it forward.
Click the Locally Built Providers link.
Click the name of the Database Provider that contains the portlet on which you want to grant access privileges.
Click the Manage link next to the relevant portlet.
The Manage page displays.
Click the Access tab.
Select the Inherit Privileges from Provider check box.
Portlet access will be defined by the portlet's host provider.
You can override the default access privileges (that is, those granted through the provider) by setting them at the portlet level. This section describes how to set access privileges at the portlet level, allowing you to more specifically target privileges to individual users.
To grant access privileges to individual users:
Click the Navigator link at the top of the Portal Builder page.
Click the Providers tab to bring it forward.
Click the Locally Built Providers link.
Click the name of the Database Provider that contains the portlet on which you want to grant access privileges.
Click the Manage link next to the relevant portlet.
The Manage page displays.
Click the Access tab.
Clear the Inherit Privileges from Provider check box, then click Apply.
The Access page displays two new sections: Grant Access and Change Access.
In the Grantee field, enter the name of the user or group to whom you want to grant privileges.
If you are not sure of the name of the user or group click the Browse Users or Browse Groups icon and select from the list provided.
From the privilege list, choose an access privilege to grant to the user or group.
See Table A-34 for information on the actions allowed with different access privileges.
Click Add.
The user or group you entered in the Grantee field displays along with the access privilege you granted in the Change Access section at the bottom of the page.
|
Note: OracleAS Portal uses the Oracle Internet Directory for identity management, serving as the repository for users and groups. In Oracle Internet Directory, groups are uniquely identified by their distinguished name (DN). Each group has a unique DN, though many groups can share a common name, in the same way that two people can share a common name, yet have completely different lineage (that is, John Smith and John Doe). When working within the portal, groups created from within that portal are displayed simply with their common names. However, when the portal references a group from some other location in the Oracle Internet Directory—such as a group from some other portal associated with the same Identity Management Infrastructure—the DN of the group is displayed to distinguish it from the portal's locally defined groups. |
(Optional) To modify a user or group's access privilege, choose a new privilege next to the user or group in the Change Access section.
(Optional) To remove all privileges, click the Delete icon next to the user or group in the Change Access section.
Click Apply.
Click Close to exit the Manage page and return to the Portal Navigator.
After you create a component under a Portal DB Provider, you will likely want to test whether it runs to your satisfaction and make edits to it if it does not. All of this functionality is available to you through the Develop tab on the Manage page. From this tab, you can run a component as a full page, as a portlet, and through the component's personalization form.
You also have the option of running the component as a portlet through the portlet personalization form. But this option is not available on the Develop tab. To do this, you must first publish the component as a portlet, place the portlet on a page, then click the Personalize link in the portlet header.
This section discusses how to run a component using these various methods. It includes the following subsections:
|
Note: To run a portlet, you must have at least the Execute privilege on the portlet or the provider that owns it. You must also ensure that the Publish as Portlet check box is selected on the Access tab of the Manage page.You can run a portlet only if there is a valid portlet version. See "Managing Versions" for more information. |
To run a component as a full page:
Click the Navigator link at the top of the Portal Builder page.
Click the Providers tab to bring it forward.
Click the Locally Built Providers link.
Click the name of the Database Provider that owns the portlet.
Click the Manage link next to the component you want to run.
The Develop tab of the Manage page displays.
Click Run.
The component displays in a separate window on a full Web page.
To run a component as a portlet:
Click the Navigator link at the top of the Portal Builder page.
Click the Providers tab to bring it forward.
Click the Locally Built Providers link.
Click the name of the Database Provider that owns the portlet.
Click the Manage link next to the component you want to run.
The Develop tab of the Manage page displays.
Click Run as Portlet.
The portlet displays in a separate browser window in a smaller-than-full-page format.
To run a component through the full page personalization form:
Click the Navigator link at the top of the Portal Builder page.
Click the Providers tab to bring it forward.
Click the Locally Built Providers link.
Click the name of the Database Provider that owns the portlet.
Click the Manage link next to the component you want to run.
The Develop tab of the Manage page displays.
Click Personalize.
The personalization form displays.
Personalize your settings and click the Run button.
The component displays in a separate browser window on a full Web page.
To run a component as a portlet through the portlet personalization form:
Publish the component as a portlet:
Click the Navigator link at the top of the Portal Builder page.
Click the Providers tab to bring it forward.
Click the Locally Built Providers link.
Click the Database Provider that owns the component with which you want to work.
Click the Manage link next to the portlet with which you want to work.
On the Manage page, click the Access tab to bring it forward.
Under the Portal Access heading, verify that Publish as Portlet is selected.
|
Note: The Publish As Portlet check box is available only when the provider has been configured appropriately. For more information, see "Exposing a Provider". |
Click Close to save your change and return to the Portal Navigator.
Add the portlet to a page:
Go to the page where you want to place the portlet.
Click the Edit link at the top of the page.
Go to a portlet region on the page.
Click the Add Portlet icon.
Enter the portlet's display name in the Portlet Repository's Search field, and click Go.
If you do not remember the exact name, you can drill to the portlet's location within the Portlet Repository. Typically, you'll find newly-created portlets under the Portlet Staging Area node. Click the node, then click the portlet's host provider name.
Click the portlet to add it to the Selected Portlets list.
Click OK to add the portlet and return the page where you have placed it.
Click the Personalize link in the portlet header.
If this link does not display, edit the host region's properties to include it (in Page Edit mode, click the Edit Region icon at the top of the region).
Personalize your settings and click OK.
The portlet displays with your personalizations.
Developers can add a Batch button to a personalization form that enables end users to run the component in batch mode. Batch mode is asynchronous, allowing users to run a transaction in the background, freeing their systems for other tasks.You can place a Batch button on the personalization forms for charts and reports. Batch processing is useful if the component is based on a large amount of data, or if you anticipate that the portlet will display many rows of data.
When you execute a job in batch mode, OracleAS Portal displays a page indicating that the job was submitted to the batch queue, and provides a number for identifying the job.
This section provides information on how to add the Batch button to an existing component, and the parameters that should be pre-set by the database administrator in the init.ora file to enable batch processing. It includes the following subsections:
To enable end users to execute jobs in batch mode, the database administrator should review the parameters in the init.ora file for the Oracle database where OracleAS Portal is installed. If these parameters are not set correctly, even though batch jobs may be sent to the batch queue, they may not run.
Table A-35 provides some suggested settings:
To add a Batch button to an existing component:
Navigate to the component management page for the portlet you will work with.
For information on how to navigate to this page, see "Navigating to the Component Management Page".
If necessary, click the Develop tab to bring it forward.
Click the Edit link at the bottom of the tab.
Click the Personalization Form Display Options tab to bring it forward.
Scroll to the Button Options section at the bottom of the tab.
Select the check box next to Batch.
Optionally, set the Batch button's display options:
Enter a display name for the Batch button.
The default is Batch.
Specify the location for the button.
Choose from Top, Top and Bottom, and Bottom. Top is the default
Specify button alignment.
Choose from Center, Left, or Right. Center is the default.
Click OK to save your changes and return to the Manage page
Click Close to return to the Portal Navigator.
To make the import and export of applications more robust, wherever you can use PL/SQL code, you can use constants in place of the names of the OracleAS Portal Schema, the application schema, and the application name. Table A-36 lists the components that can use these constants and the places where they can be used within the Portlet Builder.
Table A-36 Constants for Applications and Schemas for Portlet Builder Components
| Component | Constants | Places to Use in the Portlet Builder |
|---|---|---|
|
Reports |
#APP_SCHEMA# #PORTAL_SCHEMA# #APP_NAME# |
|
|
Charts |
#APP_SCHEMA# #PORTAL_SCHEMA# #APP_NAME# |
|
|
Calendars |
#APP_SCHEMA# #PORTAL_SCHEMA# #APP_NAME# |
|
|
Forms |
#APP_SCHEMA# #PORTAL_SCHEMA# #APP_NAME# |
|
|
Dynamic Page |
#APP_SCHEMA# #PORTAL_SCHEMA# #APP_NAME# |
|
|
XML |
#APP_SCHEMA# #PORTAL_SCHEMA# #APP_NAME# |
|
|
Hierarchy |
#APP_SCHEMA# #PORTAL_SCHEMA# #APP_NAME# |
|
|
Frame Driver |
#APP_SCHEMA# #PORTAL_SCHEMA# #APP_NAME# |
|
|
Links |
#APP_SCHEMA# #PORTAL_SCHEMA# |
Component Name |
|
LOV |
#APP_SCHEMA# #PORTAL_SCHEMA# |
SQL query |
These constants should be replaced by the caller at runtime, that is, passed as a parameter to the component when the component is run. When you edit a component in the Portlet Builder, any constants you have used should still appear "as is," that is, as #APP_SCHEMA# or whatever constant you used.
Table A-37 provides some examples of how you can use these constants.
Table A-37 Examples of the Use of Constants
| Location in Portlet Builder | Examples |
|---|---|
|
SQL Query |
|
|
Advanced PL/SQL Section |
|
|
LOV Name |
|
|
Table Name |
|
The data for OracleAS Portal components is fetched from a database through the use of a SQL query. When you build charts and reports, you can write your own SQL query or use a build wizard to generate it for you. When you build a calendar or frame driver, you must write your own SQL query.
Charts, calendars, and hierarchies all require OracleAS Portal-specific syntax in the SQL statement that creates these portlets. For example, you must identify in the chart SQL statement a table or view column that supplies labels for the chart. You also identify a column that contains numeric data to determine the size of chart bars. The wizards for building charts and other types of components guide you through the specification of any special syntax.
You can also specify hyperlinks in the SQL query. These links jump from column values that are displayed in the component to other components or Web pages. For example, you can link employee names on a department chart to individual reports containing information about each employee on the chart.
This section explores some of the ways you can build additional functionality into your locally built components. It includes the following subsections:
You can add bind variables to the SQL query that enables the locally built component to accept user input from a personalization form. Each bind variable corresponds to a column in the table or view on which the component is based. They each create an entry field in the personalization form for the portlet. The user can then choose which data to display in the component.
|
Note: You can also set up bind variables declaratively, through wizards. For an example of how to do this as well as for additional information on how to map the variable to a page parameter, see "Defining Values through Page Parameters". |
A bind variable appears in a SQL query as an alphanumeric string preceded by a colon (:var1, :var2, :var3, and so on). For example, the following SQL query creates entry fields for the SALARY and DEPT columns of the SCOTT.EMP table:
select ename, sal, dept
from scott.emp
where sal = :salary and deptno like :dept
Entering this SQL query creates a personalization form with two text entry fields. The first enables the user to select a salary. The second field selects a department number. OracleAS Portal uses the values that the user types in the personalization form entry fields to create the output.
You do not need to know SQL to specify bind variables. You can identify columns that will accept parameters in the Column field in the Personalization Form Display Options step of several portlet build wizards.
You can code JavaScript and PL/SQL event handlers to personalize the layout and operation of items on forms. An in-depth knowledge of JavaScript and PL/SQL is required to successfully include event handlers in your forms.
You can use JavaScript event handlers to personalize the behavior of form items, such as buttons, check boxes, lists, text boxes, and the like. Your browser must support the JavaScript version you use.
You can use PL/SQL event handlers to personalize the behavior of buttons.
If you code both JavaScript and PL/SQL event handlers for the same button, be careful to avoid potential conflicts between the execution of the two scripts.
Refer to your JavaScript or PL/SQL documentation for descriptions of the events that are available to you in OracleAS Portal.
This section describes how to add event handlers through the portlet build wizards. It includes the following subsections:
To write a JavaScript event handler for an item on a form:
Edit the form that includes the item for which you want to write an event handler:
Go to the Manage page for the relevant form component.
For information on navigating to this page, see "Navigating to the Component Management Page".
If necessary, click the Develop tab to bring it forward.
Click the Edit link toward the bottom of the tab.
Click the Formatting and Validation Options icon to bring that tab forward.
In the left frame, click the name of the item for which you want to write a JavaScript event handler.
In the right frame, scroll to the JavaScript Event Handlers section.
From the JavaScript Event Handlers list, choose the required event, and enter the JavaScript to be executed when the event occurs.
Example A-1 Converting a Value to Uppercase
To convert a value in a text box or text area input field to uppercase whenever the field loses focus, choose the onBlur event and enter the following JavaScript:
this.value = this.value.toUpperCase();
Example A-2 Confirming Submission of a Form
To add a confirmation when the end user clicks a button before submitting a form, choose the onClick event and enter the following JavaScript:
return confirm('Are you sure you want to submit the form?');
This displays a prompt dialog where the end user can click OK or Cancel; clicking OK submits the form.
To write a PL/SQL event handler for a button on a form:
Edit the form that includes the button for which you want to write an event handler:
Go to the Manage page for the relevant form component.
For information on navigating to this page, see "Navigating to the Component Management Page".
If necessary, click the Develop tab to bring it forward.
Click the Edit link toward the bottom of the tab.
Click the Formatting and Validation Options icon to bring that tab forward.
In the left frame, click the name of the button for which you want to write a PL/SQL event handler.
In the right frame, scroll to the PL/SQL Button Event Handler section.
Define either:
A pre-defined event: Choose an event for the button from the PL/SQL Button Event Handler list.
A custom event: Choose Custom from the PL/SQL Button Event Handler list, and type the associated PL/SQL code.
You can access and modify form field values using the methods of the form's session storage object contained in the variable p_session. To get a value, you must use type-specific get methods on p_session. This p_session has the following get functions for the data types NUMBER, VARCHAR2, and DATE:
get_value_as_NUMBER
get_value_as_VARCHAR2
get_value_as_DATE
You must provide the block name and attribute name as arguments to these functions. For a single-block form, the block name is DEFAULT. For a master-detail form, the block name is MASTER_BLOCK or DETAIL_BLOCK
For the detail block, you must also provide the row index. The attribute name is the column name prefixed by A_.
To get the value of DEPTNO in a single block form, you would code:
declare
   my_deptno number;
begin
   my_deptno := p_session.get_value_as_NUMBER(
      p_block_name => 'DEFAULT',
      p_attribute_name => 'A_DEPTNO');
end;
For example, if you're doing this in the third record of a detail block, use:
my_deptno := p_session.get_value_as_NUMBER(
   p_block_name => 'DETAIL_BLOCK',
   p_attribute_name => 'A_DEPTNO',
   p_index => 3);
To set a field value, use p_session.set_value. This p_session.set_value function takes the same arguments as the get_value functions, with the addition of p_value for specifying the value (p_value is overloaded for any data type). Here, set_value is a procedure, and does not return a value. For example, to set the value of DEPTNO, use:
p_session.set_value(
   p_block_name => 'DEFAULT',
   p_attribute_name => 'A_DEPTNO',
   p_value => '20');
You can use the session storage object (p_session) in any button event handler and in the following places in the Advanced PL/SQL step of the Forms wizard (see also Table A-6):
Before page
After page
Before processing
After processing
Note that the Before form and After form handlers do not have access to the session storage object.
If you define custom code for a button mapped to an Insert, Update, or Delete event, you must call the procedure doInsert, doUpdate, or doDelete at an appropriate place in your code to perform the button's default function. For example, if you programmatically set a field value in an Insert button, call doInsert after p_session.set_value to perform the insert into the table.
When you use PL/SQL in OracleAS Portal, you have access to a variety of packages that are part of the PL/SQL Gateway. The gateway is delivered as part of OracleAS Portal. One of these is the package owa_cookie.
This package contains data types, procedures, and functions that enable you to send HTTP cookies to and get them from the client's browser. HTTP cookies are opaque strings sent to the browser to maintain state between HTTP calls. State can be maintained throughout the client's session—longer if an expiration date is included.
Maintaining a state means that the client can be identified throughout a session, allowing for the execution of transactions. So, for example, shopping applications can store information about currently-selected items; for-fee services can send back registration information, freeing the client from retyping a user ID on the next connection; and sites can store per-user preferences on the client, and in turn, have those clients supply those preferences every time it reconnects to that site.
The owa_cookie package contains subprograms and data types that you can use to set and get cookie values. Table A-38 lists some owa_cookie subprograms and data types, and describes how each is used.
Table A-38 owa_cookie Subprograms and Data Types
| Subprogram or Data Type | Used to |
|---|---|
|
|
Contain cookie name-value pairs |
|
|
Get the value of the specified cookie |
|
|
Get all cookie name-value pairs |
|
|
Remove the specified cookie |
|
|
Generate a "Set-Cookie" line in the HTTP header |
Sessions are used by the Web Request Broker to maintain persistent states within gateways through multiple accesses over a period of time. Since the PL/SQL Gateway is unique in connecting to the database and all the states are maintained within the database, the concept of sessions does not apply to the PL/SQL Gateway. Instead, cookies can be used to maintain persistent state variables from the client browser.
For many components, you can set values for columns using page parameters. To do this, you need to:
Indicate that a column is customizable in the component's Personalization Form Display Options page.
Enable parameters for the page group that will host the component.
Add a page parameter to the page that will host the component.
Map the page parameter to the portlet parameter.
This section provides a brief overview of this process. We'll add a customizable value—a parameter or bind variable—to a report and map that parameter to the page that will host the portlet component.
|
Note: This procedure explains how to set a parameter for a report portlet that displays directly on a page. If you include the report portlet as a link (click Edit Region; on the Attributes tab, select the Display Name Link attribute; click the Actions icon, then Edit Portlet Instance link, and check Link That Displays Item In New Browser Window), the parameter attached has no effect when end users click the link to display the report: the result shown isno rows displayed.
|
To set up a parameter and use it on a portal page:
Create a report as described in "Building Reports Declaratively".
When you reach the step covering Personalization Form Display Options, select the Value Required check box, choose a column, assign a prompt to it, and make it public (Figure A-70).
Figure A-70 Report Personalization Form Display Options
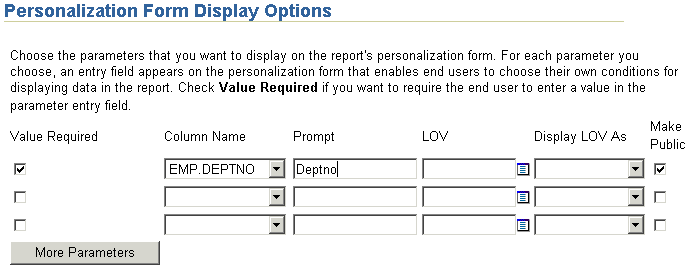
Complete the creation of your report.
Go to the Page Groups portlet (typically, on the Build tab of the Portal Builder.)
In the Page Group field, select the page group that will host the report and click the Edit button to edit the page group's properties.
Click the Configure tab to bring it forward, and scroll down to the Parameters and Events section of the tab.
Click the Edit link.
Select the Enable Parameters and Events check box.
Click OK, then click Close.
In the Page Groups portlet, click the Browse icon next to the Name field under Edit a Page.
In the resulting secondary window, drill to the page on which you want to place the portlet, and click the Return Object link next to it.
Click the Edit button next to the now-populated Name field.
Add the new report portlet to the page:
Click the Add Portlet icon over a region.
In the Portlet Repository, click the Portlet Staging Area node.
Click the name of the provider that owns the portlet.
Click the portlet to add it to the Selected Portlets list.
Click OK to return to the host page.
The portlet will display with the following error message: Error: Required field not set yet - emp.deptno (WWV-14900). Once you define the page parameter and wire it to the portlet parameter you can provide a value, and this message will no longer display.
In the page tool bar at the top of the page, click the Page: Properties link.
On the resulting page, click the Parameters tab to bring it forward.
This tab displays only when parameters and events are enabled for the page's page group.
In the Parameter Name field, enter a name for the page parameter you will wire to the parameter (bind variable) you created for your component (Figure A-71).
Figure A-71 The Parameter Name Field on the Parameters tab

Click Add.
Optionally, go to the Page Parameter Properties section and configure the parameter (Figure A-72):
Enter a display name, which identifies the parameter to other users.
Enter a default value.
Select whether to allow users to change the value of the parameter when they personalize the page.
Enter a description of the parameter.
Figure A-72 Defining Page Parameter Properties

Go to the Portlet Parameter Values section, and expand the node next to the portlet you added to the page in Step 13 (Figure A-73).
Figure A-73 Expanding a Portlet Node under Portlet Parameter Values

From the drop-down list next to your portlet parameter, select Page Parameter (Figure A-74).
Figure A-74 Selecting the Type of Mapping to Use with a Portlet Parameter

By default, the next drop-down list should display the relevant page parameter display name. If it doesn't, select the relevant name from the list (in our example, the relevant display name is Department Number).
This maps the parameter you defined for your portlet (on the Personalization Form Display Options page) to the parameter you have defined for the page (on the Parameters tab).
Click OK.
If you provided a default value for the page parameter in Step 18b, the report portlet will display with results relevant to the parameter, for example, with results for the specified department number (Figure A-75).
Figure A-75 Report Results for Department 20
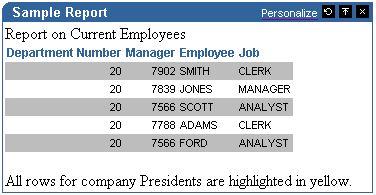
If you did not provide a default value, you can provide one by clicking the Personalize link in the portlet header (if the parameter was made customizable in Step 18c) and providing a value under Query Options (Figure A-76).
Figure A-76 Personalizing Page and Portlet Parameter Values

Each portlet build wizard contains options that enable you to define a look and feel for the portlet's content. For example, you can choose the colors of the rows in a report; the font type, color, and size for chart labels; and the height, width, and order of entry fields in a form. In addition to its built-in look-and-feel capabilities, OracleAS Portal offers advanced features through the Shared Components provider for the creation of a more personalized look and feel.
Through the Shared Components provider, you can build JavaScripts for use in your wizard-built forms; define custom colors, fonts, and images; and apply User Interface Templates to portlets.
The Shared Components provider is located in the Portal Navigator on the Providers tab under Locally Built Providers.
OracleAS Portal includes a default set of shared components. These are system type components. The components you develop yourself under the Shared Components provider are user type components. You can edit, export, and delete a user-type shared component, but not a system-type. To edit a system type, you must first copy it, then edit the copy.
This section explores the capabilities of the Shared Components provider and describes how to put them to use. It includes the following subsections:
Access privileges to the Shared Components provider define the actions you can perform on shared components. Table A-39 lists and describes the access privileges that are relevant to the Shared Components provider:
Table A-39 Shared Components Provider Access Privileges
| Access Privilege | Enables You to |
|---|---|
|
|
|
By default, all users who are members of the DBA or PORTAL_DEVELOPERS groups have Manage shared component access privileges.
Access privileges are granted for all shared components. Access privileges cannot be granted on a shared component type, such as all JavaScripts, nor on an individual shared component, such as a particular JavaScript. Access must be granted to all shared components or none of them.
To grant access privileges to the Shared Components provider to a user or group:
In the Navigator, click the Providers tab to bring it forward.
At the root level of the Providers tab, click the Locally Built Providers link.
In the Actions column for the Shared Components provider, click the Grant Access link.
In the Grantee field, enter the name of the user or group that you want to allow to access the shared components.
Optionally, click the Browse Users or Browse Groups icon and select from the list provided.
Choose the level of access to grant to the user or group from the list of available privileges.
See Table A-39 for a list of relevant privileges.
Click Add.
The user or group you specified now appears in the Change Access section at the bottom of the page.
(Optional) To modify an access privilege, choose a new privilege next to the user or group in the Change Access section.
(Optional) To remove a privileges, click the Delete icon next to the user or group in the Change Access section.
Click OK.
OracleAS Portal provides tools for you to create JavaScripts that perform field- and form-level validation on entry fields in forms. Field-level validation is performed when the end user causes the onBlur condition to occur after entering a value in an entry field, for example, when tabbing to another entry field. Form-level validation occurs after the user enters a value in an entry field and submits all values on the page, for example, when clicking an OK button.
This section provides a few guidelines for using JavaScript to build field- or form-level validation in a form and describes how to create and add JavaScript to your form. It contains the following subsections:
Follow these guidelines when writing a field- or form-level validation JavaScript:
|
Note: You must have at least the Create shared component access privilege to create a JavaScript.You must have the Manage shared component access privilege to edit a JavaScript. |
All validation routines should be written as functions and return either TRUE or FALSE values.
The routine should display an alert message to users if the element (entry field) being validated contains an invalid value.
The routine should bring focus (position the cursor) to the entry field where the user entered the incorrect value flagged by the JavaScript.
Example A-4 demonstrates the use of JavaScript to perform field-level validation.
Example A-4 Example JavaScript
1->  function isNumber(theElement)
     {
2->     if (isNaN(Math.abs(theElement.value)))
        {
3->        alert("Value must be a number.");
4->        theElement.focus();
           return false;
        }
        return true;
     }
The JavaScript presented in Example A-4 performs field-level validation tasks in the following sequence:
Identifies the name of the function and the entry field being validated.
Checks whether the absolute value of the entry field is a number. A relevant JavaScript function that signifies that a value is not a number is: isNaN
If the value in the entry field is not a number, the user is alerted with the message, "Value must be a number."
The routine brings focus to the entry field.
To create JavaScript under the Shared Components Provider:
In the Navigator, click the Providers tab to bring it forward.
At the root level of the Providers tab, click the Locally Built Providers link.
Click the link for the Shared Components provider.
Click the Javascript link next to Create New…
In the JavaScript Name field, enter a descriptive name for the JavaScript.
For example, enter NotNull for a JavaScript that ensures there are no null values in an entry field.
In the Language field, enter the language in which the JavaScript will be written.
For example, enter JavaScript1.1 or JavaScript1.2.
Click Next.
Enter or copy your JavaScript into the field provided.
Click Finish.
To edit the JavaScript you just created, drill to the relevant JavaScript (in the Portal Navigator: Providers tab: Locally Built Providers link: Shared Components: JavaScripts: your JavaScript), and click the Edit link next to the relevant JavaScript.
Once you have created JavaScript under the Shared Components provider, it is automatically added to the selection list that is available in the Build Form wizard. For example, when you create a form, you can select a JavaScript that you created once you reach the Formatting and Validation Options page. The list of available JavaScripts is located on this page under the Validation Options section (for more information, see "Building Forms Declaratively").
Creating a color definition is an opportunity for you to provide a meaningful name to a color you plan to use in your portal. A color definition is an association between a color name and its hexadecimal value. For example, you might use a standard red as your corporate color. Using your ability to define colors, you could select that red and give it a meaningful name within OracleAS Portal, such as standard_red, company_red, or even <your company name>_red.
You associate a color value in the form #XXXXXX, where X is a value in the range 0-9 or A-F, with any name you choose. The color names you define are used in fonts, page backgrounds, and other elements of OracleAS Portal portlets.
|
Note: You must have at least the Create shared component access privilege to create a color definition.You must have at least the Manage shared component access privilege to edit a color definition. |
To create a color definition:
In the Navigator, click the Providers tab to bring it forward.
At the root level of the Providers tab, click the Locally Built Providers link.
Click the link for the Shared Components provider.
Click the Color link next to Create New…
In the Color Name field, enter the name you want to give the color.
You can identify a color by any name you choose; for example, My_Blue_Color.
In the Color Value field, enter the hexadecimal value for the color, for example, #FF0000 for a shade of red.
Hexadecimal values must be prefaced by the # character. You can click a color in the palette to automatically enter its hexadecimal value in the Color Value field.
(Optional) To preview a color value, click Preview.
When you are satisfied with your color definition, click Create.
The page updates with a link, which you can click to edit the color definition. If you do not want to edit the color definition at this time, click Close.
Creating an image definition is an opportunity for you to provide a meaningful name and type to an image you plan to use in your portal. An image definition is an association between an image name and the name of the file containing the image. You can specify any name you choose.
|
Note: You must have at least the Create shared component access privilege to create an image definition.You must have at least the Manage shared component access privilege to edit an image definition. |
To create an image definition:
In the Navigator, click the Providers tab to bring it forward.
At the root level of the Providers tab, click the Locally Built Providers link.
Click the link for the Shared Components provider.
Click the Image link next to Create New…
In the Image Name field, enter the name you want to give the image.
You can identify an image by any name you choose; for example, SiteLogo.
In the Image Filename field, enter the name and extension of the file containing the image.
For example, enter logo.gif. The image must be located in a directory mapped to the OracleAS Portal virtual directory /images/.
From the Image Type list, choose an image type, for example Icon 24x24.
The type you choose will display next to the image in the Type column of the Portal Navigator.
Click Create.
The page updates with a link, which you can click to edit the image definition. If you do not want to edit the image definition at this time, click Close.
Creating a font definition is an opportunity for you to provide a meaningful name to a font you plan to use in your portal. A font definition is an association between the name of a font face and any descriptive name you choose to give it. For example, your company may have identified a font to be used in all public documents. Using your ability to create a font definition, you could identify that font in OracleAS Portal with a custom name, such as <your company name>_font. The fonts you define are used for text that appears in portlets.
|
Note: You must have at least the Create shared component access privilege to create a font definition.You must have at least the Manage shared component access privilege to edit a font definition. |
To create a font definition:
In the Navigator, click the Providers tab to bring it forward.
At the root level of the Providers tab, click the Locally Built Providers link.
Click the link for the Shared Components provider.
Click the Font link next to Create New…
In the Font Name field, enter the name you want to give the font.
You can identify a font by any name you choose; for example, web_banner_font.
In the Font Value field, enter the name of a font, for example Arial.
You can specify the name of any font that is supported by a Web browser. If you specify a font that is not supported, the Web browser will use its own default font.
You can specify alternative fonts by separating them with commas in the Font Value field; for example, Times New Roman, Times. In this example, if the user's Web browser does not support the Times New Roman font, it will use the Times font instead.
Click Create.
The page updates with a link, which you can click to edit the font definition. If you do not want to edit the font definition at this time, click Close.
Use User Interface (UI) templates to provide a header and footer to an application. UI templates can be applied to Portlet Builder components. By applying a template, you can automatically specify a title, a title background, links to home and help pages, and background colors and images.
UI templates are good for standardizing the overall look and feel of many Portlet Builder components. For example, you can design a UI template for a provider that includes the company logo in the heading, the name of the company in the title, and a common background image. By ensuring every component in the application uses the same UI template, you impose a standard appearance.
|
Note: In earlier releases you could apply UI templates to pages as well as components within OracleAS Portal. This functionality of UI templates has been replaced by HTML Skins. Refer to Oracle Application Server Portal User's Guide. |
This section provides information about the two types of user interface template— structured and unstructured—and describes generally how to use them to create a look and feel. It contains the following subsections:
You can use structured UI templates only with portlets. You create them with a wizard. In the wizard, you specify images, text, and layout elements that you want to apply to every portlet that uses the template.
You cannot use your own HTML code to extend the template beyond the pre-identified attributes. To achieve greater flexibility, you may want to build an unstructured user interface template (see "Building an Unstructured User Interface Template").
To build a structured user interface template:
In the Navigator, click the Providers tab to bring it forward.
At the root level of the Providers tab, click the Locally Built Providers link.
Click the link for the Shared Components provider.
Click the User Interface Template link next to Create New…
Click the Structured UI Template link.
In the Template Name field, enter a name for the template.
Make the name as descriptive as possible. This is the name users will see when applying a UI template to a portlet during the build process. For example, if the template will be applied to all portlets created for a scheduling provider, you could name it Schedule_Template.
Select other options to refine the look and feel of the template.
For example, you can choose an image to appear in the upper left corner of the template and a background image to display behind the portlet, as shown in Figure A-77.
Figure A-77 Structured UI Template with Cloud Image
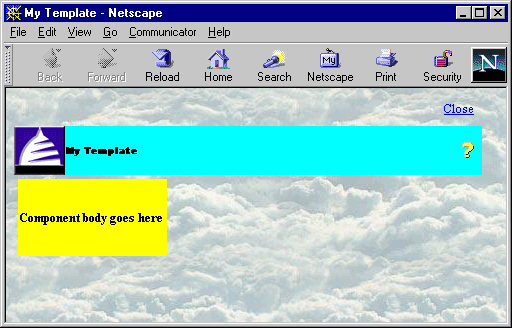
If you have a question about an option, click the help icon. Leave an option blank if you do not want to include it in your template.
(Optional) Click Preview to open a new browser window that displays the UI template.
You can reselect options then click Preview again to see how the changes affect the look of the template.
When you are satisfied with your template, click Create.
The page updates with a link, which you can click to edit the template. If you do not want to edit the template at this time, click Close.
Unstructured user interface templates are based on HTML code that you supply. Because you are writing your own HTML code, you can create a more elaborate and sophisticated unstructured UI template than you can a structured UI template.
To create an unstructured user interface template, you first write HTML code to create a Web page. You can also copy this code into OracleAS Portal from another source, such as a Web page editor. Once entered into OracleAS Portal, you edit the HTML code to add substitution tags. When the HTML code executes, the substitution tags embed portlets, titles, and other elements into the Web page. For example, you can add a #BODY# tag that adds a portlet such as a chart or report to the original Web page background. For a list of all the substitution tags you can include in your HTML code, see Table A-40.
In an unstructured template, you can use <ORACLE></ORACLE> tags to include SQL statements or PL/SQL blocks. You can also include HEAD elements such as custom JavaScript, cascading style sheet references, and META tags. You can use special substitution tags for integrating page metadata to embed PL/SQL scripting.
To build an unstructured user interface template:
In the Navigator, click the Providers tab to bring it forward.
At the root level of the Providers tab, click the Locally Built Providers link.
Click the link for the Shared Components provider.
Click the User Interface Template link next to Create New…
Click the Unstructured UI Template link.
In the Template Name field, enter a name for the template.
Because this is the name users will see when applying a UI template to a page or portlet during the build process, you should make the name as descriptive as possible. For example, if the template will be applied to all portlets created for a calendar, you could name it Calendar_Template.
In the Template Definition field, enter or paste the HTML code you want to use as the basis for your unstructured user interface template.
The HTML code you supply should create a Web page.
Embed substitution tags in the HTML code in the location where you want the items associated with the tags to appear in the finished template.
Table A-40 lists and describes the tags you can use. For example, you may want to embed a #BODY# substitution tag in the code. #BODY# adds the main body of the page, such as page content or a portlet, to the Web page when the HTML code executes. If the HTML source code divides a page into two frames, you can embed the #BODY# tag in different places in the code, causing the portlet to display in the left frame or the right frame.
Table A-40 Unstructured UI Template Substitution Tags
(Optional) Click Preview to open a new browser window that displays the UI template.
You can update the code then click Preview again to see how the changes affect the look of the template.
When you are satisfied with your template, click Create.
The page updates with a link, which you can click to edit the template. If you do not want to edit the template at this time, click Close.
This example assumes that you have access to an OracleAS Portal database provider in the SCOTT schema called myCompany_DB_Provider. If you have the appropriate privileges, you can create this provider yourself (for information about how to do this, see "Creating a Provider for Locally Built Portlets"). If you do not have the appropriate privileges to create OracleAS Portal database providers, ask your portal administrator to create the provider for you.
This example includes the following exercises:
The Team Details report, shown in Figure A-78, displays a list of employees in the Sales department (department 30).
To build the Team Details report:
In the Navigator, click the Providers tab to bring it forward.
At the root level of the Providers tab, click the Locally Built Providers link.
Click the link for the provider myCompany_DB_Provider.
If you do not see this provider, you can create it. For more information, see "Creating a Provider for Locally Built Portlets".
Click the Report link next to Create New…
Click the Reports From Query Wizard link.
In the Name field, enter <YourName>_team_details.
In the Display Name field, enter Team Details.
In the Description field, enter team details exercise.
In the Portal DB Provider list, MYCOMPANY_DB_PROVIDER should already be selected.
Click Next.
In the Tables and Views field, enter SCOTT.EMP if necessary.
Click Add.
Click Next.
From the Columns list, select:
EMP.ENAME
EMP.EMPNO
EMP.JOB
Click the right arrow button after each selection to move it from Columns to Selected Columns.
If necessary, use the up and down arrows to the right of Selected Columns to arrange the columns in the order specified above.
Click Next.
From the Column Name list, choose EMP.DEPTNO.
From the Condition list, choose =.
In the Value field, enter 30.
Click Next.
Select Tabular.
Click Next.
Next to each column, enter the Column Heading Text as indicated in Table A-41:
Table A-41 Team Details Report Column Heading Text
| Column | Column Heading Text |
|---|---|
|
ENAME |
Name |
|
EMPNO |
Employee No |
|
JOB |
Job |
This will add descriptive labels above columns that appear in your report.
Click Next twice, or until you see the Display Options step of the wizard.
In both the Full Page Options and Portlet Options sections, select the values shown in Table A-42:
Click Finish.
Click Run as Portlet to see what your report looks like.
Close the browser window where the report is displayed, and click Close to close the component manager and return to the Portal Navigator.
The Average Salaries chart, shown in Figure A-79, displays the average salary for each job title.
To build the Average Salaries chart:
In the Navigator, click the Providers tab to bring it forward.
At the root level of the Providers tab, click the Locally Built Providers link.
Click the link for the provider myCompany_DB_Provider.
Click the Chart link next to Create New…
Click the Charts From SQL Query link.
In the Name field, enter <YourName>_team_average_salary.
In the Display Name field, enter Average Salaries.
In the Description field, enter average salaries exercise.
In the Portal DB Provider list, MYCOMPANY_DB_PROVIDER should already be selected.
Click Next.
In the SQL Query field, enter the following code:
select
   null     the_link,
   job      the_name,
   avg(sal) the_data
from emp
group by job
This SQL query will work only if you have SELECT privileges on the EMP table in the SCOTT schema.
Click Next twice, or until you see the Display Options step of the wizard.
In both the Full Page Options and Portlet Options sections, select the values shown in Table A-43:
Click Finish.
Click Run as Portlet to see what your chart looks like.
Close the browser window where the chart is displayed, and click Close to close the component manager and return to the Portal Navigator.
The Team Bonuses report, shown in Figure A-80, displays the average bonus paid to employees in each department.
To build the Team Bonuses report:
In the Navigator, click the Providers tab to bring it forward.
At the root level of the Providers tab, click the Locally Built Providers link.
Click the link for the myCompany_DB_Provider provider.
Click the Report link next to Create New…
Click the Reports From SQL Query link.
In the Name field, enter <YourName>_team_bonuses.
In the Display Name field, enter Team Bonuses.
In the Description field, enter team bonuses example.
In the Portal DB Provider list, MYCOMPANY_DB_PROVIDER should already be selected.
Click Next.
In the SQL Query field, enter the following code:
select dept.deptno, dept.dname||','||dept.loc, sum(emp.comm)
from dept, emp
where dept.deptno = emp.deptno
group by dept.deptno, dept.dname||','||dept.loc
The above query summarizes data from selected columns contained in the DEPT and EMP tables. Although we used a SQL query to build the report, we just as easily could have built it using the Reports Query Wizard.
This SQL query will work only if you have SELECT privileges on the DEPT and EMP tables in the SCOTT schema.
Click Next.
Select Tabular.
Click Next.
Next to each column, enter the Column Heading Text as indicated in Table A-44:
Table A-44 Team Bonuses Report Column Heading Text
| Column | Column Heading Text |
|---|---|
|
DEPTNO |
Department No |
|
DEPT.DNAME||','||DEPT.LOC |
Department |
|
SUM(EMP.COMM) |
Bonus Paid |
This will add descriptive labels above the columns that appear in your report.
Click Next twice, or until you see the Display Options step of the wizard.
For both the Full Page Options and Portlet Options sections, select the values shown in Table A-45:
Click Finish.
Click Run as Portlet to see what your report looks like.
Close the browser window where the report is displayed, and click Close to close the component manager and return to the Portal Navigator.