| Oracle Workflow User's Guide Release 2.6.4 Part Number B15854-02 |
|
|
View PDF |
| Oracle Workflow User's Guide Release 2.6.4 Part Number B15854-02 |
|
|
View PDF |
| Oracle Workflow User's Guide Release 2.6.4 Part Number B15854-02 |
Contents |
 Previous |
 Next |
Use the standalone Oracle Workflow home page to link to all of Oracle Workflow's web-based features. This page centralizes your access to the features so you do not have to remember individual URLs.
Note: If Oracle Internet Directory/Single Sign-On integration has been implemented for your installation of Oracle Workflow, you can use single sign-on when accessing Oracle Workflow's web-based features. With single sign-on, a user who is logged into any participating component is automatically authenticated when accessing any other participating component and does not need to log in again. See: Synchronizing Workflow Directory Services with Oracle Internet Directory, Oracle Workflow Administrator's Guide.
Note: For information about the self-service home page in Oracle Applications, see: Accessing the Oracle Workflow Self-Service Home Page.
To Access the Oracle Workflow Home Page
Use a web browser to connect to the URL for the home page:
<webagent>/wfa_html.home
<webagent> represents the base URL of the web agent configured for Oracle Workflow in your Web server. See: Setting Global User Preferences, Oracle Workflow Administrator's Guide.
Attention: This is a secured page, so if you have not yet logged on as a valid user in the current web session, you will be prompted to do so before the page appears.
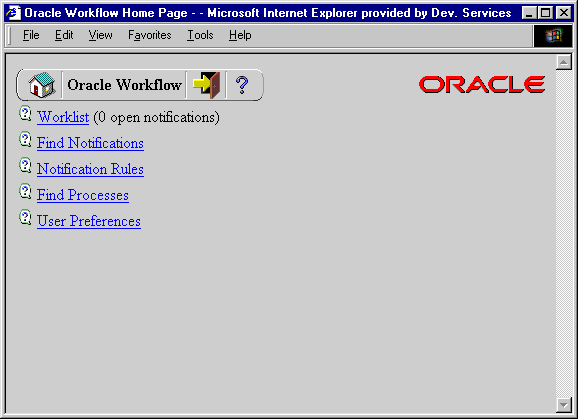
Standalone Oracle Workflow Home Page

The web page identifies the current version of Oracle Workflow.
A toolbar appears in the upper left corner of the Oracle Workflow home page, as well as on every other Oracle Workflow web page. The Home icon returns you to the Oracle Workflow home page. The name of the current page appears in the middle of the toolbar. The Logout icon logs you out of your current Oracle Workflow web session and the Help icon displays online help for the current screen. Some of the Event Manager web pages also include a Query icon that lets you enter query details to search for Event Manager objects.
Choose the Worklist link to display your list of workflow notifications. You can close or reassign your notifications directly from the Worklist or you can drill down to the details of each specific notification and close, reassign, or respond to them individually. See: To View Notifications from the Worklist.
Choose the Find Notifications link to locate notifications that match specific criteria and act on those notifications. See: To Find Notifications.
Choose the Notification Rules link to view and define your automatic notification routing rules. If you are logged in as a role with workflow administrator privileges, the Find Automatic Notification Processing Rules web page appears, letting you first display the routing rules for the role you specify. See: To Define a Rule for Automatic Notification Routing.
Choose the Find Processes link to query for a list of workflow process instances that match certain search criteria. Once you find a specific process instance, you can view its status details in the Workflow Monitor. See: Using the Find Processes Web Page, Oracle Workflow Administrator's Guide.
Choose the User Preferences link to set the preferences that control how you interact with Oracle Workflow. See: Setting User Preferences.
You can control how you interact with standalone Oracle Workflow by specifying user preferences in the User Preferences Web page. The values that you specify in the User Preferences Web page override the default global values set by your workflow administrator in the Global Preferences Web page.
Note: For information about setting user preferences in Oracle Applications, see: Preferences, Oracle Applications User's Guide.
To Set User Preferences
Use a web browser to connect to the Oracle Workflow home page:
<webagent>/wfa_html.home
From the Oracle Workflow home page, choose the User Preferences link.
Alternatively, you can connect directly to the User Preferences web page:
<webagent>/wf_pref.edit
<webagent> represents the base URL of the web agent configured for Oracle Workflow in your Web server. See: Setting Global User Preferences, Oracle Workflow Administrator's Guide.
Attention: These are secured pages, so if you have not yet logged on as a valid user in the current web session, you will be prompted to do so before the page appears.
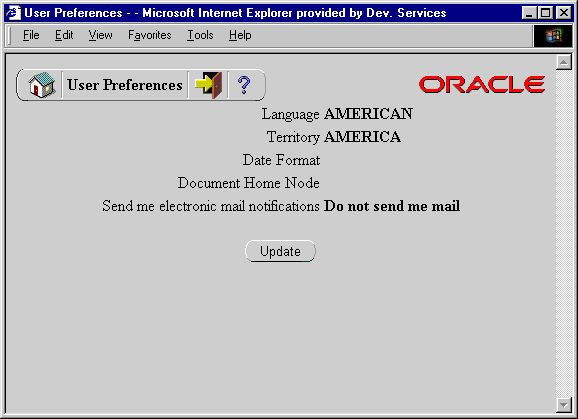
User Preferences Page (Summary)

The User Preferences web page displays a summary of your current user preferences. Choose Update to modify these preferences.
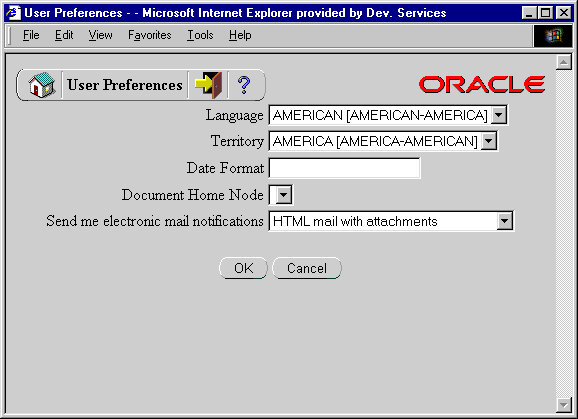
User Preferences Page (Update)

In the Language and Territory fields, use the list of values to select the NLS_LANGUAGE and NLS_TERRITORY combination that defines the default language-dependent behavior and territory-dependent formatting of your notification sessions.
In the Date Format field, specify an Oracle Database-compliant date format to use for your database session. An example of an Oracle Database-compliant date format is DD-Mon-RRRR. If you do not specify a date format, then the date format defaults to DD-MON-YYYY.
Note: Oracle Workflow may include a time element when relevant for certain displayed dates, even if you do not include a time format with your date format. If you specify a time format along with your date format, then in those situations when Oracle Workflow displays a time element, you will see two time elements following your date.
Leave the Document Home Node field blank. This functionality is reserved for future use.
In the 'Send me electronic mail notifications' section, select a notification preference:
HTML mail with attachments - send you notifications as HTML e-mail with attached links to the Notification Details page. Your mail reader must be able to display HTML formatting in the message body.
Plain text mail with HTML attachments - send you notifications as plain text e-mail but include the HTML-formatted version of the notifications and links to the Notification Details page as attachments.
Plain text mail - send you notifications as plain text e-mail.
Plain text summary mail - send you a summary of all notifications as plain text e-mail. You must use the Worklist web page to take action on individual notifications.
Do not send me mail - do not send you notifications as e-mail. You must view the notifications and take action from the Worklist web page.
HTML mail - send you notifications as HTML e-mail only, without any standard attachments. If custom attachments have been defined for individual notifications in a process, however, those attachments will still be included. Your mail reader must be able to display HTML formatting in the message body.
Note: The "HTML summary mail" preference is not applicable for standalone Oracle Workflow. This notification preference is currently only available with Oracle Workflow embedded in Oracle Applications.
Choose OK once you are satisfied with your changes.
Related Topics
Notification Preferences, Oracle Workflow Administrator's Guide
Use the Oracle Workflow self-service home page to link to Oracle Workflow's web-based self-service features in Oracle Applications. This page centralizes your access to the features.
Note: Oracle Applications Framework Personalization provides the ability to customize Oracle self-service web application pages. If you are logged in as a user or with a responsibility for which the Personalize Self-Service Defn profile option is set to Yes, you can choose the Personalize button or Personalize Region links to create your personalizations. For more information, please refer to OracleMetaLink note 268969.1, Oracle Applications Framework Personalization Guide.
For information about features available for Oracle Workflow user Web pages through personalization, see: Oracle Workflow User Personalizations.
Note: For information about the home page in standalone Oracle Workflow, see: Accessing the Oracle Workflow Home Page.
To Access the Oracle Workflow Self-Service Home Page
Use a web browser to navigate to the self-service home page, using a responsibility and navigation path specified by your system administrator. See: Oracle Workflow User Navigation Paths.
To set your Oracle E-Business Suite general preferences, including language and notification preferences, select the Preferences button. See: Set Preferences, Oracle Applications User's Guide.
The Notifications region of the home page lists your five highest priority notifications, ordered by priority and then by date. For each notification, the list displays the from role, workflow type, subject, sent date, and due date. Select the From, Type, Subject, Sent, or Due column heading to sort the list by that column.
To view and respond to a notification, select the notification subject link in the Subject column. See: To View the Details of a Notification.
To define vacation rules, select the Vacation Rules link. See: To View and Maintain Vacation Rules.
To grant access to your worklist to another user, select the Worklist Access link. See: To Grant Access to Your Worklist.
To view the complete list of all your notifications, select the Full List button. When the full list is displayed, the Notifications region also displays the View pull-down menu, the Open button, and the Reassign, Delegate, or Transfer button.
To specify which notifications to display in the Worklist, select the type of notifications you want from the View pull-down menu and select Go. You can choose to view Open Notifications, FYI Notifications, To Do Notifications, All Notifications, or Notifications From Me. If you choose All Notifications, the list additionally displays the status for each notification. If you choose Notifications From Me, the list displays the recipient of each notification instead of the from role.
To view and respond to a notification or a group of notifications, select the notification or notifications you want and select the Open button. If you select more than one notification to open, only one notification is displayed at a time. You can navigate among the open notifications by selecting the Next or Back buttons in the Notification Details page. See: To View the Details of a Notification.
To collectively reassign a group of notifications, select the notifications you want and select the Reassign button, the Delegate button, or the Transfer button. The Reassign button appears if you have access to reassign notifications to another user either by delegating the notifications or by transferring complete ownership of the notifications. The Delegate button appears if you only have access to delegate the notifications. The Transfer button appears if you only have access to transfer ownership of the notifications. See: To Reassign a Notification to Another User and Setting the WF: Notification Reassign Mode Profile Option, Oracle Workflow Administrator's Guide.
Note: Your workflow may include special logic to restrict reassignment of notifications. If any of the notifications that you selected are restricted in this way, Oracle Workflow displays an error message when you select the Reassign, Delegate, or Transfer button. In this case you should deselect the restricted notifications before performing the reassignment. See: #HIDE_REASSIGN Attribute, Oracle Workflow Developer's Guide.
The Status at a Glance region displays the five most recent workflows that you own and that were started within the last two weeks. For each workflow, the list displays the status, workflow type, workflow identifier, start date, and completion date. Select the Workflow Type, Workflow, or Started column heading to sort the list by that column.
To view the error details for an errored workflow, select the error icon or the error link in the Status column. See: Viewing Error Information for a Workflow.
To view the notification history for a workflow, select the workflow identifier link in the Workflow column. See: Viewing Notification History.
To view the complete list of all your workflows in the Status Monitor, select the Full List button. See: Viewing Workflows in the Status Monitor.
To view notifications in the Notifications Worklist, choose the Notifications tab, or select the Notifications link at the bottom of the page. See: To View Notifications from the Advanced Worklist.
To view the Workflow Monitor, choose the Status Monitor tab, or select the Status Monitor link at the bottom of the page. See: Accessing the Self-Service Monitor.