|
Oracle® Business Intelligence Discoverer Desktop User's Guide
10g Release 2 (10.1.2.1) for Windows B13917-03 |
|
 Previous |
 Next |
|
Oracle® Business Intelligence Discoverer Desktop User's Guide
10g Release 2 (10.1.2.1) for Windows B13917-03 |
|
 Previous |
 Next |
This chapter describes the basic procedures for working with Discoverer Desktop to analyze data.
The topics covered in this chapter include:
Using Discoverer Desktop Tools to Analyze Your Data
A description of each analysis tool and how it's used; see the following sections for details:
The Discoverer Desktop Tools menu gives you a range of tools for analyzing your data. For example, tools for creating and managing Conditions, data Sorts, Calculations etc, (see Figure 5-1 below).
Workbook behaviors that you define using the tools are known as Tool Definitions. Examples of Tool Definitions are
Condition - "Department is Video Rental or Video Sales"
Sort - Sort on Calendar Date Year, Department
Calculation - Profit Increase = 'Profit SUM * 1.15'
Select an option from the Tools menu to see the definitions you have already created for the tool. You turn a tool definition on and off by adding or removing the checkmark in front of its name in the tool's dialog box.
Turning on a tool definition applies it to the data in the table or crosstab. The results are then displayed according to the specifications of the tool. For example, turning on (applying) a condition filters the data to show the precise information you want to see. Similarly, turning on a set of totals definitions with the Totals tool calculates and displays subtotals and Grand Totals in your data.
Turning off a tool definition returns the data to its original form. For example, turning off a condition re-displays the data previously filtered out by the condition, and turning off totals displays the data again without subtotals and Grand Totals.
To turn on another tool definition, click the box in front of that definition so a checkmark appears in front of it too.
To turn off a tool definition, click the box in front of the definition to remove the checkmark.
|
Note: Clicking the Delete button removes the Condition from the Workbook. You cannot delete Items created for you by your Discoverer manager. When you select these Items, the Delete button is grayed out. |
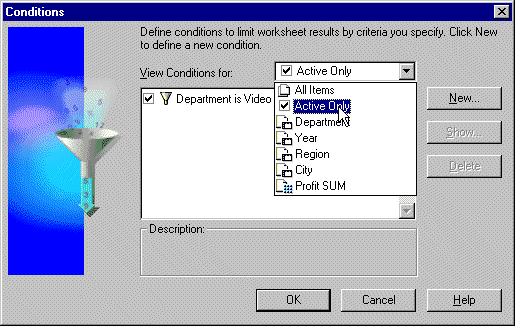
When creating a tool definition, you select whether to assign it to all data items or to a single item. Use the View drop-down menu to see the definitions assigned to various items, (see Figure 5-3 below).
Figure 5-3 Choosing which definitions to display in the Conditions dialog box
To see definitions for different items:
Click the down-pointing arrow in the View drop-down list.
Select one of the items on the list.
The list of definitions in the dialog box pertain to the selected item in the drop-down list. To see all of the definitions for the worksheet, choose All Items. To see only those currently turned on, choose Active Only.
Figure 5-4 Choosing definitions that apply to specific Items

Each tool has its own features, but the initial process to create a new definition is similar.
Choose a tool from its menu.
The tool's dialog box appears.
Click the New button.
A dialog box appears for creating a new definition for that tool.
Each New dialog box is different. See the descriptions in the rest of this chapter for details on how to create a new definition for each tool.
To edit a tool definition, you must select it first on the list of definitions:
Select a tool from its menu.
The tool's dialog box appears.
Select a definition from the list.
Click the Edit (or Show) button.
A dialog box appears for editing the definition.
Each dialog box for editing a definition is different. See the descriptions in the rest of this chapter to see how to edit definitions for each tool.
|
Note: Editing a definition does not automatically apply it to the data. The box in front of the definition must have a checkmark in it in order to be applied to the data. |
Although you can delete definitions, you may want to simply turn them off instead. Then, if you need a definition later, you can just turn it back on. Deleted definitions are erased permanently. If you delete a definition and want to reuse it later, you will have to re-create that definition from the beginning.
|
Note: You cannot remove Items created for you by your Discoverer manager. |
To delete an existing tool definition:
A typical analysis task is to find numerical data that meets or exceeds a particular amount (that is, data that is an Exception to the rest of the data). For example, you may want to find all the stores in your nationwide chain that have profits in excess of $10,000 for the year.
Finding Exceptions to the data involves two steps:
Defining the Exception itself, such as Òis greater than 10,000Ó or Òis less than 25%Ó or Òis between 10,000 and 50,000Ó.
Defining the format of the Exception data so you can see it easily among the rest of the data.
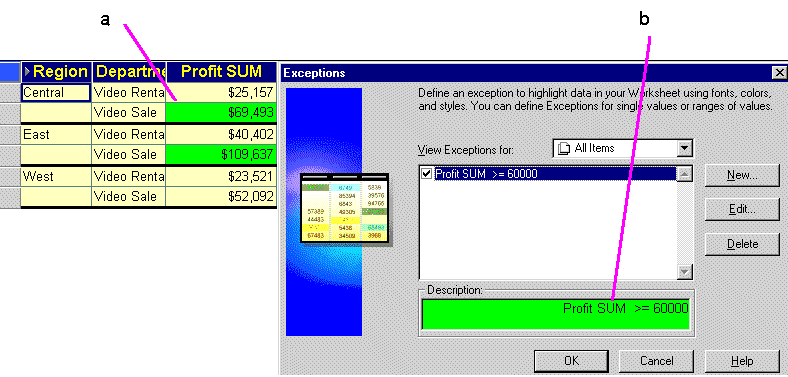
Use the Exception dialog box for both steps. Figure 5-6 shows an example.
Figure 5-6 Applying Exception analysis to Worksheets
To turn on an Exception:
The Exceptions dialog box appears. It shows the Exceptions you have already defined.
Click the check box in front of the Exception definition. A checkmark appears in the check box to indicate that it is selected.
In the example above, the Exception ÒProfit SUM >= 60000Ó is turned on.
Click OK.
Discover now analyzes the data, finds the Exception data, and displays it according to the format of the Exception's definition.
Choose Format | Exceptions.
The Exceptions dialog box appears.
Click the Exception's box to remove the checkmark.
Click OK. The Exception is turned off and removed from the analysis.
Choose Format | Exceptions.
The Exceptions dialog box appears.
Click the New button.
Creating a new Exception has two parts: defining the Exception and defining its format. The top portion of the dialog box is for defining the Exception; the bottom part is for the formatting.
To create the Exception definition:
Click the leftmost drop-down button to see a list of data items.
Choose the data item for which you want to find the Exception.
Click the drop-down button for the Exception expression, such as Òis betweenÓ or Òis greater than,Ó and choose the one you want.
Figure 5-10 Select the Exception Expression
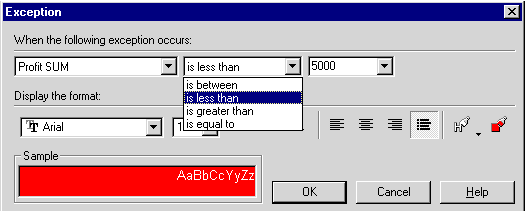
The following table shows some examples of the types of expressions you can define for Exceptions.
Type the number or text for the Exception in the box(es) at the right of the Exception dialog box. For the expression Òis betweenÓ two boxes appear for the low and high values.
If you select a data item with discrete values, such as Region, and then select the expression Òis equal toÓ you don't have to type in the value. Simply click the drop-down button on the third box to see the list of values for that item.
For example, in the sample Vidstore workbook, the three values for Region are Central, East, and West. Selecting ÒRegion is equal toÓ and then clicking the drop-down button displays Central, East, and West as the choices.
Select the display options for the Exception from the bottom half of the dialog box.
Click OK.
The Exceptions dialog box reappears with your new Exception listed in it. Remember to click the box in front of the Exception to turn it on and click OK to apply it to the data.
Select the Exception on the Exceptions dialog box.
In this example, the Exception ÒProfit SUM greater than 60000Ó is selected. The Description at the bottom of the box shows the current Exception and its format.
Click the Edit button. The Exception dialog box appears (Figure 5-8).
Make the changes to the Exception as required.
Click OK to save any changes.
If you now want to apply the edited Exception to your data items, make sure it is turned on (the check box in front of the Exception is selected) and click OK.
When working with numeric items, you often want to see various types of summations of the data. Using the Totals tool you can sum rows and columns of numbers, find averages and standard deviation, compute subtotals and Grand Totals, and so on. The Totals tool automatically places the summations at the appropriate positions on the display.
Here are some examples:
Figure 5-15 A Crosstab Total on Worksheet Rows
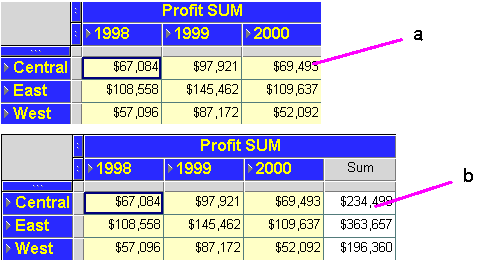
Figure 5-16 A Worksheet with Totals on Columns
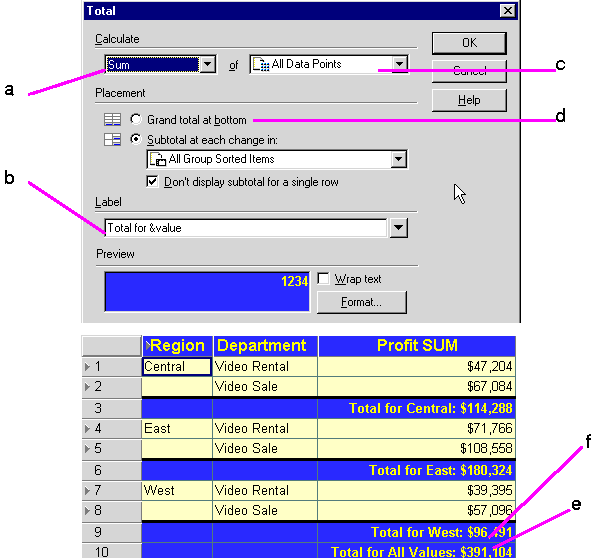
Figure 5-17 Multiple Totals on a Crosstab
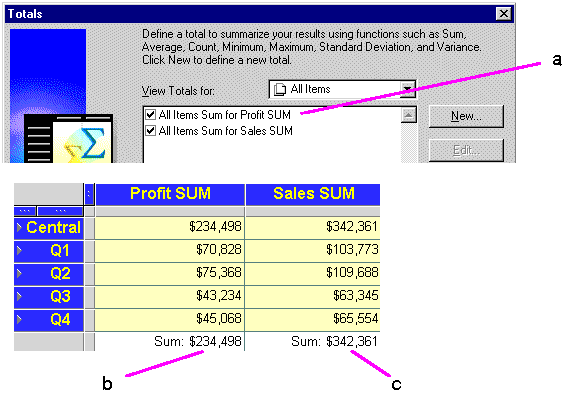
Notice that the two Totals are displayed on the same row. When a crosstab has multiple Totals active, Discoverer Desktop puts them on the same row.
To display totals or subtotals on a table or crosstab:
The Totals dialog box appears. It shows any totals you've already defined.
Click the check box in front of the Total definition so a checkmark appears.
Click OK. Discoverer Desktop now computes the totals and displays them on the table or crosstab.
To remove the totals from the data:
Choose Tools | Totals.
The Totals dialog box appears.
Click the selected check box(es).
Click OK. The totals are removed from the table or crosstab.
Creating a new totals definition has four basic steps:
Selecting the totals to calculate.
Selecting the type of total and where to place it on the table or crosstab.
Creating a label for the totals column or row.
Defining the format for the totals column or row.
To create a new totals definition:
Choose Tools | Totals.
The Totals dialog box appears (Figure 5-18).
Click the New button.
The Total dialog box for a new totals appears.
Click the leftmost drop-down button to see the list of totals.
Figure 5-20 Select the Totals to Calculate
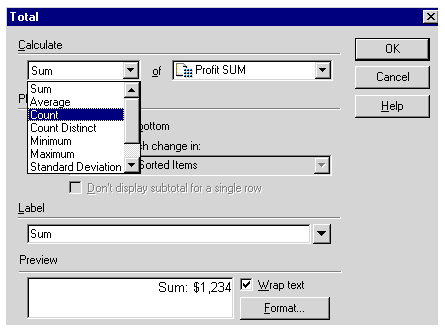
From the drop-down list, choose the type of total for the data.
Click the drop-down button to select the data points to be totaled.
Figure 5-21 Select the Data Points to Total
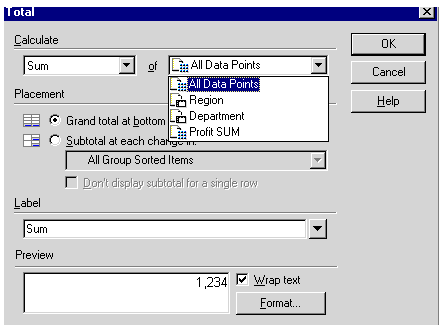
All Data Points— displays totals for each set of appropriate data points. For example, if the table contains two columns of numeric data points, both columns display totals. However, data points not appropriate for the type of total are not displayed.
In the example above, Region is a set of data points, but summing Region data points doesn't make sense—it would be like trying to add ÒCentralÓ to ÒEastÓ. In this case, Regions are not summed even though you selected All Data Points.
A specific numeric data point (such as Profit SUM in the example)—displays totals for the selected set of data points.
A non-numeric data point (such as Region in the example)—when you select a non-numeric set of data points, the options for the totals in the first drop-down list are limited to only those options that apply to non-numeric data points. For example, if you select Region, sum of regions does not make sense. The only totals that make sense for non-numeric data points are Count, Count Distinct, Maximum, and Minimum.
|
Note: If you choose the All Data Points option when your Worksheet contains Calculations, the Calculation is applied to the Totals. Discoverer Desktop does not total the Calculations, (see Section 5.3.2, "Totals and Calculations"). |
Click one of the options for Placement of the totals data:
Grand total at bottom—Calculates the Grand Total for a column and places it after the last row of the table or crosstab.
Grand total at right—Calculates the Grand Total for a row and places it to the right of the last column in the crosstab. (This option is only available from the Total dialog box for crosstabs.)
Subtotal at each change in—Calculates the subtotals for a column and places it at each new value for the selected item. Select the item from the drop-down list. For example, the subtotals for Regions appear at the end of the data for each Region.
Now enter a Label for the totals data.
You can click the drop-down menu for labels and choose additional options for the title from it.
The system values from the drop-down list produce labels that can change as the data changes by adding text codes (such as Ò&ItemÓ and Ò&ValueÓ) to the label when you insert them in the label text. In the actual labels on the table or crosstab, the ampersand (&) will not appear, and appropriate names from the table or crosstab will be inserted in place of the words ÒItemÓ or ÒValueÓ.
This table shows some examples.
If the total calculates for all data points (as selected at the top of the dialog box), the labels can appear for each appropriate name. For example, when totaling two items, and you select Insert Item Name (&Name), labels for both item names appear in the data or crosstab.
To remove options from the labels, click in the label text on the dialog box and edit it as you would regular text.
When creating your Totals, if you total a Calculation, the Calculation is applied to the Total. Discoverer Desktop does not total the Calculations.
For example, in Figure 5-24, the Profit Item is a Calculation: Sales SUM / Cost SUM. The Sum value for Profits is $3.23, ($1,150,603 / 356,087). The SUM value is NOT $9.70, ($3.20 + $3.23 + $3.27).
Figure 5-24 A Worksheet Total on a Calculation (Profits)

|
Note: If you want Discoverer Desktop to total Calculations rather than apply the Calculations to Totals, contact your Discoverer manager. |
Select the definition you want to edit on the Totals dialog box.
Click the Edit button. The Total dialog box appears (Figure 5-25).
Make the changes you want.
A typical data analysis task is to calculate Item percentages. To calculate percentages in Discoverer Desktop, use the Percentages option on the Tools menu.
Figure 5-26 Using Percentages on a Crosstab Worksheet
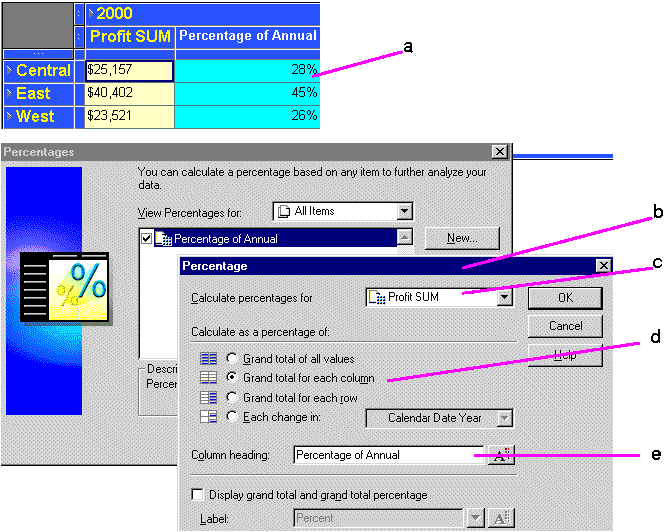
To find a percentage with the Percentages tool on the tool bar:
Select the column containing the data that you want to use to find percentages.
Click the Percentages tool on the tool bar.
The percentage column shows the percentage of each row to the total of all the rows displayed on the table or crosstab.
Here are examples of percentages on a Crosstab Worksheet:
Figure 5-27 A Percentages example on a Crosstab Worksheet
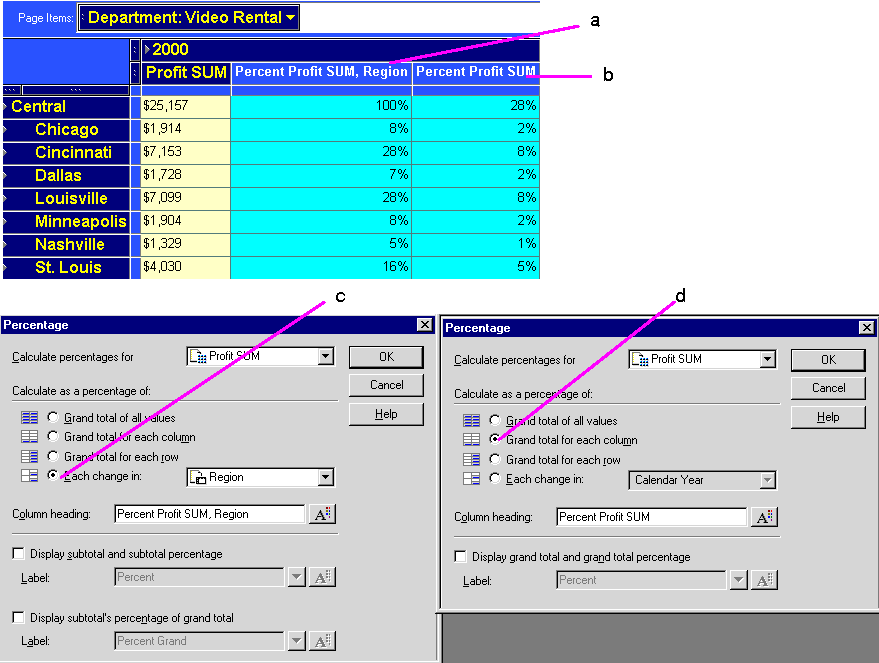
To display percentages on a table or crosstab:
Discover now computes the percentages and displays them on the table or crosstab.
To remove the percentages from the data:
Choose Tools | Percentages.
The Percentages dialog box appears.
Clear the check box(es).
Click OK to remove the percentages from the data.
Creating a new percentage definition has four basic steps:
Selecting the data item for calculating the percentage.
Selecting to calculate the percentage of a total or change in values.
Creating a label for the percentage column.
Defining the format for the column.
To create a new percentage definition:
Choose Tools | Percentages.
The Percentages dialog box appears (Figure 5-28).
Click the New button.
The Percentage dialog box for a new definition appears:
On the Percentage dialog box, click the drop-down button at the top of the box to see the list of data items for which to calculate percentages.
Select the data item from the list to use to calculate percentages.
Select one of the options to calculate a percentage of. If you select the option Each Change in, select the data item where you want the percentage to be displayed when the value changes.
The following table lists your choices:
Select the check boxes at the bottom of the dialog box to display subtotals and their percentages, or subtotals as a percentage of the Grand Total.
Enter labels for the subtotal and Grand Total percentages, or click the drop-down menus for labels and choose additional options.
Figure 5-31 Create Labels for Percentage Columns
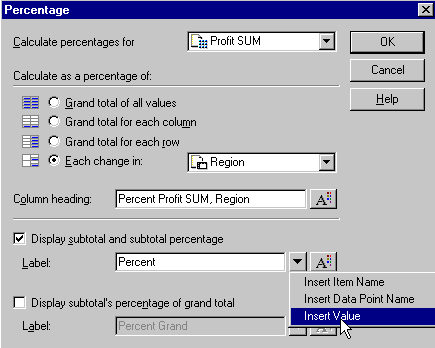
The options from the drop-down menu produce labels that can change as the data changes by adding text codes such as Ò&ItemÓ and Ò&ValueÓ where you insert them in the label text. In the actual labels on the table or crosstab, the ampersand (&) will not appear, and appropriate names from the table or crosstab will be inserted in place of the words ÒItemÓ orÓ ValueÓ.
The table below shows some examples.
To remove options from the labels, click in the label text on the dialog box and edit it as you would regular text.
A typical data analysis task is to filter the data to find only that data that meets certain conditions. For example, you might want to limit the display of data to the last two years of sales. Or, you want to see the data for only two types of sales items. Each of these tasks involves filtering the data to find the specific data that meets the conditions.
Some sample conditions are:
Year = 1998 or 1999—The displayed data applies to 1998 and 1999 only. The workbook may contain data from other years, but it will not be displayed.
Profit SUM > 3000—The worksheet displays Profit SUMs greater than 3000.
City <> 'Boston'—The worksheet displays data for all cities, except Boston. Note that the value Boston is enclosed in single quotes. Text values in conditional expressions must be in single quotes.
|
Note: Several features for creating conditions involve advanced analysis techniques. For example, instead of creating a condition for a defined data element, you can specify a condition based on a calculated value that computes which data can meet the condition. The advanced features are covered in Chapter 8, "Advanced Discoverer Desktop Features". |
Conditions can be similar to Exceptions. The differences between conditions and Exceptions, however, are significant.
An Exception finds data that meets the Exception definition and highlights it in the tables and crosstabs. All other data remains visible.
A condition finds data that meets the condition and removes the rest of the data from the display so you see only the data that meets the conditions.
Conditions are essentially powerful data filters that find the specific data you're looking for and displays only that data. You can define numerous conditions and turn them on and off to filter the data in the tables and crosstabs.
Note: Applying a condition to a table or crosstab does not remove the data from the workbook. It merely filters the data to show the precise data you want to see. To return the rest of the data to the table or crosstab, turn off the condition.
To find data that meets certain conditions:
The Conditions dialog box appears.
To find data that meets a condition, select the check box in front of the condition definition. That turns on the condition.
In the example above, the condition ÒDepartment is Video Rental or Video SaleÓ is selected.
Click OK. Discover now filters the data, finds the data that meets the condition, and displays it.
To see conditions for specific data items:
At the Conditions dialog box, choose an item from the drop-down list, View Conditions For. You can display all the conditions defined in a workbook, or only those that apply to particular data items.
To see conditions that apply to a specific data item, click the drop-down button and select a data item to see its conditions.
To see all of the conditions defined for the workbook, choose All Items.
To see only those conditions currently turned on, choose Active Only.
Figure 5-33 View Conditions for a Specific Data Item
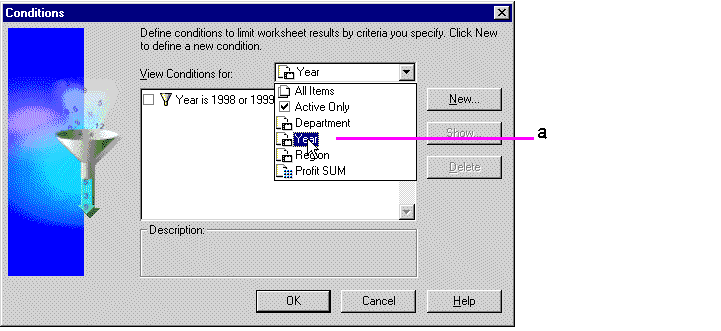
To remove the condition from the data:
Choose Tools | Conditions.
The Conditions dialog box appears (Figure 5-32).
Clear in the check box next to the condition.
Do not click the Delete button. That deletes the condition definition from the list of conditions.
Click OK. The condition is removed from the data.
Now, the data is restored to the table or crosstab, because the data is not being filtered. That is, the condition is turned off.
Choose Tools | Conditions.
The Conditions dialog box appears.
Click the New button.
The New Condition dialog box appears:
Name—automatically generates a name for the condition based on the item, the condition, and the values that you select for it. To create a different name, clear the check box Generate name automatically. You can then enter a name for the condition in the Name box.
Description—For simple, straightforward conditions, the name and description are usually sufficient to explain how the condition will filter the data, and you don't need to type an extra description. However, advanced conditions may need descriptions for clarity. Enter a description here and it appears on the Conditions dialog box when the condition is selected.
Location—The workbook where the condition will be applied.
Click the drop-down button for Item.
The drop-down list shows the data items in the workbook that you can use for the condition. It also lists Create Calculation and Select Condition, which are some other ways to create the first part of the condition.
Create Calculation—You can use a calculation to filter the data (see Chapter 8, "Advanced Discoverer Desktop Features").
Select Condition—Creates conditions that use other conditions to filter the data first (see Chapter 8, "Advanced Discoverer Desktop Features").
Notice that the list of items contains all the data items in the workbook, not just those being displayed on the current table or crosstab. You can use any data item to create a condition.
Click the drop-down button for the condition expression and choose the one you want. See the table below for descriptions and examples of the expressions.
Figure 5-36 Select the Condition Expression
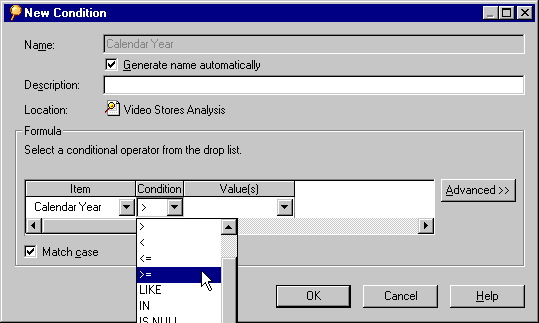
To complete the definition of the condition enter a value in the Value(s) box.
|
Note: When you create a condition with text for the value, the text must be enclosed in single quotes. For example, in the condition Region = 'Central', the text value, 'Central', must be enclosed in single quotes. Numbers do not have to be in quotes. |
The following table describes the condition expressions:
To create an advanced condition, click the drop-down button to see other options. You can also click the Advanced button for more options. See Chapter 8, "Advanced Discoverer Desktop Features" for a description of the value options and other advanced features.
If you select a data item with discrete values, such as Calendar Year, and then select Òis equal toÓ you do not have to type in the value. Click the Value(s) drop-down button to see the list of values for that item, then select the one that you want to use.
For example, in the sample Video Stores workbook, the three values for Calendar Year are 1998, 1999, and 2000.
If you are dealing with text and want the condition to match the uppercase and lowercase characters in the text, select the Match Case check box.
For example, if you want the condition to filter the data to find all ÒWidgetsÓ but not ÒwidgetsÓ, select the Match Case check box.
Click OK. The new condition appears on the Conditions dialog box.
To edit an existing condition:
Select the condition on the Conditions dialog box.
Click the Edit button. The Edit Condition dialog box appears.
Make the changes you want to the condition.
Click OK. The condition is now edited.
If you now want to apply that condition to the data, make sure it is turned on (the check box in front of the condition is selected) and click OK.
To delete a condition from the list of conditions that you can apply to the data:
Choose Tools | Conditions.
The Conditions dialog box appears (Figure 5-38).
Select the condition you want to delete.