|
Oracle® Application Server Adapter for PeopleSoft User's Guide
10g Release 2 (10.1.2) B14060-02 |
|
 Previous |
 Next |
|
Oracle® Application Server Adapter for PeopleSoft User's Guide
10g Release 2 (10.1.2) B14060-02 |
|
 Previous |
 Next |
This chapter contains the following examples:
The event and service scenarios shown depend on the following prerequisites and configuration steps:
Prerequisites
OracleAS Adapter for PeopleSoft installed on Oracle Application Server.
OracleAS Database adapter deployed and configured.
OracleAS Integration InterConnect Adapter Plugin for EIS installed and running.
|
See Also: Oracle Application Server Adapter Installation Guide |
Configuration Steps
The examples present all the configuration steps necessary for demonstrating service and event integration with PeopleSoft. The following cross references are given to identify where more information can be obtained.
Configure the OracleAS Adapter for PeopleSoft for services and events. See Chapter 2, "Configuring OracleAS Adapter for PeopleSoft" for more information.
Configure OracleAS Integration InterConnect iStudio for service and event interactions. For more information, see the following service and event steps.
The following example describes how to create events for LOCATION_SYNC.VERSION_1 and how to create a channel and a port.
In the left pane, expand the Adapters node.
The applications systems supported by Application Explorer appear as nodes based on the adapters that are installed.
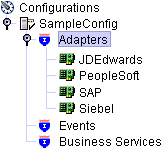
Right-click the PeopleSoft node and select Add Target.
The Add Target dialog box opens.
In the Name field, type a descriptive name, for example, PsoftTarget.
In the Description field, type a description for the target (optional).
From the Target Type list, select a target type.
The default value is Application Server.
Click OK.
The Application Server dialog box opens where you must specify connection information for PeopleSoft and the application server that is hosting PeopleSoft.
Verify your connection parameters. If required, provide the password.
Right-click the target name and select Connect.
The x icon disappears, indicating that the node is connected.
From the expanded Adapter list, expand the PeopleSoft node, expand Messages, and then select LOCATION_SYNC.VERSION_1.
Creating Events for LOCATION.SYNC.VERSION1
To create events for LOCATION_SYNC.VERSION_1:

Right-click the LOCATION_SYNC.VERSION_1 node and select Create Event Port.
The Create Event Port dialog box opens.
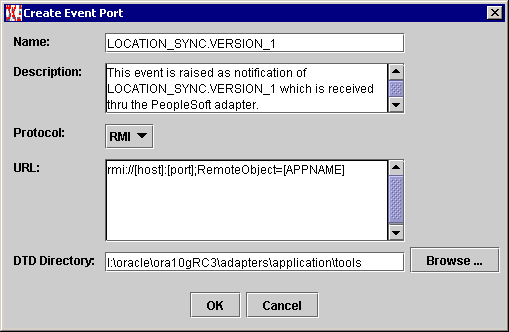
Description of the illustration location_event_port.gif
Type a name for the event port and provide a brief description.
From the list, select the required disposition, for example, RMI.
Type the disposition URL.
Type (or browse to) the path containing the DTD directory.
Click OK.
The port appears under the ports node in the left pane.

In the right pane, a table appears that summarizes the information associated with the event port you created.

Description of the illustration location_sync_detail.gif
Creating a Channel
In the left pane, click the Events node.
Right-click Channels and select Add Channel.
The Add Channel dialog box opens.
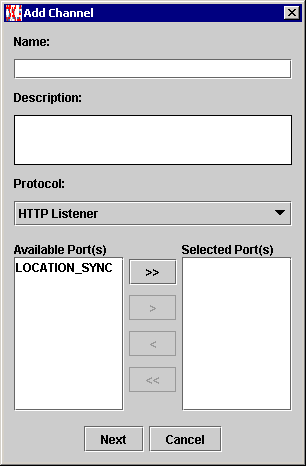
Perform the following steps:
Type a name for the channel, for example, TEST_CHANNEL.
Type a brief description.
Select an event port from the list of available ports. To select more than one, hold down the Ctrl key and click the ports.
To transfer the ports to the list of selected ports, click the double right (>>) arrow button.
Click Next.
When the dialog box opens, type the system information as specified in the following table:
| Parameter | Description |
|---|---|
| Port | Port on which to listen for PeopleSoft event data. |
| Server port | Port on which the host database is listening. |
| Synchronization Type | Choose from three synchronization options:REQUESTREQUEST_RESPONSEREQUEST_ACK |
Click OK.
The channel appears under the channels node in the left pane.
An X over the icon indicates that the channel is currently disconnected. You must start the channel to activate your event configuration.
Right-click the channel node and select Start.
The channel you created becomes active. The X over the icon in the left pane disappears.
To stop the channel, right-click the connected channel node and select Stop.
This topic illustrates PeopleSoft event integration. The procedures describe design time and runtime.
The following procedures describe how to start the repository, create a common view, and then define invoked and implemented procedures. Then, it describes how to export PL/SQL code from iStudio.
Starting the Repository
To start the repository, double-click the start.bat file located in the following directory:
OracleAS_home\ora92InterCon\oai\9.0.4\repository\start.bat
Creating a Common View
Start Oracle iStudio by double-clicking the start.bat file located in the following directory:
OracleAS_home\ora92iStudio\oai\9.0.4\istudio\iStudio.bat
iStudio opens.
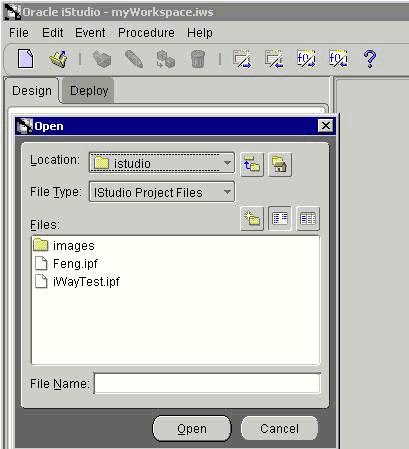
Open a project.
Open Common Views and Business Objects.
Create a Business Object called PSFTFL.
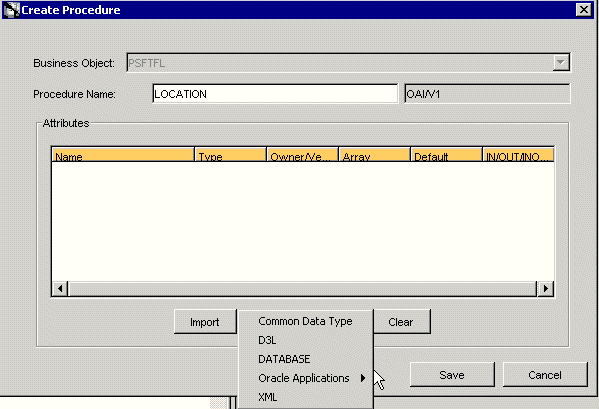
Create a new procedure under PSFTFL and type LOCATION as the procedure name.
Open the DTD generated from Application Explorer and load it.
The Choose Root Element dialog box opens.
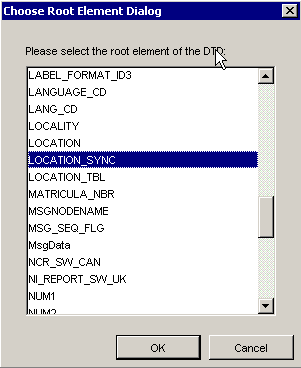
Select the root element, PS8, for this example.
Click OK.
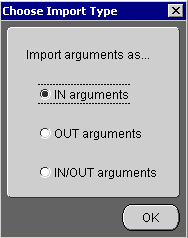
Select IN arguments as the import type for the request DTD and click OK.
Import the response DTD, select the root element, and click OK.
The Choose Import Type dialog box opens.
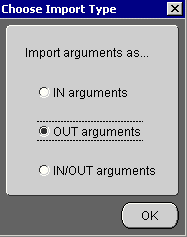
Select OUT arguments as the import type for the response DTD and click OK.
To save the new procedure, click Save.
Creating an Invoked Procedure
To create an invoked procedure:
Create a new application called AQAPP.
Right-click Invoked Procedures and select New.
The Invoke Wizard - Select a Procedure window opens.
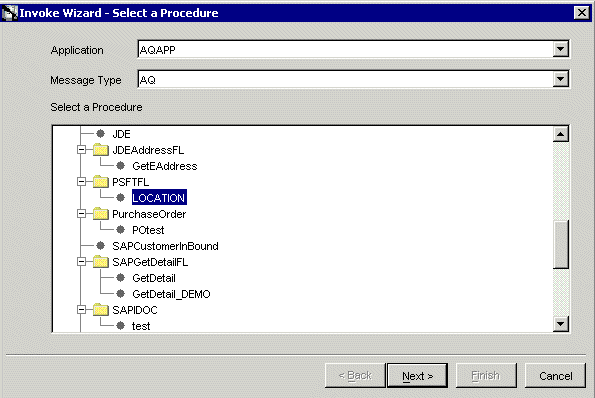
From the Message Type list, select AQ.
Expand the PSFTFL business object as the event and select LOCATION.
Click Next.
The Invoke Wizard - Define Application View window opens.
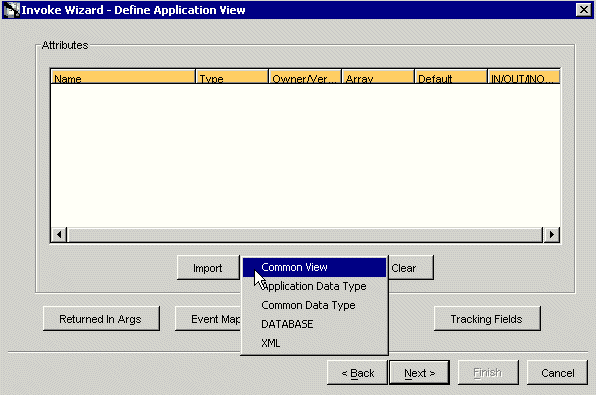
Perform the following steps:
Click Import.
Select Common View.
Click Next.
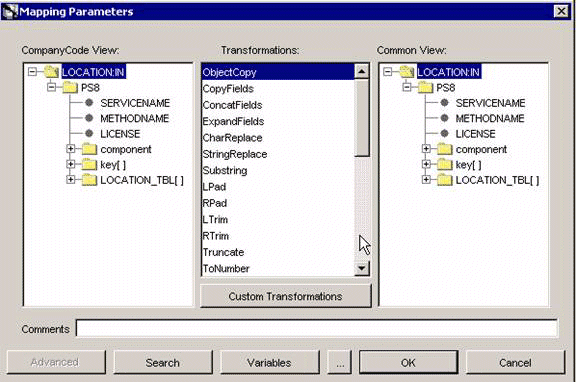
Click New to create a mapping between the Common View and the Application View for the IN parameters.
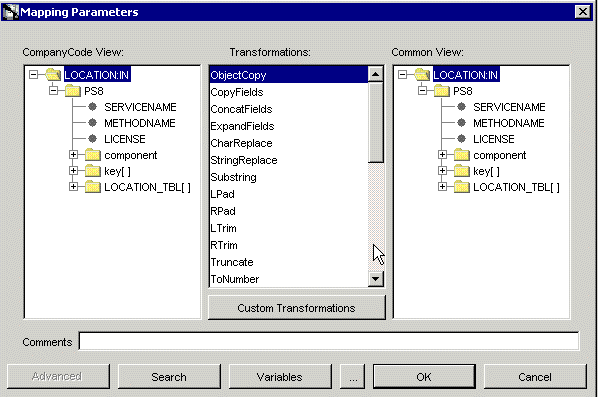
Description of the illustration object_copy.gif
In this example, the Application View and the Common View have the same structure. All the attributes can be mapped by using ObjectCopy Transformation.
Click Apply and then OK.
Click Finish.
You have completed defining the application definition for the invoked procedure.
Defining Queues for AQ
You must create and specify a queue for Advance Queuing (AQ):
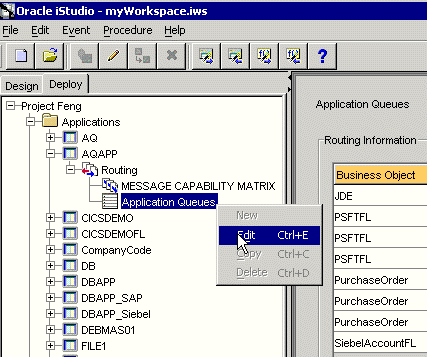
To specify the queue in iStudio, select the Deploy tab, Project, Application, AQAPP, Routing, and Application Queues.
Right-click Application Queues and select Edit.
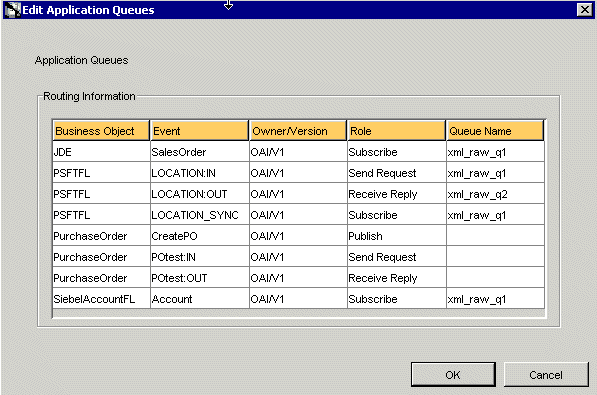
In the Queue Name column, type the queue name, in this example, xml_raw_ql for PSFTFL LOCATION:IN event, and xml_raw_q2 for PSFTFL LOCATION:OUT event.
To finish, click OK.
To create xml_raw_ql and xml_raw_q2 queues, execute the following SQL under the appropriate schema, in this example, the AQAPP schema.
EXECUTE dbms_aqadm.create_queue_table (queue_table => 'RawMsgs_qtab', queue_payload_type => 'RAW', multiple_consumers => FALSE);
EXECUTE dbms_aqadm.create_queue (queue_name => 'xml_raw_q1', queue_table => 'RawMsgs_qtab');
EXECUTE dbms_aqadm.start_queue (queue_name => 'xml_raw_q1');
EXECUTE dbms_aqadm.create_queue (queue_name => 'xml_raw_q2', queue_table => 'RawMsgs_qtab');
EXECUTE dbms_aqadm.start_queue (queue_name => 'xml_raw_q2');
Implementing the Procedure
Create a new application called PSFTFL, expand the application, right-click Implemented Procedure, and select New.
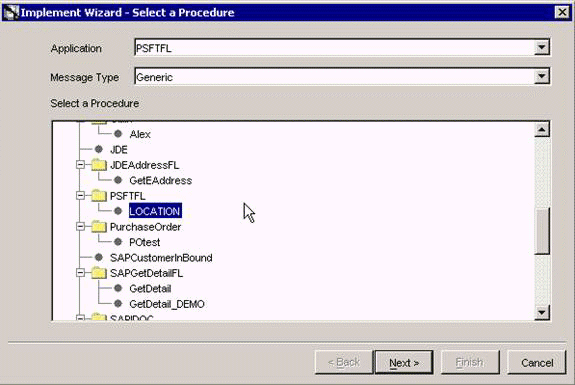
From the Message Type list, select Generic.
Select LOCATION under PSFTFL as the procedure.
Click Next.
Open the DTD generated from Application Explorer and load it.
The Choose Root Element dialog box opens.

Select the root element, PS8, for this example.
Click OK.

Select IN arguments as the import type for the request DTD and click OK.
In the Name field, type the root element of the request DTD if it is not populated automatically after importing the request DTD.
Editing the adapter.ini File
Open the adapter.ini file.
Add the following two lines to adapter.ini for the adapter:
// Bridge class
bridge_class=com.iwaysoftware.iwbridge.IWBridge
// IBSE URL
ibse_url=http://hostname:7777/ibse/IBSEServlet/XDSOAPRouter
Where hostname is the URL of the server and 7777 is the port number.
Runtime
Start Oracle Application Server or make sure it is running. Restart OC4J if necessary by executing the following command:
\OracleAS_HOME\opmn\bin\opmnctl  stopproc process-type=home
\OracleAS_HOME\opmn\bin\opmnctl  startproc process-type=home
Start the channel in Application Explorer:

Start both publishing adapter and subscribing adapter by executing the following commands:
\\OracleAS_Home\integration\interconnect\adapters\AQAPP\start.bat
\\OracleAS_Home\integration\interconnect\adapters\PSFTFL\start.bat
Log in to PeopleSoft, select PeopleTools, Integration Broker, and then Node Definitions.
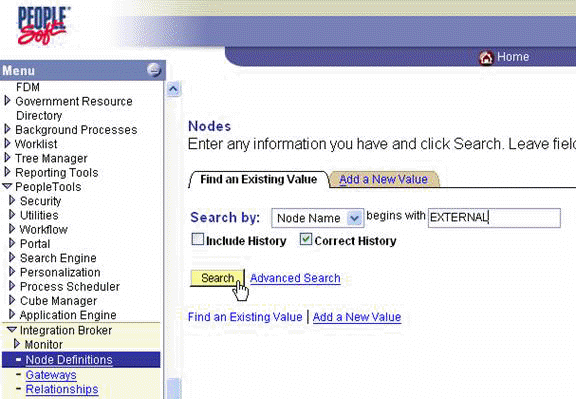
Type the node name you will be using, for example, EXTERNAL; then click Search.
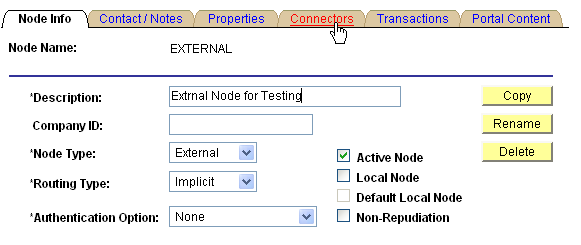
Click the Connectors tab.
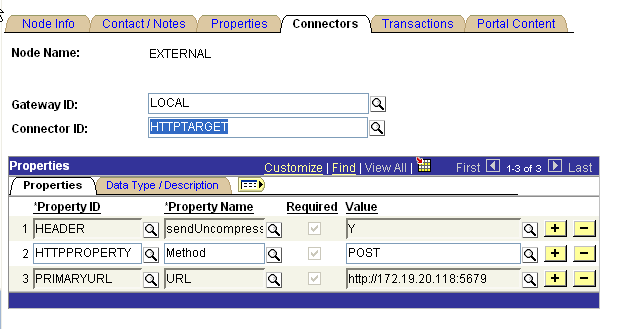
Enter HTTPTARGET in the Connector ID field; then enter the iBSE listener URL and its port in the PRIMARYURL field.
To save the configuration, click Save.
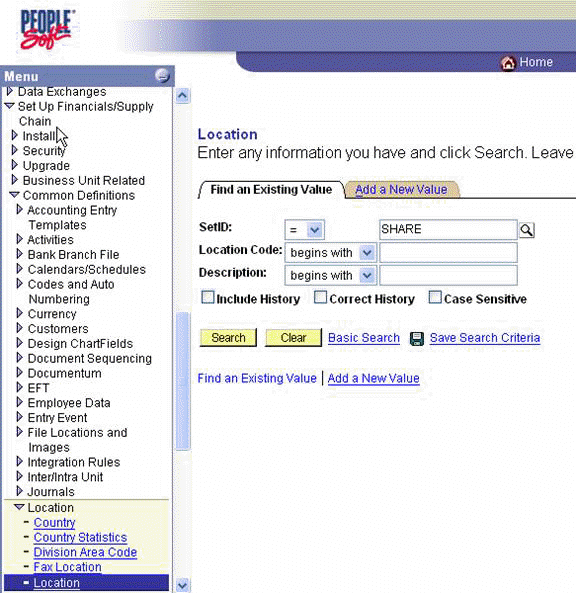
From Menu in the left pane, select Set Up Financials/Supply Chain, Common Definitions, Location, and then Location.
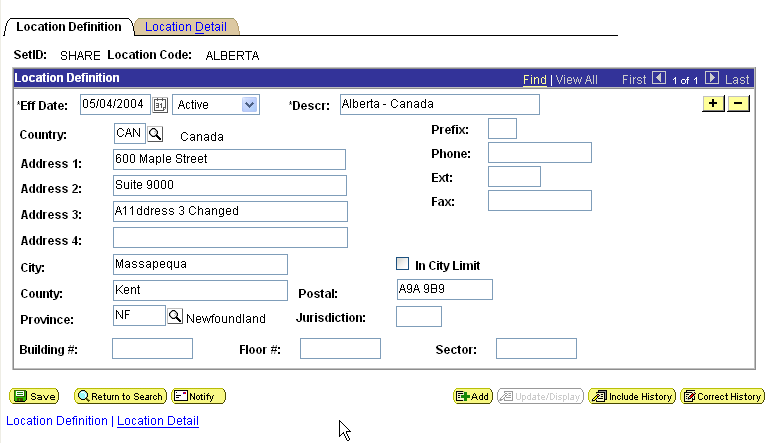
To find the location record you want to update, click Search; then make the changes and click Save.
When the change is saved, it triggers an event and sends the event to the BSE listener.
Verifying Results
The following code is an example of the PSFTFL log file:
Tue Nov 09 20:45:18 GMT-05:00 2004: The message was sent to topic(s) {oai_hub_queue=[AQAPP]}. Processing Time = 10,203 ms.
<?xml version = '1.0' encoding = 'UTF-8'?>
<!DOCTYPE MSG>
<MSG>
<H>
<BO>PSFTFL</BO>
<EN>LOCATION_SYNC</EN>
<EV>OAI/V1</EV>
<MV>OAI/V1</MV>
<T>0</T>
<SN>PSFTFL</SN>
<SA>PSFTFL</SA>
<SAID>41</SAID>
<CI>PSFTFL1100051108265</CI>
</H>
<B>
<AO N = "LOCATION_SYNC_CO">
<AO N = "LOCATION_SYNC">
<AO N = "FieldTypes">
<AO N = "LOCATION_TBL">
<A N = "class">R</A>
<AO N = "SETID">
<A N = "type">CHAR</A>
<A N = "PCDATA"></A>
</AO>
<AO N = "LOCATION">
<A N = "type">CHAR</A>
<A N = "PCDATA"></A>
</AO>
<AO N = "EFFDT">
<A N = "type">DATE</A>
<A N = "PCDATA"></A>
</AO>
<AO N = "EFF_STATUS">
<A N = "type">CHAR</A>
<A N = "PCDATA"></A>
</AO>
<AO N = "DESCR">
<A N = "type">CHAR</A>
<A N = "PCDATA"></A>
</AO>
<AO N = "DESCR_AC">
<A N = "type">CHAR</A>
<A N = "PCDATA"></A>
</AO>
<AO N = "DESCRSHORT">
<A N = "type">CHAR</A>
<A N = "PCDATA"></A>
</AO>
<AO N = "BUILDING">
<A N = "type">CHAR</A>
<A N = "PCDATA"></A>
</AO>
<AO N = "FLOOR">
<A N = "type">CHAR</A>
<A N = "PCDATA"></A>
</AO>
<AO N = "SECTOR">
<A N = "type">CHAR</A>
<A N = "PCDATA"></A>
</AO>
<AO N = "JURISDICTION">
<A N = "type">CHAR</A>
<A N = "PCDATA"></A>
</AO>
<AO N = "ATTN_TO">
<A N = "type">CHAR</A>
<A N = "PCDATA"></A>
</AO>
<AO N = "COUNTRY">
<A N = "type">CHAR</A>
<A N = "PCDATA"></A>
</AO>
<AO N = "ADDRESS1">
<A N = "type">CHAR</A>
<A N = "PCDATA"></A>
</AO>
<AO N = "ADDRESS2">
<A N = "type">CHAR</A>
<A N = "PCDATA"></A>
</AO>
<AO N = "ADDRESS3">
<A N = "type">CHAR</A>
<A N = "PCDATA"></A>
</AO>
<AO N = "ADDRESS4">
<A N = "type">CHAR</A>
<A N = "PCDATA"></A>
</AO>
<AO N = "CITY">
<A N = "type">CHAR</A>
<A N = "PCDATA"></A>
</AO>
<AO N = "NUM1">
<A N = "type">CHAR</A>
<A N = "PCDATA"></A>
</AO>
<AO N = "NUM2">
<A N = "type">CHAR</A>
<A N = "PCDATA"></A>
</AO>
<AO N = "HOUSE_TYPE">
<A N = "type">CHAR</A>
<A N = "PCDATA"></A>
</AO>
<AO N = "ADDR_FIELD1">
<A N = "type">CHAR</A>
<A N = "PCDATA"></A>
</AO>
<AO N = "ADDR_FIELD2">
<A N = "type">CHAR</A>
<A N = "PCDATA"></A>
</AO>
<AO N = "ADDR_FIELD3">
<A N = "type">CHAR</A>
<A N = "PCDATA"></A>
</AO>
<AO N = "COUNTY">
<A N = "type">CHAR</A>
<A N = "PCDATA"></A>
</AO>
<AO N = "STATE">
<A N = "type">CHAR</A>
<A N = "PCDATA"></A>
</AO>
<AO N = "POSTAL">
<A N = "type">CHAR</A>
<A N = "PCDATA"></A>
</AO>
<AO N = "GEO_CODE">
<A N = "type">CHAR</A>
<A N = "PCDATA"></A>
</AO>
<AO N = "IN_CITY_LIMIT">
<A N = "type">CHAR</A>
<A N = "PCDATA"></A>
</AO>
<AO N = "COUNTRY_CODE">
<A N = "type">CHAR</A>
<A N = "PCDATA"></A>
</AO>
<AO N = "PHONE">
Transform: CopyFields
<A N = "type">CHAR</A>
<A N = "PCDATA"></A>
</AO>
<AO N = "EXTENSION">
<A N = "type">CHAR</A>
<A N = "PCDATA"></A>
</AO>
<AO N = "FAX">
<A N = "type">CHAR</A>
<A N = "PCDATA"></A>
</AO>
<AO N = "SETID_SALARY">
<A N = "type">CHAR</A>
<A N = "PCDATA"></A>
</AO>
<AO N = "SAL_ADMIN_PLAN">
<A N = "type">CHAR</A>
<A N = "PCDATA"></A>
</AO>
<AO N = "LANG_CD">
<A N = "type">CHAR</A>
<A N = "PCDATA"></A>
</AO>
<AO N = "HOLIDAY_SCHEDULE">
<A N = "type">CHAR</A>
<A N = "PCDATA"></A>
</AO>
<AO N = "ESTABID">
<A N = "type">CHAR</A>
<A N = "PCDATA"></A>
</AO>
<AO N = "LOCALITY">
<A N = "type">CHAR</A>
<A N = "PCDATA"></A>
</AO>
<AO N = "CAN_CMA">
<A N = "type">CHAR</A>
<A N = "PCDATA"></A>
</AO>
<AO N = "CAN_OEE_AREACD">
<A N = "type">CHAR</A>
<A N = "PCDATA"></A>
</AO>
<AO N = "GEOLOC_CODE">
<A N = "type">CHAR</A>
<A N = "PCDATA"></A>
</AO>
<AO N = "OFFICE_TYPE">
<A N = "type">CHAR</A>
<A N = "PCDATA"></A>
</AO>
<AO N = "NCR_SW_CAN">
<A N = "type">CHAR</A>
<A N = "PCDATA"></A>
</AO>
<AO N = "TBS_OFFICE_CD_CAN">
<A N = "type">CHAR</A>
<A N = "PCDATA"></A>
</AO>
<AO N = "WRKS_CNCL_ID_LCL">
<A N = "type">CHAR</A>
<A N = "PCDATA"></A>
</AO>
<AO N = "SPK_COMM_ID_GER">
<A N = "type">CHAR</A>
<A N = "PCDATA"></A>
</AO>
<AO N = "TARIFF_AREA_GER">
<A N = "type">CHAR</A>
<A N = "PCDATA"></A>
</AO>
<AO N = "TARIFF_GER">
<A N = "type">CHAR</A>
<A N = "PCDATA"></A>
</AO>
<AO N = "INDUST_INSP_ID_GER">
<A N = "type">CHAR</A>
<A N = "PCDATA"></A>
</AO>
<AO N = "NI_REPORT_SW_UK">
<A N = "type">CHAR</A>
<A N = "PCDATA"></A>
</AO>
<AO N = "GVT_GEOLOC_CD">
<A N = "type">CHAR</A>
<A N = "PCDATA"></A>
</AO>
<AO N = "GVT_DESIG_AGENT">
<A N = "type">CHAR</A>
<A N = "PCDATA"></A>
</AO>
<AO N = "SOC_SEC_WRK_CTR">
<A N = "type">CHAR</A>
<A N = "PCDATA"></A>
</AO>
<AO N = "MATRICULA_NBR">
<A N = "type">NUMBER</A>
<A N = "PCDATA"></A>
</AO>
<AO N = "LABEL_FORMAT_ID2">
<A N = "type">CHAR</A>
<A N = "PCDATA"></A>
</AO>
<AO N = "LABEL_FORMAT_ID3">
<A N = "type">CHAR</A>
<A N = "PCDATA"></A>
</AO>
<AO N = "USG_LBL_FORMAT_ID">
<A N = "type">CHAR</A>
<A N = "PCDATA"></A>
</AO>
<AO N = "COMMENTS_2000">
<A N = "type">CHAR</A>
<A N = "PCDATA"></A>
</AO>
<AO N = "REG_REGION">
<A N = "type">CHAR</A>
<A N = "PCDATA"></A>
</AO>
</AO>
<AO N = "PSCAMA">
<A N = "class">R</A>
<AO N = "LANGUAGE_CD">
<A N = "type">CHAR</A>
<A N = "PCDATA"></A>
</AO>
<AO N = "AUDIT_ACTN">
<A N = "type">CHAR</A>
<A N = "PCDATA"></A>
</AO>
<AO N = "BASE_LANGUAGE_CD">
<A N = "type">CHAR</A>
<A N = "PCDATA"></A>
</AO>
<AO N = "MSG_SEQ_FLG">
<A N = "type">CHAR</A>
<A N = "PCDATA"></A>
</AO>
<AO N = "PROCESS_INSTANCE">
<A N = "type">NUMBER</A>
<A N = "PCDATA"></A>
</AO>
<AO N = "PUBLISH_RULE_ID">
<A N = "type">CHAR</A>
<A N = "PCDATA"></A>
</AO>
<AO N = "MSGNODENAME">
<A N = "type">CHAR</A>
<A N = "PCDATA"></A>
</AO>
</AO>
</AO>
<AO N = "MsgData">
<AO N = "Transaction">
<AO N = "LOCATION_TBL">
<A N = "class">R</A>
<AO N = "SETID">
<A N = "PCDATA">SHARE</A>
</AO>
<AO N = "LOCATION">
<A N = "PCDATA">ACT001x</A>
</AO>
<AO N = "EFFDT">
<A N = "PCDATA">2002-07-26</A>
</AO>
<AO N = "EFF_STATUS">
<A N = "PCDATA">A</A>
</AO>
<AO N = "DESCR">
<A N = "PCDATA">Testing PSoft Runtime - 2</A>
</AO>
<AO N = "DESCR_AC">
<A N = "PCDATA"></A>
</AO>
<AO N = "DESCRSHORT">
<A N = "PCDATA"></A>
</AO>
<AO N = "BUILDING">
<A N = "PCDATA">2</A>
</AO>
<AO N = "FLOOR">
<A N = "PCDATA">29</A>
</AO>
<AO N = "SECTOR">
<A N = "PCDATA"></A>
</AO>
<AO N = "JURISDICTION">
<A N = "PCDATA"></A>
</AO>
<AO N = "ATTN_TO">
<A N = "PCDATA"></A>
</AO>
<AO N = "COUNTRY">
<A N = "PCDATA">USA</A>
</AO>
<AO N = "ADDRESS1">
<A N = "PCDATA">2 Pennn Plazaa</A>
</AO>
<AO N = "ADDRESS2">
<A N = "PCDATA"></A>
</AO>
<AO N = "ADDRESS3">
<A N = "PCDATA"></A>
</AO>
<AO N = "ADDRESS4">
<A N = "PCDATA"></A>
</AO>
<AO N = "CITY">
<A N = "PCDATA">New York</A>
</AO>
<AO N = "NUM1">
<A N = "PCDATA"></A>
</AO>
<AO N = "NUM2">
<A N = "PCDATA"></A>
</AO>
<AO N = "HOUSE_TYPE">
<A N = "PCDATA"></A>
</AO>
<AO N = "ADDR_FIELD1">
<A N = "PCDATA"></A>
</AO>
<AO N = "ADDR_FIELD2">
<A N = "PCDATA"></A>
</AO>
<AO N = "ADDR_FIELD3">
<A N = "PCDATA"></A>
</AO>
<AO N = "COUNTY">
<A N = "PCDATA"></A>
</AO>
<AO N = "STATE">
<A N = "PCDATA">NY</A>
</AO>
<AO N = "POSTAL">
<A N = "PCDATA">10121</A>
</AO>
<AO N = "GEO_CODE">
<A N = "PCDATA"></A>
</AO>
<AO N = "IN_CITY_LIMIT">
<A N = "PCDATA"></A>
</AO>
<AO N = "COUNTRY_CODE">
<A N = "PCDATA">212</A>
</AO>
<AO N = "PHONE">
<A N = "PCDATA">736-4433</A>
</AO>
<AO N = "EXTENSION">
<A N = "PCDATA">3694</A>
</AO>
<AO N = "FAX">
<A N = "PCDATA"></A>
</AO>
<AO N = "SETID_SALARY">
<A N = "PCDATA"></A>
</AO>
<AO N = "SAL_ADMIN_PLAN">
<A N = "PCDATA"></A>
</AO>
<AO N = "LANG_CD">
<A N = "PCDATA"></A>
</AO>
<AO N = "HOLIDAY_SCHEDULE">
<A N = "PCDATA"></A>
</AO>
<AO N = "ESTABID">
<A N = "PCDATA"></A>
</AO>
<AO N = "LOCALITY">
<A N = "PCDATA"></A>
</AO>
<AO N = "CAN_CMA">
<A N = "PCDATA"></A>
</AO>
<AO N = "CAN_OEE_AREACD">
<A N = "PCDATA"></A>
</AO>
<AO N = "GEOLOC_CODE">
<A N = "PCDATA"></A>
</AO>
<AO N = "OFFICE_TYPE">
<A N = "PCDATA"></A>
</AO>
<AO N = "NCR_SW_CAN">
<A N = "PCDATA"></A>
</AO>
<AO N = "TBS_OFFICE_CD_CAN">
<A N = "PCDATA"></A>
</AO>
<AO N = "WRKS_CNCL_ID_LCL">
<A N = "PCDATA"></A>
</AO>
<AO N = "SPK_COMM_ID_GER">
<A N = "PCDATA"></A>
</AO>
<AO N = "TARIFF_AREA_GER">
<A N = "PCDATA"></A>
</AO>
<AO N = "TARIFF_GER">
<A N = "PCDATA"></A>
</AO>
<AO N = "INDUST_INSP_ID_GER">
<A N = "PCDATA"></A>
</AO>
<AO N = "NI_REPORT_SW_UK">
<A N = "PCDATA"></A>
</AO>
<AO N = "GVT_GEOLOC_CD">
<A N = "PCDATA"></A>
</AO>
<AO N = "GVT_DESIG_AGENT">
<A N = "PCDATA"></A>
</AO>
<AO N = "SOC_SEC_WRK_CTR">
<A N = "PCDATA"></A>
</AO>
<AO N = "MATRICULA_NBR">
<A N = "PCDATA">0</A>
</AO>
<AO N = "LABEL_FORMAT_ID2">
<A N = "PCDATA"></A>
</AO>
<AO N = "LABEL_FORMAT_ID3">
<A N = "PCDATA"></A>
</AO>
<AO N = "USG_LBL_FORMAT_ID">
<A N = "PCDATA"></A>
</AO>
<AO N = "COMMENTS_2000">
<A N = "PCDATA"></A>
</AO>
<AO N = "REG_REGION">
<A N = "PCDATA"></A>
</AO>
</AO>
</AO>
</AO>
</AO>
</AO>
</B>
</MSG>
Tue Nov 09 20:45:18 GMT-05:00 2004: Outbound Transform Engine: beginning to transform message.
Tue Nov 09 20:45:18 GMT-05:00 2004: Outbound Transform Engine: performing transform.
Subscribing Adapter (AQAPP) Console Log
Tue Nov 09 20:45:11 GMT-05:00 2004: AQ Adapter: received the message from the Agent and will now write it to AQ.
Tue Nov 09 20:45:12 GMT-05:00 2004: AQ Adapter: successfully converted the OAI message to XML
<?xml version = '1.0' encoding = 'UTF-8' standalone = 'yes'?>
<LOCATION_SYNC>
   <FieldTypes>
      <LOCATION_TBL class="R">
         <SETID type="CHAR"></SETID>
         <LOCATION type="CHAR"></LOCATION>
         <EFFDT type="DATE"></EFFDT>
         <EFF_STATUS type="CHAR"></EFF_STATUS>
         <DESCR type="CHAR"></DESCR>
         <DESCR_AC type="CHAR"></DESCR_AC>
         <DESCRSHORT type="CHAR"></DESCRSHORT>
         <BUILDING type="CHAR"></BUILDING>
         <FLOOR type="CHAR"></FLOOR>
         <SECTOR type="CHAR"></SECTOR>
         <JURISDICTION type="CHAR"></JURISDICTION>
         <ATTN_TO type="CHAR"></ATTN_TO>
         <COUNTRY type="CHAR"></COUNTRY>
         <ADDRESS1 type="CHAR"></ADDRESS1>
         <ADDRESS2 type="CHAR"></ADDRESS2>
         <ADDRESS3 type="CHAR"></ADDRESS3>
         <ADDRESS4 type="CHAR"></ADDRESS4>
         <CITY type="CHAR"></CITY>
         <NUM1 type="CHAR"></NUM1>
         <NUM2 type="CHAR"></NUM2>
         <HOUSE_TYPE type="CHAR"></HOUSE_TYPE>
         <ADDR_FIELD1 type="CHAR"></ADDR_FIELD1>
         <ADDR_FIELD2 type="CHAR"></ADDR_FIELD2>
         <ADDR_FIELD3 type="CHAR"></ADDR_FIELD3>
         <COUNTY type="CHAR"></COUNTY>
         <STATE type="CHAR"></STATE>
         <POSTAL type="CHAR"></POSTAL>
         <GEO_CODE type="CHAR"></GEO_CODE>
         <IN_CITY_LIMIT type="CHAR"></IN_CITY_LIMIT>
         <COUNTRY_CODE type="CHAR"></COUNTRY_CODE>
         <PHONE type="CHAR"></PHONE>
         <EXTENSION type="CHAR"></EXTENSION>
         <FAX type="CHAR"></FAX>
         <SETID_SALARY type="CHAR"></SETID_SALARY>
         <SAL_ADMIN_PLAN type="CHAR"></SAL_ADMIN_PLAN>
         <LANG_CD type="CHAR"></LANG_CD>
         <HOLIDAY_SCHEDULE type="CHAR"></HOLIDAY_SCHEDULE>
         <ESTABID type="CHAR"></ESTABID>
         <LOCALITY type="CHAR"></LOCALITY>
         <CAN_CMA type="CHAR"></CAN_CMA>
         <CAN_OEE_AREACD type="CHAR"></CAN_OEE_AREACD>
         <GEOLOC_CODE type="CHAR"></GEOLOC_CODE>
         <OFFICE_TYPE type="CHAR"></OFFICE_TYPE>
         <NCR_SW_CAN type="CHAR"></NCR_SW_CAN>
         <TBS_OFFICE_CD_CAN type="CHAR"></TBS_OFFICE_CD_CAN>
         <WRKS_CNCL_ID_LCL type="CHAR"></WRKS_CNCL_ID_LCL>
         <SPK_COMM_ID_GER type="CHAR"></SPK_COMM_ID_GER>
         <TARIFF_AREA_GER type="CHAR"></TARIFF_AREA_GER>
         <TARIFF_GER type="CHAR"></TARIFF_GER>
         <INDUST_INSP_ID_GER type="CHAR"></INDUST_INSP_ID_GER>
         <NI_REPORT_SW_UK type="CHAR"></NI_REPORT_SW_UK>
         <GVT_GEOLOC_CD type="CHAR"></GVT_GEOLOC_CD>
         <GVT_DESIG_AGENT type="CHAR"></GVT_DESIG_AGENT>
         <SOC_SEC_WRK_CTR type="CHAR"></SOC_SEC_WRK_CTR>
         <MATRICULA_NBR type="NUMBER"></MATRICULA_NBR>
         <LABEL_FORMAT_ID2 type="CHAR"></LABEL_FORMAT_ID2>
         <LABEL_FORMAT_ID3 type="CHAR"></LABEL_FORMAT_ID3>
         <USG_LBL_FORMAT_ID type="CHAR"></USG_LBL_FORMAT_ID>
         <COMMENTS_2000 type="CHAR"></COMMENTS_2000>
         <REG_REGION type="CHAR"></REG_REGION>
      </LOCATION_TBL>
      <PSCAMA class="R">
         <LANGUAGE_CD type="CHAR"></LANGUAGE_CD>
         <AUDIT_ACTN type="CHAR"></AUDIT_ACTN>
         <BASE_LANGUAGE_CD type="CHAR"></BASE_LANGUAGE_CD>
         <MSG_SEQ_FLG type="CHAR"></MSG_SEQ_FLG>
         <PROCESS_INSTANCE type="NUMBER"></PROCESS_INSTANCE>
         <PUBLISH_RULE_ID type="CHAR"></PUBLISH_RULE_ID>
         <MSGNODENAME type="CHAR"></MSGNODENAME>
      </PSCAMA>
   </FieldTypes>
   <MsgData>
      <Transaction>
         <LOCATION_TBL class="R">
            <SETID>SHARE</SETID>
            <LOCATION>ACT001x</LOCATION>
            <EFFDT>2002-07-26</EFFDT>
            <EFF_STATUS>A</EFF_STATUS>
            <DESCR>Testing PSoft Runtime - 2</DESCR>
            <DESCR_AC></DESCR_AC>
            <DESCRSHORT></DESCRSHORT>
            <BUILDING>2</BUILDING>
            <FLOOR>29</FLOOR>
            <SECTOR></SECTOR>
            <JURISDICTION></JURISDICTION>
            <ATTN_TO></ATTN_TO>
            <COUNTRY>USA</COUNTRY>
            <ADDRESS1>2 Pennn Plazaa</ADDRESS1>
            <ADDRESS2></ADDRESS2>
            <ADDRESS3></ADDRESS3>
            <ADDRESS4></ADDRESS4>
            <CITY>New York</CITY>
            <NUM1></NUM1>
            <NUM2></NUM2>
            <HOUSE_TYPE></HOUSE_TYPE>
            <ADDR_FIELD1></ADDR_FIELD1>
            <ADDR_FIELD2></ADDR_FIELD2>
            <ADDR_FIELD3></ADDR_FIELD3>
            <COUNTY></COUNTY>
            <STATE>NY</STATE>
            <POSTAL>10121</POSTAL>
            <GEO_CODE></GEO_CODE>
            <IN_CITY_LIMIT></IN_CITY_LIMIT>
            <COUNTRY_CODE>212</COUNTRY_CODE>
            <PHONE>736-4433</PHONE>
            <EXTENSION>3694</EXTENSION>
            <FAX></FAX>
            <SETID_SALARY></SETID_SALARY>
            <SAL_ADMIN_PLAN></SAL_ADMIN_PLAN>
            <LANG_CD></LANG_CD>
            <HOLIDAY_SCHEDULE></HOLIDAY_SCHEDULE>
            <ESTABID></ESTABID>
            <LOCALITY></LOCALITY>
            <CAN_CMA></CAN_CMA>
            <CAN_OEE_AREACD></CAN_OEE_AREACD>
            <GEOLOC_CODE></GEOLOC_CODE>
            <OFFICE_TYPE></OFFICE_TYPE>
            <NCR_SW_CAN></NCR_SW_CAN>
            <TBS_OFFICE_CD_CAN></TBS_OFFICE_CD_CAN>
            <WRKS_CNCL_ID_LCL></WRKS_CNCL_ID_LCL>
            <SPK_COMM_ID_GER></SPK_COMM_ID_GER>
            <TARIFF_AREA_GER></TARIFF_AREA_GER>
            <TARIFF_GER></TARIFF_GER>
            <INDUST_INSP_ID_GER></INDUST_INSP_ID_GER>
            <NI_REPORT_SW_UK></NI_REPORT_SW_UK>
            <GVT_GEOLOC_CD></GVT_GEOLOC_CD>
            <GVT_DESIG_AGENT></GVT_DESIG_AGENT>
            <SOC_SEC_WRK_CTR></SOC_SEC_WRK_CTR>
            <MATRICULA_NBR>0</MATRICULA_NBR>
            <LABEL_FORMAT_ID2></LABEL_FORMAT_ID2>
            <LABEL_FORMAT_ID3></LABEL_FORMAT_ID3>
            <USG_LBL_FORMAT_ID></USG_LBL_FORMAT_ID>
            <COMMENTS_2000></COMMENTS_2000>
            <REG_REGION></REG_REGION>
         </LOCATION_TBL>
      </Transaction>
   </MsgData>
</LOCATION_SYNC>
This topic illustrates PeopleSoft service integration. The procedures describe design time and runtime.
The following procedures describe how to start the repository and create a common view and then, define invoked and implemented procedures. Then, it describes how to export PL/SQL code from iStudio.
Starting the Repository
To start the repository, double-click the start.bat file located in the following directory:
OracleAS_home\ora92InterCon\oai\9.0.4\repository\start.bat
Creating a Common View
Start Oracle iStudio by double-clicking the start.bat file located in the following directory:
OracleAS_home\ora92iStudio\oai\9.0.4\istudio\iStudio.bat
iStudio opens.

Open a project.
Open Common Views and Business Objects.
Create a Business Object called PSFTFL.

Create a new procedure under PSFTFL and type LOCATION as the procedure name.
Open the DTD generated from Application Explorer and load it.
The Choose Root Element dialog box opens.
Select the root element, PS8, for this example.
Click OK.

Select IN arguments as the import type for the request DTD and click OK.
Import the response DTD, select the root element, and click OK.
The Choose Import Type dialog box opens.

Select OUT arguments as the import type for the response DTD and click OK.
Creating an Invoked Procedure
To create an invoked procedure:
Create a new application called AQAPP.
Right-click Invoked Procedures and select New.
The Invoke Wizard - Select a Procedure window opens.

Click Next.
The Invoke Wizard - Define Application View window opens.

Perform the following steps:
Click Import.
Select Common View.
Click Next.
Click New to create a mapping between the Common View and the Application View for the IN parameters.

Description of the illustration object_copy.gif
In this example, the Application View and the Common View have the same structure. All the attributes can be mapped by using ObjectCopy Transformation.
Click Apply, and then OK.

Click Finish.
You have completed defining the application definition for the invoked procedure.
Defining Queues for AQ
You must create and specify a queue for Advance Queuing (AQ):

To specify the queue in iStudio, select the Deploy tab, Project, Application, AQAPP, Routing, and Application Queues.
Right-click Application Queues and select Edit.

In the Queue Name column, type the queue name, in this example, xml_raw_ql for PSFTFL LOCATION:IN event, and xml_raw_q2 for PSFTFL LOCATION:OUT event.
To finish, click OK.
To create xml_raw_ql and xml_raw_q2 queues, execute the following SQL under the appropriate schema, in this example, the AQAPP schema.
EXECUTE dbms_aqadm.create_queue_table (queue_table => 'RawMsgs_qtab', queue_payload_type => 'RAW', multiple_consumers => FALSE);
EXECUTE dbms_aqadm.create_queue (queue_name => 'xml_raw_q1', queue_table => 'RawMsgs_qtab');
EXECUTE dbms_aqadm.start_queue (queue_name => 'xml_raw_q1');
EXECUTE dbms_aqadm.create_queue (queue_name => 'xml_raw_q2', queue_table => 'RawMsgs_qtab');
EXECUTE dbms_aqadm.start_queue (queue_name => 'xml_raw_q2');
Implementing the Procedure
Create a new application called PSFTFL, expand the application, right-click Implemented Procedure, and select New.

Select LOCATION under PSFTFL as the procedure.
Click Next.
Open the DTD generated from Application Explorer and load it.
The Choose Root Element dialog box opens.
Click OK.

Select IN arguments as the import type for the request DTD and click OK.
In the Name field, type the root element of the request DTD if it is not populated automatically after importing the request DTD.
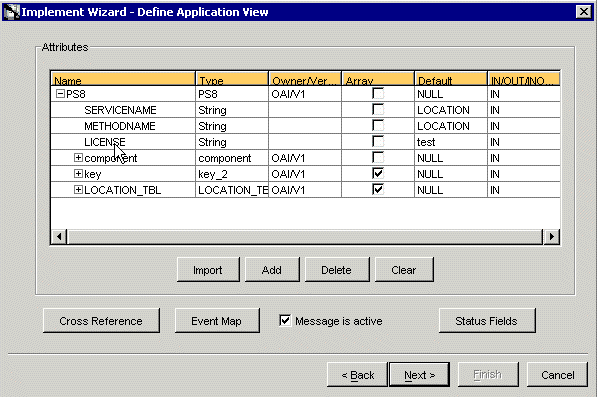
Import the response DTD, select PS8 as the root element, and then click OK.
Select OUT arguments as the Import Type for the response.

You have now imported both request and response DTDs into iStudio.
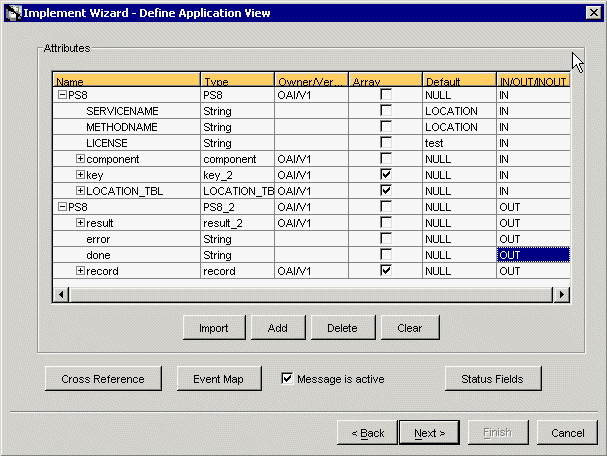
To define a mapping between the Application View and the Common View, click Next and then New.
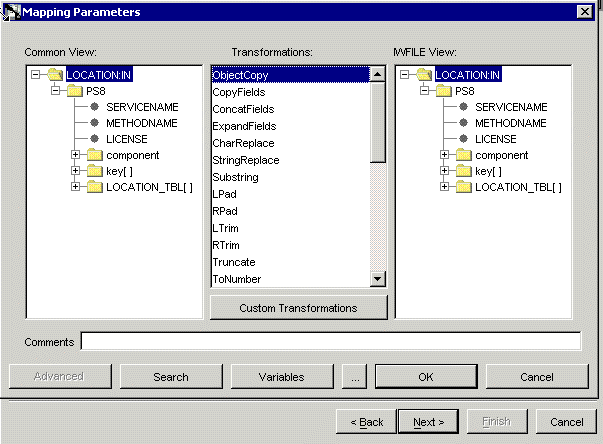
Because the structures are the same, use ObjectCopy transformation for the mapping.
Click Apply and then OK.
Click Next to define the mapping for OUT arguments, using the ObjectCopy transformation.
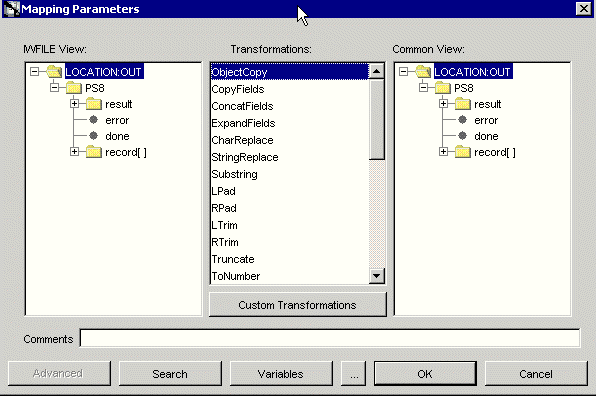
To complete the definition of the implemented procedure, click Next and then Finish.
Editing the adapter.ini File
Open the adapter.ini file.
Add the following two lines to adapter.ini for the adapter:
// Bridge class
bridge_class=com.iwaysoftware.iwbridge.IWBridge

// IBSE URL
ibse_url=http://hostname:7777/ibse/IBSEServlet/XDSOAPRouter
Where hostname is the URL of the server and 7777 is the port number.
The following topic describes how to verify service integration using OracleAS Adapter for PeopleSoft.
Verifying Service Integration
To verify service integration:
Start Oracle Application Server or ensure that the server is running.
Restart OC4J, if required, by executing the following command:
\OracleAS_home\opmn\bin\opmnctl  stopproc process-type=home
\OracleAS_home\opmn\bin\opmnctl  startproc process-type=home
Check the status of OC4J by executing the following command:
\OracleAS_home\opmn\bin\opmnctl status
Invoke and implement the adapter by executing the following commands:
\InterConnect_HOME\oai\9.0.4\adapters\PSFTFL\start.bat
\InterConnect_HOME\oai\9.0.4\adapters\AQAPP\start.bat
Log on to SQL*Plus with AQAPP, in this example, and execute the following command:
DECLARE
      enqueue_options     dbms_aq.enqueue_options_t;
      message_properties  dbms_aq.message_properties_t;
      msgid               RAW(16);
      payload             RAW(5000);
BEGIN
      payload := utl_raw.cast_to_raw('<?xml version="1.0" encoding="UTF-8"?>
<PS8 SERVICENAME="LOCATION" METHODNAME="LOCATION" LICENSE="test">
	<component perform="browse">LOCATION</component>
	<key name="SETID">SHARE</key>
	<key name="LOCATION">ALBERTA</key>
</PS8>');
      dbms_aq.enqueue(queue_name         => 'xml_raw_q1',
                      enqueue_options    => enqueue_options,
                      message_properties => message_properties,
                      payload            => payload,
                      msgid              => msgid);
      COMMIT;
END;
/
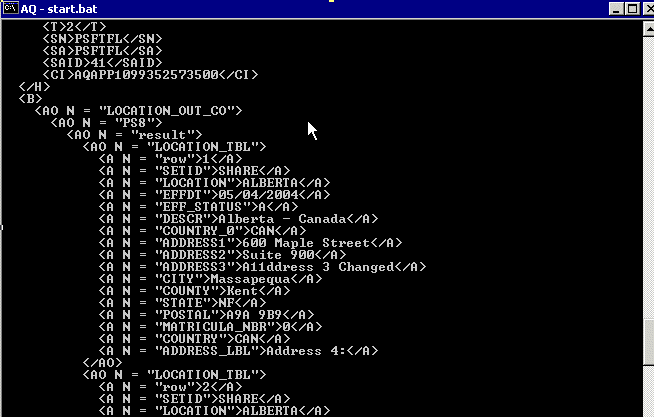
The following image shows the PSFTFL example. It receives a reply from PeopleSoft and returns the reply to the hub.
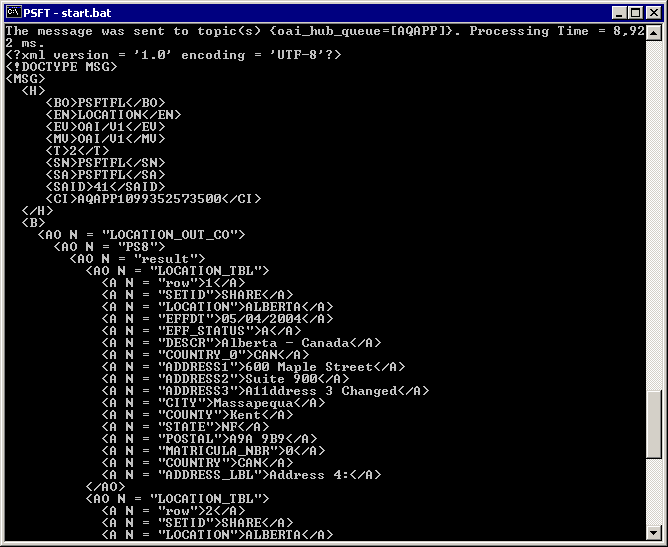
The following image shows the AQ example. It receives a reply from the hub and writes the data to the database table.
