|
Oracle® BPEL Process Manager Quick Start Guide
10g Release 2 (10.1.2) B15604-02 |
|
 Previous |
 Next |
|
Oracle® BPEL Process Manager Quick Start Guide
10g Release 2 (10.1.2) B15604-02 |
|
 Previous |
 Next |
This tutorial describes how to design and execute a more sophisticated BPEL process than the one you created in Chapter 2, "Credit Flow Tutorial". Fault-handling, interaction with asynchronous services, parallel flows of execution, and decision making logic are all key requirements for many business flows. This tutorial enables you to design, test, debug, and manage a BPEL process that implements all of these requirements.
This tutorial contains these topics:
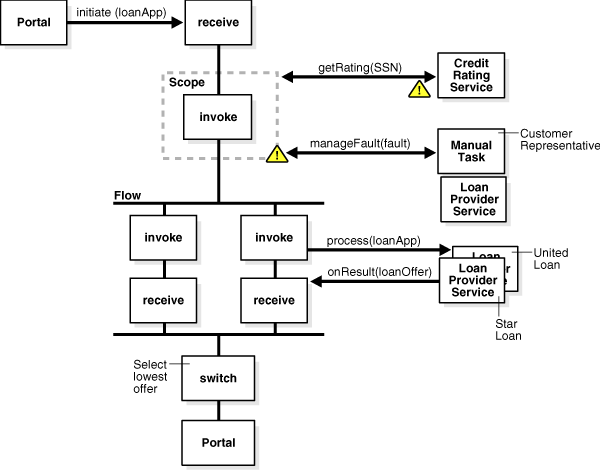
In this tutorial, you design a process that takes a loan application document from a client and returns a selected and approved loan offer. When you run this process, it retrieves a social security number that you enter into an HTML user interface and contacts the Credit Rating service to request a credit rating for the client. If a credit rating is supplied, the process sends the completed loan application to two loan providers (Star Loan and United Loan). Each provider can take some time before returning loan offers. The flow waits for both loan offers to be received before selecting the offer with the lowest interest rate to send to the client.
The process can also be designed to handle negative credit exceptions. These exceptions are made known by the credit rating service if a negative credit event is identified for the client (for example, a bankruptcy).
Figure 3-1 provides an overview of this communication:
Figure 3-1 Loan Process Tutorial Overview
This tutorial contains these topics:
Creating and Configuring a Partner Link for the Credit Rating Service
Creating and Configuring Partner Links for the Asynchronous United Loan and Star Loan Services
Adding Error Handling Capabilities to the Loan Process (Optional)
|
Note: Save frequently to ensure that you do not lose any changes. |
Ensure that Oracle BPEL Server and JDeveloper BPEL Designer are started. See "Starting Oracle BPEL Server and JDeveloper BPEL Designer" for instructions.
During this tutorial, the BPEL process that you design communicates with the Credit Rating service and the Star Loan and United Loan provider services described in "Loan Process Introduction". You must first start these services and test that they are running.
Select Start > All Programs > Oracle - Oracle_Home > Oracle BPEL Process Manager 10.1.2 > Developer Prompt to open up a command prompt at the Oracle_Home\integration\orabpel\samples directory.
Change directories to the demos\LoanDemo subdirectory:
cd demos\LoanDemo
Enter the following command:
obant
This deploys and starts the required services for using this tutorial. If successful, a message similar to the following appears at the end:
deployLoanFlowUI:all:BUILD SUCCESSFULTotal time: 1 minute 25 secondsC:\oranew\integration\orabpel\samples\demos\LoanDemo>ENDLOCAL
Log into Oracle BPEL Console by selecting Start > All Programs > Oracle - Oracle_Home > Oracle BPEL Process Manager 10.1.2 > BPEL Console.
Enter bpel as the password when prompted.
All services for this tutorial are running if the following names display in the Dashboard tab.
CreditRatingService
LoanFlow
StarLoan
TaskActionHandler
TaskManager
UnitedLoan
You must create a project to begin. Follow these instructions to create a new Loan Process project inside the same myBPELworkspace workspace you created in "Creating a Workspace and a Project". If you have not yet created a workspace, see that section for instructions.
Right-click myBPELworkspace in the Applications Navigator section of JDeveloper BPEL Designer.
Select New Project.
Double-click BPEL Process Project in the Items window to display the BPEL Process Project window.
Enter myLoanProcess in the BPEL Process Name field. All other fields default to the correct values for creating an asynchronous BPEL process.
Click OK.
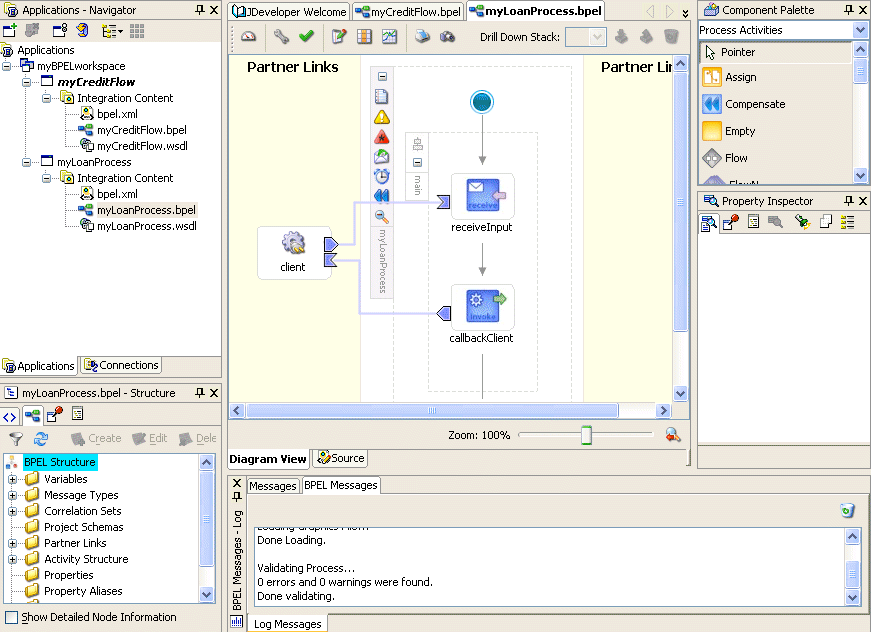
The following sections appear. If these do not appear, click Diagram View and double-click myLoanProcess.bpel in the Applications Navigator section. See the Oracle BPEL Process Manager Developer's Guide for a description of JDeveloper BPEL Designer sections.
Use an ASCII text editor to copy and paste the following syntax into a file:
<?xml version="1.0"?>    <schema attributeFormDefault="qualified" elementFormDefault="qualified"
 targetNamespace="http://www.autoloan.com/ns/autoloan"
 xmlns="http://www.w3.org/2001/XMLSchema"
 xmlns:s1="http://www.autoloan.com/ns/autoloan">
          <element name="loanApplication" type="s1:LoanApplicationType"/>
          <element name="loanOffer" type="s1:LoanOfferType"/>

          <complexType name="LoanOfferType">
              <sequence>
                <element name="providerName" type="string"/>
                <element name="selected" type="boolean"/>
                <element name="approved" type="boolean"/>
                <element name="APR" type="double"/>
              </sequence>

          </complexType>
          <complexType name="LoanApplicationType">
              <sequence>
                <element name="SSN" type="string"/>
                <element name="email" type="string"/>
                <element name="customerName" type="string"/>
                <element name="loanAmount" type="double"/>
                <element name="carModel" type="string"/>
                <element name="carYear" type="string"/>
                <element name="creditRating" type="int"/>
              </sequence>
          </complexType>
    </schema>
Save the file to Oracle_Home\integration\jdev\jdev\mywork\myBPELworkspace\myLoanProcess\Loanflow.xsd.
Go to the Structure section on the lower left side of JDeveloper BPEL Designer. If this section does not appear, double-click myLoanProcess.bpel in the Applications Navigator.
Right-click Project Schemas.
Select Import Schema to display the Import Schema window.
Click the flashlight icon to access the Open window.
Select Loanflow.xsd from the directory in which you saved it in Step 2 and click Open.
The file is added to the URL field of the Import Schema window.
Click OK.
The Loanflow.xsd file now displays in both the Applications Navigator section (under myLoanProcess > Web Content > Miscellaneous Files) and the Structure section (under Project Schemas).
Select and right-click Message Types in the Structure tree.
Select Expand All Child Nodes.
Select myLoanProcessRequestMessage > payload.
Right-click payload and select Edit Message Part.
Click Element and click the flashlight icon to display the Type Chooser window.
Select Project Schema Files > Loanflow.xsd > loanApplication.
Click OK to close the Type Chooser window and Edit Message Part window.
Select myLoanProcessResponseMessage > payload.
Right-click payload and select Edit Message Part.
Click Element and click the flashlight icon to display the Type Chooser window.
Select Project Schema Files > Loanflow.xsd > loanOffer.
Click OK to close the Type Chooser window and Edit Message Part window.
Select Save from the File main menu.
You now create and configure a partner link for the synchronous Credit Rating service.
This section contains these tasks:
|
Note: As you drag and drop activities, create partner links, create variables, and so on, the project files that display in the Applications Navigator section are also updated. If you want, you can click Source for the selected project file to view the syntax changes. However, do not manually edit these files. |
|
Summary: Partner links define the external services with which your BPEL process interacts. You must create a partner link for the Credit Rating service. |
Ensure that Process Activities is selected in the drop-down list of the Component Palette section.
Drag and drop a PartnerLink activity onto the right side of JDeveloper BPEL Designer.
Enter the following values to create a partner link for the Credit Rating service:
|
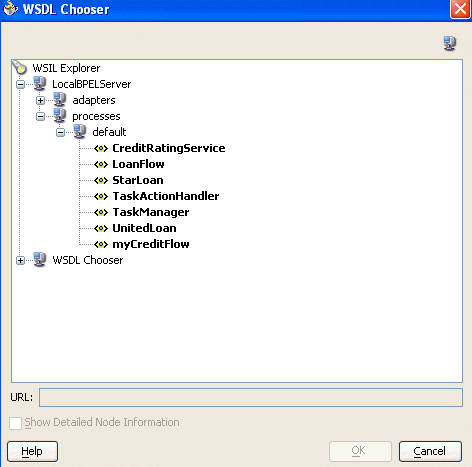
Note: For the WSDL File field below, click the flashlight (the second icon from the left named WSIL Browser) to access the WSDL Chooser window shown below for automatically selecting the Credit Rating service deployed in "Starting and Testing Your Services". |
| Field | Value |
|---|---|
| Name | CreditRatingService |
| WSDL File | Access this URL by clicking the WSIL Browser flashlight icon and expanding and selecting LocalBPELServer > processes > default > CreditRatingService.
http://localhost:9700/orabpel/default/CreditRatingService/CreditRatingService?wsdl See Also: "Setting the Hostname in Your Web Browser Preferences" if you receive a parsing error when attempting to add a WSDL file in the WSDL Chooser window. |
| Partner Link Type | CreditRatingService |
| My Role | Leave unspecified. |
| Partner Role | CreditRatingServiceProvider |
Click OK.
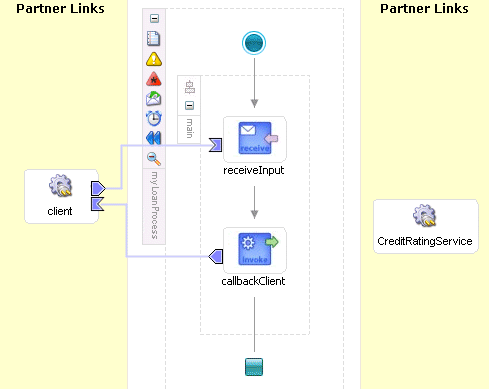
The CreditRatingService partner link now appears on the right side of JDeveloper BPEL Designer.
Go to the Component Palette section in the upper right part of JDeveloper BPEL Designer.
Drag and drop a Scope activity between the receiveInput and callbackClient activities that were automatically created with your BPEL project.
Double-click the Scope activity to display the Scope window.
Enter GetCreditRating in the Name field of the General tab.
Click OK.
Click the + sign to expand the GetCreditRating Scope activity.
Select Save from the File main menu.
|
Summary: You create an Invoke activity in this section. An Invoke activity enables you to specify the operation you want to invoke for the service (identified by its partner link). You can also create variables in an Invoke activity.This Invoke activity provides the initial interaction operation between the client and the Credit Rating service. |
Drag and drop an Invoke activity from the Component Palette section into the GetCreditRating Scope activity.
Double-click the Invoke icon to display the Invoke window.
Enter the following details:
| Field | Value |
|---|---|
| Name | invokeCR |
| Partner Link | CreditRatingService |
The Operation (process) field is automatically filled in.
Click the first icon to the right of the Input Variable field. This is the automatic variable creation icon.

Click OK on the Create Variable window that appears.
A variable named invokeCR_process_InputVariable is automatically created in the Input Variable field. This variable is automatically assigned a message type of CreditRatingServiceRequestMessage.
Click the first icon to the right of the Output Variable field.
Click OK on the Create Variable window that appears.
A variable named invokeCR_process_OutputVariable is automatically created in the Output Variable field. This variable is automatically assigned a message type of CreditRatingServiceResponseMessage.
Click OK.
Select Save from the File main menu.
Drag and drop an Assign activity from the Component Palette section to above the invokeCR Invoke activity and inside the Scope activity.
Double-click the Assign icon to display the Assign window.
Enter assignSSN in the Name field of the General tab.
Click Apply.
Click the Copy Rules tab.
Click Create to display the Create Copy Rule window.
Enter the following details:
| Field | Value |
|---|---|
| From |
|
|
Variable |
|
Expand and select Variables > inputVariable > payload > ns1:loanApplication > ns1:SSN
Note: The namespace number values (for example, ns1, ns2) can vary. Use the namespace values that automatically appear. |
| To |
|
|
Variable |
|
Expand and select Variables > invokeCR_process_InputVariable > payload > ns2:ssn |
Click OK to close the Create Copy Rule window and the Assign window.
Select Save from the File main menu.
|
Summary: This Assign activity returns details about the client's assigned credit rating. If the credit rating query did not identify a bad credit history (such as a bankruptcy), the client's loan application request document is ready to be sent to the Star Loan and United Loan service providers. |
Drag and drop a second Assign activity from the Component Palette section to below the invokeCR Invoke activity and inside the Scope activity.
Double-click the Assign icon to display the Assign window.
Enter assignCreditRating in the Name field of the General tab.
Click Apply.
Click the Copy Rules tab.
Click Create to display the Create Copy Rule window.
Enter the following details:
| Field | Value |
|---|---|
| From |
|
|
Variable |
|
Expand and select Variables > InvokeCR_process_OutputVariable > payload > ns2:rating
Note: The namespace number values (for example, ns1, ns2) can vary. Use the namespace values that automatically appear. |
| To |
|
|
Variable |
|
Expand and select Variables > inputVariable > payload > ns1:loanApplication > ns1:creditRating |
Click OK to close the Create Copy Rule window and the Assign window.
The Scope activity (when expanded) now displays the following details:
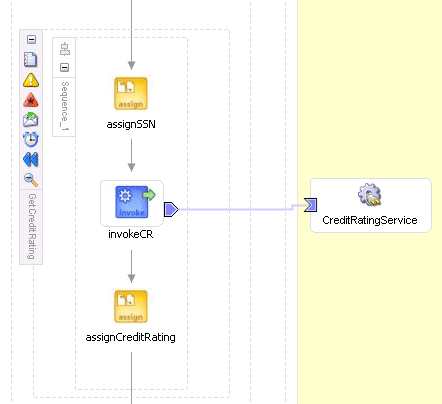
Click the - sign to close the GetCreditRating Scope activity.
Select Save from the File main menu.
You now create and configure partner links for the asynchronous Star Loan and United Loan Rating service loan providers.
This section contains these tasks:
Creating Partner Links for the United Loan and Star Loan Services
Creating Invoke and Receive Activities for the Star Loan Service
Creating Invoke and Receive Activities for the United Loan Service
|
Caution: Do not include any special characters in activity or element names (such as periods). If you do include special characters, errors appear when you attempt to compile your project. |
Drag and drop a PartnerLink activity from the Component Palette section onto the right side of JDeveloper BPEL Designer.
Enter the following values to create a partner link for the United Loan provider:
|
Note: For the WSDL File field below, click the flashlight (the second icon from the left named WSIL Browser) to access the WSDL Chooser window for automatically selecting the United Loan service deployed in "Starting and Testing Your Services". |
| Field | Value |
|---|---|
| Name | UnitedLoanService |
| WSDL File | Access this URL by clicking the WSIL Browser flashlight icon and expanding and selecting LocalBPELServer > processes > default > UnitedLoan.
http://localhost:9700/orabpel/default/UnitedLoan/UnitedLoan?wsdl |
| Partner Link Type | LoanService |
| My Role | LoanServiceRequester |
| Partner Role | LoanServiceProvider |
Click OK.
Drag another PartnerLink activity from the Component Palette section. However, drop it onto the left side of JDeveloper BPEL Designer this time. This is not a requirement. However, it makes it easier to view the BPEL process interaction with the three partner links in JDeveloper BPEL Designer when you are done.
Enter the following values to create a partner link for the Star Loan provider:
| Field | Value |
|---|---|
| Name | StarLoanService |
| WSDL File | Access this URL by clicking the WSIL Browser flashlight icon and expanding and selecting LocalBPELServer > processes > default > StarLoan.
http://localhost:9700/orabpel/default/StarLoan/StarLoan?wsdl |
| Partner Link Type | LoanService |
| My Role | LoanServiceRequester |
| Partner Role | LoanServiceProvider |
Click OK.
The three partner links now appear as follows in JDeveloper BPEL Designer.
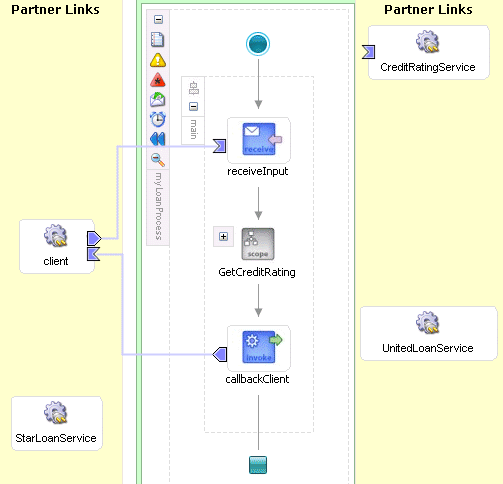
Select Save from the File main menu.
|
Summary: If you accidently created the Star Loan and United Loan partner links on the same side of JDeveloper BPEL Designer, right-click the StarLoanService partner link, and select Move To Opposite Swim Lane. |
|
Summary: Within this Scope activity, the client's loan application document is submitted to the Star Loan and United Loan service providers. Both loan providers submit offers, of which the best offer is returned to the client. |
Drag and drop a second Scope activity from the Component Palette section to below the GetCreditRating Scope activity.
Double-click the Scope activity.
Enter GetLoanOffers in the Name field of the General tab.
Click OK.
Select Save from the File main menu.
Click the + sign to expand the GetLoanOffers Scope activity.
Drag and drop a Flow activity from the Component Palette section into the GetLoanOffers Scope activity.
Double-click the diamond to display the Flow window.

Enter FlowInvokeProviders.
Click OK.
JDeveloper BPEL Designer now looks as follows:
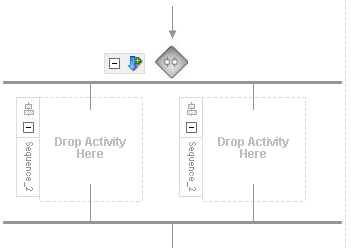
Note that the FlowInvokeProviders name does not appear when the Flow activity is expanded. You must click the - sign to display the FlowInvokeProviders name.
Select Save from the File main menu.
Drag and drop an Invoke activity into the left side of the Flow activity.
Double-click the Invoke icon to display the Invoke window.
Enter the following details:
| Field | Value |
|---|---|
| Name | invokeStarLoan |
| Partner Link | StarLoanService |
The Operation (initiate) field is automatically filled in.
|
Note: The Output Variable field is disabled. This is because only a single input variable is received. |
Click the first icon to the right of the Input Variable field. This is the automatic variable creation icon.
Click OK on the Create Variable window that appears.
A variable named invokeStarLoan_initiate_InputVariable is automatically created in the Input Variable field. This variable is automatically assigned a message type of LoanServiceRequestMessage.
Click the flashlight (the second icon) to the right of the Input Variable field to display the Variable Chooser window.
Right-click invokeStarLoan_initiate_InputVariable.
Select Edit Variable.
Rename it to loanApplication. You perform this task because the loanApplication variable is passed to Receive activities for both the Star Loan and United Loan services. The best offer is determined and returned to the client.
Click OK to close the Edit Variable window, Variable Chooser window, and Invoke window.
Drag and drop a Receive activity below the invokeStarLoan Invoke activity you just created.
Double-click the Receive icon to display the Receive window.
Enter the following details:
| Field | Value |
|---|---|
| Name | receiveStarOffer |
| Partner Link | StarLoanService |
| Create Instance | Leave this box unchecked. |
The Operation (onResult) field is automatically filled in.
Click the first icon to the right of the Variable field.
Click OK on the Create Variable window that appears.
A variable named receiveStarOffer_onResult_InputVariable is automatically created in the Variable field. This variable is automatically assigned a message type of LoanServiceResultMessage.
Click OK.
Select Save from the File main menu.
The Flow activity now looks as follows:
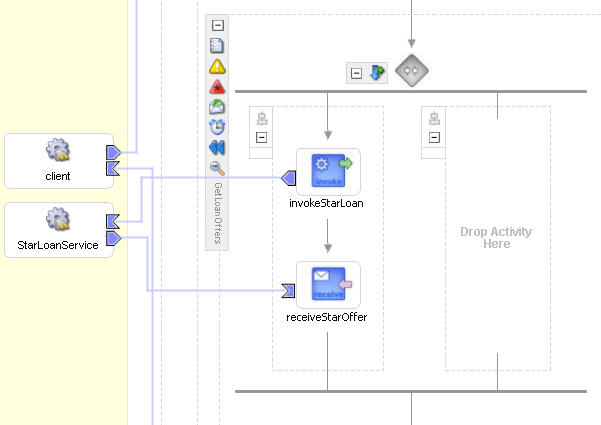
|
Summary: This Invoke activity invokes the operation between the client's loan application document and the United Loan service loan provider.This Receive activity returns the loan offer results from the United Loan service loan provider. |
Drag and drop an Invoke activity into the right side of the Flow activity where it says Drop Activity Here.
Double-click the Invoke icon to display the Invoke window.
Enter the following details:
| Field | Value |
|---|---|
| Name | invokeUnitedLoan |
| Partner Link | UnitedLoanService |
The Operation (initiate) field is automatically filled in.
|
Note: The Output Variable field is disabled. This is because only a single variable is received. |
Click the flashlight icon (the second icon) to the right of the Input Variable field. This displays the Variable Chooser window. We reuse the loanApplication variable for this activity.
Select loanApplication.
Click OK to close the Variable Chooser window and Invoke window.
Drag and drop a Receive activity below the invokeUnitedLoan Invoke activity you just created.
Double-click the Receive icon to display the Receive window.
Enter the following details:
| Field | Value |
|---|---|
| Name | receiveUnitedOffer |
| Partner Link | UnitedLoanService |
| Create Instance | Leave this box unchecked. |
The Operation (onResult) field is automatically filled in.
Click the first icon to the right of the Variable field.
Click OK on the Create Variable window that appears.
A variable named receiveUnitedOffer_onResult_InputVariable is automatically created in the Variable field. This variable is automatically assigned a message type of LoanServiceResultMessage.
Click OK.
Select Save from the File main menu.
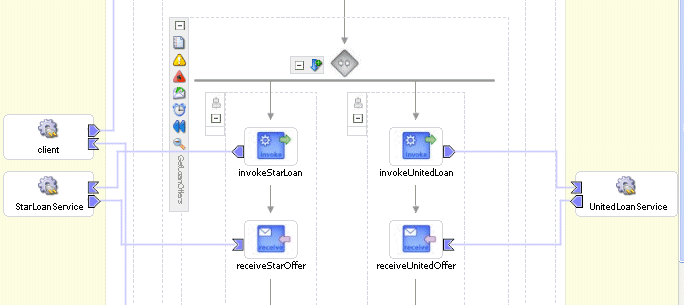
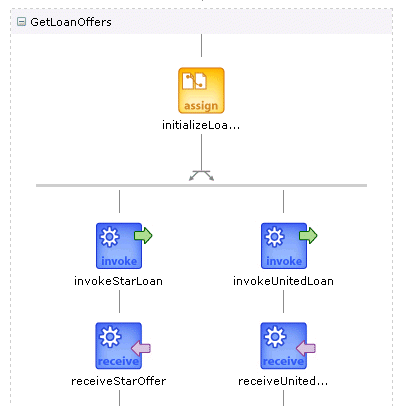
The Flow activity now displays the following details. This activity passes the loan application document as an input variable to the initiate operations for the United Loan and Star Loan services. These initiate operations return immediately, but the next activity, the Receive activity for the onResult callback, waits until the service has called back with a loan offer.
|
Summary: This Assign activity takes the client's loan application document and sends it to the Star Loan and United Loan service loan providers. |
Drag and drop an Assign activity from the Component Palette section inside the GetLoanOffers Scope activity and above the Flow activity (above the diamond).
Double-click the Assign activity.
Enter initializeLoanApplication in the Name field of the General tab.
Click Apply.
Click the Copy Rules tab.
Click Create to display the Create Copy Rule window.
Enter the following details:
| Field | Value |
|---|---|
| From |
|
|
Variable |
|
Expand and select Variables > inputVariable > payload |
| To |
|
|
Variable |
|
Expand and select Variables > loanApplication > payload |
Click OK to close the Create Copy Rule window and the Assign window.
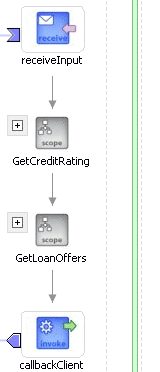
Click all - signs to close the Flow activity and Scope activity. When all are closed, your BPEL process flow displays the following details:
Select Save from the File main menu.
You now add a Switch activity to the GetLoanOffers Scope activity.
Click the + sign to expand the GetLoanOffers Scope activity.
Drag and drop a Switch activity from the Component Palette section into the GetLoanOffers Scope activity and below the FlowInvokeProviders Flow activity.
Double-click the question mark for the Switch activity to display the Switch window.
Enter GetBestOffer in the Name field.
Click OK.
Double-click <case> to display the Switch Case window.
Press Ctrl and then the space bar in the Expression field to display a list for selecting (double-clicking) the following syntax. Edit as necessary. As you enter information, a trailing slash can appear. This means you are being prompted for additional information. Either enter additional information, or press the Esc key and delete the trailing slash to complete the input of information.
bpws:getVariableData('receiveStarOffer_onResult_InputVariable','payload','/ns1:loanOffer/ns1:APR') > bpws:getVariableData('receiveUnitedOffer_onResult_InputVariable','payload','/ns1:loanOffer/ns1:APR')
Note that the syntax you added does not explicitly display when you view the <case> icon in the flow. (See Step 24.) If you want to view this syntax, double-click <case>. The syntax you entered displays in the Expression field.
Drag and drop an Assign activity from the Component Palette section into the <case> section of this Switch activity.
|
Summary: This Assign activity takes the United Loan offer and, if it is the best offer, submits it to the client. The syntax you defined in the Expression field in Step 7 determines the best offer. |
Double-click the Assign activity.
Enter PickUnited in the Name field of the General tab.
Click Apply.
Click the Copy Rules tab.
Click Create to display the Create Copy Rule window.
Enter the following details:
| Field | Value |
|---|---|
| From |
|
|
Variable |
|
Expand and select Variables > receiveUnitedOffer_onResult_InputVariable > payload |
| To |
|
|
Variable |
|
Expand and select Variables > outputVariable > payload |
Click OK to close the Create Copy Rule window and the Assign window.
Drag and drop an Assign activity from the Component Palette section into the <otherwise> section of this Switch activity.
|
Summary: This Assign activity takes the Star Loan offer and, if it is the best offer, submits it to the client. The syntax you defined in the Expression field in Step 7 determines the best offer. |
Double-click the Assign activity.
Enter PickStar in the Name field of the General tab.
Click Apply.
Click the Copy Rules tab.
Click Create to display the Create Copy Rule window.
Enter the following details:
| Field | Value |
|---|---|
| From |
|
|
Variable |
|
Expand and select Variables > receiveStarOffer_onResult_InputVariable > payload |
| To |
|
|
Variable |
|
Expand and select Variables > outputVariable > payload |
Click OK to close the Create Copy Rule window and the Assign window.
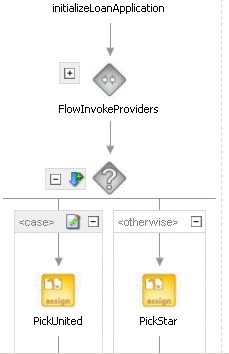
The Switch activity displays the following details:
Select Save from the File main menu.
You have now completed the loan process design and are ready to proceed to the validation, compilation, and deployment tasks described in the following section.
You are now ready to deploy your BPEL process.
Go to the Applications Navigator section.
Right-click myLoanProcess.
Select Deploy > LocalBPELServer > Deploy to default domain.
Enter bpel when prompted for the domain password.
Click OK.
This compiles the BPEL process. Review the bottom of the window for any errors. If there are no errors, the following message appears:
[3:43:31 PM] Successful compilation: 0 errors, 0 warnings.
Deploying to http://localhost:9700 domain: default. Please wait ...
            bpel_myLoanProcess_1.0.jar deployed successfully.
If there are errors, click BPEL Validation Errors to display details about the type and location of the error.
Make corrections and deploy again.
You are now ready to begin the process of applying for and receiving a loan offer.
Log into Oracle BPEL Console by selecting Start > All Programs > Oracle - Oracle_Home > Oracle BPEL Process Manager 10.1.2 > BPEL Console.
Enter bpel as the password when prompted.
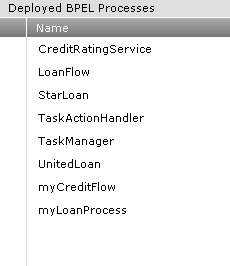
The Dashboard tab of Oracle BPEL Console appears. These are the services that you started and verified in Step 5 of "Starting and Testing Your Services". Note that your BPEL process, myLoanProcess, now appears in the Deployed BPEL Processes list.
Click myLoanProcess in the Deployed BPEL Processes list.
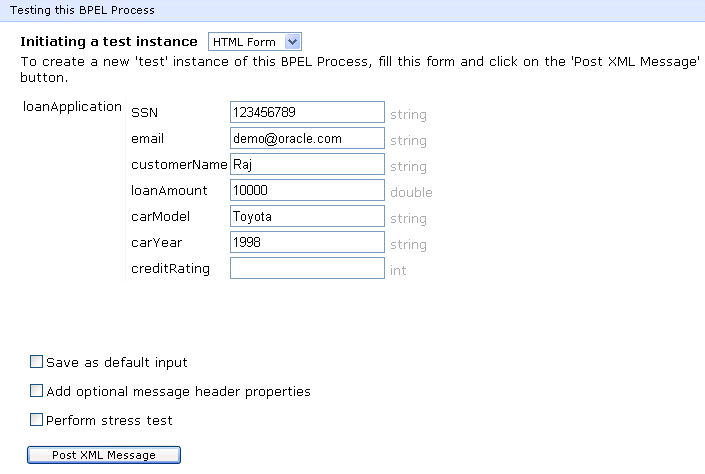
The loan application form appears. Note that the form includes a social security number field. At the beginning of the execution of this process, the social security number you enter is retrieved and the Credit Rating service is contacted to request a credit rating for you.
Complete the loan application form. Ensure that you enter a social security number that does not begin with zero in the SSN field of the HTML Form and click Post XML Message.
Go to the following URL for the Star Loan service loan provider to enter an APR value:
http://localhost:9700/StarLoanUI
The loan approval typically takes several minutes to display. Refresh as necessary.
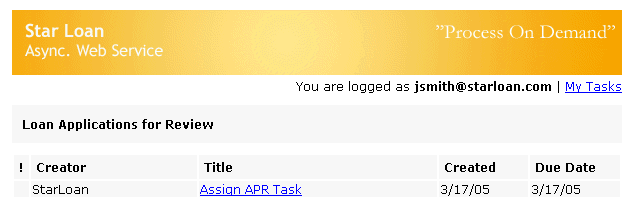
Click Assign APR Task.
Enter an APR value that is more than 5.75% or less than 5.7% in the APR field.
Click Approve.
The following message appears:
Assign APR Task has been completed
Return to Oracle BPEL Console.
Click the Instances tab to access details about this running process instance.
Click the latest instance of myLoanProcess in the Instance column.

A message indicates that the state of the instance is completed.
Click the Flow link.
A visual representation of the history of this process instance flow appears. This represents a view of the current state and history of the execution of this process flow instance. You can select activities to view details.
Scroll through the flow.
Continue scrolling and click the callbackClient activity at the end of the flow to see the results of the loan offer, including the best credit rating returned by the Credit Rating service to the client.
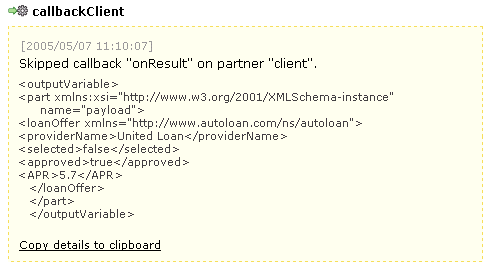
You have now completed running the loan process. You can continue to explore the features of Oracle BPEL Console.
Now that you have designed, validated, compiled, deployed, and run a process, you can add optional error handling functionality to handle rejections (for example, due to a bankruptcy).
This section contains these tasks:
Creating a Catch Branch in the GetCreditRating Scope Activity
Creating an Assign Activity Inside the Catch Branch of the Scope Activity
Creating an Invoke Activity Inside the Catch Branch of the Scope Activity
Creating a Terminate Activity Inside the Catch Branch of the Scope Activity
|
Summary: You create fault handling to catch and manage exceptions identified by the credit rating service. Fault handlers are associated with a particular Scope activity and faults encountered within a scope are passed up to this enclosing Scope activity. |
Go to the Structure section of JDeveloper BPEL Designer.
Select Variables > Process > Variables.
Right-click Variables and select Create Variable to display the Create Variable window.
Enter crError in the Name field.
Select Message Type and click the flashlight to display the Type Chooser window.
Select Message Types > Partner Links > CreditRatingService > CreditRatingService > Message Types > CreditRatingServiceFaultMessage.
Click OK to close the Type Chooser window and Create Variable window.
Select Save from the File main menu.
Click the + sign to expand the GetCreditRating Scope activity.
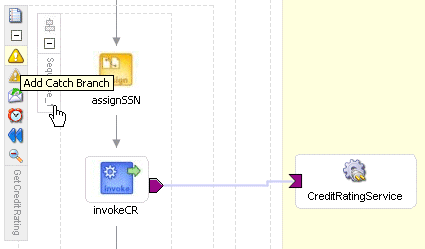
Click Add Catch Branch near the top of the icons (fourth icon) on the left side of GetCreditRating.
A new box displays to the right with an exclamation point and the words Drop Activity Here.
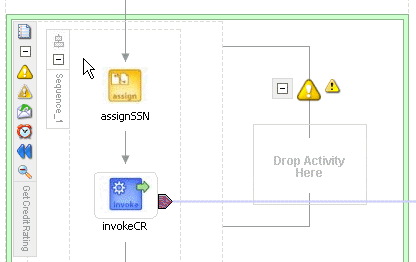
Double-click the exclamation point inside the new box to display the Catch window.
Enter the following details. Note that you assign the crError variable that you previously created.
| Field | Description |
|---|---|
| Namespace URI | http://services.otn.com
Note: This URI is the Credit Rating service's namespace. If you want to see where this namespace URI comes from, perform the following steps:
|
| Local Part | NegativeCredit
Note: This is the fault name element value that displays in the above URI. |
| Fault Variable | crError |
Click OK.
Select Save from the File main menu.
|
Summary: The client initially provided a social security number to the Credit Rating service for a credit check to occur. If a bad credit history is identified or the social security number is invalid, this Assign activity notifies the client of the loan offer rejection. The entire loan application process is terminated, and the client's loan application document is never submitted to the Star Loan and United Loan service loan providers. |
Drag and drop an Assign activity from the Component Palette section into the ns2:NegativeCredit Catch branch you just created. Note that ns2: automatically appears.
Double-click the Assign icon to display the Assign window.
Enter RejectApplication in the Name field of the General tab.
Click Apply.
Click the Copy Rules tab.
Click Create to display the Create Copy Rule window. You now create three fault handling rules.
Enter the following values:
| Field | Value |
|---|---|
| From |
|
|
Expression |
|
string('None - rejected because of bad credit') |
| To |
|
|
Variable |
|
Expand and select Variables > outputVariable > payload > ns1:loanOffer > ns1:providerName
Note: The namespace number values (for example, ns1, ns2) can vary. Use the namespace values that automatically appear. |
Click OK.
Repeat Step 6 through Step 8 to add a second copy expression for the Assign activity with the following values:
| Field | Value |
|---|---|
| From |
|
|
Expression |
|
false() |
| To |
|
|
Variable |
|
Expand and select Variables > outputVariable > payload > ns1:loanOffer > ns1:selected
Note: The namespace number values (for example, ns1, ns2) can vary. Use the namespace values that automatically appear. |
Click OK.
Repeat Step 6 through Step 8 to add a third copy expression to the Assign activity with the following values:
| Field | Value |
|---|---|
| From |
|
|
Expression |
|
false() |
| To |
|
|
Variable |
|
outputVariable > payload > ns1:loanOffer > ns1:approved
Note: The namespace number values (for example, ns1, ns2) can vary. Use the namespace values that automatically appear. |
Click OK to close the window.
The Assign activity now displays the copy rules.
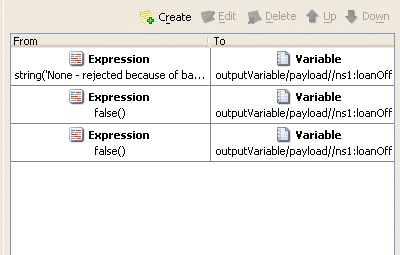
Click OK.
Select Save from the File main menu.
Drag and drop an Invoke activity from the Component Palette section to below the RejectApplication Assign activity you just created.
Double-click the Invoke icon to display the Invoke window.
Enter the following details:
| Field | Value |
|---|---|
| Name | BadCreditInvokeClient |
| Partner Link | client |
| Input Variable | outputVariable
Note: Click the flashlight icon (the second icon to the right of this field) to access the Variable Chooser window for selecting this variable. Then, click OK. |
The Operation (onResult) field is automatically filled in.
|
Note: The Output Variable field is disabled. This is because only a single input variable is received. |
Click OK.
Select Save from the File main menu.
|
Summary: A Terminate activity enables you to end the fault handling tasks in the Catch branch. If a bad credit history is identified or the social security number is invalid, the entire loan application process is terminated, and the client's loan application document is never submitted to the Star Loan and United Loan service loan providers. Entering a social security number that begins with zero in the SSN field of the HTML Form executes this bad credit condition. |
Drag and drop a Terminate activity from the Component Palette section to below the BadCreditInvokeClient Invoke activity you just created.
Double-click the Terminate activity to display the Terminate window.
Name it terminateNegativeCredit.
Click OK.
The Catch branch now displays the following activities.
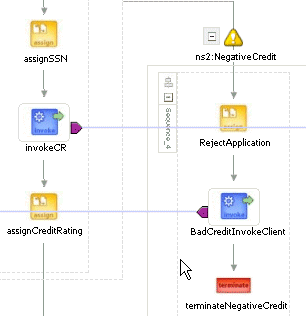
Click the - sign to close the ns2:NegativeCredit Catch branch.
Select Save from the File main menu.
See section "Validating, Compiling, and Deploying the Loan Process" to run the loan process again with error handling functionality. Note that since you are deploying myLoanProcess again, the Deploy Properties window appears. Increment the version number to start a new version of myLoanProcess (for example, enter 1.1). This means you have two myLoanProcess versions running: the one you previous deployed and ran, and this new one that tests the fault handling logic.
When you complete the loan application form, ensure that you enter a social security number beginning with zero in the SSN field of the HTML Form and click Post XML Message. This action activates the fault handling logic.