| Oracle Enterprise Manager Configuration Guide Release 9.2.0.2 Part Number A96673-02 |
|
|
View PDF |
| Oracle Enterprise Manager Configuration Guide Release 9.2.0.2 Part Number A96673-02 |
|
|
View PDF |
If you have chosen to deploy the entire Enterprise Manager framework, you will need to perform additional configuration tasks on the middle tier Management Server machines. The framework includes, for example, the Console, the Management Server, and the Intelligent Agents. On such a machine or machines, you must use the Enterprise Manager Configuration Assistant to configure the Management Server.
This chapter will describe the following:
The Enterprise Manager Configuration Assistant will start automatically if you are performing one of the following installation scenarios:
The Enterprise Manager Configuration Assistant is started as an auto-run during the configuration phase of these installations. If you installed Oracle Enterprise Manager through any other installation type, the Enterprise Manager Configuration Assistant will not start automatically at the end of the installation; you must manually start the Enterprise Manager Configuration Assistant when installation completes.
To start the Enterprise Manager Configuration Assistant, perform the following steps:
You can start the Enterprise Manager Configuration Assistant from the Windows Start Menu.
You can also start the Enterprise Manager Configuration Assistant from the command line using the command:
emca
You can start the Enterprise Manager Configuration Assistant from the command line using the command:
emca
You must have write access to the omsconfig.properties file in the $ORACLE_HOME\sysman\config directory to run the emca command.
Whenever you start the Enterprise Manager Configuration Assistant to create a new 9i repository during a post install configuration or through a manual start of the Configuration Assistant, it will perform the following tasks for you:
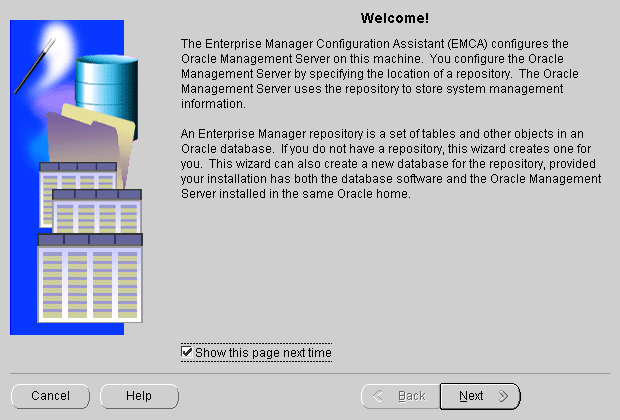
OEM_REPOSITORY tablespace.ORACLE_HOME/sysman/config/omsconfig.properties.When you start the Configuration Assistant manually, the Welcome page appears.
By default, the Show this page next time option is selected. You can specify not to show this page again once you are familiar with the Configuration Assistant. If you clear the Show this page next time option, the Configuration Assistant starts on the Configuration Operation page next time.
Text description of the illustration rep0.gif
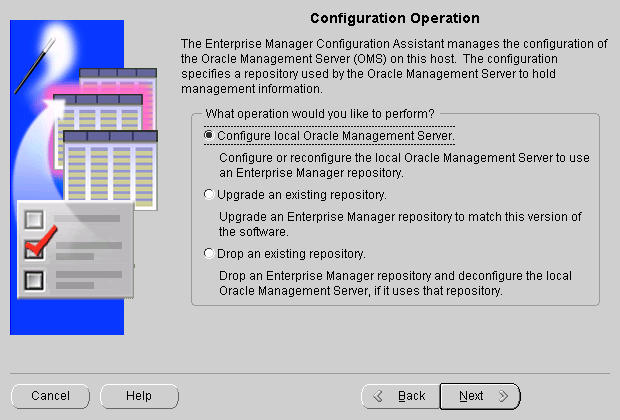
After you click Next on the Welcome page, the Configuration Operation page appears.
Text description of the illustration rep1.gif
If you want to configure the Management Server by creating a repository or editing an existing repository configuration, select the Configure local Management Server option from the list of repository operations and click Next.
If no previous configuration exists, the Configure Oracle Management Server page appears.
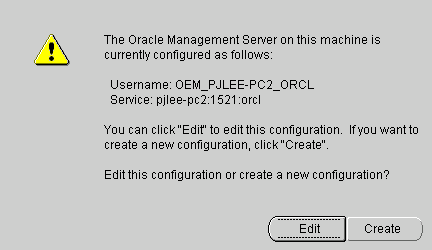
If a configuration already exists, a dialog appears asking you if you want to edit this configuration or create a new configuration.
Text description of the illustration editorcr.gif
Click Edit or Create.
If you click Edit, the Edit Configuration Parameters page appears. For more information on editing the configuration, skip to "Edit Configuration Parameters".
If you click Create, the Configure Oracle Management Server page appears.
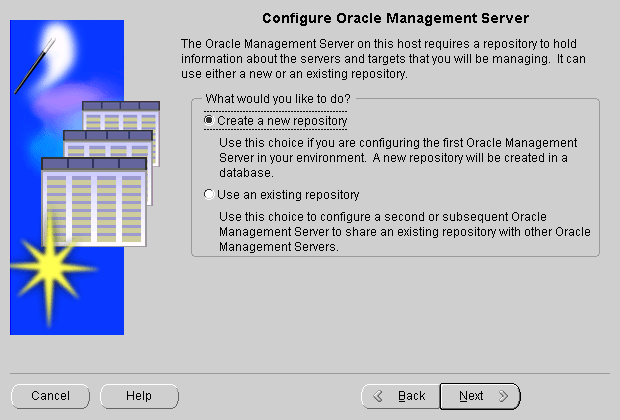
The Management Server on this host requires a repository to hold information about the servers and targets that you will be managing.
Text description of the illustration cfgoms.gif
If you are a new Oracle Enterprise Manager user or if you want to configure the first Management Server in your environment and create a new Release 9i repository, you will use the Create a new repository option. It will create and load your Release 9i repository and set up the configuration parameters for a local Management Server.
The Enterprise Manager Configuration Assistant can automate the creation of a new repository or you can specify the details of creating a new repository.
|
Note: This page will only appear if the Configuration Assistant is run from an Oracle Home that contains a 9i database server installation. |
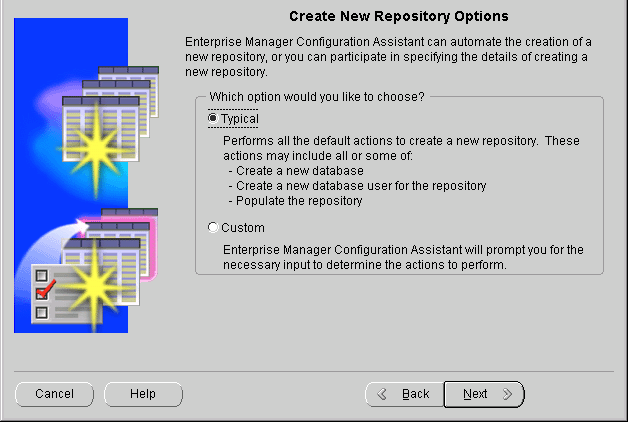
Text description of the illustration repoptio.gif
The actions include all of the ones detailed below.
If you select the Typical option, there are no additional steps to perform, and the next page will be the Create Repository Summary page with special entries.
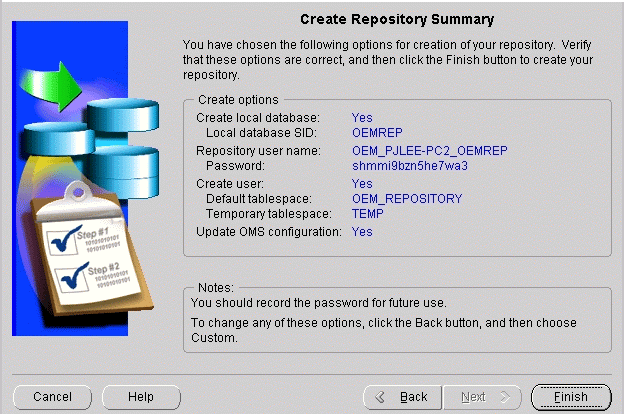
Text description of the illustration sumtypic.gif
|
Note: Record the password for the repository user for future reference. This is the only time the password will appear, and you will need it to perform such tasks as dropping or upgrading the repository. For information on changing the password for the repository user at a later date, refer to "Changing the Repository User Password". |
Click Finish to initiate repository creation or click Back to return to previous pages to make modifications.
When you click Finish, the Enterprise Manager Configuration Assistant starts the Database Configuration Assistant to create the database instance.
|
Note: It may not be obvious that the Database Configuration Assistant is being run since there is no Database Configuration Assistant identification on the progress dialog. |
When the Database Configuration Assistant allows you to change the passwords for the database, you must change the passwords; otherwise, you will not be allowed to continue.
Once the instance has been created and the Database Configuration Assistant exits, the Enterprise Manager Configuration Assistant tries to connect to the database using the SYS credentials. Once the connection has been made, the Enterprise Manager Configuration Assistant then creates the repository user and populates the repository schema.
If you select Custom option, the assistant will allow you to select from the following actions later depending on the choices you make.
If you select the Custom option, the Select Database Location page appears.
You may place your Enterprise Manager repository in a new local database or in another existing database somewhere on your network. The database must be a version which supports a 9i Management Server repository.
|
Note: This page will only appear if the Configuration Assistant is run from an Oracle Home that contains a 9i database server installation. |
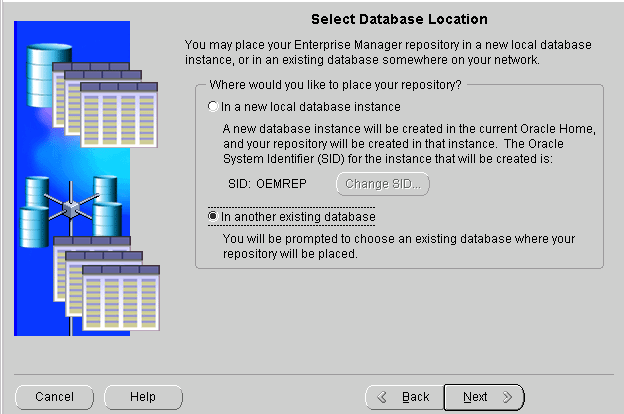
Text description of the illustration dblocati.gif
You will create a new database instance in the current Oracle Home, and your repository will be created in that instance.
The repository will be created in the OEM_REPOSITORY tablespace. The SID will be OEMREP. If you want to change your SID, click Change SID.
You will be prompted to select an existing database where your repository will be placed. Make sure that the database is installed and running.
If you select the In a new local database instance option without clicking Change Database SID, the Repository Login Information page appears. Skip to "Repository Login Information" for details.
If you select the In a new local database instance option and click Change Database SID, the Change Database SID dialog appears. Skip to "Change Database SID" for details.
If you select the In another existing database option, the Select Database for Repository page appears. Skip to "Select Database for Repository" for details.
You can change the Oracle System Identifier (SID) that identifies the local database instance where your Enterprise Manager repository will be created.
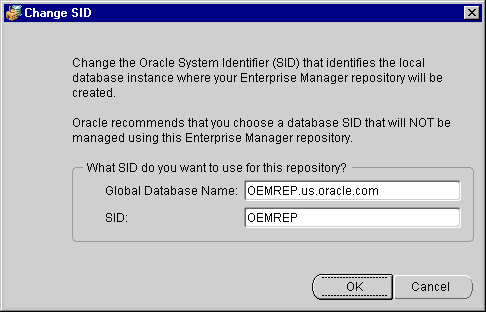
Text description of the illustration changesi.gif
Oracle recommends that you select a database SID that will not be managed using this Enterprise Manager repository.
The full name of the database which uniquely identifies it from any other database. The global database name is of the form database_name.database_domain, for example, oemrep.us.ovenbird.com.
The database name portion, oemrep, is a simple name you wish to call your database. The database domain portion, us.ovenbird.com, specifies the database domain in which the database is located, making the global database name unique. When possible, Oracle recommends that your database domain mirror the network domain.
The global database name is the default service name of the database, as specified by the SERVICE_NAMES parameter in the initialization parameter file.
The Oracle System Identifier (SID). A name that identifies a specific instance of a running Oracle database. For any database, there is at least one instance referencing the database.
Click OK to close the dialog after changing the database name or SID. Then click Next on the Select Database Location page to proceed to the Repository Login Information page. Skip to "Repository Login Information" for details.
Log in to the database where you want to create the repository.
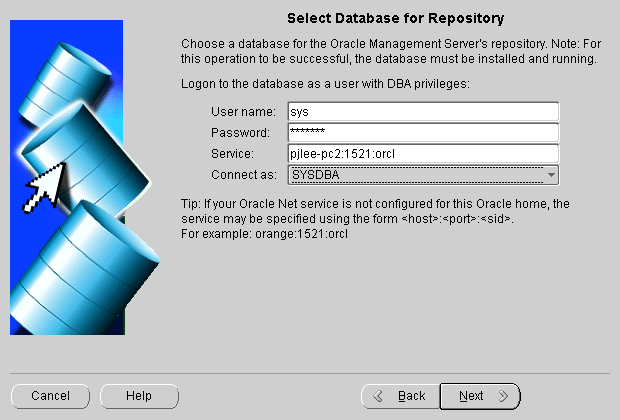
Text description of the illustration dbrep.gif
User name and Password: You must connect to the database as a user with DBA privileges. The Enterprise Manager Configuration Assistant asks for a DBA account in case a new user needs to be created in the database to contain the repository and to allow the Configuration Assistant to make queries about the database/repository.
This is an individual database user account, not an Oracle Enterprise Manager administrator account.
For example, system/manager.
Service: The service may be specified using the form:
<host>:<port>:<sid>
where
host is the machine name where the database is located
port is the database listener port address, usually 1521 or 1526
SID is the database system identifier
An example:
my_em_machine:1521:em92
which connects to the em92 database using port 1521 on the my_em_machine machine.
|
Note: Specifying the service as <host>:<port>:<sid> is the recommended method, but you may also use Oracle Net names if your Oracle Net client is properly configured. |
Click Next to continue.
An Enterprise Manager repository is owned by a database user. During repository creation, a database user, a repository schema user who owns the repository, will be created by the Enterprise Manager Configuration Assistant with the username and password you enter on this page.
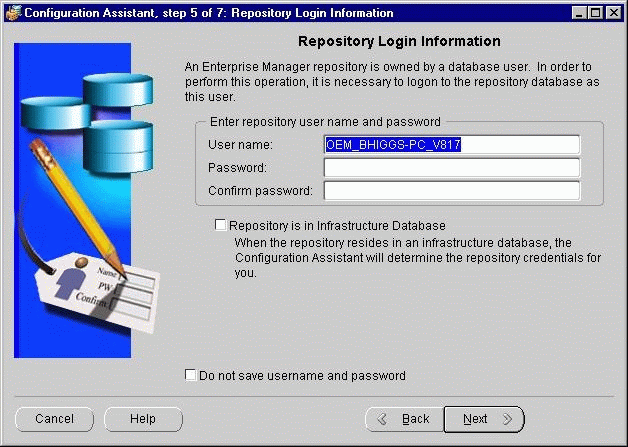
Text description of the illustration rep3.gif
User name: By default, the Enterprise Manager Configuration Assistant uses OEM_<TCP/IP hostname of machine>_<SID> as the repository's user name that will be used to create a database user that will own the repository.
TCP/IP hostname of machine is the machine name where the database is located
SID is the database system identifier
The repository's user name must be unique across the network. If you select another name, you must ensure that it is unique.
The Intelligent Agent identifies each Management Server by its repository name. If two repositories existed with the same name in different databases, the Intelligent Agent would have difficulty contacting the Management Server.
Password: Enter the password for that user.
Confirm: Verify the password by typing it again.
You can select whether to save the user name and encrypted password in the omsconfig.properties file, which is read by the Management Server on startup. If these repository credentials are stored in the file, the Management Server uses them to login to the repository. The password is stored in encrypted format.
On Windows NT and Windows 2000, if they are not saved, you can enter them in the Control Panel's Startup Parameters field when you start the Management Server. If you do not enter the repository credentials in the Startup Parameters field, you will be prompted for them in a dialog.
On UNIX, if they are not saved, the Management Server will prompt you for a user name and password before it starts up.
If you do not want to store the user name and encrypted password in the omsconfig.properties file, select the Do not save username and password option. The option of not storing your repository credentials is referred to as the secure Management Server mode.
The repository account information will be used to perform the maintenance operations in the repository schema like create, upgrade, or drop.
The roles and privileges required by the repository schema user which are automatically created by the Configuration Assistant are listed below:
To avoid potential security issues and unnecessary access to objects outside of Oracle Enterprise Manager, do not grant more privileges to your repository schema user than is absolutely necessary.
The Select Repository User Tablespaces page does not appear:
or
When you start the Configuration Assistant manually, if the OEM_REPOSITORY tablespace already exists and you have entered the name of a different repository user than the one managing the repository in the Repository Login Information page, an error message appears, saying, "Do you wish to change it to manage the repository owned by user '<user>' on service '<service>'?" If you click Yes or No, the following page appears.
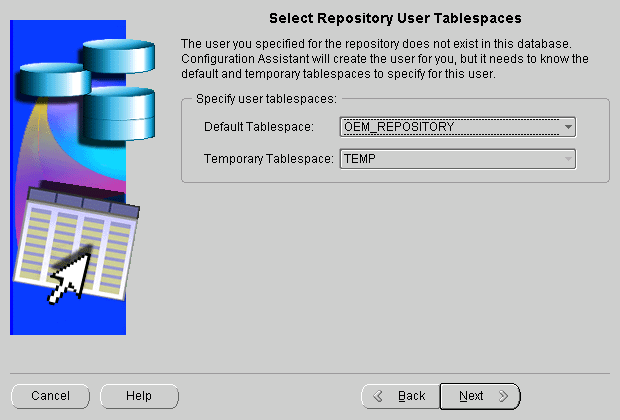
Text description of the illustration rep4.gif
Select the default and temporary tablespaces for the Enterprise Manager repository to use.
If the OEM_REPOSITORY tablespace does not exist, the following page appears:
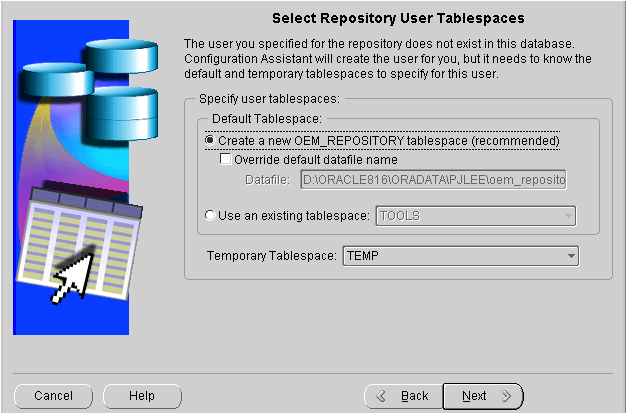
Text description of the illustration oemrep.gif
Default Tablespace:
Select this option if you want to create the OEM_REPOSITORY tablespace, which has specific characteristics for the Enterprise Manager repository, and use it as the repository user's default tablespace.
Select this option if you want to change the default name of the datafile for the OEM_REPOSITORY tablespace. This is not normally recommended.
Select an existing tablespace from the list.
Temporary Tablespace
Select a temporary tablespace from the list.
Click Next to continue.
If the Enterprise Manager Configuration Assistant detects that the default tablespace for the repository contains the required amount of free space, the Create Repository Summary page appears. Otherwise, errors will appear.
If you have chosen to specify the details of creating a new repository in the Create New Repository Options page, the Create Repository Summary page provides a summary of all the information supplied.
The following page appears at the end if you have selected the Custom option.
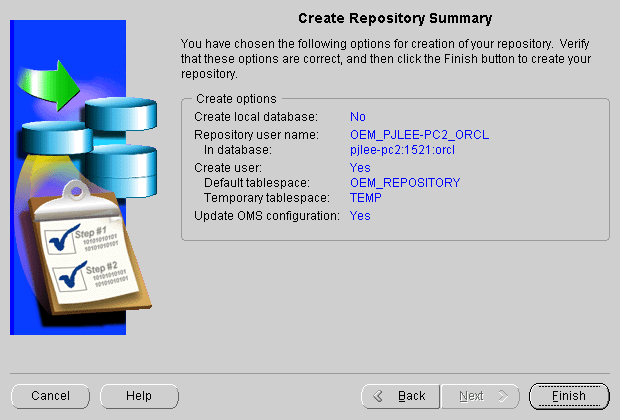
Text description of the illustration rep5.gif
Click Finish to initiate repository creation or click Back to return to previous pages to make modifications.
When you click Finish, the Configuration Assistant Progress window appears, showing the processing performed and the processing steps that comprise the operation being performed.
If you want to view detailed information about what is happening during the processing, including any errors that might occur, click Show Details to expand the dialog to show a text area. You can hide the detailed information by clicking Hide Details.
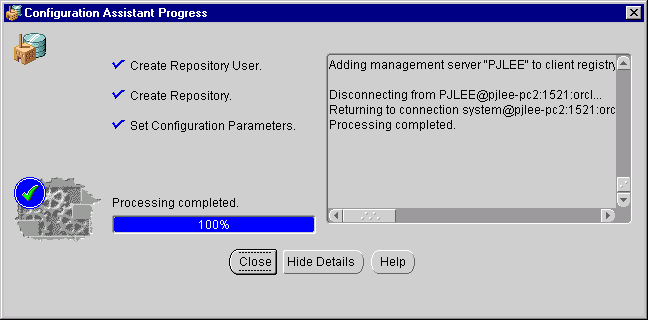
Text description of the illustration rep6.gif
Cancel changes to Close when processing is completed, whether it is successful or not.
When all of the steps have been completed without error, the "Processing completed." message appears.
You can cancel the requested operation before it completes by clicking Cancel.
You must click Close to exit the Configuration Assistant.
If the repository creation fails, drop the repository, turn on tracing for the Management Server by adding the appropriate tracing properties to the omsconfig.properties file, and perform the repository creation procedure again. For information on Management Server tracing and logging, refer to Appendix B, "Activating Logging and Tracing".
For information on dropping the repository, refer to "Dropping an Existing Repository".
In an environment with multiple Oracle Management Servers, a set of Management Servers can share the same repository. There may be only one Management Server running per node.
Select the Configure local Management Server option if you want to perform the following tasks:
omsconfig.properties file; it does not change the repository credentials in the database.As the number of nodes and managed services in your network increases or if the current Management Server is overloaded, you can add more Oracle Management Servers to the middle tier to share and balance the workload.
Multiple Oracle Management Servers provide fault tolerance for each other. If an Oracle Management Server fails, the other Management Servers continue to operate. The clients that registered with the failed Management Server can immediately log in again, registering with any of the other Management Servers using or sharing the same repository, and work continues with the remaining available Oracle Management Servers. Any clients that had been configured to register with a different Oracle Management Server than the one that failed are unaffected.
If the available Management Servers are CPU-bound (the CPU usage is exhausted), adding additional Management Servers is an alterative to increasing the capacity of the nodes that run the Management Servers.
If you want to run an Oracle Management Server on a specific machine, you must first install the Oracle Management Server software on that machine.
Refer to the installation guide provided with the database release for detailed instructions.
When you add a new Management Server, you must run the Enterprise Manager Configuration Assistant to update the configuration for that node.
The Configuration Assistant can only set or change configuration parameters in the omsconfig.properties file for the machine on which it is running. It does not have the ability to change another machine's configuration parameters; you must go to each of the other Management Servers sharing the repository and run the Configuration Assistant to change each machine's configuration parameters.
You must set up or change the repository connect information (user name, password, service) to point to the correct repository. It is important that all the Management Server machines that are sharing the same repository have consistent configuration parameters.
For information about starting the Enterprise Manager Configuration Assistant, refer to "Starting the Enterprise Manager Configuration Assistant".
Select the Configure local Management Server option from the list of configuration operations in the Configuration Operation page and click Next to continue.
For details about the Configuration Operation page, see "Configuration Operation".
On the Configure Management Server page, select the Use an existing repository option to configure a second or subsequent Management Server to share an existing repository with other Management Servers, and click Next to continue.
If a configuration already exists, a dialog appears asking you if you want to edit this configuration or create a new configuration. See Figure 3-3, "Edit or Create Dialog". Clicking Edit takes you to the Edit Configuration Parameters page directly.
On the Edit Configuration Parameters page, direct the local Management Server to use an existing repository by entering the username, password, and service for an existing repository.
Enter the user name of the existing repository which you wish this machine's Management Server to use or enter the repository's user name to change the Management Server configuration to use another repository. The user name is a database username, not an Oracle Enterprise Manager administrator name.
Enter the password for the above user name or enter the repository user's password to change the password that the Management Server uses to log into the repository when it starts. The information will be used on the next Management Server start up.
If you change the password, you must also change the Confirm field so that it matches the password you changed.
Enter the service/database where the repository resides to change the Management Server to use a repository in another database.
This information will be used when this machine's Management Server next starts up. If any of the information is invalid, then the Management Server will not start successfully.
You can select whether to save the user name and encrypted password in the omsconfig.properties file, which is read by the Management Server on startup. If the user name and encrypted password are stored in the file, the Management Server uses them to login to the repository.
On Windows NT, if they are not saved, you can enter them in the Control Panel's Startup Parameters field when you start the Management Server. If you do not enter the repository credentials in the Startup Parameters field, you will be prompted for them in a dialog.
On UNIX, if they are not saved, the Management Server will prompt you for a user name and password before it starts up.
If you do not want to save the user name and password, select the Do not save username and password option. The option of not storing your repository credentials is referred to as the secure Management Server mode.
Click Next to proceed from the Edit Configuration Parameters page.
If the username and password are not stored in the configuration file, you are prompted with a login dialog for the credentials to log into the repository. The Configuration Assistant connects to the specified repository and validates the specified repository and displays any errors it encounters. If the validation was successful, the Select Management Region page appears.
If you have a large, global deployment of Enterprise Manager or have Enterprise Manager deployed across a mixture of LANs and WANs, then you should consider using the Management Regions feature. In both situations, Management Regions can improve performance over slow networks by allowing you to assign a subset of Management Servers and a subset of discovered nodes to a Management Region to prevent cross-regional or cross-network communication. Additionally, Management Regions are useful for mapping discovered nodes within firewall boundaries.
For example: Company XYZ has a Management Server running in England and monitored targets in England. It also has a Management Server running at its headquarters in California and monitored targets in California.
With previous releases of Enterprise Manager, the Management Server in England could actually monitor the targets in California. You could not "bind" a Management Server to the targets. Additionally, if there is a firewall between the Management Server in England and the monitored node in California, the Management Server and the nodes would not interact with each other. Management Regions functionality in release 9i prevents this cross regional communication and enables users to specify that the Management Server in England should only monitor targets in England within a firewall. It should not monitor the targets in California.
The Enterprise Manager Configuration Assistant by default creates the initial, default Management Region called DEFAULT. By default, all Management Servers that use the existing repository and all discovered nodes within the repository will be placed within this DEFAULT Management Region. If your enterprise does not see a need to use Management Region functionality (that is, you do not have a large, global enterprise or a deployment that spans several LANs and WANs) then using this DEFAULT Management Region would be sufficient. However, if you want to take complete advantage of the Management Region functionality, then you should create additional Management Regions and specify a subset of discovered nodes and a subset of Management Servers within each Management Region.
When a Management Server is not already assigned to a Management Region, the Enterprise Manager Configuration Assistant will prompt you to assign it to one, or to create an entirely new Management Region to which the local Management Server will be assigned. Under most circumstances, the Select Management Region page will appear with the options disabled because the Management Server will have already been assigned to a Management Region. In this case, an explanatory message will appear in red within the page.
In situations where the local Management Server is not already assigned to a Management Region, you will see the following page in Enterprise Manager Configuration Assistant:
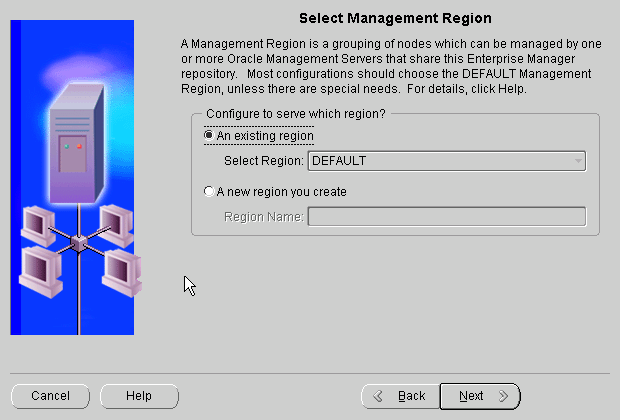
Text description of the illustration mg_regio.gif
Select one of the listed options or enter a name for a new management region.
Select Region: Select the region from the list.
By default, all nodes and Management Servers are in the same management region, called DEFAULT. You can reassign a node/Management Server from one management region to another if you are logged into the Console as a super administrator.
Region Name: Type in the name of the region.
The Configuration Parameters Summary page provides a summary of all the information supplied during the modify configuration parameters operation. Click Finish to initiate the change or click Back to return to previous pages to change your information.
Existing pre-9i repositories are not upgraded automatically during installation. To upgrade, you must run the Oracle Enterprise Manager Configuration Assistant manually after the installation.
The Oracle Enterprise Manager Configuration Assistant can take an existing Release 2.x repository and upgrade it directly to a Release 9.2 or it can take a Release 9.0 repository and upgrade it directly to a Release 9.2. After the upgrade, the repository is at the newer version.
Direct migration of Release 1.x repositories to a single Release 9.2 repository is not supported with the Enterprise Manager Configuration Assistant. This migration is a two step process. First you must run the Enterprise Manager Migration Assistant to migrate Version 1 to Version 2 and then run the Enterprise Manager Configuration Assistant Release 9.2 to upgrade Version 2 to Version 9.2. Refer to the Oracle Enterprise Manager Configuration Guide Release 2.2 for instructions on migrating Version 1 repositories to a single Version 2 repository.
Before you attempt to perform an upgrade, you must first stop all Management Servers and Oracle Enterprise Manager applications that are using this repository. If any Management Server is currently using this repository, upgrading the repository causes a server error.
Before you attempt to upgrade the repository, you must first back up the database or repository schema using the standard export mechanism.
The EXPORT utility is a base utility shipped with the Oracle database server. For detailed information about the Export utility, refer to Oracle9i Utilities.
If there is a failure during a repository upgrade, the repository will no longer be usable. The failed repository would no longer appear in the list of available repositories that could be upgraded.
If you are using a Release 2.x repository or a Release 9.x repository and want to upgrade your repository to Release 9i, do not perform any repository upgrades until all Oracle Enterprise Manager components have been upgraded to Release 9i.
Because an Enterprise Manager repository is shared, it is important to coordinate your repository upgrade with the installation of the new Oracle Enterprise Manager software on all the machines that share the repository. If you do not upgrade your repository, the new version of the software will not operate with that repository.
However, if you do upgrade your repository, the older version of the software will not operate with that repository. Remember that both the base Oracle Enterprise Manager system, which includes the Management Server, and the Oracle Enterprise Manager packs share a repository, so if you want all your users to continue to perform their work, you must ensure that the repository upgrade is coordinated with the software upgrades on all relevant machines.
The Enterprise Manager Console, separately licensable Packs, Management Server and repository must all be of the same release. For example, you cannot use a Release 2.2 Management Server and repository with a Release 9i Console nor can you use a Release 9i Management Server and repository with a Release 2.2 Pack.
If the existing Management Server and repository are of a previous version, then you can upgrade them to the most recent version. In the case of upgrading a Management Server and repository to Release 9i, ensure that all Enterprise Manager products you intend to use with the repository are of Release 9i. For instance, do not upgrade the Management Server and repository to Release 9i if you are still using Diagnostics Pack Release 2.2 or Change Management Pack Release 2.2.
|
Note: Reports scheduled and generated with the Enterprise Manager Reporting Wizard Release 2.2 cannot be upgraded to Release 9.2. |
To upgrade the repository, follow the steps outlined in the following sections.
For information about starting the Enterprise Manager Configuration Assistant, refer to "Starting the Enterprise Manager Configuration Assistant".
When you click Next on the Welcome page, the Configuration Operation page appears.
Select the Upgrade an existing repository option from the list of configuration operations and click Next to continue. The Select Database for Repository page appears.
Log in to the database which contains the repository you want to upgrade.
In order to upgrade a repository, you must connect to the database as a user with DBA privileges. The repository schema user created by the Enterprise Manager Configuration Assistant will not have the necessary DBA privileges for this step. To avoid potential security issues, do not grant more privileges to your repository schema user than is necessary. Connect to the database as a different user with DBA privileges instead. For example, system/manager.
For information about logging in to the database which contains the repository, refer to "Select Database for Repository".
If you log in successfully, the Select Repository page appears.
If you are selecting a repository to upgrade, the Select Repository page shows only Release 2.0, 2.1, 2.2, and 9.0.1 repositories. The Enterprise Manager Configuration does not display release 9.2 repositories in this situation, because they do not need to be upgraded; they are already at the most up-to-date version.
Username: The username of the repository.
Version: The version of the repository.
Type: The type of repository. Type can be either "Enterprise" or "Standalone". An Enterprise repository is used by the Oracle Enterprise Manager connected to a Management Server. A Standalone repository is required by certain applications when you use Oracle Enterprise Manager not connected to a Management Server.
Select the appropriate repository and click Next to continue.
If the specified database does not contain any Release 2.x or 9.0.1 repositories, the list of repositories is empty and grayed out, and a note stating that "No repositories were found in the database" appears. You may click Cancel to exit the Enterprise Manager Configuration Assistant or click Back to return to previous pages to connect to a different database.
In the Repository Login Information page, you must supply the repository user password.
During repository creation, a database user (repository schema user) who owns the repository was created by the Enterprise Manager Configuration Assistant with the username and password you have supplied.
In order to perform a repository upgrade, it is necessary to logon to the repository database as this user.
The repository user name has been entered into the username field as a result of your choice in the previous page. However, you will need to enter the password.
Click Next to continue. The Upgrade Repository Summary page appears.
The Upgrade Repository Summary page provides a summary of all the information supplied during the upgrade repository session. Click Finish to initiate the repository upgrade or click Back to return to previous pages to change the information.
When you click Finish, the Configuration Assistant Progress window appears, showing the processing performed and the processing steps that comprise the operation being performed. Each processing step is shown by a line of text.
If you want to view detailed information, click Show Details to expand the dialog to show a text area. You can hide the text area by clicking Hide Details.
Cancel changes to Close when processing is completed whether it is successful or not.
When all of the steps have been completed without error, the "Processing completed." message appears.
You can cancel the requested operation before it completes by clicking Cancel. However, if you cancel the operation, the repository will become unusable.
Click Close when you are finished.
During the Configuration Assistant upgrade operation, the Oracle Management Service will be created, if it does not already exist and only if the repository being upgraded is the one actually being used by the local Management Server.
In order to drop a repository, you must connect to the database as a user with DBA privileges.
To drop the repository and deconfigure the local Management Server if it uses that repository, follow the steps outlined in the following sections.
Before you attempt to drop the repository, you must first stop all Management Servers and Oracle Enterprise Manager applications that are using this repository.
If any Management Server is currently using this repository, deleting the repository causes a server error.
For information about starting the Enterprise Manager Configuration Assistant, refer to "Starting the Enterprise Manager Configuration Assistant".
After clicking Next on the Welcome page, the Configuration Operation page appears.
Select the Drop an existing repository option from the list of configuration operations and click Next to continue. The Select Database for Repository page appears.
Log in to the database which contains the repository you want to drop. You must connect to the database as a user with DBA privileges.
The repository schema user created by the Enterprise Manager Configuration Assistant will not have the necessary DBA privileges for this step. To avoid potential security issues, do not grant more privileges to your repository schema user than is necessary. Connect to the database as a different user with DBA privileges instead. For example, system/manager.
For information about logging in to the database which contains the repository, refer to "Select Database for Repository". If you log in successfully, the Select Repository page appears.
If you are selecting a repository to drop, the Select Repository page shows all releases of repositories, beginning with 2.0.
Select the appropriate repository and click Next to continue.
Username: The username of the repository.
Version: The version of the repository.
Type: The type of repository. Type can be either "Enterprise" or "Standalone". An Enterprise repository is used by the Oracle Enterprise Manager connected to a Management Server. A Standalone repository is required by certain applications when you use Oracle Enterprise Manager not connected to a Management Server.
If the specified database does not contain any Release 2.x or 9i repositories, the list of repositories is empty and grayed out, and a note stating that "No repositories were found in the database" appears. You may click Cancel to exit the Enterprise Manager Configuration Assistant or click Back to return to previous pages to change the information.
From the Select Drop Repository Options page, you can select to drop the repository user and all its schema objects or merely the repository objects.
If you select to drop only the repository, you must supply the repository user's password so that the Enterprise Manager Configuration Assistant can connect to the repository in order to invoke the Oracle Enterprise Manager SQL drop scripts. Only repository objects are dropped. Other schema objects in the repository remain.
If you select to drop the repository user and all its schema objects, a password is not required. Make sure that you do not have other objects of value in that schema before proceeding with this step. Valuable data may be lost if you do not ensure this.
If a repository is selected that is not at the current/latest version, the only valid choice is to drop the repository user because the drop scripts can only handle the latest/current version.
If the Configuration Assistant detects that a managed repository is specified in the omsconfig.properties file, and you are not dropping that repository, the Configuration Assistant will not change the Management Server configuration.
If you are dropping the managed repository, the Configuration Assistant will clear the Management Server configuration.
Click Next to continue. The Drop Repository Summary page appears.
The Drop Repository Summary page provides a summary of all the information supplied during the drop repository operation.
Click Finish to initiate repository removal or click Back to return to previous pages to change the information.
When you click Finish, the Configuration Assistant Progress window appears, showing the processing performed and the processing steps that comprise the operation being performed. Each processing step is shown by a line of text.
If you want to view detailed information, click Show Details to expand the dialog to show a text area. You can hide the text area by clicking Hide Details.
Cancel changes to Close when processing is completed whether it is successful or not.
When all of the steps have been completed without error, the "Processing completed." message appears.
You can cancel the requested operation before it completes by clicking Cancel.
Click Close when you are finished.
Once configured, the Management Server provides distributed control between clients and managed nodes. A central engine for notification, it processes all system management tasks and administers the distribution of these tasks across the enterprise.
Specific topics discussed in this section are listed below:
The repository database used with the Management Server must be started and open and the database listener must be started before starting the Management Server.
To start the Management Server on Windows, follow the instructions below.
If you supply invalid or incomplete repository credentials in the Control Panel's Startup Parameters field, the Management Server will not start, and an error message will appear.
If you are in secure mode and do not enter the repository credentials in the Startup Parameters field, you will be prompted for them later in a dialog.
For information on troubleshooting the Management Server if it does not start, refer to "Management Server Does Not Start".
To start the Management Server on UNIX, at the command line, enter
% oemctl start oms
When you are prompted, enter the repository's user name that was used to create the database user and the password for that user if you have chosen not to save your repository credentials during repository configuration. For a complete definition of a repository owner, refer to "Repository Login Information".
|
Note: If the ORACLE_HOME environment variable is not set to the Oracle home in which the Management Server is running, the Management Server will not start correctly because it will try to find its class files in the default Oracle home instead of the correct Oracle home. For information on setting the Oracle environment, refer to "Management Server May Not Run Correctly from a Non-Default Oracle Home". |
To quickly check whether a local Management Server is up or down on Windows or UNIX, at the operating system prompt, enter:
% oemctl ping oms
To check the status of a local Management Server on Windows or UNIX, at the operating system prompt, enter:
% oemctl status oms
You will be prompted to enter the username and password of an Oracle Enterprise super administrator.
To check the status of a remote Management Server on Windows or UNIX, at the operating system prompt, enter:
% oemctl status oms sysman/<password>@<hostname of Management Server machine>
For example
% oemctl status oms sysman/sysman@dlsun2305
The information that oemctl status oms returns include the following:
Indicates the number of target databases in the session. A target database session is obtained when a user tries to connect to a database (by expanding a database under the Databases folder in the navigator). Because it is inefficient to open and close database sessions every time one is required, a certain number of target database sessions are kept in a pool and the Management Server tries to use these sessions before more are opened.
Indicates the number of activities waiting for processing. Activities may include submitting jobs, registering events, deleting jobs, deleting events, sending email, or other maintenance procedures.
Indicates the number and host names of Management Servers running in the enterprise.
Indicates the number of Enterprise Manager administrators logged into this Management Server.
Indicates the number of sessions available from the database repository to the Oracle Management Server to perform actions such as submitting jobs to and registering events with Oracle Intelligent Agents. By default, the session pool depth is set to 15. This default value should be sufficient for most environments. Since the repository sessions are consumed when jobs are submitted and events registered, you should only need to adjust this default value if your administrative team is performing many activities.
Indicates the number of repository sessions currently in the pool. A repository session is obtained when the Management Server performs any task that requires retrieving or updating information in the Enterprise Manager repository. For example, the task could be submitting a job or event, or viewing a group, job history, registered events, etc. Because it is inefficient to open and close a session every time it is required, a certain number of sessions to the repository are kept in a pool and the Management Server tries to use these sessions before more are opened. The Management Server takes up about 5-7 sessions on startup.
An example of the output is shown below:
OEMCTL for Windows NT: Version 9.2.0.1.0
Copyright (c) 1998, 2002 Oracle Corporation.  All rights reserved.

The Oracle Management Server on host [znripley-pc.ovenbird.com] is functioning
pr
operly.

  The server has been up for 0 00:00:25.953

  Target database session count: 0 (session sharing is off)
  Operations queued for processing: 1
  Number of OMS systems in domain: 1 (znripley-pc.ovenbird.com)
  Number of administrators logged in: 0
  Repository session pool depth: 15
  Repository session count: 8 in-use and 1 available, pool efficiency: 18%
To stop a local Management Server, perform the following steps:
You will be prompted to enter the username and password of an Oracle Enterprise super administrator.
At the command line, enter
% oemctl stop oms
You will be prompted to enter the username and password of an Oracle Enterprise super administrator.