|
Oracle® Business Intelligence Discoverer Plus User's Guide
10g Release 2 (10.1.2.1) B13915-04 |
|
 Previous |
 Next |
|
Oracle® Business Intelligence Discoverer Plus User's Guide
10g Release 2 (10.1.2.1) B13915-04 |
|
 Previous |
 Next |
This chapter explains how to use Discoverer Plus Relational's drilling capabilities to answer typical business questions, and contains the following topics:
Discoverer enables you to navigate worksheet data quickly and easily using a powerful set of drilling tools.
The table below lists the types of drill supported by Discoverer:
| Drill type | Description | Drill icon used in worksheets |
|---|---|---|
| Drill up and down | Drill up and down a drill hierarchy created by the Discoverer manager.
You can drill up and down in both worksheet data and graph data. For more information, see "How to drill up and down"). |

|
| Drill to a related item | Drill to a related worksheet item.
You can drill to a related item in worksheet data, but not graph data. For more information, see"About drilling to related items". |

|
| Drill to detail | Drill to a level of detail set up by the Discoverer manager.
You can drill to detail in worksheet data, but not graph data. For more information, see "About drilling to detail"). |
Use the Drill dialog |
| Drill out | Drill out to a worksheet, Internet URL, or file stored in the database.
You can drill out in worksheet data, but not graph data. For more information, see "About drill links". |

|
| Drill out to worksheet (displayed when you click a drill out icon) | Drill out to a worksheet.
For more information, see "About drill links". |

|
| Drill out to Internet URL (displayed when you click a drill out icon) | Drill out to an Internet URL.
For more information, see "About drill links". |

|
A drill hierarchy is a set of related items that provide a predefined path to help Discoverer users navigate worksheets. The figure below shows a typical drill hierarchy based on geographical region (i.e. Region, City, and Store Name).
Figure 10-1 Typical Discoverer drill hierarchy
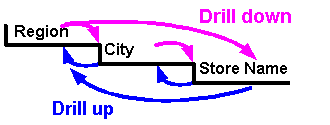
Using the example drill hierarchy above, drilling down into a region enables a worksheet user to analyze data about cities in the selected region.
Drill hierarchies are created by the Discoverer manager. If a worksheet item is included in multiple drill hierarchies, Discoverer assigns the last hierarchy used and saved as the default drill hierarchy. The default hierarchy items are displayed in a -drill menu. Other hierarchy items are displayed under the All Hierarchies menu option.
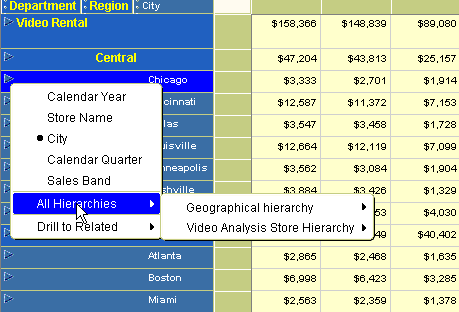
To select a drill level from other hierarchies available, select the All Hierarchies option on the drill menu. In the example below, the other hierarchies available are Geographical hierarchy and Video Analysis Store Hierarchy.
Figure 10-2 Multiple hierarchies in Discoverer
When you drill into numeric data, Discoverer behaves as follows:
When you drill down, Discoverer breaks down the numeric values at the drill level you select. For example, if you drill into an annual sales figure, you might see the annual sales figure broken down into monthly sales figures.
When you drill up, Discoverer consolidates numeric values at the drill level you select. For example, if you drill up from monthly sales figures, you might see the monthly sales figures consolidated into annual sales figures.
Note: When you drill into a worksheet that contains analytic functions, you might have to adjust the analytic function formula to work correctly with the new worksheet layout (for more information, see "About analytic functions and drilling into and out of data").
You can drill up and down on any worksheet item that has a drill hierarchy associated with it, as follows:
You drill up to see consolidated data. For example, you might drill up from weekly data to monthly data.
You drill down to see data in more detail. For example, you drill down from monthly data to weekly data.
For more information about drill hierarchies, see "What are drill hierarchies?".
You can drill up and down using:
a drill icon in worksheet data (for more information, see "How to drill up and down using a drill icon in worksheet data")
a graph (for more information, see "How to drill up and down using a graph label in graph data")
the Drill dialog (for more information, see "How to drill up and down using the Drill dialog")
To drill down using a drill icon:
Click the drill icon next to the heading of the worksheet item you want to drill down into.
For example, to drill down from Region to City, select the drill icon in the Region item heading.

Select a level of detail below the current level of detail.
Hint: The current level of detail is indicated by a black dot.
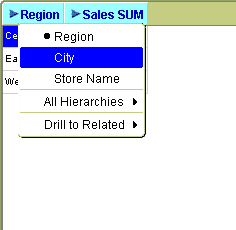
For example, to drill down from Region to City, select the City option.
Discoverer updates the worksheet with the drill level you selected. For example, if you drill down from Region to City, Discoverer expands the worksheet to show City information.
To drill up using a drill icon:
Click the drill icon next to the heading of the worksheet item you want to drill up from.
For example, to drill up from City to Region, select the drill icon in the City item heading.
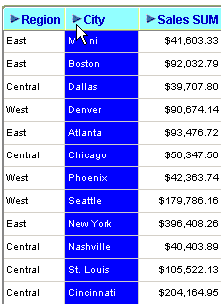
Select a level of detail above the current level of detail.
Hint: The current level of detail is indicated by a black dot.
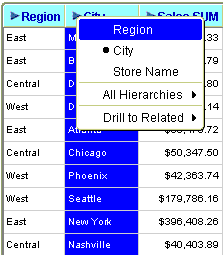
For example, to drill up from City to Region, select the Region option.
Discoverer updates the worksheet with the drill level you selected. For example, if you drill up from City to Region, Discoverer collapses the worksheet to only show data summarized at the Region level.
To drill down using a graph label in graph data:
Display the graph you want to analyze.
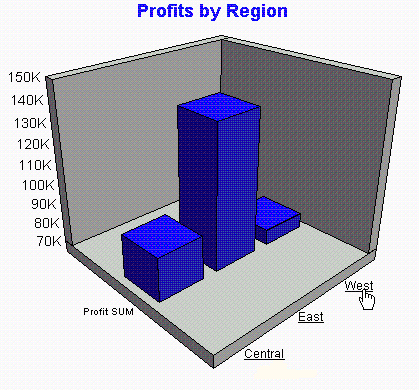
Select the underlined graph label for the item value you want to drill down into.
For example, select the West graph label to drill down to data for the West region. Discoverer displays data for the next level down in the current drill hierarchy.
To drill up using a graph label in graph data:
Display the graph you want to analyze.
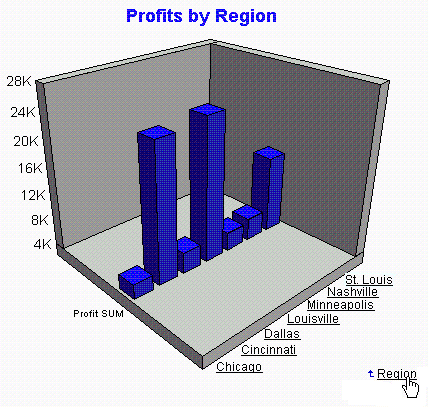
Select the underlined graph label with an up arrow beside it to drill up to that level of data.
For example, select the Region drill link to drill up to Region level data. Discoverer displays the data at the next level up in the drill hierarchy.
Notes
When you drill in a graph you only drill using the current drill hierarchy.
In pie charts, you can also drill directly down into each segment. In the example below, to display detailed profits data about cities in the East region, you double click on the East segment (i.e. labelled 46.85%). Alternatively, select the axis label East in the graph legend to drill down.
Figure 10-3 Drilling directly into a pie chart
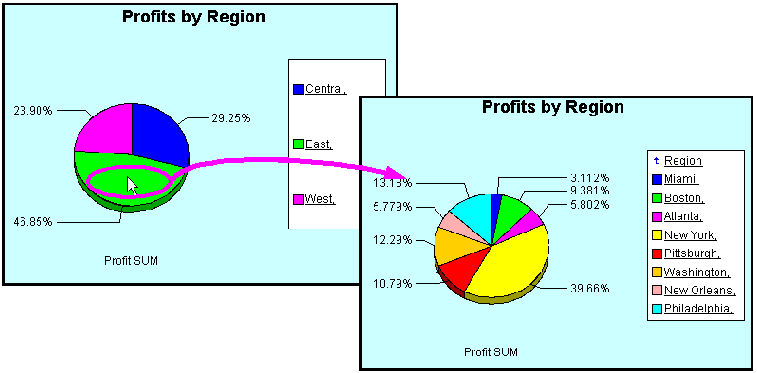
When you drill into a graph, the worksheet data is also updated (if displayed) to match the graph.
You can drill directly into a bar on a bar graph by double clicking on the bar.
To drill up and down using the Drill dialog:
(optional) Select the worksheet item you want to drill on.
Choose Tools | Drill to display the "Drill dialog".
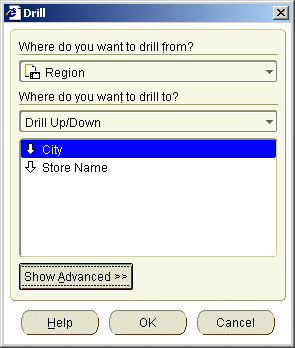
Hint: You can also display the Drill dialog by right-clicking on a worksheet cell and selecting the Drill option.
If you did not select a worksheet item in step 1, use the Where do you want to drill from? drop down list to select the worksheet item you want to drill from.
Select Drill Up/Down from the Where do you want to drill to? drop down list.
Select an item from the list.
For example, to drill from Region to City, select City.
(optional) If you want to change the default advanced drill options, click Show Advanced to display the extra options and select as required.
Click OK.
Discoverer updates the worksheet with the options you selected. For example, if you drill down from Region to City, Discoverer adds City data to the worksheet.
You drill to a related item to add a related item to the worksheet. For example, if you select Department, the Department item is added to the worksheet. Related items are items that are not currently in the worksheet but are in folders used by the worksheet. The item you drill to does not have to be in the same drill hierarchy as the item you drill from.
In the example below, you want to add information on sales bands to a worksheet. Although you could do this by editing the worksheet to add the Sale Band item to the worksheet, you can also use the drill menu to quickly add this information.
You can drill to a related item from worksheet data, but not from graph data.
For more information, see "How to drill to a related item".
You drill to a related item to add a related item to the worksheet. For example, if you select Department, the Department item is added to the worksheet. Related items are items that are not currently in the worksheet but are in folders used by the worksheet. Discoverer sets up the drill to related item options automatically.
You can drill to a related item using:
a drill icon (for more information, see "How to drill to a related item using a drill icon")
the Drill dialog (for more information, see "How to drill to a related item using the Drill dialog")
To drill to a related item using a drill icon:
Click the drill icon next to the heading of the worksheet item you want to drill from.
A pop up list is displayed.
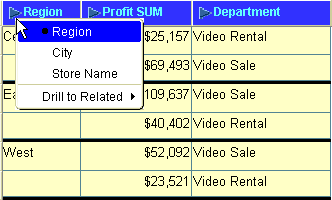
If there are too many items to display in a drop down list, you choose the drill item from the "Select item to drill dialog".
From the pop up list, select the Drill to Related option.
Discoverer displays a list of related worksheet items.
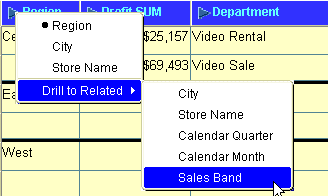
Select a worksheet item from the pop up list to drill to that item.
Discoverer adds the related item that you selected to the worksheet (unless you changed the advanced settings on the Drill dialog).
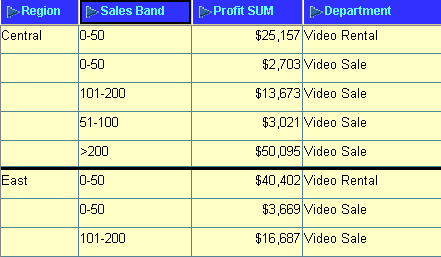
To drill to a related item using the Drill dialog:
(optional) Select a worksheet cell or the heading of the item you want to drill from.
Choose Tools | Drill to display the "Drill dialog".

Hint: You can also display the Drill dialog by right-clicking on a worksheet cell and selecting the Drill option.
If you did not select a worksheet cell or item heading in step 1, use the Where do you want to drill from? drop down list to select the worksheet item you want to drill from.
Select Drill to a Related Item from the Where do you want to drill to? drop down list.
Select an item from the list.
Click OK.
Discoverer updates the worksheet according to the default drill options currently selected.
Hint: Click Show Advanced to display extra drill options that enable you to specify how Discoverer adds the new item to the worksheet. For example, if you click Show Advanced and select the Place drill results in a new sheet check box, Discoverer creates a new worksheet that includes the related item.
You drill to detail to analyze a particular folder in a business area or to see what values make up a particular summarized or aggregated value. Discoverer displays the detail data in a new worksheet. Drill to detail is set up by the Discoverer manager. For example, you might drill from Department in a sales worksheet to display information on all departments in a new worksheet.
In the example below, you want to analyze the component values that make up the Region summary values. You select the Region item then display the drill dialog and select Products list.
You can drill to detail from worksheet data, but not from graph data.
For more information, see "How to drill to detail".
You drill to detail to analyze all worksheet items in a folder or to analyze the individual rows that make up summary values. For example, you might want to drill from a worksheet item called Month to analyze a folder called Monthly Sales Analysis in a separate window. Or you might want to click on a summary Sales value and analyze the individual values that contribute to the sales total.
To drill to detail:
(optional) Select the worksheet item you want to drill from.
Choose Tools | Drill to display the "Drill dialog".

Hint: You can also display the Drill dialog by right-clicking on a worksheet cell and selecting the Drill... option.
Select Drill to Detail from the Where do you want to drill to? drop down list.
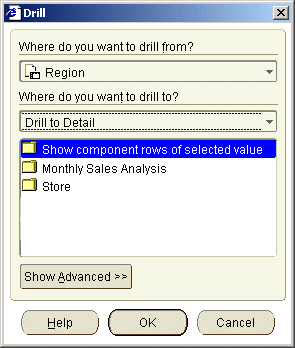
The list shows the Drill to Detail options available.
Select a Drill to Detail option from the list of available options.
(optional) If you want to change the default worksheet style for the Drill to Detail data, click Show Advanced and select a worksheet style from the Advanced options.
Click OK.
Discoverer displays the folder you selected in a new worksheet (unless you changed the advanced settings on the Drill dialog). If you want to save the new worksheet, you must save the Discoverer workbook (for more information, see "How to save workbooks").
This section explains how to use drill links in Discoverer, and contains the following topics:
A user defined drill link is a way to access (or drill out to) another worksheet or Internet page from a particular worksheet cell value. For example, you might select a drill link in a worksheet cell in the Region item to display a worksheet containing more detailed information about the region in the cell you selected. Or, an Internet site containing a map of the region.
In Discoverer Plus Relational, you can create you own drill links in worksheet items. When you add drill links to a worksheet, the drill links are available when the worksheet is accessed in Discoverer Viewer and Discoverer Desktop. In addition, the Discoverer manager might set up drill links for database files (for more information, see "About drill links defined by the Discoverer manager").
Drill links enable you to navigate from one worksheet to another (in any workbook that you have access to) and from a worksheet to an Internet URL.
When you create a drill link for a worksheet item, a drill link icon is displayed in every worksheet cell value in the worksheet for that item.
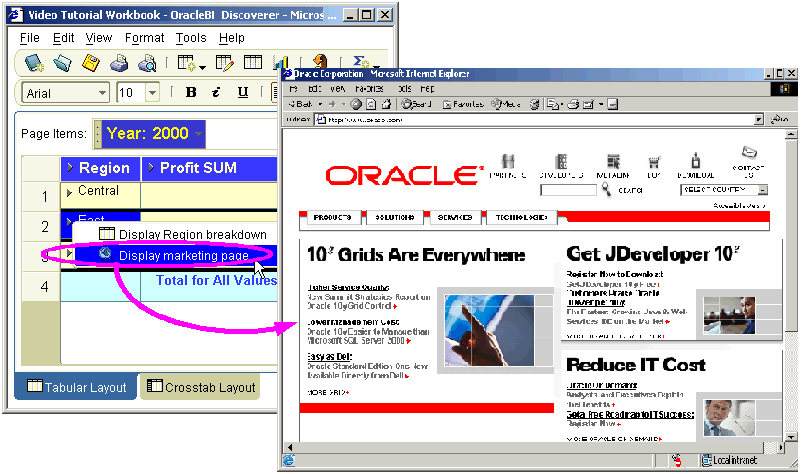
You can create more than one drill link for a worksheet item. When you select a drill link on a worksheet item that has multiple drill links, Discoverer displays a list of drill links available. In the example below, the Region worksheet cell has two drill links (i.e. Display Region breakdown, and Display marketing page).
Figure 10-7 Multiple drill links in a worksheet cell
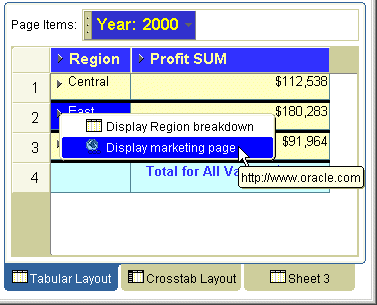
In Discoverer you can create:
static drill links (i.e. drill links that always display the same worksheet or Internet page)
dynamic drill links (i.e. drill links that display different worksheet data or Internet pages depending on the value of the worksheet cell where the drill link is selected)
The table below explains when to use different types of drill link.
| Drill link type | Use when: |
|---|---|
| Static drill link to a worksheet | The worksheet data displayed in the second worksheet is the same for each cell in the item.
For example, you might select a drill link in a cell of a worksheet item called Year to display a worksheet showing a sales summary for all years. For more information, see "How to create drill links to Discoverer worksheets". |
| Dynamic drill link to a worksheet | The worksheet data displayed in the second worksheet depends on the value in the cell where the drill link was selected (i.e. the target worksheet is filtered by a parameter).
For example, you might select a drill link in a cell of a worksheet item called Year to display sales information for that particular year. The value of the worksheet cell is passed to the target worksheet using a worksheet parameter. For more information, see "How to create drill links to Discoverer worksheets". |
| Static drill link to an Internet URL | The Internet URL opened is the same for each cell in the item.
For example, you might select a drill link in a cell of a worksheet item called Region to display an Internet page containing a map of all regions. For more information, see "How to create drill links to Internet URLs". |
| Dynamic drill link to an Internet URL | The Internet page displayed is different for each cell in the item (i.e. the Internet URL can accept the value of the cell).
For example, you might select a drill link in a cell of a worksheet item called Region to display an Internet page containing a map of the region in the selected cell. For more information, see "How to create drill links to Internet URLs". |
When files are stored on the middle tier machine, the Discoverer manager can make drill links available in worksheets to drill out to the file. The example below shows how clicking the drill link displays the report in the default text editor (in this case Microsoft Word) inside an Internet browser.
Figure 10-8 Drilling out to a text document in the database
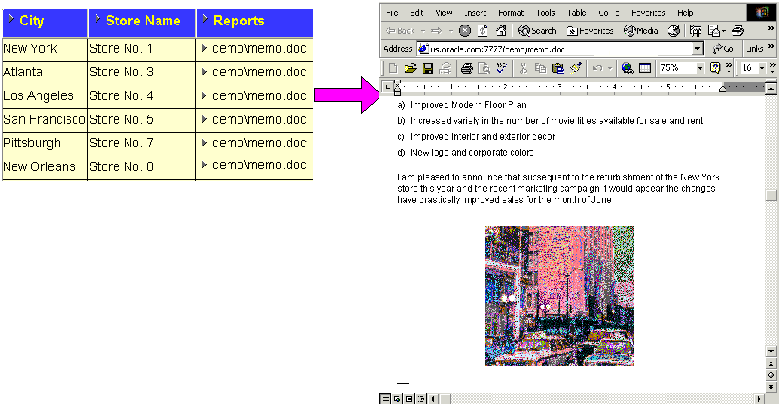
You use drill links that you set up yourself (or are set up by the workbook creator) to drill out to other worksheets or Internet URLs (for more information, see "About user defined drill links").
Drill links enable you to interconnect worksheets and Internet pages to enable both Discoverer Plus Relational and Discoverer Viewer users to analyze a wider range of data quickly and easily. For more information about creating drill links, see "How to create drill links".
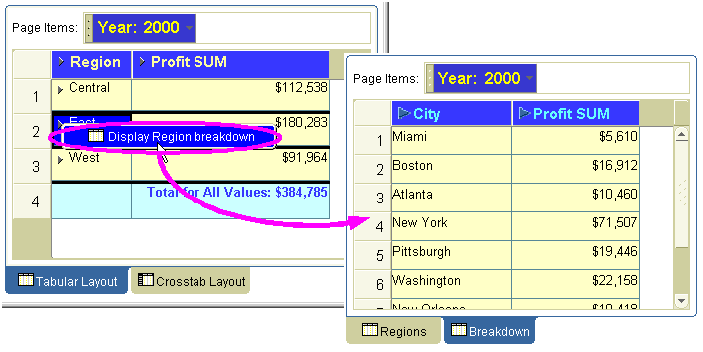
In the example below, the drill link on the Region item in the Tabular Layout worksheet displays the Breakdown worksheet with data for the selected region (e.g. East).
Figure 10-9 Discoverer worksheet item with a drill link
A worksheet item can have multiple drill links. In the example below, the Region worksheet item contains two drill links, which are displayed when you select the drill link icon. Selecting the 'Show marketing Internet page' link displays the Oracle Corporation Internet page in a browser.
Figure 10-10 Multiple drill links in a worksheet cell
You can also drill out to a file using a drill link (for more information, see "About drill links defined by the Discoverer manager".
This sections explains how to create drill links in Discoverer (for more information about drill links, see "About user defined drill links", and contains the following topics:
You create a drill link to a Discoverer worksheet when you want to connect worksheet item cell values to another worksheet. You can create either a static drill link or a dynamic drill link to a worksheet.
Hint: If you want to create a dynamic drill link to a worksheet, the target worksheet must contain at least one parameter.
To create a drill link to a Discoverer worksheet:
Display the worksheet that you want to edit.
(optional) Select the worksheet item to which you want to add the link (i.e. select an item heading or a cell in a column or row).
Choose Tools | Manage Links to display the "Manage Links dialog".
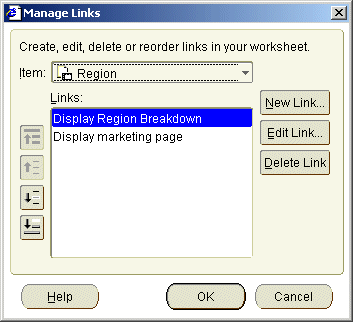
Hint: You can also display the Manage Links dialog by right-clicking on a worksheet cell and selecting the Manage Links option.
(optional) If you did not select a worksheet item in step 2, use the Link drop down list to select the worksheet item to which you want to add the link.
Click New Link to display the "New Link dialog".
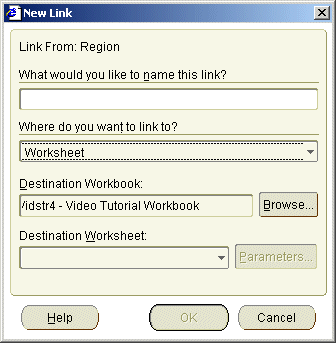
Enter a descriptive name for the drill link in the What would you like to name this link? field.
Select Worksheet from the Where do you want to link to? drop down list.
Select the target worksheet to display when the drill link is selected, as follows:
if the worksheet is in the current workbook, select a worksheet name in the Destination Worksheet drop down list
if the worksheet is in a different workbook, click Browse to display the "Choose Worksheet dialog" and select a worksheet
If you select a worksheet that contains no parameters, you can only create a static link (for more information about static links, see "About user defined drill links").
If you selected a target worksheet that contains no parameters, skip the next two steps.
If you select a target worksheet that contains an active parameter, click Parameters to display the "Parameters dialog", which enables you to specify the parameter value, or pass a dynamic worksheet value to the parameter.
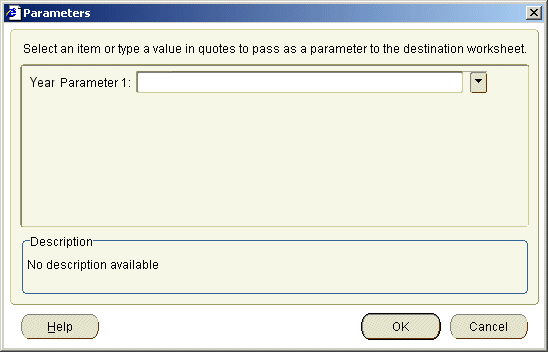
Create a static or dynamic drill link as follows:
To create a static drill link to a Discoverer worksheet that has an active parameter, do the following:
(optional) If you want to change the default value for active parameters, enter new parameter values into each of the fields in the Parameters area.
If you want to accept the default parameter value(s), skip this step.
Note: If you enter all possible parameter values for the parameter, the end user is not prompted to specify a parameter when they select the link. The target worksheet will always display the same data by default.
Click OK to close the Parameters dialog.
To create a dynamic drill link to a Discoverer worksheet that has a parameter, use the "Parameters dialog" to specify a parameter value as follows:
Click the down arrow next to the parameter field and select the worksheet item that you want to use as the value of the parameter in the target worksheet.
For example, if you select Year in the parameter field, when a user selects the drill link in a cell from the Year item, Discoverer passes the value of that cell to the target worksheet as a parameter value. In other words, if an end user selects a drill link in the 2005 cell, Discoverer displays data relating to 2005. If an end user selects a drill link in the 2006 cell, Discoverer displays data relating to 2006.
Click OK to close the Parameters dialog.
Click OK to save the drill link details and close the New Link dialog.
Click OK to close the Links dialog.
You create a drill link to an Internet URL when you want to connect worksheet cell values to an Internet page. You can create either a static drill link or a dynamic drill link to an Internet page.
To create a drill link to an Internet URL:
Display the worksheet that you want to edit.
(optional) Select the worksheet item to which you want to add the link (i.e. select an item heading or a cell in a column or row).
Choose Tools | Manage Links to display the "Manage Links dialog".

Hint: You can also display the Manage Links dialog by right-clicking on a worksheet cell and selecting the Manage Links option.
(optional) If you did not select a worksheet item in step 2, use the Item drop down list to select the worksheet item to which you want to add the link.
Click New Link to display the "New Link dialog".

Enter a descriptive name for the drill link in the What would you like to name this link? field.
Select URL from the Where do you want to link to? drop down list.
To create a static link to an Internet page, enter an Internet address in the Destination field (e.g. www.oracle.com).
To create a dynamic link to an Internet page:
Enter a URL in the Destination field, up to the part of the address that will take the dynamic value.
For example, you might type http://company.com/regions/
Click the Insert button and select the worksheet item whose values you want to use in the URL.
For example, you might select Region to append the name of a region to the URL.
Enter the rest of the URL.
For example, you might type /details.htm at the end of the URL.
Hint: You can also type the URL in full into the Destination field. Remember to enclose item names in angle brackets (i.e. <>).
The screenshot below shows how the Destination field would look if you had followed this example.
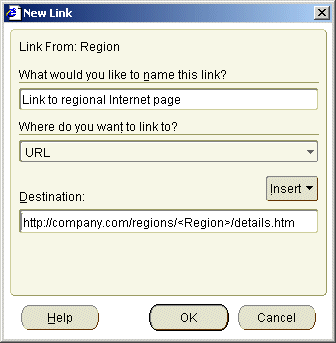
The URL contains the worksheet item name in angle brackets (e.g. <Region>), indicating that the value of that worksheet item is passed to the Web browser at runtime. For example, if you select a drill link in a Region item and the cell contains the value West, Discoverer passes the following URL to the default Web browser:
http://company.com/regions/West/details.htm
Click OK to save the drill link details and close the New Link dialog.
Click OK to close the Links dialog
You use drill links that you set up yourself (or are set up by the worksheet creator) to drill out to other worksheets or Internet pages. You can also drill out to a file stored in the database. For more information, see "About user defined drill links".
You can drill to another worksheet, Internet URL, or file stored in the database using:
a drill link icon (for more information, see "How to drill out to a worksheet or Internet URL using a drill link icon")
the Drill dialog (for more information, see "How to drill out to a worksheet or Internet URL using the Drill dialog")
You drill out to analyze data or information external to the current worksheet. For example, you might want to:
display a different worksheet in a new tab window
display an Internet page in a browser window
display a file (e.g. a Microsoft Word file) in a separate application
To drill out to a worksheet, Internet page, or file:
Select the drill link icon in the worksheet cell you want to drill out from.
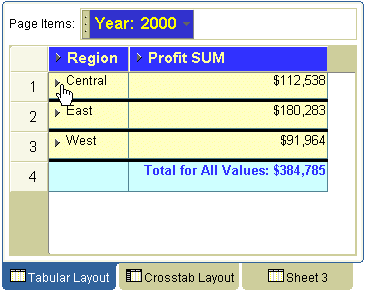
Discoverer displays a pop up list of drill links available. Select the link that you want to use from the pop up list.

Discoverer behaves as follows:
if you drill out to a worksheet in the same workbook, Discoverer displays the worksheet in a new tab window
if you drill out to a worksheet in a different workbook, Discoverer closes the current workbook and opens the new workbook and worksheet
if you drill out to an Internet page, Discoverer displays the Internet page in a new browser window
if you drill out to a file, Discoverer displays the file using associated application (e.g. a text editor)
To drill out to a worksheet or Internet URL using the Drill dialog:
Select the worksheet item or cell you want to drill on.
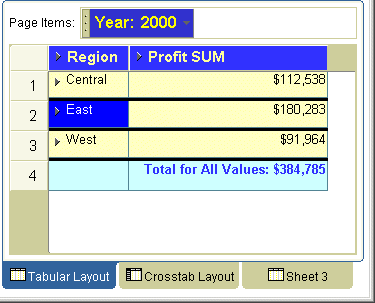
Choose Tools | Drill to display the "Drill dialog".

Hint: You can also display the Drill dialog by right-clicking on a worksheet cell and selecting the Drill option.
If you did not select a worksheet cell in step 1, use the Where do you want to drill from? drop down list to select the worksheet item you want to drill on.
Select Drill to Link from the Where do you want to drill to? drop down list.
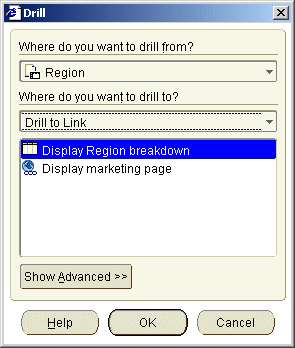
Select an item from the list.
Click OK.
Discoverer behaves as follows:
if you drill out to a worksheet in the same workbook, Discoverer displays the worksheet in a new tab window
if you drill out to a worksheet in a different workbook, Discoverer closes the current workbook and opens the new workbook and worksheet
if you drill out to an Internet URL, Discoverer displays the Internet page in a new browser window