|
Oracle® Application Server Portal User’s Guide
10g (9.0.4) Part No. B10358-01 |
|
|
|
|
|
Oracle® Application Server Portal User’s Guide
10g (9.0.4) Part No. B10358-01 |
|
|
|
|
This chapter explains how to create different types of pages, including how to create page layouts, set up tabs, configure display options, add content, and perform other related tasks. It includes the following main sections:
The content of this chapter is intended for users with at least the Manage privilege on the pages you will work with. If a particular task requires or can be performed under different privileges, those privileges will be listed before the steps of that task. For more information on page privileges, see Section 7.12.4, "Page Privileges".
A page is a container for your content. There are five base page types. This section explains how to create these types of pages. It includes the following subsections:
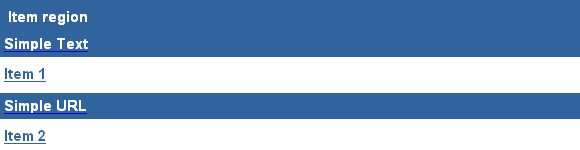
Standard pages display portlets, items, tabs, and sub-page links.
Sub-pages enable you to create additional levels in your page hierarchy.
URL pages display the contents of a particular URL.
PL/SQL pages display the results of executing PL/SQL code.
Creating a JavaServer Page (JSP)
JSP pages display the results of executing a JavaServer Page (JSP).
Creating Pages for Mobile Devices
Mobile pages display portlets and items. Mobile pages provide a way to design pages specifically for displaying in mobile devices, such as cell phones. Standard pages can also be displayed in mobile devices, however the standard page design environment is more suited to creating pages for larger display devices, such as PC monitors.
You can create mobile pages only if the Enable Mobile Page Design global setting is enabled. Typically, global settings are controlled by the portal administrator. They’re located in the Settings portlet on the Administer tab of the Portal Builder.
Standard pages display portlets, items, tabs, and sub-page links.
To create a standard page:
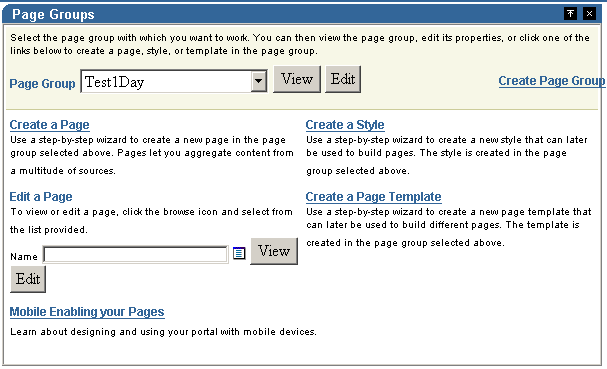
In the Portal Builder, click the Build tab to bring it forward.
Default installations of OracleAS Portal include the Page Groups portlet on the Build tab of the Portal Builder. If your installation does not, see your portal administrator to for this portlet’s location.
Go to the Page Groups portlet, and select the page group that will own the new page from the Page Group drop-down list.
Click Create a Page.
On the resulting page, choose Standard from the Page Type list.
If Standard is not included in this list, the Standard page type has been excluded from the page group. If you have the required privileges, you can click the Configure link next to the Page Type list to configure the page group to include standard pages If you do not have the required privileges, see your page group administrator.
In the Name field, enter a name for the page. The name can be used in a URL to directly access the page. Direct access URLs take the following format:
http://<hostname>:<portnumber>/pls/<dad>/url/page/<pagegroupname>/<pagename>
For example:
http://mymachine.mycompany.com:5000/pls/portal/url/page/myportal/mypage
http://mymachine.mycompany.com:5000/pls/portal/url/page/myportal/mypage/mysubpage
The name is limited to 40 characters, and can contain any alphanumeric character (A-Z, a-z, 0-9), spaces, and the following special characters:
- _ . ! , ; = + ~ @ ( ) [ ] { } ^ $
In the Display Name field, enter a descriptive name for the page.
The display name is limited to 40 characters. This is the name that is displayed in the Portal Navigator. It is not required that you enter a display name. If you leave this field blank, Portal assigns a default display name.
(Optional) In the Description field, enter a description for the page.
The description is displayed only when you edit the page. It does not appear to the user.
The description must not exceed 2000 characters.
From the Navigation Page For Banner list, choose a navigation page to use as a banner for the page.
The navigation page is added as a portlet to a region across the top of the page. Choose a navigation page that fits appropriately. If you do not want to include a banner across the top of the page, choose <None> from this list.
This list includes all the navigation pages in this page group and the Shared Objects page group that have been published as portlets.
If you choose a page template in step 11, the navigation page you choose in this list will be ignored.
Select a page caching option.
Caching at the system level places a single copy of the page's structure (or structure and content) in the system cache for all users. Consequently, all page customization options are disabled.
Click Next.
(Optional) From the Page Template list, choose a page template to apply to the page.
Page templates allow you to standardize the appearance of your pages through the application of a predetermined structure and a pre-selected style. You can also use a template to include standard images and other content, such as a corporate logo. If you do not want to base your page on a template, choose <None> from this list.
The Preview section provides an example of the structure and content of the page template.
|
Note: You cannot add new regions to pages based on templates. You should apply a page template to a page only if you are sure that the page template provides the exact layout that you want to use for your page.For more information about templates, see Section 6.1, "Working with Page Templates". |
Click Next.
If you do not see the Next button, you have based your page on a page template that does not allow pages to use their own style and access control. Choose a different page template, or go to step 18.
(Optional) From the Style list, choose a style to apply to this page.
The Preview section provides an example of how portlets, items, tabs, and common style elements will appear in the chosen style.
If you have based your page on a page template that does not allow pages to use their own style, you will not see this step.
Click Next.
If you do not see the Next button, you have based your page on a page template that does not allow pages to use their own access control. Go back and choose a different page template, or go to step 18.
(Optional) Select Display Page To Public Users if you want everyone, including users who are not logged into the portal, to be able to view the page.
(Optional) Select Enable Item Level Security if you want content contributors to be able to specify access privileges on individual items in this page.
If you do not select this check box, item privileges are inherited from the pages on which the items appear. For more information, see Section 7.8.9.1, "What Is Item Level Security?"
(Optional) To explicitly grant access to specific users or groups:
In the Grantee field, enter the name of the user or group that you want to allow to access this page.
Optionally, click either the Users or Groups icon and select from the list provided.
|
Note: OracleAS Portal uses the Oracle Internet Directory (OID) for identity management, serving as the repository for users and groups. In OID, groups are uniquely identified by their distinguished name (DN). Each group has a unique DN, though many groups can share a common name, in the same way that two people can share a common name, yet have completely different lineage (i.e., John Smith and John Doe). When working within the portal, groups created from within that portal are displayed simply with their common names. However, when the portal references a group from some other location in the OID—such as a group from some other portal associated with the same Identity Management Infrastructure—the DN of the group is displayed to distinguish it from the portal’s locally defined groups. |
Choose an access privilege level from the list.
|
Note: The order of the privileges in the list is not based on any hierarchy of privileges. For more information, see Section 7.12.4, "Page Privileges". |
Click Add.
Click Finish to create the page and display it in Edit mode.
Any page you add to a page group is a sub-page to the page group’s root page (the root is the page that is created when you create a page group). You may want to add to your hierarchy of sub-pages to create additional levels. For example, let’s say you have the page group Departments, under which you create Orders, Fulfillment, and Accounts pages. Under the Accounts page, you create three sub-pages: Regions, Forms, and Tips. This section explains how to create a sub-page to a standard page.
To create a sub-page to a standard page:
Go to the page for which you will create sub-pages.
For information on locating a page, see Section 7.2, "Navigating to Pages".
Switch to Edit mode.
Click the Create: Sub-Pages link in the toolbar at the top of the page.
Follow the steps for creating a page as described in Section 7.1.1, "Creating a Standard Page".
You can create other types of sub-pages beneath a standard page. For more information, see the other sub-sections in Section 7.1, "Creating Pages".
URL pages display the content of a particular URL. For example, when a user clicks a link to a URL page in OracleAS Portal, the resulting page is the target URL. URL pages allow you to transparently include information from other sites in your page group.
To create a URL page:
In OracleAS Portal, click the Build tab to bring it forward.
Go to the Page Groups portlet, and, from the Page Group drop-down list, select the page group that will own the new page.
Click Create a Page.
In the Page Type list, choose URL.
If URL is not included in this list, the URL page type has been excluded from the page group. If you have the required privileges, you can click the Configure link next to the Page Type list, and configure the page group to include this type.
In the Name field, enter a name for the page. The name can be used in a URL to directly access the page. Direct access URLs take the following format:
http://<hostname>:<portnumber>/pls/<dad>/url/page/<pagegroupname>/<pagename>
For example:
http://mymachine.mycompany.com:5000/pls/portal/url/page/myportal/mypage
http://mymachine.mycompany.com:5000/pls/portal/url/page/myportal/mypage/mysubpage
The name is limited to 40 characters, and can contain any alphanumeric character (A-Z, a-z, 0-9), spaces, and the following special characters:
- _ . ! , ; = + ~ @ ( ) [ ] { } ^ $
In the Display Name field, enter a descriptive name for the page.
The display name is limited to 40 characters. This is the name that is displayed In the Portal Navigator.
(Optional) In the Description field, enter a description for the page.
The description is displayed only when you edit the page. It does not appear to the user.
The description must not exceed 2000 characters.
Click Next.
In the URL field, enter the URL of the Web page to show when the page is displayed.
Click Next.
(Optional) Select Display Page To Public Users if you want everyone, including users who are not logged into the portal, to be able to view the page.
(Optional) To explicitly grant access privileges to specific users or groups:
In the Grantee field, enter the name of the user or group who will access this page.
Optionally, click the Users or Groups icon, and select from the list provided.
|
Note: OracleAS Portal uses the Oracle Internet Directory (OID) for identity management, serving as the repository for users and groups. In OID, groups are uniquely identified by their distinguished name (DN). Each group has a unique DN, though many groups can share a common name, in the same way that two people can share a common name, yet have completely different lineage (i.e., John Smith and John Doe). When working within the portal, groups created from within that portal are displayed simply with their common names. However, when the portal references a group from some other location in the OID—such as a group from some other portal associated with the same Identity Management Infrastructure—the DN of the group is displayed to distinguish it from the portal’s locally defined groups. |
In the list, choose a privilege level.
|
Note: The order of the privileges in the list is not based on any hierarchy of privileges. For more information, see Section 7.12.4, "Page Privileges".The following page privileges do not apply to URL pages: Manage Items With Approval, Manage Style, Customize Portlets, Customization. |
Click Add.
Click Finish to create the page.
PL/SQL pages display the results of executing a piece of PL/SQL code. PL/SQL pages allow you to include data from your database in your page group.
|
Note: To create a page, you must have the Create global privilege on All Pages, and at least the Manage privilege on the parent page of the new page. |
To create a PL/SQL page:
In OracleAS Portal, click the Build tab to bring it forward.
Go to the Page Groups portlet, and select the page group that will own the new page from the Page Group drop-down list.
Click Create a Page.
In the Page Type list, choose PL/SQL.
If PL/SQL is not included in this list, the PL/SQL page type has been excluded from the page group. If you have the required privileges, you can click the Configure link next to the Page Type list, and configure the page group to include this type.
In the Name field, enter a name for the page. The name can be used in a URL to directly access the page. Direct access URLs take the following format:
http://<hostname>:<portnumber>/pls/<dad>/url/page/<pagegroupname>/<pagename>
For example:
http://mymachine.mycompany.com:5000/pls/portal/url/page/myportal/mypage
http://mymachine.mycompany.com:5000/pls/portal/url/page/myportal/mypage/mysubpage
The name is limited to 40 characters, and can contain any alphanumeric character (A-Z, a-z, 0-9), spaces, and the following special characters:
- _ . ! , ; = + ~ @ ( ) [ ] { } ^ $
In the Display Name field, enter a descriptive name for the page.
The display name is limited to 40 characters. This is the name that is displayed In the Portal Navigator.
(Optional) In the Description field, enter a description for the page.
The description is displayed only when you edit the page. It does not appear to the user.
The description must not exceed 2000 characters.
Click Next.
In the PL/SQL Code field, enter (or paste) the PL/SQL code you want to execute when the page is displayed.
You do not need to include BEGIN and END statements, but you must include the final semicolon (;).
In the PL/SQL Execute Options section, select either:
Public to execute the PL/SQL code as the PUBLIC database schema.
Creator to execute the PL/SQL code as the database schema mapped to your user account.
Schema to execute the PL/SQL code as a specific database schema. Enter the database schema name, or click the Browse icon and select a schema from the list provided. This option is available only if you have DBA privileges.
Click Next.
(Optional) Select Display Page To Public Users if you want everyone, including users who are not logged into the portal, to be able to view the page.
(Optional) To explicitly grant privileges to specific users or groups:
In the Grantee field, enter the name of the user or group that you want to allow to access this page.
Optionally, click the Users or Groups icon, and select from the list provided.
|
Note: OracleAS Portal uses the Oracle Internet Directory (OID) for identity management, serving as the repository for users and groups. In OID, groups are uniquely identified by their distinguished name (DN). Each group has a unique DN, though many groups can share a common name, in the same way that two people can share a common name, yet have completely different lineage (i.e., John Smith and John Doe). When working within the portal, groups created from within that portal are displayed simply with their common names. However, when the portal references a group from some other location in the OID—such as a group from some other portal associated with the same Identity Management Infrastructure—the DN of the group is displayed to distinguish it from the portal’s locally defined groups. |
In the list, choose a privilege level.
|
Note: The order of the privileges in the list is not based on any hierarchy of privileges. For more information, see Section 7.12.4, "Page Privileges".The following page privileges do not apply to PL/SQL pages: Manage Items With Approval, Manage Style, Customize Portlets, Customization (Style). |
Click Add.
Click Finish to create the page.
JSP pages display the results of executing a JavaServer Page (JSP). You can create JSPs in OracleAS Portal, provided the parent page group is configured to allow for the creation of JSPs, and the JSP page type is included in the Page Group’s list of available page types. For more information, see Section 4.4.6, "Enabling JavaServer Page Access" and Chapter 5, "Making a Page Type Available to a Page Group".
You can create a JavaServer Page two ways through the OracleAS Portal user interface:

You can also create JSPs for use in OracleAS Portal outside the Portal user interface, for example with Oracle9i JDeveloper. For more information, see the Oracle9i JDeveloper page on the Oracle Technology Network, http://otn.oracle.com/products/jdev/content.html.
To create a JSP through the Page Creation Wizard:
In the Portal Builder, click the Build tab to bring it forward.
Go to the Page Groups portlet, and select the page group that will own the new page from the Page Group drop-down list.
Click the Create a Page link.
From the Page Type list, select JSP.
In the Name field, enter a name for the page. The name can be used in a URL to directly access the page. Direct access URLs take the following format:
http://<hostname>:<portnumber>/pls/<dad>/url/page/<pagegroupname>/<pagename>
For example:
http://mymachine.mycompany.com:5000/pls/portal/url/page/myportal/mypage
http://mymachine.mycompany.com:5000/pls/portal/url/page/myportal/mypage/mysubpage
The name is limited to 40 characters, and can contain any alphanumeric character (A-Z, a-z, 0-9), spaces, and the following special characters:
- _ . ! , ; = + ~ @ ( ) [ ] { } ^ $
In the Display Name field, enter a descriptive name for the page.
The display name is limited to 40 characters. This is the name that is displayed In the Portal Navigator.
(Optional) In the Description field, enter a description for the page.
The description is displayed only when you edit the page. It does not appear to the user.
The description must not exceed 2000 characters.
Select a caching option for the JSP.
For more information, see Section 7.10.3, "Page Caching Options"
Click Next.
In the File Name field under JSP Source, enter the path and file name of the JSP, JAR, or WAR file to upload for the page.
Optionally, click Browse to locate and select the file.
In the Initial JSP for JAR or WAR Files section, enter the name of the JSP file to execute when the user first views the page in the Initial JSP File field.
Do this only if you uploaded a JAR or WAR file in step 8.
Click Next.
Select Display Page to Public Users to allow all users to view this page, even users who are not logged on.
In the Grantee field under Grant Access, enter the name of the users or groups who should have access to this page.
Optionally, click the Users or Groups icon and select from the list provided.
From the list next to the Grantee field, select an access level for the selected user or group.
Click Add.
Repeat steps 14 through 16 until all relevant users and groups have been granted access.
Click Finish.
To create a JSP by copying an existing page:
In the Portal Navigator, click the Page Groups tab to bring it forward.
To get to the Portal Navigator, click the Navigator link at the top of the Portal Builder. If the link does not display, ask your page group or portal administrator for access to this link.
Click the page group that owns the page you will copy as a JSP.
On the resulting page, click the Pages node.
Click the Copy as JSP link next to the page you will copy.
Enter a Name and a Display Name for the JSP.
The name you enter into the Name field is used by OracleAS Portal in the creation of direct access URLs. The Display Name becomes the title of the JSP.
Under Content Options, choose from:
Use original page’s portlet instances. Select this option to copy the customizations that were made to portlets on the original page to portlets on the JSP.
Create externally published portlets. Select this option to create an externally published portlet for each portlet on the original page, and then use the externally published portlets on the JSP. If you select this option, any customizations made to the portlets on the original page will not affect the portlets on the JSP.
Click OK.
Through OracleAS Portal, you can create portal pages specifically for mobile devices, such as cell phones. Note that standard pages can also be viewed on mobile devices. However, to provide page designers with more control over the appearance of pages displayed on mobile devices, Portal provides the means of setting up portal pages specifically for display on the small screens available on such devices.
This section describes Portal’s mobile support and explains how to set up and manage mobile pages through the Portal user interface. It includes the following subsections:
Before you can create a mobile page, your portal administrator must enable their creation via the Global Settings link in the Services portlet. For information on setting up OracleAS Portal for mobile support, see the OracleAS Portal Configuration Guide. You’ll find this guide on Portal Center, http://portalcenter.oracle.com. Click the Search icon in the upper right corner of any Portal Center page.
A mobile page is a page that is specifically designed for display on a mobile device. Mobile pages are presented in a hierarchical tree structure. The structure is defined by levels. Any level, including the top level, can contain any number of portlets, items, and levels. This provides the flexibility to represent a large amount of content, yet limit the list displayed at any one time to fit the limited display sizes of most mobile devices. Mobile pages give page designers complete control of how a page will look on a mobile device.
When creating a mobile page, the page designer can choose to start with a blank page or to base the page on an existing standard page. If the page designer chooses to base the mobile page on an existing standard page, the mobile-enabled portlets on the standard page are shared with the mobile page. This means that any customizations made to the portlets on the standard page will also apply to the portlets on the mobile page.
|
Note: Only the portlets that are on the standard page at the time of the mobile page's creation are shared. If portlets are added to the standard page after the mobile page has been created, these new portlets are not shared. The page designer can explicitly share the new portlets and add the shared portlet instances to the mobile page. For more information, see Section 7.6.2.5, "Sharing a Portlet Across Multiple Pages". |
Some things to consider before you create your pages:
If you use standard pages exclusively, they may not display optimally on the small screens available on mobile devices. On the other hand, if you decide to create a standard and a mobile version of pages, you’ll end up maintaining two sets of portal pages.
If you anticipate heavy traffic on your mobile pages, it will probably be worth it to risk the overhead and create two sets of pages. On the other hand, if only a few users will access your portal through mobile devices, or if mobile access will be infrequent, it’s probably not worth the overhead.
If you anticipate any mobile access, be sure to test how your standard pages will look on mobile devices. Go to your standard page; switch to Edit mode; and click the Mobile: Preview link in the toolbar at the top of the page.
If the portal administrator has enabled the mobile access global setting, any standard page can be displayed in a mobile device. The structure of a standard page is flattened into a list of portlets and items from which users can make selections. Any tabs on the page are converted into levels, which users can drill down into to view more content. When a standard page is requested by a mobile device, only those portlets and items that are mobile-enabled are displayed. Mobile-enabled portlets are those portlets capable of handling MobileXML. It’s easy to know which portlets are mobile-enabled by noting which portlets are available in the portlet repository when you add a portlet to a mobile page. Mobile-enabled items include any items based on BaseURL, BasePageLink, and BaseSubPageDisplay.
When editing a standard page, page designers can preview how the page will look in a mobile device by clicking the Mobile: Preview link in the toolbar at the top of the page.
Before you can create a mobile page, your portal administrator must enable their creation via the Global Settings link in the Services portlet. For information on setting up OracleAS Portal for mobile support, see the Oracle Application Server Portal Configuration Guide. You’ll find this guide on Portal Center, http://portalcenter.oracle.com. Click the Search icon in the upper right corner of any Portal Center page.
Mobile pages provide a way to design pages to display portlets and items specifically within mobile devices, such as cell phones. Standard pages can also be displayed in mobile devices; however, the standard page design environment is more suited to creating pages for larger display devices, such as computer monitors.
If you base your mobile page on an existing standard page, the layout of the existing page is flattened so that it is more suitable for display on mobile devices:
The standard page is examined and its regions are arranged in a logical order.
The mobile content in these regions is copied over into the single region of the new mobile page. Non-mobile content is not copied over to the new mobile page. Non-mobile content includes any portlets that are not mobile-enabled, and any item types that are not based on the BaseURL, BasePageLink, and BaseSubPageDisplay item types.
The portlet customizations on the mobile portlets are shared between the standard page and the mobile page. This means that any customizations made to either page affect the other page. For example, if a user customizes a stock portlet on a page with a specific portfolio, and that page was used as the initial content for a mobile page, then the user will see the same customizations on the mobile page. Even though the portlets are shared, they will not be listed in the Portlet Repository.
Any tabs on the standard page are converted into levels on the new mobile page.
The access control settings on the standard page are copied to the new mobile page. You can edit the mobile page to change these settings later. Privileges that do not apply to mobile pages are converted as follows:
Manage Items With Approval becomes Manage Content
Manage Style becomes Customize Portlets (Full)
Customization (Style) becomes View
|
Note: To create a page, you must have the Create global privilege on All Pages, and at least the Manage privilege on the parent page of the new page. |
To create a mobile page:
In OracleAS Portal, click the Build tab to bring it forward.
Go to the Page Groups portlet, and select a page group that will own the new page from the Page Group drop-down list.
Click Create a Page.
In the Page Type list, choose Mobile.
If Mobile is not included in this list, the mobile page design global setting is not enabled, or the Mobile page type has not been included in the page group. If you have administrative privileges, you can add this type to the list of available types by clicking the Configure link next to the Page Type field. Use this to configure the page group that owns this page to include the Mobile page type.
In the Name field, enter a name for the page. The name can be used in a URL to directly access the page. Direct access URLs take the following format:
http://<hostname>:<portnumber>/pls/<dad>/url/page/<pagegroupname>/<pagename>
For example:
http://mymachine.mycompany.com:5000/pls/portal/url/page/myportal/mypage
http://mymachine.mycompany.com:5000/pls/portal/url/page/myportal/mypage/mysubpage
The name is limited to 40 characters, and can contain any alphanumeric character (A-Z, a-z, 0-9), spaces, and the following special characters:
- _ . ! , ; = + ~ @ ( ) [ ] { } ^ $
In the Display Name field, enter a descriptive name for the page.
The display name is limited to 40 characters. This is the name that is displayed In the Portal Navigator.
(Optional) In the Description field, enter a description for the page.
The description is displayed only when you edit the page. It does not appear to the user.
The description can contain up to 2000 characters.
Select a page caching option.
Caching at the system level places a single copy of the page's structure (or structure and content) in the system cache for all users. Consequently, all page customization options are disabled.
For more information, see Section 7.10.1, "Changing How a Page Is Cached" and Section 7.10.3, "Page Caching Options"
Click Next.
Select:
Blank Page to create a blank mobile page.
Base On Existing Page to pre-populate the mobile page with the same content as an existing page.
Click the Browse icon next to the Existing Page field, and the Return Object link next to the page you will use as the starting point for your mobile page.
|
Note: You can base a mobile page only on a Standard page. If you want to create a new mobile page based on an existing mobile page, copy the mobile page, then edit the copy. |
Click Next.
(Optional) Select Display Page To Public Users if you want everyone, including users who are not logged into the portal, to be able to view the page.
(Optional) To explicitly grant privileges to specific users or groups:
In the Grantee field, enter the name of the user or group you will allow to access this page.
Alternatively, click the Users or Groups icon, and select from the list provided.
|
Note: Because Oracle Internet Directory (OID) can include multiple containers that can use the same group names, the distinguished name (DN) is displayed next to any group that does not belong to the local OracleAS Portal instance. |
In the list, choose a privilege level.
Alternatively, click the Users or Groups icon, and select from the list provided.
|
Note: If you based your mobile page on an existing page, the new page uses the same access settings as the existing page. You can change these settings later. Privileges that do not apply to mobile pages are converted as follows:
|
Click Add.
Click Finish to create the page.
If you based your mobile page on an existing page, and the existing page is complex, the page creation process may take a while as the existing page is converted into a layout more suited for display on mobile devices. When you click the Finish button, you are given the opportunity of continuing the page creation process in the background so that you can move on to other tasks. If you attempt to edit the mobile page before the creation is completed, a pop up window will inform you that the page is not yet complete.
If you add a portlet to a page that was used as the starting point for a mobile page, that portlet will not appear on the mobile page. If you want the portlet to also appear on the mobile page, you must add it to the mobile page. Additionally, if you want to share any customizations made to the portlet between the two pages, you must explicitly share the portlet on one page, and then add that shared portlet instance to the other page. For more information, see Section 7.6.2.5, "Sharing a Portlet Across Multiple Pages".
To add content to a mobile page:
Go to the mobile page you will work with.
For information on locating a page, see Section 7.2, "Navigating to Pages".
Click Edit.
Click the Add Portlet icon to add a portlet to the page.
Navigate through the Portlet Repository to find the portlet you want to add, click the portlet name, then click OK. In the mobile page’s Edit mode, click Edit Defaults next to a portlet to change the portlet properties.
Click the Add Item icon to add an item to the page.
You can add any item type that is based on BaseURL, BasePageLink, and BaseSubPageDisplay. This means the item types potentially available for mobile pages include Simple URL, URL, Simple Page Link, Page Link, and SubPage Display. This also means that any item types that users create that are based on these types are also potentially available for adding to mobile pages.
Once an item has been added to a page, click the Create or Edit link next to an item to create a new item or change the item properties.
|
Note: When a page group is first created, none of these item types are available. You can edit the properties of the parent page group to make these item types available. |
Click the Add Level icon to add a level to the page.
A level is displayed on the page as a link that users can click to drill down to more content. Levels provide the flexibility to represent a large amount of content while limiting the displayed list to fit the small display sizes of most mobile devices.
Click the Level Properties icon to change the name of the level, or to specify who can access a particular level.
Levels are the equivalent of tabs on a standard page, and the same access rules apply; see Section 7.5.3.3, "Controlling Access to a Tab" for more information.
Click the Rearrange icon to rearrange the order of portlets, items, and levels within the current level.
Select the check box next to one or more portlets, items, and levels and click Hide to hide them on the page.
Select the check box next to one or more hidden portlets, items, and levels (displayed in gray) and click Show to show them on the page.
Select the check box next to one or more portlets, items, and levels and click Delete to remove them from the page.
Select the check box next to one or more portlets and items, and click Move to move them to a different level of the page.
|
Note: You cannot move levels. |
Select the check box next to one or more portlets, and click Share to make these particular instances of the portlets available to other pages.
For more information, see Section 7.6.2.5, "Sharing a Portlet Across Multiple Pages".
You can use a mobile device to access a portal page that contains a page portlet within another page portlet. However, when a user navigates to the inner page portlet, it may not be possible to navigate back without going back to the Home page. The Back link context is lost when page portlets are nested on mobile pages and when viewing a standard page on a mobile device.
MobileXML is well-formed XML that conforms to the Oracle Application Server Wireless MobileXML DTD. The Oracle Application Server Wireless gateway transforms MobileXML generated by OracleAS Portal portlets into device-specific markup (such as tinyHTML and WML). This allows your MobileXML portlet to be displayed on a variety of mobile devices automatically.
OracleAS Portal includes a MobileXML portlet in its portlet repository. Use it to write MobileXML.The following steps describe placing the MobileXML portlet on a standard page.
For more information on MobileXML and the MobileXML DTD, see the Oracle Application Server Wireless documentation on the Oracle Technology Network, http://otn.oracle.com.
When editing pages, the first step often requires navigating to the page. We recommend wherever possible that you go through the Portal Builder page; however, in some cases, for some tasks, you will go through the Navigator. This section provides information on the different ways you can locate pages, including:
You locate pages through the Portal Builder page via the Page Groups portlet. Default installations of OracleAS Portal place this portlet on the Build tab of the Portal Builder page. If you don’t find it there, ask your portal administrator where this portlet is located.
To locate a page through the Portal Builder page:
In the Portal Builder page, click the Build tab to bring it forward.
Go to the Page Groups portlet.
Click the Browse icon next to the Name field under Edit a Page.
In the window displayed, click the Plus icon next to the page group that owns the page you’re locating.
In this way, drill to the relevant page, and click the Return Object link next to it.
In the Page Groups portlet, click the View or Edit button, depending on what you will do next, next to the now populated Name field.
You locate pages in the Navigator first through the page’s page group, then through one of the nodes under that page group, either the Pages, Templates, or Navigation Pages node. This section describes how to get to these nodes in the Navigator.
To locate a page through the Navigator:
In the Portal Builder page, click the Navigator link at the top of the page.
In the Navigator, click the Page Groups tab to bring it forward.
At this point, if you wish you can enter the name of the page you want to locate in the Find field at the top of the tab, click Go, and select the page from the list of returned results. If you’re unsure of the page name, or prefer to drill to a specific page, continue with Step 3.
Click the page group that owns the page you want to locate.
On the resulting page, click the node for the type of page you want to locate:
Click the Pages node to locate standard, mobile, JSP, URL, and PL/SQL type pages.
If the page you want is a sub-page of one of the main pages, drill to it by clicking the Sub-Pages link next to its parent page.
Click the Templates node to locate page templates.
Click the Navigation Pages node to locate navigation pages.
In addition to the many actions you can perform within a page, there are a number of things you can do to the entire page. This section explores those actions and explains how to carry them out. It includes the following subsections:
You can use an existing page as a starting point for a new page. Use the Copy feature to copy an existing page, and then edit the copy. Note that you can create a copy of a page only within the same page group as the original page.
To copy a page:
In the Portal Navigator, click the Page Groups tab to bring it forward.
To get to the Portal Navigator, click the Navigator link at the top of the Portal Builder. If the link does not display, ask your page group or portal administrator for access to this link.
On the resulting page, click the page group that owns the page you want to copy.
|
Tip: If you want to copy the page group's home page, click the Copy Root Page link next to the page group. |
On the resulting page, click the Pages node.
Click the Copy link next to the page you want to copy.
|
Note: If the page you want to copy is a sub-page of one of the pages listed here, click the Sub-Pages node next to the parent page, and continue to drill down the page hierarchy until you see the page you want to copy listed in the Portal Navigator. |
In the Page Group Map, click the Copy Here link next to the page under which you want to create the copy.
|
Note: You can create a copy only in the same page group as the original page. |
In the Name field, enter a name for the new page. The name can be used in a URL to directly access the page. Direct access URLs take the following format:
http://<hostname>:<portnumber>/pls/<dad>/url/page/<pagegroupname>/<pagename>
For example:
http://mymachine.mycompany.com:5000/pls/portal/url/page/myportal/mypage
http://mymachine.mycompany.com:5000/pls/portal/url/page/myportal/mypage/mysubpage
The name is limited to 40 characters, and can contain any alphanumeric character (A-Z, a-z, 0-9), spaces, and the following special characters:
- _ . ! , ; = + ~ @ ( ) [ ] { } ^ $
In the Display Name field, enter a descriptive name for the new page.
The display name is limited to 40 characters. This is the name that is displayed In the Portal Navigator.
(Optional) Select Copy Access Control if you want the new page to have the same privilege settings as the original page.
(Optional) Select Copy Sub-Pages if you want to include the original page's sub-pages in this copy.
|
Note: The copy options specified for the page also apply to its sub-pages. For example, if you select Copy Access Control, the privileges of the sub-pages are also copied. Also, copied sub-pages retain their original names. |
(Optional) Select Copy Content to copy the content of the original page as well as its properties.
(Optional) Select Copy Portlet Customizations to copy any customizations that were made to the portlets on the original page.
If you do not select this option, the portlets on the new page are reset to their default settings.
|
Note: This option is only available if you select Copy Content. |
Click OK to create the new page.
You can move a page to a different location within the page group that owns it.
You cannot move a page if an item in that page or any of its sub-pages has been locked by a WebDAV client or is checked out by another user.
Moving a page also moves all of its sub-pages.
You cannot move a page to a different page group.
To move a page:
In the Portal Navigator, click the Page Groups tab to bring it forward.
To get to the Portal Navigator, click the Navigator link at the top of the Portal Builder. If the link does not display, ask your page group or portal administrator for access to this link.
On the resulting page, click the page group that owns the page you will move.
Click the Pages node.
If necessary, to drill down to the right page click the Sub-pages link next to the page that owns the page you will move.
Click the Move link next to the page you want to move.
In the Page Group Map, click the Move Here link next to the page under which you want to move the page.
When you delete a page, all of its sub-pages are also deleted. Deleted pages cannot be retrieved.
To delete a page:
In the Portal Navigator, click the Page Groups tab to bring it forward.
To get to the Portal Navigator, click the Navigator link at the top of the Portal Builder. If the link does not display, ask your page group or portal administrator for access to this link.
On the resulting page, click the page group that owns the page you want to delete.
Click the Pages node.
Click the Delete link next to the page you want to delete.
In the confirmation page, click Yes.
|
Note: All of this page’s sub-pages are also deleted. Separate confirmations for sub-pages are not displayed. |
If you have the appropriate privileges, you can delete a sub-page by switching to Edit mode, Graphical view and clicking the Delete icon next to the sub-page link in a sub-page links region.
Before users can add a page to a region on another page, the page being added must first be published as a portlet.
You can publish only the following types of pages as portlets: navigation pages, Standard pages, and page types you create that are based on the Standard page type.
To publish a page as a portlet:
Go to the page you will publish as a portlet.
For information on locating a page, see Section 7.2, "Navigating to Pages".
Switch to Edit mode.
Click the Properties link next to Page in the page toolbar.
Be sure to click the link for the page rather than the page group.
Click the Optional tab to bring it forward, and go to the Publish as Portlet section.
Select Publish As Portlet.
Select Use Style Of Page On Which Portlet Is Placed, if you want the page portlet to use the style of the page on which it is placed.
If you do not select this check box, when the page is added as a portlet, it uses its own style.
|
Note: If the portlet background color of the style applied to the container page (i.e., the page on which the portlet is added) is set to a specific value, rather than left blank, this setting is ignored. |
To use a different heading for the portlet, enter the heading in the Portlet Display Name field.
By default, the page display name is displayed in the portlet header.
Click OK to save your changes and return to the page.
The portlet is published to the Portlet Repository. You can find it easily using the Search feature in the repository. Search for the portlet display name.
You can also navigate to your new page portlet. If this is the first object published for this page group, the page group is added to the list of providers on the Published Portal Content page of the Portlet Repository. Click the Published Portal Content link in the Portlet Repository, then the page group name to drill down through the repository to your new page portlet.
If you have the required privileges, you can move the page group provider to a preferred location in the Portlet Repository.
You can simultaneously perform an action on multiple pages in a page group:
Delete
Move
Copy
Add to or overwrite access privileges
Make public
Make private
To perform actions on multiple pages simultaneously:
In the Portal Navigator, click the page group that owns the pages you will change through bulk actions.
To get to the Portal Navigator, click the Navigator link at the top of the Portal Builder. If the link does not display, ask your page group or portal administrator for access to this link.
On the resulting page, click the Pages node.
On the resulting page, click the actions link in Perform actions on multiple objects simultaneously.
On the resulting page, select the pages you want to change, then select an action, such as Delete.
If an object does not include a check box, you do not have permission to perform an action on the object.
With OracleAS Portal, you have many options for creating the overall appearance of a page. This section explores these options and describes how to put them to use. It includes the following subsections:
The style you apply to a page governs the colors and fonts used by the page and all the tabs, portlets, and items displayed within it.
You can apply styles to standard pages and pages of a custom type that is based on a standard page.
You can specify that the page use the current user’s default style. The user’s view of the page will display in that style. Users set their default style under Account Info. For more information, see Section 1.1.6, "Choosing a Default Page Style".
If you base a page on a page template that does not allow pages to use a different style, your users will not be able to apply a different style to the page when they edit or customize the page.
If you apply a different style to a page template, that style is also applied to any page that is based on that template. However, if the template allows pages to use a different style, and users have chosen different styles for pages based on the template, changes to the page template style do not affect these pages.
There is a hierarchical structure to the application of styles when no explicit style is selected. First, it’s useful to understand that default styles can be set at the system, page group, and individual user levels.
Note that the page group default is not automatically applied to the page group root page; you must explicitly specify a style in the root page’s page properties.
If the page group administrator has selected the page group option to Copy Parent Page Properties When Creating Page, new pages created in the page group will (by default) use the same style specified in the parent page’s page properties (rather than the default style selected in the page group properties).
To summarize how default styles are used:
When page group administrators configure a page group to Copy Parent Page Properties When Creating a Page, then sub-pages use the style specified in the page properties of the page group’s root page (or, if the parent page is not the root page, the style specified in the page properties of the parent page).
When page group administrators de-select the Copy Parent Page Properties configuration option, the page group’s default style, specified in page group properties, is used for newly created sub-pages.
When page group administrators de-select the Copy Parent Page Properties configuration option, and the page group’s default style is set to <None>, then the system default style is applied.
An individual user’s default style is specified in each user’s Account Info settings. Users go into their personal portal accounts and select a preferred page style. This selection is applied when a page designer explicitly selects the page style <Use User’s Default Style>. If the user default is set to <None>, then the page uses the page group’s default style; if that is also set to <None>, then the page uses the system default style.
All of this becomes moot when you explicitly apply a style to a page.
To apply a style to a page:
Go to the page where you will apply a style.
For information on locating a page, see Section 7.2, "Navigating to Pages".
Switch to Edit mode.
In the page toolbar at the top of the page, click the Style link.
Choose the style you want to use from the Choose Style list.
|
Note: The Choose Style list includes all styles that you have created in this page group, all styles that were created in this page group by others and that you have privileges to use, and all styles in the Shared Objects page group.Additionally, this list includes the choice <Use User's Default Style>. With this selection, the style a user chooses via the Account Info link will be used. The style each user will see will depend on his or her default style. The Current Style field shows which style is currently applied to the page. The Style Properties section includes a preview of the current style's settings. |
If you cannot find a style with the color and font settings that you want, and you have the appropriate privileges, you can click the link in the Style Properties section to edit an existing style, or you can use the New Style section to create a new style.
Click each of the radio buttons in the Style Properties section to preview the colors and fonts used in the style.
The Style Properties section shows the style that is currently selected in the Choose Style list.
Click OK to save your change and return to the page.
When you create or edit pages, you can choose to base those pages on a particular page template. If a page is based on a template, any changes made to the template are automatically cascaded to all pages that use it. A page template provides a way of enforcing a particular look and feel and establishing a common security model for multiple pages. You can apply page templates only to standard pages or pages of a custom page type that is based on the standard page type.
This section describes how to apply a template to an existing page. For more detailed information on templates, see Section 6.1, "Working with Page Templates".
To apply a template to an existing page:
Go to the page where you will apply a template.
For information on locating a page, see Section 7.2, "Navigating to Pages".
Switch to Edit mode.
In the page toolbar at the top of the page, click the Properties link next to Page.
Be sure to click the link for the page rather than the page group.
Click the Template tab to bring it forward.
from the Page Template list, select the template you want to apply.
The Region Mapping section may appear on the Template tab. If it does, that means that one or more regions on the page contain content that must be placed somewhere within the template you selected. Region Mapping is displayed only when:
You are choosing a template for a page that 1) has never had a template applied, and 2) contains content.
You are choosing a new template for a page that 1) already has a template applied, and 2) contains portlets or items that were added to the base page after the original template was applied.
One or more users customized the page for their own use by adding content. As the page designer, you must decide where the content should be located not only for the base page, but for every single customization of the page.
For each region listed in the Move content from... column, select a new home for the content using the drop-down list in the Move content to... column.
The drop-down list displays only those regions that:
Allow content to be added. If the Enable Pages To Include Content In This Region check box was de-selected, the region is not eligible to have content moved into it, and thus is not displayed.
Match the type (portlet or item) of the region named to the left. If no region of the appropriate type exists in the selected template, you may want to select <Discard Content>.
The <Discard Content> option is useful when assigning a template to a page that already has some template-like elements on it, such as a banner. For example, if the page has content in the banner region, you may not want to move the old banner content over to the new template's banner region. Instead, you may opt simply to discard that content.
All items and portlets on the page must have a home in the new template. So, if your page contains an item, but you chose a new template that does not have a region allocated to items, you must either discard that item or choose a different template.
Use the Preview section to determine which region corresponds to a given region number.
If the region has a name, the name is used instead of a number.
Click OK.
Content belonging to the original template is not eligible for mapping to the new template because it belongs to the template and not to the page.
For example, a page was initially based on Template A, which contains a company logo and a Favorites portlet. When Template B is applied, the page loses the logo and the Favorites portlet (if they are not also included in Template B). You will not have an opportunity to map the Favorites portlet that used to appear on the page because it belonged to Template A, not to the page.
Content that belongs to the template itself is flagged by the From Template icon.
If you decide that you no longer want to use a page template for a particular page, you can detach the page from the template.
When you detach a page from its template, the page retains the same layout and content as before, but the page now owns it. This means that changes to the template will no longer affect the page. You will also now be able to change the layout of the page and add content to any region.
To detach a page from its template:
Go to the page you will detach from its template.
For information on locating a page, see Section 7.2, "Navigating to Pages".
Switch to Edit mode.
In the page toolbar at the top of the page, click the Properties link next to Page.
Be sure to click the link for the page rather than the page group.
Click the Template tab to bring it forward.
Click the Detach from Template link next to the Page Template field.
|
Note: If you do not see the Detach from Template link, the page does not use a template. |
In the confirmation page, click Yes to detach from the template.
Click OK to return to the page.
You can use user interface templates to determine the design elements to display around the contents of a page.
You’ll find additional information about using templates in the technical note "OracleAS Portal Best Practices: Templates." You’ll find this on Portal Center, http://portalcenter.oracle.com. Click the Search icon in the upper right corner of any Portal Center page.
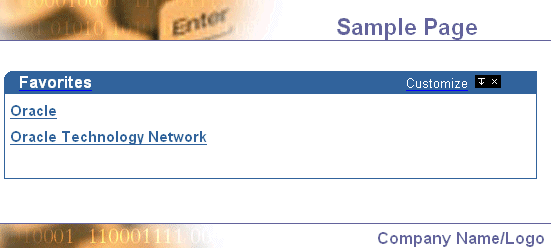
Figure 7-2 shows a page that uses a user interface template (this page has only one portlet on it):
You can apply user interface templates only to Standard pages, or pages of custom types based on the Standard page type.
To apply a user interface template to a page:
Go to the page where you will apply a user interface template.
For information on locating a page, see Section 7.2, "Navigating to Pages".
Switch to Edit mode.
In the page toolbar at the top of the page, click the Properties link next to Page.
Be sure to click the link for the page rather than the page group.
Click the Optional tab.
Go to the User Interface Templates section, and choose a user interface template from the UI Template list.
|
Tip: The option to use a UI template for a page is available only if the user interface page group setting has been enabled. |
Click OK to return to the page.
You can apply only unstructured UI templates to pages. Structured user interface templates are intended solely for use with portlets.
The layout of a page is determined by the configuration of its regions. You can visualize regions as simple, discrete, rectangles, which divide up the surface area of a page. In these rectangles, you place the images, links, text, files, portlets, and other content you wish to appear on your portal page (see also, Section 7.6, "Adding Content"). Regions serve both to provide the layout structure of a page and to contain your portal content. You can use tabs to produce a virtual stack of regions. You can subdivide regions on both pages and tabs into multiple regions.
As simple as the concept of regions is, it is nonetheless possible to exercise a number of powerful controls over how a region behaves. This section explores the controls you can bring to bear on regions and provides information on how to use those controls to get your desired result.
This section discusses how to use OracleAS Portal regions. It includes the following subsections:
You’ll find more information about regions in the technical note "OracleAS Portal Best Practices: Regions," on Portal Center, http://portalcenter.oracle.com. Click the Search icon in the upper right corner of any Portal Center page.
A region is an area on a page that displays information and can contain either portlets, items, tabs, or links to sub-pages of the current page. When you first create a page, it consists of at least a single region. After creating a page, you can edit it to add more regions.
This section discusses the ways you can use regions to create a page layout. It includes the following subsections:
If you have Full Customization privileges on a page, you can add regions to the tabs you created when you customized the page. You cannot add regions anywhere else in the page.
To add a region to a page:
Go to the page where you will add a region.
For information on locating a page, see Section 7.2, "Navigating to Pages".
Switch to Edit mode.
Use the Add Region icons to add a region to the page.
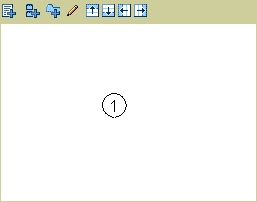
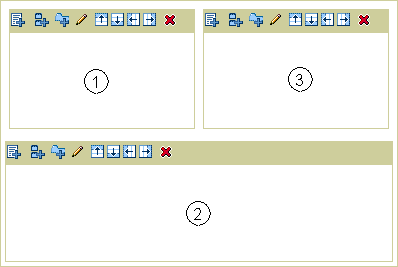
For example, a page currently has a single region (Figure 7-3):
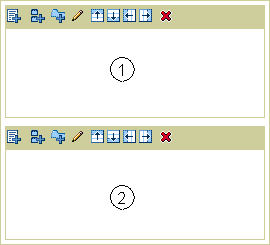
Click the Add Region Below icon in region 1 to create a second region (region 2) of the same width directly below region 1 (Figure 7-4):
Click the Add Region Right icon in region 1 to create third region (region 3) to the right of region 1 (Figure 7-5):
|
Note: Region 3 is the same height as region 1 (the region next to 3), not the height of the entire page. |
When you add a region while editing a page, the region type is undefined.
The new region has the potential to contain either portlets, items, sub-page links, or tabs. It does not matter what the region type was where you clicked the Add Region icon. When you designate the region as a portlet, item, or sub-page link region, the new region will use the same property settings as the source region. If you change the new region to be the same type as the source region, the new region will use the same attribute list as the source region. If you change the new region to be a different type than the source region, the new region uses the default attribute list for that region type.
When you add a region while customizing a page, the new region type defaults to portlet. In Customize mode, you can add new regions only to newly created tabs (i.e., customized tabs you see only in your view of the portal). And you can add only tab or portlet type regions to it (that is, you can add a portlet or a subtab to a custom tab).
If a page is based on a page template, region configuration is determined by the page template. You will not be able to add more regions directly to the page. To add more regions, you must add them to the page template (provided you have the required privileges).
Deleting a region from a page changes the entire landscape of the page. Once you've deleted a region there is no way to reinstate it, so be sure that is the action you want to take.
If the region you are deleting contains portlets or items, you are prompted to specify where you would like to relocate them. If the region contains tabs or sub-page links, you cannot relocate them within the Delete Region screen. With tabs, you must either delete the region and all its content, or cancel and relocate the content before deleting the region. With a sub-page links region, you must add another region of the same type.
If you have Full Customization privileges on a page, you can delete regions from your own tabs when you customize the page; you cannot delete regions anywhere else in the page.
To delete a region from a page:
Go to the page where you will delete a region.
For information on locating a page, see Section 7.2, "Navigating to Pages".
Switch to Edit mode.
Click the Delete icon in the region you want to delete.
If the region contains portlets or items, you are prompted to specify where you would like to relocate them.
Use the radio buttons to make your selection, then click Move Content. Alternatively, click Delete Content to remove the region and its content.
|
Note: You can move portlets only to another portlet region; you can move items only to another item region. |
If the region contains tabs, you are reminded that deleting the region will delete all the tabs within that region and remove all the content on those tabs.
Click Delete Region to continue, or Cancel if you want to move the portlets or items before deleting the region.
|
Note: Every page contains at least one region. If there is only one region in a page, you will not be able to delete it. |
Regions come with powerful controls you can use to define how they will treat the content that is placed inside them. The next sections describe how to use those controls, including:
Providing a name for a region is useful for at least two reasons:
To identify the content of a region for your users
You can display the region name in a banner at the top of the region to let users know what kind of content to expect in the region.
To provide descriptive names for regions during region mapping
Regions names are also useful for identifying specific regions when you map the regions in an existing page to the regions in a new template you are applying to that page. The name appears above the region in lieu of an automatically assigned number.
To change the region name:
Go to the page where you will change a region name.
For information on locating a page, see Section 7.2, "Navigating to Pages".
Switch to Edit mode.
Click the Edit icon in the relevant region.
Go to the Region Display Options section, and enter a name in the Display Name field.
|
Note: The region display name must be no more than 40 characters. |
If you want to display the region name in a banner at the top of the region, select Display Region Banner.
Click OK to return to the page.
The region types are item, portlet, sub-page links, tab, and undefined. Region types accept only their related type of content. For example: Add portlets to a portlet region and items to an item region. You cannot add portlets to an item region, nor can you add items to a portlet region. You cannot add anything to a sub-page links region; these regions automatically populate with links to sub-pages of the current page. You cannot add anything to a tab region; although you can configure the tab to include, for example, rollover images.
If you have Manage privileges on the page, you can add a portlet or an item to an undefined region. Once you add content to an undefined region, the region becomes defined: it becomes a portlet region if you add a portlet, an item region if you add an item.
Users who do not have Manage privileges on the page cannot add content to an undefined region. For them, undefined regions display without edit controls. To enable such users to add content, a user with Manage privileges on the page must explicitly change the region type to item or portlet, or add an item or a portlet to the region.
You can change the region type of portlet and item regions only if the region is empty. You can change the region type of sub-page link regions at any time, whether or not the region contains any links to sub-pages. You cannot change the region type of a tab region. You cannot change a region type in a page template if a page that is based on the template already includes content in that region.
To change the region type:
Go to the page where you will change a region type.
For information on locating a page, see Section 7.2, "Navigating to Pages".
Switch to Edit mode.
Click the Edit icon in the relevant region.
Go to the Region Type section, and from the Type radio group, select either:
Items
Portlets
Sub-Page Links
Undefined
|
Note: If you do not see the radio buttons, your region already contains items, portlets, or tabs; so you cannot change the type. Delete the tabs, or delete or move the items or portlets; and try again.You can change the type of a sub-page links region at any time, provided you have the privileges to do so and the region is not part of a template applied to the page you are working with. |
Click OK to return to the page.
You may want to freeze the content of a particular region so that users cannot change what appears in that region. For example, your page might be divided into regions that contain navigational elements and a main content region. You want users to be able to edit or customize the content in the main content region, but you don't want them to be able to edit or customize the other regions.
In page templates you can freeze the content of regions so that users cannot change it when they are editing or customizing a page that is based on the template.
You can also freeze the content of regions in pages. This means that users cannot change the content in these regions when they customize the page. Users with Manage privileges can still change the content of these regions when they edit the page.
To freeze the content of a region in a page template:
In the Portal Navigator, click the Page Groups tab to bring it forward.
To get to the Portal Navigator, click the Navigator link at the top of the Portal Builder. If the link does not display, ask your page group or portal administrator for access to this link.
On the resulting page, click the page group that owns the template you will change.
Click the Templates node.
Click the Edit link next to the template you will change.
On the resulting page, click the Edit icon in the relevant region.
Go to the Region Content section, and clear the check box Enable Users To Include Content In This Region.
Click OK to save your changes and return to the page template.
When users edit or customize a page based on this template, they will not be able to add content to the region, or hide, show, delete, or move existing content.
To freeze the content of a region in a page:
Go to the page where you will freeze region content.
For information on locating a page, see Section 7.2, "Navigating to Pages".
Switch to Edit mode.
Click the Edit icon in the relevant region.
Go to the Region Content section, and clear the check box Enable Users To Include Content In This Region.
|
Note: Users cannot customize the content of item regions; consequently, this check box appears only for portlet and tab regions. |
Click OK.
When users customize the page, they will not be able to add content to the region, or hide, show, delete, or move existing content. Users can still add, hide, show, delete, and move content when they edit the page (rather than customize).
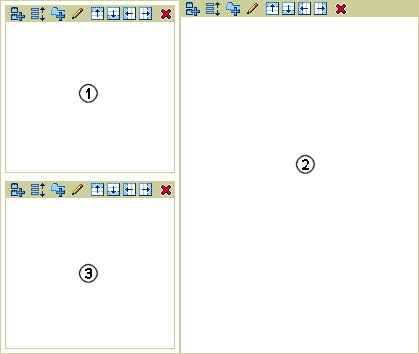
By default regions are all equal widths. For example, here is a page with a single region (Figure 7-6):
If you add another region to the right of the existing region, each region will take up 50% of the width of the page (Figure 7-7):
Figure 7-7 Two Regions, Each Using 50% of Available Space

If you want each region to take up a different amount of space, you can explicitly set the width of each region. You can set the width of a region to a specific number of pixels or to a percentage of the overall width of the page.
You can also set the height of a region.
To change the height and width of a region:
Go to the page where you will change the height and width of a region.
For information on locating a page, see Section 7.2, "Navigating to Pages".
Switch to Edit mode.
Click the Edit icon in the relevant region.
In the Width field, enter the width of the region in pixels (a number, such as 20) or as a percentage of the overall width of the page (a number and a percent sign, such as 20%).
|
Note: You must include a percent sign (%) if you want the number you enter to be interpreted as a percentage of page width, rather than a number of pixels. |
In the Height field, enter the height of the region in pixels.
Click OK to return the page.
If you choose to have the width of some regions expressed in pixels and others on the same page expressed in percentages, the page may look slightly different in different browsers.
If you enter a height or width of 1 in an attempt to make the region as small as possible, the region will expand to display the full content of the region.
If you add another region to the right or left of an existing region, the region widths are automatically reset to be equal. For example, if you have a page with two regions side-by-side, one with a width of 40% and the other 60%, if you add a third region on the same line, all the regions will be reset to a width of 33%.
You might have a region configuration that looks something like Figure 7-8:
In this case, even if you set regions 1 and 3 to have different widths, the actual width of the column will be as wide as the widest region in that column. So if region 1 had a width of 40% and region 3 had a width of 20%, when viewing the page, the column containing regions 1 and 3 would be 40% of the width of the page.
Pixel widths take precedence over percentage widths. Therefore, if region 1 had a width of 40% and region 3 had a width of 200 pixels, when viewing the page, the column containing regions 1 and 3 would be 200 pixels wide.
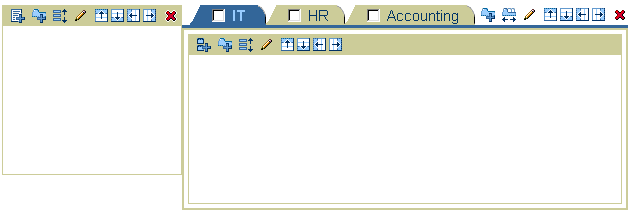
You can choose whether or not to display banners in a region. There are two types of banners:
The region banner appears at the top of the region (Figure 7-9).
Group By banners appear above each group of items in the region (Figure 7-10).
|
Note: For more information about grouping items in a region, see Section 7.5.2.12, "Grouping Items in a Region". |
Figure 7-10 Group By Banners Appear Above Each Group of Items in the Region
To display or hide banners:
Go to the page where you will display or hide banners.
For information on locating a page, see Section 7.2, "Navigating to Pages".
Switch to Edit mode.
Click the Edit icon in the relevant region.
Go to the Region Display Options section:
To display a region banner, provide a region Display Name, and select Display Region Banner. The region banner appears only if you have given the region a name.
To hide a region banner, clear the Display Region Banner check box.
Go to the Item Display Options section:
To display a Group By banner, choose a Group By option, and select Display Group By Banner. The Group By banner option is available only for item regions. The group by banners appear only if you have selected to group items in the region.
To hide a Group By banner, clear the Display Group By Banner check box.
Click OK to return to the page.
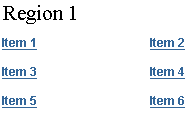
If you have many items or portlets in a region, you may want to arrange the items or portlets into multiple columns to conserve space. You can specify how many columns and rows you want to include in a region.
Regardless of how many columns you include in the region, the number of rows dynamically expands to accommodate all the items or portlets in the region, provided you have not defined a specific number of rows.
If you specify a number of columns and a number of rows, and the number of items in the region exceeds the number of placements this allows, the overflow items will not display until you change the number of columns or rows to accommodate them. For example, if you have eight items, and you specify two columns and three rows, only six items display. The other two do not. The items that do not display are retained, rather than lost or deleted. If you change the number of rows to four or the number of columns to three, all eight items will display.
The following examples show the same region with different numbers of columns and rows:
Figure 7-11 Region with Eight Items in Four Columns (Rows not Specified)
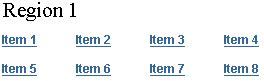
Figure 7-12 The Same Region with Two Columns and Three Rows (Two Items Truncated)
To change the number of columns and rows in a region:
Go to the page where you will change the number of region columns and rows.
For information on locating a page, see Section 7.2, "Navigating to Pages".
Switch to Edit mode.
Click the Edit icon in the relevant region.
Go to the Region Display Options section, and enter the number of columns you want for the region in the Number of Columns field.
Leaving this field blank will result in one column in the region.
In the Number of Rows field, enter the number of rows you want for the region.
Leaving this field blank will result in however many rows are required to accommodate whatever content is added to the region.
Click OK to return to the page.
Align items in a region to the left, center, or right.
The following example shows the same region with different item alignment settings:
Figure 7-13 The Same Region with Different Item Alignment Settings

To change the alignment of items in a region:
Go to the page where you will change the alignment of items.
For information on locating a page, see Section 7.2, "Navigating to Pages".
Switch to Edit mode.
Click the Edit icon in the relevant item region.
Go to the Item Display Options section, and choose an item alignment from the Item Alignment list: Left, Center, or Right.
Click OK to return to the page.
Sub-Page Links regions share many of the same region properties you find with item and portlet regions. Additionally, they have a few that are unique to type. These include:
Additionally, at the page level, you define which sub-page links will be displayed on the current page and specify link display order. For more information, see Section 7.8.1, "Defining the Display of Sub-Page Links".
You can specify that either one or two levels of sub-page links should display in a Sub-Page Links region.
To set the level of sub-page links:
Go to the page that contains the Sub-Page Links region you will change.
For information on locating a page, see Section 7.2, "Navigating to Pages".
Switch to Edit mode.
Click the Edit icon for the relevant region.
Go to the Page Level Display section, and select either:
Display One Level Of Sub-Pages to link to one level of sub-pages below the current page
Display Two Levels Of Sub-Pages to link to two levels of sub-pages below the current page
Click Apply to save your changes, or OK to save your changes and return to the page.
Use these properties to specify the attributes to display along with sub-page links. Choose from a sub-page icon, a description of the sub-page, an image/rollover image for the sub-page.
To specify which sub-page links attributes will display:
Go to the page that contains the Sub-Page Links region you will change.
For information on locating a page, see Section 7.2, "Navigating to Pages".
Switch to Edit mode.
Click the Edit icon for the relevant region.
Go to the Sub-Pages section, and select any or all of the following attributes:
Display Sub-Page Icon to display an icon next to each sub-page link
Display Sub-Page Description to display the content of the sub-page’s description attribute
Display Sub-Page Image and Rollover Image to display an image/rollover image in lieu of the page name
The image and (optionally) rollover image were specified for the sub-page when it was created (or edited). For more information about page images and rollover images, see Section 7.8.4, "Specifying a Representative Image for a Page".
Click Apply to save your changes, or OK to save your changes and return to the page.
Use this section to suppress or select the navigation icon to display on sub-pages. This icon displays on the sub-pages themselves. Users click it to navigate back up the hierarchy of pages.
To suppress or select the navigation icon to display on sub-pages:
Go to the page that contains the Sub-Page Links region you will change.
For information on locating a page, see Section 7.2, "Navigating to Pages".
Switch to Edit mode.
Click the Edit icon for the relevant region.
Go to the Image section, and select one of the following image options:
No Image to suppress the display of a sub-page navigation icon
Default Image to display the default sub-page navigation icon (an upward-pointing arrow)
Image to display a sub-page navigation icon that you specify
In the first field, click the Browse button to locate and select a file on your file system.
OR
In the second field, either enter the URL and file name of an image on the Web, or enter the internal name of an image already uploaded into OracleAS Portal, for example 1655.gif.
To obtain the internal name OracleAS Portal has assigned to an image, go to a place within your portal where the image is already in use; right click it; and select Properties from the right-click menu.
Click Apply to save your changes, or OK to save your changes and return to the page.
When you add or edit an item, you can specify a representative image for that item. To ensure a consistent look, you may want to set a uniform height and width for these images.
If you set a uniform height and width, some item images may look squashed or stretched if they are larger or smaller than the height and width you specify.
To set a uniform height or width for item images:
Go to the page where you will set a uniform height or width for item images.
For information on locating a page, see Section 7.2, "Navigating to Pages".
Switch to Edit mode.
Click the Edit icon in the relevant item region.
|
Note: The item icon height and width options are available only for item regions. |
Go to the Item Display Options section, and enter the height (in pixels) in the Item Icon Height field.
If you leave this field empty, the height defaults to the actual height of the image.
Enter the width in the Item Icon Width field.
If you leave this field empty, the width defaults to the actual width of the image.
Click OK to return to the page.
Typically, when you add an item to a region, you also enter information about that item into item attribute fields. For both portlets and items, some attributes are populated automatically, such as the creation date; and they do not require any data entry when the item or portlet is added. Through region properties, you can specify which attributes you would like to display along with the item or portlet.
For example, by default, the Display Name and Image and Description attributes are displayed for each item in a region. In some regions you might want to provide more information. For example, you might want to include the Document Size, Expire Date, or some custom attribute specific to your own content. In some regions, you might want to provide less information. For example, you might choose not to include item descriptions.
To change the attributes displayed in a region:
Go to the page where you will change the displayed attributes.
For information on locating a page, see Section 7.2, "Navigating to Pages".
Switch to Edit mode.
Click the Edit icon in the relevant region.
Click the Attributes/Style tab (for item regions) or the Attributes tab (for portlet regions).
To add an attribute to the region, select the attribute in the Available Attributes list and click the Move Right icon.
The attribute is added to the bottom of the Displayed Attributes list. Use the rearrange buttons to determine where the attribute is displayed in relation to the other attributes in the region.
For example, if you want the Description attribute to be displayed first, select Description in the Displayed Attributes list, and click the Move Top icon to move it to the top of the list.
|
Note: The Portlet Content attribute is selected by default for all portlet regions. If this attribute is not selected, portlets do not display in the region. |
Add <Blank Line> and <Space> attributes to improve the layout of the attributes in the region.
You can add as many of these attributes as needed. By default, a single space is added between attributes. You can add more if desired. Use blank lines to separate attribute values as required. If an attribute value following the blank line is empty, the blank line is not displayed to avoid unnecessary white space.
To remove an attribute from the region, select the attribute in the Displayed Attributes list and click the Move Left icon.
Click Apply to save your changes.
Click Close to return to the page.
If an item or portlet has no information for a particular attribute, the attribute will not be displayed in the region, even if you selected to display that attribute. For example, if you selected to display the Description attribute in a region, but the Description field has been left blank for a particular item in that region, then the Description attribute will not display next to the item.
Note, however, that no matter what attributes are displayed for the region, navigation item types, such as Portal Smart Links, List of Objects, and the like, do not display any attributes other than Item Content and Display Name (or some version of a display name, such as Search Label). If you remove Item Content or Display Name from the list of Displayed Attributes, navigation item types will nonetheless continue to display the Item Content or the Display Name.
You can display MIME type images next to items on a page to provide users with a visual cue about the item type. For example, a Word MIME type image is a small version of a Word document icon. It would display next to any Microsoft Word documents uploaded to the page. To display the MIME type image before any other attribute (recommended), select Mime Type Image in the Displayed Attributes list, and click the Move Top icon.
You can specify the order in which items are displayed in a region. If the items are grouped through the Group By option, the display order you specify determines the order of the items within each group.
To order items in a region:
|
Note: The item ordering options are available only for item regions. |
Go to the page where you will specify the display order of items in a region.
For information on locating a page, see Section 7.2, "Navigating to Pages".
Switch to Edit mode.
Click the Edit icon in the relevant item region.
In the Sort By list, choose:
Default to not order items.
If you choose this option, items are ordered according to how you explicitly place them in the region.
Title to order items alphabetically by their display name
Size to order items by their size
|
Note: If you choose to order the items in a region by display name or size, the Arrange Items icon is not displayed in the region toolbar. The order of the items is determined by the Sort By option. If your selection is other than Default, you cannot manually order the items. |
In the Sort Order list, choose:
Ascending to order items from A to Z (Title), or smallest to largest (Size)
Descending to order items from Z to A (Title), or largest to smallest (Size)
Click OK to return to the page.
You can group the items in a region by:
Category
Author
Date
Item Type
You can also choose to not group the items in the region.
Figure 7-14 shows the same region, first grouped by item type, then grouped by category.
Figure 7-14 The Same Region, First Grouped by Item Type and then by Category
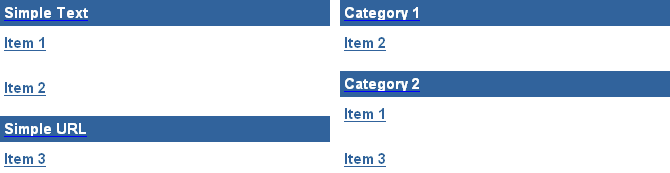
To group the items in a region:
|
Note: The Group By option is available only for item regions. |
Go to the page where you will group the items in a region.
For information on locating a page, see Section 7.2, "Navigating to Pages".
Switch to Edit mode.
Click the Edit icon in the relevant item region.
In the Group By list, choose:
None to not group items
Category to group items by their category
To change the order of the category groups, see Chapter 5, " Working with Content".
Author to group items by their author
Author groups are ordered alphabetically by user name.
Date to group items by their creation date
Date groups are ordered from oldest to most recent.
Item Type to group items by their item type
For example, File, Text, Image, etc. To change the order of the item type groups, see Chapter 5, " Working with Content".
Select Display Group By Banner if you want to display a banner above each group as shown in Figure 7-14.
|
Note: To determine the order of items within each group, see Section 7.5.2.11, "Specifying the Display Order of Items in a Region". |
Click OK to return to the page.
|
Note: When you choose to display or hide portlet headers or borders, all the portlets within the region are affected. You cannot control portlet headers or borders for individual portlets within the region. However, you can display portlet headers or borders in one region and hide them in another. |
Portlet headers contain the name of the portlet and any links that are available for display (see Section 7.5.2.14). Portlet borders outline the border of each portlet in a region. You can choose whether or not to display portlet headers and borders.
Figure 7-15 shows the same region, first with portlet headers and borders displayed, then hidden.
Figure 7-15 Same Region with Portlet Headers Displayed, then Hidden
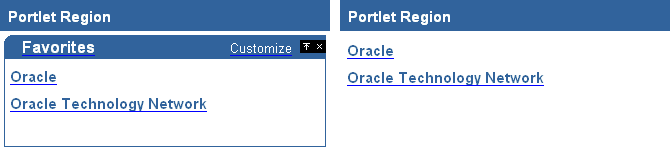
Because portlet headers contain the Customize link, if you hide headers, users will not be able to access this link nor customize the portlets in the region. Users will still be able to edit the portlet defaults by editing the page.
To display or hide portlet headers or borders:
|
Note: The portlet header and border options are available only for portlet regions. |
Go to the page where you will display or hide portlet headers and/or borders.
For information on locating a page, see Section 7.2, "Navigating to Pages".
Switch to Edit mode.
Click the Edit icon in the relevant portlet region.
Go to the Portlet Display Options section:
To display portlet headers, select Show Portlet Headers. To hide portlet headers, clear the Show Portlet Headers check box.
To display portlet borders, select Show Portlet Borders. To hide portlet borders, clear the Show Portlet Borders check box.
Click OK to return to the page.
If you choose to show or hide a portlet header link, all the portlets within the region are affected. You control portlet header links for all portlets within the region, rather than for individual portlets. Additionally, you can display portlet header links in one region and hide them in another.
Choose which links to include in portlet headers.
The Customize link enables users to customize the way the portlet appears.
The About link provides access to a description of the portlet.
The Details link provides access to a more detailed view of the portlet by clicking the portlet title.
The Remove link enables users to remove the portlet from the page.
The Collapse/Restore link enables users to minimize and maximize the portlet on the page.
For information on how to specify help text and descriptions for your portlets, see the Portal Developer Kit on Portal Center, http://portalcenter.oracle.com. Click the Search icon in the upper right corner of any Portal Center page.
If you have chosen not to display portlet headers, these links will not be displayed even if you have selected the appropriate check box.
To show or hide portlet header links:
|
Note: Portlet header link options are available only for portlet regions. |
Go to the page where you will display or hide portlet headers.
For information on locating a page, see Section 7.2, "Navigating to Pages".
Switch to Edit mode.
Click the Edit icon in the relevant portlet region.
Go to the Portlet Display Options section:
To show portlet headers, select Show Portlet Headers, then select the portlet header links you will display.
To hide portlet headers, clear the Show Portlet Headers check box.
Click OK to return to the page.
You can change the amount of space to appear around and between the portlets and items in a region.
Figure 7-16 shows the same region with different portlet spacing. In the first example the space around portlets is set to 4 pixels and the space between portlets is set to 6. In the second example, the space around portlets has been changed to 10 pixels. In the final example the space between portlets has been changed to 15 pixels.
Figure 7-16 The Same Region with Different Portlet Spacing
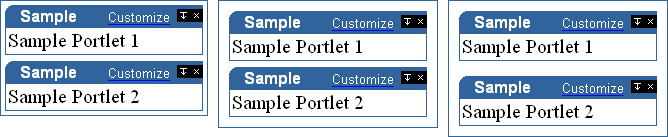
To change portlet or item spacing:
Go to the page where you will change portlet or item spacing.
For information on locating a page, see Section 7.2, "Navigating to Pages".
Switch to Edit mode.
Click the Edit icon in the relevant region.
Go to the [Portlet or Item] Display Options section, and enter a value (in pixels) in the Space Between [Portlets or Items] field.
Enter a value (in pixels) in the Space Around [Portlets or Items] field.
Click OK to return to the page.
The style you apply to a region governs the colors and fonts used by the region and all the tabs, items, and sub-page links displayed within it. (Note that you cannot apply a style to a portlet region. Portlet regions always use the style assigned to their host page.)
By default, regions use the same style as their parent page. However, you may want to apply a different style to a region to create visual interest or make the region stand out.
To apply a style to an item, tab, or sub-page links region:
Go to the page where you will apply a style to a region.
For information on locating a page, see Section 7.2, "Navigating to Pages".
Switch to Edit mode.
Click the Edit icon in the relevant region.
Click the Attributes/Style tab (for item regions) or the Style tab (for tab and sub-page links regions).
Choose a style from the Choose Style list.
The Choose Style list includes all the public styles in this page group and the Shared Objects page group, as well as any styles that you have created in this page group for your own use.
If you want the region to use the same style that is applied to the page, choose <Use Page Style>.
If you cannot find a style with the color and font settings that you want, and you have the appropriate privileges, you can edit an existing style to meet your requirements.
The style you chose is applied to the region, and Preview is refreshed to show the style's settings.
Click Close to return to the page.
Tabs allow you to increase the amount of information that your page can display. For example, suppose you want to create a home page for your entire user base. The information you want to provide encompasses several different areas, each of which is relevant for certain users. To consolidate the information and present it in an organized way, you decide to create four tabs (Figure 7-17):
A tab can be in one of two states: active or inactive. In Figure 7-17, the Technical tab is the active tab. An active tab is the one that is currently selected within a tab set. The rest of the tabs are inactive. You can specify different colors and fonts for active and inactive tabs.
This section explores some of the ways you can work with tabs within OracleAS Portal. It includes the following subsections:
Go to the page where you will add a tab.
For information on locating a page, see Section 7.2, "Navigating to Pages".
Switch to Edit mode.
In the region where you will add a tab, click the Add Tab icon.
The region now looks like Figure 7-18.
To add more tabs at the same level, click the Add Tab icon that displays to the side of the tab you just added. If you click the Add Tab icon below the tab, you'll start another row of tabs below this row.
Click OK to return to the page.
If you add a tab to a region that already contains items or portlets, a single tab is created to hold the items or portlets already in the region.
If there is a portlet or an item you want to appear on every tab—say, a link to your corporate Web page—divide your page into two regions: one containing your tabs, and the other containing the common portlet or item (Figure 7-19).
When you first add a tab to a page, the text displayed on the tab defaults to New Tab. You can change this text to describe the contents of the tab.
Alternatively, you can change the appearance of a tab by uploading images for the tab. For information on how to do this, see Section 7.5.3.7, "Applying Images to a Tab". If you provide images for a tab, the tab’s display name is used as rollover text—that is, it displays when the user moves the mouse pointer over the tab.
To change tab text:
Go to the page where you will change tab text.
For information on locating a page, see Section 7.2, "Navigating to Pages".
Switch to Edit mode.
Click the Edit icon on the relevant tab.
In the Display Name field, enter the text to display in the tab.
Click OK to return to the page.
Tabs can acquire access settings in the following ways:
Inheriting access settings from the template
This assigns the tab the same access privileges as the template tab from which the tab is derived.
Inheriting access settings from the page
This assigns the tab the same access privileges that have been assigned to the page on which the tab is placed.
User specified access settings
This allows users with the appropriate privileges to control access to the tab apart from the page’s access setting. A tab can have its own access setting.
To control access to a tab:
Go the to page that contains the tab where you will define access settings.
For information on locating a page, see Section 7.2, "Navigating to Pages".
Switch to Edit mode.
Click the Edit icon on the relevant tab.
This is the Edit icon on the prominent part of the tab.
Click the Access tab.
Select from one of the following:
Inherit Access Settings from Template <template name> if you want to assign the tab the same access privileges as the equivalent tab on the template it is based on. Continue at Step 9.
|
Note: This option displays when the tab is on a page that is based on a template. |
Inherit Access Settings from Page <page name> if you want to assign the tab the same access privileges that have been assigned to the page on which the tab is placed. Continue at Step 9.
|
Note: You can view these privileges from the Access tab when you edit the page or tab properties. |
Specify Access Settings if you want the tab to have its own access privileges, separate from the page itself.
Select Display Tab To Public Users if you want everyone, including users who are not logged into the portal, to be able to view the tab.
Select Enable Item Level Security to allow item creators to specify access control for individual items on the tab.
|
Note: If you do not select this check box, all the items on the tab inherit access control from the tab. If you select this check box, item creators have the choice of inheriting access control from the tab, or specifying specific access control for individual items. For more information, see Section 7.8.9.1, "What Is Item Level Security?" |
To explicitly grant privileges to specific users or groups:
In the Grantee field, enter the name of the user or group that you want to allow to access this tab.
|
Tip: If you are not sure of the name of the user or group, click the Users or Groups icon, and select from the list provided.OracleAS Portal uses the Oracle Internet Directory (OID) for identity management, serving as the repository for users and groups. In OID, groups are uniquely identified by their distinguished name (DN). Each group has a unique DN, though many groups can share a common name, in the same way that two people can share a common name, yet have completely different lineage (i.e., John Smith and John Doe). When working within the portal, groups created from within that portal are displayed simply with their common names. However, when the portal references a group from some other location in the OID—such as a group from some other portal associated with the same Identity Management Infrastructure—the DN of the group is displayed to distinguish it from the portal’s locally defined groups. |
In the list, choose a privilege level.
|
Note: The order of the privileges in the list is not based on any hierarchy of privileges. For more information, see Section 7.12.4, "Page Privileges". |
Click Add.
To clear all the Web Cache entries for the tab, click Clear Cache.
The next time the tab is requested, it will be retrieved from the database rather than the cache.
If you revoke a user's privileges on the tab, the user will still be able to access the tab if it is in the cache. If you want to make sure that your changes are applied immediately, clear the tab from the cache by clicking this link.
|
Note: This link is available only if one or more of the Web Cache global settings are enabled. For information about global settings, see the OracleAS Portal Configuration Guide, available on Portal Center,http://portalcenter.oracle.com. Click the Search icon in the upper right corner of any Portal Center page.
|
Click OK to return to the page.
If you create a page that is based on a template, and the Enable Pages To Have Different Access option was selected for the template, the page and its tabs will not inherit the template's privileges by default. To have the page and its tabs inherit the template's privileges, edit the page and select Inherit Access Settings from the Template on the Access tab. Then edit the tabs, and verify that Inherit Access Settings from the Page is selected on the Access tab.
Use the Privilege list under Change Access to change a user or group's privilege level. Click the Delete icon to remove the user's or group's privileges entirely.
You can change the order in which tabs are displayed in a region.
If you have full customization privileges on a page, you can also rearrange the order of tabs when you customize the page. However, any changes you make to the order of tabs will be visible only to you.
To rearrange the order of tabs in a region:
Go to the page that contains the region where you will rearrange tabs.
For information on locating a page, see Section 7.2, "Navigating to Pages".
Switch to Edit mode.
Click the Arrange Tabs icon in the relevant region.
In the Arrange Tabs list, select a tab and use the arrows to reorder it in relation to the other tabs in the list.
Repeat step 4 for the tabs you will rearrange.
Click OK to return to the page.
In some situations, you may want to hide a tab from users. For example, you may want to continue work on a tab before you make it available to other users. If you hide a tab, other users are not able to see the tab when they are viewing the page; however, you can see and work with it in Edit mode. Users will be able to see the tab when they customize the page, but it will be identified as a hidden tab.
To hide a single tab:
Go to the page where you will hide a tab.
For information on locating a page, see Section 7.2, "Navigating to Pages".
Switch to Edit mode.
Click the Actions icon on the tab you want to hide.
Select Hide.
The tab now appears grayed out in Edit mode. If you switch back to View mode, the tab no longer appears. You can still edit the tab in Edit mode and show it again, if required.
To hide more than one tab:
Go to the page where you will hide multiple tabs.
For information on locating a page, see Section 7.2, "Navigating to Pages".
Switch to Edit mode, Layout view.
Select the check box of all the tabs you want to hide.
|
Tip: At this point, you can also select portlets to hide. |
Click Hide.
To show a hidden tab, click the Actions icon on the tab, and select Show.
You can specify whether tabs appear on the left or right side of a region. You can change the tab alignment only in a region that already contains at least one tab.
Figure 7-20 shows the same region with different tab alignment settings:
Figure 7-20 Same Region with Different Tab Alignment Settings

To change tab alignment:
Go to the page where you will change tab alignment.
For information on locating a page, see Section 7.2, "Navigating to Pages".
Switch to Edit mode.
Click the Edit icon in the relevant region.
|
Note: Be sure to click the icon in the tabbed region itself (that is, the icon to the right of the tabs), not in a region within the tab. |
In the Tab Alignment list, choose whether the tabs are displayed on the left or right side of the region.
Click OK to return to the page.
You can change the appearance of tabs on your page by applying images to them. If you apply images to a tab, the tab’s display name is used as rollover text—that is, it displays when the user moves the mouse pointer over the tab.
Each tab can have two different images: an active tab image and an inactive tab image. An active tab is the one that is currently selected within a tab set. The rest of the tabs are inactive.
If you do not want to use two different images for a tab, apply an active image to the tab without applying an inactive tab image.
The image file must be of a type that can be viewed in browser, for example, JPEG or GIF.
To apply images to a tab:
Go to the page that contains the tab where you will apply images.
For information on locating a page, see Section 7.2, "Navigating to Pages".
Switch to Edit mode.
Click the Edit icon on the relevant tab.
Enter the name and location of the image you want to use as the active tab image in the Active Tab Image field, for example:
c:\webimages\maintab_on.gif
Alternatively, click Browse to locate and select the file.
Enter the name and location of the image you want to use as the inactive tab image in the Inactive Tab Image field, for example:
c:\webimages\maintab_off.gif
Alternatively, click Browse to locate and select the file.
|
Note: You need to provide an inactive tab image only if you want the tab to look different when it is not the currently selected tab, or if you want to use a rollover effect. |
Click OK to return to page.
|
Tip: If you want to check the result before you return to the page, click Apply rather than OK. |
To delete a tab image, click the Delete icon next to the image. (This icon displays only when there is a tab image.)
With a rollover effect, the image that displays with an object switches to a different image when users move their mouse pointers over the object. You can add a rollover effect to a tab by enabling the rollover effect in the tab region and applying active and inactive images to the tabs.
You can enable the rollover effect only in a region that already contains at least one tab.
To add a rollover effect to a tab:
Go to the page where you will add a rollover effect to a tab.
For information on locating a page, see Section 7.2, "Navigating to Pages".
Switch to Edit mode.
Click the Edit icon of the relevant region.
|
Note: Be sure to click the icon for the tabbed region itself (that is, the icon to the side of the tabs), rather than in a region within the tab. |
Go to the Region Display Options section, and select Use Rollover Effect For Tab Images.
Click OK to return to the page.
Edit each tab to specify active and inactive images.
|
Note: The active tab image is used as the rollover image—that is, the active tab image displays when the user moves the cursor over the tab. |
If the tab you want to delete includes content, the content is deleted along with the tab. You will not be given an opportunity to move the content during the delete operation. If you want to move the content, make sure you do so before deleting the tab.
To delete a single tab from a page:
Go to the page where you will delete a tab.
For information on locating a page, see Section 7.2, "Navigating to Pages".
Switch to Edit mode.
Click the Actions icon on the tab you will delete.
Click the Delete link.
In the confirmation page, click Yes.
The tab and all of its content are deleted.
To delete multiple tabs simultaneously:
Go to the page where you will delete multiple tabs.
For information on locating a page, see Section 7.2, "Navigating to Pages".
Switch to Edit mode, Layout view.
Select the check box of all the tabs you want to delete.
Click Delete.
In the confirmation page, click Yes.
This section contains information about how a page designer can add content to a page. It includes the following subsections:
This section provides a general overview of how to add items to your pages. Items include objects such as images, documents, text, and the like. This section includes the following subsections:
The types of items you can add to a page depend on the item types allowed in the page’s parent page group. These are specified when the page group is configured (via page group properties). For more information, see the OracleAS Portal Configuration Guide on Portal Center, http://portalcenter.oracle.com. Click the Search icon in the upper right corner of any Portal Center page.
|
Note: Chapter 2, " Publishing Content " and Chapter 5, " Working with Content" provide additional information about working with items in OracleAS Portal. Section 6.3.4, "Creating Navigation With Built-In Navigation Item Types" provides detailed information about Built-In Navigation Item types, including how to add them to a page. |
To add a content item type to a page:
Go to the page where you will add an item.
For information on locating a page, see Section 7.2, "Navigating to Pages".
Switch to Edit mode.
Click the Add Item icon in the region where you will add the item.
|
Note: If the region already contains portlets, you cannot add items to the region. |
Select the type of item you will add from the Content Item Types list or from the Built-In Navigation Item Types list.
Click Next.
Enter values for item attributes as required.
Different item types carry different item attributes. For example, for a File or Image item type, you click Browse to locate and select the item from your file system; for a Text item type, you enter the relevant text into a text window. You’ll find additional information about valid values for each attribute by clicking the Help icon on the relevant Portal page.
Click Finish to save your changes and return to the page.
Use the following steps to add PL/SQL code that executes a PL/SQL procedure and displays the results on a page.
To add a PL/SQL item to a page:
Go to the page where you will add the PL/SQL item.
If you do not see the page that you want to work with, you may not have the appropriate page access privileges. See your page group administrator to gain access.
For information on locating a page, see Section 7.2, "Navigating to Pages".
Switch to Edit mode.
Click the Add Item icon in the region where you will add the PL/SQL item.
|
Note: If the add item icon does not display next to the region, the region may be a portlet region (and may contain portlets). In this case, you cannot add items to this region. |
from the Content Item Types list, choose PL/SQL.
|
Note: You can also choose a custom item type that is based on the PL/SQL item type.If an item type does not appear in the list, contact your page group administrator. Your administrator selects which item types to display here. If you are the administrator or have administrative privileges, you can click the configure the list of available item types link on this page and configure the page group to include this item type. |
Click Next.
In the PL/SQL Code field, enter the PL/SQL code that executes when this item is clicked.
In the Display Name field, enter the item's link text.
This is what users will click to view the item.
|
Note: Steps 8 through 16 are optional.These attributes may not appear on this page. Item attributes, such as Author, Description, Image, New Item Indicator, and so on, are included in the Add <Item> page only if the item type has been configured to include them. For more information, see Chapter 5, " Working with Content". |
Choose a category that describes this item, and enter a Description for this item.
Change the Publish Date default to the date and time the item should be published to other users.
The format is DD-MON-YYYY HH12:MI PM.
When you upload the item, you can see it immediately, despite the Publish Date you enter here. Other users will not see this item until the date and time you specify.
In the Expiration Period field, choose whether you want this item to be always available, available only for a specified number of days (calculated from the publish date), or available up to a specific date and time.
The format is DD-MON-YYYY HH12:MI PM.
In the Perspectives field, click the Move icons to move a perspective from the Available Perspectives to the Displayed Perspectives list.
Use the up and down arrows to set the order that the perspectives are displayed.
|
Note: You can choose more than one perspective for an item. For example, a sales report might belong to both the Sales Representative and Marketing Manager perspectives.You can select multiple perspectives by holding the Ctrl key while clicking each perspective you want. Move the mouse pointer over the Move icons to get hint text. |
In the Image field, enter the location of the image that you want to associate with this item.
Use the first field to enter or browse for the image on your file system. Alternatively, use the second field to enter the URL of an image, or reuse an image that has already been uploaded to the portal. To reuse an image that has been uploaded to OracleAS Portal, enter its internal name (not file name) without a path in this field, for example, enter 1645.GIF.
To obtain the internal name OracleAS Portal has assigned to an image, go to a place within your portal where the image is already in use; right click it; and select Properties from the right-click menu.
In the Image Alignment list, choose how you want the item's image aligned in the page area.
For descriptions and examples of image alignment options, see Table 6-5.
Enter a keyword to locate this item in a basic search, and enter a name for the author.
|
Note: By default, the Author field is filled with the name of the initial logged on user. |
Select Enable Item Check-Out to enable users to check this item into and out of the portal.
In the Display Options field, choose how you want the PL/SQL item to display in the page area. Choose from:
Item Displayed Directly In Page Area to display the execution results in the portlet region that hosts this item.
Link That Displays Item In Full Browser Window to replace the displayed page with the execution results.
Link That Displays Item In New Browser Window to display the execution results in a second browser window.
In the PL/SQL Execute Options field, choose the database schema in which to execute this PL/SQL item: the Public schema, the schema belonging to the item's creator, or another schema.
Click Finish to save your changes and return to the page.
A PL/SQL item is executed as the user who created the item. Therefore, only the user who created a PL/SQL item may edit the item. Even page owners or users with the Manage Items privilege may not edit PL/SQL items that they did not create.
OracleAS Portal offers a couple of ways you can make good use of Zip files:
You can upload a Zip file as the Content Item Type File, and make it available to users for downloading multiple files at one time.
You can upload a Zip file as the Content Item Type Zip File, and unzip it within your portal for a fast upload of many files. If you wish, you can include their directory structure and, in the case of HTML, preserve their relative links and images.
This section explains how to make use of Zip files in your portal. It includes the following subsections:
You can upload a Zip file as a File item type or a Zip File item type.
When you add an item as a Zip file, you can upload compressed files from your computer to pages in OracleAS Portal. Users with the appropriate security privileges can upload compressed files of virtually any size or quantity.
Each extracted file in the Zip file is displayed in the page area as an item link. By creating descriptive file names before zipping files to be uploaded, you can provide meaningful link names to guide users to the file.
Uploaded files are accessible through automatically created links in the page area:
If you do not include path information in your Zip file, links for the uploaded pages display in a single page that you specify.
To upload files without path information, when you create the Zip file, clear the Include sub-pages and Save Extra Page Info check boxes.
If you include path information in your Zip file, links for each level are displayed in a common page for each level.
To upload path information, when you create the Zip file select Include sub-pages and Save Extra Page Info. The relative locations of your files when you zip them are the relative locations they have when uploaded.
If you are uploading an HTML file with a title, the text between the <TITLE></TITLE> tags becomes the item's display name link.
You can associate categories and perspectives with any uploaded file. Once associated, both categories and perspectives are retained by uploaded files, even if those files are overwritten with newer files of the same name. However, categories and perspectives are not maintained if item version control is enabled and when the Create New Version option is selected for uploaded files.
To add a Zip file that you will unzip within Portal:
Go to the page where you will add a Zip file.
If you do not see the page that you want to work with, you may not have the appropriate page access privileges. See your page group administrator to gain access.
For information on locating a page, see Section 7.2, "Navigating to Pages".
Switch to Edit mode.
Click the Add Item icon in the region where you will add the Zip file item.
|
Note: If the add item icon does not display next to the region, the region may be a portlet region (and may contain portlets). In this case, you cannot add items to this region. |
from the Content Item Type list, choose Zip File.
|
Note: If you do not see Zip File in the list, the page group that owns the page may not allow Zip files to be uploaded, or your administrator may not have selected this item type to display here. Contact your page group administrator for more information. If you are the administrator or have administrative privileges, you can click the configure the list of available item types link on this page and configure the page group to include this item type. |
Click Next.
In the File Name field, browse for or enter the pathway to the file (including the file name).
In the Display Name field, enter the item's link text. This is what users click to view the item.
Click Finish to upload the Zip file and return to the page.
Item attributes such as Author, Description, Image, New Item Indicator, and so on are available on the Add <Item> page only if the item was configured to include them. For more information, see Chapter 5, " Working with Content".
To extract the contents of a Zip file to a page:
Add the Zip file to the page as described in Section 7.6.1.3.2.
Click the Unzip link next to the Zip file.
Click the Browse icon next to the Target Page field, and select a page, or a tab on a page, on which you want to display the content of the Zip file.
(Optional) Select Run Unzip In Background to run the extraction process in the background.
If you clear this check box, you will remain on this page until the content of the Zip file have been extracted to the target page.
|
Note: If the Run Unzip in Background option does not function properly, your system administrator may need to set JOB_QUEUE_PROCESSES in the init.ora file to greater than one. |
In the Item Type section, select the type of items that you would like to create for the different types of files in the Zip file.
|
Note: If items with the same name already exist, and you plan to choose Overwrite Existing Files or Create New Version in step 6, the item type of the extracted files will be the same as the existing files rather than the item type specified here. |
For example, you can specify that all of the images in your Zip file will be extracted as File items instead of Image items.
If your Zip file contains document files, such as *.doc, *.pdf, or *.htm, select an item type for these files in the File list.
When the Bulk Load process is complete, an item of the type you selected is added in the target page for each file.
|
Note: The list of item types may include File, Simple File, Zip File, and custom item types based on file item types. |
If your Zip file contains image files, such as *.gif and *.jpg, select an item type for these files in the Image list.
When the Bulk Load process is complete, an item of the type you selected is added in the target page for each file.
|
Note: The list of item types may include Image, Simple Image, Simple Image Map, File, Simple File, Zip File, and custom item types based on image item types. |
If your Zip file contains other Zip files that do not end with a *.zip extension, select an item type for these files in the Zip File list.
When the extraction process is complete, an item of the type you selected is added in the target page for each file.
If your Zip file contains other Zip files that do end with a *.zip extension, you do not need to select an item type here. Zip File items will be created automatically for each of the files.
|
Note: The list of item types may include File, Simple File, Zip File, and custom item types based on zip file item types. |
In the Overwrite Or Rename Files section, choose whether to overwrite or rename existing files of the same name in the target page.
If item versioning ("Simple" or "Audit") is enabled at the page level on the target page, the Create New Version option displays. Choose this to create a new version of any existing file(s) that have the same name as those files being extracted into the target page.
Click Unzip to begin the file extraction process.
This process may take several minutes depending on the number and size of the files. Do not extract another Zip file while the extraction process is underway.
If you selected Run Unzip In Background, you will return to the page. If you did not select this option, you will remain on the Bulk Load page.
After the extraction process is complete, read the Bulk Load Log for information on the pages and files created and added.
If you selected Run Unzip In Background, you can access the Bulk Load Log after the extraction process is complete by clicking Unzip next to the Zip file.
Only Zip files that are added as Zip File item types display the Unzip link. You cannot extract files from Zip files that are added as File or Simple File item types.
OracleAS Portal maintains the directory structure in Zip files. If the Zip file contains directories, OracleAS Portal creates sub-pages inside the target page during the extraction process.
OracleAS Portal comes pre-packaged with portlets ready for adding to your pages. This section contains information about adding portlets to a page.
For information on the pre-packaged portlets that come with OracleAS Portal, see Section B.5, "Built-in Portlets".
This section includes the following subsections:
Each portlet region on a page may contain one or more portlets. The steps to add a portlet to a page vary depending on whether you want the portlet to be visible to all users of the page, or just yourself. Edit a page for changes other users should see; customize a page for changes for just yourself.
To add a portlet to a page:
Go to the page where you will add a portlet.
For information on locating a page, see Section 7.2, "Navigating to Pages".
If you do not see the page that you want to work with, you may not have the appropriate page access privileges. See your page group administrator to gain access.
To add a portlet to the view of the page that all (authenticated) users see, click the Edit link to switch to Edit mode.
To add a portlet to your own view of the page, click the Customize link to switch to Customize mode.
Click the Add Portlet icon in the region where you will add a portlet.
|
Note: If the region already includes items, you cannot add portlets to the region. If you are customizing your own version of the page, and there are no existing portlet regions, you can add a tab to the page, then add a portlet to the tab’s default portlet region. For information on adding tabs to a page, see Section 7.5.3.1, "Adding a Tab to a Page". |
In the Portlet Repository, enter the portlet name in the Search field, and click Go.
Alternatively, click the relevant repository links to drill to the portlet’s location.
To preview a portlet before adding it to your page, click the Preview icon next to the name of the portlet.
|
Note: The Preview icon displays only for those portlets that support it. |
To add a portlet to your page, click the portlet name.
Multiple selects are not supported.
The order of the portlets in the Selected Portlets list reflects the order in which they appear on the page. To change the order, highlight the portlet name and use the Move icons to the right of the list.
Click OK to return to the page.
In some situations, you may want to hide a portlet from view. For example, you may want to continue work on a portlet before you make it available to other users. If you hide a portlet, other users are not able to see the portlet in View mode; however, you can still access it in Edit mode.
|
Note: If a portlet is not hidden, it is displayed in View mode to all authorized users and available to all public users if the page is enabled to display to public users. |
To hide a portlet in View mode:
Go to the page that includes the portlet you will hide.
For information on locating a page, see Section 7.2, "Navigating to Pages".
If you do not see the page that you want to work with, you may not have the appropriate page access privileges. See your page group administrator to gain access.
Click Edit Page to switch to Edit mode.
Click the Actions icon beside the portlet you want to hide.
Click Hide to hide the portlet and return to your page.
You can change the order that portlets display in a region. You can change everyone’s view of the order (Edit) or just your view (Customize). This section covers editing the region. For information on customizing a region, see Chapter 1, " Viewing and Customizing Pages".
To rearrange the order of portlets in a region for all users of the page:
Go to the page that hosts the portlets you will rearrange.
If you do not see the page you want to work with, you may not have the appropriate page access privileges. See your page group administrator to gain access.
For information on locating a page, see Section 7.2, "Navigating to Pages".
Switch to Edit mode.
Click the Rearrange icon in the region that contains the portlets you will rearrange.
In the Arrange Portlets list, select a portlet and use the Move icons to reposition it in the list.
Repeat this step for all portlets you will rearrange.
Click OK to save your changes and return to the page.
You can move portlets to another region on the same page. You can do this so that it affects everyone’s view of the portlets (Edit) or just your view (Customize). This section covers editing the region. For information on customizing a region, see Chapter 1, " Viewing and Customizing Pages".
To move a portlet to another region for all users of the page:
Go to the page that hosts the portlet you want to move.
If you do not see the page you want to work with, you may not have the appropriate page access privileges. See your page group administrator to gain access.
For information on locating a page, see Section 7.2, "Navigating to Pages".
Switch to Edit mode.
Click the Actions icon next to the portlet you want to move.
Click Move to another region.
Select a new region, and click Move Portlet.
The portlet is moved, and you are returned to the page.
When a portlet is added to a page, a portlet instance is created that stores information about that particular instance of the portlet, including information about customizations made to the portlet. You can share a portlet instance so that the exact same portlet (including all of your customizations) can be used on another page. This means that when a user customizes the portlet instance on a page, those customizations are reflected on all other pages that include the shared portlet instance. Users do not have to make the same customizations to multiple instances of the same portlet.
For example, there are two versions of the same page: a standard page for use on desktop machines and a mobile page for use on mobile devices. You could share the portlets on the standard page and then add those shared portlet instances to the mobile page. That way, the user just needs to customize the portlets on the standard page, and those same customizations will automatically apply to the portlets on the mobile page.
You can share only portlets; you cannot share items or tabs.
To share a single portlet:
Go to the page that hosts the portlet you will share.
For information on locating a page, see Section 7.2, "Navigating to Pages".
Switch to Edit mode.
Click the Actions icon next to the portlet you will share.
Click Share Instance.
In the confirmation page, click Yes to share the portlet instance and return to the page.
In Edit mode, the text Shared appears next to the portlet.
To share more than one portlet:
Go to the page that hosts the portlets you will share.
For information on locating a page, see Section 7.2, "Navigating to Pages".
Switch to Edit mode, Layout view.
Select the check box next to all the portlets that you want to share.
Click Share.
Click Yes in the confirmation page to share the portlets you have selected and return to the page.
To add a shared portlet instance to a page:
Go to the page where you will add a shared portlet instance.
For information on locating a page, see Section 7.2, "Navigating to Pages".
Switch to Edit mode.
Click the Add Portlets icon in the region where you want to add the shared portlet instance
Click the Shared Portlets link in the Portlet Repository.
|
Note: By default, shared portlet instances are located in the Shared Portlets page of the Portlet Repository. Your OracleAS Portal administrator may have relocated shared instances. If so, either search for the name of the shared portlet instance, or ask your OracleAS Portal administrator for the new location. |
Click the portlet name.
Click OK to return to the page.
When you create a mobile page, if you base the page on an existing page, any portlets on the existing page are automatically shared with the mobile page. However, new portlets are not implicitly shared between a mobile page and the page on which it was based. If you add a portlet to a page that was used as the starting point for a mobile page, that portlet will not appear on the mobile page. If you want the portlet to also appear on the mobile page, you must add it to the mobile page. Additionally, if you want to share any customizations made to the portlet between the two pages, you must explicitly share the portlet on one page, and then add that shared portlet instance to the other page.
If you want users to add a shared portlet instance to a page rather than the portlet itself, make sure access privileges in the Portlet Repository are set up appropriately.
You can delete a portlet from your personal view of a page (Customize) of from everyone’s view of the page (Edit). This section covers editing the region. For information on customizing a region, see Chapter 1, " Viewing and Customizing Pages".
To delete a portlet from a page for all users of the page:
Go to the page that hosts the portlet you will delete.
If you do not see the page that you want to work with, you may not have the appropriate page access privileges. See your page group administrator to gain access.
For information on locating a page, see Section 7.2, "Navigating to Pages".
Switch to Edit mode.
Click the Actions icon beside the portlet you want to delete.
Click Delete.
In the confirmation page, click Yes to delete the portlet and return to the page.
If you have Manage privileges on one or more pages in a page group, you can easily access them from any page where you have privileges to add a portlet.
|
Note: To add this portlet so that all authorized users can see it, you must have at least the Manage Content privilege on the page where you will place it.You can also add the User Managed Pages portlet to your own view of a page if you have the Add-Only Customize Portlets privileges on the page. Customize the page and add the portlet. The list will be visible only when you view the page; other users will not be able to see it. |
To add a list of the pages you can manage to a page:
Go to the page where you will add the list.
For information on locating a page, see Section 7.2, "Navigating to Pages".
Switch to Edit mode.
In the region where you want to add the list, click the Add Portlets icon.
Enter User Managed Pages in the Search field, and click Go.
|
Tip: By default, the User Managed Pages portlet is located under the Portal Content Tools page of the Portlet Repository. |
Click User Managed Pages to add it to the Selected Portlets list.
Click OK to return to the page.
In the User Managed Pages portlet's header, click the Customize link.
Change the name of the portlet, if desired, in the Display Name field.
For example, you might want to change the portlet header to My Pages.
In the Number Of Pages field, enter the number of pages you want to display.
Leave the field blank to display all the pages on which you have Manage privileges, up to a maximum of 99999.
In the Order By list, choose either:
Display Name to order the pages alphabetically from A to Z
Creation Date to order them from the most recently created to the oldest
|
Note: When you order by creation date, the portlet lists display names in creation order, rather than listing creation dates. |
Click OK to return to the page.
To automatically add content to a page, add a Custom Search portlet and then customize the portlet to search by particular criteria. If the Custom Search portlet is set up to perform an automatic query, all of the items belonging to the selected criteria are automatically displayed when the portlet is displayed. Every time the page displays, the search is refreshed. This means that as content that matches the search criteria is added to your portal, it is automatically published to the Custom Search results. The page remains current with all relevant material.
With Custom Search results, normal security-checking is imposed. Therefore, only those items the user is authorized to see are displayed. This may not include every item that otherwise matches the search criteria.
For detailed information about placing and configuring a Custom Search portlet, see Section 7.7.3, "Working with the Custom Search Portlet".
To provide consistent navigation throughout a page group, you can create a navigation page and add it to every page in the page group (or to your page template).
To add a navigation page to a page, the navigation page must be published as a portlet. You’ll find information on publishing a page as a portlet in Section 7.3.4, "Publishing a Page as a Portlet". For information on creating a navigation page, see Section 6.3.2, "Creating a Navigation Page".
To add a navigation page to a page:
Go to the page where you will add navigation.
For information on locating a page, see Section 7.2, "Navigating to Pages".
Switch to Edit mode.
Click the Add Portlets icon in the region where you will add a navigation page.
In the Portlet Repository, enter the name of the navigation page in the Search field and click Go.
In the Portlet Repository Search Results, click the navigation page name.
Click OK to return to the page.
|
Tip: You might want to edit the properties of the region that hosts the navigation page. For example, you may want to change the region width to improve the way the navigation page looks on the page. To edit region properties, click the Edit icon above the relevant region. For more information, see Section 7.5.2, "Configuring Region Display Options". |
OracleAS Portal offers a number of options for adding search engines to your pages. You can add a Basic, Advanced, Custom, or Ultra Search. A Basic search matches results with search criteria entered into the Search field. An Advanced Search is a Basic Search with additional capabilities, such as the ability to limit the search to a specific page group, a specific category, and so on. Use Custom Search to create an automatically executed search whose results dynamically populate the search results page.
A pre-built Ultra Search portlet is also available. It provides crawling and universal search over all Ultra Search-supported repositories. It includes the ability to search the content of OracleAS Portal. To make use of the pre-built Ultra Search portlet, OracleAS Portal must be registered as an Ultra Search content source, and the Ultra Search provider must be registered with OracleAS Portal.
|
Note: If the Ultra Search portlet is not available in your portlet repository, contact your portal administrator. For more information on how to set up Ultra Search, see the OracleAS Portal Configuration Guide on Portal Center,http://portalcenter.oracle.com. Click the Search icon in the upper right corner of any Portal Center page.
|
For custom searches, you can display search results in the same portlet you used to submit the search criteria, and you can place two Custom Search portlets on two different pages—one for submitting search criteria and one for displaying results. This has implications for the set-up values specified for each portlet.
This section explains how to use OracleAS Portal’s search features and includes a discussion of the options that are shared and not shared when Custom Search criteria and results are provided in two separate portlets. It includes the following subsections:
Refer to the OracleAS Portal Configuration Guide for additional information on setting up a search feature in Portal. You’ll find this guide on Portal Center, http://portalcenter.oracle.com. Click the Search icon in the upper right corner of any Portal Center page.
No matter what type of search you will use, the task of placing the search is the same. To place a search on a page:
Go to the page where you will place the search portlet.
For information on locating a page, see Section 7.2, "Navigating to Pages".
Click the Add Portlet icon in the region that will host the search portlet.
In the Portlet Repository, enter search in the Search field, and click Go.
In the Portlet Repository Search Results, click the type of search portlet you will add.
Click OK to save your changes and return to the page.
When you place a Basic or Advanced Search portlet on a page, you can edit some default portlet settings, including the portlet’s banner title and whether a page group selector is displayed. The page group selector allows users to limit their search to one or more specific page groups.
This section discusses the options that are set at the portlet level. You’ll find information about setting options at the administrator level in the OracleAS Portal Configuration Guide, available on Portal Center at http://portalcenter.oracle.com. Click the Search icon in the upper right corner of any Portal Center page.
To edit a Basic or Advanced Search portlet:
Go to the page that contains the search portlet you want to edit.
For information on locating a page, see Section 7.2, "Navigating to Pages".
Click the Edit icon associated with the portlet.
Change defaults as desired:
Enter a different Portlet Header Title. The default is Basic Search or Advanced Search.
Select Show page group selector to enable users of this search portlet to choose which page groups are included in a search. Once this option is selected, a Page Groups field displays in the portlet. Users click the Browse icon next to this field to select one or more page groups.
If this option is not selected, all page groups are searched.
Click OK to save your changes and return to the page.
|
Note: When you edit a portlet, e.g., through Edit Defaults, you make changes to the portlet that affect all views of it. When you customize a portlet, you affect just your view of it. You can make the same changes discussed in this section to your personal view of the Basic or Advanced Search portlet by clicking the Customize link in the portlet header, provided that a Customize link is set to display. |
The Custom Search portlet included with OracleAS Portal allows page builders to define a variety of searches against information uploaded to your portal. Using this portlet, you can define unique search submission forms, results pages, and predefined search queries that all meet very specific search requirements.
You’ll find more information about Custom Search Portlets in the technical note "Using the Custom Search Portlet," on Portal Center, http://portalcenter.oracle.com. Click the Search icon in the upper right corner of any Portal Center page.
This section provides information on how to work with Custom Search portlets. It includes the following subsections:
To place the Custom Search portlet on a page:
Go to the page where you will add the Custom Search portlet.
For information on locating a page, see Section 7.2, "Navigating to Pages".
If you do not see the page that you want to work with, you may not have the appropriate page access privileges. See your page group administrator.
Switch to Edit mode.
Click the Add Portlet icon in the region where you will add the portlet.
If the region already includes items, you cannot add a portlet to the region.
In the Portlet Repository, enter custom search in the Search field, and click Go.
In the Portlet Repository Search Results list, click Custom Search.
This places the portlet in the Selected Portlets list. The order of the portlets in this list reflects the order in which they appear on the page. To change the order of the portlets, highlight the portlet name and use the arrows to the right of the Selected Portlets list.
Click OK.
The custom search portlet is added to the page.
With Custom Search configuration, some options affect all Custom Search portlets, and some affect only a particular instance of the portlet. The options that affect all search portlets are set at the administrator level. The options for a particular instance of the Custom Search portlet are set at the portlet level.
This section discusses the options that are set at the portlet level. You’ll find information about setting options at the administrator level in the OracleAS Portal Configuration Guide, available on Portal Center, http://portalcenter.oracle.com. Click the Search icon in the upper right corner of any Portal Center page.
To set Custom Search options at the portlet level:
Go to the page that contains the Custom Search portlet.
For information on locating a page, see Section 7.2, "Navigating to Pages".
If you do not see the page that you want to work with, you may not have the appropriate page access privileges. See your page group administrator.
Switch to Edit mode.
Click the Edit icon associated with the portlet.
Edit the Custom Search options as required.
Five tabs contain the options for the custom search portlet:
Portlet Type—Use the Portlet Type tab to generally define the type of Custom Search portlet you will create. See Portlet Type Tab for more information.
What to Search—Use the What to Search tab to specify the content type and range of page groups to be searched. See What to Search Tab for more information.
Search Criteria—Use the Search Criteria tab to enter specific search terms and define filters to further refine your search. See Search Criteria Tab for more information.
Search Form—Use the Search Form tab to create the search form your users will see when you opt to Display a search form for users to fill in (on the Portlet Type tab). See Search Form Tab for more information.
Results Display—Use the Results Display tab to specify the target location of search results and to select display options, including extra services the page will display and the style to be applied to displayed items. See Results Display Tab for more information.
Click OK.
This section discusses the options available on the default version of a Custom Search Form and explains how to use those options to create a Custom Search Form. It includes the following subsections:
When you place the Custom Search portlet on a page, what you get is the default version of the Custom Search Form. You can edit the portlet defaults to display other content in lieu of the form, such as the search results. But the first thing you see, before you edit defaults, is the default version of the Custom Search Form. Table 7-1 lists and describes the elements that make up the default Custom Search Form.
Figure 7-21 The Default Version of the Custom Search Form (Oracle Text Enabled)
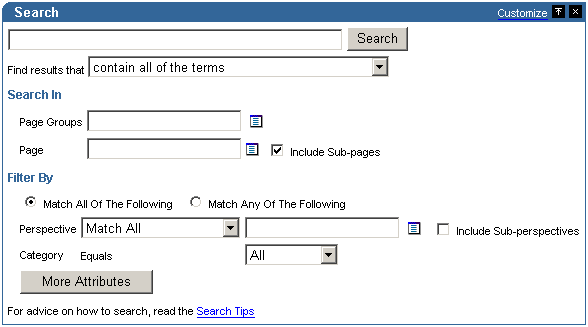
Table 7-1 Options available on the default version of the Custom Search Form
| Option | Description |
|---|---|
| Search field and buttons | Enter the term(s) you will search for. Separate terms with spaces. Enclose phrases in quotation marks.
Click the Search button to execute the search. |
| Find results that | Use this list to specify how rigorously the search results should match the terms entered in the Search field. For example, if you enter three terms, policy, benefit, retirement, and you choose:
|
| Page Groups | Use this to limit the range of the search to one or more selected page groups. Click the Browse icon to select from a list of page groups to search. This opens a secondary window where users can move one or more page groups from an Available to a Selected list.
Note that searches can be restricted to one or more page groups or pages. When a page is selected, the Page Groups option is ignored. |
| Page | Use this to select a specific page to search. Clicking the Browse icon opens a secondary window where users may select a page.
Note that searches can be restricted to one or more page groups or pages. When a page is selected, the Page Groups option is ignored. |
| Include Sub-pages | Select this option to include all subpages of the page you selected in the Page field in your search. |
| Match All/Any Of The Following | Use these options to further restrict your search:
|
| Perspective
Match All / Match Any [ ] |
(Oracle Text enabled only) Specify which perspective(s) should apply to search results. Choose Match All or Match Any to perform a search that matches all/any of the perspectives you select. |
| Include Sub-perspectives | (Oracle Text enabled only) Select this option to include all sub-perspectives of the perspectives you select. |
| Perspective Equals [ ] | (Oracle Text disabled) Specify which perspective(s) should apply to the search results. |
| Category Equals [ ] | Specify which category(s) should apply to the search results. |
| More Attributes | Click this button to include more attributes in the list of filters, and to define filtering values for those attributes. |
| For advice on how to search, read the Search Tips | Click this link to open a list of tips for refining a search. |
Using the Custom Search portlet, you can create unique search submission forms that meet very specific search requirements. For example, you can determine which actions can be performed by users of the search form and which links, buttons, and headings are displayed on the search form.
To create a custom search form:
Go to the page that contains the Custom Search portlet.
For information on locating a page, see Section 7.2, "Navigating to Pages".
Switch to Edit mode.
Click the Edit icon associated with the portlet.
The Custom Search Edit Defaults page opens. This includes five tabs, which are listed and described below:
Click OK to save your changes and return to the page.
Use the Portlet Type tab to generally define the type of Custom Search portlet you will create. Table 7-2 lists and describes the Custom Search options that are available on the Edit Defaults: Portlet Type tab.
Table 7-2 Custom Search options on the Edit Defaults: Portlet Type tab
| Option | Description |
|---|---|
| Display a search form for users to fill in | This option enables users to see a submission form to enter search criteria. Whether users will be able to enter and select their own search criteria is dependent on how you configure the Search Form Tab. |
| Automatically display search results | Search results from the predefined custom search will display in the Custom Search portlet in lieu of the Custom Search Form. Users will have no input into what is searched. The search is defined by the option values you specify on the What to Search and Search Criteria tabs. |
| Cache search results for [ ] minutes | If users access the Custom Search portlet within [ ] minutes after the search was executed, they will see a cached version of the original search results. |
| Do not cache search results | Every time users return to the page where the Custom Search portlet was placed, the search is re-executed and the results are refreshed. |
| Portlet Header Title | A display title for the Custom Search portlet. |
Use the What to Search tab to specify the content type and range of page groups to be searched. Table 7-3 lists and describes the Custom Search options that are available on the Edit Defaults: What to Search tab.
Table 7-3 Custom Search options on the Edit Defaults: What to Search tab
| Option | Description |
|---|---|
| Any | Search results will return any portal object that matches the search criteria, whether it be an item, such as a link to a file or image that contains the search term; or a page, category, or perspective that contains the search term.
The selection you make here works with your selection for the Choose type of content to search option, which appears on the Search Form tab. Additionally, it is affected by where you choose to display your results. Results displayed in the same portlet:
Results displayed on a different page: In this scenario, one Custom Search portlet defines the search submission criteria (the search form). A second Custom Search portlet defines how search results are displayed (the search results). The Search Form portlet and Search Results portlet are on different pages.
Results displayed from an automatic search query:
|
| Items | Search results will return links to items only. |
| Pages | Search results will return links to pages only. |
| Categories | Search returns all categories that meet the specified search criteria. |
| Perspectives | Search returns all perspectives that meet the specified search criteria. |
| Search in all page groups, including newly created page groups | All page groups are included in the search. |
| Search in selected page groups | Only the page groups you select from the Available Page Groups list and add to the Page Groups to Search list are searched.
If you select two or more page groups, only shared attributes may be used for search criteria. |
Use the Search Criteria tab to enter specific search terms and define filters to further refine your search. Table 7-4 lists and describes the Custom Search options that are available on the Edit Defaults: Search Criteria tab.
Table 7-4 Custom Search options on the Edit Defaults: Search Criteria tab
| Option | Description |
|---|---|
| blank field | Enter the term(s) to be searched for. Search terms are not required. For example, if you choose to search for a specific attribute, such as a Create Date, and leave this field blank, all objects within the selected page groups that share that Create Date will display in your search results. On the other hand, if you enter a search term, such as policy, and specify the Create Date, search results will include all objects within the selected page groups that include the word policy and were created on the specified date.
Note that if Oracle Text is not enabled, only the objects’ metadata, that is, the content of their attributes, is searched. |
| By default, find results that | Indicate how rigorously the search terms you entered into the blank field should be applied to the search. For example, if you enter three terms, policy, benefit, retirement, and you choose:
|
| Choose Attributes | Click this link to define which attributes should be considered in the search. A second window opens where you can add or delete attributes to be searched for. |
| Page Group | Display only. This column displays only if a single page group was selected on the What to Search tab. |
| Attribute | Display only. The name of the attribute to be available for use as a search criterion, for example, Create Date, Description, Display Name, and so on. |
| Data Type | Display only. The data type of the attribute. |
| Restriction | Restrict the attribute’s relationship to its default value, such as attribute equals default value, attribute contains all default value, and so on. |
| Default Value | The default value of the attribute. This column is entitled Value, if Automatically display search results is selected on the Portlet Type tab.
There are two special default values: #TODAY#, which is today’s date, and #USER#, which is the currently logged on user. Additionally, you can specify #TODAY#+n or #TODAY#-n, where n is an integer. These values are case sensitive. For example, if you want to search for all items created in the last seven days, choose the Create Date attribute, set Restriction to Greater Than, and the Default Value to #TODAY#-7. For auto-queries, if a search term is not specified in the Search For section, at least one attribute must have a value. |
Use the Search Form tab to create the search form your users will see. The options on this tab are useful when you opt to Display a search form for users to fill in (on the Portlet Type tab). Table 7-5 lists and describes the Custom Search options that are available on the Search Form tab.
Table 7-5 Custom Search options on the Edit Defaults: Search Form tab
| Option | Description |
|---|---|
| Search Terms Box | Select this to enable users to enter their own search terms. |
| Search Terms Restriction Selector | Select this, provided Search Terms Box is selected, to enable users to place additional restrictions on the search terms. For example, if users enter three terms, policy, benefit, retirement, and you have specified:
|
| Choose a page group to search | Select this to enable users to choose one or more page groups to search. The page groups that appear on the list on the submission form depend on the options chosen on the What to Search tab. If you chose:
In both cases, the user can select one or more page groups by moving page groups from the Available list to the Selected list. The heading "Search In" that appears above this field can be hidden using the Subsection headers option described in the Other Options section of this table. Note that searches can be restricted to one or more page groups or pages. When a page is selected, the Page Groups option is ignored. |
| Choose a page to search | Select this to enable users to identify a page, and, optionally, its subpages, to search.
Note that searches can be restricted to one or more page groups or pages. When a page is selected, the Page Groups option is ignored. |
| Order search results | Select this to enable users to specify how their search results should be organized, for example, by Create Date, Author, and so on.
Some of the options in the Order By list may not be applicable to certain search results. For example, the results are ordered by Author and a returned result has no author. In such cases, the particular returned result is ordered by Title. Search results are arranged in ascending order, unless the user ordered by date. |
| Set number of results per page | Select this to enable users to specify how many results should appear on a page. If the number of results exceeds the value specified here, they are placed on additional pages. |
| Set maximum number of results | Select this to enable users to limit the number of results returned. |
| Choose type of content to search (items, categories, perspectives, or pages) | Select this to enable users to specify a results type to return, either categories, perspectives, pages, or items.
Assume that your custom search involves two portlets in two different locations: one custom search portlet displays the search form; the other custom search portlet displays the search results. For this option to take effect, the results portlet setting for What type of content should be searched? must be set to Any on the What to Search tab. If it is not, only search results of the chosen content type are returned, and users are not given the option to choose a content type. |
| Search Tips Link | Select this to add a link to the Search Form that provides users with help on how to set up search criteria. |
| Advanced Search Link | Select this to add a link to the Search Form that enables users to set up additional search criteria. |
| Image | Select this to display an image with your Search Form. Choose:
|
| Internet Search Engine Link | Select this to display a link to an external search engine, such as Google or Yahoo, on the Search Form. For more information, see the Administrator Level subsection of Section 7.7.3.2, "Setting Custom Search Options". |
| Reset Button | Select this to display a button that enables users to reset the search criteria. |
| Subsection headers | Select this to display group headings for items displayed on the search form, such as Search In, Filter By, and Results Options. |
| Hidden/Displayed Attributes | Select which attributes to show on the Search Form. The list of attributes available here depend on those chosen on the Search Criteria tab. The order of attributes appears to users in the order you set for the Displayed Attributes list. Reorder this list using the arrow icons to the right of the list. |
| Allow users to add extra attributes to the search | Select this to enable users to specify additional attribute search criteria. Checking this will display the More Attributes button on the Search Form.
If no attributes were selected on the Search Criteria tab, then selection of this option results in the display of a single, empty attribute row on the Search Form. |
| Allow users to choose Match Any/Match All for attributes | Select this to allow users to set restrictions on attribute searches. Selecting this option places two radio buttons on the form:
If these options are not displayed on the Search Form, the search will return results that match all the attribute search criteria specified. |
Use the Results Display tab to specify the target location of search results and to select display options, including extras the page should display and the style of displayed items. Table 7-6 lists and describes the Custom Search options that are available on the Edit Defaults: Results Display tab.
Table 7-6 Custom Search options on the Edit Defaults: Results Display tab
| Options | Description |
|---|---|
| Default Search Results Page (Default when displaying a search form) | Choose this to display the search results on the Default Search Results Page.
The Default Search Results Page is specified on the Search Settings page, typically managed by a portal administrator. For more information, see the OracleAS Portal Configuration Guide on Portal Center, |
| Custom Search Results Page [ ] | Choose this to display search results on a page that you specify. To select a page, click the Browse icon next to the input field. The target page must also contain a search portlet. |
| This Portlet (Only choice when search results are automatically displayed) | Choose this to display search results in the same portlet from which the search was executed. This is the only choice available when you opt to automate your custom search. |
| Bulk action link | Displays a Bulk Action link along with search results. This allows users to perform actions on multiple objects returned by the search. This link displays only when the search was performed on a single page group. It is not displayed for the Shared Objects page group.
Note: This setting applies only to the portlet that is being customized. If your search results are displayed in a portlet different from where your search form is displayed, then be sure to set values for these options in the search results portlet. |
| Results pagination | Choose this to display the Previous and Next icons and a results summary so users can view search results on a page-by-page basis. If you choose not to paginate results, the number of results returned is limited to the value you enter in the Show a maximum of [ ] results per page field.
Note: This setting applies only to the portlet that is being customized. If your search results are displayed in a portlet different from where your search form is displayed, then be sure to set values for these options in the search results portlet. |
| Show a maximum of [ ] results per page | Choose this to specify the maximum number of results returned on a page. This becomes the total allowable number of results returned if Results pagination is not also selected.
Note: This setting applies only to the portlet that is being customized. If your search results are displayed in a portlet different from where your search form is displayed, then be sure to set values for these options in the search results portlet. |
| Save search link with the text [ ] | Choose this to display a save search link with the search results. The text you enter here becomes the link text. The default is Save Search.
This enables users to save the defined search criteria and rerun the same search without respecifying. Note: This setting applies only to the portlet that is being customized. If your search results are displayed in a portlet different from where your search form is displayed, then be sure to set values for these options in the search results portlet. |
| Search form with submission criteria | Choose this to display the Search Form, along with the last-specified search criteria, on the Search Results page. This way, users can adjust the criteria and resubmit the search if it didn’t yield the desired result.
If search results are to be displayed in a portlet other than the one from which the search was submitted, set the Search Form attributes for both portlets (the submitting portlet and the result portlet). Otherwise, not all attributes that are visible on the Search Form may be visible with the results. This option is not available if the Custom Search is set up as an automatic query. Note: This setting applies only to the portlet that is being customized. If your search results are displayed in a portlet different from where your search form is displayed, then be sure to set values for these options in the search results portlet. |
| Style | Select a style for items returned as search results. The default is Main Style. This style does not affect the appearance of the portlet itself or the page that hosts the portlet. It only affects the item results, that is, their font style, size, color, and so on. |
| Available/Displayed Attributes | Select the attributes to include in item search results. Use the Move icons to move them from Available to Displayed Attributes. The order of Displayed Attributes is the order they appear on the Search Results page. Use the Move icons to the right of this list to rearrange the order of display. |
| Order search results by | Select an order to display search results, that is, by Author, Create Date, Display Name, and so on.
If a search returns pages, and Order By is set to Author, the order automatically defaults to order by Title. This is because pages do not have an Author attribute. |
This section discusses the options available on a default search results page and explains how to customize those options to create a custom search results page. It includes the following subsections:
The Search Results Page displays the results of a search as well as any number of other services you may care to include. The objects displayed in the default Search Results page (Figure 7-22) are listed and described in Table 7-7.
Table 7-7 Elements of the default Search Results Page
| Element | Description |
|---|---|
| Items tab | This tab displays all returned results that are items. Items include files, images, page links, and the like. Users click a result, and the file is opened, the image is displayed, the link is executed, and so on.
This and other tabs display only on search results from manual, rather than automatic, searches. |
| Pages tab | This tab displays all returned results that are pages. Users click a result, and page is opened.
This and other tabs display only on search results from manual, rather than automatic, searches. |
| Categories tab | This tab displays all returned results that are categories. Users click a result, and a page is opened with a list of all OracleAS Portal objects that are classified under that category.
This and other tabs display only on search results from manual, rather than automatic, searches. |
| Perspectives tab | This tab displays all returned results that are perspectives. Users click a result, and a page is opened with a list of all OracleAS Portal objects that are classified under that perspective.
This and other tabs display only on search results from manual, rather than automatic, searches. |
| Results | This informational field displays the range of results on the current page and the total number of results. |
| Save Search | Users click this button to save the search criteria specified for the current search. Users have the option of adding a Saved Searches portlet to a page. Any time they click Save Search, the current search criteria are added as a new link in the Saved Searches portlet. In the portlet, they click the link to a particular saved search to rerun the search. |
| result | The result link jumps to the item, page, or category or perspective list that matches the search criteria. |
| Information icon | Click this icon to view the properties (attribute values) of a particular result, such as its description, its publish date, or its expiration period. |
| Attributes | These are the attributes that were configured (on the Custom Search Edit Defaults: Results Display tab) to display with each result. On the default Custom Search Results Page, the default attributes include the object’s Create Date, its parent page group, and its classification category and perspective(s). |
| Search Form | The default Search Results Page includes the Custom Search Form so that users may alter the search criteria and rerun the search without having to navigate back to the Custom Search portlet. |
Using the Custom Search portlet, you can create unique search results pages to meet specific search requirements. For example, you can choose how many results are displayed per page and the style and layout of the results.
The style and layout of search results are controlled by settings on the Custom Search Edit Defaults: Results Display tab, and not by settings in the Custom Search Form.
To create a custom search results page:
Go to the page that contains the Custom Search portlet.
For information on locating a page, see Section 7.2, "Navigating to Pages".
Switch to Edit mode.
Click the Edit icon beside the portlet.
Click the Results Display tab.
Edit tab options as desired.
For more information, see Table 7-6.
Click OK to save your changes and return to the page.
The custom search portlet is displayed. When you next perform a search, the results are displayed in format you have specified.
Using the Custom Search portlet, you can create a portlet that performs a predefined search query and automatically displays the results when the portlet is displayed.
For example, you can create a search portlet that lists items created by a particular user, or one that searches for a list of items that belong to a selected category and that have been modified in the last seven days.
To create a portlet with a predefined search query:
Go to the page that contains the Custom Search portlet.
For information on locating a page, see Section 7.2, "Navigating to Pages".
Switch to Edit mode.
Click the Edit icon beside the portlet.
On the Portlet Type tab:
To specify that this portlet is to execute a predefined query, select Automatically display search results.
With this option, users are not able to enter search submission criteria. Instead, the search results appear when this portlet is displayed.
To cache the results from the automatic query, enter the length of time in minutes that the portlet content is cached.
The default is 10 minutes.
Select Do not cache the search results to disable caching. This means, every time the page that hosts the portlet is called, the search is rerun and the results automatically refresh.
Change the Portlet Header Title if you wish.
Click the What to Search tab to choose the page groups and content type to be searched:
For What type of content should be searched?, choose whether to search for items, pages, categories, or perspectives.
In an autoquery search, only one content type can be returned; therefore, the option any of these does not apply.
For Which page groups should be searched?, choose all, or select a subset of page groups.
For more information see Section 7.7.3.6, "Restricting Portal Content from a Custom Search".
Click the Search Criteria tab to define a set of conditions for your search:
In Search For, enter a search term for the automatic query if required.
Select an operator for the query, such as contain all of the terms, contain any of the terms, contain these terms exactly.
If Oracle Text is in use on your portal, there will be a larger set of operators to select from.
Choose which (if any) of the search submission attributes are needed to define your search query.
Enter a Restriction and Default Value for each selected attribute as required.
If a search term is not specified, at least one attribute must have a value. With autoquery searches, the Default Value field is named Value.
Click the Results Display tab to define how the results are displayed:
For Order search results by, choose the order in which the results are displayed.
Customize how your search results are displayed, as required.
For more information, see Section 7.7.3.4.2, "Creating a Custom Search Results Page".
Click OK to save your changes and return to the page.
When this custom search portlet is displayed, it executes the search query you have specified and automatically displays the results.
Using the Custom Search portlet, you can restrict the portal content that can be included in a search. Users may not override the restrictions you define.
For example, you can create a portlet that allows users to search for items only, in one specific page group.
To restrict portal content from a custom search:
Go to the page that contains the Custom Search portlet.
For information on locating a page, see Section 7.2, "Navigating to Pages".
Switch to Edit mode.
Click the Edit icon beside the portlet.
Click the What to Search tab to choose which page groups and content type to include in the search:
For What type of content should be searched?, restrict the search to items, pages, categories, or perspectives.
Alternatively, allow any of these.
If the results are to be displayed in a different portlet, and the Search Results Page is set up to display a particular type of content, the setting for the Search Results Page overrides the content type selected in the Search Form. The user can search only for the type of content that is selected in the Search Results Page.
For Which page groups should be searched?, move the page group(s) you will include in your search from the Available Page Groups list to the Page Groups to Search list.
Click the Search Form tab:
Select Choose a page group to search to allow the user to further restrict which page groups are searched.
The list of available page groups displayed when the user clicks the Browse icon are those selected on the What to Search tab. If you want the user to always search in all the page groups you have selected, do not select this option.
Select Choose type of content to search to allow the user to restrict the search to items, categories, perspectives, or pages.
For this option to take effect, the custom search portlet setting What type of content should be searched? must be set to Any, on the What to Search tab. If it is not, only search results of the chosen content type are returned. The user is not given the option to choose a content type.
Click OK to save your changes and return to the page.
This instance of the Custom Search Portlet returns search items from the portal content you have defined.
Using the Custom Search portlet, you can define searches that return results that match a set of predefined conditions. You can predefine a set of conditions if you wish, so that they appear on the search form when it is displayed in the portlet. If your custom search portlet displays a search form, users can override the search criteria that you define.
Alternatively, you may want to hide search conditions from portlet users so they cannot be changed.
For example, you can create a portlet that searches for a list of items in a selected category that have been modified in the last 7 days. If you do not display the category details, the user can only search in the category you specify. If you choose to display the Date Updated attribute, the default is provided, but the user can modify the date as required.
To set search criteria for a custom search:
Go to the page that contains the Custom Search portlet.
For information on locating a page, see Section 7.2, "Navigating to Pages".
Switch to Edit mode.
Click the Edit icon beside the portlet.
On the Portlet Type tab:
To specify that users of this portlet can enter search criteria, select Display a search form for users to fill in.
Change the Portlet Header Title if you wish.
Click the What to Search tab to choose which page groups and content type to search:
For What type of content should be searched?, choose whether to search for items, pages, categories, perspectives, or any of these.
For Which page groups should be searched?, choose All, or select a subset of page groups.
For more information see Section 7.7.3.6, "Restricting Portal Content from a Custom Search".
Click the Search Criteria tab to predefine a set of conditions for your search:
In Search For, enter a default search term for the query if required.
Select a default operator for the query, such as contain all of the terms, contain any of the terms, contain these terms exactly.
If Oracle Text is in use on your portal, there will be a larger set of operators to select from.
Choose which (if any) of the search submission attributes are needed to define your search query.
Enter a Restriction and Default Value for each selected attribute as required.
With autoquery searches, if a search term is not specified, at least one attribute must have a default value.
If Oracle Text is enabled you can choose more than more perspective. You can perform a search that Matches All or Matches Any of the perspectives you select and if you choose Include Sub-perspectives you can extend your search to perspectives beneath the perspectives you have chosen.
Click the Search Form tab to specify whether users can override the search criteria you have defined:
Select Search Terms Box, to allow users to enter their own search terms.
Select Search Terms Restriction Selector, to allow users to choose their own operator for the search.
Hide any search attributes that you do not want users to change, by moving them to the Hidden Attributes list.
Click OK to save your changes and return to the page.
The custom search portlet is displayed with your search criteria defined.
You can set up a Custom Search portlet for submitting search criteria and another, separate Custom Search portlet that displays the search results. If you do this, you must configure both portlets. Some configuration values are passed from the search submission portlet to the search results portlet, while others do not. Table 7-8 lists and explains the configuration settings that are passed over and those that are not.
To understand Table 7-8, imagine the following scenario:
Page A hosts Portlet A, which is used to submit search criteria.
Page B hosts Portlet B, which is used to display search results from search criteria submitted to Portlet A.
Table 7-8 Sharing of options between Custom Search form and results portlets
It is also important to understand how page group and perspective selection is resolved when a separate Custom Search portlet is used to display search results and the page groups/perspectives selected on the two portlets do not match.
For example, if you choose page groups (or perspectives) in Portlet A (say PG1 and PG2), but the results Portlet B is configured to search:
a subset of these (say PG2), then the common page groups are searched, i.e. PG2.
different page groups (say PG3 and PG4), then result Portlet B settings are used, i.e. PG3 and PG4.
any page groups (nothing selected), then the search form Portlet A settings are used, i.e. PG1 and PG2.
Similarly, if Portlet A has no page groups selected, then results Portlet B settings are used. The example here describes page group selection, but the behavior is the same for perspective selection.
If you want the results on Portlet B to match the page group/perspective selection in Portlet A, ensure that the options set on Portlet A are a subset or the same as those on Portlet B.
Each page presents an opportunity to define useful information about the page. This section discusses some of these opportunities and explains how to put them to use. It includes the following subsections:
If a page will have a sub-page links region, you can define which sub-pages should display in that region and specify whether sub-page links should display in alphabetical order.
Sub Page Display options affect a page only when that page includes a sub-page links region.
To define the display of sub-page links:
Go to the page where you will include a sub-page links region.
For information on locating pages, see Chapter 1, " Viewing and Customizing Pages".
Switch to Edit mode.
Click the Properties link next to Page in the page toolbar.
Be sure to click the link for the page rather than the page group.
Click the Optional tab.
Go to the Sub Page Display section, and select the sub-page or pages you want to display from the Available Sub-Pages list.
Click the Move Right icon to move your selections to the Displayed Sub-Pages list.
Use the Move Up and Move Down icons to the right of the Displayed Sub-Pages list to rearrange the sub-pages into your preferred display order.
If you want the displayed sub-pages to be arranged alphabetically, select Display Objects Alphabetically. Note that the Move Up and Move Down icons disappear when you select this option. Any sub-pages you move to the Displayed Sub-Pages list will automatically insert themselves in alphabetical order.
Click OK to save your changes and return to the page.
For additional information about sub-page links regions, see Section 7.5.2.8, "Setting Sub-Page Links Properties".
When users add content to a page by some means other than the Graphical or Layout view of the page, OracleAS Portal must determine the region where the content should be placed. For example, if a user adds an item to a page using a WebDAV client, that user has no way of specifying the region where the item should be placed. To address this scenario, OracleAS Portal lets you specify default item and portlet regions for a page.
You can also select default portlet and item regions at the page template level. Any page based on the template will use the defaults specified in the template. Pages based on templates cannot specify their own default region.
If you do not explicitly select a default item or portlet region, OracleAS Portal selects its own defaults: the second item and portlet regions in the page. The second region is selected, rather than the first, to avoid placing content in regions intended for navigation elements. If the page does not have an eligible portlet or item region, an undefined region is used as the default region. If an item is added, the undefined region becomes an item region; if a portlet is added, the undefined region becomes a portlet region.
To select a default region for a page:
Go to the page where you will identify default portlet and item regions.
For information on locating pages, see Chapter 1, " Viewing and Customizing Pages".
Switch to Edit mode.
Click the Properties link next to Page in the page toolbar.
Be sure to click the link for the page rather than the page group.
Click the Regions tab.
From the Default Region Type list, choose Default Portlet Region or Default Item Region.
Select the radio button in the region you will identify as the page's default portlet or item region.
|
Note: You can see radio buttons only in the regions of the type chosen in the Default Region Type list. That is, you can only select a portlet region as the default portlet region and an item region as the default item region.You cannot select an undefined region as a default region. You must edit the region to explicitly make it a portlet or item region first. |
Click OK to return to the page.
To select a default region for a page template:
In the Portal Navigator, click the Page Groups tab to bring it forward.
To get to the Portal Navigator, click the Navigator link at the top of the Portal Builder. If the link does not display, ask your page group or portal administrator for access to this link.
On the resulting page, click the page group that owns the template you will work with.
Click the Templates node.
Click the Properties link next to the template you will work with.
Click the Regions tab to bring it forward.
In the Default Region Type list, choose Default Portlet Region or Default Item Region.
Select the radio button in the region that you want to use as the page's default portlet or item region.
|
Note: You can see radio buttons only in the regions of the type chosen in the Default Region Type list. That is, you can only select a portlet region as the default portlet region and an item region as the default item region. |
Click OK to return to the Navigator.
When a user performs a search on the portal, the search criteria is compared to each page's display name, description, and keywords. To ensure that users find your page when they are searching the portal, add meaningful keywords to describe the content of the page.
Keywords are also included in the page's META tags, so that they can be searched from the Web.
You can add keywords only to Standard, URL, and PL/SQL pages, or custom pages that are based on these page types.
To add keywords to a page:
Go to the page where you will add keywords.
For information on locating a page, see Section 7.2, "Navigating to Pages".
Switch to Edit mode.
Click the Properties link next to Page in the page toolbar.
Be sure to click the link for the page rather than the page group.
On the Properties page, click the Optional tab to bring it forward and go to the Optional Page Properties section.
In the Keywords field, enter the keywords that best describe this page.
Separate keywords with a space.
Click OK to save your changes and return to the page.
When you include a page in a list of objects, you can specify that an image should be used in lieu of the page’s display name to represent the page in the list. You can also specify a rollover image to use when users move a mouse pointer over the page image.
You can specify images only for Standard, URL, and PL/SQL pages or custom pages that are based on these page types.
To specify a representative image for a page:
Go to the page where you will specify a representative image.
For information on locating a page, see Section 7.2, "Navigating to Pages".
Switch to Edit mode.
Click the Properties link next to Page in the page toolbar.
Be sure to click the link for the page rather than the page group.
Click the Optional tab to bring it forward, and scroll to the Page Images section.
In the Image Name field, enter the path and file name of an image.
|
Tip: Optionally, click Browse to locate the image. |
Optionally, enter the path and file name of the rollover image in the Rollover Image Name field.
|
Tip: Optionally, click Browse to locate the image. |
Click OK to save your changes and return to the page.
You can assign a category to a page to classify its content. Then your users can perform searches based on those categories to find a particular type of content.
You can categorize only Standard, URL, and PL/SQL pages or custom pages that are based on these page types.
To categorize a page:
Go to the page where you will assign a category.
For information on locating a page, see Section 7.2, "Navigating to Pages".
Switch to Edit mode.
Click the Properties link next to Page in the page toolbar.
Be sure to click the link for the page rather than the page group.
Click the Optional tab to bring it forward, and go to the Optional Page Properties section.
From the Category list, choose the category that best describes the purpose or content of the page.
Click OK to save your changes and return to the page.
The page contact is the person for users to contact with questions about the page. Typically, it is a user with Manage privileges on the page. You can provide the page contact e-mail address, and display that address on the page via a Portal Smart Link contact-type item. This section explains how to specify the contact information. For information on how to display the contact information, see Section 6.3.4.6, "Adding a Portal Smart Link Item".
You can only specify a page contact for Standard pages and custom pages that are based on the Standard page type.
To specify a page contact:
Go to the page where you will specify a page contact.
For information on locating a page, see Section 7.2, "Navigating to Pages".
Switch to Edit mode.
Click the Properties link next to Page in the page toolbar.
Be sure to click the link for the page rather than the page group.
Click the Optional tab to bring it forward, and go to the Optional Page Properties section.
In the Contact E-mail field, enter the e-mail address of the page contact, for example:
scott@mycompany.com
Click OK to save your changes and return to the page.
When users add files to a portal page using a WebDAV client (for example, Web Folders, Cadaver, or Dreamweaver), items are created in the portal for those files. OracleAS Portal uses the default WebDAV item types that are specified for the portal page where the files are being added to determine what item type to use.
For example:
If the other items in your page use specific custom item types, you might want to make sure that items added with WebDAV clients also use those custom item types.
You may want to choose Zip File as the default WebDAV item type for Zip files that are added with a WebDAV client. Doing so will enable users to extract Zip files within their portal.
If you want users to be able to upload Zip files, but not to extract them, you might choose Simple File as the default WebDAV item type for Zip files.
To choose default WebDAV item types:
Go to the page for which you will identify default WebDAV item types.
For information on locating a page, see Section 7.2, "Navigating to Pages".
Switch to Edit mode.
Click the Properties link next to Page in the page toolbar.
Be sure to click the link for the page rather than the page group.
Click the Optional tab to bring it forward, and go to the Default WebDAV Type section.
From the Default Regular Files list, choose the item type to use for regular files (for example, documents) that are uploaded to a portal page through a WebDAV client.
From the Default Zip Files list, choose the item type to use for Zip files that are uploaded to a portal page through a WebDAV client.
From the Default Image Files list, choose the item type to use for image files (for example, gif and jpg files) that are uploaded to a portal page through a WebDAV client.
Click OK to save your changes and return to the page.
The default WebDAV item types lists include only file-based item types (that is, Simple File, Simple Image, File, Image, Zip File, and some custom item types), and only those file-based item types that are available in the page group that owns the page.
For sub-pages, choose Inherit from Parent Page if you want to use the same default WebDAV item types as the page's parent page. For the root page, choose Use Default to allow OracleAS Portal to choose a suitable default item type. For example, if you choose Use Default for regular files, Portal will use the File item type.
Item versioning determines what happens to the old version of an item when a new version is added. You can set the level of versioning you want for items in a page group. You can override the page group’s item versioning level on individual pages or page templates.
You can override the page group item versioning level only with a higher level. For example, if the item versioning level for a page group is set to Simple, you can set the item versioning level for a page to Audit, but not to None.
You can set the item versioning level only for Standard pages and custom pages that are based on the Standard page type.
To set the item versioning level for a page:
Go to the page on where you will set the item versioning level.
For information on locating a page, see Section 7.2, "Navigating to Pages".
Switch to Edit mode.
Click the Properties link next to Page in the page toolbar.
Be sure to click the link for the page rather than the page group.
Click the Optional tab to bring it forward, and go to the Optional Page Properties section.
In the Item Versioning radio group, select:
None to completely replace the item's previous version when uploading a new version of an item. If you choose this option, none of the item's previous versions are retained in the database
Simple to offer the content contributor the choice of completely replacing the previous version of the item with the new version or adding a new version of the item that does not touch the previous version. If the contributor chooses the latter, all of the item's previous versions are retained in the database.
Audit to always create a new version when editing an item. If you choose this option, all of the item's previous versions are retained in the database.
The choices available here depend on the choices made at the page group level. That is, if the item versioning level for a page group is set to Simple, you will be able to select Audit at the page level, but not None.
Click OK to return to the page.
Item level security provides a means of restricting access to specific items you have uploaded to pages or tabs within your portal. Item level security can be applied to items placed on pages, items placed on tabs, and items placed on pages that are based on a page template; though it cannot be applied (successfully) to items intrinsic to the template—that is, to items that are part of the template itself—even if item level security is turned on for the template and the user has privileges on the item.
The following sections further define item level security and describe how to enable it on a page or a tab. It includes the following subsections:
By default, items inherit the access settings that apply to the page or tab that hosts the item. Only users or groups who are authorized to access a given page or tab can access its items. When you enable item level security for a page or tab, items initially use the same security that is applied to the page or tab. It’s up to item owners to grant access to a given item to specific users and/or groups.
Manage and Manage Content page-level privileges override item level security privileges. However, item level security takes precedence over other page-level privileges, such as Manage Style. If a user has Manage Style privileges on a page where item level security is enabled, and item level access privileges have been defined for the items, the user can work with the items based on the item level privileges.
Users may be granted a higher level of access to an item than they have on the page or tab that hosts the item. For example, users may have View privileges on a page or tab, allowing them to look at the page or tab, but not to change it. If an item owner explicitly grants Manage or Edit privileges to users, the users are authorized to edit the item, even though they can do nothing else to other objects on the page or tab.
You can enable item level security only on Standard pages and custom pages that are based on the Standard page type.
|
Note: There is no relationship between item level security and item versioning. Item level security has to do with who can access an item, and item versioning has to do with how older versions of an item are handled as newer versions are uploaded.Changes to the access settings of a page template affect all pages that are based on the template. However, if the template allows for the use of access settings that are different from those specified in the template, changes to the page template's access settings do not affect the pages that are based on the template. |
To enable item level security for a page:
Go to the page where you will set up item level security.
For information on locating a page, see Section 7.2, "Navigating to Pages".
Switch to Edit mode.
Click the Access link in the page toolbar.
Go to the Access Properties section, and select Enable Item Level Security.
Click OK to return to the page.
This allows item creators to specify access control for individual items on the page. Item creators have the choice of inheriting access control from the page or setting specific access control for individual items.
To enable item level security for a tab:
Go to the tab where you will set up item level security.
For information on locating a page (where the tab is placed), see Section 7.2, "Navigating to Pages".
Switch to Edit mode.
Click the Edit icon on the tab.
On the resulting page, click the Access tab to bring it forward.
Go to the Access Settings section, and select Specify Access Settings.
In the Access Properties section, select Enable Item Level Security.
This allows item creators to specify access control for individual items on the tab. Item creators have the choice of inheriting access control from the tab, or specifying specific access control for individual items.
See also, Section 2.3, "Protecting Your Content" for information on how to grant privileges on an item.
This section discusses how to set up a chain of approval through which you can pass documents before they are posted publicly (or to a specified group). It includes the following subsections:
You’ll find additional information related to the Approval and Notification process in Chapter 2, " Publishing Content ".
Once approvals are enabled for your portal, you can define an approval process. An approval process consists of one or more steps in which a newly created or updated item must be approved before it can be published. When a step in the approval process includes multiple users and/or groups, you can specify whether:
The notification is sent to that step’s approvers one at a time in the specified sequence, and all of the approvers must respond before the item is routed to the next step.
The notification is sent to that step’s approvers all at the same time, and all of the approvers must respond before the item is routed to the next step.
The notification is sent to that step’s approvers all at the same time, and only one of the approvers must respond before the item is routed to the next step.
Approvals can be enabled at the page group and page level. A page-level approval process overrides that of the page group, and sets up an approval process that is unique to the page.
To set up an approval process for a page, two options must be enabled at the page group level: Enable Approvals and Notifications and Override the Page Group Approval Process. The Override option automatically adds an Approval tab to the Properties page of all standard pages created in this page group.
For users to receive notice of an approval, they must place a Notifications Portlet on one of their pages. For more information, see Section 7.6.2, "Adding Portlets".
To set up an approval process for a page:
Go to the page where you will define an approval process.
For information on locating a page, see Section 7.2, "Navigating to Pages".
Switch to Edit mode.
Click the Properties link next to Page in the page toolbar.
Be sure to click the link for the page rather than the page group.
Click the Approval tab to bring it forward.
Select Define a New Approval Process for the Page.
The Approval Routing List section now appears.
|
Note: If you do not select this option, the page uses the approval process defined for the page group.If you select this option and then do not define an approval process for the page, users with the Manage Items With Approval privilege will be able to add items to the page without requiring approval. |
In the Approvers field in the Approval Routing List section, select one or more approvers (users or groups) for the first step of the approval routing list.
Click the Users or Groups icon to add a user or a group.
In the Routing Method for Approvers list, choose a routing method for the first step of the approval routing list:
One at a time, all must approve (Serial, All)—This sends the approval to approvers in the step one at time in the sequence specified. All of the approvers must respond to the approval.
All at the same time, all must approve (Parallel, All)—This sends the approval to approvers in the step all at the same time. All of the approvers must respond to the approval.
All at the same time, only one must approve (Parallel, Any)—This sends the approval to approvers in the step all at the same time. Only one of the approvers must respond to the approval.
Click Add Step to continue adding steps to the approval routing list.
For each step, select approvers and a routing method. Each step you add is listed in the Current Approval Process section. You can edit existing steps by clicking the list of users and groups, or the Edit icon. When you edit a step, the step details are displayed in the routing method section and the Add Step button changes to Update Step.
Click OK when the approval routing list is complete.
An approval routing list is now defined for the page.
If there is an active approval process pending for an item, the approval routing steps for the item can not be reordered. If the approval routing list is changed at the page group or page level, it does not affect the process pending for the item. However, the administrator can still delete routing steps and edit the recipients in individual steps of the pending process (but cannot reorder the steps).
You can enable users to subscribe to a page or item so that they can be notified whenever that page or item is updated. Note, however, that subscriptions are not possible unless Enable Approvals and Notifications is enabled for the relevant page group.
Although you can add the Subscribe link or icon to any page or region at any time. The link or icon is visible only if the page group administrator has enabled approvals and notifications for the page group.
Additionally, to enable users to subscribe to a page, you must have at least Manage Content privileges on the page. To enable users to subscribe to an item, you must have at least Manage privileges on the page that contains the item.
To enable users to subscribe to a page:
Go to the page you will work with.
For information on locating a page, see Section 7.2, "Navigating to Pages".
Switch to Edit mode.
Click the Add Item icon in an item region.
If the page does not have any item regions, you will need to add a new region to the page and make that region an item region.
Even if there is already an item region in the page, you may want to create a new region at the top of the page specifically for the Subscribe link. If the page includes a navigation page, you may want to consider adding the Subscribe link to the navigation page instead of the page itself.
From the Built-In Navigation Item Types list, select Portal Smart Link.
Click Next.
In the Portal Smart Link list, choose Subscribe.
If you want to use the default label for the Subscribe link, select Use The Default Display Name.
Using the default display name means that the display name will be automatically translated if users view the page in a different language.
When you select this check box, the Display Name field is cleared.
If you want to provide your own label for the Subscribe link, enter it in the Display Name field.
If you want to use an image instead of a label:
Provide the name of the image in one of the Image fields:
If you want to upload an image from your file system, click Browse to locate and select the image.
If you want to use an image that has already been uploaded, enter the internal name of the image (not file name) without a path, for example, 1645.gif, in the second field.
To obtain the internal name OracleAS Portal has assigned to an image, go to a place within your portal where the image is already in use; right click it; and select Properties from the right-click menu.
If you want to use an image from somewhere else on the Web, enter the image URL in the second field.
In the Image Alignment field, choose how you want the image to be aligned within the region.
For descriptions and examples of image alignment options, see Table 6-5 in Chapter 6.
Click Finish.
Users can now click the Subscribe link to be notified whenever that page is updated. Subscribing to a page automatically subscribes a user to every item on that page.
Users are notified through the My Notifications portlet of the changes to pages or items they have subscribed to. Users must have access to a page that includes the My Notifications portlet. Also, the My Notifications portlet must be set up to display subscription notifications.
To enable users to subscribe to an item:
Go to the page you will work with.
For information on locating a page, see Section 7.2, "Navigating to Pages".
Switch to Edit mode.
Click the Edit icon in the region you will work with.
Click the Attributes/Style tab.
From the Available Attributes list, select Subscribe.
Click the Move Right icon to move the attribute to the Displayed Attributes list.
Click Apply.
It is very important that you click Apply. If you do not click Apply, any changes that you make to the list of displayed attributes will be lost when you click Close.
Click Close.
Users can now click the Subscribe icon next to any item in the region to be notified whenever that particular item is updated.
Users are notified of changes through the My Notifications portlet. Users must have access to a page that includes the My Notifications portlet. Also, the My Notifications portlet must be set up to display subscription notifications.
If you include a Subscribe link on a page template, all the pages that are based on the template will include the link. When users subscribe to the pages, they will receive notifications when the pages and the template itself are updated.
If you are developing pages that will be accessed frequently, or if you are creating a portal that experiences high traffic, you will probably want to take advantage of OracleAS Portal's caching features. This section describes caching options offered at the page and system level and steps you through changing your caching options. It includes the following subsections:
After you have used your portal for a while, you may care to take advantage of performance-enhancing features, such as OracleAS Portal’s page caching options. This section describes the steps you take to move from one page caching option to another.
To change how a page is cached:
Go to the page where you will change caching options.
For information on locating a page, see Section 7.2, "Navigating to Pages".
Switch to Edit mode.
Click the Properties link next to Page in the page toolbar.
Be sure to click the link for the page rather than the page group.
Go to the Page Caching section of the Main tab, and select a page caching option.
See Section 7.10.3, "Page Caching Options" for a description of each caching option.
Click OK to save your changes.
The judicious use of system-level caching can significantly boost your portal’s performance. System-level caching takes place on the middle tier, where one page is generated for all users rather than being generated uniquely for each user. This can provide a huge benefit for the performance and scalability characteristics of your site. Because the page is generated once for all users, some idiosyncrasies will exist that you can address through page design decisions appropriate to system-level caching.
This section describes some decision criteria for the selection of system-level caching and covers how to set up system-level caching for pages and portlets. It includes the following subsections:
System-level caching is best used for objects that do not include sensitive data or other information that you do not want to display to all users. For example, use system-level caching on objects that are not part of an approval process. When approvals are enabled and system-level caching is used, all pending items, rejected items, and deleted rejected items are displayed to all users.
With system-level caching, you get one page/one view, so you’ll want to be sure that view is suitable for a wide audience.
In keeping with the idea of one page/one view, use system-level caching for pages that do not need to be available for individual user customizations. Because customizations affect only a particular user’s unique view of a page, they are not available when all users share the same view.
Access privileges on objects are enforced on a user-by-user or group-by-group basis; consequently, they are not enforced on objects that are cached at the system level. This is because those objects are rendered once, on the middle tier, rather than many times for each individual user.
In your system-level caching, include portlets suitable for public users. Portlets cached at the system level are run as the public user, and only public data is shown.
You can cache both page metadata and page content at the system level. Such pages include a Refresh link that users with the appropriate page privileges can click to invalidate the page in the cache for all users. Once Refresh is clicked, a new version of the page is generated for all users.
Consider omitting the Edit link on pages you intend to cache at the system level. When users click that link they will get a runtime error if they do not have the appropriate privileges to enter Edit mode. You can edit the page through the Portal Navigator.
In summary, apply system-level caching to pages and portlets that would properly be available to all users.
|
Note: To set up system-level caching, you must have at least the Manage Content privilege on the page. |
To set up system-level caching for a page:
Go to the page where you will set up system level caching.
For information on locating a page, see Section 7.2, "Navigating to Pages".
Switch to Edit mode.
Click the Properties link next to Page in the page toolbar.
Be sure to click the link for the page rather than the page group.
On the Main tab, go to the Page Caching section, and select one of the following system-level page caching options:
Cache Page Definition Only At System Level
Cache Page Definition And Content At System Level For [ ] Minutes
For an explanation of these selections, see Section 7.10.3, "Page Caching Options".
Click OK to save your changes and return to the page.
You can increase your portal performance by specifying system-level caching for a portlet. The portlet is rendered once for all users, rather than many times for each user. This is also a way of getting the benefit of system-level caching on pages that might otherwise not be good candidates for it. You can set up system-level caching for a portlet, independent of how the rest of the page content is cached.
Note, however, that if the page that includes a portlet uses system-level caching, the portlet will use system-level caching as result. In the same way, if this portlet's Web Provider indicates system-level caching for the portlet, this portlet will use system-level caching. In these cases, you do not need to set up system-level caching for the portlet manually (as described here), nor will you be able to change the cache setting.
To set up system-level caching for a portlet:
Go to the page that contains the portlet for which you will set up system-level caching.
For information on locating a page, see Section 7.2, "Navigating to Pages".
Switch to Edit mode.
Click the Edit icon next to the portlet.
Next to Portlet Caching, select Cache portlet at the system level.
Click OK to save your changes and return to the page.
Table 7-9 lists and describes all page caching options.
Table 7-9 Page caching options
This section defines parameters and events as they are used in OracleAS Portal and describes how to use them within the Portal user interface. It includes the following subsections:
For information on enabling parameters and events in a page group, see Chapter 4, " Working with Page Groups". For information on how to add parameters and events to portlets, go to http://portalstudio.oracle.com.
This section discusses two types of parameter: page and portlet. A page parameter passes values to a page. A portlet parameter passes values to a portlet.
This section describes how these types of parameters are used in OracleAS Portal and steps you through setting them up through the Portal user interface. It includes the following subsections:
Page parameters are used to pass values to a page. Their presence on a page means that the information displayed on a page can be different depending on where the page is called from, or who is viewing the page. For example, a stock ticker portlet could be set up to display a different portfolio depending on who is viewing the page.
You can use parameters in your pages only if the Enable Parameters and Events page group setting is enabled. For information on enabling parameters and events in a page group, see Chapter 4, " Working with Page Groups".
A page parameter can get its value from (in order of precedence):
The URL used to access the page, for example:
http://myportal/mypage?a=1&b=2
Parameters are case-sensitive, so if your parameter name is a, entering a=1 will work, but A=1 will not.
The customized value for the current user
The default value of the parameter, as specified by the page designer
The following subsections describe these uses of parameters in greater detail:
In URL pages, the parameters added to the URL used to access the page are used to pass parameters on to the location specified for the page. For example, if a URL page (myurlpage) is created that points to the following URL:
http://www.yahoo.com/somepage
A user accesses the page with the following parameters:
http://myportal/myurlpage?a=1&b=2
The following URL is generated:
http://www.yahoo.com/somepage?a=1&b=2
In PL/SQL pages, the parameters added to the URL used to access the page are used to pass values on to bind variables in the PL/SQL code. For example, if a PL/SQL page (myplsqlpage) is created that contains the following PL/SQL statement:
a:=:param1;
A user accesses the page with the following parameters:
http://myportal/myplsqlpage?param1=123
The bind variable (a) is assigned the value 123.
Portlet parameters pass values to portlets. This means that the information displayed in a portlet can be specific to a particular page or user. A portlet's parameters are specified in the provider.xml file.
There are two types of portlet parameter: public and private. When a portlet is placed on a page, if the parameters and events page group setting is enabled, its public parameters are displayed to the page designer. The page designer can assign values to the parameters to make the information that is displayed in the portlet specific to the page. The page designer can provide a specific value (constant), a system variable (for example, USER), or a page parameter.
Private parameters are used internally by the portlet, for example, for identifying the current row displayed, or the current tab displayed. Private portlet parameters are not displayed to the page designer.
For example, a stock ticker portlet could have a public portlet parameter (ticker) that accepts a stock symbol as its value. When the stock ticker portlet is placed on a page, the ticker parameter is displayed on the Edit Page: Parameters tab. On this tab, the page designer can set the value of the ticker parameter to a specific value, for example, ORCL. When the page is displayed, the portlet shows stock information for the specified company. Alternatively, the page designer could add a page parameter (e.g., symbol) to the page, and pass that page parameter to the portlet parameter. If the page parameter is customizable, users can set the stock ticker portlet to display stock information for any company they choose.
For information on how to add parameters to your portlets, see the Portal Developer Kit on Portal Center, http://portalcenter.oracle.com. Click the Search icon in the upper right corner of any Portal Center page.
An event is something that happens when a link or button is clicked in a portlet. A portlet's events are specified in the provider.xml file. In your pages, you can specify what to do when an event occurs on any of the portlets on that page.
When an event occurs, you can:
Go to another page, optionally passing values to that page's parameters
Redisplay the current page
For information on setting up a portlet event handler for your portlets, see the Portal Developer Kit on Portal Center, http://portalcenter.oracle.com. Click the Search icon in the upper right corner of any Portal Center page.
Page parameters pass values to a page. This means that the information displayed on a page can be different depending on where the page is called from, or on who is viewing the page.
To add a parameter to a page:
Go to the page where you will add a parameter.
For information on locating a page, see Section 7.2, "Navigating to Pages".
Switch to Edit mode.
Click the Properties link next to Page in the page toolbar.
Be sure to click the link for the page rather than the page group.
On the Properties page, click the Parameters tab to bring it forward.
If you cannot see the Parameters tab, the Enable Parameters and Events page group setting has not been enabled.
In the Parameter Name field, enter a name for the parameter.
The name must be unique within the page, and can contain up to 200 characters. The name can contain only alphanumeric characters (A-Z, a-z, 0-9) and the underscore (_) character. Do not use spaces or other special characters.
Click Add.
The parameter is added to the page and you can edit its properties in the Page Parameter Properties section.
In the Display Name field, enter a descriptive name for the parameter.
If you allow users to customize the value of this page parameter (by selecting the Customizable check box), the display name appears on the Customize Page: Parameters tab.
The display name can contain up to 4000 characters.
(Optional) In the Default Value field, enter the value that you want to be assigned to the parameter if no other value is provided.
(Optional) Select Customizable if you want users who customize the page to be able to provide their own value for the parameter.
(Optional) In the Description field, enter a description of the parameter.
If you allow users to customize the value of this page parameter (by selecting the Customizable check box), the description appears on the Customize Page: Parameters tab. Use the description to provide users with hints or an example of what kind of value to provide for the parameter.
Click OK to save your changes and return to the page.
Portlet parameters pass values to portlets. This means that the information displayed within a portlet can be specific to a particular page or user. A portlet's parameters are specified in the provider.xml file.
You can pass values to portlet parameters only on Standard or Mobile pages or custom pages that are based on the Standard page type.
To pass values to portlet parameters:
Go to the page that hosts the portlets to which you will pass parameters.
For information on locating a page, see Section 7.2, "Navigating to Pages".
Switch to Edit mode.
Click the Properties link next to Page in the page toolbar.
Be sure to click the link for the page rather than the page group.
On the Properties page, click the Parameters tab to bring it forward.
If you cannot see the Parameters tab, the Enable Parameters and Events page group setting has not been enabled.
The Portlet Parameter Values section lists the portlets that are included on the page and indicates whether those portlets have any parameters.
Click the name of the portlet whose parameters you want to pass values to, to show the parameters.
If you want to show the parameters for all the portlets on the page, click Expand All. However, If a portlet does not have any parameters, you cannot expand it in the list.
For each portlet parameter:
In the value type list choose:
Null if you do not want to provide a value for the portlet parameter.
Page Parameter to pass the value of one of the page parameters to the portlet parameter.
System Variable to pass the value of a system variable to the portlet parameter.
Constant to pass a specific value to the portlet parameter.
In the value field or list:
If you are using Internet Explorer: Choose the page parameter or system variable whose value you want to pass to the portlet parameter, or enter the constant value.
If you are using Netscape Navigator: Enter the name of the page parameter or system variable whose value you want to pass to the portlet parameter, or enter the constant value. If you are not sure of the name of the page parameter or system variable, click and select one from the list provided.
Click OK to save your changes and return to the page.
For information on adding parameters to a portlet, see the Portal Developer Kit on Portal Center, http://portalcenter.oracle.com. Click the Search icon in the upper right corner of any Portal Center page.
An event is something that happens when a link or button is clicked in a portlet. A portlet's events are specified in the provider.xml file.
You can set up events only on Standard or Mobile pages or custom pages that are based on the Standard page type.
To set up events on a page:
Go to the page where you will set up events.
For information on locating a page, see Section 7.2, "Navigating to Pages".
Switch to Edit mode.
Click the Properties link next to Page in the page toolbar.
Be sure to click the link for the page rather than the page group.
On the Properties page, click the Events tab to bring it forward.
If you cannot see the Events tab, the Enable Parameters and Events page group setting has not been enabled.
Click the name of the portlet you will work with.
If you want to show the events for all the portlets on the page, click Expand All; however, if a portlet does not have any events, you cannot expand it in the list.
Click the event for which you will specify an action.
Select:
Go to Page to display a particular page when the event occurs
Click the Browse icon and select a page to display from the list provided.
Redisplay Page to ignore the event when it occurs
The Page Input section lists the page parameters defined for the page you selected in the previous step.
For each page parameter:
In the value type list choose:
None if you do not want to provide a value for the page parameter
Event Output to pass the value of one of the portlet event output parameters to the page parameter when the event occurs
System Variable to pass the value of a system variable to the page parameter when the event occurs
Constant to pass a specific value to the page parameter when the event occurs
In the value field or list:
If you are using Internet Explorer: Choose the event output parameter or system variable whose value you want to pass to the page parameter, or enter the constant value.
If you are using Netscape Navigator: Enter the name of the event output parameter or system variable whose value you want to pass to the page parameter, or enter the constant value. If you are not sure of the name of the event output parameter or system variable, click and select one from the list provided.
Click OK to save your changes and return to the page.
For information on adding events to your portlets, see the Portal Developer Kit on Portal Center, http://portalcenter.oracle.com. Click the Search icon in the upper right corner of any Portal Center page.
This section contains information on how to allow or prevent users or groups from viewing information in your portal. It includes the following subsections:
OracleAS Portal gives you complete control over who can access the information in your portal. Using its features, you can:
Create pages for non-confidential information, and display those pages to everyone, even users who are not logged on to the portal.
Create other pages for confidential information and grant access to specific users or groups. Only users who are logged on to the portal and who have specific access to a page, either directly or through a group membership, can view the content of these pages.
Within the same page, add tabs with sensitive content. You can control access to each tab individually, so that it is visible only if a user is authorized.
Enable item level security on a page so that content contributors can choose which users or groups will see individual items on that page.
Apply security at the portlet level to control which users can see individual portlets. If users are not authorized, they will not see the portlet no matter where it is placed.
You can allow all users to view your page, even users who are not logged on (public users). If you do not make your page available to everyone, only those users with View privileges or higher on the page will be able to view it.
Making a page available to public users allows everyone to view the page only. You will still need to set up privileges for those users and groups that you want to be able to manage, customize, or add content to the page.
If you are creating a sub-page that you want to make available to all users, make sure that its parent page is also displayed to public users.
To make a page available to everyone:
In Portal, go to the page you will make available to everyone.
For information on locating a page, see Section 7.2, "Navigating to Pages".
Switch to Edit mode.
Click the Properties link next to Page in the page toolbar.
Be sure to click the link for the page rather than the page group.
Click the Access tab to bring it forward.
Select Display Page To Public Users.
Click OK to save your change and return to the page.
Changing the access settings of a page template affects all pages that are based on that template, unless the template allows page designers to use different access settings for pages that are based on it. This control is on the Access tab of the template’s Properties page: Enable Pages To Have Different Access.
You can determine who has access to a page and to what extent. Keep in mind, however, that page access works in tandem with the global privileges that are set for users and groups. For example, on the Access tab you may explicitly grant View access to a particular page to three users. But there may be many more users who can actually view your page, depending on how many users have been granted View privileges for All Pages.
With respect to page access and customization, it may help to consider two versions of a page: the one that an individual user sees, and the public version of the page. If you are the page designer, you control the extent to which other users can customize your page: whether they can modify the public version, their own private version, or nothing at all.
If a page is based on a template, page designers may not be able to control the access and style of the page. There are two options at the template level that control whether page designers can specify different style and access settings for pages based on the template: Enable Pages To Have Different Access and Enable Pages To Use Different Style. These must be selected; otherwise, the page access and style settings cannot be changed by page designers.
To control access to a page:
Go to the page where you will control access.
For information on locating a page, see Section 7.2, "Navigating to Pages".
Switch to Edit mode.
Click the Properties link next to Page in the page toolbar.
Be sure to click the link for the page rather than the page group.
Click the Access tab to bring it forward.
Select Display Page To Public Users if you want everyone, including users who are not logged into the portal, to be able to view the page.
Select Enable Item Level Security to allow item creators to specify access control for individual items in the page.
This option is available only if the page is a Standard page, or is a custom page that is based on the Standard page type. If you do not select this check box, all the items on the page inherit access control from the page. If you select this check box, item creators have the choice of inheriting access control from the page, or specifying access control for individual items.
For more information, see Section 7.8.9.1, "What Is Item Level Security?"
To explicitly grant privileges to specific users or groups:
In the Grantee field, enter the name of the user or group that you want to allow to access this page.
Optionally, click the Users or Groups icon, and select from the list provided.
|
Note: OracleAS Portal uses the Oracle Internet Directory (OID) for identity management, serving as the repository for users and groups. In OID, groups are uniquely identified by their distinguished name (DN). Each group has a unique DN, though many groups can share a common name, in the same way that two people can share a common name, yet have completely different lineage (i.e., John Smith and John Doe). When working within the portal, groups created from within that portal are displayed simply with their common names. However, when the portal references a group from some other location in the OID—such as a group from some other portal associated with the same Identity Management Infrastructure—the DN of the group is displayed to distinguish it from the portal’s locally defined groups. |
Choose a privilege level from the list.
|
Note: The order of privileges in the list is not based on any hierarchy of privileges. For more information, see Section 7.12.4, "Page Privileges". |
Click Add.
To clear all the Web Cache entries for the page, click Clear Cache.
The next time the page is requested, it will be retrieved from the database, not the cache.
For example, if you revoke a user's privileges on the page, the user will still be able to access the page if it is in the cache. If you want to make sure that your changes are applied immediately, clear the page from the cache by clicking this link.
|
Note: This link is available only if one or more of the Web Cache global settings are enabled. |
Click OK to save your changes and return to the Page.
Use the Privilege list under Change Access to change a user or group's privilege level. Click the Delete icon to remove the user's or group's privileges entirely.
Changing the access settings of a page template affects all pages that are based on that template, unless the template allows page designers to use different access settings for pages that are based on it. This control is on the Access tab of the template’s Properties page: Enable Pages To Have Different Access.
Table 7-10 lists and describes the various page privilege levels available in OracleAS Portal.
Table 7-10 Page privileges
If a mobile page is created based on an existing standard page, any privileges that are not available for mobile pages are converted:
Manage Items With Approval becomes Manage Content.
Manage Style becomes Customize Portlets (Full).
Customization (Style) becomes View.
|
 Copyright © 2003 Oracle Corporation All rights reserved |
|