|
Oracle® Business Intelligence Discoverer Plus User's Guide
10g Release 2 (10.1.2.1) B13915-04 |
|
 Previous |
 Next |
|
Oracle® Business Intelligence Discoverer Plus User's Guide
10g Release 2 (10.1.2.1) B13915-04 |
|
 Previous |
 Next |
This section explains how to edit Discoverer Plus Relational worksheets and format worksheet data, and contains the following topics:
When you create a new worksheet, Discoverer applies a default format (e.g. colors, fonts) to worksheet items. For more information about changing the default format that is applied to worksheet items, see "How to change default worksheet formats").
Discoverer's powerful layout tools enable you to format worksheets exactly how you want them. For example, you might want to:
add items to a worksheet
remove items from a worksheet
change the color of rows and columns
change the background color or title of worksheets
change the format of text and numbers
change the column width on table worksheets (Discoverer automatically sets the column size on crosstab worksheets)
You can edit worksheets using any of the following methods:
by dragging and dropping a worksheet item from one area of a worksheet to another area (you can also resize worksheet columns using drag and drop)
by right-clicking on any area of a worksheet (e.g. a graph, worksheet item, worksheet item heading) to display a list of options for that area.
by using the Edit Worksheet wizard (for more information, see "How to edit worksheets using the Edit Worksheet wizard")
Hint: If you want to change a worksheet but keep a copy of the original worksheet, use the duplicate worksheet facility. Here, you make an exact copy of a worksheet that you can work on (for more information, see "How to duplicate a worksheet"). Alternatively, save the whole workbook under a different name and work with this copy (for more information, see "How to save workbooks").s
You edit a worksheet to change the way that the worksheet looks or behaves. For example, you might want to change the layout of worksheet data, or add calculations, percentages, or totals.
To edit a worksheet using the Edit Worksheet Wizard:
Display the worksheet that you want to edit.
Choose Edit | Worksheet... to display the "Edit Worksheet dialog".
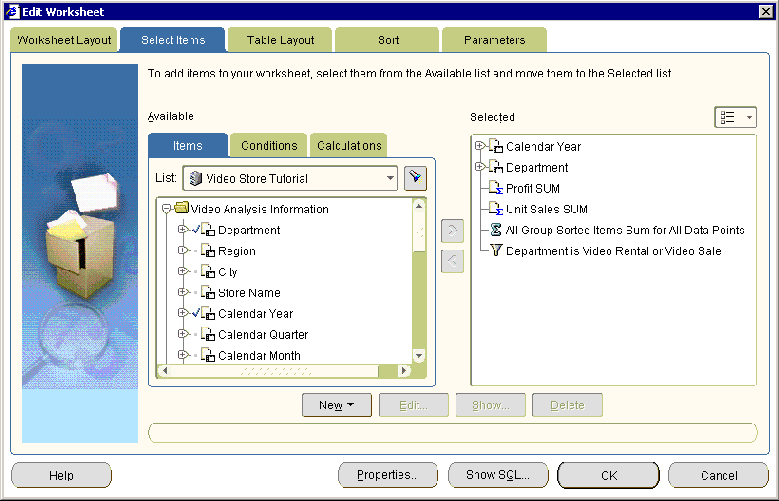
The tabs on the Edit Worksheet dialog enable you to edit the properties of the current worksheet, as follows:
use the Worksheet Layout tab to select the worksheet elements (e.g. title area, graph) to display on the worksheet (for more information, see "Edit Worksheet dialog: Worksheet Layout tab")
use the Select Items tab to specify which items to display on the current worksheet (for more information, see "Edit Worksheet dialog: Select Items tab")
use the Crosstab/Table Layout tab to change the layout of the current worksheet (for more information, see "Edit Worksheet dialog: Crosstab Layout tab" or "Edit Worksheet dialog: Table Layout tab")
use the Sort tab to change the sort order of items on the current table worksheet (e.g. title area, graph) to display on the worksheet (for more information, see "Edit Worksheet dialog: Sort tab")
Note: The Sort tab is only displayed for table worksheets. To sort a crosstab worksheet, Choose Tools | Sort to display the "Sort Crosstab dialog" (for more information, see "How to sort data on a crosstab worksheet").
use the Parameters tab to manage existing parameters and create new parameters (for more information, see "Edit Worksheet dialog: Parameters tab")
Click OK to save changes you have made and return to the worksheet.
Discoverer updates the worksheet with the changes that you specified.
Notes
You can also edit the worksheet directly in the Discoverer work area using drag and drop, right click menus, and toolbars (for more information, see " About the Discoverer Plus Relational work area").
You add items to a worksheet when you want to analyze new areas of data using items in the business area. For example, you might want to add an item called Year to analyze trends over time.
For more information about creating a new worksheet item (e.g. a calculation, or percentage), see "How to create new worksheet items".
To add an item to a worksheet:
Display the worksheet that you want to edit.
Choose Edit | Worksheet... to display the "Edit Worksheet dialog".
Display the "Edit Worksheet dialog: Select Items tab".

Use the Available list to locate and select the item you want to add to the worksheet.
Hint: Click the plus (+) sign next to folders and items to see items and values within them. Click the flashlight button above the Available box to display the "Find dialog (in Item Navigator)", where you can search for items.
Move items that you want to add to the worksheet from the Available list to the Selected list.
You can select more than one item at a time by pressing the Ctrl key and clicking another item.
Click OK to save the changes you have made and close the dialog.
Discoverer updates the worksheet with the changes that you specified.
Hint: To change the position of worksheet items, display the "Edit Worksheet dialog: Table Layout tab" or "Edit Worksheet dialog: Crosstab Layout tab" and drag and drop items to arrange them on the worksheet.
Notes
To quickly add a worksheet item, simply drag and drop an item from the Available Items pane to the worksheet area. To display the Available items pane, choose View | Available Items Pane. For more information, see "About dragging and dropping items in the Discoverer work area".
To move items from the Available list to the Selected list, do one of the following:
use the right arrow button to move selected items to the Selected list
use the cursor to drag and drop selected items from the Available list to the Selected list
You create new worksheet items when you want to analyze different data using items that might not be in the business area. For example, you might want to create a three month moving sales average.
For more information about adding an existing item to a worksheet, see "How to add items to worksheets".
To create a new worksheet item:
Display the worksheet that you want to edit.
Choose Edit | Worksheet to display the "Edit Worksheet dialog".

Click New and choose one of the following:
to create a calculation, select New Calculation (for more information, see "How to create calculations")
to create a percentage, select New Percentage (for more information, see "How to create percentages")
to create a total, select New Total (for more information, see "How to create totals")
Click OK to save the changes you have made and close the dialog.
Discoverer updates the worksheet with the changes that you specified.
Notes
To quickly create a new worksheet item, select an item in the Selected Items pane and click one of the 'add item' buttons (e.g. Add Calculation button, Add Percentage button). For more information, see "About dragging and dropping items in the Discoverer work area").
You remove an item from a worksheet when you no longer need to analyze the item. For example, you might remove a year item when you no longer need to analyze data by time.
To remove an item from a worksheet:
Display the worksheet that you want to edit.
Choose Edit | Worksheet... to display the "Edit Worksheet dialog".
Display the "Edit Worksheet dialog: Select Items tab".

To remove an item from the worksheet, move the item from the Selected list to the Available list.
You can select more than one item at a time by pressing the Ctrl key and clicking another item.
Click OK to save changes you have made and close the dialog.
Discoverer updates the worksheet with the changes that you specified.
Notes
To quickly remove a worksheet item, simply right-click on the item and choose Delete. For more information, see "About dragging and dropping items in the Discoverer work area").
You duplicate a worksheet when you want to quickly create a new worksheet that is very similar to an existing worksheet. For example, you might want to transform a duplicate of a crosstab worksheet into a table worksheet.
Duplicating a worksheet also enables you to work on a copy of a worksheet, leaving the original worksheet intact. For example, you might want to work on a temporary worksheet that you discard later.
To duplicate a worksheet:
Display the worksheet that you want to duplicate.
Choose one of the following options, depending on whether you want the new worksheet to be a table worksheet or a crosstab worksheet:
choose Edit | Duplicate Worksheet | As Table to duplicate the current worksheet using the Duplicate as Table dialog
choose Edit | Duplicate Worksheet | As Crosstab to duplicate the current worksheet using the Duplicate as Crosstab dialog
Discoverer displays the Duplicate as Table dialog or Duplicate as Crosstab dialog, which enables you to change the default position of the new worksheet.
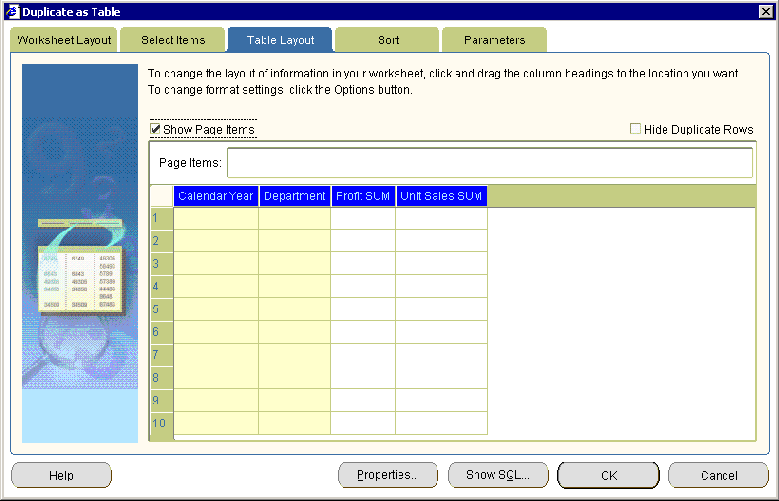
(optional) Use the tabs on the Duplicate as Table dialog or Duplicate as Crosstab dialog to change the default settings for items on the new worksheet.
For example, you might use the Select Items tab to add items to the duplicated worksheet, or you might use the Format tab to change the default display style of worksheet items.
Click OK to save the new worksheet and close the dialog.
The new worksheet is now displayed ready for you to analyze. The default worksheet name that Discoverer assigns is the original worksheet name appended with a unique number. For example, if you duplicate a worksheet named Sales Analysis, the new worksheet is named Sales Analysis 2.
You might want to change the default name of the new worksheet (for more information, see "How to rename worksheets and workbooks").
Hint: Use the tabs at the bottom of the Discoverer work area to navigate between the original worksheet and the new worksheet.
You change the format of worksheet items to change the default look and feel of a worksheet. For example, you might want to:
change the text color of worksheet values
modify the number of decimal places displayed
change the background color of headings and totals
To change the format of worksheet items:
Display the worksheet that you want to edit.
Select one or more worksheet items that you want to edit.
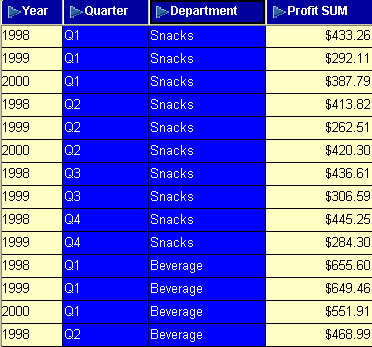
For example, click on one or more item headings in the data area.
Hint: You can select more than one item by pressing the Ctrl key and clicking another item. In the example below, the Quarter and Department items are selected.
Choose Format | Data to display the "Format Data dialog".
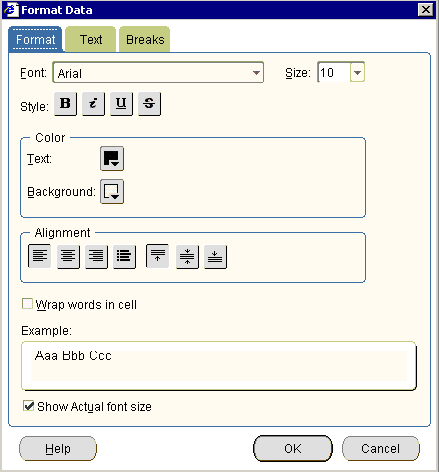
Note: The tabs that you see on the "Format Data dialog" depend on the number and type of worksheet items you select, as follows:
if you select a single worksheet item or multiple worksheet items of the same type, you see a Format tab and a Breaks tab, and a tab corresponding to the worksheet item type (e.g. Text, Number, Date)
if you select multiple worksheet items of different types (e.g. a numeric item and a text item), you see a Format tab and a Breaks tab only
Use the tabs on the "Format Data dialog" to change the worksheet item settings, as follows:
use the "Format Data dialog: Format tab" to change the text style (e.g. text font or text color)
use the "Format Data dialog: Date tab" to change the format of date items (e.g. to change the date format for a Year item from YY to YYYY)
use the "Format Data dialog: Number tab" to change the format of numeric items (e.g. to add or remove decimal places, specify a currency symbol (e.g. $), or create a custom number format)
use the "Format Data dialog: Text tab" to change the format of text items (e.g. to change the text style to UPPERCASE, lowercase, or Capitalized)
use the "Format Data dialog: Breaks tab" to change the group sorting style (e.g. to insert a blank row after each set of rows to separate areas of the worksheet)
Click OK to save the changes you have made and return to the worksheet.
Discoverer updates the worksheet with the changes that you specified.
Notes
You can also format worksheet items by choosing Format | Item Formats to display the "Format dialog", and using the Format Data, Format Heading, and Edit Heading options.
You can also change the item heading (for more information, see "How to change the text in item headings") and change the format of item headings (for more information, see "How to change the format of worksheet item headings").
If you are formatting a single worksheet item (or multiple items of the same type), you can format all worksheet characteristics. For example, you can set the currently symbol for three numeric worksheet items at the same time. If you are formatting multiple worksheet items at the same time, you can format characteristics that are common to all items (e.g. text style and break settings).
For more information about applying a conditional format or stoplight format, see "Using conditional formatting".
To change the width of a column on a worksheet, drag and drop the column heading border to the required position. On a table worksheet, you can also choose Format | Columns | Column Width to display the "Column Width dialog".
You can specify the currency symbol to use for numeric values on a worksheet. For example, you might want to display the dollar symbol next to sales figures.
To set the currency symbol for a numeric item:
Display the worksheet that you want to edit.
Select one or more numeric worksheet items to edit.
For example, click on one or more item headings in the data area.
Hint: You can select more than one item by pressing the Ctrl key and clicking another item. In the example below, the Profit SUM and Sales SUM items are selected.
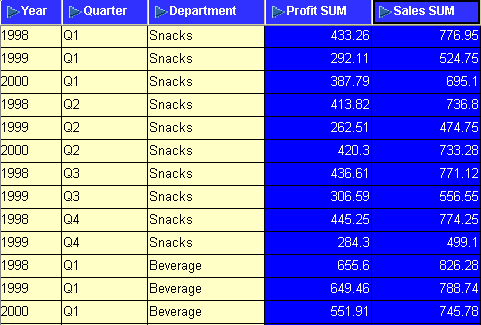
Choose Format | Data to display the "Format Data dialog: Format tab".
Display the "Format Data dialog: Number tab".
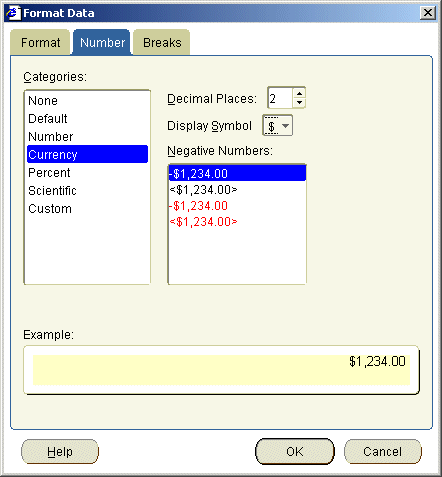
Select Currency in the Categories list.
Select the currency symbol to use from the Display Symbol drop down list.
Click OK to save the changes you have made and close the dialog.
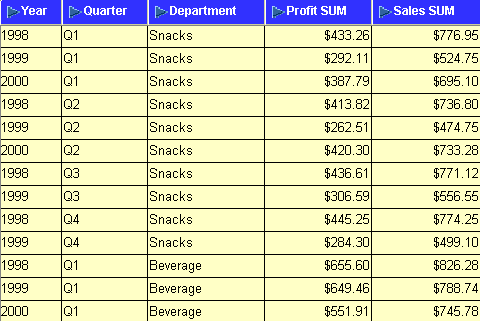
Discoverer displays the selected currency symbol in front of the worksheet item values. The example below shows the dollar ($) currency symbol displayed next to Profit SUM values and Sales SUM values in a worksheet.
You change the format of worksheet item headings to change the default look and feel of a worksheet. For example, you might want to change the default alignment or background color of a column heading.
To change the format of a single worksheet item heading:
Display the worksheet that you want to edit.
Select the worksheet items you want to format.
For example, click on one or more item headings in the data area.
Hint: You can select more than one item by pressing the Ctrl key and clicking another item. In the example below, the Quarter and Department items are selected.

Choose Format | Heading to display the "Format heading dialog".
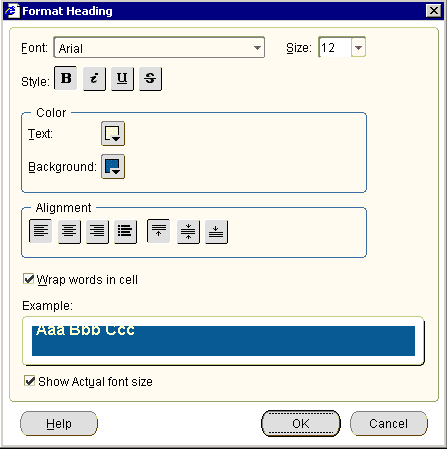
Use the "Format heading dialog" to change the format of the selected item headings.
Click OK to save changes and return to the worksheet.
Discoverer updates the worksheet with the changes that you specified.
Notes
You can also format worksheet item headings by selecting one or more items and selecting Format Heading from the right click menu.
You can also format worksheet item headings by choosing Format | Item Formats to display the "Format dialog", and using the Format Heading option.
For more information about changing the format of worksheet items, see "How to change the format of worksheet items".
To change the width of a column on a worksheet, drag and drop the column heading border to the required position. Alternatively, on a table worksheet you can also choose Format | Columns | Column Width to display the "Column Width dialog".
You change the text in item headings to change the text that is displayed at the top of a column or the side of a row (on crosstab worksheets). Item names are usually descriptive enough to use as the heading. However, sometimes you might want to change the heading to something more descriptive.
For example, you might want to change the heading of the Calendar Year item from Calendar Year to Year. In the example below, the item headings are Year, Quarter, Department, Profit SUM, and Sales SUM.

To change the text in an item heading:
Display the worksheet that you want to edit.
Select an item on the worksheet.
For example, click on an item headings in the data area. In the example below, the Department item is selected
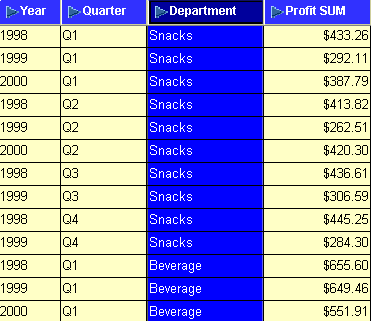
Note: If you select more than one item, the Edit Heading option is grayed out. You can only edit one item heading at a time.
Right click on the item heading and select Edit Heading to display the "Edit Heading dialog".
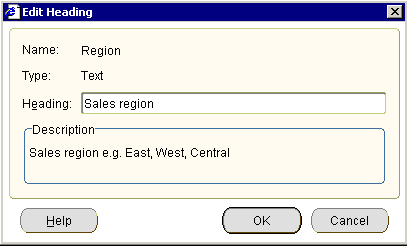
Use the "Edit Heading dialog" to change the heading text.
Click OK to save changes and return to the worksheet.
Discoverer updates the worksheet with the changes that you specified.
Notes
You can also change worksheet item headings by choosing Format | Item Formats to display the "Format dialog", and using the Edit Heading option. If you select more than one item on the "Format dialog", the Edit Heading option is grayed out. You can only edit one item heading at a time.