|
Oracle® Business Intelligence Discoverer Configuration Guide
10g Release 2 (10.1.2.1) for Microsoft Windows and Solaris Operating System (SPARC) B13918-03 |
|
 Previous |
 Next |
|
Oracle® Business Intelligence Discoverer Configuration Guide
10g Release 2 (10.1.2.1) for Microsoft Windows and Solaris Operating System (SPARC) B13918-03 |
|
 Previous |
 Next |
Note: This chapter only applies to Discoverer Plus and Discoverer Viewer. For more information about configuring Discoverer Plus OLAP, see Chapter 6, "Configuring the Discoverer Catalog and Discoverer Plus OLAP".
This chapter describes the different security mechanisms that Discoverer uses to protect sensitive resources, and contains the following topics:
Section 14.2, "About Discoverer and the database security model"
Section 14.3, "About Discoverer and the Discoverer EUL security model"
Section 14.4, "About Discoverer and the Oracle Applications security model"
Section 14.5, "About Discoverer and the OracleAS Security model"
Section 14.6, "Using Discoverer with OracleAS Framework Security"
Section 14.7, "Using Discoverer with Oracle Identity Management Infrastructure"
Section 14.8, "Discoverer support for Single Sign-On details propagation"
Discoverer uses (and must therefore protect) different sensitive resources, including:
data (e.g. users must only see information they are allowed to see)
metadata (e.g. users must not be able to edit workbooks to which they do not have access)
Discoverer connections (e.g. database login details must not be transmitted or persisted without being securely encrypted)
system resources (e.g. CPU, memory)
network resources (or more precisely, the protection of data as it is transmitted across a network)
The table below shows the sensitive resources used and protected by the different Discoverer components:
| Sensitive resources | Used and protected by Discoverer Plus | Used and protected by Discoverer Viewer | Used and protected by Discoverer Portlet Provider | Used and protected by Discoverer Administrator | Used and protected by Discoverer pages in Application Server Control |
|---|---|---|---|---|---|
| data | Yes | Yes | Yes | Yes | No |
| metadata | Yes | Yes | Yes | Yes | Yes |
| Discoverer connections | Yes | Yes | Yes | No | Yes |
| system resources | Yes | Yes | Yes | Yes | Yes |
| network resources | Yes | Yes | Yes | Yes | Yes |
Discoverer uses a number of security mechanisms to prevent unauthorized access to the above resources. These security mechanisms are provided by the following security models:
the database security model
the Discoverer EUL security model
the Oracle Applications security model
the OracleAS Security model
The diagram below shows the multiple security mechanisms employed by Discoverer, all of which ultimately protect data and system resources from unauthorized access:

The security mechanisms that Discoverer employs will depend on the category of Discoverer user (as defined by the Discoverer product they are using), as follows:
Discoverer Plus, Discoverer Viewer, and Discoverer Portlet Provider users (i.e. Discoverer end users)
OracleBI Discoverer Administrator users (i.e. Discoverer managers)
users administering Discoverer using Application Server Control (i.e. Discoverer middle tier administrators)
The table below shows which security models are used by which Discoverer components:
| Security Model | Used by Discoverer Plus | Used by Discoverer Viewer | Used by Discoverer Portlet Provider | Used by Discoverer Administrator | Used by Discoverer pages in Application Server Control |
|---|---|---|---|---|---|
| Database | Yes | Yes | Yes | Yes | No |
| Discoverer EUL | Yes | Yes | Yes | Yes | No |
| Applications | Yes | Yes | Yes | Yes | No |
| OracleAS | Yes | Yes | Yes | No | Yes |
At the most basic level, data in the database is protected from unauthorized access by the database's own security model. In the case of an Oracle database, this security model comprises:
database users and roles
database privileges
The database privileges granted directly to database users (or granted indirectly via database roles) determine the data that users can access. Typically, you will set up database security using a database administration tool or SQL*Plus.
Discoverer uses the database's own security model to make sure that users never see information to which they do not have database access.
For more information about the database security model and how Discoverer uses it, see Oracle Business Intelligence Discoverer Administration Guide.
Note: Discoverer is certified with the Oracle Advanced Security Option (ASO) encryption technology provided by the Oracle database (i.e. in Oracle 8.1.7 databases and later). The certification has four encryption types (RC4, DES, Triple-DES, and AES). Oracle ASO encryption incurs little performance overhead, although performance will vary depending on a number of factors (e.g. the operating system, the encryption algorithm). For more information about Oracle ASO encryption, refer to the Oracle database documentation.
Discoverer managers use Discoverer Administrator to grant Discoverer access permissions and task privileges directly to database users (or indirectly via database roles), as follows:
to control who can see and use which business areas, Discoverer managers grant Discoverer access permissions
to control the tasks each user is allowed to perform, Discoverer managers grant Discoverer task privileges
Regardless of the access permissions and task privileges granted in Discoverer Administrator, a Discoverer end user only sees folders if that user has been granted the following database privileges (either directly or through a database role):
SELECT privilege on all the underlying tables used in the folder
EXECUTE privilege on any PL/SQL functions used in the folder
Even if they share workbooks with each other, Discoverer users will never see information to which they do not have database access.
Discoverer Administrator also enables Discoverer managers to protect system resources by:
setting scheduled workbook limits to control the system resources available to end users
preventing end user queries from running for longer than a specified maximum duration
preventing end user queries from returning more than a specified number of rows
Discoverer managers can extend Discoverer functionality by registering their own PL/SQL functions. However, they can only register PL/SQL functions to which they have been granted the EXECUTE database privilege.
For more information about the Discoverer EUL security model, see Oracle Business Intelligence Discoverer Administration Guide.
Notes
To enforce read-only access to Discoverer workbooks, run Discoverer Plus in read-only mode for specified Discoverer end users by removing the Create/Edit Query privilege in OracleBI Discoverer Administrator (for more information, see Oracle Business Intelligence Discoverer Administration Guide).
Some of the EUL maintenance scripts supplied with Discoverer grant database privileges to the Discoverer manager and the PUBLIC user (for more information, see Appendix C, "OracleBI Discoverer administrative account information ").
A common use of Discoverer is to provide ad-hoc query access to Oracle Applications databases. To provide such access, Discoverer managers can use Discoverer Administrator to create Applications mode EULs.
Discoverer end users can connect to an Oracle Applications database using their Oracle e-Business Suite user ID and responsibility. For more information, see Section 15.1, "About Discoverer connections and Oracle e-Business Suite".
An Oracle Applications mode EUL is a Discoverer End User Layer based on an Oracle Applications schema (containing the Oracle Applications FND (Foundation) tables and views).
Oracle Applications EULs make use of the following Oracle Applications security model features:
Oracle Applications users and responsibilities
Oracle Applications EULs employ Oracle Applications user names and responsibilities whereas standard EULs use database users and roles. Discoverer managers running Discoverer Administrator in Oracle Applications mode grant access permissions or task privileges to Oracle Applications responsibilities instead of roles.
Oracle Applications row level security
Many Oracle Applications tables and views are user-sensitive, and will return different results depending on which user/responsibility is used to access these tables/views. Discoverer correctly runs queries that respect these user-sensitive tables and views.
Oracle Applications multiple organizations
Oracle Applications multiple organizations support enables Discoverer to work with data from more than one organization. Discoverer end users can query and analyze data from the set of organizations to which they have been granted access. The folders in the EUL must be based on Oracle Business Views (available in Oracle Applications 11i).
For more information about the Oracle Applications security model and how Discoverer uses it, see Oracle Business Intelligence Discoverer Administration Guide.
Notes
Oracle Application Server Single Sign-On does not work within BIS, EDW, or DBI Web pages.
Note: This section only applies if the Discoverer installation is associated with an OracleAS Infrastructure. For more information, see Section 2.1, "About installing Oracle Business Intelligence".
OracleAS Security is an integrated management and security framework that provides:
central management for OracleAS and the Oracle environment to reduce total cost of ownership
out-of-box monitoring, alerting, and diagnostics to eliminate unexpected downtime and performance problems
end-to-end performance monitoring of Web applications, and root cause analysis to resolve performance bottlenecks
a complete and integrated identity management infrastructure for user management, provisioning, Single Sign-On and Public Key infrastructure
advanced security and identity management features to ensure end-to-end security of deployed Web applications
The OracleAS Security model comprises:
OracleAS Framework Security
Oracle Identity Management infrastructure
Oracle Advanced Security
To make sure that Discoverer fully leverages the OracleAS Security model:
use the HTTPS services provided by OracleAS Framework Security (for more information, see Section 14.6, "Using Discoverer with OracleAS Framework Security")
use the Single Sign-On services provided by Oracle Identity Management infrastructure (for more information, see Section 14.7, "Using Discoverer with Oracle Identity Management Infrastructure")
In addition, the OracleAS Security model underpins the Discoverer connection mechanism (for more information, see Section 14.5.1, "About Discoverer public connections and the OracleAS Security model").
For more information about OracleAS Security, see:
Oracle Application Server Security Guide
Oracle Identity Management Concepts and Deployment Planning Guide
Discoverer managers can give users access to information by using Oracle Application Server Control to create public connections. Each connection specifies an EUL containing one or more business areas.
Discoverer managers can control users' access to information by restricting users to using public connections or by giving users permission to create their own private connections.
For more information about connections, see Chapter 4, "Managing OracleBI Discoverer connections".
OracleAS Framework Security provides a number of services, including:
HTTPS/SSL support (using Oracle HTTP Server)
user authentication and authorization (using Java Authentication and Authorization Service (JAAS), also known as JAZN)
encryption (using Java Cryptography Extension (JCE))
You can specify that Discoverer uses the HTTPS/SSL support offered by the Oracle HTTP Server as one of the communication protocols to communicate between the Discoverer server and the Discoverer client tier components. For more information, see:
Section 14.6.1, "About specifying Discoverer communication protocols"
Section 14.6.2, "About Discoverer Viewer security and communication protocols"
Section 14.6.3, "About Discoverer Plus security and communication protocols"
For more information about OracleAS Framework Security, see Oracle Application Server Security Guide.
Notes
When you install Oracle Business Intelligence, SSL is installed automatically and enabled by default (i.e. the start-mode parameter in opmn.xml is set to 'ssl-enabled'). For more information, see Oracle HTTP Server Administrator's Guide.
You can use Discoverer in different network environments that might or might not include firewalls using different communication protocols (i.e. JRMP, HTTP, HTTPS).
The most appropriate network environment depends on both existing network strategies in your organization as well as your requirements for:
performance (how long it takes to display information)
accessibility (whether data has to be accessed through a firewall)
security (how secure the data needs to be during transmission)
Note that you must use HTTPS if you want to make sure that sensitive information (e.g. passwords, data) is securely transmitted across a network.
Discoverer Viewer and Discoverer Plus require different security configurations:
for more information about configuring security for Discoverer Viewer, see Section 14.6.2, "About Discoverer Viewer security and communication protocols"
for more information about configuring security for Discoverer Plus, see Section 14.6.3, "About Discoverer Plus security and communication protocols"
Notes
If you are deploying OracleBI Discoverer with OracleAS Web Cache, there are security implications for some restricted user environments.
For more information, see:
Section 8.4, "When to use Discoverer Viewer with OracleAS Web Cache"
Oracle Application Server Security Guide
If you have deployed Discoverer in a multiple machine installation, note that you might want to specify different communication protocols on different Discoverer middle tier machines. For example, you might use:
the JRMP protocol on one machine for Plus users working inside a firewall
the HTTPS protocol on two other machines for Viewer users accessing reports across the Web
Discoverer Viewer uses standard HTTP or HTTPS protocols to connect Discoverer Viewer clients to the Discoverer servlet.
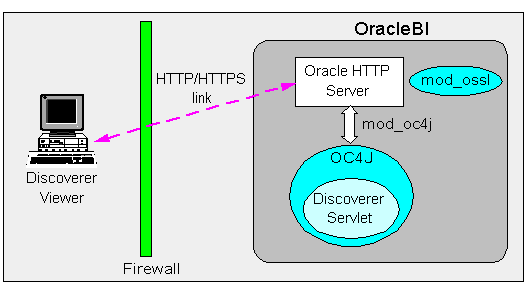
Note: Discoverer Viewer client machines require only a standard Web browser to run Discoverer Viewer.
In a default OracleAS installation, Discoverer Viewer is configured as follows:
In a HTTP environment, no additional security configuration is required. If you are using a firewall, open the firewall for the Oracle HTTP Server port used by OracleAS (e.g. 80).
If you are using a firewall, open the firewall for the Oracle HTTP Server SSL port used by OracleAS (e.g. 4443). In a HTTPS environment, Discoverer Viewer uses SSL security certificates on the client machine's browser. If you are using a non-standard or private SSL signing authority, you need to install the root certificates in the browser. For more information about deploying Discoverer Viewer over HTTPS, see Section 3.5, "About running Discoverer over HTTPS").
Discoverer Plus uses standard Java Remote Method Protocol (JRMP), HTTP, or HTTPS protocols to connect clients to the Discoverer servlet.
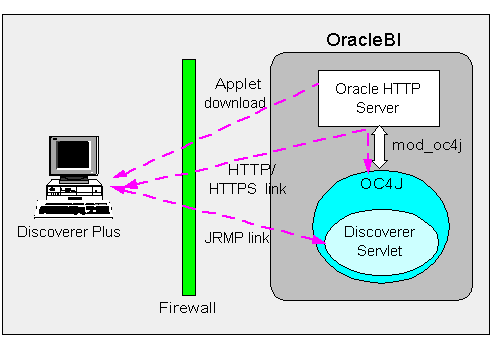
Discoverer Plus uses two communication channels:
when a Discoverer Plus client first connects to the Discoverer servlet, the Discoverer Plus applet is downloaded and installed on the Discoverer client machine
after the Discoverer Plus applet is installed on the Discoverer client machine, the Discoverer Plus client machine uses one of JRMP, HTTP, or HTTPS to communicate with the Discoverer servlet
In a default OracleAS installation, Discoverer Plus is configured as follows, depending on the environment:
In an Intranet environment (i.e. inside firewalls), no additional security configuration is required. Discoverer Plus clients connect to the Discoverer servlet using the JRMP protocol.
Make sure that the default Discoverer Plus communication protocol (i.e. Default) is selected (for more information, Section 14.6.3.4, "How to set up Discoverer Plus to use the Default communication protocol").
In a HTTPS environment, Discoverer Plus uses security certificates on the client machine's browser. When you run Discoverer Plus for the first time over HTTPS (i.e. in Secure Sockets Layer (SSL) mode), you need to install your Web server's security certificate into the Java Virtual Machine (JVM) certificate store in all client machines that need to run Discoverer Plus.
Note: To deploy Discoverer Plus over HTTPS, you must select the Secure Tunneling security protocol in Oracle Application Server Control (Section 14.6.3.6, "How to set up Discoverer Plus to use the Secure Tunneling communication protocol").
For more information about deploying Discoverer Plus over HTTPS, see Section 3.5, "About running Discoverer over HTTPS").
If you are using a non-standard SSL signing authority, you might need to configure the certdb.txt file on client machines (for more information, see Section 14.6.3.1, "About configuring Discoverer Plus for a non-standard SSL signing authority"). If you are using a firewall, open the firewall for the Oracle HTTP Server SSL port used by OracleAS (e.g. port 4443 on a UNIX middle tier or 443 on a Windows middle tier).
Notes
You typically use the same communication protocol to download the Discoverer applet as you do for communication with the Discoverer servlet (for more information, see Section 14.6.3.2, "About specifying a Discoverer Plus communication protocol").
If you are deploying Discoverer Plus using a non-standard or private SSL signing authority, you need to make sure that the root certificate information is in the certdb.txt file on each client machine (for more information about the location of configuration files, see Appendix A, "OracleBI Discoverer configuration files"). Certificate information is required in the certdb.txt file because Discoverer Plus ignores the browser's signing authority and uses Oracle's SSL technology.
For more information about Discoverer and SSL, see Section 3.5, "About running Discoverer over HTTPS".
Using Application Server Control, you can specify which communication protocol the Discoverer Plus applet (i.e. the Discoverer client) and the Discoverer servlet (i.e. on the Discoverer middle tier) use to communicate. The three communication protocol options are:
Default
Specify this option if you want the Discoverer Plus applet to attempt to use JRMP and if this fails, to use HTTP or HTTPS (depending on the URL) to communicate with the Discoverer servlet.
The advantage of using the Default communication protocol is that Discoverer Plus works regardless of whether the client browser is running inside or outside a firewall. However, it will be slower outside the firewall on the initial connection because JRMP will be tried first.
For more information about specifying this option, see Section 14.6.3.4, "How to set up Discoverer Plus to use the Default communication protocol".
Tunneling
Specify this option if you want the Discoverer Plus client to connect using the same method to communicate with the Discoverer servlet as was originally used to download the applet itself (i.e. either HTTP or HTTPS depending on the URL). This option works regardless of whether a firewall is being used.
The advantage of using the Tunneling communication protocol is that it is quicker than the Default option, because JRMP is not attempted first before failing and trying again using HTTP or HTTPS.
For more information about specifying this option, see Section 14.6.3.5, "How to set up Discoverer Plus to use the Tunneling communication protocol".
Secure Tunneling
Specify this option if you want the Discoverer Plus client to always use HTTPS to communicate with the Discoverer servlet.
The advantage of using the Secure Tunneling communication protocol is that it is quicker than the Default option, because JRMP is not attempted first before failing and trying again using HTTPS.
For more information about specifying this option, see Section 14.6.3.6, "How to set up Discoverer Plus to use the Secure Tunneling communication protocol".
Note: If you deploy Discoverer Plus over HTTPS, end users must use a HTTPS URL. If they use a HTTP URL, Discoverer will not start (for more information about troubleshooting HTTPS problems, see Section D.1.7, "Discoverer Plus reports RMI error").
You use the Discoverer Plus Communication Protocols page in Application Server Control to specify a Discoverer Plus communication protocol. For example, if you want to encrypt Discoverer Plus data, you might want to configure Discoverer Plus to use the HTTPS communication protocol.
To display the OracleBI Discoverer Plus Configuration page in Application Server Control:
Display the Application Server Control Discoverer Home page (for more information, see Section 5.1.3, "How to display the Application Server Control Discoverer Home page").

Select the Discoverer Plus link to display the Application Server Control Discoverer Plus Home page.
Hint: To display the Discoverer Plus link, either scroll down the page to the Components area, or select the Components link.

Select the Communication Protocols link to display the Communication Protocols page.
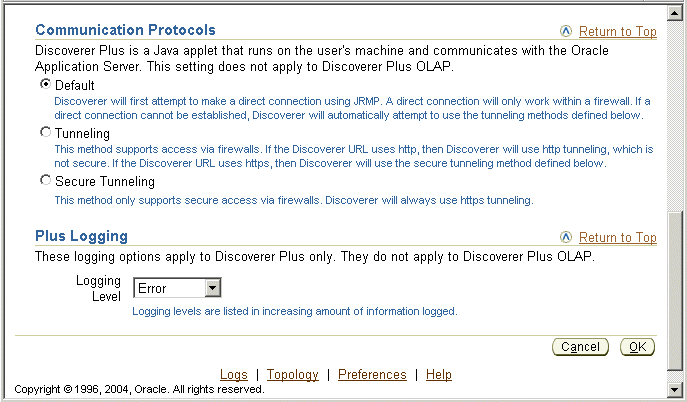
To set up Discoverer Plus to use the Default communication protocol:
Display Application Server Control and navigate to the OracleBI Discoverer Plus Communication Protocols page (for more information, see Section 14.6.3.3, "How to display the OracleBI Discoverer Plus Communications Protocols page in Application Server Control").
Select the Default radio button from the Communication Protocols options.
Click OK to save the details.
Give Discoverer Plus users the URL of the Discoverer servlet:
For example, http://<host.domain>:80/discoverer/plus
The Discoverer Plus applet will attempt to use JRMP. If JRMP is not available, the Discoverer Plus applet will use HTTP or HTTPS (depending on the URL) to communicate with the Discoverer servlet.
Note: This option works regardless of whether the applet is running inside or outside a firewall. However, it will be slower outside the firewall because JRMP will be tried first. For more information about the other options on this page, refer to Section 14.6.3.2, "About specifying a Discoverer Plus communication protocol".
You use the Secure Tunneling option when you want to run Discoverer Plus over HTTP.
To set up Discoverer Plus to use the Tunneling communication protocol:
Display Application Server Control and navigate to the OracleBI Discoverer Plus Communication Protocols page (for more information, see Section 14.6.3.3, "How to display the OracleBI Discoverer Plus Communications Protocols page in Application Server Control").
Choose the Tunneling radio button from the Communication Protocols options.
Click OK to save the details.
(optional) If you are using a firewall, open the appropriate port in the firewall to accept HTTP or HTTPS traffic as appropriate.
Give Discoverer Plus users the URL of the Discoverer servlet:
For example, http://<host.domain>:80/discoverer/plus
The Discoverer Plus applet will use the same protocol to communicate with the Discoverer servlet as was originally used to download the applet itself (i.e. either HTTP or HTTPS). This option works regardless of whether a firewall is being used.
You use the Secure Tunneling option when you want to run Discoverer Plus over HTTPS.
To set up Discoverer Plus to use the Secure Tunneling communication protocol:
Display Application Server Control and navigate to the OracleBI Discoverer Plus Communication Protocols page (for more information, see Section 14.6.3.3, "How to display the OracleBI Discoverer Plus Communications Protocols page in Application Server Control").
Choose the Secure Tunneling radio button from the Communication Protocols options.
Click OK to save the details.
(optional) If you are using a firewall, open the appropriate port in the firewall to accept HTTP or HTTPS traffic as appropriate.
Give Discoverer Plus users the URL of the Discoverer servlet:
For example, https://<host.domain>:4443/discoverer/plus
The Discoverer Plus applet will use the HTTPS protocol to communicate with the Discoverer servlet.
When a Discoverer end user starts Discoverer Plus for the first time on a client machine, they are prompted to confirm that they want to accept a default security certificate. Before selecting the Yes option on the Security Alert dialog, the Discoverer end user must install a Discoverer Plus security certificate on the client machine (for more information, see Section 3.5.1, "How to install a security certificate on a Discoverer Plus client machine").
Note: This section only applies if the Discoverer installation is associated with an OracleAS Infrastructure. For more information, see Section 2.1, "About installing Oracle Business Intelligence".
Oracle Identity Management Infrastructure provides a number of services, including:
OracleAS Single Sign-On
OracleAS Certificate Authority
Oracle Internet Directory (OID)
Oracle Delegated Administration Services
Oracle Directory Integration and Provisioning
LDAP Developer Kit
You can specify that Discoverer uses OracleAS Single Sign-On to enable users to access Discoverer using the same user name and password as other Web applications. For more information, see:
For more information about Oracle Identity Management Infrastructure, see Oracle Identity Management Concepts and Deployment Planning Guide.
This section describes OracleAS Single Sign-On and how to use it with Discoverer.
OracleAS Single Sign-On is a component of Oracle Application Server that enables users to access multiple Web applications (e.g. OracleBI Discoverer and OracleAS Portal) using a single user name and password that is entered once.
Note: OracleAS Single Sign-On is implemented using Oracle Single Sign-On Server.
When you install OracleAS, the OracleAS Single Sign-On service is installed automatically, but it is not enabled by default for Discoverer. For information about how to enable OracleAS Single Sign-On, see Section 14.7.2.2, "How to enable and disable Single Sign-On for Discoverer".
Discoverer connections work in both Single Sign-On and non-Single Sign-On environments. In an OracleAS Single Sign-On environment, if a Discoverer end user starts Discoverer without having been authenticated by OracleAS Single Sign-On, the user is challenged for Single Sign-On details (user name and password). Having provided Single Sign-On details, the user can display the Discoverer connections page and start Discoverer without having to enter a user name or password again.
Note: For more information about how OracleBI Discoverer works with OracleAS Portal and Single Sign-On, see Section 14.7.2.3, "An example showing how Discoverer works with OracleAS Portal and Single Sign-On".
Notes
Oracle Application Server Single Sign-On does not work within BIS, EDW, or DBI Web pages.
You enable and disable Single Sign-On on the OracleBI Discoverer instance.
To enable and disable Single Sign-On, do the following:
Open the mod_osso.conf file in a text editor (for more information about the location of configuration files, see Section A.1, "List of Discoverer file locations").
To enable Single Sign-On for Discoverer, add the following text to the end of the file:
<Location /discoverer/plus>
require valid-user
AuthType Basic
</Location>
<Location /discoverer/viewer>
require valid-user
AuthType Basic
</Location>
<Location /discoverer/app>
require valid-user
AuthType Basic
</Location>
To disable Single Sign-On for Discoverer, remove the following text from the file:
<Location /discoverer/plus>
require valid-user
AuthType Basic
</Location>
<Location /discoverer/viewer>
require valid-user
AuthType Basic
</Location>
<Location /discoverer/app>
require valid-user
AuthType Basic
</Location>
Save the mod_osso.conf file.
Type the following at a command prompt:
opmnctl stopall
opmnctl startall
Notes
Do not enable SSO for the URL /discoverer/portletprovider. Discoverer relies on OracleAS Portal to protect the /discoverer/portletprovider URL. In other words, do not specify the Location value as /discoverer, as follows:
<Location /discoverer/portletprovider>
require valid-user
AuthType Basic
</Location>
Make sure that the OssoIPCheck parameter value in the mod_osso.conf file is set to off.
If you use OracleAS Web Cache to cache Discoverer Viewer pages, note that caching for Discoverer does not work if Single Sign-On is enabled.
When you publish Discoverer content in a portlet on an OracleAS Portal page, you give portal users access to the Discoverer workbooks and worksheets. However, portal users accessing Discoverer workbooks only see data to which they have database access. In other words, two different users accessing the same workbook might see different data, depending on their database privileges. For more information, see Section 11, "Using OracleBI Discoverer with OracleAS Portal".
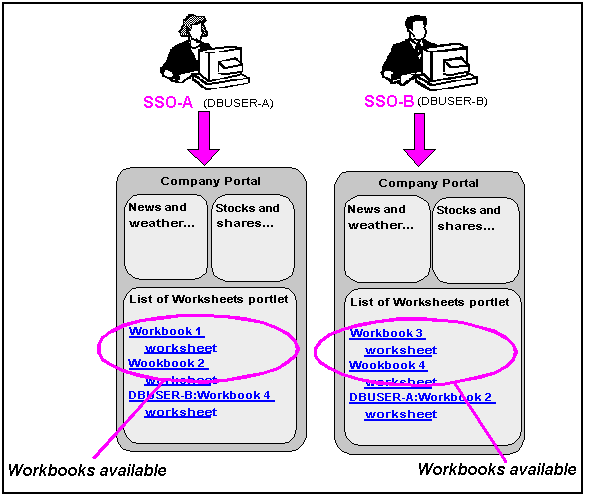
To illustrate how OracleBI Discoverer works with OracleAS Portal, consider the following example:
Imagine that there are two Single Sign-On users:
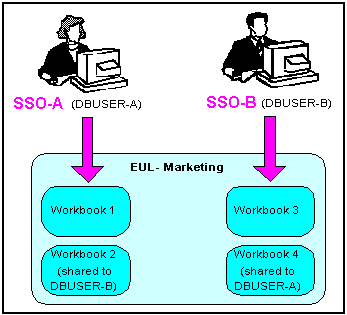
User SSO-A has a private connection Conn-A pointing to DBUSER-A@discodb, EUL-Marketing.
User SSO-B has a private connection Conn-B pointing to DBUSER-B@discodb, EUL-Marketing.
User SSO-A using connection Conn-A creates two workbooks Workbook 1 and Workbook 2 in the Marketing EUL. User SSO-A uses Discoverer Plus to share Workbook 2 with DBUSER-B.
User SSO-B using connection Conn-B creates two workbooks Workbook 3 and Workbook 4 in the Marketing EUL. User SSO-B uses Discoverer Plus to share Workbook 4 with DBUSER-A.
This situation is shown in the figure below:
Figure 14-1 Single Sign-On users creating workbooks
Now imagine that user SSO-A creates a List of Worksheets portlet using Conn-A, and chooses the 'Use user's database connection' option in the Logged In users section (i.e. in the Select Database Connections page in the Discoverer Portlet Provider).
When user SSO-A accesses the List of Worksheets portlet, worksheets in the following workbooks are available:
Workbook 1
Workbook 2
DBUSER-B.Workbook 4
When user SSO-B accesses the same List of Worksheets portlet, worksheets in the following workbooks are available:
Workbook 3
Workbook 4
DBUSER-A.Workbook 2
This situation is shown in the figure below:
Figure 14-2 Single Sign-On users accessing Discoverer portlets
If you are not deploying Discoverer with Single Sign-On, end users must confirm the database password each time a private connection is used. In other words, when a Discoverer end user chooses a private connection for the first time in a browser session, they are prompted to confirm the database password.
If the end user closes the Web browser and then starts the Web browser again (i.e. creates a new browser session), they are prompted to confirm their database password. End users do not have to confirm passwords for public connections (for more information, see Section 4.2.2, "About public connections").
Notes
To store private Discoverer connections in non-SSO environments, cookies must be enabled in the Web browser.
In non-SSO environments, a Discoverer end user can only access private connections created using the current machine and current Web browser. If an end user wants to use a different machine or different Web browser, they must re-create the private connections.
This section explains how you can use Discoverer in conjunction with a Virtual Private Database (VPD) using Single Sign-On (SSO) details, and contains the following topics:
Section 14.8.1, "Introducing Virtual Private Databases, Single Sign-On, and Discoverer"
Section 14.8.2, "Example showing how SSO user names can limit Discoverer data"
Section 14.8.3, "What tasks are required to use SSO user names to limit Discoverer data"
Section 14.8.6, "How to modify database LOGON (and subsequent) triggers to use the SSO user name"
Section 14.8.7, "How to use the eul_trigger$post_login trigger"
Notes
Discoverer does not support Single Sign details propagation when running against a multidimensional data source (e.g. in Discoverer Plus OLAP). You can create a VPD using the database ID, and using the D4O_AUTOGO file to control scoping (or striping) in the database when starting a Discoverer Plus OLAP session. For more information, refer to the appropriate Oracle database documentation.
For more information about configuring Discoverer Plus OLAP, see Chapter 6, "Configuring the Discoverer Catalog and Discoverer Plus OLAP".
Discoverer only uses the SSO identity to determine what data is accessible. Discoverer uses database user names and roles internally to manage business area access, workbook sharing, and scheduling. In other words, if you create a VPD policy for an SSO user, Discoverer does not restrict the list of workbooks that it displays based on the SSO identity. Discoverer will display all workbooks available to the current user name/database connection regardless of the SSO user name that was used to log in. However, the SSO user will only be able to view worksheet data that conforms to the VPD policy defined for that SSO user.
The Oracle9i Release 1 (and later) Enterprise Edition database's powerful Virtual Private Database (VPD) feature enables you to define and implement custom security policies. Among other things, the VPD feature enables you to enforce fine-grained access control based upon attributes of a user's session information (referred to as application context). This VPD functionality is commonly employed as a way of controlling access to data using the currently logged-on user's Single Sign-On (SSO) identity. For more information about setting up a VPD, see Oracle9i Application Developer's Guide - Fundamentals.
If Discoverer has been configured to require SSO authentication, Discoverer can pass a Discoverer end-user's SSO user name to the database (as the CLIENT_IDENTIFIER attribute of the built-in application context USERENV). Providing a VPD policy based on SSO user names has been implemented in the database, the data returned to a Discoverer worksheet will be restricted to the data that the SSO user is authorized to access.
You can optionally add user-defined PL/SQL statements to both database LOGON (and subsequent) triggers and to a Discoverer trigger (eul_trigger$post_login) to use the SSO user name to further control the data that is returned. You can use the database and Discoverer triggers separately or in conjunction with each other.
The Discoverer manager at Acme Corp. does the following:
Configures the Discoverer middle tier machines so that SSO authentication is necessary to access the Discoverer URLs.
Creates a Discoverer public connection called 'Analysis', that has access to a workbook called 'Sales'.
Creates a VPD policy against the base tables of the workbooks. The VPD policy determines the data that is returned, based on the value of a variable called 'CONTEXT1'.
Creates a database LOGON trigger that sets variable CONTEXT1 to the value of the SSO user name (extracted from the application context information passed to the database by Discoverer).
The Sales workbook is used by two Discoverer users at ACME Corp., Fred Bloggs and Jane Smith. A typical workflow for these two users is shown below:
User 'Fred.Bloggs' authenticates via SSO and accesses the top level Discoverer URL.
Fred selects the public connection 'Analysis', and opens the workbook 'Sales'.
Fred views the data in the default worksheet, and then logs out.
User 'Jane.Smith' authenticates via SSO and accesses the top level Discoverer URL.
Jane selects the public connection 'Analysis', and then opens workbook 'Sales'.
Jane views the data in the default worksheet.
Jane sees different data to Fred, despite the identical database connection, workbook, worksheet and database query. The difference is determined by the VPD policy being based on SSO user identities.
Before the data shown in a Discoverer worksheet can be controlled using SSO user names, a Discoverer manager performs the following tasks:
configures the Discoverer middle tier machines so that SSO authentication is necessary to access the Discoverer URLs (for more information, Section 14.7.2.2, "How to enable and disable Single Sign-On for Discoverer")
creates a Discoverer public connection, with access to one or more workbooks (for more information, see Section 4.6, "How to create public connections")
creates a VPD policy against the base tables of the workbooks, if one does not exist already (for more information about how to create a VPD policy, see Oracle9i Application Developer's Guide - Fundamentals
(optional) configures a Discoverer Worksheet portlet to use SSO user names (for more information, see Section 14.8.4, "How to set up Discoverer Worksheet Portlets to show different data based on SSO user name")
(optional) creates or modifies database LOGON (and subsequent) triggers to use the SSO user name to further control the data that is available to the SSO user (for more information, see Section 14.8.6, "How to modify database LOGON (and subsequent) triggers to use the SSO user name")
(optional) creates a function to be executed by the eul_trigger$post_login trigger, and registers the function using Discoverer Administrator (for more information, see Section 14.8.7, "How to use the eul_trigger$post_login trigger")
Having created a VPD policy in the database that uses SSO user names to determine the data that users can access, you can set up a Discoverer Worksheet portlet to only show the data that can be accessed by the current SSO user name.
To specify that users only see the data they can access with their SSO user name:
In the Users Logged In region of the Select Database Connections setup page for the Discoverer Worksheet Portlet.
Select the Display different data using the Publisher's connection radio button.
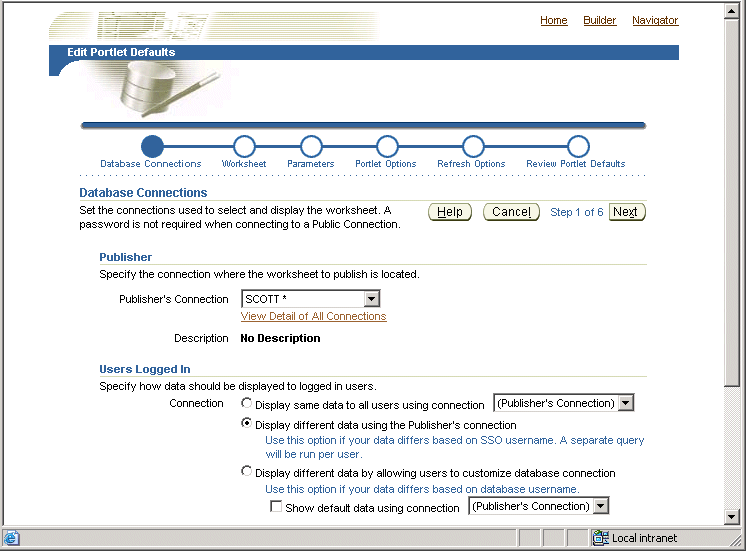
When you select the above option, Discoverer passes the worksheet portlet user's SSO user name to the database. The VPD policy can then use the SSO user name to restrict the data that is returned to the worksheet portlet.
If you want all users to always see the same data from the database regardless of their own database user names or SSO user names, do the following in the Select Database Connections setup page for the Discoverer Worksheet Portlet:
Select the Display same data to all users using <Publisher's Connection> radio button.
If you want users to initially see the same data from the database (regardless of their own database user names or SSO user names) but to give them the option of specifying an alternative database user name:
Select the Display different data by allowing users to customize database connection radio button.
Select the Show default data using <Publisher's Connection> check box.
You can modify database LOGON (and subsequent) triggers to use the SSO user name passed by Discoverer to further control the data that is available to the SSO user. For example, you might want to call custom PL/SQL functions that take the SSO user name to perform application specific initialization.
To modify database triggers to use the SSO user name:
Create a suitable database trigger.
Add the required code to manipulate the SSO user name.
Hint: To return the SSO user name passed by Discoverer, query the CLIENT_IDENTIFIER attribute of the USERENV application context namespace using the following function call:
SYS_CONTEXT('USERENV', 'CLIENT_IDENTIFIER')
Notes
The SSO user name passed by Discoverer is available as early as the execution of the database LOGON trigger.
If Discoverer has not been configured to use SSO, the SYS_CONTEXT function call above will return NULL.
The SSO user name is only available with Oracle9i Release 1 (and later) databases.
You can use the eul_trigger$post_login trigger instead of, or in conjunction with, the database LOGON (and subsequent) triggers to further control the information that is displayed in a Discoverer worksheet based on the SSO user name. Use the eul_trigger$post_login trigger (rather than the database triggers) if:
you want trigger code to affect just Discoverer users, not all database users
you do not have DBA privilege (and therefore cannot modify the database LOGON (or subsequent) trigger code)
To use the eul_trigger$post_login trigger:
Define a PL/SQL function in the database that:
has a return type of integer
does not take any arguments
Add the required code to manipulate the SSO user name.
Hint: To return the SSO user name passed by Discoverer, query the CLIENT_IDENTIFIER attribute of the USERENV application context namespace using the following function call:
SYS_CONTEXT('USERENV', 'CLIENT_IDENTIFIER')
Register the function with Discoverer Administrator and give it the following properties:
Name: eul_trigger$post_login
Return type: Integer
Arguments: none
For more information about registering PL/SQL functions and using Discoverer EUL triggers, see the Oracle Business Intelligence Discoverer Administration Guide.
If the Database/EnableTriggers preference exists in the pref.txt file, set it to a value other than zero.
Notes
If the Database/EnableTriggers preference does not exist in the pref.txt file, do not create it.
If the Database/EnableTriggers preference does exist and you have to change its value (i.e. to make it non-zero), you must subsequently:
Run the applypreferences script to apply the preference change.
Stop and restart the OracleBI Discoverer service for the change to take effect.
This section contains common security questions and answers.
A firewall is one system or a group of several systems put in place to enforce a security policy between the Internet and an organization's network.
In other words, a firewall is an electronic 'fence' around a network to protect it from unauthorized access.
Figure 14-3 A typical Internet connection with a Client-side and Server-side firewall
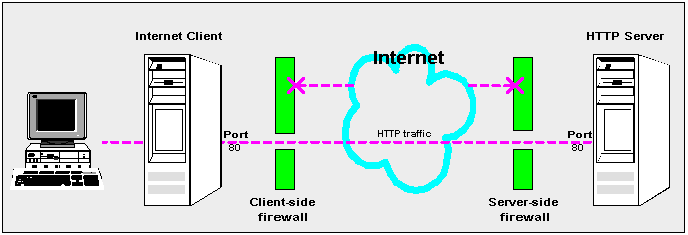
Typically, an organization using a Web Server machine that communicates across the Internet has a firewall between its Oracle HTTP Server machine and the Internet. This is known as a Server-side firewall. Other organizations (or remote parts of the same organization) connecting to this Web Server machine typically have their own firewall, known as a Client-side firewall. Information that conforms to the organization's firewall policy is allowed to pass through the firewalls enabling server machines and client machines to communicate.
A demilitarized zone (DMZ) is a firewall configuration that provides an additional level of security. In this configuration, the DMZ is an extra network placed between a protected network and the Internet. Resources residing within the DMZ are visible on the public Internet, but are secure. DMZs typically hold servers that host a company's public Web site, File Transfer Protocol (FTP) site, and Simple Mail Transfer Protocol (SMTP) server.
Firewall policies vary across organization and there are a wide variety of bespoke and off-the-shelf firewall packages in use.
A good firewall configuration assumes that resources in the DMZ will be breached, and if this happens should minimize damage to the internal network and any sensitive data residing on the network. This involves two steps:
move sensitive private resources (at a minimum, databases and application logic) from the DMZ to the internal network behind the internal firewall
restrict access to sensitive private resources from the DMZ itself, as well as from internal networks
The HTTPS protocol uses an industry standard protocol called Secure Sockets Layer (SSL) to establish secure connections between clients and servers.
The SSL protocol enables sensitive data to be transmitted over an insecure network, such as the Internet, by providing the following security features:
authentication - a client can determine a server's identity and be certain that the server is not an impostor (and optionally, a client can also authenticate the identity of its server)
privacy - data passed between the client and server is encrypted so that if a third party intercepts their messages, the third party will not be able to unscramble the data
integrity - the recipient of encrypted data will know if a third party has corrupted or modified that data
You can tell when SSL is enabled in Discoverer as follows:
the URL to start Discoverer Plus begins with https://, and a closed padlock appears at the left hand side of the applet's status bar
Note: To deploy Discoverer Plus over HTTPS, you must select the Secure Tunneling security protocol in Oracle Application Server Control (Section 14.6.3.6, "How to set up Discoverer Plus to use the Secure Tunneling communication protocol").
the URL to start Discoverer Viewer starts with https://, and a closed padlock or other equivalent symbol (browser dependent) appears in the browser's status bar
You configure Discoverer to work in an intranet as follows:
Discoverer Viewer
Deploying Discoverer Viewer in an intranet (i.e. inside a firewall) requires no additional configuration after an OracleAS installation. Discoverer Viewer uses a HTTP connection.
Discoverer Plus
Deploying Discoverer Plus in an intranet (i.e. inside a firewall) requires no additional configuration after an OracleAS installation. Discoverer Plus uses a direct connection using JRMP.
Figure 14-5 A typical network configuration for Discoverer in an intranet

You configure Discoverer to work through firewalls with HTTP or HTTPS, as follows:
Discoverer Viewer
Discoverer Viewer requires no additional configuration as long as the firewall allows HTTP traffic to pass through.
Discoverer Plus
Discoverer Plus requires no additional configuration as long as the firewall allows HTTP or HTTPS traffic to pass through.
To improve performance on initial connection, you might want to change the Discoverer Plus communication protocol to one of the following:
for HTTP, set the communication protocol to Tunneling to prevent the Discoverer client from first trying to connect using JRMP, then by HTTP (for more information, see Section 14.6.3.5, "How to set up Discoverer Plus to use the Tunneling communication protocol").
for HTTPS, set the communication protocol to Secure Tunneling to prevent the Discoverer client from first trying to connect using JRMP, then by HTTP, then by HTTPS (for more information, see Section 14.6.3.6, "How to set up Discoverer Plus to use the Secure Tunneling communication protocol").
Figure 14-6 A typical firewall configuration for Discoverer using HTTP
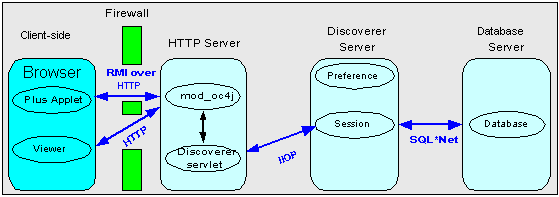
Yes, if you are using HTTP or HTTPS, Discoverer will work through multiple firewalls (for more information, see Section 14.9.5, "How do I configure Discoverer to work through a firewall?").
You configure Discoverer to use encryption as follows:
Discoverer Viewer
Configure mod_ossl to use HTTPS (for more information, see Oracle HTTP Server Administrator's Guide) and deploy Discoverer Viewer on a HTTPS URL.
Discoverer Plus
Configure mod_ossl to use HTTPS (for more information, see Oracle HTTP Server Administrator's Guide) and deploy Discoverer Plus on a HTTPS URL. You must change the Discoverer Plus communication protocol to Secure Tunneling (for more information, see Section 14.6.3.6, "How to set up Discoverer Plus to use the Secure Tunneling communication protocol").
You configure Discoverer to use encryption through firewalls as follows:
Discoverer Viewer
Configure Discoverer Viewer to work through a firewall (for more information, see Section 14.9.5, "How do I configure Discoverer to work through a firewall?"). Then, make sure that the firewall(s) allow HTTPS traffic to pass through.
Discoverer Plus
Configure Discoverer Plus to work through a firewall (for more information, see Section 14.9.5, "How do I configure Discoverer to work through a firewall?"). Then, make sure that the firewall(s) allow HTTPS traffic to pass through.
Figure 14-7 A typical firewall configuration for Discoverer using HTTPS

In Discoverer Viewer, make sure that client browsers display a closed padlock or other equivalent symbol (browser dependent) in the Discoverer Viewer browser's status bar.
In Discoverer Plus, make sure that the client displays a closed padlock symbol in the bottom left-hand corner of the Discoverer Plus applet window.
Yes, you can configure Discoverer for both intranet users and Internet users. For example, if you use the Default Discoverer Plus communication protocol:
sessions connecting from inside the firewall use a direct JRMP connection because JRMP is a direct connection that only works inside a firewall
sessions connecting from outside the firewall automatically use a HTTP or HTTPS connection (depending on the URL)