|
Oracle® Application Server High Availability Guide
10g Release 2 (10.1.2) B14003-03 |
|
 Previous |
 Next |
|
Oracle® Application Server High Availability Guide
10g Release 2 (10.1.2) B14003-03 |
|
 Previous |
 Next |
This chapter describes how to transform non-highly available topologies to OracleAS Cold Failover Cluster highly available topologies.
Section 21.1, "Overview of Transformation to OracleAS Cold Failover Cluster (Identity Management)"
Section 21.2, "Software, Hardware, and Documentation Requirements"
Section 21.3, "Transformation to OracleAS Cold Failover Cluster (Identity Management) on UNIX"
Section 21.4, "Transformation to OracleAS Cold Failover Cluster (Identity Management) on Windows"
For transformation to OracleAS Cold Failover Cluster (Identity Management), you can transform to OracleAS Cold Failover Cluster (Identity Management) or to distributed OracleAS Cold Failover Cluster (Identity Management). In both versions, you transform the source OracleAS Metadata Repository to a cold failover cluster database, and the Oracle Identity Management components to an OracleAS Cold Failover Cluster (Identity Management) configuration:
In an OracleAS Cold Failover Cluster (Identity Management), Oracle Identity Management components run from the same Oracle home.
In a distributed OracleAS Cold Failover Cluster (Identity Management), you install and run the Oracle Identity Management components on different nodes:
You configure Oracle Internet Directory and Oracle Directory Integration and Provisioning in an OracleAS Cold Failover Cluster (Identity Management). This means that the nodes are in a hardware cluster, and the Oracle home is located on a shared storage. You can use the same hardware cluster as for the OracleAS Metadata Repository database. See Figure 21-1.
You configure OracleAS Single Sign-On and Oracle Delegated Administration Services in an OracleAS Cluster (Identity Management). This means that you install the Oracle home locally on each node, and each node is active. You also need a load balancer to direct requests to these nodes. See Figure 21-19.
In general, you perform the following steps to transform a non-highly available installation to an OracleAS Cold Failover Cluster (Identity Management) topology:
Transform the OracleAS Metadata Repository from a single-instance database to a cold failover cluster database.
Transform the Oracle Identity Management components to run in an OracleAS Cold Failover Cluster (Identity Management). This includes configuring the components to use the virtual hostname associated with the hardware cluster.
Configure the middle-tier components to use the virtual hostname associated with the hardware cluster.
Notes on the transformation:
The transformation procedure works only on version 10.1.2.0.2 of Oracle Application Server: you are transforming a 10.1.2.0.2 non-highly available installation to a 10.1.2.0.2 highly available topology. If you are running an older version, you have to upgrade first.
The OracleAS Metadata Repository must be installed in an existing database using OracleAS Metadata Repository Creation Assistant.
The operating system must be the same on all nodes.
On Windows, the operating systems on the source and target nodes may be different editions within the same Windows family. For example, your source nodes can be running Windows 2000 Professional, but your target nodes can be running Windows 2000 Advanced Server.
Downtime Information
For certain portions of the transformation procedure, Oracle Application Server components needs to be stopped, and during these times (called downtimes), clients will not be able to access the Oracle Application Server topology. The "Steps in Detail" sections for the transformation procedure indicate when the downtimes occur.
You can use the downtime information to plan your transformation. For example, if you want to perform the transformation procedure in chunks, you can begin the transformation procedure and stop at the end of a downtime (that is, when components are up and running again). Clients can access Oracle Application Server at this time.
When you are ready to continue, you can pick up where you left off and continue with the procedure. You will not achieve a highly available topology until you complete all the steps in the transformation procedure.
To perform the transformation, check that you meet the following requirements:
two nodes in a hardware cluster, and virtual hostname and IP address for the hardware cluster
You can also run the cold failover cluster database on one hardware cluster, and the Oracle Identity Management components on another hardware cluster. In this case, each hardware cluster contains two nodes, and each hardware cluster has its own virtual hostname and IP address.
Oracle Database distribution CD-ROMs for installing the database on the shared storage
Oracle Application Server distribution CD-ROMs for installing additional instances of Oracle Application Server
Patches listed in Table 21-1. You can download the patches from OracleMetaLink (http://metalink.oracle.com).
Additional Requirements for Windows
If you are running on Windows, check that you have the following items:
Microsoft Cluster Server installed on all the nodes in the hardware cluster(s)
Oracle Fail Safe Release 3.3.3 distribution CD-ROMs for installing Oracle Fail Safe
Additional Requirements for Distributed OracleAS Cold Failover Cluster (Identity Management)
If you are transforming to a distributed OracleAS Cold Failover Cluster (Identity Management) topology, check that you have the following items:
two nodes fronted by a load balancer (this is for running OracleAS Single Sign-On and Oracle Delegated Administration Services in an active-active configuration)
virtual server name and IP configured for HTTP traffic on the load balancer ("sso.mydomain.com" in Figure 21-19)
Documents Referenced by the Transformation Procedure
Some steps in the transformation procedure refer to the Oracle documentation listed in Table 21-2. To perform the transformation procedure, you must have these documents.
You can access these documents on Oracle Technology Network (http://www.oracle.com/technology/documentation), or on your Oracle distribution CD-ROMs.
Table 21-2 Documents Needed
| Product | Guides Needed |
|---|---|
|
Oracle Database |
If you are running Oracle9i Release 2 (9.2) Database, you need this guide:
You can find it on Oracle Technology Network:
If you are running Oracle Database 10g Release 1 (10.1), you need these guides:
You can find these guides on Oracle Technology Network: |
|
Oracle Application Server |
|
This section describes how to transform a non-highly available configuration to an OracleAS Cold Failover Cluster configuration on UNIX. If your platform is Windows, see Section 21.4, "Transformation to OracleAS Cold Failover Cluster (Identity Management) on Windows".
In the non-highly available, or "source", configuration, the OracleAS Metadata Repository and Oracle Identity Management run from different Oracle homes. They can run on the same computer, or on different computers. Figure 21-1 shows them on the same computer, but the procedure described in this section can be used for either case.
To transform this to an OracleAS Cold Failover Cluster configuration, you make the following transformations:
Install a new database Oracle home on the shared storage.
Transform the OracleAS Metadata Repository to a cold failover cluster database.
Install Oracle Identity Management on the shared storage.
Configure Oracle Identity Management and middle tiers to use the cluster's virtual hostname.
Figure 21-1 shows the steps in the transformation.
Figure 21-1 Transforming to OracleAS Cold Failover Cluster Configuration
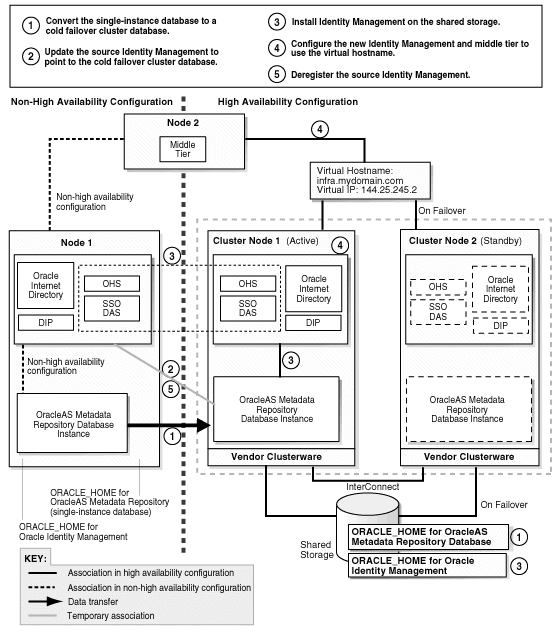
Transformation steps, at a high level, are:
Step 1: Convert the Single-Instance Database to a Cold Failover Cluster Database
Step 2: Update the Source Oracle Identity Management to Use the New OracleAS Metadata Repository
Step 3: Install New Oracle Identity Management Instance on the Shared Storage
Step 4: Configure Oracle Identity Management and Middle Tiers to Use the Virtual Hostname
Step 5: Deregister the Source Oracle Identity Management
Step 6: (optional) Create Failover Scripts
Step 7: Start the OracleAS Metadata Repository, Oracle Identity Management, and Middle Tiers
Step 8: Verify That All the Components Are Working
Step 9: Decommission the Oracle Homes That Are No Longer Used
The following steps use the following names to refer to the different nodes (the names match the ones used in Figure 21-1):
Node 1 and node 2 are nodes in the source configuration.
Cluster node 1 and cluster node 2 are nodes in the hardware cluster. At any given time, only one of these nodes has access to the shared storage on which you will install the Oracle Identity Management instance and the Oracle database.
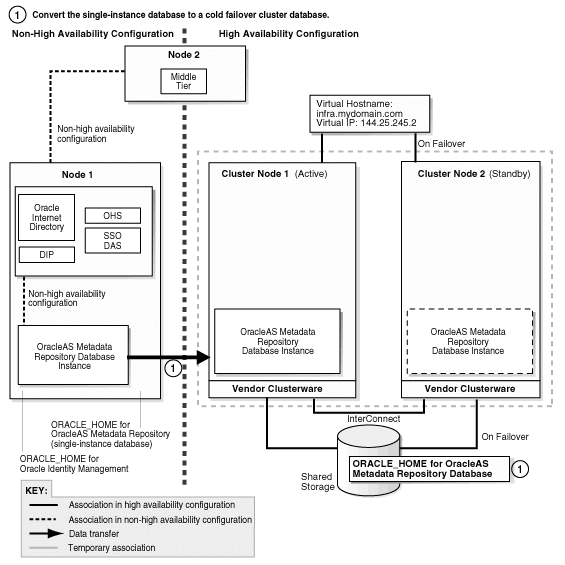
Step 1 Convert the Single-Instance Database to a Cold Failover Cluster Database
After this step, your environment should look like the following (Figure 21-2):
Figure 21-2 Step 1: Convert the Single-Instance Database to a Cold Failover Cluster Database
Run the Oracle database installer on cluster node 1 to install only the Oracle database software on the shared storage (do not create a database). The database version that you install must be the same version as the source OracleAS Metadata Repository database.
The database Oracle home created in this step will be referred to as CFC_MR_ORACLE_HOME in subsequent steps.
If you are using Oracle Database 10g:
Follow the steps in the guide listed below, but note this difference: In the Select Database Configuration screen, do not create a starter database.
| Item | Name |
|---|---|
| Book | Oracle Database 10g Quick Installation Guide for your platform
This book is available in the Oracle Database 10g documentation set. |
| Section | "Install Oracle Database 10g" |
Apply the 10.1.0.4 patch set to the database software that you just installed by following the instructions in the README that comes with the patch set. Note: Perform the steps in the section "Required Post-Installation Tasks" in the README, up to, but not including, the section "Upgrade the Database". You have not created the database yet. You will do this later
If you are using Oracle9i Database:
Install the Oracle9i Release 2 (9.2.0.1) software. In the installer, select "Database Configuration: Software Only" because you are not creating the database yet.
Apply the Oracle9i Release 2 (9.2.0.6) patch set. Perform these steps:
In the README file for the patch set, perform the steps in the section "Before You Install This Patch Set" if they apply to you.
Install the 9.2.0.6 patch set.
Perform the steps in the section "Required Post-Installation Tasks" in the README, up to, but not including, the section "Upgrade the Database". You have not created the database yet. You will do this later.
|
Downtime 1 Starts: The next step starts the first downtime. |
Stop the middle tier and the Oracle Identity Management instances so that they are not modifying the OracleAS Metadata Repository database while you are backing it up.
To stop the middle tier:
> MT_ORACLE_HOME/bin/emctl stop iasconsole
> MT_ORACLE_HOME/opmn/bin/opmnctl stopall
To stop the Oracle Identity Management:
> SRC_IM_ORACLE_HOME/bin/emctl stop iasconsole
> SRC_IM_ORACLE_HOME/opmn/bin/opmnctl stopall
Back up the source Oracle Identity Management and middle tiers. You can use any backup tools. For example, you can use the OracleAS Backup and Recovery Tool, described in the Oracle Application Server Administrator's Guide.
Perform a cold backup of the OracleAS Metadata Repository datafiles and the oraInventory directory.
Back up the source OracleAS Metadata Repository by using DBCA to create a database template from the OracleAS Metadata Repository database.
On node 1, start up DBCA.
> SRC_MR_ORACLE_HOME/bin/dbca
Select Manage Templates.
Select Create a Database Template and select From an existing database (structure as well as data).
Select the name of your database instance.
Enter a name for the template.
DBCA generates two files, template_name.dbc and template_name.dfb, in the SRC_MR_ORACLE_HOME/assistants/dbca/templates directory.
Select Convert the file locations to use OFA structure.
Copy (or ftp in binary mode) the two files generated in the previous step to the shared storage and place them in the CFC_MR_ORACLE_HOME/assistants/dbca/templates directory on the shared storage.
Create a database listener.
Start up Network configuration assistant.
> CFC_MR_ORACLE_HOME/bin/netca
Select Listener Configuration.
Select the protocol and port.
Exit the Network configuration assistant.
In the CFC_MR_ORACLE_HOME/network/admin/listener.ora file, update the hostname in the listening address from the local host (cluster node 1) to the virtual hostname.
Stop and restart the listener for the changes in the previous step to take effect.
> CFC_MR_ORACLE_HOME/bin/lsnrctl stop
> CFC_MR_ORACLE_HOME/bin/lsnrctl start
Restore the templates to the database that you installed in step 1.
On cluster node 1, run DBCA to create a database using the templates you created in step 5.
> CFC_MR_ORACLE_HOME/bin/dbca
Select Create Database.
Select the template name for the files that you copied to the shared storage.
When prompted for the global database name and SID, enter the same names as your source OracleAS Metadata Repository.
Accept the default values for the remaining screens.
On cluster node 2, create or edit the oratab file so that it includes a line for the Oracle database. The location of the file is platform-dependent:
Solaris: /var/opt/oracle/oratab
Other UNIX operating systems: /etc/oratab
See the Oracle Database Installation Guide for the format of this file.
Step 2 Update the Source Oracle Identity Management to Use the New OracleAS Metadata Repository
In this step, you update the source Oracle Identity Management so that it uses the OracleAS Metadata Repository that you just installed in the hardware cluster. At the end of this step, your environment should be functional and look like the following (Figure 21-3):
Figure 21-3 Step 2: Update Source Identity Management to Use the New OracleAS Metadata Repository

Unlock the accounts in the new OracleAS Metadata Repository without changing the passwords. These accounts are listed in the SRC_IM_ORACLE_HOME/config/unlock.sql file, where SRC_IM_ORACLE_HOME is the home directory for the source Oracle Identity Management.
To unlock the accounts without changing the passwords, perform these steps:
Log into the database as the SYS user.
> sqlplus SYS/password as sysdba
Run the following commands for each user listed in the SRC_IM_ORACLE_HOME/config/unlock.sql file:
Determine the password for the user.
SQL> select password from dba_users where username = 'username';
Replace username with the name of the account.
Run the "alter user" command.
SQL> alter user username identified by values 'password' account unlock;
Replace username with the name of the account.
Replace password with the password determined from the previous step.
|
Note: Do not change the passwords for these accounts. |
In the SRC_IM_ORACLE_HOME/network/admin/tnsnames.ora file, update the HOST parameter in the OracleAS Metadata Repository connect string to use the fully qualified virtual hostname.
Update the OracleAS Metadata Repository connect string in Oracle Internet Directory.
Start the OPMN daemon (note that you run "opmnctl start", not "opmnctl startall").
> SRC_IM_ORACLE_HOME/opmn/bin/opmnctl start
Start Oracle Internet Directory.
> SRC_IM_ORACLE_HOME/opmn/bin/opmnctl startproc ias-component=OID
Start Oracle Directory Manager.
> SRC_IM_ORACLE_HOME/bin/oidadmin
Log in as cn=orcladmin.
Expand the following: Entry Management > cn=OracleContext.
Select cn=dbName on the left side.
In the Properties tab on the right side, update the HOST parameter in orclnetdescstring with the fully qualified virtual hostname.
Verify that the following items have the same connect string:
orclnetdescstring value in Oracle Internet Directory (see previous step)
the tnsnames.ora file in SRC_IM_ORACLE_HOME/network/admin
the tnsnames.ora file in CFC_MR_ORACLE_HOME/network/admin
Stop and restart Oracle Identity Management and middle tier.
> MT_ORACLE_HOME/opmn/bin/opmnctl stopall
> SRC_IM_ORACLE_HOME/opmn/bin/opmnctl stopall
> SRC_IM_ORACLE_HOME/opmn/bin/opmnctl startall
> MT_ORACLE_HOME/opmn/bin/opmnctl startall
Test OracleAS Infrastructure and middle-tier components. They should be working normally.
|
Downtime 1 Ends: This ends the first downtime. |
Step 3 Install New Oracle Identity Management Instance on the Shared Storage
Figure 21-4 shows the environment at the completion of this step.
Figure 21-4 Step 3: Install a New Oracle Identity Management Instance on the Shared Storage

Create an OracleAS Cluster (Identity Management) on the source Oracle Identity Management instance.
> SRC_IM_ORACLE_HOME/dcm/bin/dcmctl createcluster -cluster cluster_name
You create this OracleAS Cluster (Identity Management) as a means to copy configuration information from the source Oracle Identity Management to the new Oracle Identity Management.
Make the Oracle Identity Management instance the first member of the OracleAS Cluster (Identity Management).
> SRC_IM_ORACLE_HOME/dcm/bin/dcmctl joincluster -cluster cluster_name
Create a staticports.ini file to specify the ports that you are using on node 1 for Oracle Identity Management. You will specify this file in the installer.
You only need to specify the ports for Oracle Internet Directory in this file. The port numbers must match those for Oracle Internet Directory on node 1. You can copy the lines from the SRC_IM_ORACLE_HOME/install/portlist.ini file in the source Oracle Identity Management. For example:
Oracle Internet Directory port = 389
Oracle Internet Directory (SSL) port = 636
On cluster node 1, run the Oracle Application Server installer to install an Oracle Identity Management instance on the shared storage, and during installation, set this instance to belong to the OracleAS Cluster (Identity Management) that you created in the previous step. Essentially, you are installing a second instance in an OracleAS Cluster (Identity Management).
Important details:
Install the Oracle Identity Management instance on the shared storage.
In the Select Configuration Options screen, select Oracle Internet Directory, OracleAS Single Sign-On, Oracle Delegated Administration Services, Oracle Directory Integration and Provisioning, and High Availability and Replication.
In the Specify Port Configuration Options screen, select Manual and enter the fullpath to the staticports.ini file that you created in step 3.
In the Specify Repository screen, connect to the database on cluster node 1 using the virtual hostname.
In the Specify Existing Oracle Application Server Cluster Name screen, enter the name of the cluster that you created in step 1.
In the Specify ODS Password screen, enter the password for the ODS account.
In the Specify LDAP Virtual Host and Ports screen, specify node 1's hostname and the Oracle Internet Directory port.
In the Specify HTTP Listen Port, Load Balancer Host and Port screen, enter the fully qualified virtual hostname in the HTTP Load Balancer: Hostname field. Enter the HTTP port in HTTP Load Balancer: Port field.
Remove the source Oracle Identity Management instance (on node 1) from the cluster. You added it to the cluster in step 2.
> SRC_IM_ORACLE_HOME/dcm/bin/dcmctl leaveCluster -c clustername
> SRC_IM_ORACLE_HOME/dcm/bin/dcmctl removeCluster -c clustername
(optional) You can take a backup of your environment at this time, if desired.
Stop all processes.
To stop the middle tier:
> MT_ORACLE_HOME/opmn/bin/opmnctl stopall
To stop the source Oracle Identity Management instance:
> SRC_IM_ORACLE_HOME/opmn/bin/opmnctl stopall
To stop the new Oracle Identity Management instance:
> CFC_IM_ORACLE_HOME/opmn/bin/opmnctl stopall
To stop the OracleAS Metadata Repository database:
> CFC_MR_ORACLE_HOME/bin/sqlplus /nolog
SQL> connect / as sysdba
SQL> shutdown
To stop the listener:
> CFC_MR_ORACLE_HOME/bin/lsnrctl stop
Back up the Oracle Identity Management instance that you just installed.
Back up the OracleAS Metadata Repository data files.
Start up all the components (listener, OracleAS Metadata Repository, Oracle Identity Management, middle tier).
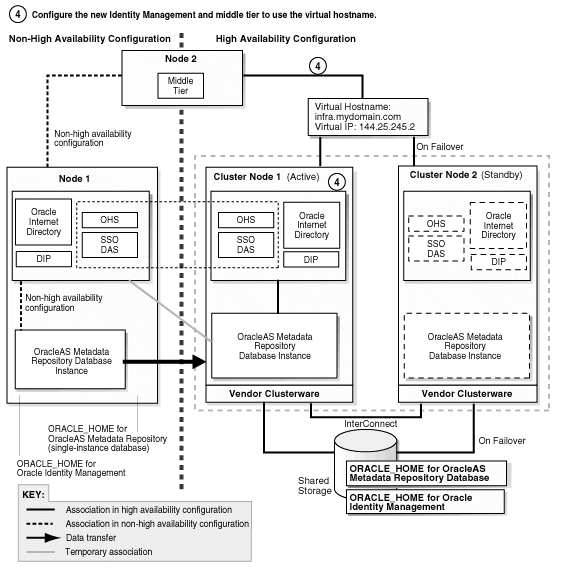
Step 4 Configure Oracle Identity Management and Middle Tiers to Use the Virtual Hostname
After installation, configure the Oracle Identity Management and middle-tier components for OracleAS Cold Failover Cluster. After this step, your environment should be functional and look like this (Figure 21-5):
Figure 21-5 Step 4: Configure Oracle Identity Management and Middle-Tier Components to Use the Virtual Hostname
|
Downtime 2 Starts: The next step starts the second downtime. |
On cluster node 1, configure the Oracle Internet Directory in the new Oracle Identity Management instance to use the virtual hostname.
Stop all Oracle Identity Management components.
> CFC_IM_ORACLE_HOME/bin/emctl stop iasconsole
> CFC_IM_ORACLE_HOME/opmn/bin/opmnctl stopall
Make these edits in the CFC_IM_ORACLE_HOME/opmn/conf/opmn.xml file.
In these categories:
category id="oidctl-parameters"
and
category id="oidmon-parameters"
add the following line (including the < and > characters):
<data id="host" value="fully_qualified_virtual_hostname"/>
Replace fully_qualified_virtual_hostname with your fully qualified virtual hostname.
On cluster node 1, edit the CFC_IM_ORACLE_HOME/config/ias.properties file as follows:
Edit the OIDhost entry to use the virtual hostname.
Update the DIRECTORY_SERVERS parameter in the CFC_IM_ORACLE_HOME/ldap/admin/ldap.ora file to use the virtual hostname.
On cluster node 1, check that the ORACLE_HOME environment variable is set correctly before running the chgiphost.sh script:
> echo $ORACLE_HOME
> CFC_IM_ORACLE_HOME/chgip/scripts/chgiphost.sh -idm -noconfig
When prompted, provide the following information:
Table 21-3 Prompts from chgiphost
| Prompt from chgiphost | Response |
|---|---|
|
|
Enter the fully qualified virtual hostname. |
|
|
Enter the fully qualified cluster node 1's hostname. |
|
|
Enter the IP associated with the virtual hostname. |
|
|
Enter the IP for cluster node 1. |
|
|
Enter the password for the |
Configure OracleAS Single Sign-On to use the virtual hostname.
Start Oracle Internet Directory (note that the first command is "opmnctl start", not "opmnctl startall").
> CFC_IM_ORACLE_HOME/opmn/bin/opmnctl start
> CFC_IM_ORACLE_HOME/opmn/bin/opmnctl startproc ias-component=OID
Start Oracle Directory Manager:
> CFC_IM_ORACLE_HOME/bin/oidadmin
Connect using virtual hostname. Log in as cn=orcladmin.
Get the password for the orasso schema.
In Oracle Directory Manager, expand Entry Management > cn=OracleContext > cn=Products > cn=IAS > cn=IAS Infrastructure Databases > orclReferenceName=DBServiceName > orclResourceName=ORASSO.
Note the password in the orclpasswordattribute field. You will use it in the next step.
On cluster node 1, log in to the OracleAS Metadata Repository database as ORASSO and run the ssooconf.sql script.
> cd CFC_IM_ORACLE_HOME/sso/admin/plsql/sso
> CFC_IM_ORACLE_HOME/bin/sqlplus orasso/password@mrdbInstanceName
SQL> @ssooconf.sql
For password, enter the password for the orasso schema.
For mrdbInstanceName, enter the instance name of the database as defined in the CFC_IM_ORACLE_HOME/network/admin/tnsnames.ora file
ssooconf.sql prompts you for the following information:
Table 21-4 ssooconf.sql Prompts
| Prompt from ssooconf.sql | Your Response |
|---|---|
|
|
Enter the fully qualified virtual hostname and press Return. |
|
|
Enter the Oracle Internet Directory port number and press Return. You can enter an SSL port or a non-SSL port. In the last prompt (see below), you indicate whether this port is an SSL port or a non-SSL port. |
|
|
Press Return so that the password is not changed. |
|
|
Enter n if the port you entered above is not an SSL port. Enter y if the port you entered above is an SSL port. |
On cluster node 1, run:
> CFC_IM_ORACLE_HOME/dcm/bin/dcmctl resetHostInformation
Update the Oracle Directory Integration and Provisioning registration to use the virtual hostname.
Run one of the following commands to update Oracle Directory Integration and Provisioning:
Non-SSL:
> CFC_IM_ORACLE_HOME/bin/odisrvreg -D cn=orcladmin -w adminPasswd
    -lhost FQvirtualHostname -p oidPort -h FQvirtualHostname
SSL:
> CFC_IM_ORACLE_HOME/bin/odisrvreg -D cn=orcladmin -w adminPasswd
    -lhost FQvirtualHostname -p oidSSLPort -h FQvirtualHostname
    -U sslMode -W walletLocation -P walletPassword
Start the Oracle Directory Integration and Provisioning server.
> oidctl connect=connectString server=odisrv inst=1 host=FQvirtualHostname
    flags="port=port host=FQvirtualHostname" start
Replace connectString with the connect string to the Oracle Internet Directory database.
Replace FQvirtualHostname with the fully qualified virtual hostname for the OracleAS Cold Failover Cluster.
Replace port with the Oracle Internet Directory port.
Update the OracleAS Metadata Repository.
Check that the ORACLE_HOME environment variable is set correctly:
> echo $ORACLE_HOME
Non-SSL:
> CFC_IM_ORACLE_HOME/sso/bin/ssocfg.sh http FQvirtualHostname port
SSL:
> CFC_IM_ORACLE_HOME/sso/bin/ssocfg.sh https FQvirtualHostname port
Replace FQvirtualHostname with the virtual hostname (fully qualified).
Replace port with either the SSL or the non-SSL port used by Oracle HTTP Server.
Skip this step if you are transforming to a distributed OracleAS Cold Failover Cluster (Identity Management) topology.
Change the URL for OracleAS Single Sign-On and Oracle Delegated Administration Services.
Start Oracle Directory Manager:
> CFC_IM_ORACLE_HOME/bin/oidadmin
Connect using cluster node 1's hostname. Log in as cn=orcladmin.
In Oracle Directory Manager, expand Entry Management > cn=OracleContext > cn=Products > cn=DAS > cn=OperationURLs.
Update the value of the orcldasurlbase attribute to the virtual hostname.
Skip this step if you are transforming to a distributed OracleAS Cold Failover Cluster (Identity Management) topology.
Update mod_osso registration by running the following command (all on one line).
> CFC_IM_ORACLE_HOME/sso/bin/ssoreg.sh
   -oracle_home_path im_oracle_home
   -site_name virtual_hostname:http_port
   -config_mod_osso TRUE
   -mod_osso_url http://virtual_hostname:port
   -u root
Replace im_oracle_home with the full path of the Oracle Identity Management Oracle home.
Replace virtual_hostname with the fully qualified virtual hostname.
Replace port with the Oracle HTTP Server port. Note that if you are using port 80, you must not specify the port number because port 80 is the default value.
Restart Oracle Identity Management components.
> CFC_IM_ORACLE_HOME/opmn/bin/opmnctl stopall
> CFC_IM_ORACLE_HOME/opmn/bin/opmnctl startall
Configure the middle tiers to use the new Oracle Identity Management.
Stop all the middle-tier instances.
> MT_ORACLE_HOME/bin/emctl stop iasconsole
> MT_ORACLE_HOME/opmn/bin/opmnctl stopall
In each middle-tier instance, in the MT_ORACLE_HOME/config/ias.properties file, update the OIDhost parameter to use the fully qualified virtual hostname.
In each middle-tier instance, update the DIRECTORY_SERVERS parameter in the MT_ORACLE_HOME/ldap/admin/ldap.ora file to use the virtual hostname.
Start OPMN and Application Server Control Console on all the middle-tier instances.
Note that the first command is "opmnctl start", not "opmnctl startall", because at this time you want to start up only OPMN and the Application Server Control Console. The middle tiers cannot be started yet.
> MT_ORACLE_HOME/opmn/bin/opmnctl start
> MT_ORACLE_HOME/bin/emctl start iasconsole
For each middle tier:
Use the Application Server Control Console and navigate to the home page for the middle tier.
Click the Infrastructure link.
In the Identity Management section, click Change.
Follow the wizard for entering a new hostname. You enter the virtual hostname here.
When the wizard completes, it asks you to restart the components. You can do this by running the following commands:
> MT_ORACLE_HOME/opmn/bin/opmnctl stopall
> MT_ORACLE_HOME/opmn/bin/opmnctl startall
|
Downtime 2 Ends: This ends the second downtime. |
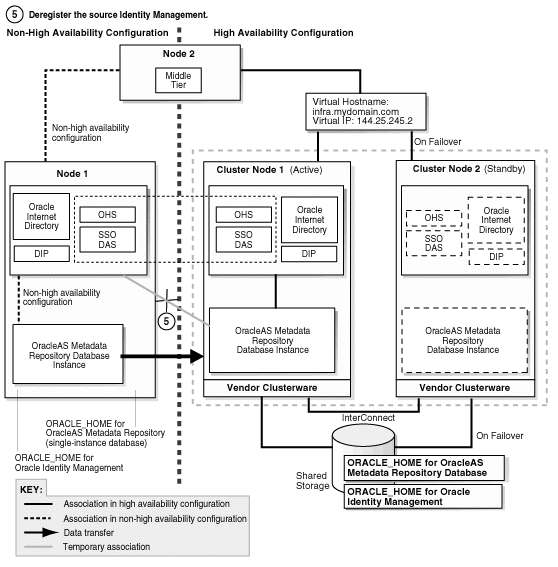
Step 5 Deregister the Source Oracle Identity Management
In this step, you deregister the source Oracle Identity Management from the OracleAS Metadata Repository. Figure 21-6 shows the environment at the completion of this step.
Figure 21-6 Step 5: Deregister the Source Identity Management
If you are running Oracle Directory Integration and Provisioning, you need to stop it:
> ORACLE_HOME/bin/oidctl connect=dbConnect flags="host=OIDhost port=OIDport"
     server=odisrv instance=1 stop
Make the following edits to the SRC_IM_ORACLE_HOME/deconfig/DeconfigWrapper.properties file, where SRC_IM_ORACLE_HOME refers to the source Oracle Identity Management home on node 1.
Comment out the line that begins with "SSO=". For example, the line might look like this:
SSO=/scratch/iastrans/im/jdk/bin/java
 -jar /scratch/iastrans/im/sso/lib/ossoca.jar deinstall
 /scratch/iastrans/im "%OID_USER%" %OID_PASSWORD%
Comment out the line by adding a # character at the beginning of the line:
#SSO=/scratch/iastrans/im/jdk/bin/java
 -jar /scratch/iastrans/im/sso/lib/ossoca.jar deinstall
 /scratch/iastrans/im "%OID_USER%" %OID_PASSWORD%
Comment out the line that begins with "MOD_OSSO=". For example, the line might look like this:
MOD_OSSO=/scratch/iastrans/im/jdk/bin/java -jar
 /scratch/iastrans/im/jlib/infratool.jar de -f
 /scratch/iastrans/im/deconfig/deconfig_modosso.properties -o
 /scratch/iastrans/im -u "%OID_USER%" -obf %OID_PASSWORD%
Comment out the line by adding a # character at the beginning of the line:
#MOD_OSSO=/scratch/iastrans/im/jdk/bin/java -jar
 /scratch/iastrans/im/jlib/infratool.jar de -f
 /scratch/iastrans/im/deconfig/deconfig_modosso.properties -o
 /scratch/iastrans/im -u "%OID_USER%" -obf %OID_PASSWORD%
On node 1, run deconfig.pl to deregister the source Oracle Identity Management from the OracleAS Metadata Repository.
> cd SRC_IM_ORACLE_HOME/bin
> SRC_IM_ORACLE_HOME/perl/bin/perl deconfig.pl -u oidUser -w passwd
 -dbp sysPasswd [-r realm]
The -u option specifies the name of the Oracle Internet Directory user. This user must have privileges for deinstalling the Oracle Identity Management components. To run as the Oracle Internet Directory superuser, specify the user as cn=orcladmin.
The -w option specifies the password of the user.
The -dbp option specifies the password of the SYS user in the OracleAS Metadata Repository database.
The -r option is required only if your Oracle Internet Directory contains multiple realms. Use it to specify the realm in Oracle Internet Directory against which the user should be validated.
See the "Deinstallation and Reinstallation" appendix in the Oracle Application Server Installation Guide for details about deconfig.pl.
Step 6 (optional) Create Failover Scripts
Create scripts to perform failover and start up Oracle Application Server components on the standby node. The scripts are dependent on the clusterware that you are running. If you do not create the failover scripts, you will have to perform the failover steps manually.
Step 7 Start the OracleAS Metadata Repository, Oracle Identity Management, and Middle Tiers
Start the OracleAS Metadata Repository and the Oracle Identity Management on cluster node 1, and start also the middle tiers. The components and applications should be functioning properly. To test failover, fail cluster node 1. The failover scripts created in step 6 should failover the processes to cluster node 2.
Step 8 Verify That All the Components Are Working
Verify that the Oracle Identity Management and middle-tier components are working.
Test Oracle Identity Management components.
Test Oracle Delegated Administration Services by accessing its URL, http://virtual_host_name:port/oiddas, and try to perform some operations. Example: http://infra.mydomain.com:7777/oiddas.
Test OracleAS Single Sign-On by accessing its URL, http://virtual_host_name:port/pls/orasso, and try to perform some operations. Example: http://infra.mydomain.com:7777/pls/orasso.
Test middle-tier components. For example, to test OracleAS Portal, access its URL, http://portalhost.mydomain.com:7777/pls/portal, and try to perform some operations.
Step 9 Decommission the Oracle Homes That Are No Longer Used
At the end of the transformation procedure, you no longer need these Oracle homes:
Oracle home for the source OracleAS Metadata Repository database
If you are not using this Oracle home for other purposes (that is, if you were using this Oracle home only for the OracleAS Metadata Repository database), then you can deinstall it. See the "Removing Oracle Software" chapter in the Oracle Database Installation Guide for details.
Oracle home for the source Oracle Identity Management
You can deinstall it by following the procedures in the "Deinstallation and Reinstallation" appendix in the Oracle Application Server Installation Guide.
This section describes how to transform a non-highly available configuration to an OracleAS Cold Failover Cluster configuration on Windows. If your platform is UNIX, see Section 21.3, "Transformation to OracleAS Cold Failover Cluster (Identity Management) on UNIX".
In the non-highly available, or "source", configuration, the OracleAS Metadata Repository and Oracle Identity Management run from different Oracle homes. They can run on the same computer, or on different computers. Figure 21-7 shows them on the same computer, but the procedure described in this section can be used for either case.
To transform this to an OracleAS Cold Failover Cluster configuration, you make the following transformations:
Install Oracle Fail Safe on the local storage of each node in the hardware cluster.
Install the a new database Oracle home on the local storage of each node in the hardware cluster.
Transform the OracleAS Metadata Repository to a cold failover cluster database.
Install Oracle Identity Management on the shared storage.
Configure Oracle Identity Management for cold failover.
Configure Oracle Identity Management and middle tiers to use the cluster's virtual hostname.
Figure 21-7 shows the steps in the transformation.
Figure 21-7 Transforming to OracleAS Cold Failover Cluster Configuration on Windows

Transformation steps, at a high level, are:
Step 1: Install Oracle Fail Safe and Create a Failover Group on the Nodes in the Hardware Cluster
Step 2: Convert the Single-Instance Database to a Cold Failover Cluster Database
Step 3: Set up the New Database for High Availability
Step 4: Change the Source Oracle Identity Management to Use the New OracleAS Metadata Repository
Step 5: Install a New Oracle Identity Management Instance on the Shared Storage
Step 6: Configure Oracle Identity Management to Use the Virtual Hostname
Step 7: Make the Oracle Identity Management Highly Available
Step 8: Configure the Middle Tiers to Use the New Oracle Identity Management
Step 9: Deregister the Source Oracle Identity Management
Step 10: Start the OracleAS Metadata Repository, Oracle Identity Management, and Middle Tiers
Step 11: Verify That All the Components Are Working
Step 12: Decommission the Oracle Homes That Are No Longer Used
The following steps use the following names to refer to the different nodes (the names match the ones used in Figure 21-7):
Node 1 and node 2 are nodes in the source configuration.
Cluster node 1 and cluster node 2 are nodes in the hardware cluster. At any given time, only one of these nodes has access to the shared storage, which will contain the Oracle Identity Management home and the data files for the OracleAS Metadata Repository database.
Step 1 Install Oracle Fail Safe and Create a Failover Group on the Nodes in the Hardware Cluster
After this step, your environment should look like the following (Figure 21-8):
Figure 21-8 Step 1: Install Oracle Fail Safe and Create a Failover Group
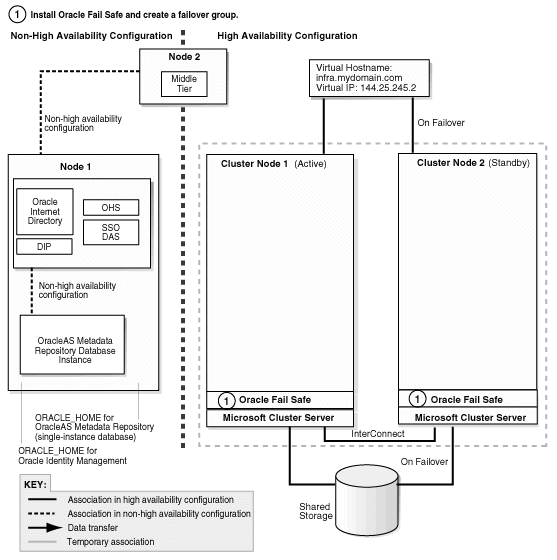
Verify that Microsoft Cluster Server (MSCS) is installed on cluster node 1 and cluster node 2. You can do this by launching the Cluster Administrator from the Start menu:
Windows 2000: Start > Programs > Administrative Tools > Cluster Administrator
Windows 2003: Start > Administrative Tools > Cluster Administrator
Get the name of the cluster by invoking the Cluster Administrator on either cluster node 1 or cluster node 2. The cluster name appears at the top of the left frame.
Install Oracle Fail Safe on both cluster nodes, and verify the cluster.
You install it on the local storage (not the shared storage) of each node. For instructions on installing Oracle Fail Safe, see the following guide:
| Item | Name |
|---|---|
| Book | Oracle Application Server Installation Guide for Microsoft Windows
This guide is available on Disk 1 of the Oracle Application Server distribution. |
| Chapter | 11, "Installing in High Availability Environments: OracleAS Cold Failover Cluster" |
| Sections | 11.2.5, "Determine a Domain User to Administer Oracle Fail Safe"
11.2.6, "Install Oracle Fail Safe on the Local Storage of Each Node" (this section includes steps on verifying the cluster) |
Create a failover group in Oracle Fail Safe. For steps, see the following guide:
| Item | Name |
|---|---|
| Book | Oracle Application Server Installation Guide for Microsoft Windows
This guide is available on Disk 1 of the Oracle Application Server distribution. |
| Chapter | 11, "Installing in High Availability Environments: OracleAS Cold Failover Cluster" |
| Section | 11.2.7, "Create a Group in Oracle Fail Safe" |
Step 2 Convert the Single-Instance Database to a Cold Failover Cluster Database
After this step, your environment should be functional and look like the following (Figure 21-9):
Figure 21-9 Step 2: Convert the Single-Instance Database to a Cold Failover Cluster Database
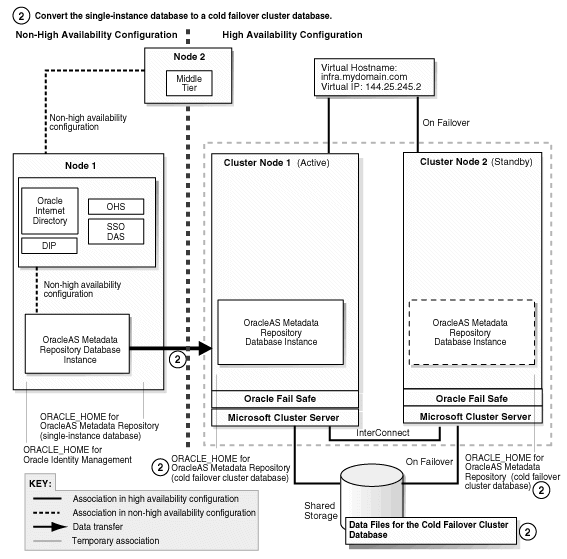
Run the Oracle database installer on cluster node 1 to install only the Oracle database software on the local storage (do not create a database). The database version that you install must be the same version as the source OracleAS Metadata Repository database.
The database Oracle home created in this step will be referred to as CFC_MR_ORACLE_HOME in subsequent steps.
If you are using Oracle Database 10g:
Follow the steps in the guide listed below, but note this difference: In the Select Database Configuration screen, do not create a starter database.
| Item | Name |
|---|---|
| Book | Oracle Database 10g Quick Installation Guide for your platform
This book is available in the Oracle Database 10g documentation set. |
| Section | "Install Oracle Database 10g" |
Apply the 10.1.0.4 patch set to the database software that you just installed by following the instructions in the README that comes with the patch set. Note: Perform the steps in the section "Required Post-Installation Tasks" in the README, up to, but not including, the section "Upgrade the Database". You have not created the database yet. You will do this later.
If you are using Oracle9i Database:
Install the Oracle9i Release 2 (9.2.0.1) software. In the installer, select "Database Configuration: Software Only" because you are not creating the database yet.
Apply the Oracle9i Release 2 (9.2.0.6) patch set. Perform these steps:
In the README file for the patch set, perform the steps in the section "Before You Install This Patch Set" if they apply to you.
Install the 9.2.0.6 patch set.
Perform the steps in the section "Required Post-Installation Tasks" in the README, up to, but not including, the section "Upgrade the Database". You have not created the database yet. You will do this later.
Install and patch the database Oracle home on the local storage of cluster node 2 by repeating step 1 for cluster node 2.
|
Downtime 1 Starts: The next step starts the first downtime. |
Stop the middle tier and the Oracle Identity Management instances so that they are not modifying the OracleAS Metadata Repository database while you are backing it up.
To stop the middle tier:
> MT_ORACLE_HOME\bin\emctl stop iasconsole
> MT_ORACLE_HOME\opmn\bin\opmnctl stopall
To stop the Oracle Identity Management:
> SRC_IM_ORACLE_HOME\bin\emctl stop iasconsole
> SRC_IM_ORACLE_HOME\opmn\bin\opmnctl stopall
Back up the source Oracle Identity Management and middle tiers. You can use any backup tools. For example, you can use the OracleAS Backup and Recovery Tool, described in the Oracle Application Server Administrator's Guide.
Perform a cold backup of the OracleAS Metadata Repository datafiles and the oraInventory directory.
Back up the source OracleAS Metadata Repository by using DBCA to create a database template from the OracleAS Metadata Repository database.
On node 1, start up DBCA from the Start menu:
Start > Programs > Oracle - SRC_MR_ORACLE_HOME_NAME > Database Administration > Database Configuration Assistant
Select Manage Templates.
Select Create a Database Template and select From an existing database (structure as well as data).
Select the name of your database instance.
Enter a name for the template.
DBCA generates two files, template_name.dbc and template_name.dfb, in the SRC_MR_ORACLE_HOME\assistants\dbca\templates directory.
Add a user-defined variable called TARGET_DB_LOCATION:
On the page where you entered the name of the template, click the File Location Variable button.
In the File Location Variable dialog, enter TARGET_DB_LOCATION in the first non-grey row of the Variable column.
Enter the fully qualified directory path on the shared disk where you want the database data files on the target system to reside. For example, if S: is the shared disk, you can enter a directory path such as S:\oracle.
Select Convert the file locations to use OFA structure.
Copy the template_name.dbc and template_name.dfb files generated in the previous step to the CFC_MR_ORACLE_HOME\assistants\dbca\templates directory on the local storage of cluster node 1.
On cluster node 1, edit the template_name.dbc file as follows:
Replace all instances of {ORACLE_BASE} with {TARGET_DB_LOCATION}. For example, this:
{ORACLE_BASE}\admin
would be changed to:
{TARGET_DB_LOCATION}\admin
For the SPfile line, replace {ORACLE_HOME} with {TARGET_DB_LOCATION}. For example, change it from this:
<SPfile useSPFile="true">{ORACLE_HOME}\database\spfile{SID}.ora</SPfile>
To this:
<SPfile useSPFile="true">{TARGET_DB_LOCATION}\database\spfile{SID}.ora</SPfile>
Do not replace other occurrences of {ORACLE_HOME}.
Create a database listener.
On cluster node 1, start up Network configuration assistant. You can do this from the Start menu:
Start > Programs > Oracle - CFC_MR_ORACLE_HOME_NAME > Network Administration > Oracle Net Configuration Assistant
Select Listener Configuration and follow the prompts accepting all defaults with the exception that if you would like to use a port number for the listener other than port 1521 you may choose to do so.
Exit Network configuration assistant.
Restore the database on the target system.
Verify that the shared storage is mounted on cluster node 1.
On cluster node 1, run DBCA to create a database using the templates you created. You can start up DBCA from the Start menu:
Start > Programs > Oracle - CFC_MR_ORACLE_HOME_NAME > Database Administration > Database Configuration Assistant
Select Create Database.
Select the template name that you copied to the local storage and edited.
When prompted for the global database name and SID, enter the same names as your source OracleAS Metadata Repository.
Accept the default values for the remaining screens. Be sure to verify the paths on the following screens:
- On screen 11, Initialization Parameters, verify that the paths to the control files point to correct locations on the shared disk. Note: If you see an extra line in the control file section, update the extra line so that its path also points to the shared disk.
- On screen 12, Database Storage, verify that the paths to the data files point to correct locations on the shared disk.
After DBCA creates the database, it displays a summary of information about the database including the fully qualified path of the server parameter file (spfile). Make a note of this fully qualified path. You will need this path in a later step (step h).
On cluster node 1, verify that a pfile named init<SID>.ora exists in the CFC_MR_ORACLE_HOME\database directory (<SID> refers to the SID of the database you restored in step 10), and that the file contains a line that looks like:
spfile=<fullpath_to_spfile>
where <fullpath_to_spfile> is the fully qualified path for the spfile that you noted in the previous step.
Unlock the accounts in the new OracleAS Metadata Repository without changing the passwords. These accounts are listed in SRC_IM_ORACLE_HOME\config\unlock.sql, where SRC_IM_ORACLE_HOME is the home directory for the source Oracle Identity Management.
To unlock the accounts without changing the passwords, perform these steps:
Log into the database as the SYS user.
> sqlplus SYS/password as sysdba
Run the following commands for each user listed in the SRC_IM_ORACLE_HOME\config\unlock.sql file:
Determine the password for the user.
SQL> select password from dba_users where username = 'username';
Replace username with the name of the account.
Run the "alter user" command.
SQL> alter user username identified by values 'password' account unlock;
Replace username with the name of the account.
Replace password with the password determined from the previous step.
|
Note: Do not change the passwords for these accounts. |
You can now perform the remaining steps in the "Required Post-Installation Tasks" section of the README for the database patch set. Specifically, perform the steps in the "Upgrade the Database" section.
Copy CFC_MR_ORACLE_HOME\database\init<SID>.ora to TARGET_DB_LOCATION\database\init<SID>.ora.
The pfile, TARGET_DB_LOCATION\database\init<SID>.ora, is needed by Oracle Fail Safe.
Verify the standalone database resource using Oracle Fail Safe Manager by providing the path to the TARGET_DB_LOCATION\database\init<SID>.ora file.
Verify that the PATH environment variable contains CFC_MR_ORACLE_HOME\bin.
Start Oracle Fail Safe Manager.
On the left side, expand the following items (Figure 21-10 shows a sample screen shot):
Cluster_Name > Nodes > Cluster_node_1 > Standalone Resources > SID
Figure 21-10 Oracle Fail Safe Manager: Right-click the SID and Select "Verify Standalone Resources"
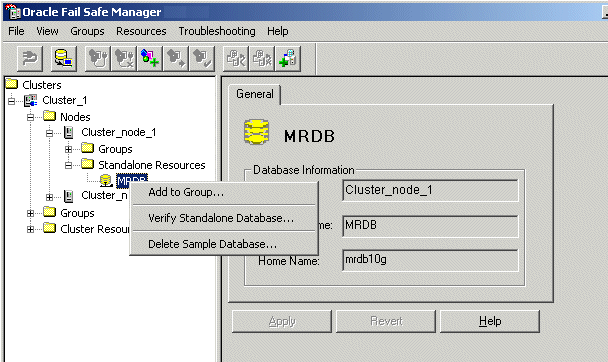
Right-click the database SID, and select Verify Standalone Database. This displays the Verify Standalone Database dialog.
Figure 21-11 Oracle Fail Safe Manager: Verify Standalone Database dialog

In the Verify Standalone Database dialog, enter the database name (example: MRDB) and the full path to the parameter file (example: S:\oracle\database\initMRDB.ora). Ensure that Use operating system authentication is selected. Then click OK.
Step 3 Set up the New Database for High Availability
Figure 21-12 shows the environment at the completion of this step.
Figure 21-12 Step 3: Set up the New Database for High Availability
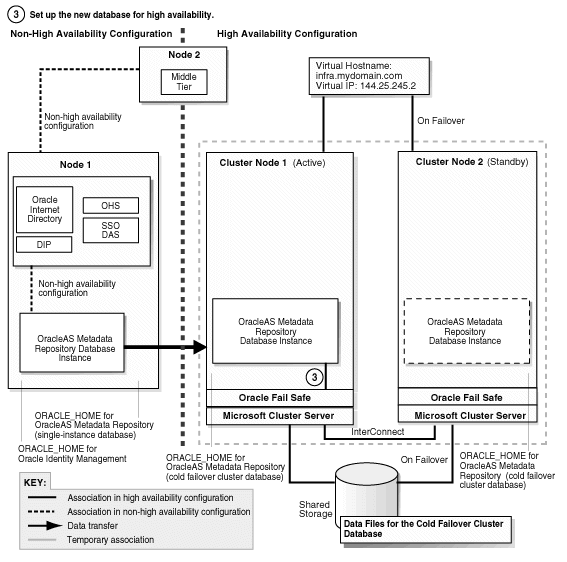
Add the OracleAS Metadata Repository to the failover group that you created in Oracle Fail Safe. For steps, see the following guide:
| Item | Name |
|---|---|
| Book | Oracle Application Server Installation Guide for Microsoft Windows
This guide is available on Disk 1 of the Oracle Application Server distribution. |
| Chapter | 11, "Installing in High Availability Environments: OracleAS Cold Failover Cluster" |
| Section | 11.12.2, "Make OracleAS Metadata Repository Highly Available" |
Add the shared storage as a dependency for the listener. For steps, see the following guide:
| Item | Name |
|---|---|
| Book | Oracle Application Server Installation Guide for Microsoft Windows
This guide is available on Disk 1 of the Oracle Application Server distribution. |
| Chapter | 11, "Installing in High Availability Environments: OracleAS Cold Failover Cluster" |
| Section | 11.12.3, "Add the Shared Disk as a Dependency for the Listener" |
Disable the old listener service.
Display the Services dialog.
Select the old listener. The name of the old listener is Oracle<CFC_MR_OracleHomeName>TNSListener.
Stop the old listener, if it is running.
Right-click the old listener and select Properties.
Set its startup type to Disabled, and click OK.
There should be another listener service with the name Oracle<CFC_MR_OracleHomeName>TNSListenerFsl<virtualHostName>. This listener was created when you added the OracleAS Metadata Repository to the failover group (in step 1). This is the listener you will be using.
Step 4 Change the Source Oracle Identity Management to Use the New OracleAS Metadata Repository
In this step, you update the source Oracle Identity Management so that it uses the OracleAS Metadata Repository that you just installed in the hardware cluster. After performing this step, your environment should look like the following (Figure 21-13):
Figure 21-13 Step 4: Change the Source Identity Management to Use the New OracleAS Metadata Repository
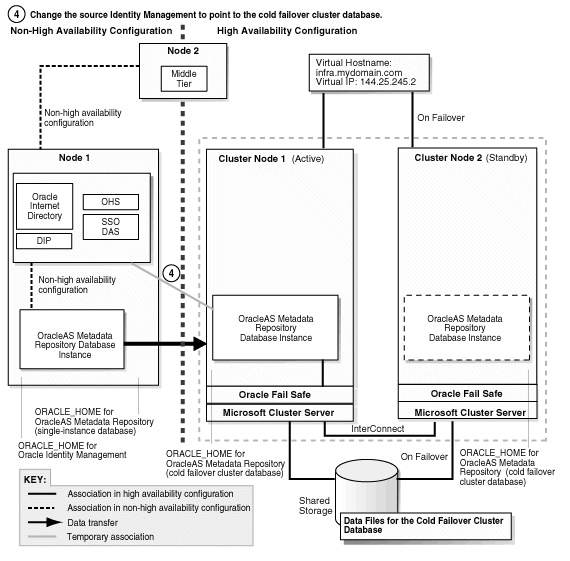
Shut down Oracle Identity Management on node 1.
> SRC_IM_ORACLE_HOME\opmn\bin\opmnctl stopall
In the SRC_IM_ORACLE_HOME\network\admin\tnsnames.ora file, update the HOST parameter in the OracleAS Metadata Repository connect string to use the fully qualified virtual hostname.
Update the OracleAS Metadata Repository connect string in Oracle Internet Directory.
Start the OPMN daemon (note that you run "opmnctl start", not "opmnctl startall").
> SRC_IM_ORACLE_HOME\opmn\bin\opmnctl start
Start Oracle Internet Directory.
> SRC_IM_ORACLE_HOME\opmn\bin\opmnctl startproc ias-component=OID
Start Oracle Directory Manager from the Start menu:
Start > Programs > Oracle - IM_OracleHomeName > Integrated Management Tools > Oracle Directory Manager
Log in as cn=orcladmin.
Expand the following: Entry Management > cn=OracleContext.
Select cn=dbName on the left side.
In the Properties tab on the right side, update the HOST parameter in orclnetdescstring with the fully qualified virtual hostname.
Verify that the following items have the same connect string:
orclnetdescstring value in Oracle Internet Directory (see previous step)
the tnsnames.ora file in SRC_IM_ORACLE_HOME\network\admin
the tnsnames.ora file in CFC_MR_ORACLE_HOME\network\admin
Stop and restart Oracle Identity Management and middle tier.
> MT_ORACLE_HOME\opmn\bin\opmnctl stopall
> SRC_IM_ORACLE_HOME\opmn\bin\opmnctl stopall
> SRC_IM_ORACLE_HOME\opmn\bin\opmnctl startall
> MT_ORACLE_HOME\opmn\bin\opmnctl startall
Test OracleAS Infrastructure and middle-tier components. They should be working normally.
|
Downtime 1 Ends: This ends the first downtime. |
Step 5 Install a New Oracle Identity Management Instance on the Shared Storage
Figure 21-14 shows the environment at the completion of this step.
Figure 21-14 Step 5: Install a New Oracle Identity Management Instance on the Shared Storage

Create an OracleAS Cluster (Identity Management) on the source Oracle Identity Management instance.
> SRC_IM_ORACLE_HOME\dcm\bin\dcmctl createcluster -cluster cluster_name
You create this OracleAS Cluster (Identity Management) as a means to copy configuration information from the source Oracle Identity Management to the new Oracle Identity Management.
Make the Oracle Identity Management instance the first member of the OracleAS Cluster (Identity Management).
> SRC_IM_ORACLE_HOME\dcm\bin\dcmctl joincluster -cluster cluster_name
Make sure that the shared storage on which you will be installing Oracle Identity Management is mounted on cluster node 1.
On the shared storage, create a staticports.ini file to specify the ports that you are using on node 1 for Oracle Identity Management. You will specify this file in the installer.
You only need to specify the ports for Oracle Internet Directory in this file. The port numbers must match those for Oracle Internet Directory on node 1. You can copy the lines from the SRC_IM_ORACLE_HOME\install\portlist.ini file in the source Oracle Identity Management. For example:
Oracle Internet Directory port = 389
Oracle Internet Directory (SSL) port = 636
On cluster node 1, run the Oracle Application Server installer to install an Oracle Identity Management instance on the shared storage, and during installation, set this instance to belong to the OracleAS Cluster (Identity Management) that you created in the previous step. Essentially, you are installing a second instance in an OracleAS Cluster (Identity Management).
Important details:
Install the Oracle Identity Management instance on the shared storage.
In the Select Configuration Options screen, select Oracle Internet Directory, OracleAS Single Sign-On, Oracle Delegated Administration Services, Oracle Directory Integration and Provisioning, and High Availability and Replication.
In the Specify Port Configuration Options screen, select Manual and enter the fullpath to the staticports.ini file that you created in step 4.
In the Specify Repository screen, connect to the database on cluster node 1 using the virtual hostname as the hostname. Connect as the system user if you did not create a password file in Oracle Fail Safe (see step 1). If you created a password file in Oracle Fail Safe, you can connect as the sys user.
In the Specify Existing Oracle Application Server Cluster Name screen, enter the name of the cluster that you created in step 1.
In the Specify LDAP Virtual Host and Ports screen, specify node 1's hostname and the Oracle Internet Directory port.
In the Specify HTTP Listen Port, Load Balancer Host and Port screen, enter the virtual hostname in the HTTP Load Balancer: Hostname field. Enter the HTTP port in HTTP Load Balancer: Port field.
On cluster node 1, remove the new Oracle Identity Management instance from the cluster and farm. You need to do this so that you can install this instance from cluster node 2.
> CFC_IM_ORACLE_HOME\dcm\bin\dcmctl leaveCluster
> CFC_IM_ORACLE_HOME\dcm\bin\dcmctl leaveFarm
Reboot cluster node 1. The resources defined in the failover group fail over to cluster node 2.
Delete the Oracle home for the Oracle Identity Management instance that you just installed on the shared storage. You need to do this because you need to perform the same installation, but this time from cluster node 2 (next step).
From cluster node 2, install the Oracle Identity Management instance in the same Oracle home directory on the shared storage. Follow the same instructions as for cluster node 1.
On cluster node 2, remove the new Oracle Identity Management instance from the cluster.
> CFC_IM_ORACLE_HOME\dcm\bin\dcmctl leaveCluster
Change the source Oracle Identity Management instance (on node 1) to its original configuration.
> SRC_IM_ORACLE_HOME\dcm\bin\dcmctl leaveCluster
> SRC_IM_ORACLE_HOME\dcm\bin\dcmctl removeCluster -cluster cluster_name
cluster_name is the name of the cluster you created in step 1.
(optional) You can take a backup of your environment at this time, if desired.
Stop all processes.
To stop the middle tier:
> MT_ORACLE_HOME\opmn\bin\opmnctl stopall
To stop the source Oracle Identity Management instance:
> SRC_IM_ORACLE_HOME\opmn\bin\opmnctl stopall
To stop the new Oracle Identity Management instance:
> CFC_IM_ORACLE_HOME\opmn\bin\opmnctl stopall
To stop the OracleAS Metadata Repository database:
> CFC_MR_ORACLE_HOME\bin\sqlplus /nolog
SQL> connect / as sysdba
SQL> shutdown
To stop the listener:
> CFC_MR_ORACLE_HOME\bin\lsnrctl stop
Back up the Oracle Identity Management instance that you just installed.
Back up the OracleAS Metadata Repository data files.
Start up all the components (listener, OracleAS Metadata Repository, Oracle Identity Management, middle tier).
Step 6 Configure Oracle Identity Management to Use the Virtual Hostname
After installation, configure the Oracle Identity Management components for OracleAS Cold Failover Cluster. After this step, your environment should look like this (Figure 21-15):
Figure 21-15 Step 6: Configure Oracle Identity Management to Use the Virtual Hostname
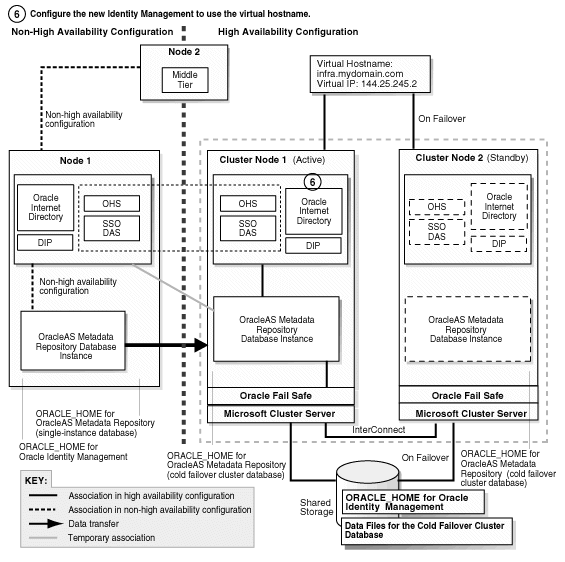
|
Downtime 2 Starts: The next step starts the second downtime. |
Check that cluster node 1 is the active node and that the shared storage is mounted on that node.
On cluster node 1, configure Oracle Internet Directory in the new Oracle Identity Management instance to use the virtual hostname.
Stop all Oracle Identity Management components.
> CFC_IM_ORACLE_HOME\bin\emctl stop iasconsole
> CFC_IM_ORACLE_HOME\opmn\bin\opmnctl stopall
Make these edits in the CFC_IM_ORACLE_HOME\opmn\conf\opmn.xml file.
In these categories:
category id="oidctl-parameters"
and
category id="oidmon-parameters"
add the following line (including the < and > characters):
<data id="host" value="fully_qualified_virtual_hostname"/>
Replace fully_qualified_virtual_hostname with your fully qualified virtual hostname.
On cluster node 1, edit the CFC_IM_ORACLE_HOME\config\ias.properties file as follows:
Edit OIDhost to use the virtual hostname.
Update the DIRECTORY_SERVERS parameter in the CFC_IM_ORACLE_HOME\ldap\admin\ldap.ora file to use the virtual hostname.
On cluster node 1, set the ORACLE_HOME environment variable to the fully qualified path for CFC_IM_ORACLE_HOME, then run the chgiphost.bat script.
> set ORACLE_HOME=CFC_IM_ORACLE_HOME
> cd CFC_IM_ORACLE_HOME\chgip\scripts
> cmd /c chgiphost.bat -idm -noconfig
(You need to enter the "cmd /c" in the last command so that the DOS window in which you enter the command does not go away when the command completes.)
When prompted, provide the following information:
Table 21-5 Prompts from chgiphost
| Prompt from chgiphost | Response |
|---|---|
|
|
Enter the fully qualified virtual hostname. |
|
|
Enter the fully qualified cluster node 2's hostname. |
|
|
Enter the IP associated with the virtual hostname. |
|
|
Enter the IP for cluster node 2. |
|
|
Enter the password for the |
Configure OracleAS Single Sign-On to use the virtual hostname.
Start Oracle Internet Directory (note that the first command is "opmnctl start", not "opmnctl startall").
> CFC_IM_ORACLE_HOME\opmn\bin\opmnctl start
> CFC_IM_ORACLE_HOME\opmn\bin\opmnctl startproc ias-component=OID
On cluster node 1, start Oracle Directory Manager from the Start menu:
Start > Programs > Oracle - IM_OracleHomeName > Integrated Management Tools > Oracle Directory Manager
Connect using the virtual hostname. Log in as cn=orcladmin.
Get the password for the orasso schema.
In Oracle Directory Manager, expand Entry Management > cn=OracleContext > cn=Products > cn=IAS > cn=IAS Infrastructure Databases > orclReferenceName=DBServiceName > orclResourceName=ORASSO.
Note the password in the orclpasswordattribute field.
On cluster node 1, log in to the OracleAS Metadata Repository database as ORASSO and run the ssooconf.sql script.
> cd CFC_IM_ORACLE_HOME\sso\admin\plsql\sso
> CFC_IM_ORACLE_HOME\bin\sqlplus orasso/password@mrdbInstanceName
SQL> @ssooconf.sql
For password, enter the password for the orasso schema.
For mrdbInstanceName, enter the instance name of the database as defined in the CFC_IM_ORACLE_HOME\network\admin\tnsnames.ora file
ssooconf.sql prompts you for the following information:
Table 21-6 ssooconf.sql Prompts
| Prompt from ssooconf.sql | Response |
|---|---|
|
|
Enter the virtual hostname and press Return. |
|
|
Enter the Oracle Internet Directory port number and press Return. You can enter an SSL port or a non-SSL port. In the last prompt (see below), you indicate whether this port is an SSL port or a non-SSL port. |
|
|
Press Return so that the password is not changed. |
|
|
Enter n if the port you entered above is not an SSL port. Enter y if the port you entered above is an SSL port. |
On cluster node 1, run:
> CFC_IM_ORACLE_HOME\dcm\bin\dcmctl resetHostInformation
Update the Oracle Directory Integration and Provisioning registration to use the virtual hostname.
Run one of the following commands to update Oracle Directory Integration and Provisioning:
Non-SSL:
> CFC_IM_ORACLE_HOME\bin\odisrvreg -D cn=orcladmin -w adminPasswd
-lhost FQvirtualHostname -p oidPort -h FQvirtualHostname
SSL:
> CFC_IM_ORACLE_HOME\bin\odisrvreg -D cn=orcladmin -w adminPasswd
 -lhost FQvirtualHostname -p oidSSLPort -h FQvirtualHostname
 -U sslMode -W walletLocation -P walletPassword
Start the Oracle Directory Integration and Provisioning server.
> oidctl connect=connectString server=odisrv inst=1 host=FQvirtualHostname
    flags="port=port host=FQvirtualHostname" start
Replace connectString with the connect string to the Oracle Internet Directory database.
Replace FQvirtualHostname with the fully qualified virtual hostname for the OracleAS Cold Failover Cluster.
Replace port with the Oracle Internet Directory port.
Update the OracleAS Metadata Repository.
Check that the ORACLE_HOME environment variable is set correctly.
> echo %ORACLE_HOME%
Non-SSL:
> CFC_IM_ORACLE_HOME\sso\bin\ssocfg.bat http FQvirtualHostname port
SSL:
> CFC_IM_ORACLE_HOME\sso\bin\ssocfg.bat https FQvirtualHostname port
Replace FQvirtualHostname with the virtual hostname (fully qualified).
Replace port with either the SSL or the non-SSL port used by Oracle HTTP Server.
Skip this step if you are transforming to a distributed OracleAS Cold Failover Cluster (Identity Management) topology.
Change the URL for OracleAS Single Sign-On and Oracle Delegated Administration Services.
Start Oracle Directory Manager from the Start menu:
Start > Programs > Oracle - IM_OracleHomeName > Integrated Management Tools > Oracle Directory Manager
Connect using the virtual hostname. Log in as cn=orcladmin.
In Oracle Directory Manager, expand Entry Management > cn=OracleContext > cn=Products > cn=DAS > cn=OperationURLs.
Update the value of the orcldasurlbase attribute to the virtual hostname.
Skip this step if you are transforming to a distributed OracleAS Cold Failover Cluster (Identity Management) topology.
Update mod_osso registration by running the following command (all on one line).
> CFC_IM_ORACLE_HOME\sso\bin\ssoreg.bat
   -oracle_home_path im_oracle_home
   -site_name virtual_hostname:http_port
   -config_mod_osso TRUE
   -mod_osso_url http://virtual_hostname:port
   -u system
Replace im_oracle_home with the full path of the Oracle Identity Management Oracle home.
Replace virtual_hostname with the fully qualified virtual hostname.
Replace port with the Oracle HTTP Server port. Note that if you are using port 80, then you must not specify the port number because port 80 is the default.
Restart Oracle Identity Management components.
> CFC_IM_ORACLE_HOME\opmn\bin\opmnctl stopall
> CFC_IM_ORACLE_HOME\opmn\bin\opmnctl startall
Step 7 Make the Oracle Identity Management Highly Available
Figure 21-16 shows the environment at the completion of this step.
Figure 21-16 Step 7: Make the Oracle Identity Management Highly Available
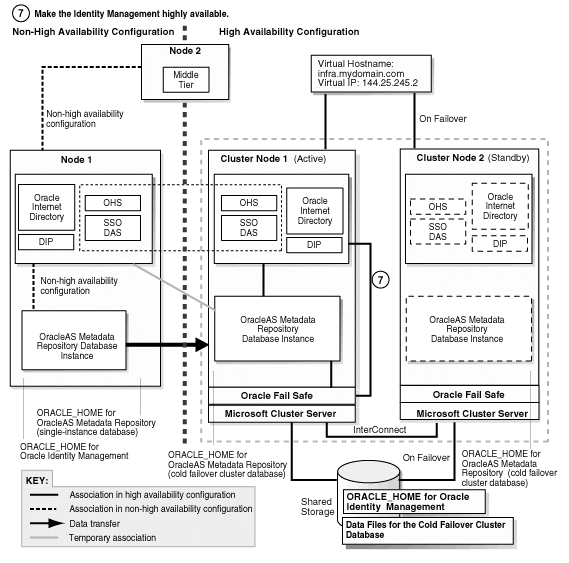
Add OPMN to the failover group that you created in Oracle Fail Safe.
On cluster node 1, start Oracle Fail Safe Manager from the Start menu:
Start > Programs > Oracle - OracleHomeName > Oracle Fail Safe Manager
Right-click the OracleAS group and select Add Resource to Group.
In Resource, Step 1, select Generic Service and click Next.
In Generic Service Identity, Step 2, select the Oracle<OracleHomeName>ProcessManager service from Display Name and click Next.
In Generic Service Account, Step 3, click Next.
In Generic Service Disks, Step 4, click Next.
In Generic Service Dependencies, Step 5, click Next.
In Generic Service Registry, Step 6, click Next.
In Finish Adding the Service to the Group, verify the information and click OK.
Add the shared storage as a dependency for OPMN. For steps, see the following guide:
| Item | Name |
|---|---|
| Book | Oracle Application Server Installation Guide for Microsoft Windows
This guide is available on Disk 1 of the Oracle Application Server distribution. |
| Chapter | 11, "Installing in High Availability Environments: OracleAS Cold Failover Cluster" |
| Section | 11.12.5, "Add the Shared Disk as a Dependency for OPMN" |
Add Application Server Control Console to the failover group.
On cluster node 1, start Oracle Fail Safe Manager from the Start menu:
Start > Programs > Oracle - OracleHomeName > Oracle Fail Safe Manager
Right-click the OracleAS group and select Add Resource to Group.
In Resource, Step 1, select Generic Service and click Next.
In Generic Service Identity, Step 2, select Oracle<OracleHomeName>ASControl from Display Name and click Next.
In Generic Service Account, Step 3, click Next.
In Generic Service Disks, Step 4, click Next.
In Generic Service Dependencies, Step 5, move the Oracle<OracleHomeName>ProcessManager service to the Resource Dependencies column. Click Next.
In Generic Service Registry, Step 6, click Next.
In Finish Adding the Service to the Group, verify the information and click OK.
Step 8 Configure the Middle Tiers to Use the New Oracle Identity Management
Figure 21-17 shows the environment at the completion of this step.
Figure 21-17 Step 8: Configure the Middle Tiers to Use the New Oracle Identity Management

Stop all the middle-tier instances.
> MT_ORACLE_HOME\bin\emctl stop iasconsole
> MT_ORACLE_HOME\opmn\bin\opmnctl stopall
In each middle-tier instance, in the MT_ORACLE_HOME\config\ias.properties file, update the OIDhost parameter to use the fully qualified virtual hostname.
In each middle-tier instance, in the MT_ORACLE_HOME\ldap\admin\ldap.ora file, update the DIRECTORY_SERVERS parameter to use the fully qualified virtual hostname.
Start OPMN and Application Server Control Console on all the middle-tier instances.
Note that the first command is "opmnctl start", not "opmnctl startall", because at this time you want to start up only OPMN and the Application Server Control Console. The middle tiers cannot be started yet.
> MT_ORACLE_HOME\opmn\bin\opmnctl start
> MT_ORACLE_HOME\bin\emctl start iasconsole
For each middle tier:
Use the Application Server Control Console and navigate to the home page for the middle tier.
Click the Infrastructure link. Note that although you may see the virtual hostname on the page, you still have to perform this step. Application Server Control Console displays the virtual hostname only because it read it from the updated ias.properties file.
In the Identity Management section, click Change.
Follow the wizard for entering a new hostname. You enter the virtual hostname here.
When the wizard completes, it asks you to restart the components. You can do this by running the following commands:
> MT_ORACLE_HOME\opmn\bin\opmnctl stopall
> MT_ORACLE_HOME\opmn\bin\opmnctl startall
|
Downtime 2 Ends: This ends the second downtime. |
Step 9 Deregister the Source Oracle Identity Management
In this step, you deregister the source Oracle Identity Management from the OracleAS Metadata Repository. Figure 21-18 shows the environment at the end of this step.
Figure 21-18 Step 9: Deregister the Source Identity Management
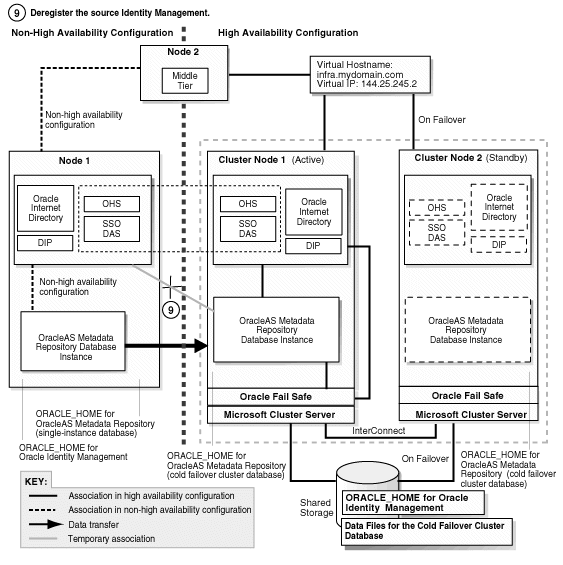
If you are running Oracle Directory Integration and Provisioning, you need to stop it:
> ORACLE_HOME\bin\oidctl connect=dbConnect flags="host=OIDhost port=OIDport"
     server=odisrv instance=1 stop
Make the following edits to the SRC_IM_ORACLE_HOME\deconfig\DeconfigWrapper.properties file, where SRC_IM_ORACLE_HOME refers to the source Oracle Identity Management home on node 1.
Comment out the line that begins with "SSO=". For example, the line might look like this:
SSO=C:\OraHome_1\jdk\bin\java -jar C:\OraHome_1\sso\lib\ossoca.jar
        deinstall C:\OraHome_1 "%OID_USER%" %OID_PASSWORD%
Comment out the line by adding a # character at the beginning of the line:
#SSO=C:\OraHome_1\jdk\bin\java -jar C:\OraHome_1\sso\lib\ossoca.jar
        deinstall C:\OraHome_1 "%OID_USER%" %OID_PASSWORD%
Comment out the line that begins with "MOD_OSSO=". For example, the line might look like this:
MOD_OSSO=C:\OraHome_1\jdk\bin\java -jar
 C:\OraHome_1\jlib\infratool.jar de -f
 C:\OraHome_1\deconfig\deconfig_modosso.properties -o
 C:\OraHome_1 -u "%OID_USER%" -obf %OID_PASSWORD%
Comment out the line by adding a # character at the beginning of the line:
#MOD_OSSO=C:\OraHome_1\jdk\bin\java -jar
 C:\OraHome_1\jlib\infratool.jar de -f
 C:\OraHome_1\deconfig\deconfig_modosso.properties -o
 C:\OraHome_1 -u "%OID_USER%" -obf %OID_PASSWORD%
On node 1, run deconfig.pl to deregister the source Oracle Identity Management from the OracleAS Metadata Repository.
> cd SRC_IM_ORACLE_HOME\bin
> SRC_IM_ORACLE_HOME\perl\5.6.1\bin\MSWin-x86\perl.exe deconfig.pl -u oidUser
 -w passwd -dbp sysPasswd [-r realm]
The -u option specifies the name of the Oracle Internet Directory user. This user must have privileges for deinstalling the Oracle Identity Management components. To run as the Oracle Internet Directory superuser, specify the user as cn=orcladmin.
The -w option specifies the password of the user.
The -dbp option specifies the password of the SYS user in the OracleAS Metadata Repository database.
The -r option is required only if your Oracle Internet Directory contains multiple realms. Use it to specify the realm in Oracle Internet Directory against which the user should be validated.
See the "Deinstallation and Reinstallation" appendix in the Oracle Application Server Installation Guide for details about deconfig.pl.
Step 10 Start the OracleAS Metadata Repository, Oracle Identity Management, and Middle Tiers
Start the OracleAS Metadata Repository and the Oracle Identity Management on cluster node 1, and start also the middle tiers. The components and applications should be functioning properly. To test failover, fail cluster node 1. The processes should fail over to cluster node 2.
Step 11 Verify That All the Components Are Working
Verify that the Oracle Identity Management and middle-tier components are working.
Test Oracle Identity Management components.
Test Oracle Delegated Administration Services by accessing its URL, http://virtual_host_name:port/oiddas, and try to perform some operations. Example: http://infra.mydomain.com/oiddas.
Test OracleAS Single Sign-On by accessing its URL, http://virtual_host_name:port/pls/orasso, and try to perform some operations. Example: http://infra.mydomain.com/pls/orasso.
Test middle-tier components. For example, to test OracleAS Portal, access its URL, http://portalhost.mydomain.com/pls/portal, and try to perform some operations.
Step 12 Decommission the Oracle Homes That Are No Longer Used
At the end of the transformation procedure, you no longer need these Oracle homes:
Oracle home for the source OracleAS Metadata Repository database
If you are not using this Oracle home for other purposes (that is, if you were using this Oracle home only for the OracleAS Metadata Repository database), then you can deinstall it. See the "Removing Oracle Software" chapter in the Oracle Database Installation Guide for details.
Oracle home for the source Oracle Identity Management
You can deinstall it by following the procedures in the "Deinstallation and Reinstallation" appendix in the Oracle Application Server Installation Guide.
This section describes how to transform a non-highly available configuration to a distributed OracleAS Cold Failover Cluster configuration.
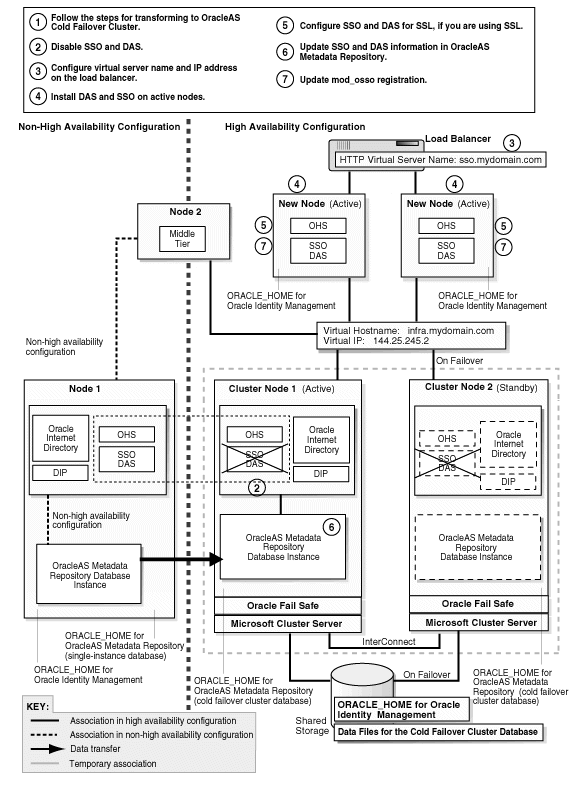
In the non-highly available, or "source", configuration, the OracleAS Metadata Repository and Oracle Identity Management run from different Oracle homes. They can run on the same computer, or on different computers. Figure 21-19 and Figure 21-20 show them on the same computer, but the procedure described in this section can be used for either case.
To transform this to a distributed OracleAS Cold Failover Cluster configuration, you make the following transformations:
Install a new database Oracle home for the cold failover cluster database, and copy the contents of the OracleAS Metadata Repository to a new database instance based on the new Oracle home.
Install an Oracle home on the shared drive for Oracle Internet Directory and Oracle Directory Integration and Provisioning.
Install Oracle homes for OracleAS Single Sign-On and Oracle Delegated Administration Services on nodes fronted by a load balancer. These nodes will run these components in an active-active configuration.
Figure 21-19 shows the transformation scenario on UNIX. Figure 21-20 shows the transformation on Windows.
Figure 21-19 Transforming to a Distributed OracleAS Cold Failover Cluster Configuration on UNIX
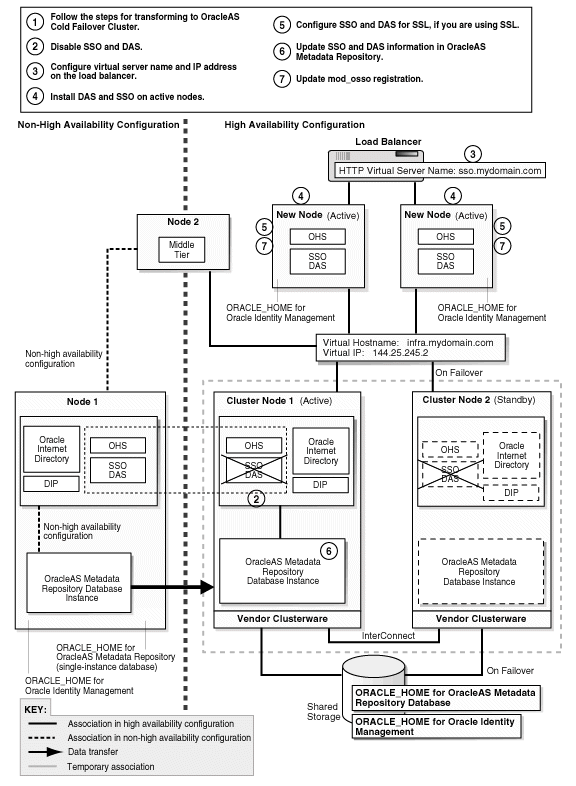
Figure 21-20 Transforming to a Distributed OracleAS Cold Failover Cluster Configuration on Windows
Transformation steps, at a high level, are:
Step 1: Perform Same Steps as for Transforming to OracleAS Cold Failover Cluster
Step 2: Disable OracleAS Single Sign-On and Oracle Delegated Administration Services
Step 3: Configure Virtual Server Name and IP on the Load Balancer
Step 4: Install OracleAS Single Sign-On and Oracle Delegated Administration Services on Active-Active Nodes
Step 5: Configure SSL (If You Want to Use SSL)
Step 6: Update OracleAS Single Sign-On and Oracle Delegated Administration Services Information in the OracleAS Metadata Repository
Step 7: Update mod_osso Registration
Step 8: Verify That All the Components Are Working
Step 9: Decommission the Oracle Homes That Are No Longer Used
The following steps use the following names to refer to the different nodes (the names match the ones used in Figure 21-19):
Node 1 and node 2 are nodes in the source configuration.
Cluster node 1 and cluster node 2 are nodes in the hardware cluster. These nodes have access to the shared storage on which you will install Oracle Identity Management instance.
New nodes for OracleAS Single Sign-On and Oracle Delegated Administration Services are fronted by a load balancer. These nodes are not in a hardware cluster.
Step 1 Perform Same Steps as for Transforming to OracleAS Cold Failover Cluster
Perform most of the steps for transforming to OracleAS Cold Failover Cluster. Table 21-7 lists the sections for the steps.
Table 21-7 Step 1 for Transforming to a Distributed OracleAS Cold Failover Cluster
| Platform | Section |
|---|---|
|
UNIX |
Perform the steps in Section 21.3, "Transformation to OracleAS Cold Failover Cluster (Identity Management) on UNIX", but skip these steps: |
|
Windows |
Perform the steps in Section 21.4, "Transformation to OracleAS Cold Failover Cluster (Identity Management) on Windows", but skip these steps: |
Step 2 Disable OracleAS Single Sign-On and Oracle Delegated Administration Services
Disable OracleAS Single Sign-On and Oracle Delegated Administration Services on the hardware cluster so that you can install them on other nodes. This enables you to create a distributed model. After running this step, you should have an environment that looks like Figure 21-21.
Figure 21-21 Step 2 (UNIX): Disable OracleAS Single Sign-On and Oracle Delegated Administration Services
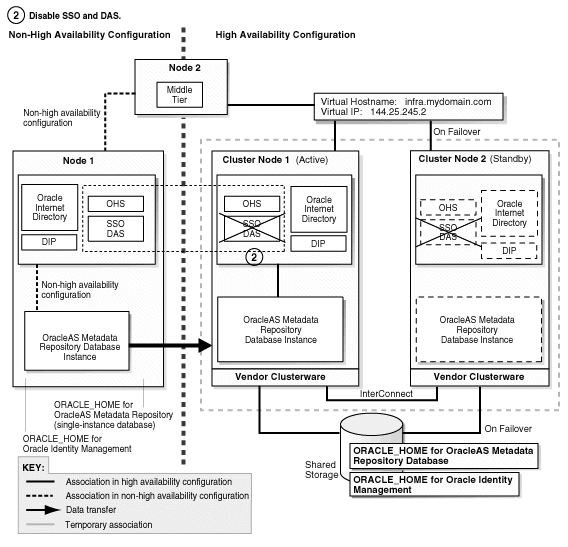
Figure 21-22 Step 2 (Windows): Disable OracleAS Single Sign-On and Oracle Delegated Administration Services

|
Downtime 1 Starts: The next step starts the first downtime. |
On either cluster node 1 or cluster node 2, from the CFC_IM_ORACLE_HOME, start up Application Server Control Console.
Display the home page for the Oracle Identity Management instance.
Select the checkbox for OC4J_SECURITY and click Enable/Disable Components. This displays the Enable/Disable Components page.
On the Enable/Disable Components page, select both OC4J_SECURITY and HTTP_Server, Single Sign-On:orasso in the Enabled Components box and click Move All to move them to the Disabled Components box. There should be three items in the Disabled Components box:
home
OC4J_SECURITY
HTTP_Server, Single Sign-On:orasso
Click OK.
On the Warning page, which warns you that the components to be disabled will be stopped, click Yes. This stops the components and disables them as well.
When you return to the instance home page, you should see only two components: Internet Directory and Management.
Step 3 Configure Virtual Server Name and IP on the Load Balancer
Configure a virtual server name and IP on the load balancer for HTTP traffic. Clients will use this virtual server name to access OracleAS Single Sign-On and Oracle Delegated Administration Services.
Step 4 Install OracleAS Single Sign-On and Oracle Delegated Administration Services on Active-Active Nodes
In this step, you install OracleAS Single Sign-On and Oracle Delegated Administration Services on the nodes fronted by the load balancer. You install the Oracle home on the local storage of each node; this means you have to perform the installation once for each node.
Figure 21-23 Step 4 (UNIX): Install OracleAS Single Sign-On and Oracle Delegated Administration Services on Active-Active Nodes

Figure 21-24 Step 4 (Windows): Install OracleAS Single Sign-On and Oracle Delegated Administration Services on Active-Active Nodes
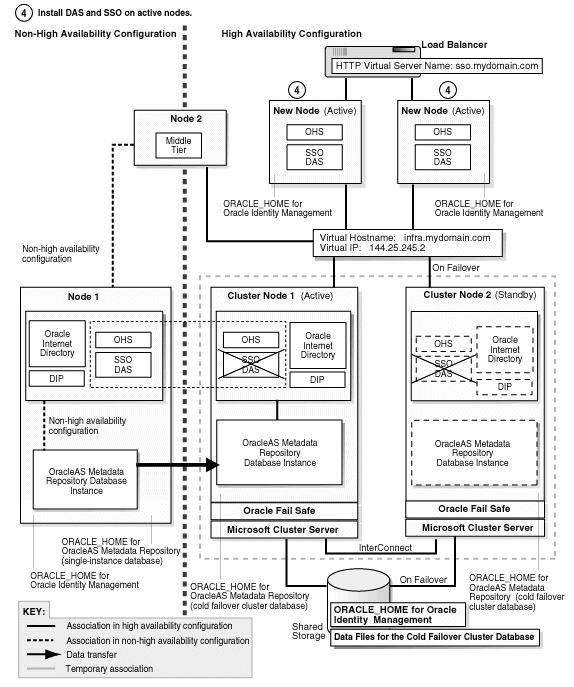
Stop all the Oracle Identity Management components except Oracle Internet Directory. One way of doing this is to stop all components, then start up Oracle Internet Directory. (In the commands below, use the appropriate slash for your operating system.)
> CFC_IM_ORACLE_HOME/opmn/bin/opmnctl stopall
> CFC_IM_ORACLE_HOME/opmn/bin/opmnctl startproc ias-component=OID
Run the installer on each node to install OracleAS Single Sign-On and Oracle Delegated Administration Services. Some important screens:
In the Select Installation Type screen, select Identity Management.
In the Select Configuration Options screen, select only OracleAS Single Sign-On, Oracle Delegated Administration Services, and High Availability.
In the Select High Availability Option screen, select OracleAS Cluster (Identity Management).
In the Create or Join an OracleAS Cluster (Identity Management) screen, for the first instance of OracleAS Single Sign-On / Oracle Delegated Administration Services that you are installing, select Create a New OracleAS Cluster. For subsequent instances, select Join an Existing Cluster.
In the Specify HTTP Load Balancer Host and Ports screen, enter the virtual server name configured on the load balancer and port.
In Specify LDAP Virtual Host and Ports screen, enter the virtual hostname and port for Oracle Internet Directory.
Step 5 Configure SSL (If You Want to Use SSL)
Configure OracleAS Single Sign-On and Oracle Delegated Administration Services for SSL, if you need these components to use SSL in your installation.
Step 6 Update OracleAS Single Sign-On and Oracle Delegated Administration Services Information in the OracleAS Metadata Repository
From one of OracleAS Single Sign-On nodes, run one of these commands:
Non-SSL on UNIX:
> SSO_ORACLE_HOME/sso/bin/ssocfg.sh http FQ_virtual_hostname port
SSL on UNIX:
> SSO_ORACLE_HOME/sso/bin/ssocfg.sh https FQ_virtual_hostname port
Non-SSL on Windows:
> SSO_ORACLE_HOME\sso\bin\ssocfg.bat http FQ_virtual_hostname port
SSL on Windows:
> SSO_ORACLE_HOME\sso\bin\ssocfg.bat https FQ_virtual_hostname port
Replace FQ_virtual_hostname with the HTTP virtual server name configured on the load balancer. Enter the fully qualified name.
Replace port with either the SSL or the non-SSL port used by Oracle HTTP Server.
Change the URL for OracleAS Single Sign-On and Oracle Delegated Administration Services.
On cluster node 1, start Oracle Directory Manager.
If you are running on UNIX, run the following command to start it:
> SSO_ORACLE_HOME/bin/oidadmin
If you are running on Windows, you can start it from the Start menu:
Start > Programs > Oracle - IM_OracleHomeName > Integrated Management Tools > Oracle Directory Manager
Connect using cluster node 1's hostname. Log in as cn=orcladmin.
Expand Entry Management > cn=OracleContext > cn=Products > cn=DAS > cn=OperationURLs.
Update the value of the orcldasurlbase attribute to the virtual server name.
Step 7 Update mod_osso Registration
Run ssoreg as follows:
On UNIX:
> CFC_IM_ORACLE_HOME/sso/bin/ssoreg.sh
   -oracle_home_path im_oracle_home
   -site_name virtual_hostname:http_port
   -config_mod_osso TRUE
   -mod_osso_url http://virtual_hostname:port
   -u root
On Windows:
> CFC_IM_ORACLE_HOME\sso\bin\ssoreg.bat
   -oracle_home_path im_oracle_home
   -site_name virtual_hostname:http_port
   -config_mod_osso TRUE
   -mod_osso_url http://virtual_hostname:port
   -u system
Replace im_oracle_home with the full path of the Oracle Identity Management Oracle home.
Replace virtual_hostname with the fully qualified virtual hostname.
Replace port with the Oracle HTTP Server port. Note that if you are using port 80, you must not specify the port number because port 80 is the default value.
Update the configuration in the DCM repository.
> SSO_ORACLE_HOME/dcm/bin/dcmctl updateConfig
Restart the second OracleAS Single Sign-On.
> opmnctl restartproc process-type=HTTP_Server
> opmnctl restartproc process-type=OC4J_SECURITY
Step 8 Verify That All the Components Are Working
Verify that the Oracle Identity Management and middle-tier components are working.
Test Oracle Identity Management components.
Test Oracle Delegated Administration Services by accessing its URL, http://virtual_server_name:port/oiddas, and try to perform some operations. Example: http://sso.mydomain.com/oiddas.
Test OracleAS Single Sign-On by accessing its URL, http://virtual_server_name:port/pls/orasso, and try to perform some operations. Example: http://sso.mydomain.com/pls/orasso.
Test middle-tier components. For example, to test OracleAS Portal, access its URL, http://portalhost.mydomain.com/pls/portal, and try to perform some operations.
|
Downtime 1 Ends: This ends the first downtime. |
Step 9 Decommission the Oracle Homes That Are No Longer Used
At the end of the transformation procedure, you no longer need these Oracle homes:
Oracle home for the source OracleAS Metadata Repository database
If you are not using this Oracle home for other purposes (that is, if you were using this Oracle home only for the OracleAS Metadata Repository database), then you can deinstall it. See the "Removing Oracle Software" chapter in the Oracle Database Installation Guide for details.
Oracle home for the source Oracle Identity Management
You can deinstall it by following the procedures in the "Deinstallation and Reinstallation" appendix in the Oracle Application Server Installation Guide.