|
Oracle® Business Intelligence Discoverer Administration Guide
10g Release 2 (10.1.2.1) B13916-04 |
|
 Previous |
 Next |
|
Oracle® Business Intelligence Discoverer Administration Guide
10g Release 2 (10.1.2.1) B13916-04 |
|
 Previous |
 Next |
This chapter explains how to maintain items and item classes using Discoverer Administrator, and contains the following topics:
"About truncating date items and the EUL_DATE_TRUNC function"
"About generating and updating EUL item names automatically"
"About improving performance when end users select parameter values in worksheets"
"Notes about items based on columns with user-defined datatypes"
A Discoverer item is a representation in the End User Layer of one of the following:
a column in a database table or view
a component of a custom folder (for more information, see "What are custom folders?")
a calculation (for more information, see Chapter 11, "Creating and maintaining calculated items")
Items are stored in folders and can be created, deleted and moved between folders. Items have properties that you can change (e.g. display name, formatting details). Items enable Discoverer end users to access and manipulate information until they find the information they want.
Item classes are groups of items that share some similar properties. An item class enables you to define item properties once, and then assign the item class to other items that share similar properties.
For example, assume the Product folder includes an item called Product Name that describes each product. A similar item also called Product Name may be required in the Sales Revenue folder. To enable both items to share common properties (e.g. a list of values), you might create one item class to define the properties, and apply it to both items. In other words, you only have to define the properties once. Without the item class, you would have to define the properties individually for each item.
Discoverer uses item classes to implement the following features:
lists of values
alternative sorts
drill to detail links
As the Discoverer manager, it is your responsibility to create suitable item classes to support these Discoverer features. You can create a different item class for each feature or you can specify that Discoverer uses the same item class for more than one feature. Note that an item class to support an alternative sort must also support a list of values.
A list of values (or 'LOV') is a set of valid values for an item. The values are those values in the database column on which the item is based. Discoverer end users use LOVs to display values or enter values in:
parameters
conditions
the Discoverer item navigator
the Export dialog
For example, assume that an item is based on a database column (e.g. Region) that contains the following values:
| Region |
|---|
| West |
| East |
| South |
| North |
| East |
| North |
| South |
An LOV based on this item might contain four distinct values:
West
East
South
North
Discoverer uses item classes to implement LOVs. When you first create a business area, you can specify that LOVs are to be generated automatically (for more information, see "Load Wizard: Step 4 dialog"). Subsequently, you can use the Item Class Wizard to create new LOVs and assign existing LOVs to other items (for more information, see "How to create a LOV item class").
An alternative sort is an instruction to Discoverer about how to sort the values in an item. Alternative sorts enable you to specify a different sort order to the one that Discoverer uses by default.
By default, Discoverer sorts items in ascending or descending order using ASCII values. However, Discoverer end users might require some items to be sorted in a different order.
For example, by default, Discoverer sorts a series of sales regions alphabetically (e.g. East, North, South, West). But Discoverer end users might need sales regions sorted in a different order (e.g. North, South, East, West).
To create an alternative sort order, you must use an item class to link together two items:
an item to define the sort order
an item to define the list of values to be sorted
Having defined the item class, you associate that item class with the item that Discoverer end users will include in their worksheets.
There are a number of ways to implement alternative sorts, including:
using a custom folder (for more information, see "Example 1: Using a custom folder to implement alternative sorts")
using a separate database table (for more information, see "Example 2: Using a database table to implement alternative sorts")
using a calculated item and a DECODE statement (for more information, see "Example 3: Using a calculated item and a DECODE statement to implement alternative sorts")
Regardless of the way you choose to implement an alternative sort, note the following:
the item class you use to implement an alternative sort must include both an alternative sort and a LOV
the two items you select for the item class's alternative sort and LOV must be in the same folder, and have a one to one relationship
For information about how to create an alternative sort item class, see "How to create an alternative sort item class".
This section contains the following examples of different ways to implement alternative sorts:
"Example 1: Using a custom folder to implement alternative sorts"
"Example 2: Using a database table to implement alternative sorts"
"Example 3: Using a calculated item and a DECODE statement to implement alternative sorts"
You can use a custom folder to implement an alternative sort by using the folder's Custom SQL property to create two items. One item contains the list of values and the other item specifies the sort order. You can then create an item class and specify the two items in the custom folder as the item class's LOV and alternative sort respectively.
For example, you might want Discoverer end users to include an item called Ordered Regions in their worksheets. When users sort the values in this item, you want the order of the sales regions to be North, South, East, West (i.e. not the default alphabetical order). To implement this alternative sort using a custom folder, you might:
create a custom folder called Sales Regions Sort Folder
enter the following as the custom folder's Custom SQL property:
select 'North' region_name, 1 region_order from dual union
select 'South' region_name, 2 region_order from dual union
select 'East' region_name, 3 region_order from dual union
select 'West' region_name, 4 region_order from dual union
create an item class called Sales Regions Customized Sort
specify region_name as the LOV item and region_order as the alternative sort item for the Sales Regions Customized Sort item class
specify Sales Regions Customized Sort as the item class associated with the Ordered Regions item that users will include in their worksheets
when users sort a worksheet using the Ordered Regions item, the worksheet is sorted using the new order
You can use a database table to implement an alternative sort by creating a new database table with two columns containing the values and their associated numerical order. If a suitable database table containing the values and their associated numerical order already exists, consider using that table. To avoid performance issues, avoid using a database table that contains more than one occurrence of each value.
Having loaded the table into the EUL as a folder, you can then create an item class and specify the two items for the item class's LOV and alternative sort respectively.
For example, you might want Discoverer end users to include an item called Ordered Regions in their worksheets. When users sort the values in this item, you want the order of the sales regions to be North, South, East, West (i.e. not the default alphabetical order). To implement this alternative sort using a database table:
use SQL*Plus to create a database table called SALES_REGION_SORT with two columns REGION_NAME and REGION_NUMBER by entering the following at the command prompt:
> create table SALES_REGION_SORT (REGION_NAME VARCHAR2(10), REGION_NUMBER NUMBER(2));
use SQL*Plus to insert values into the SALES_REGION_SORT table by entering the following at the command prompt:
> insert into SALES_REGION_SORT (REGION_NAME, REGION_NUMBER) values ('North', 1)
> insert into SALES_REGION_SORT (REGION_NAME, REGION_NUMBER) values ('South', 2)
> insert into SALES_REGION_SORT (REGION_NAME, REGION_NUMBER) values ('East', 3)
> insert into SALES_REGION_SORT (REGION_NAME, REGION_NUMBER) values ('West', 4)
load the SALES_REGION_SORT database table into the EUL as a new folder containing the items Name and Number (for more information, see Chapter 5, "Creating and maintaining business areas")
create an item class called Sales Regions Customized Sort
specify the Region Name item as the LOV item and the Region Number item as the alternative sort item for the item class
specify Sales Regions Customized Sort as the item class associated with the Ordered Regions item that users will include in their worksheets
when users sort a worksheet using the Ordered Regions item, the worksheet is sorted using the new order
You can use a calculated item with a DECODE statement to implement an alternative sort. You create two new items in an existing folder and specify the SQL statements for those items so that they contain the list of values and the sort order. You can then create an item class and specify the two items for the item class's LOV and alternative sort respectively.
If an item containing the list of values already exists in the folder, you can use that item.
For example, you might want Discoverer end users to include an item called Ordered Regions in their worksheets. When users sort the values in this item, you want the order of the sales regions to be North, South, East, West (i.e. not the default alphabetical order). To implement this alternative sort using a calculated item and a DECODE statement:
create a new calculated item called Sales Region Order in the folder that already contains the Ordered Regions item (the Ordered Regions item will provide the names of the regions)
specify the following SQL statement as the formula for the item:
DECODE(Ordered Regions,'North',1,'South',2,'East',3,4)
create an item class called Sales Regions Customized Sort
specify Sales Regions Customized Sort as the item class associated with the Ordered Regions item that users will include in their worksheets
when users sort a worksheet using the Ordered Regions item, the worksheet is sorted using the new order
Note: In performance terms, this is the least efficient mechanism.
A drill to detail is a relationship between two or more items that might otherwise be unrelated. Drill to detail is achieved using an item class and gives Discoverer end users direct access to detail information about the currently selected row from other folders, without having to drill through hierarchical levels.
When you create a drill to detail item class, you specify the items that use that item class. The folders containing the items that share the item class do not have to be joined.
When a user selects the drill to detail option for one item, any folders containing other items that share the same drill to detail item class are available for drilling. If the user selects one of those folders, the worksheet contains all the items in the selected folder and conditions are applied for all the item classes that it has in common with the original sheet.
Note that for a hyperdrill to work, items that share the same drill to detail item class must have the same data type.
Date items are items that users include in worksheets to show date information.
Date items can be:
items that are based on database columns with a date datatype
calculated items that you have created
items that Discoverer creates automatically when you specify a date hierarchy for a date item
A date format mask is an instruction about how to display date information.
The table below shows how a number of dates are stored in the database, and the affect of applying different date format masks to those dates.
| Stored in the database: | DD-MM-YYYY | DD-MONTH | MM/DD | DD-Month-YY HH:MI AM |
|---|---|---|---|---|
| 04-JUN-1999 13:03:45 | 04-06-1999 | 04-JUNE | 06/04 | 04-June-99 1:03 PM |
| 05-AUG-2000 23:14:12 | 05-08-2000 | 05-AUGUST | 08/05 | 05-August-00 11:14 PM |
| 15-JAN-2001 03:45:38 | 15-01-2001 | 15-JANUARY | 01/15 | 15-January-01 3:45 PM |
| 14-APR-2002 09:52:26 | 14-04-2002 | 14-APRIL | 04/14 | 14-April-02 9:52 AM |
As the Discoverer manager, you can specify a default date format mask for date items that users include in their worksheets.
Note that date format masks have no effect on the way the date is stored in the database.
When you create a new level in a date hierarchy template, you specify a date format for the new level. If you include that new level in the date hierarchy, Discoverer automatically creates a new date item in any folders with date items that use that date hierarchy.
The formula of the new date item is:
EUL_DATE_TRUNC(item_name, format_mask)
where:
EUL_DATE_TRUNC is a Discoverer function to truncate dates to the format specified by format_mask
item_name is the name of the item in the folder that uses the date hierarchy
format_mask is the date format you specified for the new level in the date hierarchy template
The date format you specified for the new level in the date hierarchy template is also used to set the Format Mask property of the new date item.
Truncating date items involves extracting and manipulating individual elements of a date (e.g. the month, the quarter, the year). Truncating date items is useful when comparing dates. Discoverer uses truncated date items to implement date hierarchies.
The EUL_DATE_TRUNC function truncates a date value to a specified date format mask. Using EUL_DATE_TRUNC has several benefits:
it is easier to use EUL_DATE_TRUNC to truncate a date than the alternative method (which is to convert a date to a character string, remove part of the date, and then convert the character string back to a date)
using EUL_DATE_TRUNC enables truncated dates to be sorted in correct chronological order (e.g. if the date format mask is Q, data for quarters is ordered within each year, and then by year)
using EUL_DATE_TRUNC enables periods of time to be represented by a single date, which is useful when defining conditions
Discoverer uses EUL_DATE_TRUNC automatically when creating date hierarchies. You can also use EUL_DATE_TRUNC yourself when entering a formula for a date item.
Note that EUL_DATE_TRUNC always returns dates that comprise day, month, and year elements. If one of these elements is not included in the specified format mask, EUL_DATE_TRUNC uses 01-JAN-1900 as a default date to provide the missing elements. For example:
if you apply EUL_DATE_TRUNC(date,'YYYY') to the dates 25-aug-1934, 11-nov-1934 and 03-feb-1933, the results are 01-jan-1934, 01-jan-1934 and 01-jan-1933 respectively
if you apply EUL_DATE_TRUNC(date,'Mon') to the dates 25-aug-1934, 11-nov-1934 and 03-feb-1933, the results are 01-Aug-1900, 01-Nov-1900 and 01-Feb-1900 respectively
if you apply EUL_DATE_TRUNC(date,'DD') to the dates 25-aug-1934, 11-nov-1934 and 03-feb-1933, the results are 25-jan-1900, 11-jan-1900 and 03-jan-1900 respectively
It is likely that the default values that EUL_DATE_TRUNC returns for the missing date elements will be inappropriate or not required. We therefore recommend that you specify (i.e in the EUL_DATE_TRUNC formula) all of the date elements that you want to display. Or put another way, that you only display those date elements that you specified in the EUL_DATE_TRUNC function call.
You can include a truncated date item in a condition. The value you specify for the condition must be in the same format as the date format mask of the truncated date item.
Note the following:
To reduce the risk of an item's date format mask being incompatible with the date format mask specified in the formula used to truncate the item, a warning is displayed whenever you attempt to change the date format mask of a date item that has an editable formula.
The standard Oracle date format includes time (DD-MON-YYYY:HH24:MI:SS). When you load date items into the EUL, Discoverer gives them a default date format mask of DD-MON-YYYY (i.e. without the time). If time information is stored in a database column and a user applies a condition to a date item based on that column:
the time component is included in the condition (even though the default date format mask indicates that the time component is not included)
no results will be returned
To resolve this situation, change the date item's formula to truncate dates to DD-MON-YYYY.
Example 1
Assume the formula of a date item is EUL_DATE_TRUNC(order_date,'YYYY') and the item is included in a condition as order_date='2001':
the dates of all orders placed in 2001 will be returned by the item
the date of each order will be shown as 01-JAN-2001 (because EUL_DATE_TRUNC uses the date 01-JAN-1900 to default date elements that are not specified in the format mask)
Example 2
Assume you have used EUL_DATE_TRUNC to truncate a date item called order_quarter_date, and you want to include the order_quarter_date item in a condition. If the date format mask of the truncated item is 'Q', the formula of the item must use the same date format mask (i.e. EUL_DATE_TRUNC(order_quarter_date,'Q')).
From a Discoverer perspective, a database column can contain data itself (e.g. regions, order numbers) or pointers to where data is located outside the database (e.g. names of files containing pictures of stores, URLs). You can set an item property to specify that an item is a pointer for Discoverer Desktop to drill to data outside the database.
Note: You can only drill to data outside the database (and display the data by launching an external application) when you are using Discoverer Desktop.
To specify the location of the data of the column on which an item is based, use the item's Content Type property as follows (for more information, see "Item Properties dialog"):
select NONE to specify that the column contains the data
select FILE to specify that the column contains a pointer to information held outside the database when using Discoverer Desktop (e.g. Microsoft Word documents, HTML pages)
When users include an item that has its Content Type property set to FILE, Discoverer Desktop displays the pointers contained in the column. If a user clicks the pointer, Discoverer Desktop launches the application associated with the pointer. For example:
if the pointer is a filename, Discoverer Desktop launches the application associated with the filename extension and displays the specified file (e.g. if the filename extension is .doc, Discoverer Desktop launches Microsoft Word containing the specified file)
if the pointer is a URL, Discoverer Desktop launches the user's web browser and displays the specified page
You can also set the Alternative Display Value for items that have the Content Type of FILE. Discoverer displays the value you put in Alternative Display Value in worksheets instead of the file reference or URL.
Note: If you want to change the URL to something more user-friendly, you can specify a descriptive title for the worksheet item value. For example, you might want to change the default worksheet item value \Report.doc to 'Click here to display the report in Wordpad'. To specify a descriptive title for a worksheet item value, display the "Item Properties dialog" and enter the title in the Alternative display value field.
Notes
If the datatype of the column is LONG RAW, the column can contain different kinds of data, including:
BFILE data - Locators to large binary files stored outside the database. BFILE data enables byte stream I/O access to external LOBs (large objects) residing on the database server. BFILE data has a maximum size of 4 gigabytes.
BLOB data - Binary large objects. BLOB data has a maximum size of 4 gigabytes.
CLOB data - Character large objects containing single-byte characters. Both fixed-width and variable-width character sets are supported, both using the CHAR database Data Type. CLOB data has a maximum size of 4 gigabytes.
NCLOB data - Character large objects containing multibyte characters. Both fixed-width and variable-width character sets are supported, both using the NCHAR database Data Type. Stores national character set data. NCLOB data has a maximum size of 4 gigabytes.
If the datatype of the column on which an item is based is LONG RAW, Discoverer provides additional options for the item's Content Type property (i.e. options in addition to FILE and NONE). These options enable you to specify how Discoverer Desktop decides which application to launch to view the column's content. For example, if you select DOC as the item's Content Type property, Discoverer Desktop will launch the application associated with the .DOC extension (usually Microsoft Word).
The names of some EUL items can be automatically generated for you based on the names of underlying items. For example, a sensible join name can be automatically generated for you from the names of the two folders that are involved in the join.
This section contains the following topics:
"How to set the value of the Auto-Generate name property of a secondary element"
"How to set the default value of the Auto-Generate name property to Yes"
"What happens when you create a business area using the Load Wizard?"
Primary elements are End User Layer (EUL) folders or items.
The following are defined as secondary elements:
joins
complex folder items
item hierarchies
item hierarchy nodes
date hierarchy templates
date hierarchy items
item classes
The Auto-Generate name property enables names of secondary elements to be automatically updated whenever a primary element name is changed. The Auto-Generate name property is applied to secondary elements using Discoverer Administrator (its value can be set to Yes or No). When the value of the Auto-Generate name property is set to Yes for a secondary element, Discoverer generates its name using the names of its primary elements (i.e. the folder and item names used in the secondary element).
For example, Discoverer might display a join named DEPT.DEPTNO->EMP.DEPTNO, where EMP and DEPT are primary elements (i.e. the folders and items) and DEPTNO is the foreign key used in the join. If the Auto-Generate name property value of this join is set to Yes, and you change the name of the primary element EMP to EMPLOYEE, Discoverer automatically updates the join name to DEPT.DEPTNO->EMPLOYEE.DEPTNO.
Note: The Auto-Generate name property value is set to No by default.
You might want to set the value of the Auto-Generate name property for a secondary element to Yes to automatically update the secondary element name, whenever a primary element name (from which the secondary element name is derived), is changed.
To set the value of the Auto-Generate name property for a secondary element:
Select the the secondary element to set the Auto-Generate name property value.
For more information, see "What are primary and secondary elements?"
Display the Properties dialog for the selected secondary element.
Select a value from the Auto-Generate name drop down list and click OK to confirm your selection.
For example, select Yes, to automatically update the secondary element name, whenever a primary element name (from which the secondary element name is derived), is changed.
You might want to set the default value of the Auto-Generate name property to Yes for creating new secondary elements.
To set the default value of the Auto-Generate name property to Yes:
Follow the steps described in "How to edit Discoverer Administrator and Discoverer Desktop registry settings"
Note: The AutogenNameOnCreate registry setting must be present in the registry and its value must be set to 1. If the AutogenNameOnCreate registry setting is not present in the registry, you must create it and set its value to 1. The AutogenNameOnCreate Registry setting is located in HKEY_CURRENT_USER\Software\Oracle\Discoverer 10\Database and its Type is REG_DWORD.
Notes
If the AutogenNameOnCreate Registry setting is present in the registry and its value is set to 1, Discoverer does the following:
if you install the Discoverer sample data, Discoverer sets the Auto-Generate name property to Yes for all secondary elements
when you create a secondary element, Discoverer sets the Auto-Generate name property to Yes
If you export and then import EUL objects using the /auto_gen_name command modifier in the EUL Command Line for Java (or the Discoverer Command Line Interface), Discoverer sets the Auto-Generate name property to Yes for all the secondary elements contained in the EUL objects that you exported and imported (for more information, see "How to set the Auto-Generate name property to Yes for all secondary elements in an existing business area"). Note that the AutogenNameOnCreate registry setting has no effect on the Auto-Generate name property when you import EUL objects using the Oracle Business Intelligence Discoverer EUL Command Line for Java or the Oracle Business Intelligence Discoverer command line interface.
When you create a business area using the Load Wizard and the value of the AutogenNameOnCreate registry setting is set to 1, Discoverer automatically sets the Auto-Generate name property of all secondary elements to Yes.
For more information about editing Discoverer Registry settings, see "How to edit Discoverer Administrator and Discoverer Desktop registry settings".
You might set the Auto-Generate name property for all secondary elements in an existing business area, by setting the property for each secondary element one at a time. However, you might find it quicker to set this property for all secondary elements at once.
To set the Auto-Generate name property to Yes for all secondary elements in an existing business area:
Export the EUL objects that contain the secondary elements you want Discoverer to automatically generate.
For more information about exporting EUL objects to an .EEX file, see "How to export selected EUL objects using the Export Wizard".
Import the exported EUL objects in the exported .EEX file using the EUL Command Line for Java (or the Discoverer Command Line Interface).
For more information about importing EUL objects to an .EEX file using the:
Oracle Business Intelligence Discoverer EUL command line for Java
For more information, see the Oracle Business Intelligence Discoverer EUL Command Line for Java User's Guide.
Oracle Business Intelligence Discoverer command line interface , see "How to import End User Layer objects using the Discoverer command line interface"
Note: You must include the /auto_gen_name command modifier in your import command. When you import EUL objects and use the /auto_gen_name command modifier Discoverer sets the Auto-Generate name property of each secondary element to Yes (i.e. regardless of its current setting).
Note: The AutogenNameOnCreate Registry setting has no effect on the Auto-Generate name property when you import EUL objects using the Oracle Business Intelligence Discoverer EUL Command Line for Java or the Oracle Business Intelligence Discoverer command line interface.
The following example shows a typical Oracle Business Intelligence Discoverer command line interface command that imports EUL objects and uses the /auto_gen_name command modifier:
"D:\Oracle\ORA10\dis51adm" /connect username/password@database /import d:\ba_export.eex /refresh /auto_gen_name /show_progress
For more information about using the Discoverer EUL Command Line for Java and the Oracle Business Intelligence Discoverer command line interface, see "Which Discoverer command line interfaces are available?".
If the Auto-Generate name property value is set to Yes for a secondary element, the Name field in the Properties dialog is read-only. However, you can update the secondary element name by selecting it in the Workarea and editing it directly. Discoverer automatically resets the Auto-Generate name property of the secondary element to No.
The Auto-Generate name property of a primary element is set to No, and is read-only.
You can edit the Auto-Generate name property of generated date hierarchy items in the Properties dialog. Generated date hierarchies are the date items generated by Discoverer when you associate a date hierarchy template with a date item (for more information about creating date hierarchies, see "What are date hierarchies?")
You can also set the Auto-Generate name property to Yes for a secondary item that is dependent on another secondary item. If you change the name of the other secondary item, its Auto-Generate name property changes to No. However, the dependent secondary item still inherits the name change.
When an item has its Auto-Generate name property value set to Yes, it is displayed in the Workarea in a different color from other items (e.g. blue when the Windows default color scheme is applied).
When you drag a primary item into a complex folder, the new secondary items in the complex folder will automatically have their Auto-Generate name property value set to Yes (i.e. if the AutogenNameOnCreate Registry setting exists in the registry and its value is set to 1). For more information, see "How to set the default value of the Auto-Generate name property to Yes".
You cannot set the Auto-Generate Name property of secondary items in an existing business area to Yes using the Import Wizard (for more information, see "How to set the Auto-Generate name property to Yes for all secondary elements in an existing business area".
Do not use Discoverer Release 9.0.4 to load a business area created using Discoverer Release 10.1.2 (and where the AutogenNameOnCreate Registry setting value has been set to 1).
For example, if you upgrade Discoverer to Release 10.1.2 and load a business area or install the Sample data (after the AutogenNameOnCreate Registry setting value has been set to 1) and then use Discoverer Release 9.0.4 to access the business area or Tutorial, Discoverer will display folders that all appear to use the same name (e.g. AUTOGENERATE_NAME). To avoid this you should only load business areas that were created using the same or earlier Discoverer releases.
To edit item properties:
Click an item on the Data page and choose Edit | Properties to display the "Item Properties dialog".
You can select more than one item at a time by holding down the Ctrl key and clicking another item.
Note: Where you select multiple items, all properties that are common to each of the selected items are displayed. If the data for a field is not common to each of the selected items, the field is blank.
Make the required changes.
Note: If you change the name of an item, the names of secondary elements (e.g. joins, items in complex folders) that have the Auto-Generate name property set to Yes might also change (for more information, see "About generating and updating EUL item names automatically").
Click OK.
To create a LOV item class:
Choose Insert | Item Class to display the "Item Class Wizard: Step 1 dialog".
If Discoverer displays the "Item Class Wizard: Step 2 dialog (select the item that generates the LOV)" press the Back button.
Select the List of Values check box.
Click Next to display the "Item Class Wizard: Step 2 dialog (select the item that generates the LOV)".
Figure 9-3 Item Class Wizard: Step 2 dialog
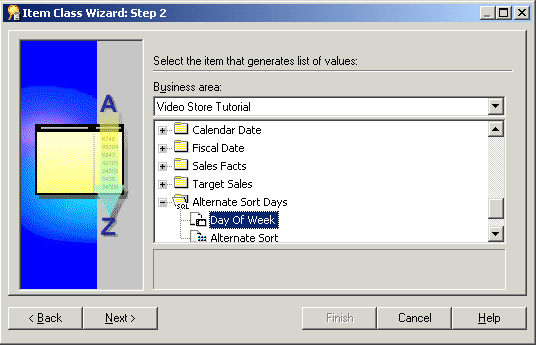
Select the business area that contains the item you want to use to generate the list of values from the drop down list.
Select the item that you want to use to generate the list of values.
Note: By default, Discoverer uses a SELECT DISTINCT query to retrieve a list of values. If you select an item in a folder with a large number of rows compared to the number of distinct values, then the query can be inefficient. It is more efficient to select an item from a smaller table (joined to the folder with a large number of rows) rather than using the large table itself. If a smaller table does not exist, it might be worth creating it to speed up the list of values process.
Alternatively if you have a small number of values, use a custom folder to create a local list of values within the End User Layer. For more information, see "How to create a list of values using a custom folder".
Click Next to display the "Item Class Wizard: Step 3 dialog (select items that use this item class)".
Figure 9-4 Item Class Wizard: Step 3 dialog
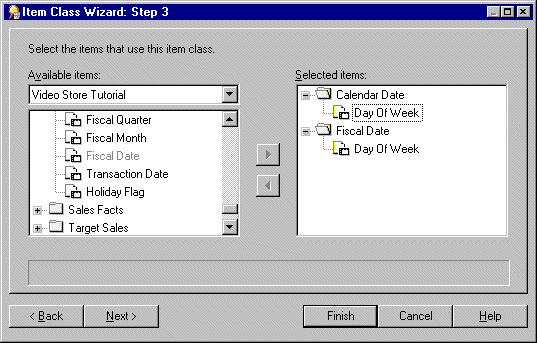
Note: If you had also selected the Drill to detail check box on the first page of the Item Class Wizard, end users will be able to drill between any of the items that you select on this page.
Move the items that use this item class, from the Available items list to the Selected items list.
Click Next to display the "Item Class Wizard: Step 4 dialog (advanced options for list of values)" to specify options controlling how LOVs are selected and displayed in Discoverer Plus.
Figure 9-5 Item Class Wizard: Step 4 dialog
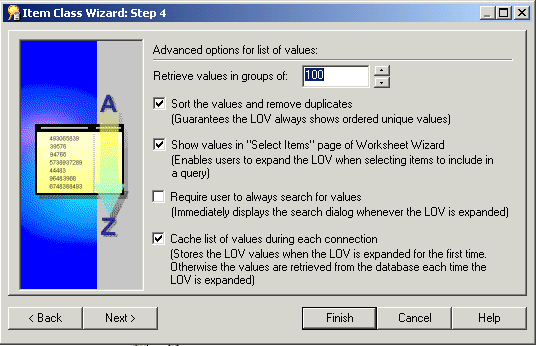
Specify the number of values to retrieve in each group, and select other check boxes as required.
Click Next to display the "Item Class Wizard: Step 5 dialog (enter name and description)" and specify a name and description for the new item class.
Figure 9-6 Item Class Wizard: Step 5 dialog
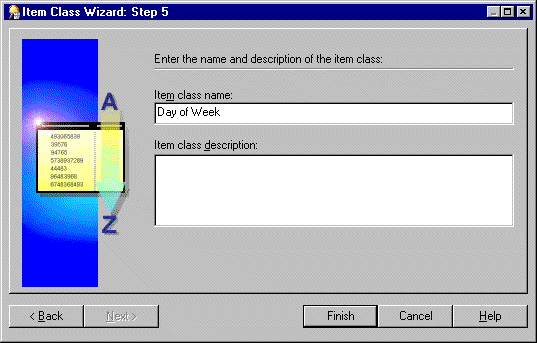
Enter a name and description for your new item class.
Click Finish.
Discoverer creates a new List of Values item class.
An alternative sort item class enables you to sort a list of values based on an alternative sort sequence.
To create an alternative sort item class:
Choose Insert | Item Class to display the "Item Class Wizard: Step 1 dialog".
Figure 9-7 The Item Class Wizard: Step 1 dialog
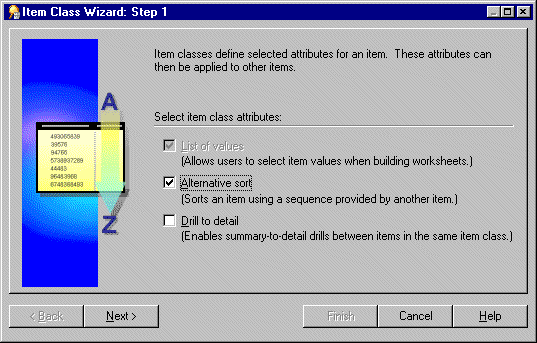
Select the Alternative sort check box.
Note: If you select the Alternative sort check box, the List of values check box is automatically selected.
Click Next to display the "Item Class Wizard: Step 2 dialog (select the item that generates the LOV)".
Figure 9-8 Item Class Wizard: Step 2 dialog

Select the business area that contains the item you want to use to generate the list of values from the drop down list.
Select the item that you want to use to generate the list of values.
Note: Discoverer uses a SELECT DISTINCT query to retrieve a list of values. If you select an item in a folder with a large number of rows compared to the number of distinct values, then the query can be inefficient. It is more efficient to select an item from a smaller table (joined to the folder with a large number of rows) rather than using the large table itself. If a smaller table does not exist, it might be worth creating it to speed up the list of values process.
Alternatively if you have a small number of values, use a custom folder to create a local list of values within the End User Layer. For more information, see "How to create a list of values using a custom folder".
Click Next to display the "Item Class Wizard: Step 3 dialog (select the item containing the alternative sort sequence)".
Figure 9-9 Item Class Wizard:Step 3 dialog
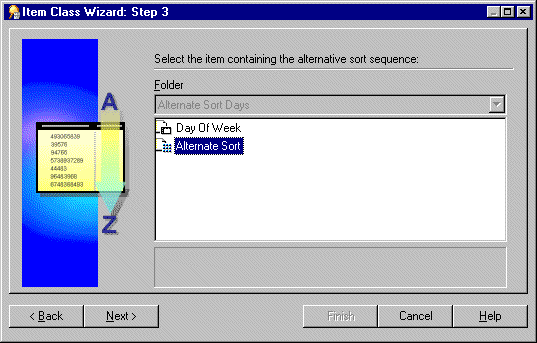
Select the item that contains the alternative sort sequence.
This item must:
already exist in the database
be in the same folder as the item that generates the list of values
have a one to one relationship with the item that contains the list of values
Click Next to display the "Item Class Wizard: Step 4 dialog (select items that use this item class)" dialog.
Figure 9-10 Item Class Wizard: Step 4 dialog
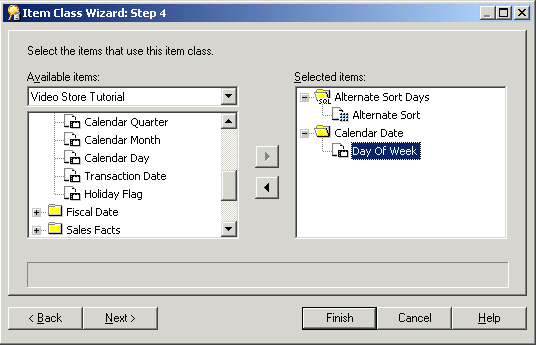
Note: If you selected the Drill to detail check box on the first page of the Item Class Wizard, end users will be able to drill between any of the items that you select on this page.
Move the items that use this item class, from the Available items list to the Selected items list.
Click Next to display the "Item Class Wizard: Step 5 dialog (advanced options for list of values)" to specify options controlling how LOVs are selected and displayed in Discoverer Plus.
Figure 9-11 Item Class Wizard: Step 5 dialog
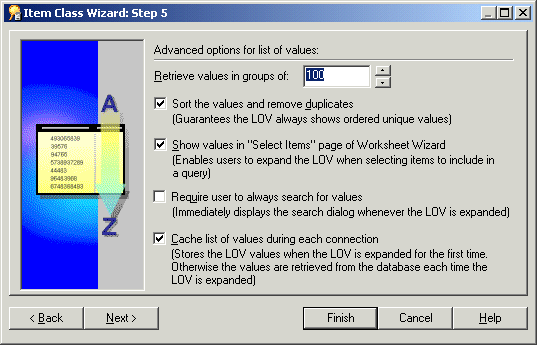
Specify the number of values to retrieve in each group, and select other check boxes as required.
Click Next to display the "Item Class Wizard: Step 6 dialog (enter name and description)".
Figure 9-12 Item Class Wizard: Step 6 dialog
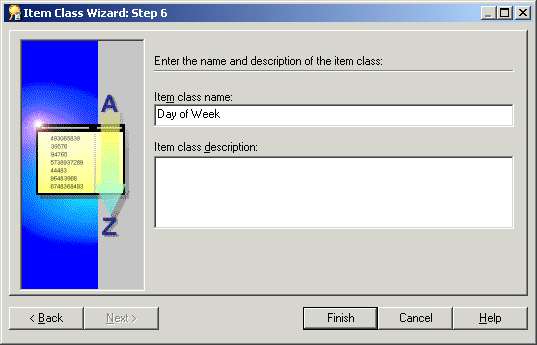
Enter a name and description for your new item class.
Click Finish.
To create a drill to detail item class:
Choose Insert | Item Class to display the "Item Class Wizard: Step 1 dialog".
Figure 9-13 The Item Class Wizard: Step 1 dialog
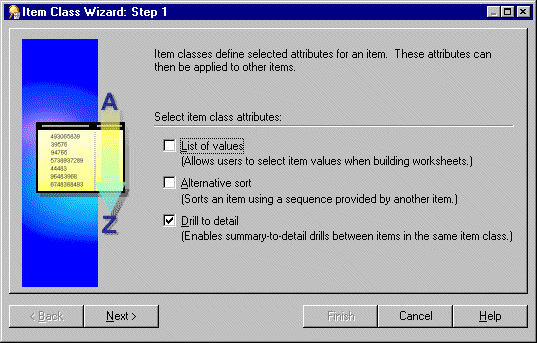
Select the Drill to detail check box.
Click Next to display the "Item Class Wizard: Step 2 dialog (select items that use this item class)" dialog.
Figure 9-14 Item Class Wizard: Step 2 dialog
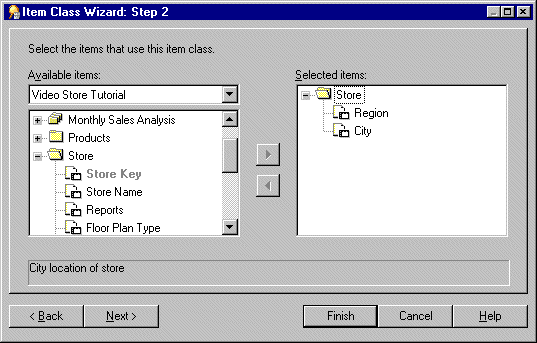
Move the items that use this item class, from the Available items list to the Selected items list.
Note: End users will be able to drill between any of the items that you select on this page.
Click Next to display the "Item Class Wizard: Step 3 dialog (enter name and description)" dialog.
Figure 9-15 Item Class Wizard: Step 3 dialog
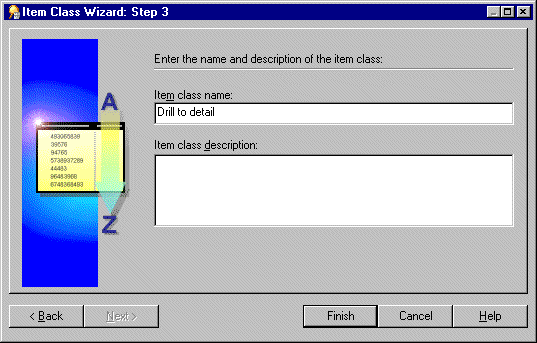
Enter a name and description for your new item class.
Click Finish.
This alternative method is useful if you have a small number of values. You can use a custom folder to create a local list of values within the End User Layer.
For example, if you want a list of values for North, South, East, and West, create a custom folder called Region_lov and type in the SQL statements suggested below.
In the Data page of the Workarea, choose Insert | Folder | Custom to display the "Custom Folder dialog".
Enter the following SQL statements into the Custom Folder dialog:
SELECT 'NORTH' REGION FROM sys.dual UNION SELECT 'SOUTH' REGION FROM sys.dual UNION SELECT 'EAST' REGION FROM sys.dual UNION SELECT 'WEST' REGION FROM sys.dual
This query creates one item Region, that can now be used as a list of values which will help optimize performance.
For more information about custom folders, see "What are custom folders?".
Click Validate to validate the SQL statement.
Click OK.
To edit an existing item class:
In the "Workarea: Data tab", click on the item class that you want to edit and choose Edit | Edit... to display the Edit Item Class dialog.
Note: The Edit Item Class dialog consists of five tabs. These resemble the pages in the Item Class Wizard and enable you to edit the settings you specified when you created the item class.
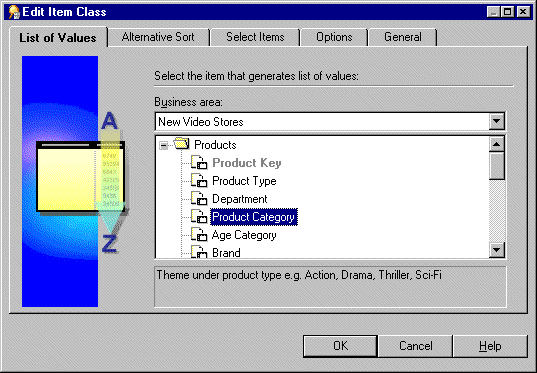
Display the "Edit Item Class dialog: List of values tab" to change the list of values used in the selected item class.
Figure 9-16 Edit Item Class dialog: List of Values tab
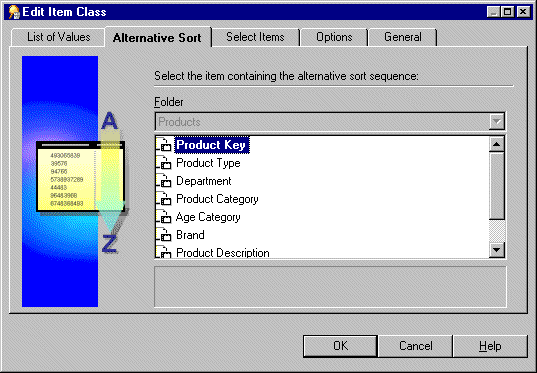
Display the "Edit Item Class dialog: Alternative Sort tab" to change the alternative sort sequence assigned to the list of values for the selected item class.
Figure 9-17 Edit Item Class dialog: Alternative Sort tab
Display the "Edit Item Class dialog: Select Items tab" to add or remove the items that use the selected item class.
Figure 9-18 Edit Item Class dialog: Select Items tab
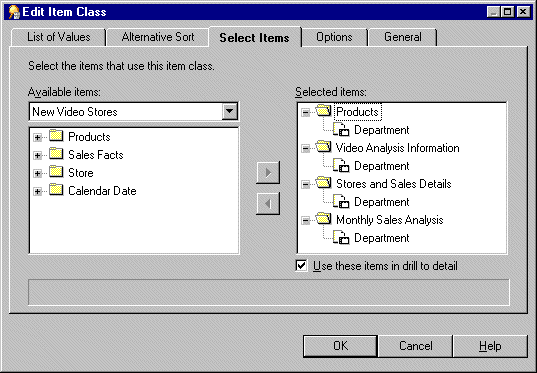
Select the checkbox Use these items in drill to detail to enable drill to detail between the items that belong to this item class (otherwise, clear it).
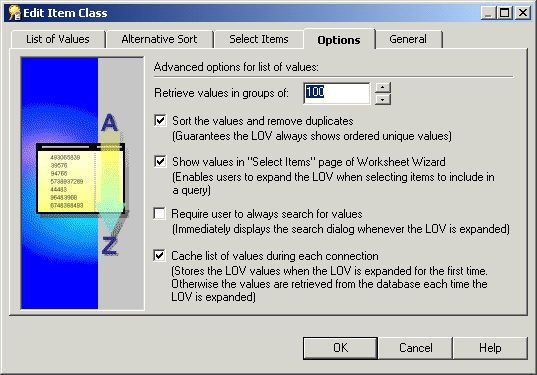
Display the "Edit Item Class dialog: Options tab" to set the advanced LOV options as required.
Figure 9-19 Edit Item Class dialog: Options tab
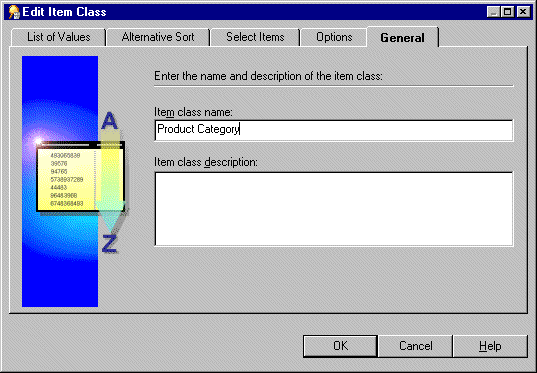
Display the "Edit Item Class dialog: General tab" to change the name and description of the selected item class.
Figure 9-20 Edit Item Class dialog: General tab
Click OK.
Use one of the following methods to add items to an item class:
"How to add items to an item class using the Edit Item Class dialog"
"How to add items to an item class using the Item Properties dialog"
Choose Window | New Window to display a second Workarea.
Select the Data tab in one Workarea.
Display the Item Classes tab in the other Workarea.
Select the Item(s) that you want to add to an item class in the Data tab of the first Workarea.
Drag the Items from the Data tab to the item class in the Item classes tab of the second Workarea.
Close one of the Workarea windows.
In the "Workarea: Data tab" click on the item class to edit and choose Edit | Edit.
Display the "For more information, see:".
Move the items from the Available items list to the Selected items list to add them to this item class.
You can select more than one item at a time by holding down the Ctrl key and clicking another item.
Note: The Available items drop down list enables you to select items from any open business area.
Click OK.
For more information see "How to edit an item class".
In the "Workarea: Data tab", select the item(s) to add to an item class.
Choose Edit | Properties to display the "Item Properties dialog".
Specify the item class for the selected item(s) to belong to using the Item class field.
Click OK.
For more information, see "How to edit item properties".
Use one of the following methods to remove items from an item class:
"How to remove items from an item class using the Edit Item Class dialog"
"How to remove items from an item class using the Item Properties dialog"
Display the "Workarea: Data tab".
Click the + symbol next to the item class you want to remove items from.
Click the + symbol to expand the Items using this item class (with drill to detail) object.
Select the items to remove from the item class.
You can select more than one item at a time by holding down the Ctrl key and clicking another item.
Right click one of the selected items and choose Delete Item from Item Class on the popup menu.
Discoverer Administrator displays the "Confirm Delete dialog".
For further information, see "How to delete items and item classes".
Click the "Workarea: Data tab".
Click the item class to edit and choose Edit | Edit...
Display the "For more information, see:".
Move the items you want to remove from this item class from the Selected items list to the Available items list.
You can select more than one item at a time by holding down the Ctrl key and clicking another item.
Click OK.
For more information, see "How to edit an item class".
In the "Workarea: Data tab" select the item(s) to remove from an item class.
Choose Edit | Properties to display the "Item Properties dialog".
Specify None in the Item class field.
Click OK.
For more information, see "How to edit item properties".
To view the items that use a specific item class:
In the "Workarea: Data tab", click the + symbol next to the item class that you want to expand.
This reveals two objects under the item class.
List of values
Items using this item class (with drill to detail)
Click the + symbol next to Items using this item class (with drill to detail) to display the list of items that belong to this item class.
To view the list of values associated with an item:
In the "Workarea: Data tab" expand the item that has a list of values you want to view.
Notes
Discoverer may warn you that retrieving the list of values may take a long time. When you retrieve a list of values Discoverer submits a SELECT DISTINCT query to the database (which selects the distinct set of values for the item). If there is a large number of values in the database, retrieving the list can take some time. The End User Layer has a record of the length of time it takes to retrieve the values. If this length of time is greater than 15 seconds, Discoverer displays a warning. You can change this limit in Discoverer Plus under Tools | Options | Query Governor.
If the item you want to display a list of values for exists in more than one folder, choose the item in the folder that has the least number of rows. This will return the list of values in the shortest amount of time.
To view the list of values associated with an item class:
Display the "Workarea: Data tab".
Click the + symbol to expand the item class whose list of values you want to view.
This reveals two items under the item class:
List of values
Items using this item class
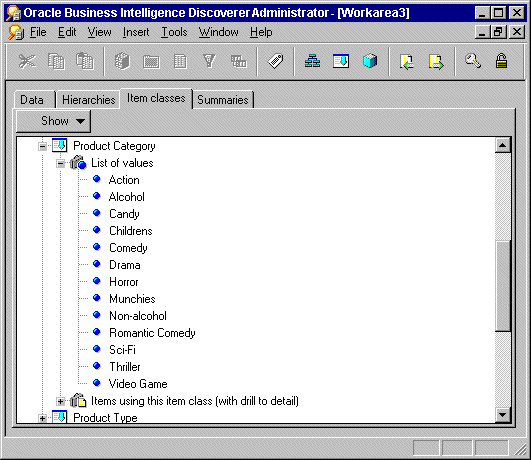
Click the + symbol to expand the List of values object to display the list of values for the item class.
Figure 9-21 Workarea: Item classes tab displaying a list of values
Notes
Discoverer may warn you that retrieving the list of values may take a long time. When you retrieve a list of values, Discoverer submits a SELECT DISTINCT query to the database (which selects the distinct set of values for the item). If there is a large number of values in the database, retrieving the list can take some time. The End User Layer has a record of the length of time it takes to retrieve the values. If this length of time is greater than 15 seconds, Discoverer displays a warning. You can change this limit in Discoverer Plus under Tools | Options | Query Governor.
To delete items and item classes:
Select the item(s) or item class(es) to delete as follows:
select the items to delete from the "Workarea: Data tab"
select the item classes to delete from the "Workarea: Data tab"
You can select more than one item or item class at a time by holding down the Ctrl key and clicking another one.
Choose Edit | Delete to open the "Confirm Delete dialog".
(optional) To see the objects that might be affected by deleting the items or item classes you selected for deletion:
Click Impact to display the "Impact dialog".
The Impact dialog enables you to review the other EUL objects that might be affected when you delete an item or item class.
Note: The Impact dialog does not show the impact on workbooks saved to the file system (i.e. in .dis files).
(optional) Select a row in the Impact dialog to view text at the bottom of the list, indicating what affect the current action will have on the EUL object.
Click Close when you have finished reviewing the impact that the deletion will have.
Click Yes to confirm you want to delete the selected item(s) or item class(es).
You can improve Discoverer's performance when end users select values for a parameter, by assigning an indexed item to the folder item on which the parameter is based.
The following diagram helps to explain how assigning indexed items to items that are used as parameters in worksheets improves Discoverer's performance. The diagram shows a typical database schema containing a large fact table (Sales Details) containing millions of rows, and a much smaller dimension table (Products) containing just a few rows.
Using the schema above, an end user might select the parameter value Product Description=The Lion King to display rows (in a worksheet) from the Sales Details table. However, the Sales Details table does not contain a Product Description, only a Product Key. Therefore, to find rows for a specific Product Description in the Sales Details table, Discoverer must first look in the Products table to match the Product Description with its Product Key, and then use the Product Key to return matching rows from the Sales Details table. This operation might be slow when the fact table that you are querying contains hundreds of thousands, or millions of rows.
To improve performance, you can specify that when an end user selects a parameter value, Discoverer is able instead to use a number (e.g. the Product Key) associated with the item on which the parameter is based to query the fact table for matching rows. For more information about how to improve Discoverer's performance when end users select parameter values in worksheets, see "How to assign an indexed item to an item".
Note: If the item on which a parameter is based is in a complex folder, you must complete the following tasks to improve performance when end users select a value using this parameter:
Include an indexed item (to be assigned to the item on which the parameter is based) in the complex folder.
For example, if Product Description is the item in the complex folder on which the parameter is based, you would add the indexed item, Product Key (also from the Products folder) to the complex folder. For more information, see "How to create complex folders".
Assign the indexed item, to the item in the complex folder on which the parameter is based.
For example, assign the Product Key item to the Product Description item (in the same complex folder). For more information, see "How to assign an indexed item to an item".
Hide the indexed item in the complex folder from end users (for more information, see "How to edit item properties").
For example, set the value of the Visible to user item property of the Product Key item (in the complex folder) to No. Users of Discoverer Plus and Discoverer Desktop do not need to see indexed items when creating a worksheet.
Notes
It is recommended that you assign indexed items to those items in folders or complex folders that end users are likely to select as parameter values in worksheets.
An item and its indexed item must have a one-to-one relationship (e.g. each Product Description must have a corresponding unique Product Key value).
Assigning indexed items to items also enables more likelihood of matching against summary folders.
To see whether the indexed item is being used in a query, you can view the SQL in the SQL Inspector dialog (for more information, see the Oracle Business Intelligence Discoverer Plus User's Guide).
You can assign an indexed item to an item (in the same folder) to improve Discoverer's performance when end users select parameter values in worksheets. For more information, see "About improving performance when end users select parameter values in worksheets".
Note: The screenshots in the instructions below assume you want to assign an indexed item (Product Key) to the Product Description item in the Product folder. The instructions below should also be followed when you assign an indexed item to an item in a complex folder.
To assign an indexed item to an item:
Display the "Workarea: Data tab" and select a folder that contains the item to which you want to assign an indexed item.
Click an item and choose Edit | Properties to display the "Item Properties dialog".
Select the Indexed Item field to display a drop down list of the other items in the folder that you can choose.
Select an item from the drop down list to use as an indexed item.
Figure 9-25 Item Properties dialog showing an indexed item
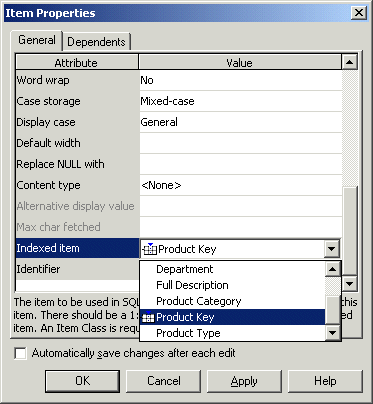
The item and its indexed item must have a one-to-one mapping. In this example each Product Description has a corresponding unique Product Key value.
Note: You can select the following items to be an indexed item:
Items that are indexed in the database
Note: In simple folders this is indicated by an icon displayed next to the item. However, in complex folders Discoverer does not display an icon next to the item.
The item will preferably be defined as a primary key in the database. If you are not sure whether the item is defined as a primary index or not, ask your database administrator.
Items that are not indexed in the database
Note: In simple folders this is indicated by the absence of an icon displayed next to the item. However, in complex folders Discoverer does not display an icon next to items whether they are indexed in the database or not. Therefore, in complex folders the absence of an icon does not indicate that an item is not indexed in the database. If you are unsure about whether an item is indexed in the database, ask the database administrator.
The item will preferably be an item that has few values (e.g. Region, Department, Month, Days of the Week, ). If you are not sure, ask your database administrator.
Click Apply.
Note: If Discoverer determines that an identical item and an associated indexed item are already defined in another folder, Discoverer displays the "Matching Values dialog".
Note: If you selected an item from the Indexed Item field drop down list that does not have a list of values (LOV) item class defined for it, Discoverer displays the following warning dialog:
If the above warning dialog is displayed, click OK.
Discoverer automatically creates a LOV item class for the item you selected in the Indexed Item field drop down list. For more information about creating a LOV item class, see "About setting up lists of values".
Note: When the item to which you assigned the indexed item is used by an end user as a parameter in a worksheet, the indexed item will improve Discoverer's performance.
Note: If you click Cancel in the warning dialog, Discoverer does not create a LOV item class for the item selected in the Indexed Item field, and Discoverer cannot improve performance for worksheet parameters. However, Discoverer still uses the indexed item to improve performance for drilling on the item in a worksheet.
Click OK to close the Item Properties dialog.
When a table is created, a datatype must be specified for each of the columns in the table. Oracle provides a number of built-in datatypes (e.g. number, date, varchar2) as well as several categories for user-defined datatypes (e.g. object types, varrays, nested tables). User-defined datatypes are sometimes called abstract datatypes. User-defined datatypes use Oracle built-in datatypes and other user-defined datatypes as the building blocks of types that model the structure and behavior of data in applications.
Note that when you create a Discoverer folder based on a table using the Load Wizard, any columns that have user-defined datatypes are ignored (i.e. no items are created in the folder).
If you want to include an attribute of a user-defined datatype as an item in a Discoverer folder, you must do one of the following:
create a custom folder and define a column with a built-in datatype in the folder's SQL statement to access the attribute of the user-defined datatype on which you want to base the item (for more information about creating custom folders, see "How to create custom folders")
create a database view, define a column with a built-in datatype in the view definition to access the attribute of the user-defined datatype on which you want to base the item, and specify the view as the object on which to base a simple folder when using the Load Wizard (for more information about using the Load Wizard, see "How to create simple folders from the database")
To access the attributes of a user-defined datatype, you will have to be familiar with the appropriate syntax. For more information about user-defined datatypes and accessing their attributes, see the Oracle documentation supplied with your version of the database.